TELEKABEL ESPECTA User manual
USER MANUAL FOR CABLE RECEIVER
ESPECTA

SECURITY INSTRUCTIONS FOR USING THE RECEIVER
•Always fallow these instructions to avoid risk of injury or damaging the
equipment.
•Before cleaning unplug the receiver from the power grid.
•Use only dry cloth when cleaning the receiver.
•Do not connect devices that are not recommended from the manufacturer so
you don’t cause damage to the device and lose your warranty.
•Do not put the device on unstable surfaces and furniture.
•Do not cover the receiver because it may disrupt the process of ventilation
and cooling and it could lead to its permanent damage.
•Never put the receiver near devices that generate heat.
•Do not put the receiver on places that there is not enough air flow.
•Do not put the receiver on top or under electronic devices.
•Do not put object on the receiver that contains water.
•Plug the receiver only on the recommended power grid that is specified in the
user manual.
•Secure the power cable so it is not pressed by any other devices.
•Use power plugs that are secured with fuses and are properly grounded.
•In case of thunderstorm or if you do not plan to use the receiver for a longer
period of time, unplug it from the power grid, unplug the cable from the cable
TV, the cable from the antenna and from all the other devices.
•Do not try to repair the device yourself. You can get exposed to danger or
damage the device.

•CI slot.
•Power supply.
•SCART connector for connecting TV.
•Video composite out.
•Audio out (right)
•Audio out (left).
•Digital audio out.
•Other CTV network out.
•In for CTV.
When connecting the receiver it is important to fallow this order:
•Connect the cable from the cable TV.
•Connect the receiver with the TV and the other CTV network in the apartment.
•At the end you plug it in an electric network of 200V AC.
MAJOR RECEIVER SETTINGS
The receiver comes pre-scanned that means additional scanning of the
channels are not needed. If there are any changes to the already existing channels
or if there are new channels from the cable operator, then you can add these
channels with scanning certain frequencies or use the automatic scan.
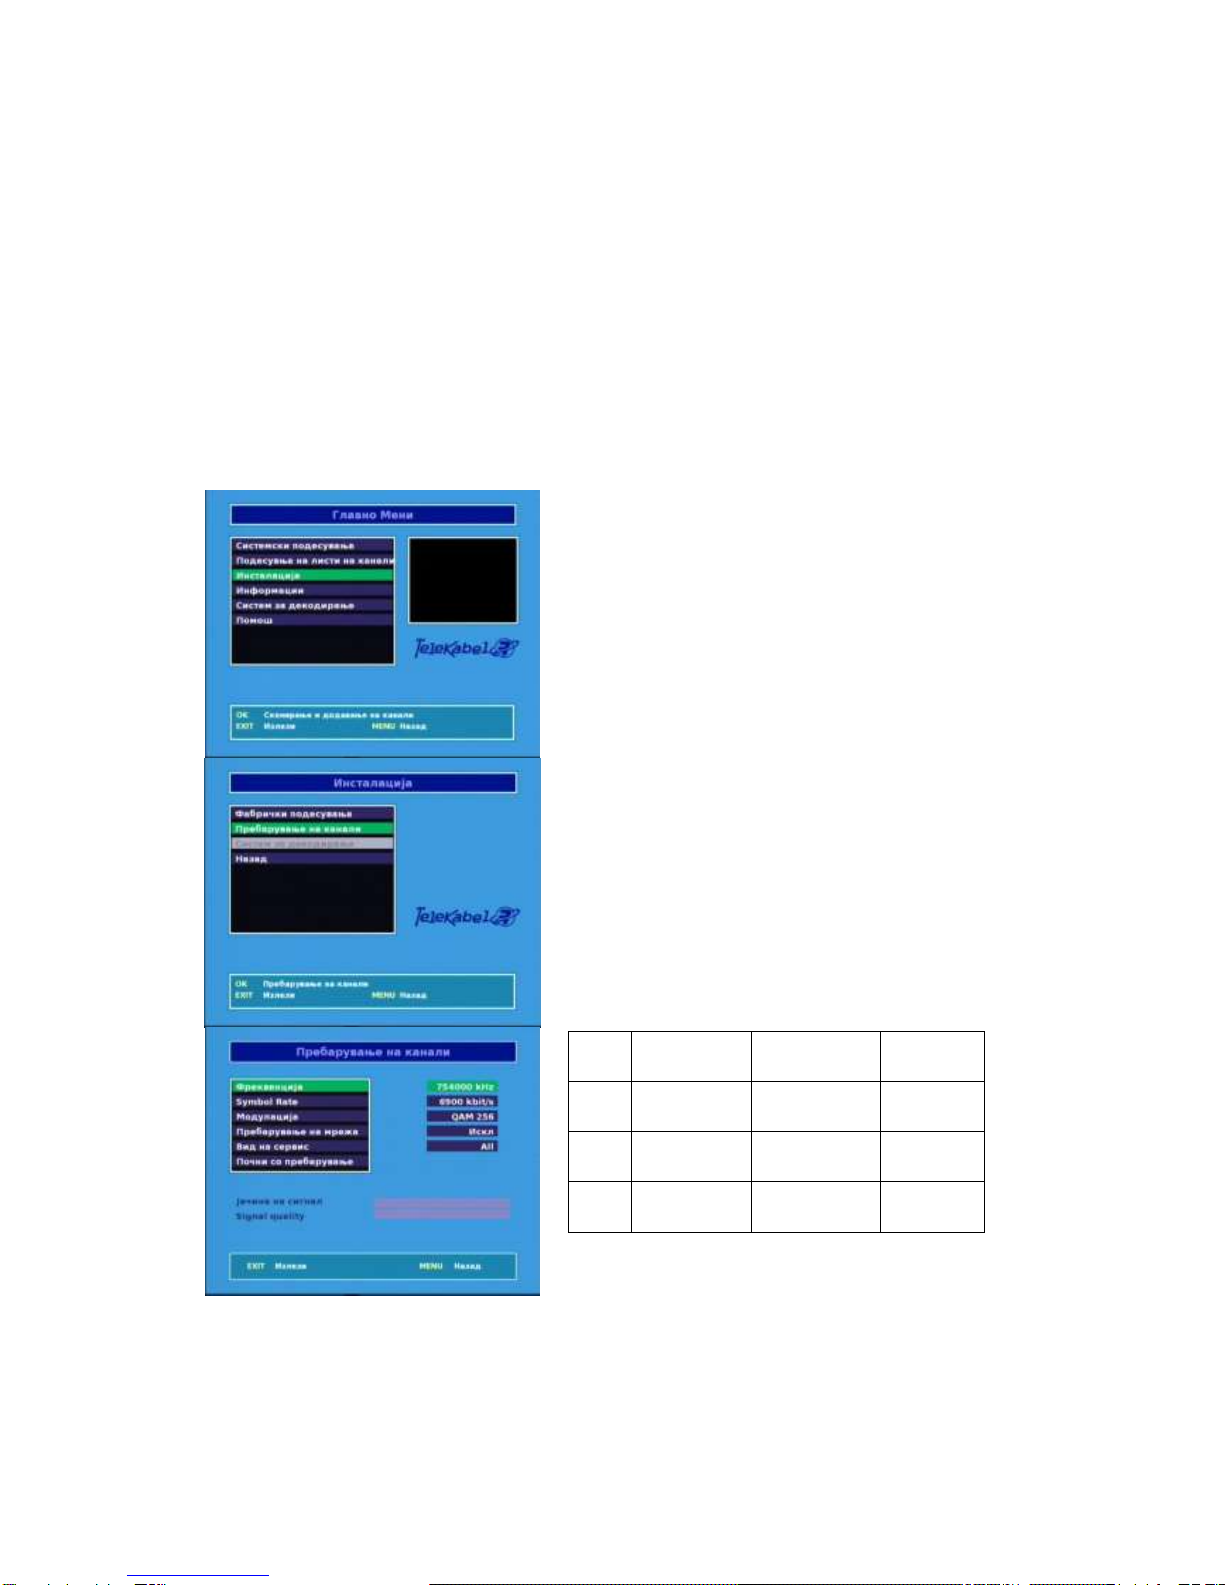
Memorizing the digital channels
Press the MENU, then choose Installation
and Tuning. In the next window you will have
to enter all the needed data (frequency,
symbol rate, const, network search-disable)
and press Start scanning to begin with the
scanning. You will have to repeat this
procedure for all the frequencies individually.
The operator has digital channels on more
than one frequency because of that you will
need to repeat the same procedure.
If you need to ender a pin in any part of the
menu then enter 0000, the pin can be changed
but this will be explained later in the manual.
Frequency
Sybmol Rate
Const.
1
2
3

The first step for setting is scanning the frequency range so you can get all
the digital channels that are emitted from the cable operator. The user must get
information’s from the operator for the frequencies on which are the digital channels
broadcasted.
After you scan and memorize all the digital channels, you can organize them
in different lists, you can erase certain channels, lock them…
In case you see this message scrambled channel or a black picture, it is
possible that these channels are encoded by the cable operator and for their
decoding you will need decoding card. For such case look for information’s from your
cable operator.
Adding a channel in a list
Press MENU and then choose the option
Setting the channel list. In the next window
you will see two columns. In the left column are
all the channels that you have and in the right
column all the channels that you will choose. To
put the channels in a list press one of the four
colored buttons on the remote control.
If you want to lock certain channels all you need
to do is choose the channel that you want to
lock, press the blue button on the remote
control and enter the pin. With this the channel
is transferred to the right column where are
shown the locked channels. After you fill the list
press EXIT and you will get message with the
next content Service list will be ch… If you are
sure that you have finished with the changes
press OK.
To watch the channels from the locked list you
will have to enter your pin.

Changing the pin
If you want to change the pin open the
main menu and choose System
Settings, find the option Pin and
parental protection and press OK after
that enter the old pin then the new pin
twice. With the button EXIT exit from this
menu and this change will be saved.
Very important is that you don’t lose
your pin because for every change of
the configuration you will have to
enter the pin.

Extras
•Menu Language / Audio Language / Subtitle Language
In this menu you can change the languages of the menu, translation and the
audio.
•Screen Type
If you have TV with 4:3 picture standard and channel with 16:9 standard, then
you can choose one of the fallowing options: 4:3 letterbox, 4:3 full screen и
16:9 full screen.
•OSD settings
With this option you can adjust the time of the banner that is shown when you
change the channels and the OSD menu opacity.
•Local Time
Choose your local time for your location.
•Channel search
With this option you can search for new channels what was explained earlier
in the user manual.
•Factory Reset
If you choose this option than all of your settings will be erased and the
receiver will be factory reset.
Table of contents


