Telemotive AG blue PiraT2 User manual

blue PiraT2
Camera User Guide
Version 1.9.1 - 29.01.2014

blue PiraT2 - Camera User Guide
Version 1.9.1 - 29.01.2014 Page 1
bP2_Camera_UserGuide_V1.9.1.doc
Index
1. LICENSE AGREEMENT.......................................................................................................... 3
2. PRODUCT LIABILITY ............................................................................................................. 4
3. Overwiev ................................................................................................................................. 5
4. System requirements............................................................................................................. 6
5. Setup Video Encoder AXIS Q7404........................................................................................ 7
5.1. Connecting to the Q7404............................................................................................. 7
5.2. Access to Axis Q7404.................................................................................................. 7
5.3. Installing the admin user.............................................................................................. 8
5.4. Setting date and time................................................................................................. 10
5.5. IP-configuration.......................................................................................................... 11
6. Setup Video Encoder AXIS P7214...................................................................................... 13
6.1. Connecting to the P7214........................................................................................... 13
6.2. Access to Axis P7214................................................................................................ 13
6.3. Installing the admin user............................................................................................ 14
6.4. Setting date and time................................................................................................. 15
6.5. IP-configuration.......................................................................................................... 16
7. Save and restore the Video Encoder settings................................................................... 18
8. Resetting the Video Encoder AXIS Q7404 or P7214......................................................... 20
9. Connecting AXIS Video Encoder to blue PiraT2............................................................... 21
10. Configuring stand alone cameras AXIS 207/210/211 ....................................................... 22
10.1. Further applicable documents................................................................................... 22
10.2. Configuration of the Ethernet camera AXIS 207/210/211......................................... 22
10.3. Automatic configuration (recommended)................................................................... 22
10.3.1. Installing the camera configuration-template........................................................ 22
10.3.2. Adding the camera user „admin“ ......................................................................... 24
10.4. Manual configuration of AXIS 207/210/211............................................................... 26
10.4.1. Reset configuration............................................................................................... 26
10.4.2. Setting up the IP-address..................................................................................... 26
10.4.3. Create admin user account .................................................................................. 27
10.4.4. Video and image settings..................................................................................... 28
10.4.5. Date and time settings.......................................................................................... 28
10.4.6. MPEG-4 settings .................................................................................................. 29
11. Preparing the blue PiraT2.................................................................................................... 30
11.1. Startup blue PiraT2.................................................................................................... 30
11.2. Shutting down blue PiraT2 manually......................................................................... 31
11.3. Updating the blue PiraT2’s firmware ......................................................................... 31
11.4. Updating the license of a blue PiraT2........................................................................ 32
11.5. Updating blue PiraT2’s client..................................................................................... 33
12. Configuration of the blue PiraT2 to use cameras or video encoder............................... 34
12.1. General settings......................................................................................................... 34
12.2. Camera settings in blue PiraT2 client........................................................................ 35
12.3. Front display of blue PiraT2....................................................................................... 36

blue PiraT2 - Camera User Guide
Version 1.9.1 - 29.01.2014 Page 2
bP2_Camera_UserGuide_V1.9.1.doc
13. Download video data........................................................................................................... 37
14. Converting the video data................................................................................................... 37
15. Watching the videos ............................................................................................................ 38
16. Contact.................................................................................................................................. 39

blue PiraT2 - Camera User Guide
Version 1.9.1 - 29.01.2014 Page 3
bP2_Camera_UserGuide_V1.9.1.doc
1. LICENSE AGREEMENT
Please read the license agreement of this license contract carefully, before you install the software.
By the installation of the software you agree to the conditions of this license contract.
This software-license agreement, in the following called as " license", contains all rights and
restrictions for final users that regulate the use of the accompanying software, operating
instructions and other documents, in the following called as "software".
1. This license contract is an agreement between Licensor and Licensee, who is being licensed
to use the named Software.
2. Licensee acknowledges that this is only a limited nonexclusive license. This means that the
licensee has no right to allocate sublicenses. Licensor is and remains the owner of all titles,
rights, and interests in the Software.
3. The software is a copyright property of the Telemotive AG. The program or parts of it may not
be further licensed to third parts, rented, sells, or be further marketed, otherwise, in any form
without explicit Written approval by Telemotive AG. The user may neither change the software
and their components, modify nor, otherwise, redevelopment or decompile in any form.
4. This Software is subject to no warranty. This software is sold as is, without any warranty. If at
any time, a user changes their system, we hold no responsibility to change our software to
make it work again.
5. This License permits Licensee to install the Software on more than one computer system, as
long as the Software will not be used on more than one computer system simultaneously.
Licensee will not make copies of the Software or allow copies of the Software to be made by
others, unless authorized by this License Agreement. Licensee may make copies of the
Software for backup purposes only. Licensee not entitled to transmit or to transfer the software
or your rights from this License agreement.
6. LICENSOR IS NOT LIABLE TO LICENSEE FOR ANY DAMAGES, INCLUDING
COMPENSATORY, SPECIAL, INCIDENTAL, EXEMPLARY, PUNITIVE, OR
CONSEQUENTIAL DAMAGES, CONNECTED WITH OR RESULTING FROM THIS LICENSE
AGREEMENT OR LICENSEE’S USE OF THIS SOFTWARE.
7. Licensee agrees to defend and indemnify Licensor and hold Licensor harmless from all claims,
losses, damages, complaints, or expenses connected with or resulting from Licensee’s
business operations.
8. Licensor has the right to terminate this License Agreement and Licensee’s right to use this
Software upon any material breach by Licensee. duration of the license contract is indefinitely
determined.
9. Licensee agrees to return to Licensor or to destroy all copies of the Software upon termination
of the License Contract.
10. This License Agreement replaces and supersedes all prior negotiations, dealings, and
agreements between Licensor and Licensee regarding this Software.
11. This License Contract is subject to german law.
12. If a regulation of this license contract is void by law, the validity of the remaining regulations is
not affected. If there is such a regulation it will be replaced by a valid, according to the legal
regulations and enforcable regulation with similar intention and similar economic
consequences.
13. the license contract is effectve by delivery of the software of the licensor to the lecensee
and/or by usage of the software by the licensee. This License contract is also valid without
Licensor’s signature.
14. The license automatically goes out if the licensee does not agree to the license regulations
described here or offend against the license regulations of this license contract. With ending
the license contract the licensee is obliged to extinguish all copies of the software or to destroy
it.
15. The LICENSEE sticks for all damages which originates the licensor from the injury of these
license regulations.

blue PiraT2 - Camera User Guide
Version 1.9.1 - 29.01.2014 Page 4
bP2_Camera_UserGuide_V1.9.1.doc
2. PRODUCT LIABILITY
For all offers, sales and supplies do explicit apply the following conditions, even if the buyer,
orderer and suchlike prescribes other conditions. Alterations are only valid, if they are agreed in
writing.
1. The technical documentation is part of the products. The product liability and the product
guarantee will be excluded, if contents and in particular the safety references and instruction
for action of the documentation are not considered.
2. The products do belong to the group of testtools. by application of the equipment a
disturbance ot the tested system cannot be completely excluded. For this reason, the warranty
of a perfectly functioning system cannot be taken over by the manufacturer.
Application of the product takes place at one’s own risk.
3. The liability of the substitution of damages according to §1 product liability law, is expressly
excluded in the context of §9 product liability law, as far as compelling legal terms do not
provide anything else.
In no event will the producer be liable for any indirect, incidental, special or consequential
damages, including loss of profits, loss of revenues, loss of data, loss of use, any other
economic advantage or damages caused by pretensions of third party towards the customer
out of this agreement, under any theory of liability, whether in an action in contract, strict
liability, tort (including negligence) or other legal or equitable theory.
The burden of proof is with the customer.
4. The Telemotive AG does ensure the legal warranty according to German law.
Except for warranties expressly set forth in this agreement, any and all products are delivered
“as is” and the producer makes and the customer receives no additional express or implied
warranties. The producer hereby expressly disclaims any and all other warranties of any kind
or nature concerning the products, whether express or implied, including without limitation,
any warranty of title, merchantability, quality, accuracy, or fitness for a particular purpose or
the customer’s purpose. The producer expressly disclaims any warranties that may be implied
form usage of trade, course of dealing, or course of performance, except for the express war-
ranties stated in this agreement. The products are provided with all faults, and the entire risk
of satisfactory quality, performance, accuracy, and effort is with customer. The producer does
not warrant that the Products will operate without interruption or be error free.
5. The Telemotive AG is justified to exchange defective goods against homogeneous acceptable
ones or to eliminate the fault within an appropriate period. In this case a demand for
redhibitory action or reduction of price expires. Warranty claims presuppose a due notice of
defects.
6. Resale, transfer, donation, exchanges or the rental of the offered products at third party, is
permitted without clearance of the Telemotive AG.
7. German Law is deemed to be as legal basis.
© by Telemotive AG, 2014

blue PiraT2 - Camera User Guide
Version 1.9.1 - 29.01.2014 Page 5
bP2_Camera_UserGuide_V1.9.1.doc
3. Overwiev
The following documentation describes the usage of a system composed of an AXIS Video-
Encoder Q7404 or P7214, the AXIS Network-Cameras 207, 210 or 211 and a blue PiraT2 data
logger. The Video-Encoders are used to connect analog (PAL / NTSC) cameras. The network
cameras can be connected directly.
For general points refer to the manual "User Guide". For special functions, appropriate instructions
are available.
The system allows the recording of one to four different videos streams at the same time. To make
it work, the server and the data logger must be connected to each other and configured separately
by a HTML based client. The procedure is explained from chapter 3.
The video streams are recorded in real-time and in a specified time interval in the logger. They can
be downloaded into a control unit for offline use. They can also be converted to a video file and
transferred from the logger into a computer. The video block length can be adjusted between 15
and 60 seconds and the videos are stored in the mpeg4 format.
When converting into a video file, the system can combine a maximum of 400 blocks per file. The
length of the blocks can change. If more video blocks are available and they cannot be converted
to one file, then the system creates several files. In this way no video data is lost.
Attention:
The Video-Encoder and the cameras are not set by default to standby mode, which may be a
reason for an empty battery.
After rebooting, the system takes approximately 60 seconds to be synchronized. The recording
starts immediately after the synchronization.
If the Ethernet cable was removed from the Video-Encoder during the recording and plugged in
again, the system takes around 11 seconds for the resynchronization.
If the supply voltage is removed from the Video-Encoder during the recording, the server takes
about 54 seconds to be synchronized (after a reconnection).
AXIS camera or Video-Encoder should be operating within the AXIS specification. This is
especially true for power and environmental parameters.
This document refers to blue PiraT2 FW 01.09.01 and blue PiraT2 client version 1.9.1. Some
features depending on model and feature license or may not be available in older versions.
Software updates are frequently available in the blue PiraT Service Center. Please make sure to
use current software.

blue PiraT2 - Camera User Guide
Version 1.9.1 - 29.01.2014 Page 6
bP2_Camera_UserGuide_V1.9.1.doc
4. System requirements
Control Unit
A Laptop or a PC is used to configure the devices by a software client. It also allows to save the
recorded data and to use them offline.
blue PiraT2
The blue PiraT2 is an optimized data logger developed by Telemotive AG. The communication of
bus systems and control units are monitored and relevant data can be recorded very precisely with
the blue PiraT2. The collected data are stored on the blue PiraT2 and can be downloaded to a PC
blue PiraT2 Ethernet Kit
This device is connected via a FCI cable to the blue PiraT2 and via Ethernet with the AXIS Server.
This establishes the connection between blue PiraT2 and the AXIS Video-Encoder and allows
connecting to a Local Area Network (LAN).
AXIS Q7404 / P7214 Video Encoder
The AXIS Video Encoder is a powerful standalone device with 4 channels. It integrates 4 analog
cameras simultaneously into an IP-based video surveillance system. It delivers also super video
quality with H.264 and significant savings in bandwidth and storage requirements.
AXIS Q7404 will use 4 different IP addresses for each group of 4 input channels.
AXIS P7214 however will use 1 IP address for each group of 4 input channels.
Network-Cameras
1 to 4 cameras are supported to record the video streams. These cameras can be connected to the
4 channels of the encoder. These cameras are supported: AXIS 207, 210 and 211.
The setup of AXIS Network-Cameras 207/210/211 is similar to the configuration of AXIS Q7404
Video-Encoder.
Camera License
For using the camera feature, a license file must be installed on each blue PiraT2.

blue PiraT2 - Camera User Guide
Version 1.9.1 - 29.01.2014 Page 7
bP2_Camera_UserGuide_V1.9.1.doc
5. Setup Video Encoder AXIS Q7404
5.1. Connecting to the Q7404
Connect your PC with the Video-Encoder via Ethernet. The video signal has to be connected to the
Video-Encoder port. Connect the Video-Encoder to the power supply. Wait until the startup is
complete (All LEDs are colored in green).
Cameras AXIS Q7404
Power (acc. AXIS spec.)
PC
Change your PC IP configuration. Use static IP address with the following setting:
IP address: 192.168.1.80
Subnet mask: 255.255.255.0
5.2. Access to Axis Q7404
Open you browser and type in the following URL: 192.168.0.90
Type in your password and keep it in mind or write it down. If the system ask for a further
authentication (in some cases), please type in the same user and password like before.

blue PiraT2 - Camera User Guide
Version 1.9.1 - 29.01.2014 Page 8
bP2_Camera_UserGuide_V1.9.1.doc
After setting the password please login to the Video Encoder
When you logged into the Video Encoder the first time, you can change the language settings if
required.
After your confirmation, you can see the live stream from camera 1.
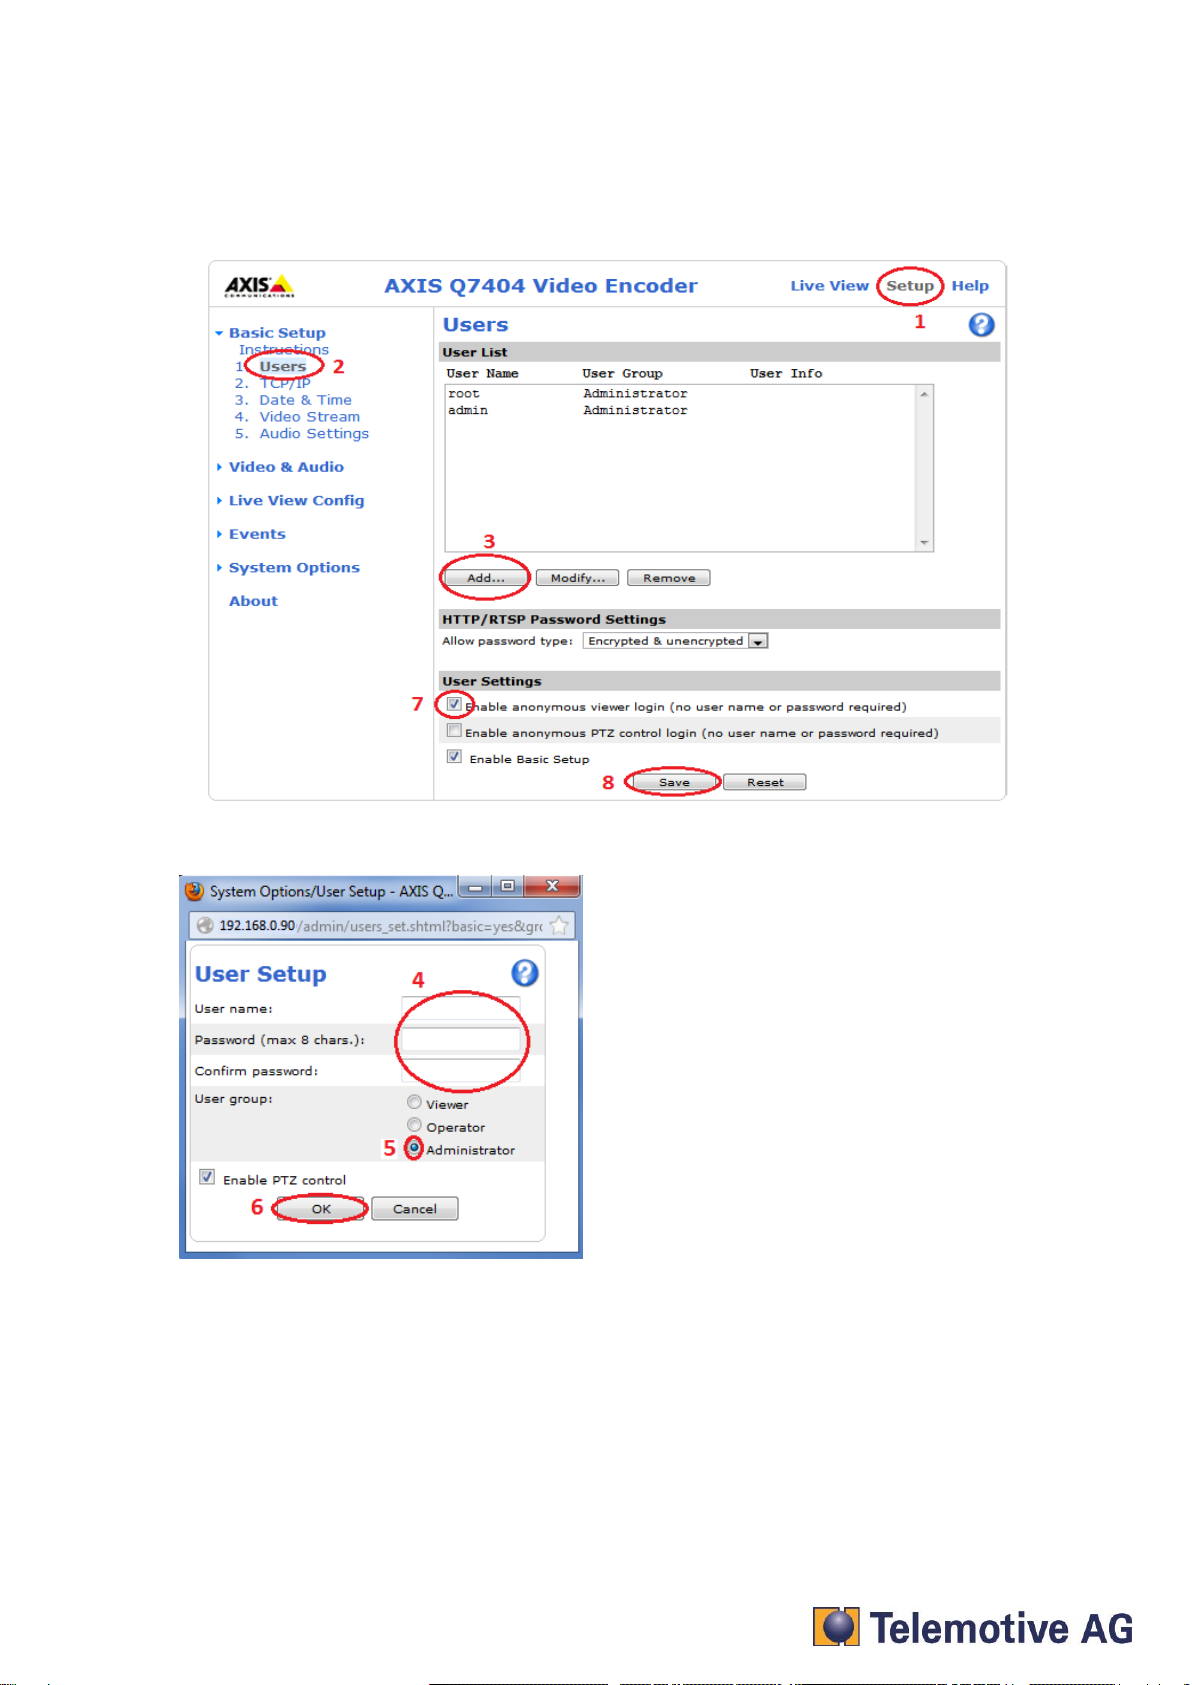
5.3. Installing the admin user
The blue PiraT2 camera application needs a special user with administrator rights.
blue PiraT2 - Camera User Guide
Version 1.9.1 - 29.01.2014 Page 9
bP2_Camera_UserGuide_V1.9.1.doc
Open “Setup” (1), “Basic Setup” => “Users” (2) and choose “Add…” (3). Name the new user
“admin” and define a password (4). Keep the data in mind or write it down. Choose the option
“Administrator” (5) and click “OK (6). Afterwards, mark the checkbox “Enable anonymous viewer
login (no user name or password required)” (7) and confirm all with “Save” (8).
We recommend these settings:
User name: admin
Password: 2x8bg4
Note:
To be sure to get access to the Video Encoder by the blue PiraT2 please use the properties above.
blue PiraT2 - Camera User Guide
Version 1.9.1 - 29.01.2014 Page 10
bP2_Camera_UserGuide_V1.9.1.doc
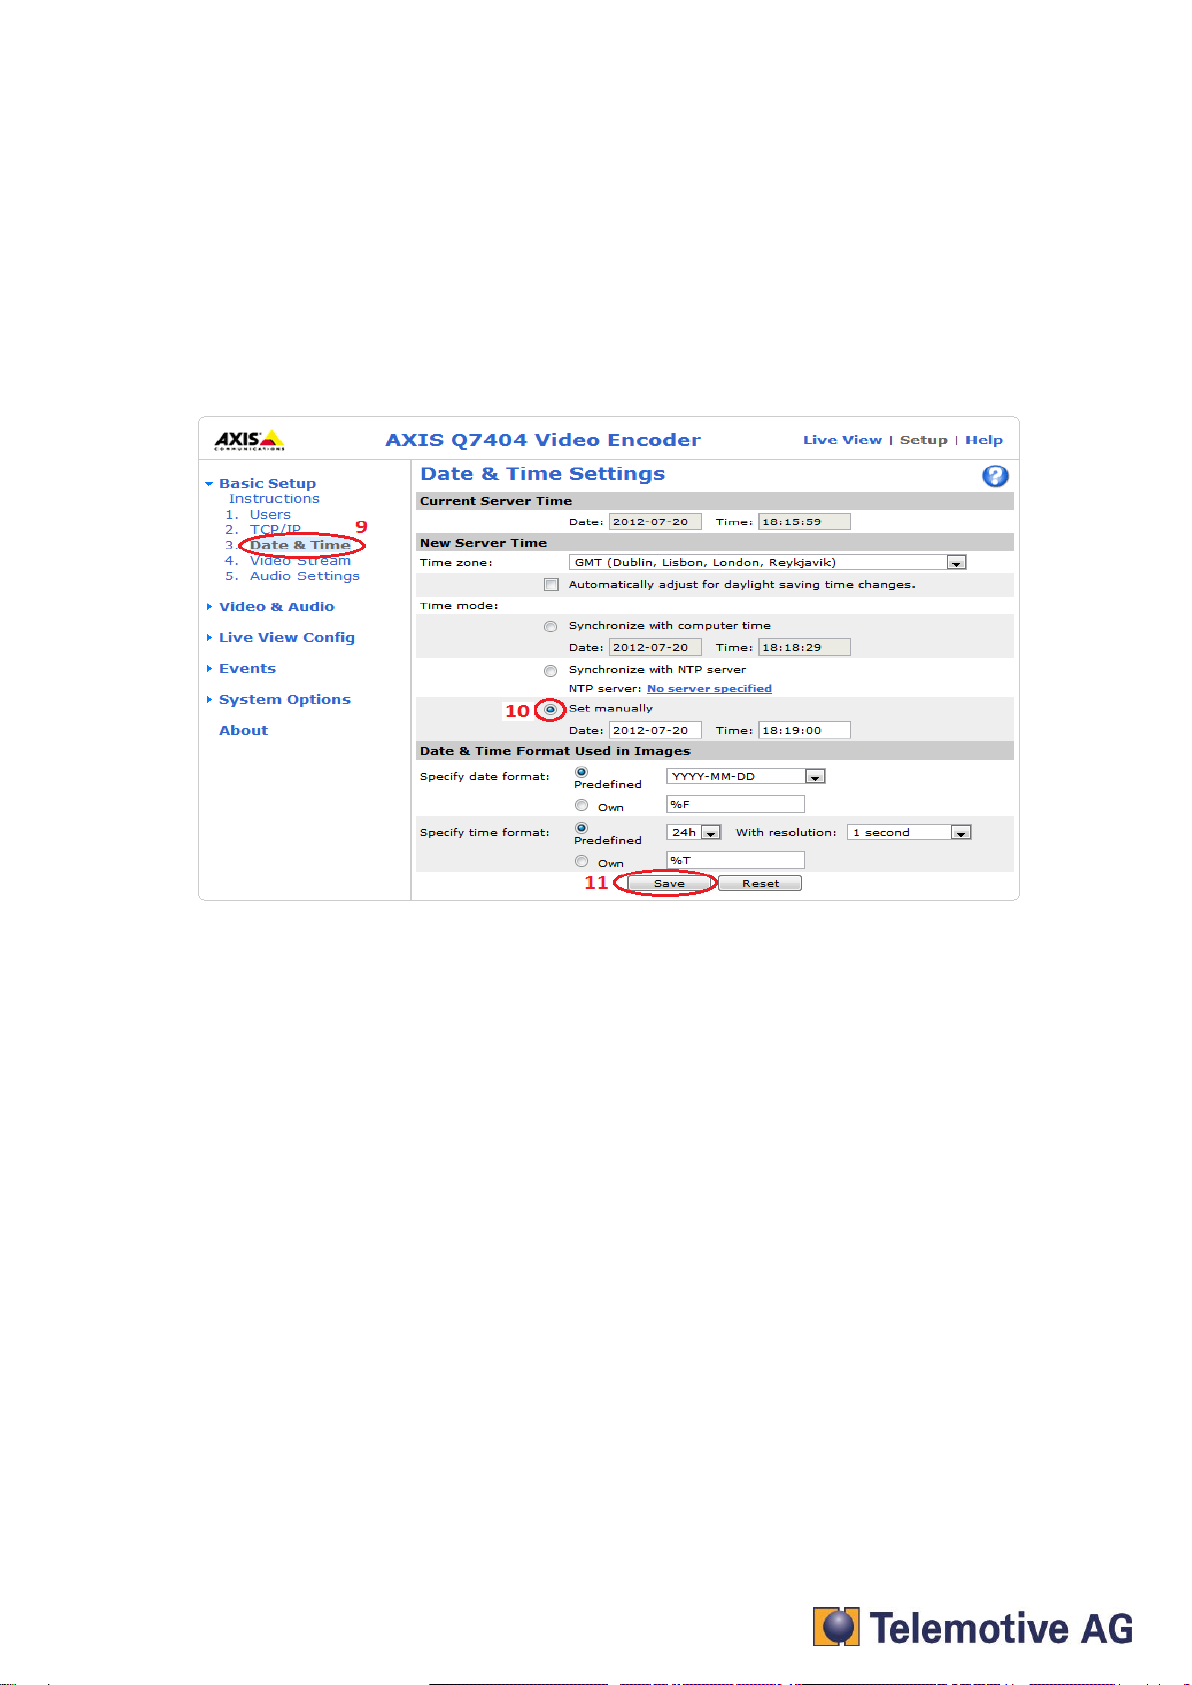
5.4. Setting date and time
Change to the entry “Date & Time” (9) and activate the checkbox “Set manually” (10).
Set up Date and Time and click “Save” (11).
Comment:
The time set here is initially only a temporary adjustment. In our system, the data logger is the time
master and overwrites it after successful synchronization with the Video-Encoder, with the logger
time.
You can also display the date and time on the video image. The settings for this feature are
described in the following.
Attention:
Always set the blue PiraT2 time before you start logging. It is impossible to change the timestamp
at recorded video data. This means, the setup of a new logger time before downloading does not
change the time within the video pictures. In this case, the timestamps of the other channels and
the video picture timestamp could not match.
The setup for embedded timestamp has to be done in the Video-Encoder setup. If the date and
time are already set up like described within step 9, 10 and 11 (see above), the format can be set
up under „Date and Time Format Used in Images“. Confirm these settings with “Save”.
Click on “Video Stream” (6) and set up the Overlay Settings. Activate both checkboxes “Include
date” and “Include time” (7). If desired, change the format options like “Text color”, “Background
color”, “Text Place” (8) and so on. Confirm the settings again with “Save” (9).

blue PiraT2 - Camera User Guide
Version 1.9.1 - 29.01.2014 Page 11
bP2_Camera_UserGuide_V1.9.1.doc
The set up for embedded timestamp is finished.
5.5. IP-configuration
Change to the entry “TCP/IP” (12) and use static IP (13) with the following data (14):
IP address: 192.168.1.90
Subnet mask: 255.255.255.0
Confirm your setting with save (15).
Note:
By pressing [Save] the new IP address is set to the Video Encoder and in this moment you loose
the connection to the device!

blue PiraT2 - Camera User Guide
Version 1.9.1 - 29.01.2014 Page 12
bP2_Camera_UserGuide_V1.9.1.doc
For reconnecting you have to connect to the Video Encoder again as described in chapter 5.2.
The first camera, connected to the Video-Encoder, is now configured. If more than one camera
should be connected, the same changes for all connected cameras has to be done
camera 2
camera 3
camera 4
IP address
192.168.1.91
192.168.1.92
192.168.1.93
subnet mask
255.255.255.0
255.255.255.0
255.255.255.0
Note:
Change your computers IP configuration back to dynamic configuration.

blue PiraT2 - Camera User Guide
Version 1.9.1 - 29.01.2014 Page 13
bP2_Camera_UserGuide_V1.9.1.doc
6. Setup Video Encoder AXIS P7214
6.1. Connecting to the P7214
Connect the AXIS P7214 via Ethernet to your PC and to the power supply. The video signal has to
be connected to the Video-Encoder port. Wait until the startup is complete (All LEDs are colored in
green).
AXIS P7214
cameras
PC
Power supply
Change your PCs IP configuration. Use static IP address with the following settings
IP address: 192.168.1.80
Subnet mask: 255.255.255.0
6.2. Access to Axis P7214
Open you browser and type in the following URL: 192.168.0.90
Type in your password and keep it in mind or write it down. If the system ask for a further
authentication (in some cases), please type in the same user and password like before.
blue PiraT2 - Camera User Guide
Version 1.9.1 - 29.01.2014 Page 14
bP2_Camera_UserGuide_V1.9.1.doc
After setting the password please login to the Video Encoder
When you logged into the Video Encoder the first time, you can change the language settings if
required.
After your confirmation, you can see the live stream from camera 1.
To have a look at the other cameras please choose the one you want to see in the drop-down
menu.
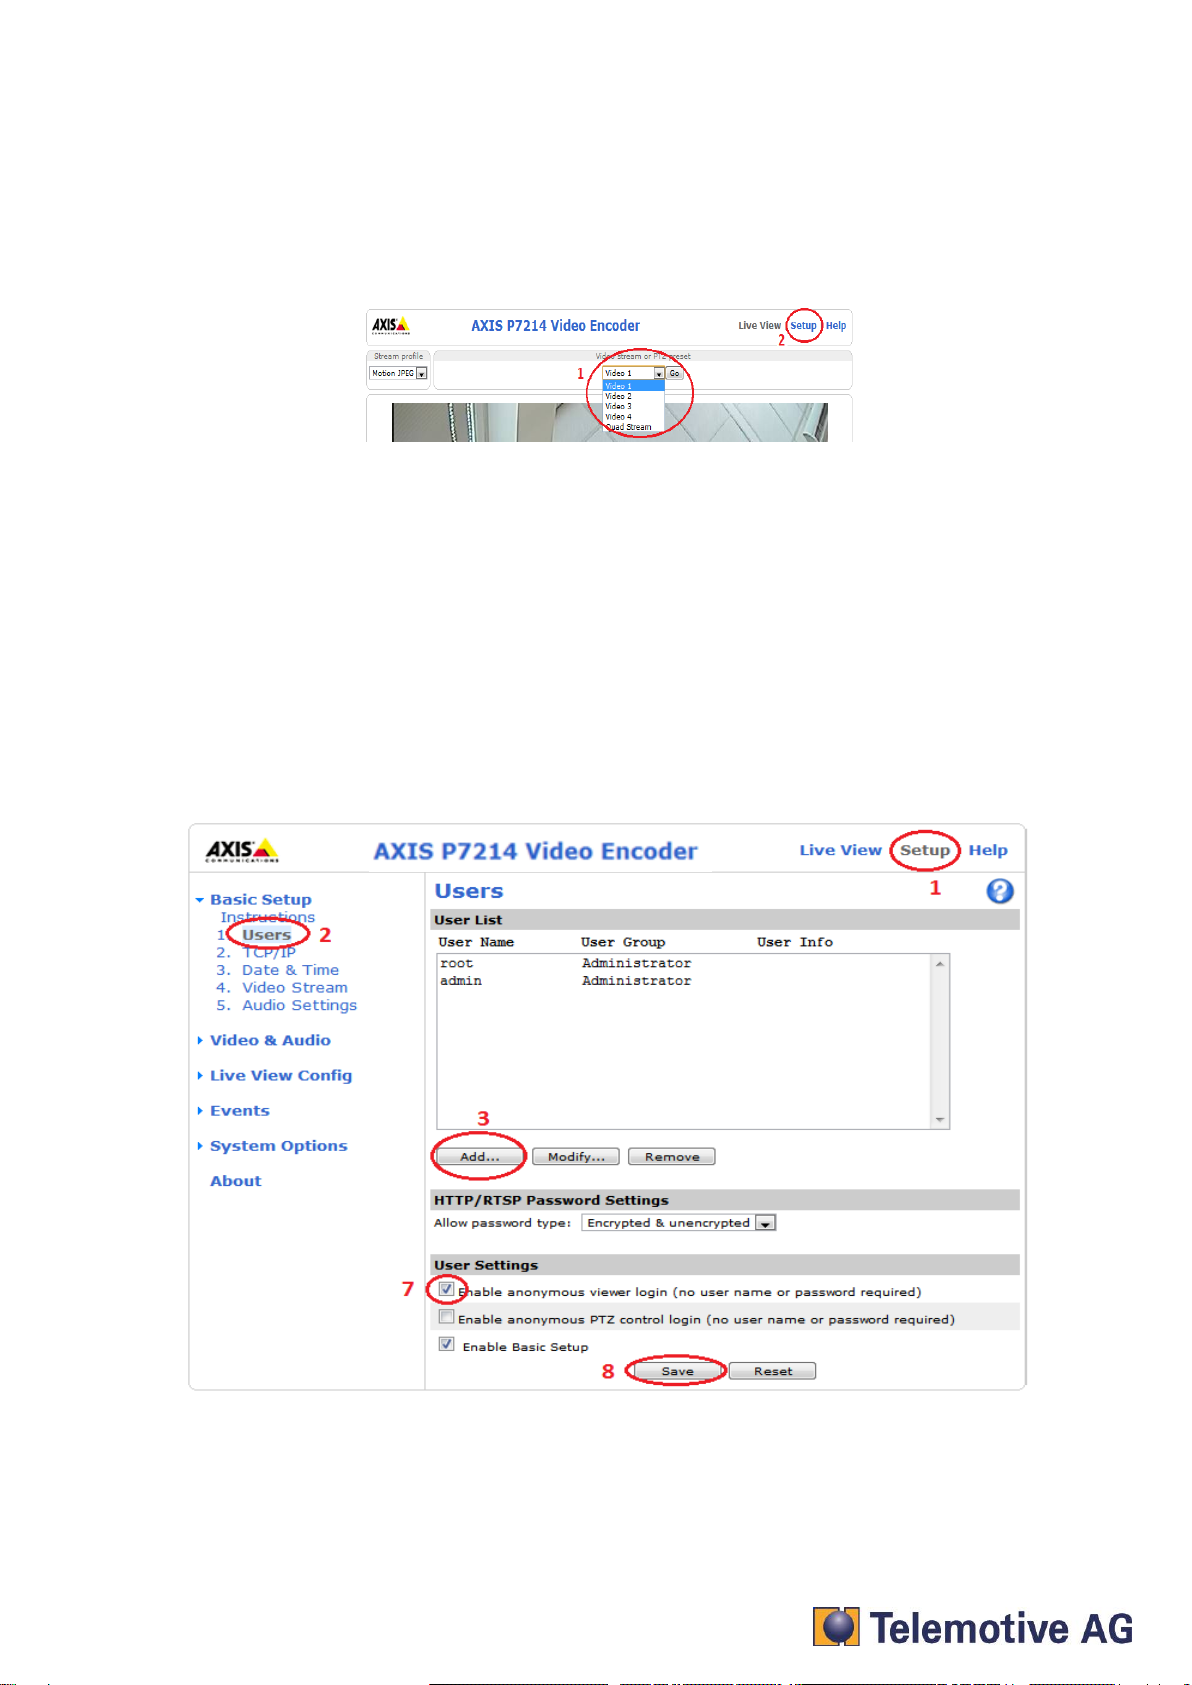
6.3. Installing the admin user
The blue PiraT2 camera application needs a special user with administrator rights.
Open “Setup” (1), “Basic Setup” => “Users” (2) and choose “Add…” (3). Name the new user
“admin” and define a password (4). Keep the data in mind or write it down. Choose the option
“Administrator” (5) and click “OK (6). Afterwards, mark the checkbox “Enable anonymous viewer
login (no user name or password required)” (7) and confirm all with “Save” (8).
blue PiraT2 - Camera User Guide
Version 1.9.1 - 29.01.2014 Page 15
bP2_Camera_UserGuide_V1.9.1.doc
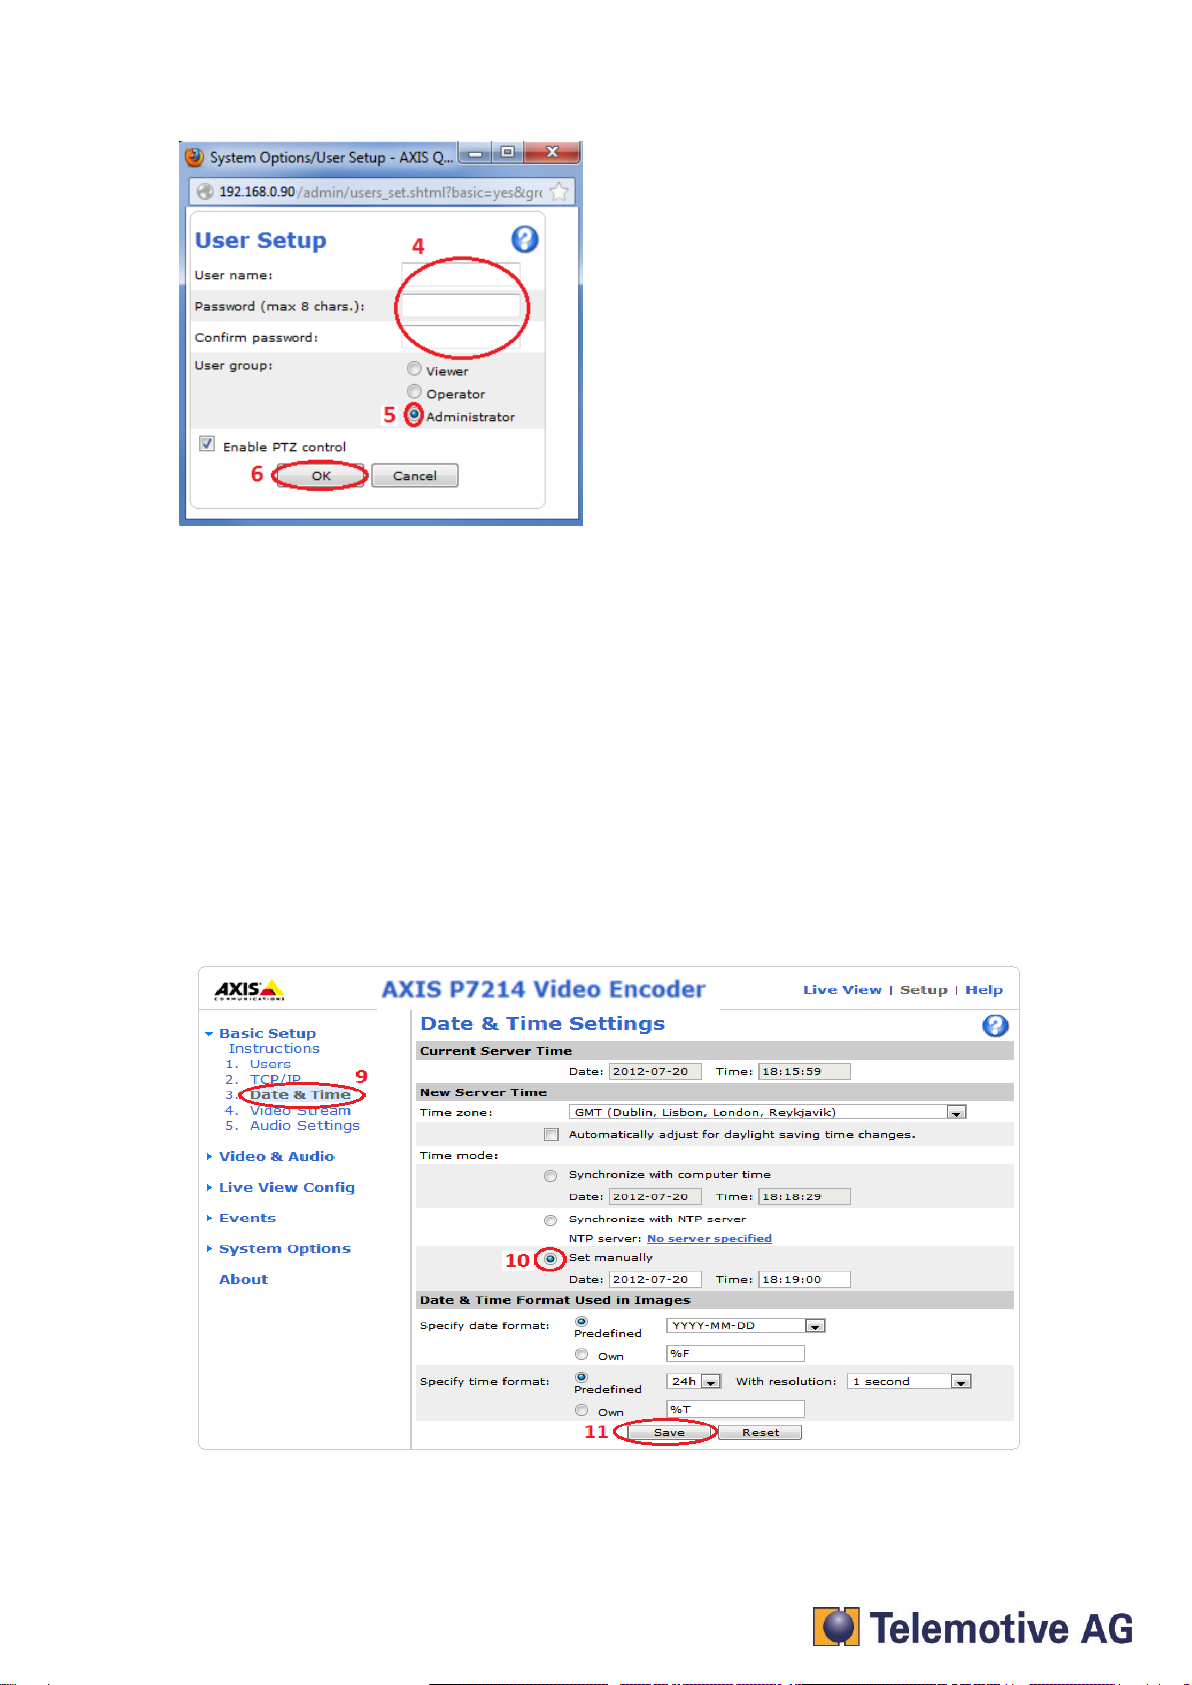
We recommend these setings:
User name: admin
Password: 2x8bg4
Note:
To be sure to get access to the Video Encoder by the blue PiraT2 please use the properties above.
6.4. Setting date and time
Change to the entry “Date & Time” (9) and activate the checkbox “Set manually” (10).
Set up Date and Time and click “Save” (11).
Comment:
The time set here is initially only a temporary adjustment. In our system, the data logger is the time
master and overwrites it after successful synchronization with the Video-Encoder, with the logger
time.
You can also display the date and time on the video image. The settings for this feature are
described in the following.

blue PiraT2 - Camera User Guide
Version 1.9.1 - 29.01.2014 Page 16
bP2_Camera_UserGuide_V1.9.1.doc
Attention:
Always set the blue PiraT2 time before you start logging. It is impossible to change the timestamp
at recorded video data. This means, the setup of a new logger time before downloading does not
change the time within the video pictures. In this case, the timestamps of the other channels and
the video picture timestamp could not match.
The setup for embedded timestamp has to be done in the Video-Encoder setup. If the date and
time are already set up like described within step 9, 10 and 11 (see above), the format can be set
up under „Date and Time Format Used in Images“. Confirm these settings with “Save”.
Click on “Video Stream” (6) and set up the Overlay Settings. Activate both checkboxes “Include
date” and “Include time” (7). If desired, change the format options like “Text color”, “Background
color”, “Text Place” (8) and so on. Confirm the settings again with “Save” (9).
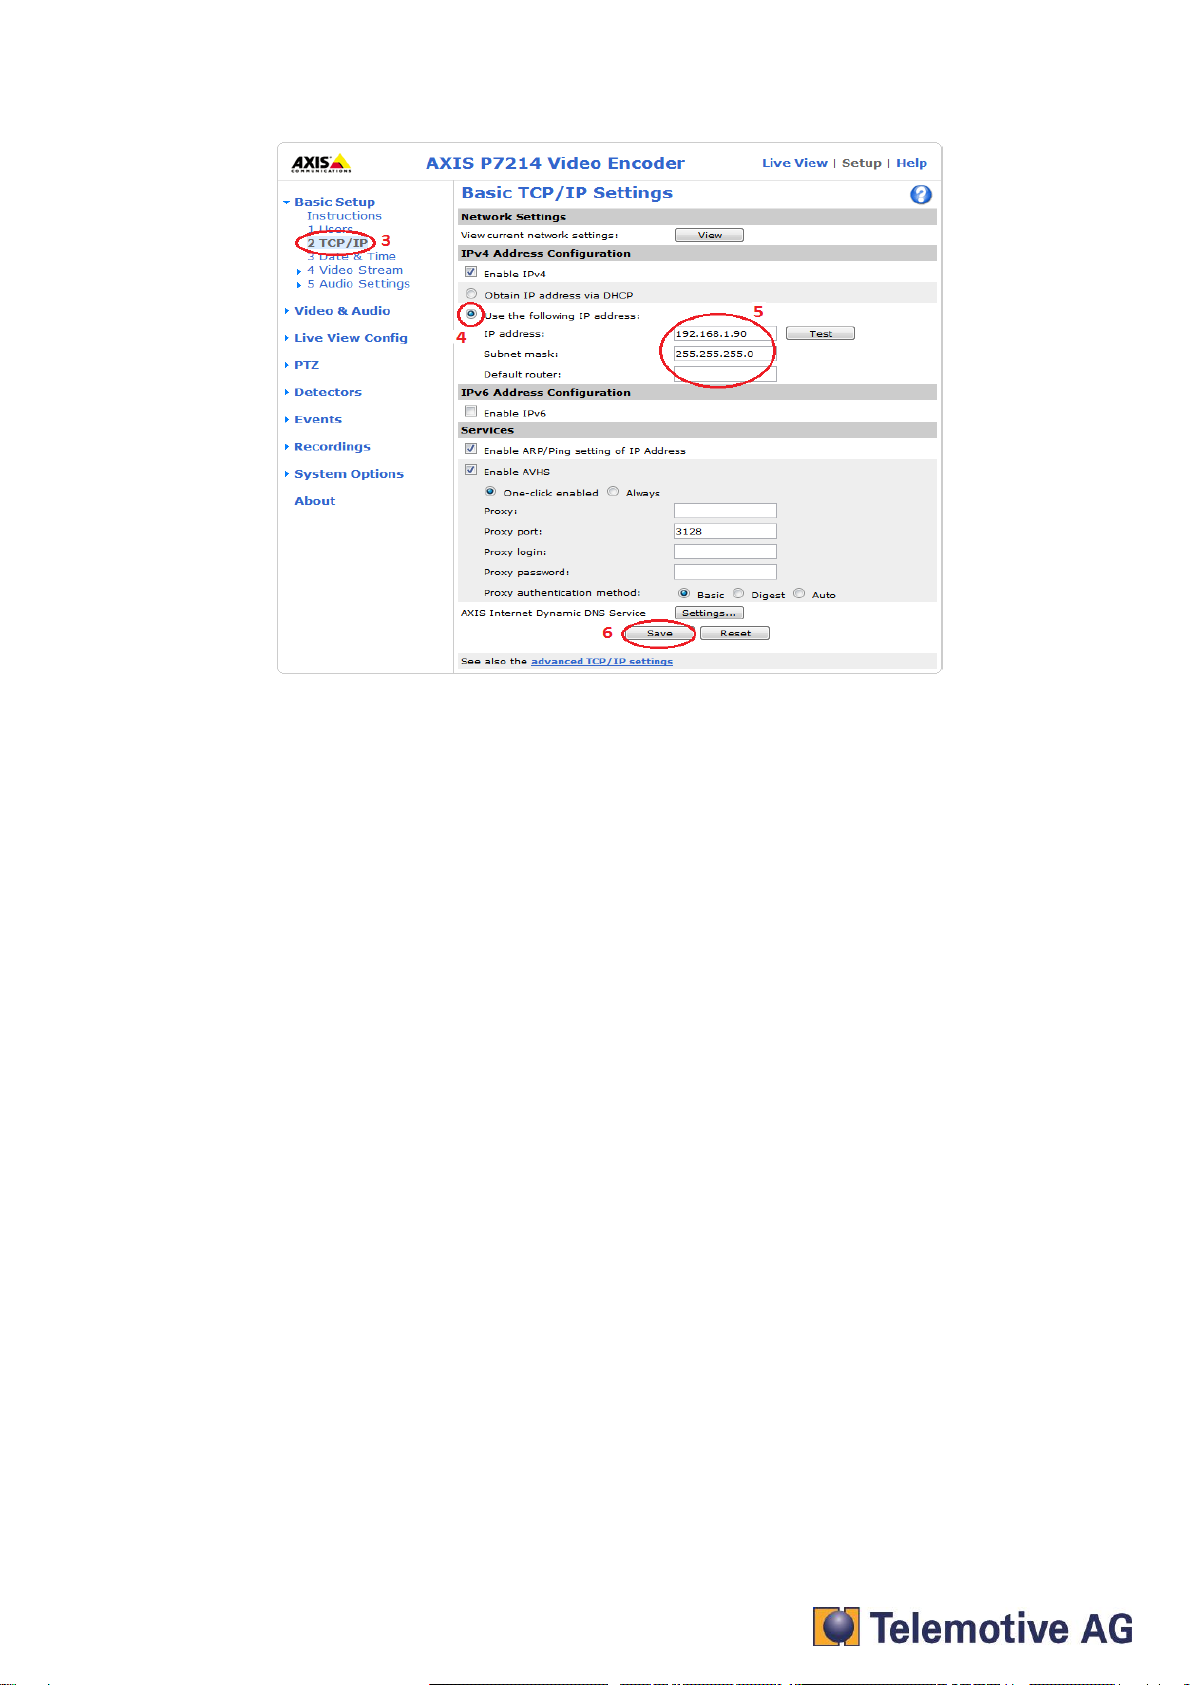
6.5. IP-configuration
Change to the entry “TCP/IP” (3) and use static IP (4) with the follow data (5) and confirm the
setting (6):
IP address: 192.168.1.90
Subnet mask: 255.255.255.0
blue PiraT2 - Camera User Guide
Version 1.9.1 - 29.01.2014 Page 17
bP2_Camera_UserGuide_V1.9.1.doc
The AXIS P7214 has only one IP address. The configuration of a camera automatically changes
the settings of the others. It is therefore unnecessary to set the other cameras.
Note:
Change your PCs IP configuration back to dynamic configuration.

blue PiraT2 - Camera User Guide
Version 1.9.1 - 29.01.2014 Page 18
bP2_Camera_UserGuide_V1.9.1.doc
7. Save and restore the Video Encoder settings
To save all settings oft he Video Encoder you can use the tool AXIS Camara Management
Software, which you can download from AXIS after registration.
http://www.axis.com/de/products/cam_mgmt_software/interface.htm
After installing the software you can start it by using
Start => AXIS Camera Management => AXIS Camera Management Client
You can add your device by clicking to [Add devices]
After selecting your device and connecting to the Video Encoder you add the device with [Next>]
and [Finish] in the next window.

blue PiraT2 - Camera User Guide
Version 1.9.1 - 29.01.2014 Page 19
bP2_Camera_UserGuide_V1.9.1.doc
To save the current settings please rightclick your device and use the option => Parameter
Management => Create Parameter File …
With [X] Select / Deselect all and then [Save] you can save the configuration of the Video
Encoder to your local system..
To restore the saved settings to your device please use the option => Parameter Management =>
Aply Parameter File …
Other manuals for blue PiraT2
2
Table of contents
Other Telemotive AG Data Logger manuals


![Lambrecht Ser[LOG] Operator's manual](/data/manuals/17/2/172t1/sources/lambrecht-ser-log-data-loggers-manual.jpg "Lambrecht Ser[LOG] Operator's manual")