TeleNav GPS Navigator v4.1 User manual

© TELENAV 2003-6
PAGE 1 OF 32
TeleNav GPS Navigator v4.1
GPS Navigation Suite for Cingular 8125/8525
User’s Guide
©2003-6 TeleNav, Inc. All rights reserved. TeleNav is a trademark of TeleNav, Inc. All other trademarks or registered
trademarks are acknowledged as the exclusive property of their respective owners.
All rights reserved. No part of this manual may be reproduced, transmitted, copied, or stored in any storage medium, for any
purpose, without prior written consent from TeleNav, Inc. TeleNav, Inc. hereby grants the right to download one copy of this
manual onto a hard drive for personal use. This manual is copyrighted and contains proprietary information that is subject to
change without notice. For more information visit www.telenav.com

© TELENAV 2003-6
PAGE 2 OF 32
Table of C
Table of CTable of C
Table of Contents
ontentsontents
ontents
1.
Welcome................................................................................................................................... 5
2.
Safety and Legal Notices ........................................................................................................ 5
3.
Getting Started with TeleNav .................................................................................................. 6
TeleNav Account............................................................................................................... 6
Data Service Options........................................................................................................ 6
4.
Installing TeleNav on Your Cingular Pocket PC.................................................................... 7
Installation Instructions............................................................................................................. 7
Using the OTA download method to install ............................................................... 7
Using the CD to install onto SD Card .......................................................................... 7
Using the CD and Microsoft ActiveSync..................................................................... 8
Adding TeleNav to the Start Menu ............................................................................... 8
Removing TeleNav from the Pocket PC...................................................................... 8
5.
Launching TeleNav.................................................................................................................. 9
Welcome Screen...................................................................................................................... 9
Terms of Use..................................................................................................................... 9
Registration...................................................................................................................... 10
TeleNav Bluetooth GPS Configuration .......................................................................... 11
6.
Addresses............................................................................................................................... 12
Address Selector.................................................................................................................... 12
Recent Addresses.................................................................................................................. 12
Recent Cities .......................................................................................................................... 13
Keying in an Address ............................................................................................................. 13
Calling in an Address ............................................................................................................. 13
Using an Airport as an address ............................................................................................. 14
Business Address .................................................................................................................. 14

© TELENAV 2003-6
PAGE 3 OF 32
Recorded Locations ............................................................................................................... 15
Address validation .................................................................................................................. 15
Web address entry................................................................................................................. 15
7.
Using TeleNav........................................................................................................................ 16
The TeleNav Menu................................................................................................................. 16
Navigation and Directions...................................................................................................... 16
Static Route and Map Summary Modes........................................................................ 17
GPS Origin Refinement .................................................................................................. 18
Guidance Instructions ..................................................................................................... 18
Moving Map View............................................................................................................ 18
Next Turn View................................................................................................................ 20
Route Summary View..................................................................................................... 20
Audio Guidance Tones...................................................................................................21
Miss a turn? ..................................................................................................................... 21
Biz Finder................................................................................................................................ 21
Business Name Only ...................................................................................................... 22
Category Search ............................................................................................................. 22
Name and Category Combined ..................................................................................... 22
Picking a Business.......................................................................................................... 23
Maps ....................................................................................................................................... 24
TeleNav Tools ........................................................................................................................ 25
Compass ......................................................................................................................... 25
Record Location .............................................................................................................. 26
View Locations ................................................................................................................ 26
Deleting Recorded Locations ......................................................................................... 27
Preferences ............................................................................................................................ 27
Help/About.............................................................................................................................. 27
Activity Messages................................................................................................................... 28

© TELENAV 2003-6
PAGE 4 OF 32
Taking an Incoming Call ........................................................................................................ 28
Exiting TeleNav ...................................................................................................................... 28
8.
The TeleNav Web Site .......................................................................................................... 28
Account Management............................................................................................................ 28
Preplanning............................................................................................................................. 28
Customer Service................................................................................................................... 28
9.
Error Conditions ..................................................................................................................... 29
Account Not Found ................................................................................................................ 29
Account Cancelled ................................................................................................................. 29
Invalid Login............................................................................................................................ 29
Please input password........................................................................................................... 29
Please input phone number................................................................................................... 29
Password needs 4 digits........................................................................................................ 29
Phone number needs 10 digits.............................................................................................. 29
Your account has expired ...................................................................................................... 29
Account in use........................................................................................................................ 29
Trial Expired............................................................................................................................ 29
GPS Signal Weak .................................................................................................................. 30
TeleNav Not Available ........................................................................................................... 30
TeleNav Encountered An Error ............................................................................................. 30
Unable to generate a route .................................................................................................... 30
10.
FAQ’s ...................................................................................................................................... 30
11.
Customer Support.................................................................................................................. 31
Technical Support .................................................................................................................. 31
12.
TeleNav Services Warranty .................................................................................................. 32

© TELENAV 2003-6
PAGE 5 OF 32
1. Welcome
TeleNav utilizes GPS position determination technology and access to your carrier’s data network. The Pocket PC
provides both the Windows Mobile OS environment and access to your carrier network.
The TeleNav application provides:
•GPS navigation that punctually guides you turn-by-turn to any destination address in the Continental
US. If you miss a turn or get off-track, TeleNav will calculate a new route for you. You can enter one or
more destination addresses by calling an automatic voice recognition system, entering them on the
TeleNav website, or by keying them directly into the handheld. Optionally, you can input a remote
origin and receive Driving Directions from that origin address to the selected destination address.
•A Business Finder feature that allows you to find businesses or points of interest near your current
location, around a waypoint, around an entered address, or around an airport. You can call the
business first to check availability of an item, or get a reservation, and then navigate to it; or you can
save the address for use later in the day.
•Maps of the area around your current location; a marked waypoint; or an address you enter manually,
or have previously entered. You can pan (adjust left/right or up/down) the map, and zoom in or out.
You can also mark a point under the cursor as a waypoint.
•The ability to personalize the application by selecting the use of US customary or metric distance units,
language for audible guidance, volume and backlight level, timing of displayed graphics, etc.
•A viewer that displays your current location relative to a selected waypoint, recent stop, or saved
Favorite address; and to navigate relative to that selected point.
•The ability to mark the current location as a waypoint that can be labeled.
•A compass-like indicator presenting your direction of travel, location, and speed.
TeleNav’s servers support these enhanced services via your carrier’s data network.
2. Safety and Legal Notices
Please read this section carefully before using TeleNav
TeleNav will not accept any responsibility whatsoever for accidents resulting from failure to observe common sense
precautions. Your personal judgment, traffic regulations, and common sense must always take precedence over
any driving direction produced by TeleNav.
WARNING: Keep your eyes on the road.
It is your responsibility as the vehicle operator to keep your eyes on the road and be an alert driver at all times,
ESPECIALLY when the vehicle is moving. The vehicle operator should not be distracted by the application
displays, audible cues, or manually interacting with the controls. When you need to enter data on your handheld
using the keypad or study the display, please do so while the vehicle is parked, not while in motion. Should your
ability to drive responsibly be decreased, please turn off the device.
WARNING: Install the equipment safely.

© TELENAV 2003-6
PAGE 6 OF 32
If you are using a handheld mounting kit, make sure that it does not obscure your vision. You may wish to charge
the handheld while using TeleNav. If so, make sure the charging cable does not interfere with any of the vehicle
controls.
WARNING: Drive safely and use common sense.
The vehicle operator’s personal judgment, traffic regulations, and common sense must always take precedence
over the instructions provided by TeleNav.
It is your responsibility as the vehicle operator to drive safely, observe all traffic rules and above all use your own
personal judgment while driving. If you feel that a route suggested by the navigation software instructs you to
perform an unsafe or illegal maneuver, places you in an unsafe situation, or routes you into an area which you
consider unsafe, do not follow the instructions.
3. etting Started with TeleNav
The TeleNav application that resides within your Pocket PC requires a TeleNav subscription and means of
accessing the public Internet.
TeleNav Account
You can establish a TeleNav account by visiting www.telenav.com.
Data Service Options
The TeleNav application on your Pocket PC communicates with the TeleNav servers to get routing, maps, and
points of interest via the carrier data network. If you have a data or email services plan for the Pocket PC, you do
not need to purchase anything else. If you do not have either of these plans, you should order one from your
carrier.
Cingular
1-800-304-3044 and select option #1

© TELENAV 2003-6
PAGE 7 OF 32
4. Installing TeleNav on Your Cingular Pocket PC
TeleNav can be installed on your Pocket PC two different ways: 1) by using the Pocket PC browser and
downloading the application directly to your handset over the air (OTA), or 2) by loading the application from a
distribution CD using the Microsoft ActiveSync application.
Installation Instructions
Using the OTA download method to install
1. Locate the Web icon on the handset menu and launch the browser.
2. Input the OTA download link: http://ota.telenav.com/ota/tn and click GO.
3. The download process will begin immediately and a warning message will be displayed, press YES to begin
the download.
NOTE: We recommend that you install the TeleNav application on the device when the option is given during the
file installation.
After the download process has completed successfully, locate the TeleNav directory in the file explorer Program
Files directory.
Using the CD to install onto SD Card
1. Insert the TeleNav application CD into your CD or DVD drive.
2. Insert the flash memory card into the card reader.
3. Browse the TeleNav application CD and open the Pocket PC folder, find the zipped CAB file with the name of
your device (8125 or 8525) and drag it to the flash media drive.
4. After moving the TeleNav application CAB file to the media card, remove the flash memory card from the
reader and insert it into the Pocket PC.
5. Verify that the TeleNav CAB file is now located on the storage device by opening the Start Menu, select File
Explorer then select Storage Card.
6. Select the TeleNav CAB file and complete the installation.
NOTE: We recommend that you install the TeleNav application on the device when the option is given during the
file installation.

© TELENAV 2003-6
PAGE 8 OF 32
Using the CD and Microsoft ActiveSync
NOTE: Customers must have the Microsoft ActiveSync desktop software installed on their personal computer
(PC) and have created a synchronization relationship with the Pocket PC before completing the steps below.
1. Insert the TeleNav application CD into your CD or DVD drive.
2. Browse the CD and open the Pocket PC folder, find the zipped CAB file that corresponds to your device and
drag it to the folder created for your Pocket PC under My Documents.
3. Connect the Pocket PC to the computer and the ActiveSync application will automatically transfer the
TeleNav application to the device.
NOTE: We recommend that you install the TeleNav application on the device when the option is given during the
file installation.
Adding TeleNav to the Start Menu
1. Once TeleNav has been installed on the device, use the stylus to open the Start Menu and select Settings
2. Select Menus
3. Check the box to the left of TeleNav and click OK.
4. Verify that TeleNav is now on your Pocket PC Start Menu.
Removing TeleNav from the Pocket PC
1. Using the stylus, open the Start Menu and select Settings.
2. Select the System tab.
3. Select Remove Programs.
4. Select TeleNav GPS Navigator and click Remove.
5. Follow on-screen instructions to remove TeleNav from your Pocket PC

© TELENAV 2003-6
PAGE 9 OF 32
5. Launching TeleNav
To launch TeleNav on your Pocket PC find the TeleNav icon on the Pocket PC
Start Menu and select it.
NOTE: If you have not added TeleNav to the Start Menu go to Programs and
select it. Follow the directions above to add TeleNav to the Pocket PC Start
Menu.
After starting TeleNav, the banner screen will appear for a few seconds.
Welcome Screen
This next screen describes the services TeleNav provides.
Terms of Use
Next you must agree to the TeleNav software license and Terms Of Use to use
TeleNav in order to continue with the setup process.
© TELENAV 2003-6
PAGE 10 OF 32
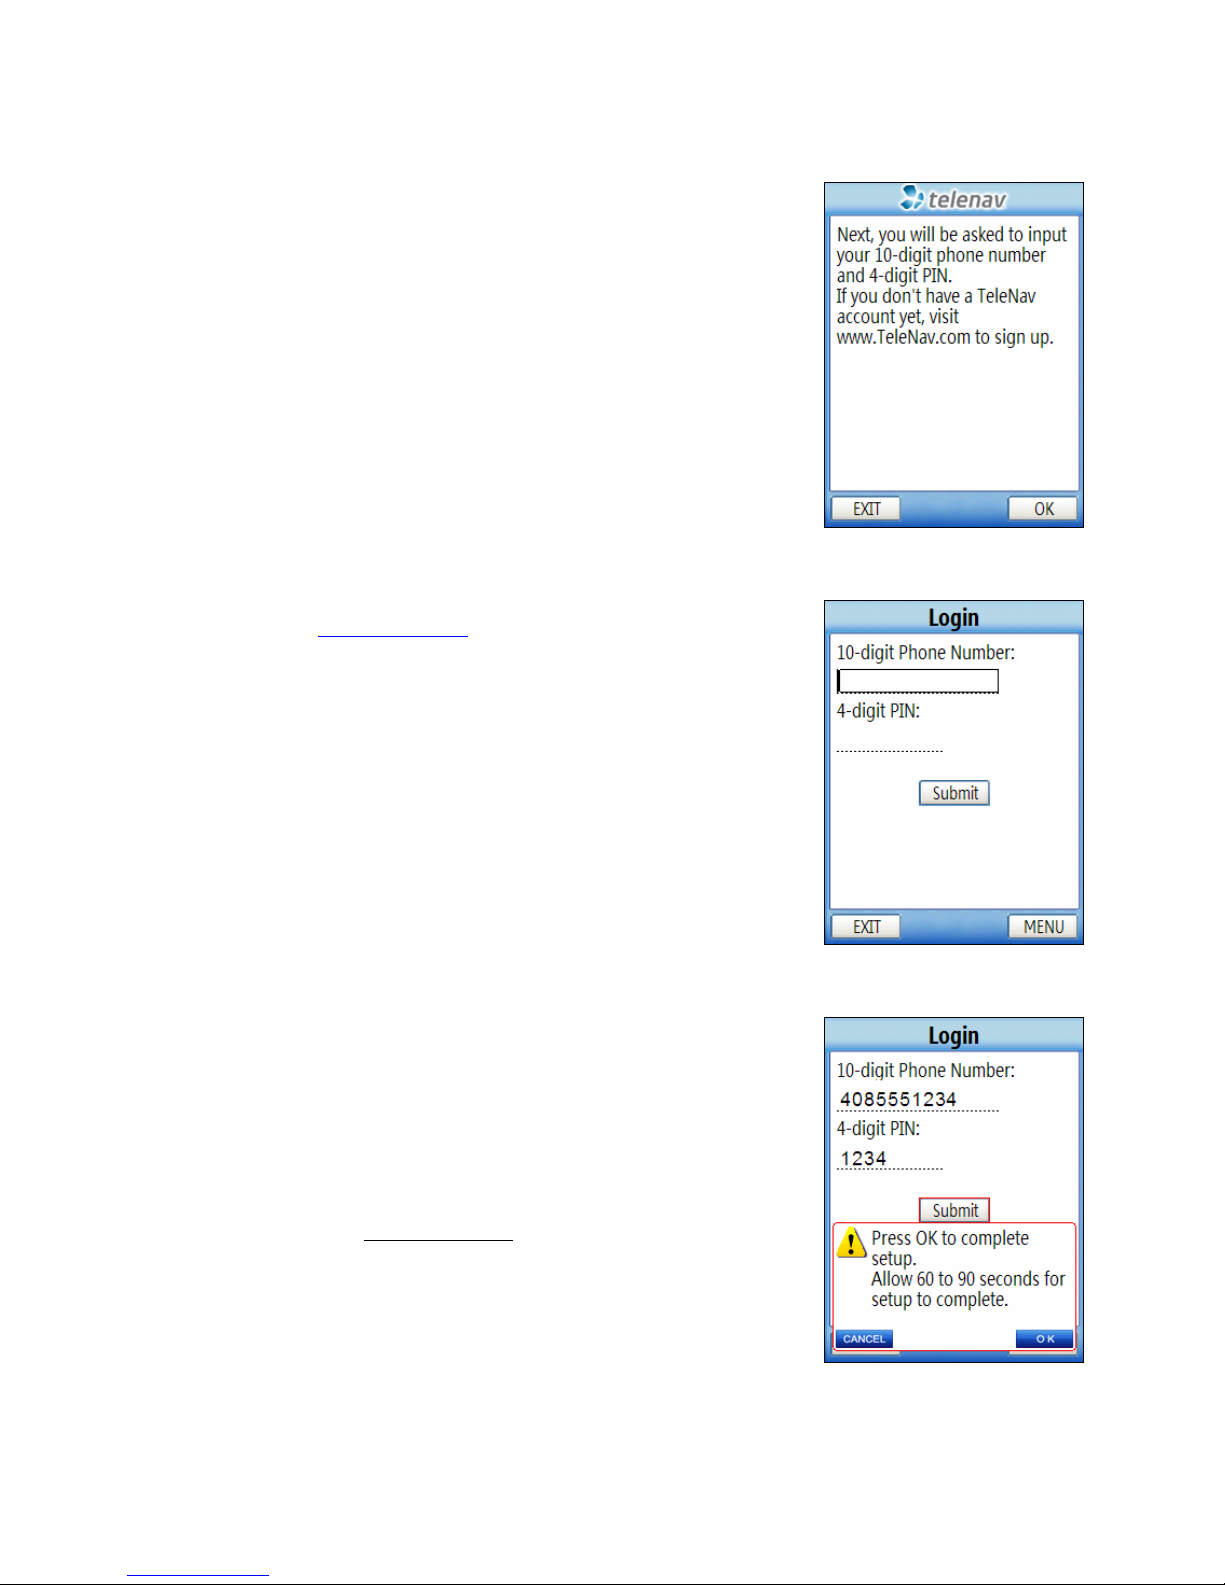
Registration
The next screen will notify you that you will need your 10-digit phone number ,
also referred to as an account number, and your 4-digit PIN.
NOTE: Your account number MUST be the same as your carrier phone
number beginning with area code so that when you call the Voice Address Input
System you will not need to type in the account number.
Input your TeleNav account number and the PIN your provided when registering
for TeleNav service at www.telenav.com. You must pull out the Pocket PC’s
keyboard in order to enter the phone number.
After you have entered the account number at 4-digit PIN, press the Submit
button.
A warning message will be displayed, press OK to complete the setup process.
NOTE:
If your TeleNav account is not active, you will be notified at this point,
and will be directed to go to www.telenav.com to extend your service
agreement. You will not be able to progress beyond this point until your account
is returned to current status. You may also see an important message from
TeleNav regarding upgrades, scheduled downtime, pending account expiration,
etc.

© TELENAV 2003-6
PAGE 11 OF 32
When the Pocket PC reaches the TeleNav servers with a valid and active phone
number and PIN, the device will be registered to use TeleNav, and will not
present any of the above screens except the splash screen in the future.
Visiting www.telenav.com, and changing the PIN will require you to repeat the
above registration process.
TeleNav Bluetooth PS Configuration
The GPS location information is provided by a TeleNav Bluetooth GPS receiver;
therefore you must configure the GPS receiver before you can access
information that is dependent upon GPS information in TeleNav.
Make certain that your TeleNav Bluetooth GPS receiver is powered ON at this
point during the setup. Press Yes to configure the settings. A scan of all nearby
devices will be completed and a list will be displayed. Highlight the TeleNav
GPS option and press the center OK button to continue.
If you do not see the GPS device, verify that the device is on and click on the
search button to search for it again.

© TELENAV 2003-6
PAGE 12 OF 32
6. Addresses
This section discusses the variety of ways you can select a previously entered address, enter a new one, or use a
Business or Airport Address. This information is presented here since the techniques for setting addresses are
used throughout TeleNav.
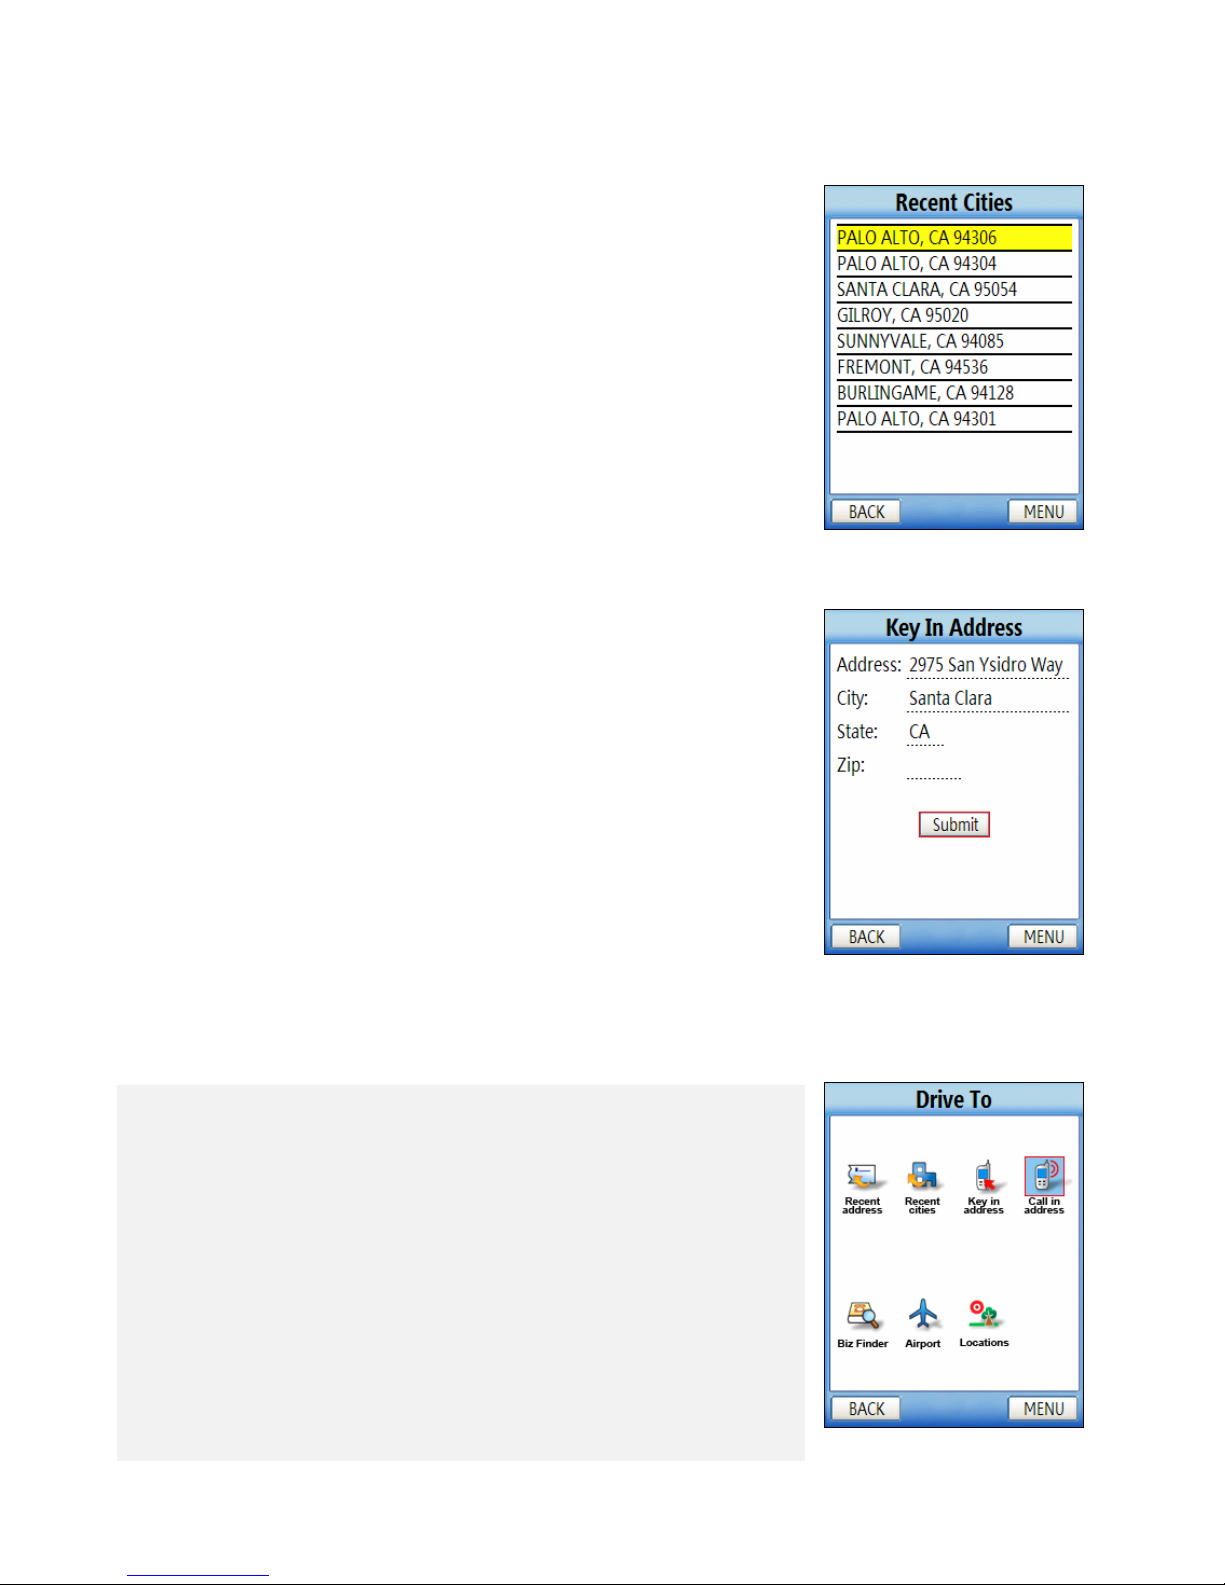
Address Selector
TeleNav presents a list of options for you to choose from when a) setting a
destination address, b) setting an origin address, c) defining the center of a
displayed map, or d) anchoring a Business Finder search.
These options include: a) using an airport’s address, b) entering an address
from the keypad, c) verbally dictating an address to an automatic voice
recognition system, d) using the address of a business, e) using a Recent City,
Recent Stop, or a previously stored Location.
NOTE: One or more options may be omitted from the Address Selector list
depending upon the application context.
Recent Addresses
Recent Addresses are addresses used recently for navigation, directions,
business finder searches, or mapping. When the 24-item capacity of the list is
exceeded, the newest stop pushes the eldest off the list. When a stop in the list
is used within TeleNav, it is promoted to the head of the list.
Press Menu and select “Refresh” to pull in any addresses you entered on the
www.TeleNav.com website Preplanning feature.
© TELENAV 2003-6
PAGE 13 OF 32
Recent Cities
The Recent Cities list is automatically extracted from the Recent Addresses.
Selecting a recent city transfers the city and state to the Address Input form so
all you need to do is add the street address.
Keying in an Address
The form allows you to specify a street address as, “123 Johnson St”, or an
intersection as “Johnson at Main”. Note the use of AT or AND in an intersection
specification. If you select a Recent City using the Address Selector, the
selected city and state information are transferred to the form allowing you to
quickly add a new street address.
Use the stylus or the navigation keys to advance down or up the rows of the
form. To type in the address, you must pull out the keyboard of the Pocket PC
and switch to the landscape view.
NOTE:
TeleNav uses standard 2-letter USPS abbreviations for states. When
this page opens, the last used USPS code is shown.
Calling in an Address
Below is a sample of what you will hear and say when using the Voice Address Input method:
TeleNav prompt> Welcome to TeleNav! Say the city and state you want like San
Francisco, California.
Your response> Arlington, Texas
TeleNav prompt> heard Arlington, Texas. To change this say GO BACK. Say the street
you want like W LSON AVENUE, or say Highway and the route number like Highway 405.
Your response> Oak Street
TeleNav prompt> heard Oak Street. To change this say GO BACK. Say the street
number or say NTERSECT ON to name a cross street.
Your response> 1620
TeleNav prompt> heard 1620. To change this say GO BACK. <pause>
TeleNav prompt> Address entered. Please launch TeleNav on your phone

© TELENAV 2003-6
PAGE 14 OF 32
<call is terminated>
After the Voice Address Input System has completed its dialog with you, it will advise you to launch the TeleNav
application, and then it will hang up.
The recognition system may reply back with an incorrectly recognized input. When this happens, simply say, “Go
Back”, and repeat the data entry. The voice system may advise you that a street number is out of range and
provide the proper range of numbers for you to use. Provide a number that is within the range or nearest the end of
the range that you are sure is valid. If you say Intersection and then provide a crossing street name, the voice
system may advise you that the streets you provided do not actually cross and allow you to change either street
name, or both street names. Select the name you want to change by saying it, and then provide the correct name.
NOTE:
If caller ID is not working, the Voice Address Input System will ask you for account number and PIN.
Simply dictate the numbers as prompted, or key in your mobile phone number followed by pressing “#”, and your
TeleNav PIN followed by pressing “#”.
NOTE:
If you are already on a voice call, this feature will be disabled.
Using an Airport as an address
Click on Airport in the Address Selector. There is one input field for either the
airport code, such as IAD for Dulles International or for the airport name, location
city or market city prefix. To type, you must pull out the keyboard of the Pocket
PC and switch to the landscape view.
If you enter “NEW” in the name/city prefix field, the server will produce a list of
airports in NEW York City; NEWark, NJ; NEW Orleans; etc. You simply
highlight the one you want, and press the ok button to submit it.
Business Address
See the section regarding the Biz Finder feature for more detailed information.
To use the Biz Finder to set an address:
1. Specify the search point or area first
2. Decide whether you want to search by Category or Business Name
3. Navigate through the categories if you selected Category search until
you have reached the list of matching businesses
4. Select a specific business
5. Display a list of options.
You can select to save the address, or use it in the current application context.
For example, if you are trying to get a Map, you can use Biz Finder to get a
business address, and then get a Map around that address.

© TELENAV 2003-6
PAGE 15 OF 32
Recorded Locations
The Locations list appears to be similar to the Recent Addresses list when it is
displayed. Locations are entered using the mark feature in TeleNav GPS Tools,
and from Maps. When the 20-item capacity of the push down list is exceeded,
the eldest element on the list is removed when the new element is added.
When Locations are deleted from the list, the list is compressed. Locations are
not derived from knowledge of a street address, but Recent Stops are.
Address validation
Once you have entered the street address or
selected the crossing street name, TeleNav will
check to see if the address you entered can be
found. This checking makes sure that: a) the
address (door) number you entered is within the
range of assigned numbers for the named
street and b) when crossing street names are
provided, the streets do actually cross. If either
condition is false, or the address is too new to
be found in the mapping database, the server
will send a message to your handheld
requesting you to correct the provided
information. For example:
Web address entry
Go to the TeleNav website, and log in using your account number and PIN. Then select preplan my trip, maps or
driving directions. Type in the address you want to go to and click on the submit link. The address will be
validated and appear in the list of addresses further down the web page. Preplan puts these addresses directly into
the list available to your phone. Maps and Directions have links that allow you to selectively pick addresses that
you want to appear in your phone’s TeleNav address list the next time you use TeleNav and select the Refresh
option under Recent Addtresses.

© TELENAV 2003-6
PAGE 16 OF 32
7. Using TeleNav
The TeleNav Menu
The TeleNav Menu selections are a) Navigation, b) Biz Finder, c) Map, d) GPS
Tools, e) Preferences, and f) Support. You Exit TeleNav from this menu by
pressing the Exit button. You can return to TeleNav Home using the Menu key
from elsewhere within TeleNav.
Navigation and Directions
If the Pocket PC is not registered, upon attempting to use this service, you will be directed to the registration
process described above.
Upon entering Navigation, the destination Address Selector form described above appears first. You select, find, or
enter an address, and are taken to the destination address confirmation screen.
On the trip confirmation screen you can change the route origin or you can change the route type (fastest, shortest,
avoid highway, prefer highway or pedestrian.)
When you are ready to get the route select Go.
The first option is “Current Location”, and the second option is “Somewhere
else”.
Selecting the first option invokes the Navigation function using your current
location determined by getting a GPS fix as the origin. There will be brief activity
to get an up-to-the-minute GPS location fix, followed by a network transaction
while the handheld sends the fix and destination address to the TeleNav servers
that respond with the routing data.
Selecting the second option takes you to the origin Address Selector so you can
pick, find, or enter the origin address. (These screens are shown above).

© TELENAV 2003-6
PAGE 17 OF 32
Static Route and Map Summary Modes
If you specified “Somewhere Else” while on the trip confirmation page and
entered in a different origin address there will be brief activity message displayed
when the directions are downloaded.
A static route view will then be displayed which shows each segment of the
route. To view a map summary of your trip press the Menu key and select Map
Summary.
There will be brief activity while the map is
downloaded. The resulting map shows an ‘O’
for the origin and a ‘D’ for the destination.
NOTE: The map summary mode is only
available when accessing static routes.

© TELENAV 2003-6
PAGE 18 OF 32
PS Origin Refinement
If are using GPS Navigation and you are in a parking lot or similar area where
your location does not exactly map to a specific street, you may see a pop-up that
shows TeleNav’s best estimate of which street you are on, and allows you to
change it. If you elect to change the starting street, a list of neighboring streets
will be presented, and you can make an alternate selection from the list. If you do
nothing, the first pop-up will disappear after a few seconds.
NOTE: If you are not sure of the street you’re on, simply start driving. TeleNav
will revise its estimate of your location, and provide you with a new route if
needed.
uidance Instructions
Within a few seconds, TeleNav will contact the TeleNav server, obtain an optimal route to your destination, and
display the first instruction telling you how to start your trip from your current location.
NOTE: Unless you are moving, GPS will not provide TeleNav with your direction of travel. If this is the case, the
first few guidance instructions may be incorrect since TeleNav may make an incorrect assumption. However, once
you start moving, TeleNav will learn your direction of travel and provide a corrected set of guidance instructions.D
Depending on the route view being displayed, navigation direction screens have slightly different content as
explained below. The large main turn type icon indicates which way and how aggressively you should turn when
you reach the intersection.
Moving Map View
With Moving maps turned on in Preferences (as is the default view), you will see a map and a highlighted route
during your trip. The map is oriented so that the segment you are on will be drawn upward from the bottom of the
screen so that you do not have to deal with a confusing North-oriented view. The main turn icon is fitted on the right
as shown below.

© TELENAV 2003-6
PAGE 19 OF 32
Portrait View
Landscape View
Eventually, you will see the destination arrival screen. This screen will show you how far it is to your destination
and whether it is on the left or right side of the street or road.
Name of the
street you turn
onto
Direction
of travel
GPS signal
strength
Distance to
destination
Distance to the
next turn and
turn direction
Name of the
street you are
on
Name of the
street you turn
onto
Distance to
destination
GPS signal
strength
Direction
of travel
Name of the
street you are
on
Distance to the
next turn and
turn direction

© TELENAV 2003-6
PAGE 20 OF 32
To switch between the different route views (Next Turn, Moving Map, or
Route Summary) during navigation, simply press the Menu key and select
the view you wish to see. You can change the default route view in the
preferences menu.
Next Turn View
When the next turn view is turned on you will see an arrow
indicating your direction of travel. When a turn along your route is
upcoming the arrow will change indicting the turn distance and
direction. When the next turn along the route almost immediately
follows the turn indicated by the main turn icon, a second turn icon
appears where the speed and heading information is shown
below.
Route Summary View
When the route summary view is turned on your will see a list of upcoming
turns, the distance to each turn and the street to which you are turning to,
similar to a route view generated by most websites offering driving
directions.
Table of contents
Other TeleNav Software manuals


Popular Software manuals by other brands

PRESONUS
PRESONUS UNIVERSAL CONTROL 1.1 SVN 2108 installation instructions

Sennheiser
Sennheiser SDC 8000 SYS General description

Asus
Asus A3Ac user guide

Lexmark
Lexmark Apps Administrator's guide

GRASS VALLEY
GRASS VALLEY AURORA EDIT - INSTALLATION V7.1 installation manual

Campbell
Campbell PC400 user manual

Novell
Novell ADMINSTUDIO 9.5 installation guide

Kyocera
Kyocera TASKalfa 3051ci user manual

NEC
NEC Storage Manager user manual

Pioneer
Pioneer CNDV-800HD Upgrade instructions and operation manual addendum

Adobe
Adobe 17510676 - InDesign CS PageMaker Edition user guide

Xerox
Xerox SCAN TO PC DESKTOP 10 brochure


