Telestar DIGIBIT R1 User manual

Operating Manual
TELESTAR DIGIBIT R1

2
1. Contents
2. Illustrations........................................................ ............................. 3
3. Please read this first.............................................. ........................ 4
4. Connecting........................................................... .......................... 6
4.1Connections........................................................ ............................ 7
5. Installing the Sat-to-IP Router................................... ..................... 7
5.1Requirements for accessories...................................... .................. 7
5.2 LNB Connection..................................................... ....................... 8
5.3 Web interface..................................................... ........................... 8
5.4 Changing the DLNA Programme list of the DIGIBIT R1........... .... 10
5.5 System settings................................................... .......................... 10
5.6 Manual reset...................................................... ............................ 10
6. DIGIBIT R1 – examples for clients.................................. ............. 11
6.1 TELESTAR DIGIBIT B1............................................... .................. 11
6.2 Elgato iPad/iPhone/Android Client................................ ................ 11
6.3 DLNA Clients.................................................... ............................. 12
6.4 Video Player...................................................... ............................ 12
7. Technical specifications........................................... ....................... 13
8. Useful knowledge.................................................. ......................... 14
9. Troubleshooting guide........................................... ......................... 15
3
Dear customer:
Thank you for selecting this high-quality product.
Should the DIGIBIT R1 not work properly, this does not necessarily mean there
is a serious defect. Please do not send the product in to the service centre im-
mediately, rather call us first!
Technische Hotline ???
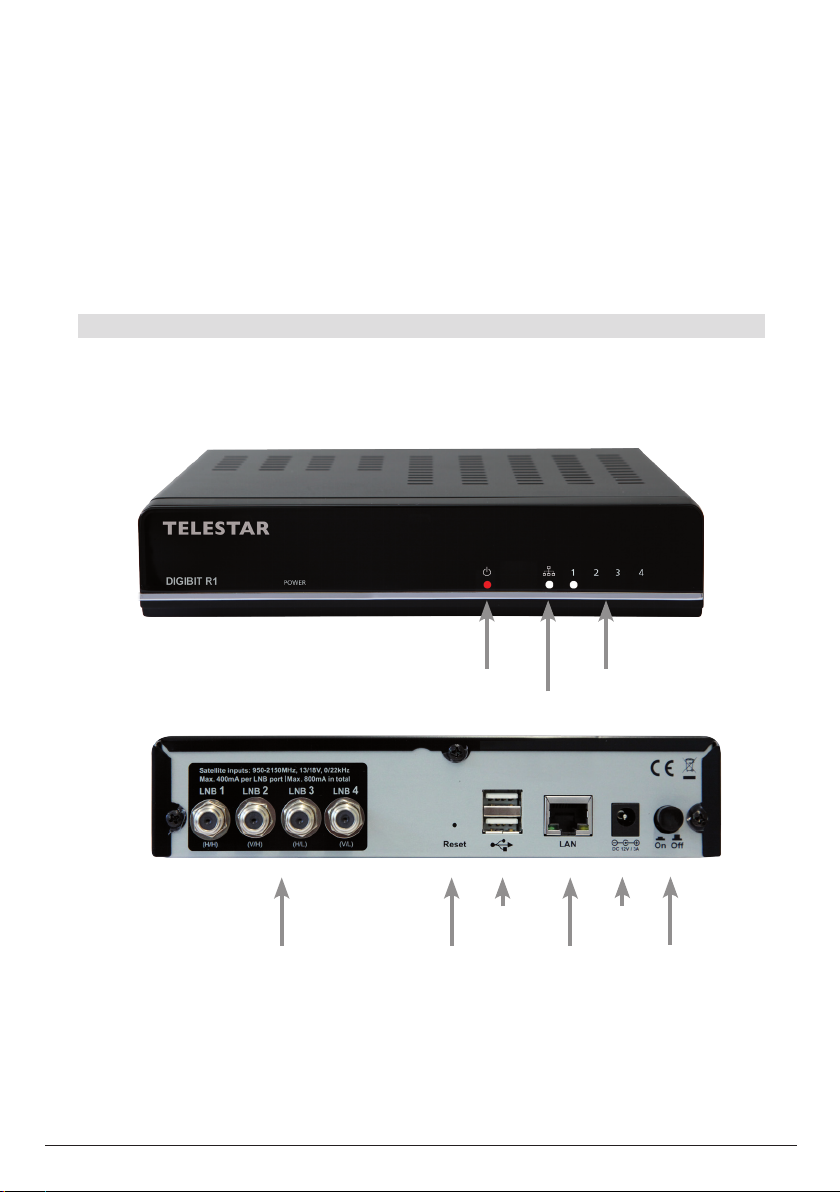
2. Illustrations
Power
Network
Connection
Tuner 1 - 4
LNB connections
1 - 4
USB
1 & 2
Network
(RJ 45)
Mains
Connection
Mains
Switch
Reset

4
3. Please read this first
> Before commencing to operate the product, please first check whether all intended
parts have been supplied. The package should contain the following:
1 Sat-to-IP router, 1 operating manual, 1 guarantee card, 1 mains adapter
> Before connecting the router, please read the safety notes in chapter 3.
> Chapters 4 and 5 describe the connections, and how to adapt the network router to
the external unit (dish antenna, LNB, ...). These settings need to be made only once,
and must only be adjusted if there is a change in your external unit, or if additional
equipment is connected.
> Chapter 6 includes several examples of the various
clients that can be operated in conjunction with the
DIGIBIT R1.
> The technical specification can be found in
chapter 7.
> Assistance in finding and solving problems can be
found in chapter
Disposal notice
The packaging of your product consists entirely of
recyclable materials. Please dispose of them in accor-
dance with the regulations in your country
Note! Important safety notes
CAUTION: TO AVOID THE DANGER OF AN
ELECTRICAL SHOCK, YOU SHOULD NEVER OPEN
THE PRODUCT HOUSING. IT DOES NOT CONTAIN
ANY USER-SERVICEABLE PARTS, IF NECESSARY,
CONTACT A QUALIFIED SERVICE TECHNICIAN.
SAFETY PRECAUTIONS:
This router was produced in accordance with interna-
tional safety standards. For your own protection, you
should read the safety precautions carefully before
commencing operation of your new product. The
manufacturer does not accept any liability for damage
caused by improper handling or by non-observance of
the safety precautions.
1. When setting up the router, ensure there is a free
space or around 5 cm on all sides, so that air can cir-
culate freely, and the unit does not overheat.
2. Do not set up the product in an enclosed space,
i.e. in a bookshelf or similarEnsure that the circulati-
on of air is not impeded. You should ensure that no
newspapers, tablecloths, curtains etc. can cover the
ventilation slots.

5
3. Do not place any burning items, such as a burning candle, on top of the unit.
4. The router should never be exposed to liquids or water. Do not place any objects
filled with liquid, such as a vase, on top of the receiver.
5. To switch off the router, do not disconnect the plug from the wall socket.
6. The mains power cable must be connected correctly. Do not touch the mains cable
or the plug with damp or wet hands.
7. The router should be operated at temperatures of 5ºC to 40ºC. Operate the product
only in a temperate climate, not under tropical conditions.
CE symbol for European markets
The CE symbol on this product gives you the assurance that the product complies with
the guidelines of the EU Directive 2004/108/EC as well as with the directive for low-
voltage products 2006/95/EC.
Operating breaks
During a thunderstorm or when the product is not being operated for an extended peri-
od (e.g. vacation), it should be disconnected from the mains power supply.
Disposal advice
The packaging of your product consists entirely of recyclable materials. Please dispose of them
in accordance with the regulations in your country (Dual System in Germany).
At the end of its useful life, this product may not be disposed of in your regular domestic waste,
instead it must be handed in at a collection point for the recycling of electric and electronic equip-
ment.
The symbol on the product, the operating manual or the packaging indicates this. The mate-
rials used are recyclable as per the symbols indicated. By recycling or otherwise safely disposing
on old equipment you are making an important contribution to the protection of the environment.
Please consult your local authorities as to the location of the appropriate disposal centre.
Please ensure that spent batteries from the remote control unit as well as electronic waste is not
disposed of via your domestic waste, and is correctly disposed off.
Disposal of spent batteries and rechargeable batteries
Batteries or rechargeable batteries may contain substances harmful to the environment or to
human health. In addition, they contain valuable raw materials that can be recycled. Incorrect dis-
posal negatively affects the environment, health and material recycling. By recycling batteries and
rechargeable batteries responsibly, you can make a positive contribution to the protection of the
environment and to the health of those around you.
The symbol on the batteries/rechargeable batteries or the packaging indicates that these
may not be disposed of in your regular domestic waste. Where a chemical symbol is shown
below the cancelled waste bin on wheels (Hg, Cd, Pb), this means that the battery contains more
than 0.0005 per cent by mass of mercury (Hg), More than 0.002 per cent by mass of cadmium
(Cd) or more than 0.004 per cent by mass of lead (Pb)
In the countries of the European Union as well as in other European countries that have a sepa-
rate collection system for batteries and rechargeable batteries, you are legally obliged to dispose
of such batteries and rechargeable batteries via the separate facilities provided, and not via your
domestic waste.
6
In as far as your product or an accessory contains spent batteries or rechargeable
batteries that are no longer to be used, please remove these in acordance with the
chapter on safe battery changing.
Please hand in the spent batteries/ rechargeable batteries to a recycling collection
point for batteries, or return them to the point of sale. You can obtain additional informa-
tion on the return and recycling of this product or of the batteries/rechargeable batteries
form your local authorities, your communal waste disposal operators or from the shop
in which you purchased the product.
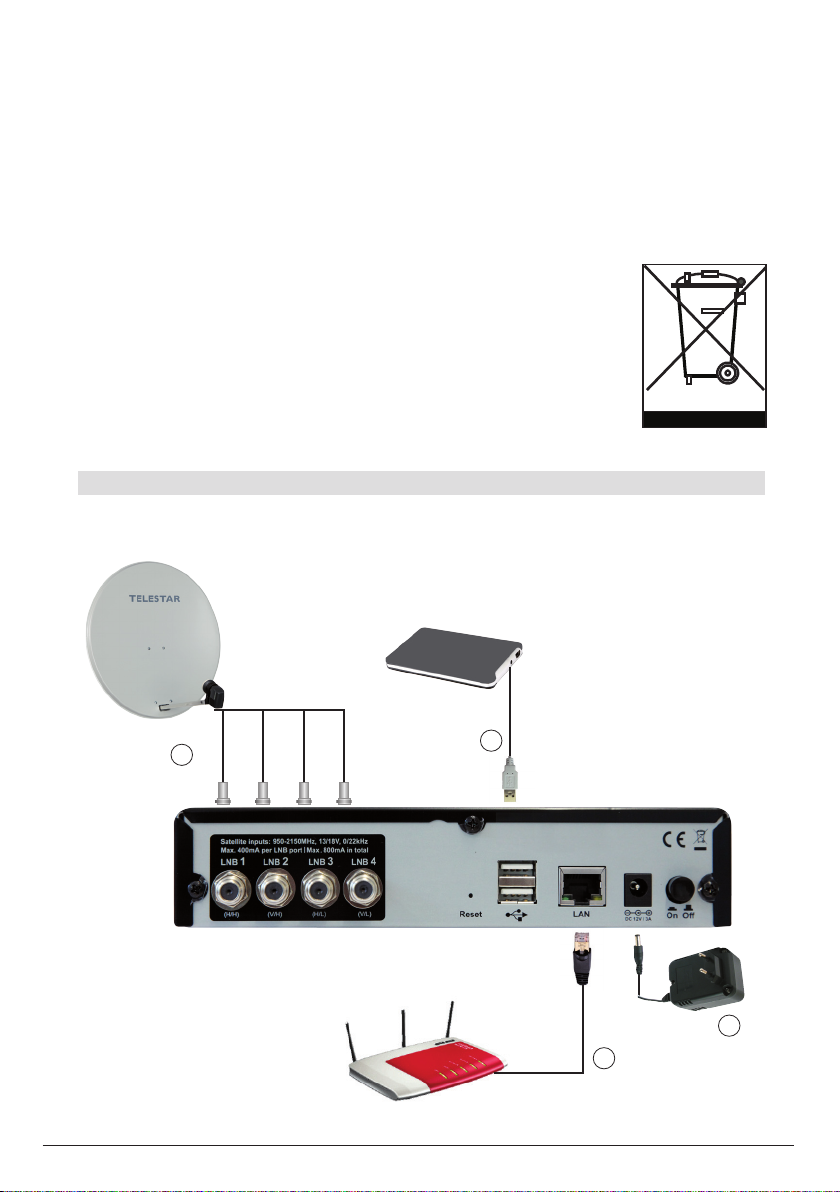
4. Connections
a
bd
c

7
4.1. Connections
The notes set out here refer to the illustration on page 6:
a.
Mains power adapter.
Connect the mains power adapter with the TELESTAR DIGIBIT R1 and connect it with
a wall socket
b.
Antenna inputs.
Connect the output/s of an LNB or multi-switch with the DIGIBIT R1.
c.
Use a network cable to connect the DIGIBIT R1 with a DSL router
d.
Use the USB interface to connect external storage media with the DIGIBIT R1 in order
to carry out software updates.
5. Installation of the Sat-to-IP router
This installation guide is intended to be a rough guide when installing the Sat-to-IP
router. The information was intentionally kept very general, as home networks can be
constructed very differently from case to case. When in doubt, please consult a profes-
sional technician.
5.1. Requirements for accessories
To ensure the DIGIBIT R1 functions smoothly within a network environment, certain
minimum requirements for accessories must be adhered to:
+ Network speed (LAN): please use only DSL routers that provide a data
throughput via LAN of at least 1000Mbit/s.
+ Network speed (WLAN/wi-fi): to ensure a smooth operation of the wi-fi func-
tion, the data throughput of the DSL router used should be at least 300Mbit/s,
as you may otherwise experience transmission problems and blocks appearing,
particular where several clients are connected to a WLAN.
+ Data throughput via WLAN decreases with increasing distance between the
router and the connected product. If you wish to maintain a WLAN (wi-fi) con-
nection over a longer distance, we recommend you use a WLAN repeater. Here,
too, the product should support a minimum speed of 300 Mbit/s.
+ Other network function (e.g. access to the Internet) may be disturbed where
many clients have access via WLAN. Where possible, therefore, use the Sat-to-
IP function via LAN.
+ To bridge longer distances, you can also use so-called Powerline or dLAN
adapters (network via mains power lines). Here, widely different data through-
put rates can be achieved, depending on the manufacturer of the equipment. If
in doubt, ensure the dLAN adapter used provides the same data throughput as
your DSL router.

8
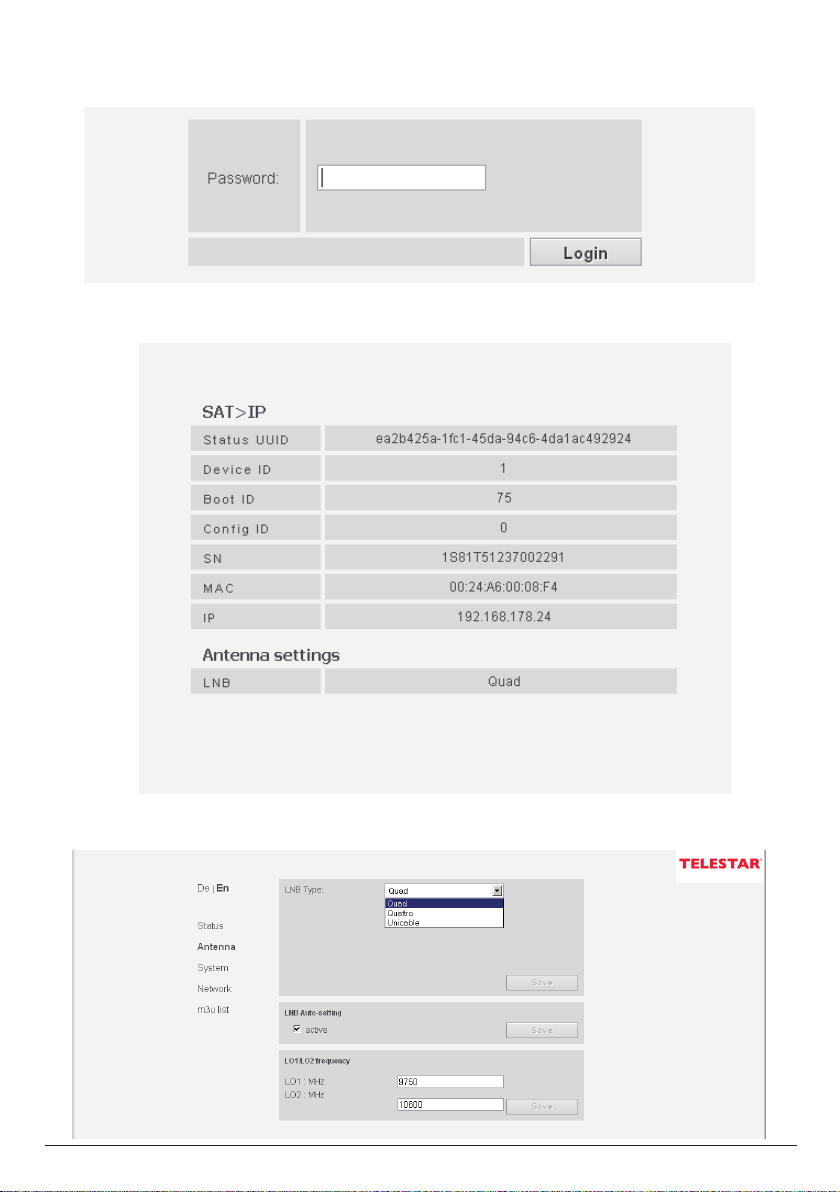
5.2 LNB connection
The DIGIBIT R 1 comes equipped with 4 tuner inputs, which can be used in combina-
tion with a
Quad LNB, or with a Quatro LNB or a Unicable LNB.
The factory setting for the DIGIBIT is for use with a Quad LNB.
The antenna setting can be changed via the Web interface (see 5.3., illustration 3)
under the jeading „Antenna“.
Single or Twin LNB:
the product can be operated together with a Single or Twin LNB
(connection to Tuner 1 resp. Tuner 1&2), the number of clients then corresponds to 1
resp. 2.
Quad LNB: connect the DIGIBIT R1 directly to a Quad LNB
(Quatro-Switch LNB) or to the outputs of a multi-switch (1 to 4 tuners).
Quatro LNB: as described, the LNB must be connected to the back panel of the
DIGIBIT, the order of the levels is as follows: Tuner 1 = H/H, Tuner 2 = V/H, Tuner 3 =
H/L, Tuner 4 = V/L.
Unicable LNB:
here, only a single cable needs to be connected to the DIGIBIT, the first tuner is the
first to be used (left socket on back panel, see illustration).
Unicable is supported in accordance with DIN EN 50494.
5.3. Webinterface
The Web interface allows you to configure the DIGIBIT, this can be called up by every
PC, tablet or Smartphone connected to the same network as the Sat-to-IP router.
a) Access via IP address
In order to access the interface, you must know the IP address of the DIGIBIT. This IP
address is allocated by the network router, and can be seen in the configuration menu
of the network router (provided the DHCP protocol is activated). Alternatively, the IP
address can also be found by using a free software package, e.g. the SoftPerfect Net-
work Scanner. Once you have found out the IP address of the DIGIBIT, enter it into the
address field of the Internet browser as follows:
http://xxx.xxx.xxx.xxx:8080 (where xxx.xxx.xxx.xxx must be replaced by the IP
address).
NOTE: some web browsers add the :8080 automatically!
b) Access via product name and MAC address
The Web interface can also be called up by entering the following in the address field
of the browser:
DIGIBIT-xxxxxx. In this case, xxxxxx stand for the last 6 characters of the MAC
address, without the colon. You will find the MAC address on the underside of the
product.
9
illustriation 1: Query password
illustriation 3 : LNB Selection, Antenna (Point 5.2)
illustriation 2: Status

10
5.5 System settings
The item „System“ (see illustration 5) provides several functions for product mainte-
nance and administration:
Online firmware update:
If a new version of the software is available for your product, you can download it here.
The button „Update“ will be active.
Local firmware update:
If you have connected a USB stick with a new version of software for your DIGIBIT R1,
and the update for some reason does not start automatically,You can start this manu-
ally here. Use the button „Select file“ to select the folder of the storage medium connec-
ted (where your software files are saved), then click on the button „Update“.
Change password:
Here you can change the default password set at the factory (admin) into any new
password of your choice. Enter the new password twice, confirm by clicking the button
„Change“.
Sytem Restart:
In case of malfunctions, or where you have mistakenly entered incorrect parameters,
you can call up the default factory settings of your DIGIBIT R1 here. Note: individual
settings will be lost! Activate the restart by clicking the button „Restart“. The restart of
the DIGIBIT R1 will take approx. 45 seconds.
5.6 Manual Reset
If the router should freeze, the DIGIBIT can be set back to the factory default setting
manually. To do this, please proceed as follows:
• Switch off the router
• Press the Reset button on the back panel of the router, using a sharp object (e.g.
a needle)
• Switch the router on, and keep the Reset button pressed down until the network
LED lights up once.
The router has now been set back to the factory setting, any software or programe list
updates must be reinstated.

11
6. DIGIBIT R1 – examples for clients
6.1 TELESTAR DIGIBIT B1
illustration. 5: System
The DIGIBIT B1 is a user-friendly Sat-to-IP client, the functions of which correspond
with those of a digital HDTV satellite receiver, featuring PVR and multi-media functions
via USB.
The client is incorporated into the home network either via an Ethernet cable or via
a USB WLAN dongle, it is connected with the television set via a HDMI connection.
When the client is switched on for the first time, the installation assistant will be started
automatically, allowing the user to perform a programme scan, and to make adjust-
ments to suit his personal viewing preferences. The DIGIBIT B1 is one of the most
user-friendly variants of Sat-to-IP. Additional information can be found at
www.telestar.de.
6.2 Elgato iPad/iPhone/Android client
Elgato can be downloaded from the iTunes Store (iPhone/iPad) or the Google Play
Store (Android) or from the Amazon App Store (for use with the Kindle Fire HD). The
name of the application is Elgato Sat>IP. This app was developed specially for use with
Sat-to-IP routers, in operation it behaves like any conventional satellite receiver, provi-
ding features such as programme scan, EPG and PVR functions (including Timeshift).

12
6.3 DLNA Clients
A number of DLNA clients are already available for this well-known open standard. The
DIGIBIT comes equipped with a DLNA server, and is recognized as such by any DLNA
client, be it an LCD television set, Smartphone, tablet, BluRay player, etc. Here are
some examples of available applications:
iPad/iPhone:
• The application AirAV is available as a download from the iTunes store
•
• The iPad/iPhone must be connected to the same network as the DIGIBIT R1
• Download the app, and execute it
• Select the „Media Servers“, the app will now scan the existing network for DLNA/
UPnP servers
• Select the DIGIBIT DLNA server
• Then select one of the streams available. Depending on the internal channel list of
the DIGIBIT, the TV programmes received may be available as individual streams
Playing will begin automatically.
Android:
• The VPlayer is avaialble as a download in the Google Play Store as a 7 day test
version
•
• The Android Smartphone must be connected to the same network as the DIGIBIT
R1
• Download the app and execute it
• In the first screen, you can select one of the available „Media Servers“,
It may take some time to complete the network scan.
Select the DIGIBIT DLNA server
Then select one of the streams provided, depending on the internal channel list in the
DIGIBIT, the TV programmes received may be available as individual streams
Playing will beginn automatically
6.4 Video Player
The DIGIBIT R1 can also be used in conjunction with various video players. For in-
stance, with a VLC player you can access the streams via the integrated DLNA/UPnP
client. Additional information on the VLC Player (suitable for MS Windows, MAC OSX
and Linux) can be found at: www.vlc.de (including free download).
We recommend you use the DVB Viewer 1.0 in conjunction with the DIGIBIT R1. This
player is suitable for use with MS Windows, and can be downloaded free of charge
from www.telestar.de. The advantage of the DVB Viewer is that it provides all the func-
tions of a digital receiver (e.g. EPG data, PVR function).

13
7. Technical Specifications
DVB-S 2 compatible Sat-to-IP router for up to 4 participants
Supports 1Gbit network connections
BUp to 4 different TV channels
Unicable compatible in accordance with DIN EN 50494
Web-based configuration menu
External energy-efficient mains power adapter (100-240V AC. 50/60Hz; max.
Power consumption: 36W, stand-by mode <4W)
Wake-on-Lan
Fully supports Sat > IP communication protocol
Network protocols: HTTP/HTTPS, DHCP, RTSP
Operation and displays
On/off switch and reset switch on product back panel
4x Client Lock LEDs (white), 1x LED network activity (white), 1x on/off LED
(white/red) on product front panel
Connections
4x RF inputs for connection with a digital satellite installation
1x RJ 45 Ethernet interface for connection to a network
2x USB 2.0 interfaces for software update and applications

14
8. Worthwhile knowledge
1. Do I require an Internet connection to operate the DIGIBIT R1?
No, an Internet connection is not required to operate the DIGIBIT R1.
2. What is the difference between DLNA and Sat-to-IP clients?
In principle, DLNA clients simply acquire the individual data streams, and reproduce
these, without providing any additional functions. Sat-to-IP clients are very similar to a
satellite receiver in terms of their functions, Here, functions such as programme scans,
electronic programme guides or Personal Video Recorder functions are available.
3. Can I operate the DIGIBIT R1 in conjunction with any DSL router?
In principle, you can operate the DIGIBIT R1 in conjunction with any DSL router, provi-
ded the data throughput of the router is sufficient. If, for example, you are using a DSL
router with a data throughput of 100 mBit, this may lead to the appearance of artefacts
on screen, or to a reduction in the number of clients. We recommend DSL routers with
a data throughput of 1000mBit (LAN) resp. 300 mBit (WLAN/wi-fi).
Recommended routers: AVM FRITZ!Box 3270, 7390 or similar models
Recommended repeaters: AVM FRITZ!WLAN Repeater N/G, 300E or similar models.

15
9. Troubleshooting guide
1. Product shows no function, indicator lights on front panel not on:
Check whether the product has been switched on via the power on/off switch on the
back panel.
Check whether the mains adapter has been connected correctly.
2. You are unable to establish contact with the DIGIBIT R1 by clients of PC’s, the
indicator lights on the front panel are on:
Check whether the LAN connection between the DIGIBIT R1 and the network router is
correctly connected. If the LAN cable is correctly connected, and you cannot establish
contact, please contact the support service of your network router, as no network set-
tings on the DIGIBIT R1 are required for this connection.
3. A client or app connected via wi-fi is not working correctly, there are blocks in
the picture, there are interruptions in the sound, or no sound and no picture:
Check whether the wi-fi network coverage is adequate. To ensure problem-free trans-
mission of sound and picture you will require a wi-fi bandwidth of at least 15mBit
(for SD transmitters) resp. 25mBit (for HD transmitters) for each respective client. If
necessary, you can use a wi-fi repeater to improve the performance of your network.
Repeaters can be obtained in the specialist computer trade.
In addition, DLNA clients not supported may cause the same problems.
If you can eliminate the above points, and are using a DLNA client, please switch this
off, and check whether the problem persists.
4. You can access the Web interface of the DIGIBIT R1, but connected clients do
not display any picture or sound:
Please check the LNB settings of the router, you can find information on this in
Chapter 5.2 of this operating manual. At the factory, the DIGIBIT R1 is set to the LNB
type „Quad“. If you are using a direct connection with a Quatro LNB or a Unicable
LNB, please change the setting accordingly.

16
Your product bears the CE symbol, and complies with all relevant EU standards.
Not responsible for errors, subject to change without notice. Correct as at 01/13
Copies and reproduction only with the permission of the publisher.
© 2013
Table of contents
Popular Network Router manuals by other brands

TRENDnet
TRENDnet TPA-311 Quick installation guide

Tenda
Tenda AX1800 Quick installation guide

Digital Barriers
Digital Barriers EDGEVIS VIDEO ROUTER 4 Hardware installation guide

Huawei
Huawei AR100 Series Hardware installation and maintenance guide

V-Sol
V-Sol V2802W manual

Ness
Ness NanoStation Loco M5 Setup guide

Juniper
Juniper EX3400 Features guide

KYLAND Technology
KYLAND Technology SICOM3000A Series Hardware installation manual

Cisco
Cisco 2501 - Router - EN user guide

Tyco Electronics
Tyco Electronics 8 Port SNMP Managed Switch user guide

MitraStar
MitraStar HGW-2501GN-R2 user guide

Cisco
Cisco ASR 9000 Series installation guide


