Telexper tx168 series User manual

Telexper International Inc.
3F-3, No.2, Chien Pa Rd., Chung Ho City,
Taipei 235, Taiwan, R.O.C.
Tel:886-2-6620-5898 Fax:886-2-6620-
6909
E-
mail:[email protected]
http://www.telexper.comISO 9001:2000
A member of VisionSoft
TX168 Series
4ch/ 8ch/ 16ch
Embedded DVR
User Manual
Telexper Incorporated © 1992-
2005

Telexper International Inc.
3F-3, No.2, Chien Pa Rd., Chung Ho City,
Taipei 235, Taiwan, R.O.C.
Tel:886-2-6620-5898 Fax:886-2-6620-
6909
E-
mail:[email protected]
http://www.telexper.comISO 9001:2000
A member of VisionSoft
Copyright Notice
Information in this document is subject to change without notice. Telexper
Incorporated may make improvements or changes in this manual and in the Digital
Recorder at any time. The software, which includes the information contained
described in this document is furnished under a license agreement and may be used
or copied only in accordance with the terms of the agreement. It is against the law to
copy the software except as specifically allowed in the license agreement. No part of
this manual may be reproduced or transmitted in any form or by any means, including
photocopying and recording, for any purpose without prior written permission of
Telexper Incorporated.
© Telexper Incorporated 1992-2005
This device complies with Part 15 FCC Rules. Operation is subject to the following two
conditions:
(1) This device may not cause harmful interference.
(2) This device must accept any interference received including interference that may cause
undesired operation.
Telexper Inc. © 1992-2005

Telexper International Inc.
3F-3, No.2, Chien Pa Rd., Chung Ho City,
Taipei 235, Taiwan, R.O.C.
Tel:886-2-6620-5898 Fax:886-2-6620-
6909
E-
mail:[email protected]
http://www.telexper.comISO 9001:2000
A member of VisionSoft
Contents Page
Chapter 1 INTRODUCTION 1
Chapter 2 HARDWARD INTRODUCTION
FRONT PANEL
4ch DVR 2
8ch DVR 3
16ch DVR 4
REAR PANEL
4ch DVR & 75ΩTERMINATION DIP-SWITCH SETTING 5
8ch DVR & 75ΩTERMINATION DIP-SWITCH SETTING 6
16ch DVR & 75ΩTERMINATION DIP-SWITCH SETTING 7
Chapter 3 INSTALLATION & OPERATION
INSTALLATION FLOW CHART 8
HARD DISK SPACE CHECK 10
HOW TO CONTROL AUDIO OUTPUT 10
PLAYBACK (ON UNIT) 10
DATE/TIME SEARCH PLAYBACK 10
ALARM/ MOTION SERACH PLAYBACK 10
TAKE OUT THE HARD DISK (WITH CADDY) 11
OFF-LINE PAYBACK (WITH OFF-LINE VIEWER SOFTWARE) 11
RECOMMENDED PC REQUIREMENT FOR OFF-LINE VIEWER SOFTWARE 12
Chapter 4 OFF-LINE VIEWER SOFTWARE
INSTALL OFF-LINE VIEWER INTO YOUR PC 13
RUN OFF-LINE VIEWERK 13
PLAYBACK 13
AVI VIDEO OUTPUT 14
IMAGE PRINTING 14
IMAGE ZOOMING 15
ALARM/ MOTION SERACH PLAYBACK 15
DATE/TIME SEARCH PLAYBACK 15
Chapter 5 ON SCREEN DISPLAY (OSD) SETUP
4ch DVR 16
8ch DVR 17
16ch DVR 18
Chapter 6 FAQ 19
Chapter 7 OTHERS
SOP –HOW TO MAKE A FAT32-FORMAT HARD DISK 20
REFERENCED STORAGE CAPACITY TABLE 22

Telexper International Inc.
3F-3, No.2, Chien Pa Rd., Chung Ho City,
Taipei 235, Taiwan, R.O.C.
Tel:886-2-6620-5898 Fax:886-2-6620-
6909
E-
mail:[email protected]
http://www.telexper.comISO 9001:2000
A member of VisionSoft
Chapter 1 Introduction
Model
TX168-4: 4ch, without audio (audio optional)
TX168-4N : 4ch, with audio, with internet
TX168-8: 8ch, with audio
TX168-8N : 8ch with audio, with intenet
TX168-16 : 16ch with audio
TX168-16N : 16ch with audio, with internet
Optionitems
USB2.0 Kit Package
Additional hard disk caddy (drawer)
Major Features
üReal-time Display (4ch:120pps; 8ch:240pps; 16ch:480pps)
ü120 pps Recording Speed (max)
ü720x480 pixels Resolution
üProprietary Wavelet Format (DVD Quality)
üEmbedded System Design
üMotion Detection
üHard Drive Full A larm Password Protection Security
üReal-time Clock
üSwappable Hard Drive with FAT32 file system
üFree Off-line proprietary Player
Ease of video search & playback
AVI export to CD, Hard Drive, Memory Sticker …
üRemote Viewer supplied
IP Addressable
Multi-channel (1/4/9/16ch) Live View Simultaneously
Alarm Call Back with the Event Video
Remote Playback (date/time search)
-PAGE: 1 of 22-
Telexper International Inc.
3F-3, No.2, Chien Pa Rd., Chung Ho City,
Taipei 235, Taiwan, R.O.C.
Tel:886-2-6620-5898 Fax:886-2-6620-
6909
E-
mail:[email protected]
http://www.telexper.comISO 9001:2000
A member of VisionSoft
Chapter 2 Hardware Introduction
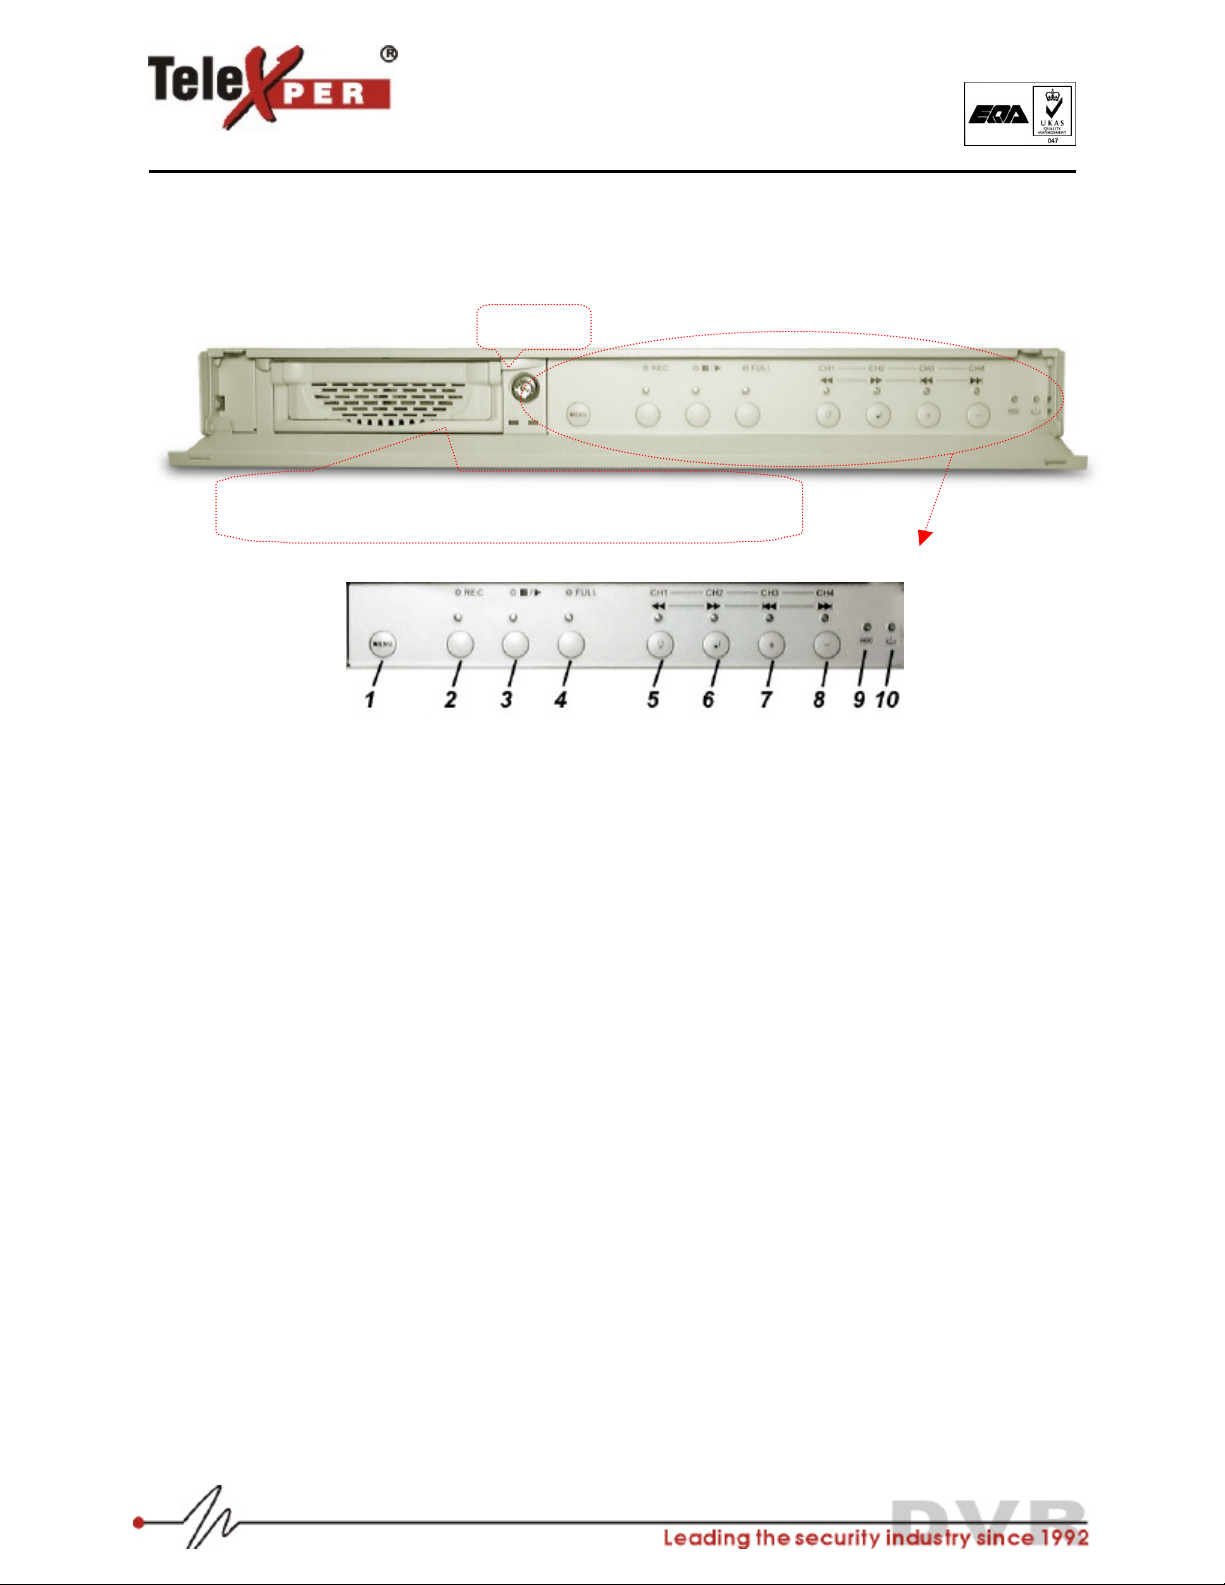
FRONT PANEL -4ch DVR (TX168-4 or/ TX168-4N)
u“MENU” button
ØOn Screen Display (OSD) Setup (push).
ØEnable “Time Search Playback”function (push button during Playbackmode).
ØSwitch“Mixed/Audio1/Audio2/Off” audio output function (hold buttonmore than 2 seconds)
v“REC” button & LED
ØRecording mode On =RED
ØEnable/disable 5-min Emergency Recording when DVR is not at recording mode (holdmore than 2
seconds).
w</4”Playback” button & LED
ØStart/pause playback. Start = RED (push)
ØRemove HARD DRIVE (hold buttons more than 2sec)
x“FULL” button & LED
ØEnable full-screen display. ON = RED(push)
Switching channel by clicking y“CH1”,z“CH2”, {“CH3”, |and“CH4”.
ØHard disk usage indicator (hold button more than 2 sec)
y7Decrease (-) playback speed (push)
z8Increase (+) playback speed (push)
{9Previous File (push) {9Rewind (hold)
|:Next File (push) |:FF (hold)
}“HDD” LED (Hard disk reading/writing LED = RED)
~“POWER” LED (LED = GREEN).
Key Lock
Removable hard drivecaddy (drawer)
HDD caddy should be one of following type
BT-27, BT-32, BT-42, RH-17, RH-27, RH-32, RH-42, MR-27 orL-007
-PAGE: 2 of 22-

Telexper International Inc.
3F-3, No.2, Chien Pa Rd., Chung Ho City,
Taipei 235, Taiwan, R.O.C.
Tel:886-2-6620-5898 Fax:886-2-6620-
6909
E-
mail:[email protected]
http://www.telexper.comISO 9001:2000
A member of VisionSoft
FRONT PANEL -8ch DVR (TX168-8 or/ TX168-8N)
14 .
.12345678910 11 12 13
1“MENU” button
ØOn Screen Display (OSD) Setup.
ØEnable “Time Search Playback”function (During Playback mode).
ØSwitch “Mixed/ Audio1/Audio2/Off” audio output function (holdmore than 2 seconds)
2“REC” button & LED
ØRecording mode On =RED
ØEnable/disable 5-min Emergency Recording when DVR is not at recording mode (holdmore than 2
seconds).
3</4”Playback” button & LED
ØStart/pause playback. Start = RED
4“FULL” button & LED
ØEnable full-screen display. ON = RED
Switching channel by clicking “CH1” 5to “CH8” 12 .
ØHard disk usage indicator (hold more than 2 sec)
57Decrease (-) playback speed (hold) 68Increase (+) playback speed (hold)
79Rewind (hold) 8:FF (hold)
9Previous File (hold) 10 Next File (hold)
12 . Remove HARD DRIVE (hold more than 2sec)
13 “HDD” LED (Hard disk reading/writing LED = RED)
14 “POWER” LED (LED = GREEN).7
-PAGE: 3 of 22-

Telexper International Inc.
3F-3, No.2, Chien Pa Rd., Chung Ho City,
Taipei 235, Taiwan, R.O.C.
Tel:886-2-6620-5898 Fax:886-2-6620-
6909
E-
mail:[email protected]
http://www.telexper.comISO 9001:2000
A member of VisionSoft
FRONT PANEL -16ch DVR (TX168-16 or/ TX168-16N)
1“MENU” button
ØOn Screen Display (OSD) Setup.
ØEnable “Time Search Playback”function (During Playback mode).
ØSwitch“Mixed/Audio1/Audio2/Off” audio output function (holdmore than 2 seconds)
2“REC” button & LED
ØRecording mode On =RED
ØEnable/disable 5-min Emergency Recording when DVR is not at recording mode (holdmore than 2
seconds).
3</4”Playback” button & LED
ØStart/pause playback. Start = RED
4“FULL” button & LED
ØEnable full-screen display. ON = RED
Switching channel by clicking “CH1” 14 to “CH16” 12 .
ØHard disk usage indicator (hold more than 2 sec)
14 7Decrease (-) playback speed (hold) 15 8Increase (+) playback speed (hold)
16 9Rewind (hold) 17 :FF (hold)
Previous File (hold) Next File (hold)
20 Remove HARD DRIVE (hold more than 2sec)
13 “HDD” LED (Hard disk reading/writing LED = RED)
22 “POWER” LED (LED = GREEN).
19
18
-PAGE: 4 of 22-
Telexper International Inc.
3F-3, No.2, Chien Pa Rd., Chung Ho City,
Taipei 235, Taiwan, R.O.C.
Tel:886-2-6620-5898 Fax:886-2-6620-
6909
E-
mail:[email protected]
http://www.telexper.comISO 9001:2000
A member of VisionSoft
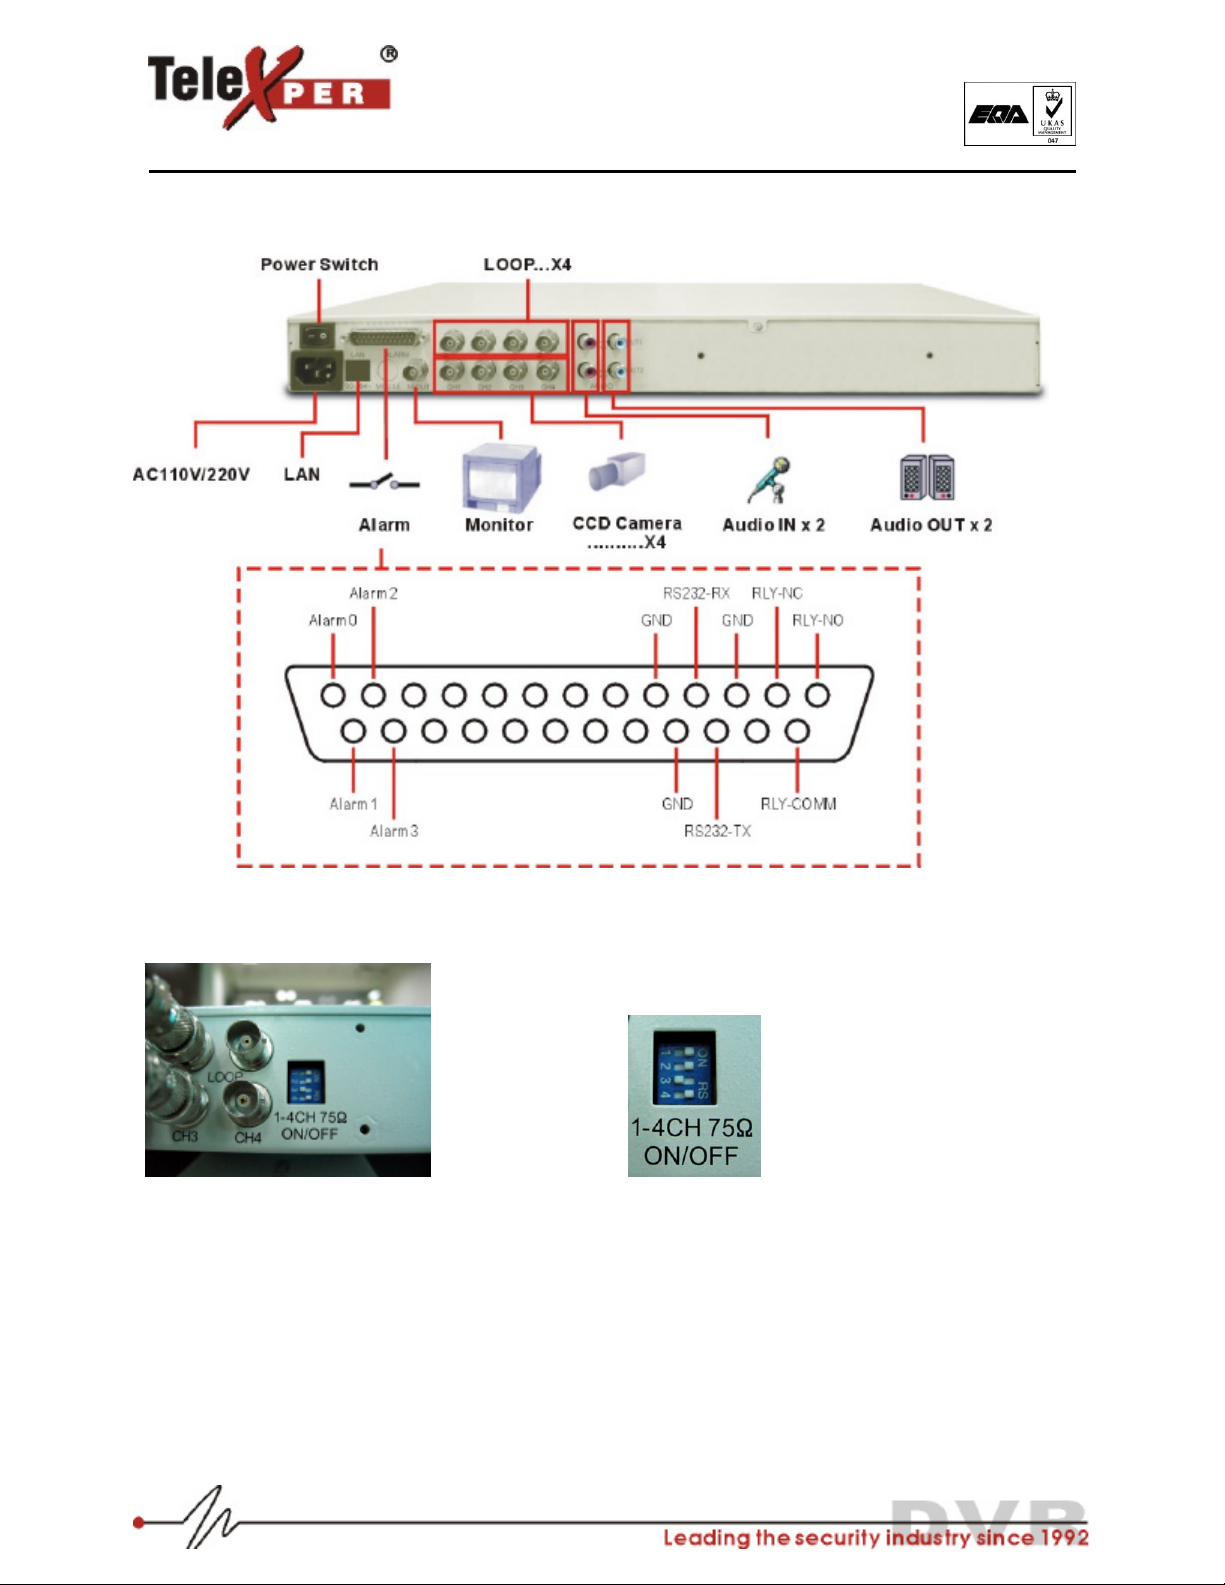
REAR PANEL -4ch DVR (TX168-4 or/ TX168-4N)
75ΩΩ Termination Dip-Switch Setting
You MUST set 75 ohm dip-switch“OFF”; when the LOOP of that camera connecting with 3rd device!
ØConnect nothing->75 ohm termination switch: ON
ØConnect Camera only-> 75 ohm termination switch:ON
ØConnect Camera + Loop (Monitor) -> 75 ohm termination switch: OFF
-PAGE: 5 of 22-
Telexper International Inc.
3F-3, No.2, Chien Pa Rd., Chung Ho City,
Taipei 235, Taiwan, R.O.C.
Tel:886-2-6620-5898 Fax:886-2-6620-
6909
E-
mail:[email protected]
http://www.telexper.comISO 9001:2000
A member of VisionSoft
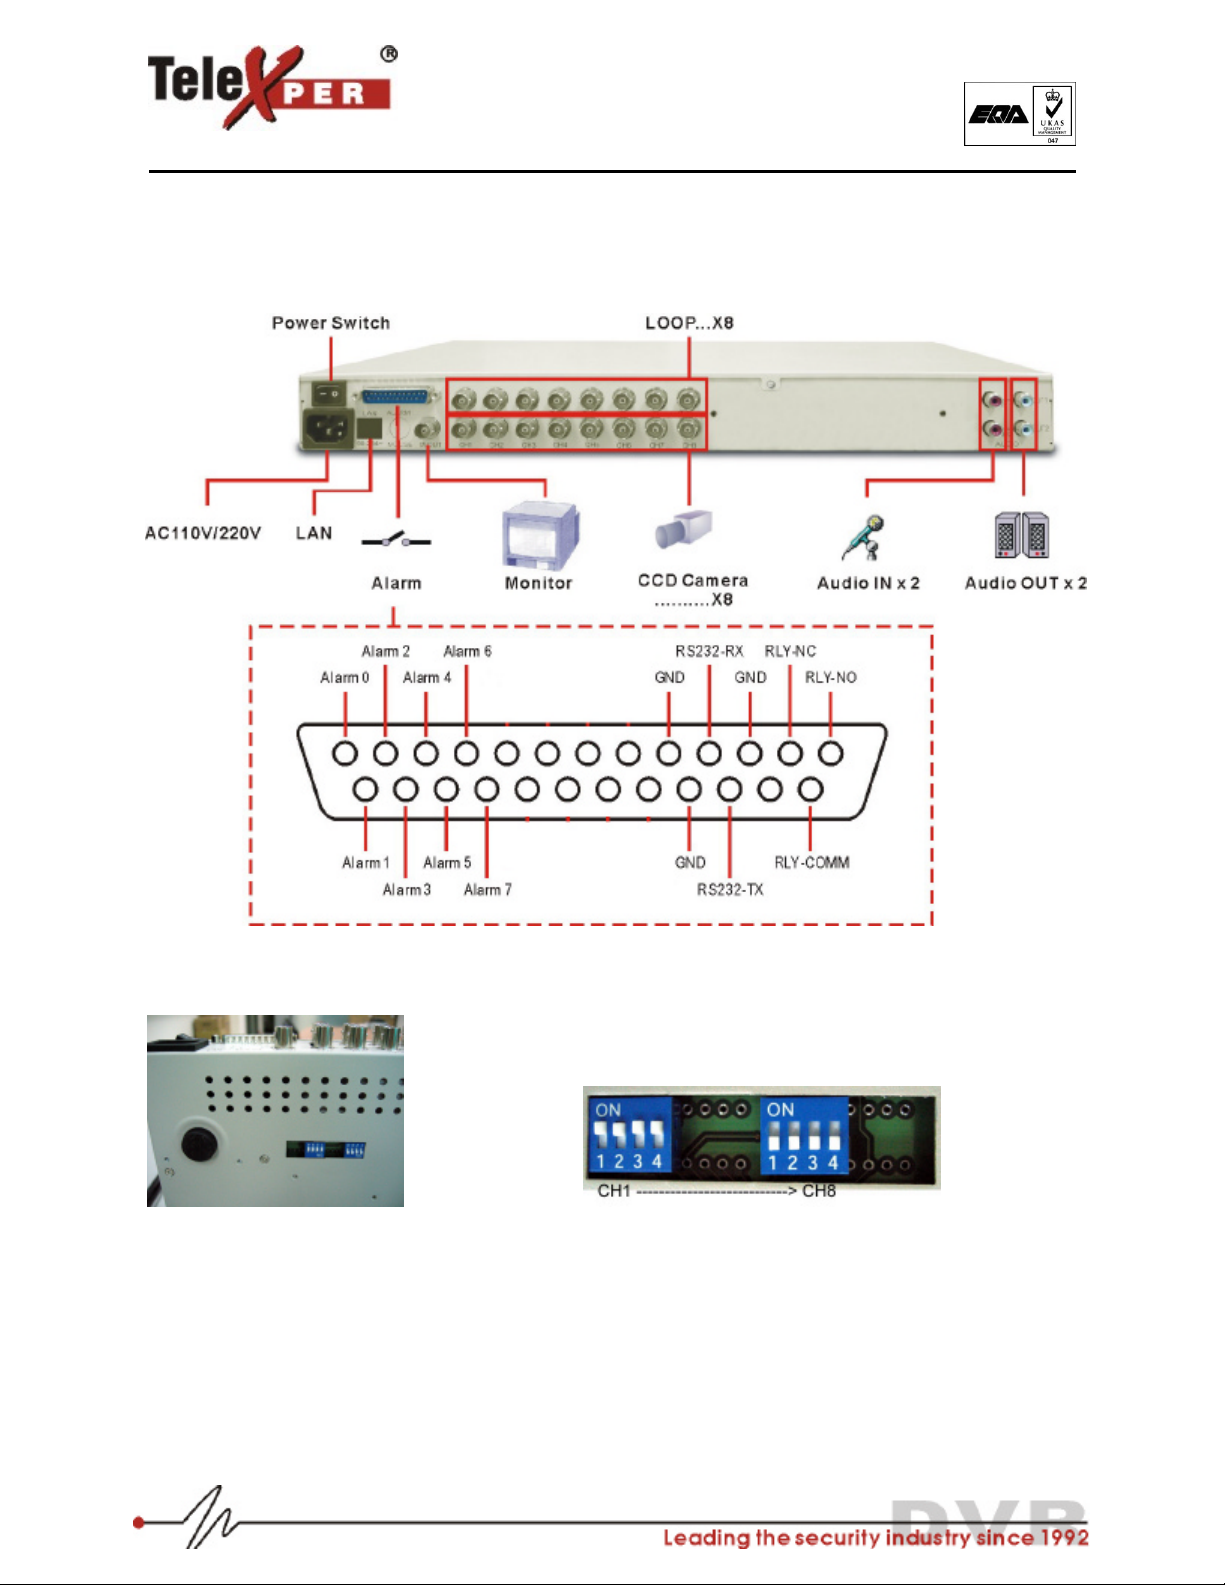
REAR PANEL -8ch DVR (TX168-8 or/ TX168-8N)
75ΩΩ Termination Dip-Switch Setting
You MUST set 75 ohm dip-switch“OFF”; when the LOOP of that camera connecting with 3rd device!
ØConnect nothing->75 ohm termination switch: ON
ØConnect Camera only-> 75 ohm termination switch:ON
ØConnect Camera + Loop (Monitor) -> 75 ohm termination switch: OFF
-PAGE: 6 of 22-
Telexper International Inc.
3F-3, No.2, Chien Pa Rd., Chung Ho City,
Taipei 235, Taiwan, R.O.C.
Tel:886-2-6620-5898 Fax:886-2-6620-
6909
E-
mail:[email protected]
http://www.telexper.comISO 9001:2000
A member of VisionSoft
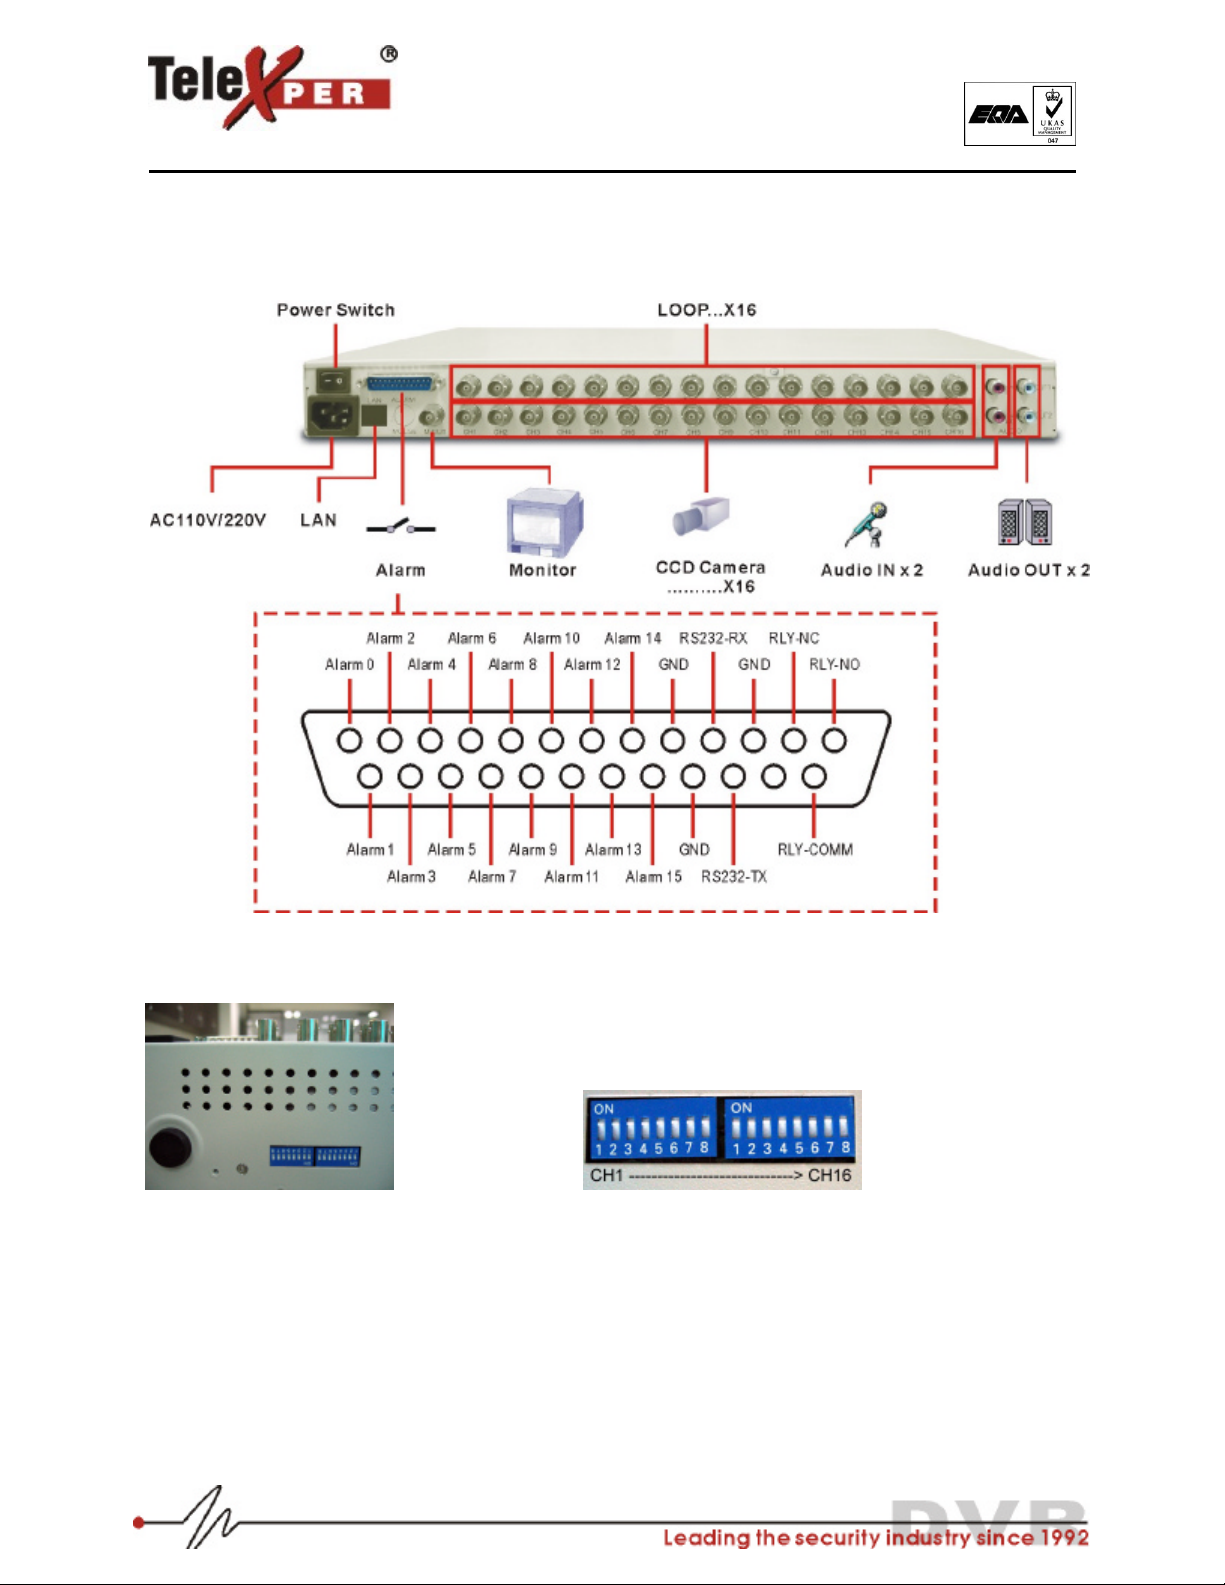
REAR PANEL -16ch DVR (TX168-16 or/ TX168-16N)
75ΩΩ Termination Dip-Switch Setting
You MUST set 75 ohm dip-switch“OFF”; when the LOOP of that camera connecting with 3rd device!
ØConnect nothing->75 ohm termination switch: ON
ØConnect Camera only-> 75 ohm termination switch:ON
ØConnect Camera + Loop (Monitor) -> 75 ohm termination switch: OFF
-PAGE: 7 of 22-
Telexper International Inc.
3F-3, No.2, Chien Pa Rd., Chung Ho City,
Taipei 235, Taiwan, R.O.C.
Tel:886-2-6620-5898 Fax:886-2-6620-
6909
E-
mail:[email protected]
http://www.telexper.comISO 9001:2000
A member of VisionSoft
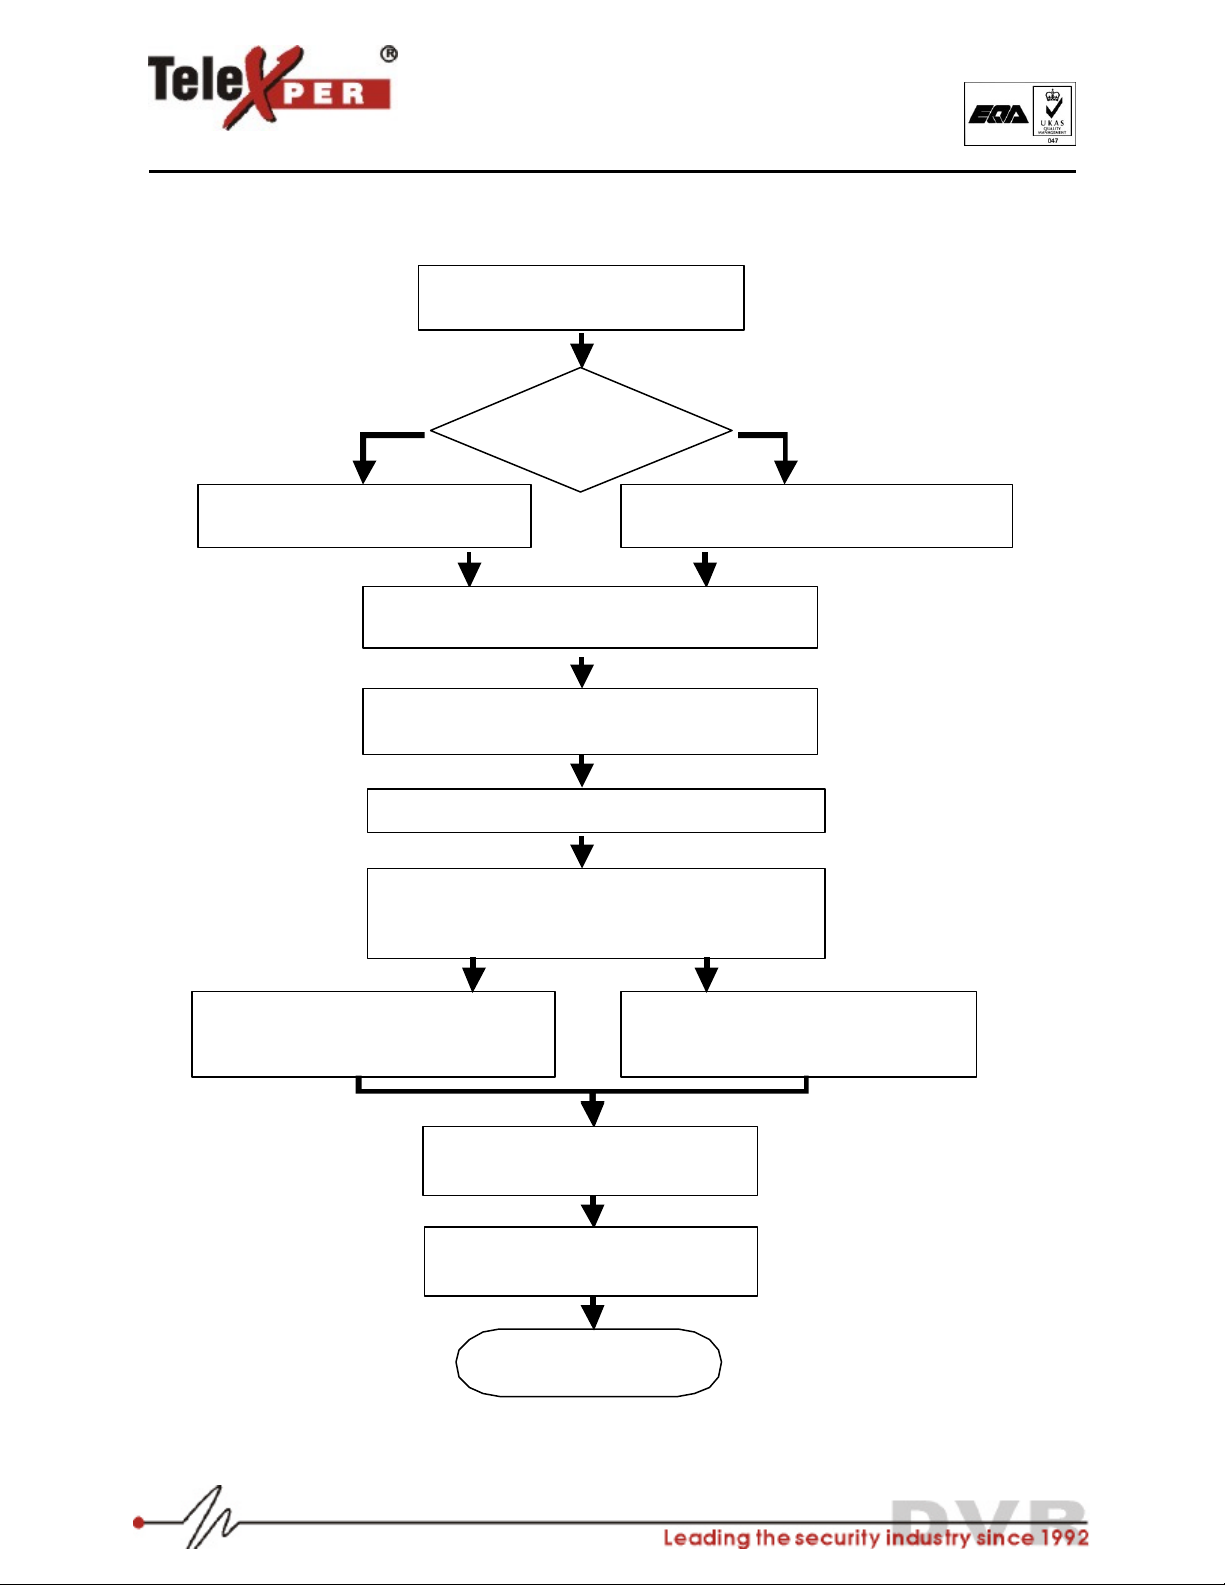
Chapter 3 :Installation & Operation
Prepare a hard disk (HDD),
Maxtor 80/120/160/250GB is recommended
FAT32 Format
recording?
Prepare a FAT32-format HDD
Refer to Chapter 7 -SOP how to make a FAT32 HDD
Install the HDD inside the caddy
Set the 75-ohm dipswitch setting per each channel.
Connect the camera
Connect the power cable to City Power Source
(90~264Vac,50/60Hz);then power on
Message shown as Fig 3.1
FAT32-Format recording.
Take~8min (80GB HDD) tobuild the file template
Message shown as Fig. 3.2
Non-FAT32 recording
Ittakesless than 5 sectionsto scan the hard disk
Message shown as Fig. 3.3
End
DVR is working properly
Message shown as Fig. 3.4
Parameter (OSD) setting
Refer to Chapter 5
Insert caddy into HDD slot; and
lock the HDDprotection key
YESNO
-PAGE: 8 of 22-

Telexper International Inc.
3F-3, No.2, Chien Pa Rd., Chung Ho City,
Taipei 235, Taiwan, R.O.C.
Tel:886-2-6620-5898 Fax:886-2-6620-
6909
E-
mail:[email protected]
http://www.telexper.comISO 9001:2000
A member of VisionSoft
Fig. 3.1 Fig.3.2 Fig.3.3
Fig.3.4
TX168-4 & TX168-4N (4ch DVR) TX168-8 & TX168-8N (8ch DVR)
TX168-16 & TX168-16N (16ch DVR)
WAIT A MOMENT
TELEXPER DVR
COPYRIGHT© TEXEXPER
INTERNATIONAL 1998 –2005
VER 1.12E
1014
INIT IDE !
WAIT A MOMENT
TELEXPER DVR
COPYRIGHT© TEXEXPER
INTERNATIONAL 1998 –2005
VER 1.12E
1014
INIT IDE !
WAIT A MOMENT
TELEXPER DVR
COPYRIGHT© TEXEXPER
INTERNATIONAL 1998 –2005
VER 1.12E
1014
INIT IDE !
2004/01/13 13:58:03
120 REC
Status
˜Rec = Recording
¢
Live = No recording
WR = Formatting hdd
Speed (PPS)
NTSCPAL
120 100
60 50
30 25
16 12
8 8
4 4
Camera Title
Alarm/ V-Loss/ Motion event.
Alarm
Motion (RED color)
Video Loss (WHITE color)
Press the corresponding
flashing button on the front
panel to acknowledge the
event.
-PAGE: 9 of 22-

Telexper International Inc.
3F-3, No.2, Chien Pa Rd., Chung Ho City,
Taipei 235, Taiwan, R.O.C.
Tel:886-2-6620-5898 Fax:886-2-6620-
6909
E-
mail:[email protected]
http://www.telexper.comISO 9001:2000
A member of VisionSoft
Hard Disk Space Check
Press &hold (>2secs) the button “FULL” xbutton; DVR will show the usage indication bar as below.
How to control the Audio output (Audio model ONLY)
Press &hold (>2secs) the button “MENU”uto switch “Mixed/ Audio1/Audio2/Off” audio output
Playback (on unit)
Date/ time Search Playback
Alarm/Motion Search Playback
HDD USAGE 41%
120 PLAY
Playback Status
<Stop
4Play
;Pause
87(hold) (+) / (-) speed
9(hold) Rewind
:(hold) Fast Forward
I3(hold) Previous File
4I (hold) Next file
4ch ONLY
9(push) Previous File
:
(push) Next file
120 PLAY
-PAGE: 10 of 22 -
TIME SEARCH
MM-DD HH:MM:SS
12-08 15:05:04
Enter
Exit
Operation
move the cursor
increase the value
decrease the value
</4start video search
“WAITING for SEARCH now ”
ÚDVR is searching video now
“FILE NOT EXIT”
Ú
No recorded video the time you entered
Alarm Log Page (1~64)
MM-DD-HH-MM-SS-CH-TP
12-18-19 37-02 xx-xx
xx-xx-xx xx-xx xx-xx
xx-xx-xx xx-xx xx-xx
xx-xx-xx xx-xx xx-xx
xx-xx-xx xx-xx xx-xx
Exit
Operation
move the cursor
</4playback

Telexper International Inc.
3F-3, No.2, Chien Pa Rd., Chung Ho City,
Taipei 235, Taiwan, R.O.C.
Tel:886-2-6620-5898 Fax:886-2-6620-
6909
E-
mail:[email protected]
http://www.telexper.comISO 9001:2000
A member of VisionSoft
Take Out the Hard Disk for replacement or/ conducting OFF-LINE PLAYBACK
TX168-4 & TX168-4N: Press &hold (>2secs) the button “</4“ w
TX168-8 & TX168-8N: Press &hold (>2secs) the button “ “12
TX168-16 & TX168-16N: Press &hold (>2secs) the button “ “20
Don’t remove the HDD until “Remove HDD now” message shown. DVR will keep beeping until you having inserted
the hard disk back DVR for recording.
OFF-LINE PLAYBACK (FAT 32-format recording ONLY)
Two options to playback the recorded video off-line (e.g. at home)
1. Via IDE interface
Step 1: Make surethe installed hdd caddy (drawer) is compatible with followings: BT-27, BT-32, BT-42, RH-17,
RH-27,RH-32, RH-42, MR-27 or L-007.
Step 2: Power-off PC before inserting the hard drive with drawer directly into the PC
Step 3: Turn on the PC again;then run the supplied off-line player to playback the recorded files (please refer to
the below figure)
NOTE: If your PC cannot recognize the hdd, please change the hard disk jumper configuration. (Master only)
2. Via USB2.0/IDE converter (optional item, buy it from local distributor; or/ PC peripheral supplier)
Step 1: Plug the USB2.0/IDE converter onto the IDE socket of the mobile drawer properly
Step 2: Make the USB2.0 connection between the converter & the PC
Step 3: power on the USB2.0 converter; then run the off-line player
NOTE: Don’t power on the USB2.0 converter until completing STEP 1; otherwise you may damage thehdd.
Please remain the jumper configuration of hard disk in “Master Mode”.
REMOVE HDD NOW
INSERT HDD NOW
DVR will keep beeping
after hdd being
removed
Internal HDD caddy (Drawer) iscompatible
with one of followings:
BT-27, BT-32, BT-42, RH-17,RH-27,RH-32,
RH-42, MR-27 and L-007
USB2.0 Kit Package
-USB2.0/IDE converter
-USB2.0 cable
-90-240 Vac power adaptor
for USB2.0/IDE converter
-Removable HDD with caddy
-PAGE: 11 of 22 -
Telexper International Inc.
3F-3, No.2, Chien Pa Rd., Chung Ho City,
Taipei 235, Taiwan, R.O.C.
Tel:886-2-6620-5898 Fax:886-2-6620-
6909
E-
mail:[email protected]
http://www.telexper.comISO 9001:2000
A member of VisionSoft
Recommended PC requirement for OFF-LINE viewer software
Your PC should have the following specificationsto use the off-line player software.
üCPU: P3 1.0 GHzor above (preferred P4)
üRAM: 256MB or above
üHard drive space: 100MB or more
üOperating System: Windows Me and Windows 2000 with Microsoft DirectX9.0 or later,
Windows XP with Microsoft DirectX 8.1 or later
IMPORTANT:
For NTSC and PAL the screen resolution should set to 1024x768 pixels or above and the color quality set to 24Bit
or 32Bit for playback on a PC
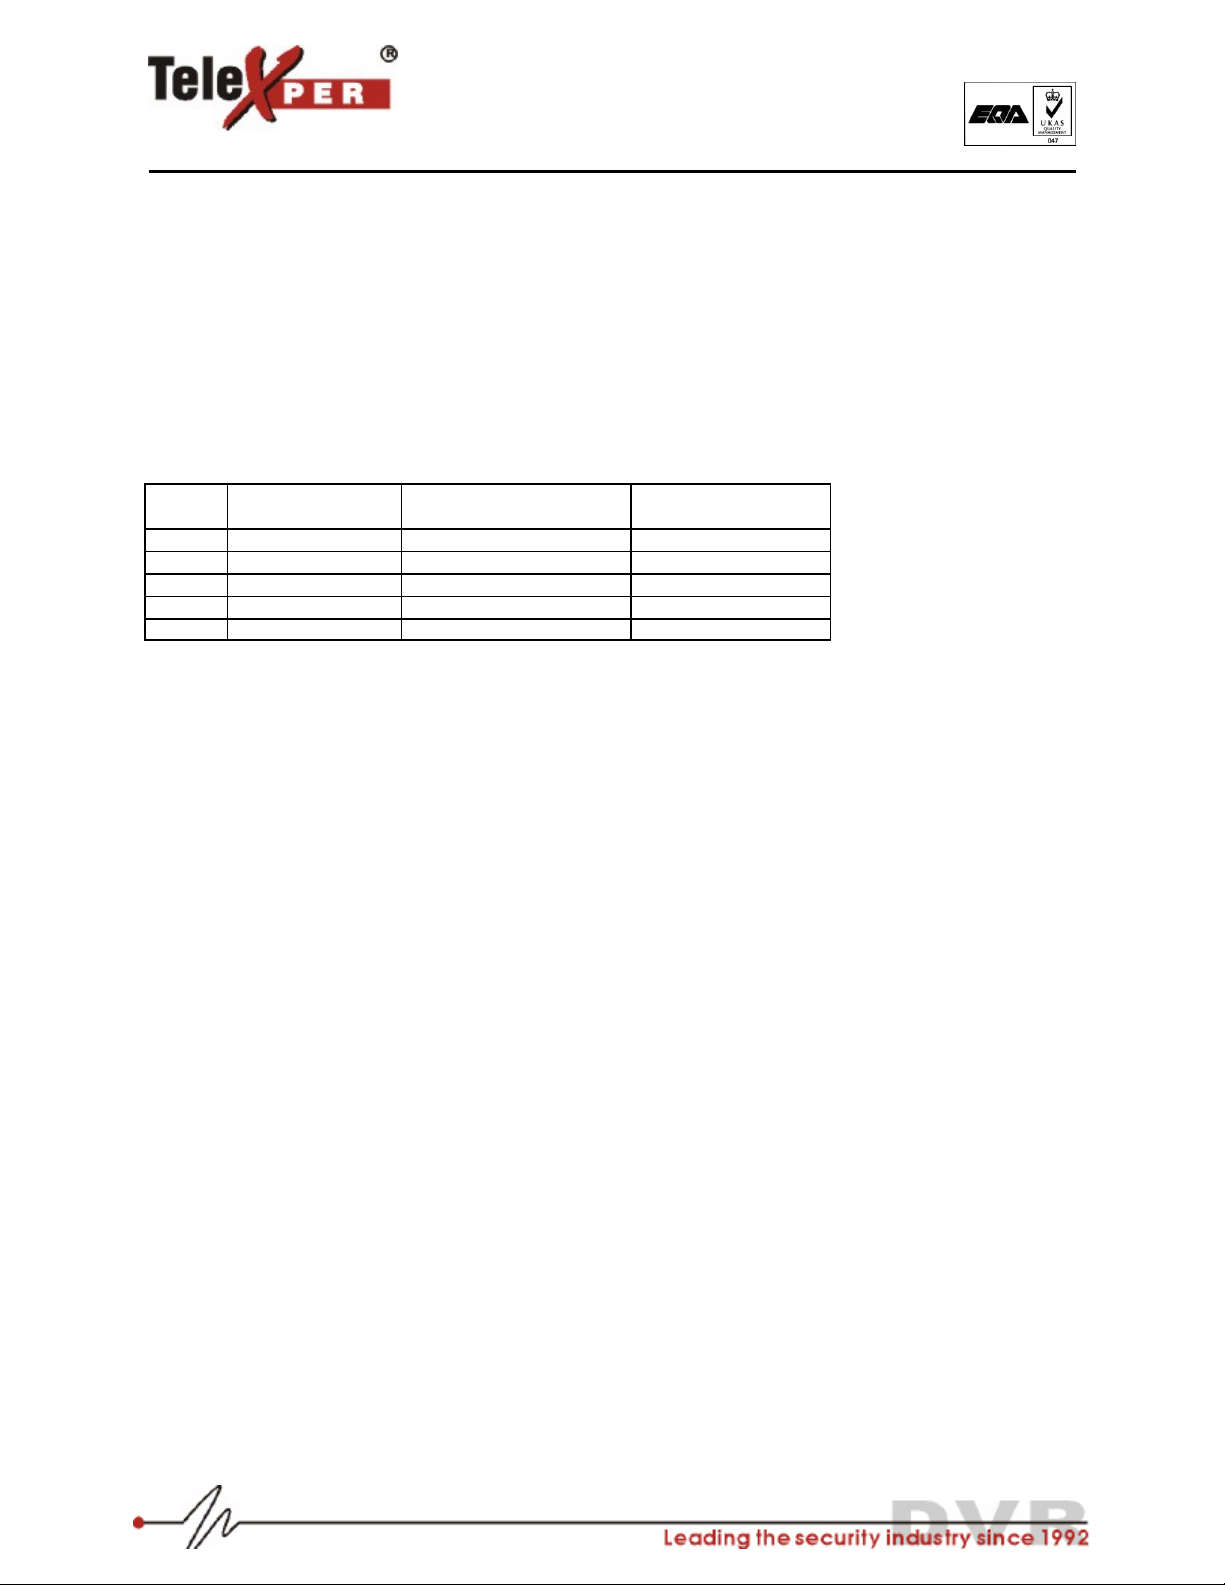
Data Transfer Rate Table of Different Interface Port
Interface Port Data Transfer Rate Recommended
(Yes/ No)
1IDE ATA66 66 MB/s Yes
2IDE ATA 100 100 MB/s Yes
3IDE ATA 133 133 MB/s Yes
4USB 2.0 60 MB/s (480M bps) Yes
5USB 1.1 1.5 MB/s (12Mbps) No
Note: 1 MB/s = 8 Mbps, e.g.
The first time required for the player to read the files structure and image in the hard drive is as follows:
-USB 1.1: takes 5 to 10 minutes
-USB 2.0: takes 30 seconds
-IDE ATA 100: takes 15 seconds
2. It is NOT recommended to use the USB1.1 interface; because of its slow transfer rate. You could upgrade
your PC from USB1.1 to USB2.0 by adding “ID E/USB2.0 card” for desktop; or/ PCMCIA/USB2.0 card for
notebookPC.
-PAGE: 12 of 22 -

Telexper International Inc.
3F-3, No.2, Chien Pa Rd., Chung Ho City,
Taipei 235, Taiwan, R.O.C.
Tel:886-2-6620-5898 Fax:886-2-6620-
6909
E-
mail:[email protected]
http://www.telexper.comISO 9001:2000
A member of VisionSoft
Chapter 4 Install the OFF-LINE viewer software into your PC
1. Insert the supplied manual CD into CD-ROM, it will start automatically and click “playback software” to install.
2. If the CD does not start automatically, please follow the steps below:
2.1 Go to “My computer” double click CD-ROM with label TX-168 .
2.2 Double click software folder.
2.3 Double click NR folder.
2.4 Double click “setup.exe” to start installation.
2.5 Choose thelanguage you like to use.
After setup is completed, a shortcut is created on the desktop.
Run OFF-LINE viewer software (double-click on its icon on the desktop)
1. Click the browse for folder shown:
2. Select the path where the recorded files are located and click on PLAY. (Recorded files should be in hard drive
withlabelTC-400_0001)
3. Click OK.
4. Click a loading dialog box will be shown on screen, and USB message box will be
displayed.
5. Playback screen will be shown after loading is completed.
-PAGE: 13 of 22 -

Telexper International Inc.
3F-3, No.2, Chien Pa Rd., Chung Ho City,
Taipei 235, Taiwan, R.O.C.
Tel:886-2-6620-5898 Fax:886-2-6620-
6909
E-
mail:[email protected]
http://www.telexper.comISO 9001:2000
A member of VisionSoft
üAVI Video output
-“Select Camera No.”will be shown when pressing“AVI”button
-Choose the record time scaleand then press “OK”
-After pressing the “SAVE”button, the files would be transformed to AVI formatautomatically by the
software.
üImages Printing
Before printing an image, a printer must be connected to the back of the unit.
Speed Down
(Down to 1/32x) Rewind
Stop
Date/time
Search
Speed Up
(Up to 16x)
Play
Alarm Log
Printing
AVI
video output
Exit Playback Speed
-PAGE: 14 of 22 -

Telexper International Inc.
3F-3, No.2, Chien Pa Rd., Chung Ho City,
Taipei 235, Taiwan, R.O.C.
Tel:886-2-6620-5898 Fax:886-2-6620-
6909
E-
mail:[email protected]
http://www.telexper.comISO 9001:2000
A member of VisionSoft
üImage Zooming
To zoom an image or picture, select the image you want and click the chosen one. You will then see the
full screen imag. Exit the screen back to PLAY mode and make sure the image zoomed is indicated then
press button. Selected image will be displayed as following:
üAlarm Log
üDate/ time Search Playback
Preview
Screen
Saveas
BMPfile
Print
Out
Exit
Zoom
In
Zoom
Out
Original
size
Default: default value
Optimized: optimization value (auto)
brightness adjustment
contrast adjustment
color adjustment
Log #
StartTime
Alarm Type
EndingTime
Alarm Playback
Exit
Search Time:
The time and date in this section always falls
within the Start Time and End Time parameters.
Enter the time and date that the viewer wishes to
see and press OK button to search.
Start Time:
Start Time shows the s
tarting time of the first
record file on hard disk.
End Time
End Time shows the starting time of the last
record file on hard disk.
-PAGE: 15 of 22 -

Telexper International Inc.
3F-3, No.2, Chien Pa Rd., Chung Ho City,
Taipei 235, Taiwan, R.O.C.
Tel:886-2-6620-5898 Fax:886-2-6620-
6909
E-
mail:[email protected]
http://www.telexper.comISO 9001:2000
A member of VisionSoft
Chapter 5 On Screen Display (OSD), 4ch DVR (TX168-4 or/ TX168-4N)
MAIN MENU
4Password
Channel 1
Channel 2
Channel 3
Channel 4
Date/Time
Display/Record
Others
Alarm Log
Internet
Exit
Password xxxx
New ID xxxx
Confirm New ID xxxx
Password Check OFF
Update New ID
Exit
4Title : xxxxxxxx
Bright. : 50
Contr : 50
Color : 50
Hue : 50
Alarm : Off
V_ Loss : Off
Motion : Off
Default
Exit
Year : xx
Month :xx
Day : xx
Hour : xx
Min : xx
Sec : xx
Update
Exit
Title On/Off: OFF
Quality : Best
REC Mode : 24hrs
Total Rate : 120
HDD Full : Cyclic
Alarm REC : 10
REC Resume : OFF
AUDIO 1 GAIN : OFF
AUDIO 2GAIN : OFF
Exit
REC Time start end
Schedule1: 00:00 23:59
Schedule2: 00:00 23:59
Schedule3: 00:00 23:59
Exit
Buzzer: ON
4Setup REC Schedule
CH1 Motion Setup
CH2 Motion Setup
CH3 Motion Setup
CH4 Motion Setup
Exit
Alarm Log Page (1~64)
MM-DD-HH-MM-SS-CH-TP
12-18-19 -37-02-xxxxx
Xx -xx-xx -xx-xx-xx
Xx -xx-xx -xx-xx-xx
Xx -xx-xx -xx-xx-xx
Exit
0 1 2 3 4 56 7 8 9 : / _ -- .
! A BCD E F G H I J K L M N O
P Q R S T U V W X Y Z a b c d e
fg hIj k l m n o p q r s t u
v w x y z
Exit
Username: telexper
Password:
99999999
IP Address:
192.168.000.100
Getaway:
255.255.255.000
Sub mask
192.168.000.001
Exit
(9999, default)
(ON/ OFF)
Cursor movement
+/-Change value
Enter
Password
4Channel 1
Channel 2
Channel 3
Channel 4
Date/Time
Display/Record
Others
Alarm Log
Internet
Exit
(On/Off)
(Best/Better/Good/Fair/Low)
(24hrs/Schedule/Trigger)
(120 /60/24/16/8/4)
(Cyclic/Stop)
(01 –60 secs)
(On/Off)
(Off/1/2/3/4/5/6/7/8) Level 8 is the loudest volume, option item
(Off/1/2/3/4/5/6/7/8) Level 8 is the loudest volume, option item
Password
Channel 1
Channel 2
Channel 3
Channel 4
4Date/Time
Display/Record
Others
Alarm Log
Internet
Exit
Password
Channel 1
Channel 2
Channel 3
Channel 4
Date/Time
4Display/Record
Others
Alarm Log
Internet
Exit
Password
Channel 1
Channel 2
Channel 3
Channel 4
Date/Time
Display/Record
4Others
Alarm Log
Internet
Exit
Password
Channel 1
Channel 2
Channel 3
Channel 4
Date/Time
Display/Record
Others
4Alarm Log
Internet
Exit
Password
Channel 1
Channel 2
Channel 3
Channel 4
Date/Time
Display/Record
Others
Alarm Log
4Internet
Exit
When
REC Resume
is set to “ ON” in
the playback mode for more than 5
minutes without any action, the system
will exit from playback mode
automatically.
You cannot set the end time past 23:59
for schedule setting.
E.g. 08:00 am-02:00 am
, you have to set
Schedule 1: 08:00-23:59
Schedule 2: 00:00-02:00
Note:
If you set schedule to 00:00 –
00:00; it
will not record.
Motion setup
1. Use +/-
to move the cursor to the beginning (upper left) point of
the wanted detection zone then press for confirmation
2.
Move the cursor to the end (right bottom) point of the zone; then
press again for confirmation.
3. Repeat step 1, step 2 to have unlimited zones
4. Press to complete the motion setup
(“Motion setup OK!” will be shown on the screen)
Default: telexper (lower case)
Default: 99999999 (8 digits)
Network Model ONLY
TX168-4N
-PAGE: 16 of 22 -

Telexper International Inc.
3F-3, No.2, Chien Pa Rd., Chung Ho City,
Taipei 235, Taiwan, R.O.C.
Tel:886-2-6620-5898 Fax:886-2-6620-
6909
E-
mail:[email protected]
http://www.telexper.comISO 9001:2000
A member of VisionSoft
8ch DVR (TX168-8 or/ TX168-8N)
MAIN MENU
4Password
Channel 1-2
Channel 3-4
Channel 5-6
Channel 7-8
Date/Time
Display/Record
Others
Alarm Log
Internet
Exit
Password xxxx
New ID xxxx
Confirm New ID xxxx
Password Check OFF
Update New ID
Exit
4Title : xxxxxxxx
Bright. : 50
Contr : 50
Color : 50
Hue : 50
Alarm : Off
V_ Loss : Off
Motion : Off
Motion Area
Default
Exit
4Channel 1: Camera 1
Channel 2: Camera 2
Exit
Year : xx
Month :xx
Day : xx
Hour : xx
Min : xx
Sec : xx
Update
Exit
Title On/Off: OFF
Quality : Best
REC Mode : 24hrs
REC Resolution : CIF
Total Rate : 120
HDD Full : Cyclic
Alarm REC : 10
REC Resume : OFF
AUDIO 1 GAIN : OFF
AUDIO 2GAIN : OFF
Exit
REC Time start end
Schedule1: 00:00 23:59
Schedule2: 00:00 23:59
Schedule3: 00:00 23:59
Exit
Buzzer: ON
4Setup REC Schedule
Exit
Alarm Log Page (1~64)
MM-DD-HH-MM-SS-CH-TP
12-18-19 -37-02-xxxxx
Xx -xx-xx -xx-xx-xx
Xx -xx-xx -xx-xx-xx
Xx -xx-xx -xx-xx-xx
Exit
0 1 2 3 4 56 7 8 9 : / _ -- .
! A B CD E F G H I J K L M N O
P Q R S T U V W X Y Z a b c d e
fg hIj k l m n o p q r s t u
v w x y z
Exit
(9999, default)
(ON/ OFF)
Cursor movement
+/-Change value
Enter
Password
4Channel 1-2
Channel 3-4
Channel 5-6
Channel 7-8
Date/Time
Display/Record
Others
Alarm Log
Internet
Exit
(On/Off)
(Best/Better/Good/Fair/Low)
(24hrs/Schedule/Trigger)
(Half-D1/ CIF )
(120 /60/24/16/8/4)
(Cyclic/Stop)
(01 –60 secs)
(On/Off)
(Off/1/2/3/4/5/6/7/8) Level 8 is the loudest volume
(Off/1/2/3/4/5/6/7/8) Level 8 is the loudest volume
Password
Channel 1-2
Channel 3-4
Channel 5-6
Channel 7-8
4Date/Time
Display/Record
Others
Alarm Log
Internet
Exit
Password
Channel 1-2
Channel 3-4
Channel 5-6
Channel 7-8
Date/Time
4Display/Record
Others
Alarm Log
Internet
Exit
Password
Channel 1-2
Channel 3-4
Channel 5-6
Channel 7-8
Date/Time
Display/Record
4Others
Alarm Log
Internet
Exit
Password
Channel 1-2
Channel 3-4
Channel 5-6
Channel 7-8
Date/Time
Display/Record
Others
4Alarm Log
Internet
Exit
Password
Channel 1-2
Channel 3-4
Channel 5-6
Channel 7-8
Date/Time
Display/Record
Others
Alarm Log
4Internet
Exit
When
REC Resume
is set to “ ON” in
the playback mode for more than 5
minutes without any action, the system
will exit from playback mode
automatically.
You cannot set the end time past 23:59
for schedule setting.
E.g. 08:00 am-02:00 am
, you have to set
Schedule 1: 08:00-23:59
Schedule 2: 00:00-02:00
Note:
If you set schedule to 00:00 –
00:00; it
will not record.
Motion setup
1. Use +/-
to move the cursor to the beginning (upper left) point of
the wanted detection zone then press for confirmation
2. Move the cursor to the en
d (right bottom) point of the zone; then
press again for confirmation.
3. Repeat step 1, step 2 to have unlimited zones
4. Press to complete the motion setup
(“Motion setup OK!” will be shown on the screen)
Username: telexper
Password:
99999999
IPAddress:
192.168.000.100
Getaway:
255.255.255.000
Sub mask
192.168.000.001
Exit
Default: telexper (lower case)
Default: 99999999 (8 digits)
Network Model ONLY
TX168-8N
-PAGE: 17 of 22 -
Other manuals for tx168 series
1
Table of contents
Other Telexper DVR manuals


