Telexper tx168 series User manual

Telexper International Inc.
3F-3, No.2, Chien Pa Rd., Chung Ho City,
Taipei 235, Taiwan, R.O.C.
Tel: 886-2-6620-5898 Fax: 886-2-6620-6909
E-mail: sales@telexper.com
http://www.telexper.com ISO 9001:2000
A member of VisionSoft
TX168 Series
4ch/ 8ch/ 16ch
Embedded DVR
User Manual
Telexper Incorporated © 1992-2005

Telexper International Inc.
3F-3, No.2, Chien Pa Rd., Chung Ho City,
Taipei 235, Taiwan, R.O.C.
Tel: 886-2-6620-5898 Fax: 886-2-6620-6909
E-mail: sales@telexper.com
http://www.telexper.com ISO 9001:2000
A member of VisionSoft
Copyright Notice
Information in this document is subject to change without notice. Telexper
Incorporated may make improvements or changes in this manual and in the Digital
Recorder at any time. The software, which includes the information contained
described in this document is furnished under a license agreement and may be used
or copied only in accordance with the terms of the agreement. It is against the law to
copy the software except as specifically allowed in the license agreement. No part of
this manual may be reproduced or transmitted in any form or by any means,
including photocopying and recording, for any purpose without prior written
permission of Telexper Incorporated.
© Telexper Incorporated 1992-2005
This device complies with Part 15 FCC Rules. Operation is subject to the following two
conditions:
(1) This device may not cause harmful interference.
(2) This device must accept any interference received including interference that may cause
undesired operation.
Telexper Inc. © 1992-2005

Telexper International Inc.
3F-3, No.2, Chien Pa Rd., Chung Ho City,
Taipei 235, Taiwan, R.O.C.
Tel: 886-2-6620-5898 Fax: 886-2-6620-6909
E-mail: sales@telexper.com
http://www.telexper.com ISO 9001:2000
A member of VisionSoft
Contents
CHAPTER 1 INTRODUCTION.....................................................................................................................................1
CHAPTER 2 HARDWARE INTRODUCTION ..............................................................................................................2
KEYPAD SERIES..........................................................................................................................................................2
FRONT PANEL ....................................................................................................................................................2
Buttons Descriptions.........................................................................................................................................................3
REAR PANEL.......................................................................................................................................................4
75ΩTermination Dip-Switch Setting.................................................................................................................................5
MOUSE SERIES...........................................................................................................................................................6
FRONT PANEL ....................................................................................................................................................6
REAR PANEL.......................................................................................................................................................6
Mouse...............................................................................................................................................................................8
75ΩTermination Dip-Switch Setting.................................................................................................................................8
CHAPTER 3 INSTALLATION AND SETUP.................................................................................................................9
INSTALLATION FLOW CHART ........................................................................................................................................9
HARD DISK SPACE CHECK.............................................................................................................................12
TAKE OUT HARD DISK FOR REPLACEMENT................................................................................................12
ON SCREEN DISPLAY (OSD) SETUP........................................................................................................................13
4ch DVR...........................................................................................................................................................13
8ch DVR.............................................................................................................................................................14
16ch DVR...........................................................................................................................................................15
CHAPTER 4 GENERAL OPERATIONS....................................................................................................................16
MOTION AREA SETUP................................................................................................................................................16
REC SCHEDULE SETUP............................................................................................................................................16
AUDIO VOLUME (AUDIO MODEL ONLY) ......................................................................................................................16
CONFIRM ALARM BUZZER..........................................................................................................................................16
SWITCH CHANNEL IN FULL SCREEN DISPLAY UNDER REC MODE................................................................................17
SWITCH CHANNEL IN SUPPORTING SCREEN DISPLAY UNDER REC MODE (8CH KEYPAD SERIES ONLY) ........................17
PLAYBACK ................................................................................................................................................................17
DATE/TIME SEARCH PLAYBACK.................................................................................................................................18
ALARM/MOTION SEARCH PLAYBACK ..........................................................................................................................19
SWITCH CHANNEL IN FULL SCREEN DISPLAY UNDER PLAYBACK MODE........................................................................19
DEFAULT DVR SETTINGS ..........................................................................................................................................19

Telexper International Inc.
3F-3, No.2, Chien Pa Rd., Chung Ho City,
Taipei 235, Taiwan, R.O.C.
Tel: 886-2-6620-5898 Fax: 886-2-6620-6909
E-mail: sales@telexper.com
http://www.telexper.com ISO 9001:2000
A member of VisionSoft
CHAPTER 5 OFF-LINE VIEWER SOFTWARE.........................................................................................................20
OFF-LINE PLAYBACK (FAT32-FORMAT RECORDING ONLY).......................................................................................20
RECOMMENDED PC REQUIREMENT FOR OFF-LINE VIEWER SOFTWARE ......................................................................21
Data Transfer Rate Table of Different Interface Port..........................................................................................21
INSTALL THE OFF-LINE VIEWER SOFTWARE INTO YOUR PC ........................................................................................22
AVI Video output ................................................................................................................................................23
Images Printing..................................................................................................................................................23
Image Zooming..................................................................................................................................................24
Alarm Log...........................................................................................................................................................24
Date/ time Search Playback...............................................................................................................................24
CHAPTER 6 REMOTE VIEWER SOFTWARE..........................................................................................................25
INSTALL REMOTE VIEWER SOFTWARE INTO YOUR PC.................................................................................................25
RUN REMOTE VIEWER SOFTWARE.............................................................................................................................25
Setup..................................................................................................................................................................25
Connect..............................................................................................................................................................26
Playback Mode...................................................................................................................................................26
History................................................................................................................................................................27
CHAPTER 7 FAQ.......................................................................................................................................................28
CHAPTER 8 OTHERS ...............................................................................................................................................29
SOP:HOW TO MAKE A FAT32 FORMAT HARD DRIVE ...................................................................................................29

1
Telexper International Inc.
3F-3, No.2, Chien Pa Rd., Chung Ho City,
Taipei 235, Taiwan, R.O.C.
Tel: 886-2-6620-5898 Fax: 886-2-6620-6909
E-mail: sales@telexper.com
http://www.telexper.com ISO 9001:2000
A member of VisionSoft
Chapter 1 Introduction
Model
Keypad Series: (gray color)
TX168-4 : 4ch
TX168-4A : 4ch, with audio
TX168-4N : 4ch, with audio, LAN
TX168-8 : 8ch, with audio TX168-16 : 16ch, with audio
TX168-8N : 8ch, with audio, LAN TX168-16N : 16ch, with audio, LAN
Mouse Series: (black color)
TX168-4M :4ch
TX168-4MA :4ch, with audio
TX168-4MAU :4ch, with audio, USB
TX168-4MUN :4ch, with audio, USB, LAN
TX168-8M :8ch
TX168-8MA :8ch, with audio
TX168-8MAU :8ch, with audio, USB
TX168-8MN :8ch, with audio, LAN
TX168-8MUN :8ch, with audio, USB, LAN
TX168-16M :16ch
TX168-16MA :16ch, with audio
TX168-16MAU :16ch, with audio, USB
TX168-16MN :16ch, with audio, LAN
TX168-16MUN :16ch, with audio, USB, LAN
Optional Items
USB2.0 Kit Package
Additional hard disk caddy (drawer)
Major Features
Reliable Embedded System Design
Real-time Clock
Proprietary Wavelet Format (DVD Quality)
“Duplex” (LIVE, Recording)
“Triplex” (LIVE, Recording, Remote Viewing) – LAN model ONLY
Alarm Input & Control Output
Real-time Display (4ch:120pps; 8ch:240pps; 16ch:480pps)
120 pps Recording Speed (max)
720x480 pixels Resolution
Motion Detection (up to 4 zones; 8-level sensitivity adjustment per camera)
512 Event Log
Hard Drive Full Alarm
Password Protection Security
USB2.0 (Built-in Port or/ USB Kit) + Off-line proprietary Player software (Optional)
Connect to any PC via USB2.0
Ease of video search & playback
AVI export to CD, Hard Drive, Memory Sticker …
Remote Viewer supplied (LAN model ONLY)
IPAddressable, LAN/WAN/ Internet (static IP)
Multi-channel (1/4/9/16ch) Live View Simultaneously
Remote Playback (date/time search)
Remote Alarm Event Call-back
Viewer software CD included
Swappable Hard Drive with FAT32 file system
Back to Contents
2
Telexper International Inc.
3F-3, No.2, Chien Pa Rd., Chung Ho City,
Taipei 235, Taiwan, R.O.C.
Tel: 886-2-6620-5898 Fax: 886-2-6620-6909
E-mail: sales@telexper.com
http://www.telexper.com ISO 9001:2000
A member of VisionSoft
Chapter 2 Hardware Introduction
KEYPAD SERIES
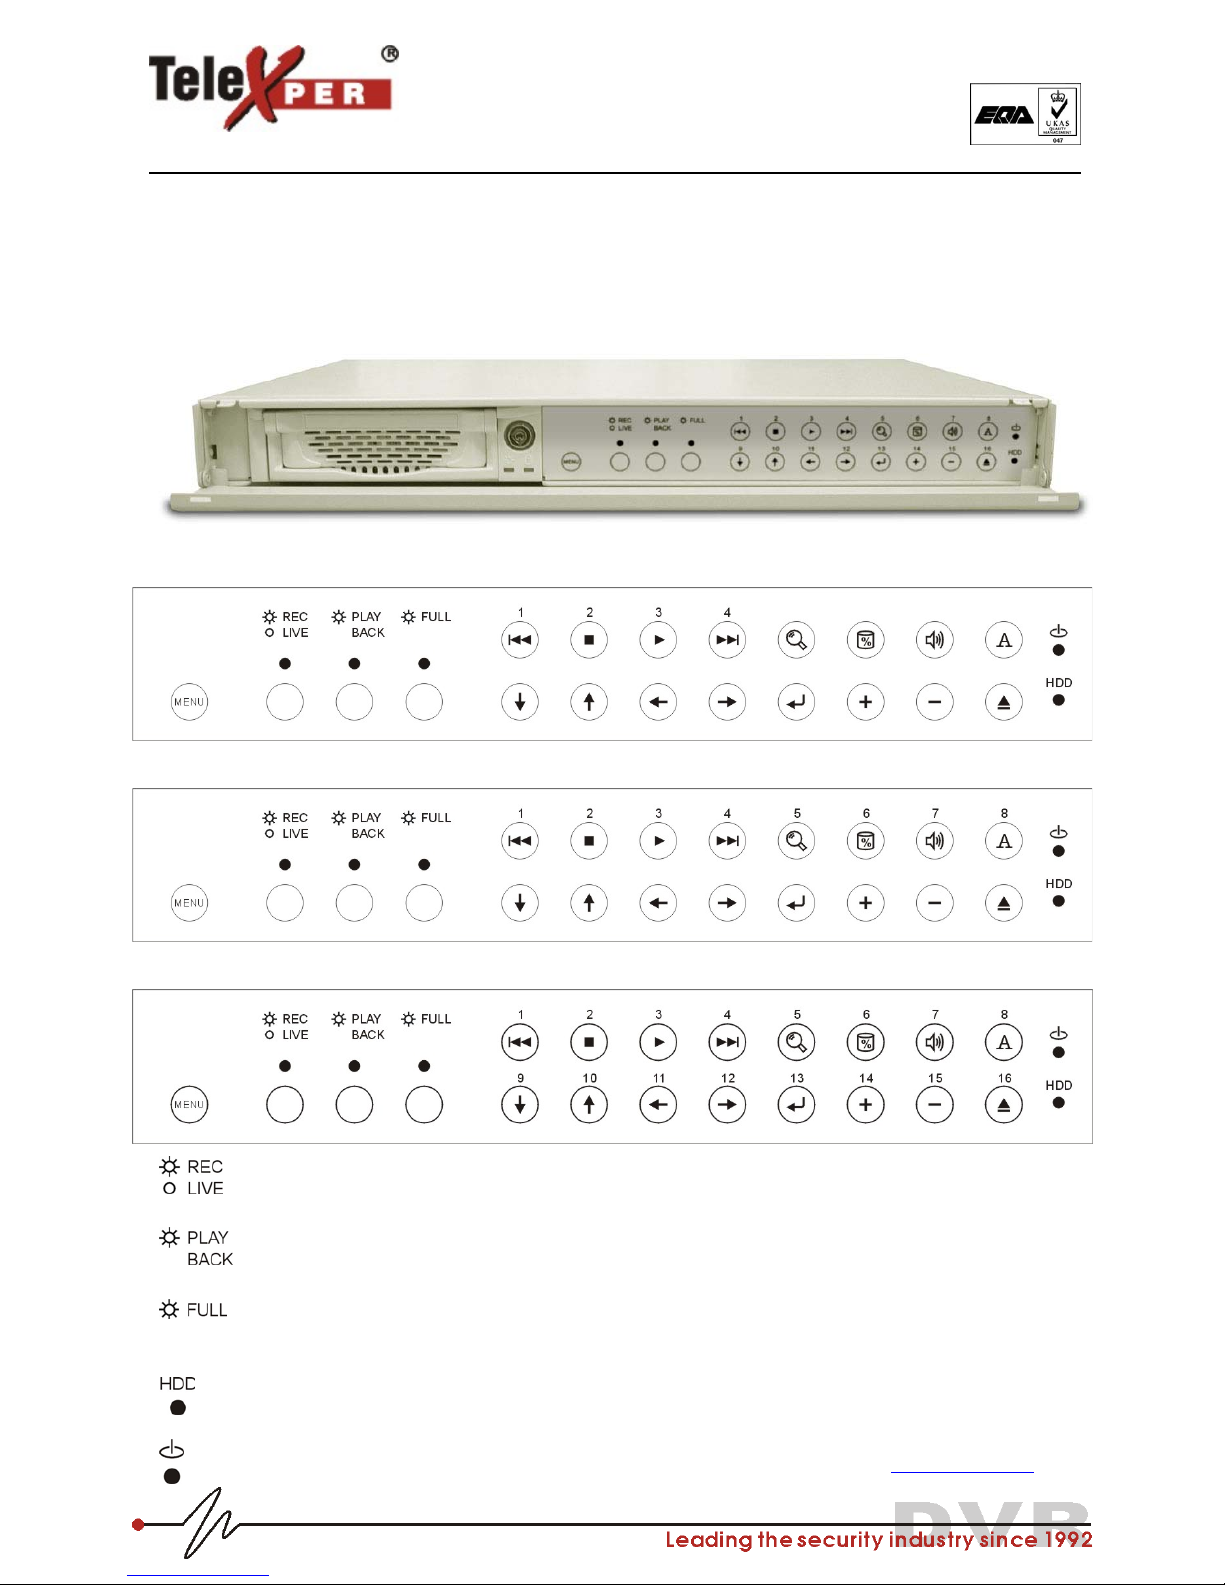
FRONT PANEL
4ch DVR
8ch DVR
16ch DVR
“REC” button and LED
Recording mode On = RED
/”Playback” button and LED
Start/pause playback. Start = RED
“FULL” button and LED
Enable full-screen display. ON = RED
Switch channel by pressing buttons with the corresponding channel numbers
“HDD” LED (Hard disk reading/writing LED = RED)
“POWER” LED (LED = GREEN).Back to Contents

3
Telexper International Inc.
3F-3, No.2, Chien Pa Rd., Chung Ho City,
Taipei 235, Taiwan, R.O.C.
Tel: 886-2-6620-5898 Fax: 886-2-6620-6909
E-mail: sales@telexper.com
http://www.telexper.com ISO 9001:2000
A member of VisionSoft
Buttons Descriptions
REC MODE
On Screen Display (OSD) Setup
(push).
4ch 1~4 / 8ch 1~8 /
16ch 1~16
When alarm buzzer active, push CH
button to confirm.
ON = RED (push) Switch channel
by pressing “CH1” to “CH16”
button
Hard disk usage indicator
PLAY BACK MODE
Start/pause playback. Start =
RED (push)
Enable/Disable the display letter on
screen.
ON = RED (push > 2sec) Switch
channel by pressing “CH1” to
“CH16” button.
Channel of audio
(Mixed/ Audio1/Audio2/Off)
Decrease (-) playback speed
(hold) Increase (+) playback speed (hold)
Rewind (hold)
FF (hold)
Time Search in play back mode
Active the time search function in
Playback mode
Change setting of day and time
Others
Remove HARD DRIVE (hold
more than 5 sec) And Default setting:
Press both buttons until the power is
turned on again
Enter
Back to Contents

4
Telexper International Inc.
3F-3, No.2, Chien Pa Rd., Chung Ho City,
Taipei 235, Taiwan, R.O.C.
Tel: 886-2-6620-5898 Fax: 886-2-6620-6909
E-mail: sales@telexper.com
http://www.telexper.com ISO 9001:2000
A member of VisionSoft
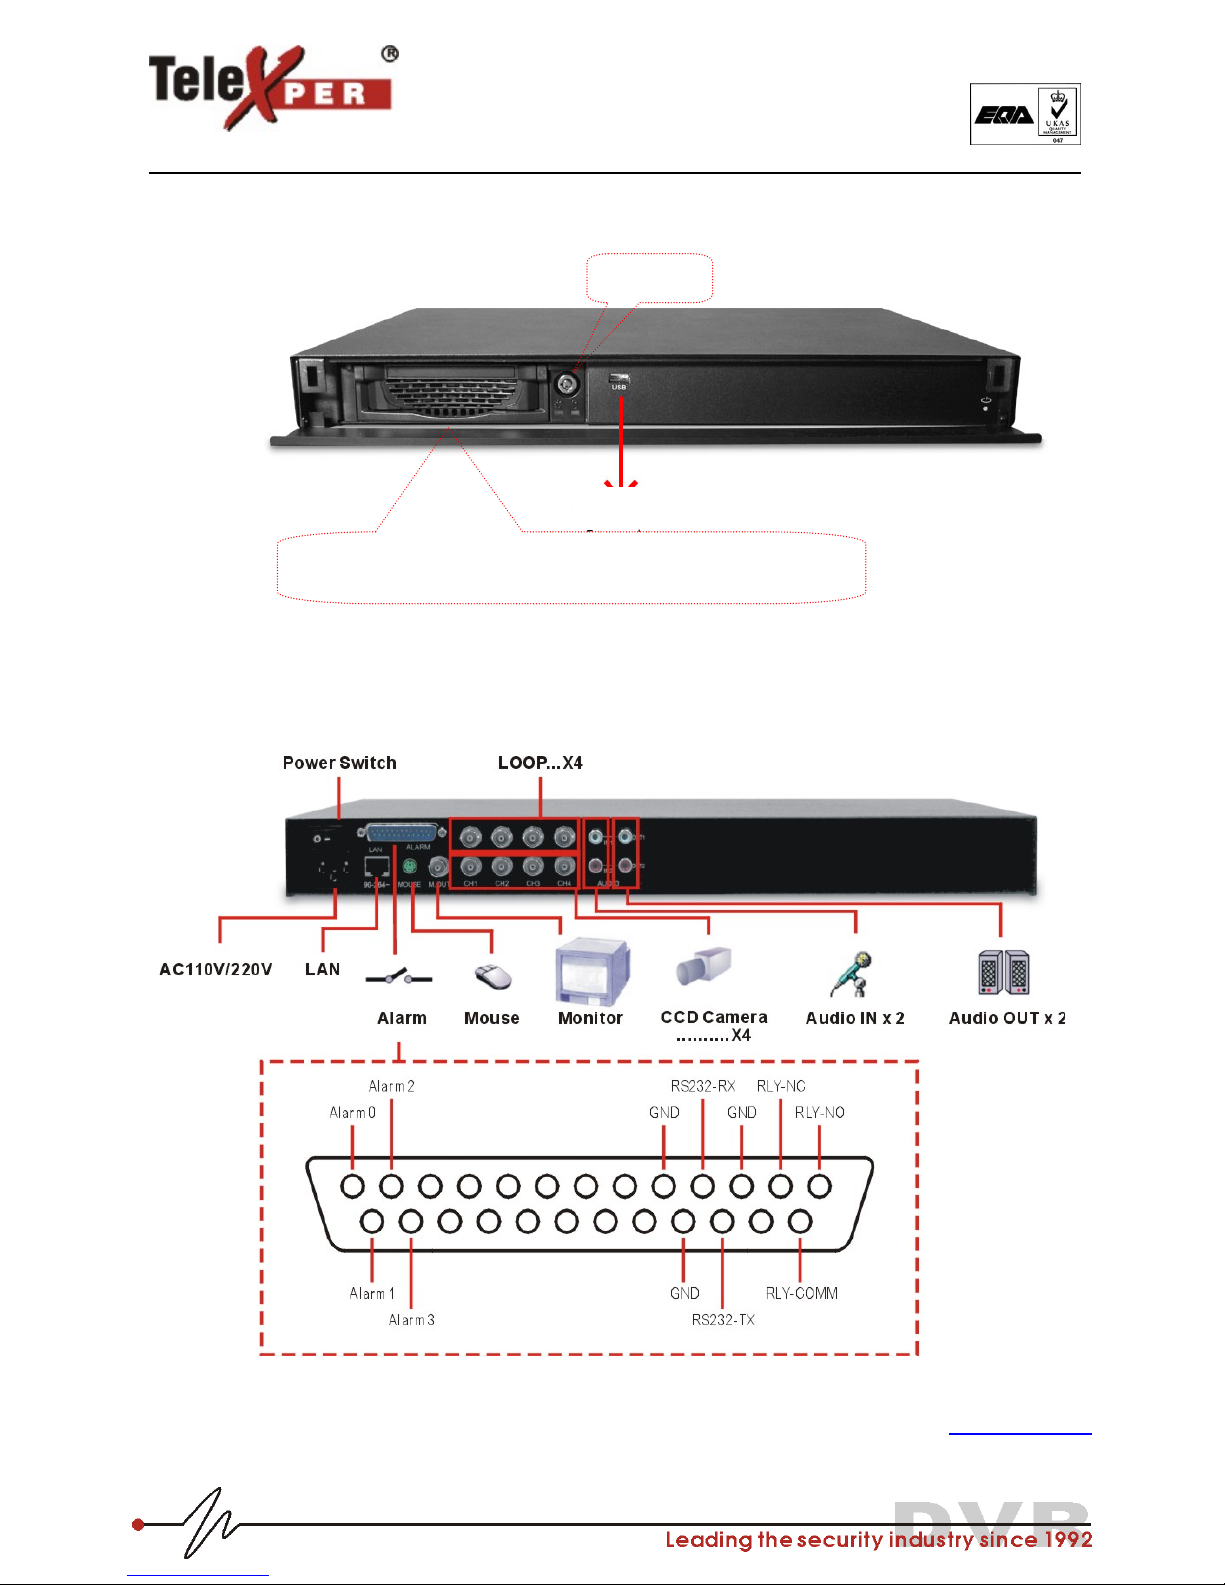
REAR PANEL
4ch DVR
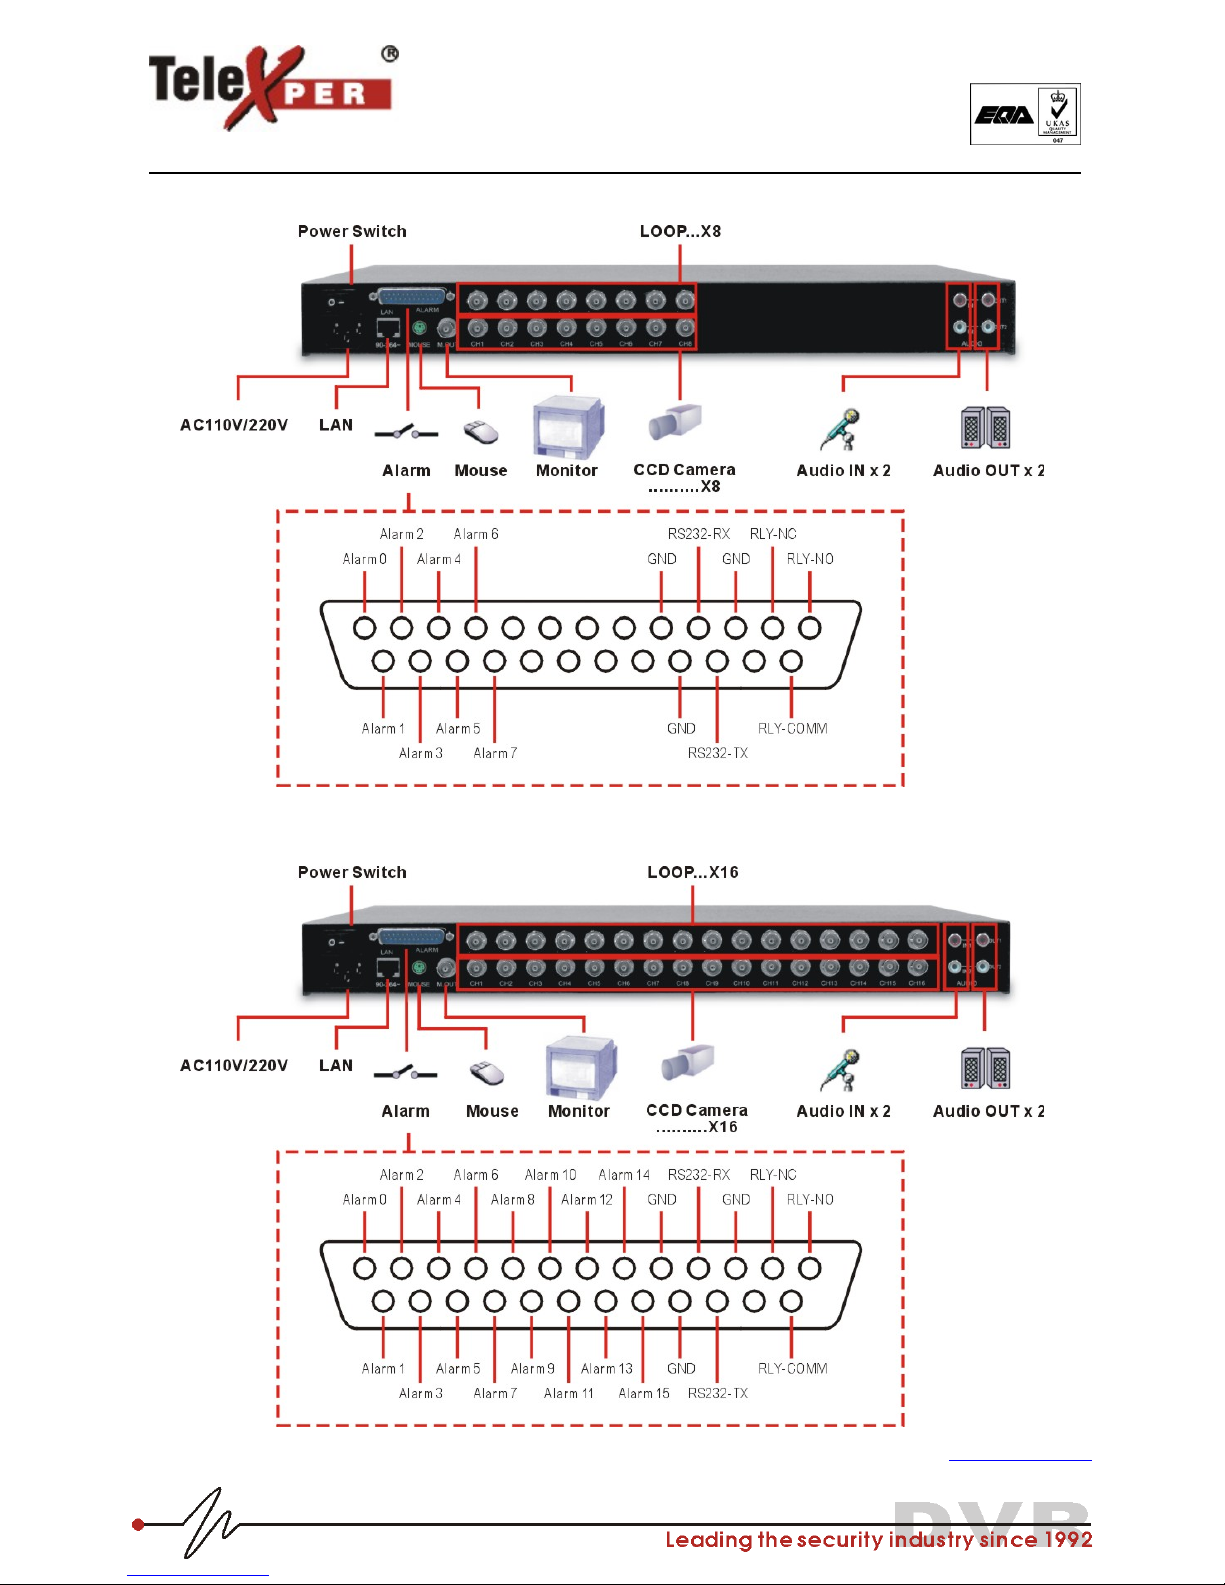
8ch DVR

5
Telexper International Inc.
3F-3, No.2, Chien Pa Rd., Chung Ho City,
Taipei 235, Taiwan, R.O.C.
Tel: 886-2-6620-5898 Fax: 886-2-6620-6909
E-mail: sales@telexper.com
http://www.telexper.com ISO 9001:2000
A member of VisionSoft
16ch DVR
75ΩTermination Dip-Switch Setting
You MUST set 75 ohm dipswitch “OFF” when the LOOP of the camera is connecting to a 3rd device!
Connect to nothing -> 75 ohm termination switch: ON
Connect to camera only-> 75 ohm termination switch: ON
Connect to camera + Loop (Monitor) -> 75 ohm termination switch: OFF Back to Contents
6
Telexper International Inc.
3F-3, No.2, Chien Pa Rd., Chung Ho City,
Taipei 235, Taiwan, R.O.C.
Tel: 886-2-6620-5898 Fax: 886-2-6620-6909
E-mail: sales@telexper.com
http://www.telexper.com ISO 9001:2000
A member of VisionSoft
MOUSE SERIES
FRONT PANEL
REAR PANEL
4ch DVR
Back to Contents
(For LAN feature only)
feature only)
Fd
Key Lock
Removable hard drive caddy (drawer)
HDD caddy should be one of following type
B
T
-27, B
T
-32, B
T
-42, RH-17, RH-27, RH-32, RH-42, MR-27 o
r
L-007
7
Telexper International Inc.
3F-3, No.2, Chien Pa Rd., Chung Ho City,
Taipei 235, Taiwan, R.O.C.
Tel: 886-2-6620-5898 Fax: 886-2-6620-6909
E-mail: sales@telexper.com
http://www.telexper.com ISO 9001:2000
A member of VisionSoft
8ch DVR
16ch DVR
Back to Contents
(For LAN feature only)
(For LAN feature only)

8
Telexper International Inc.
3F-3, No.2, Chien Pa Rd., Chung Ho City,
Taipei 235, Taiwan, R.O.C.
Tel: 886-2-6620-5898 Fax: 886-2-6620-6909
E-mail: sales@telexper.com
http://www.telexper.com ISO 9001:2000
A member of VisionSoft
Mouse
Left Button: -Increase value
-Enable/Disable full screen display
-Hide REC and Playback Mode Control Bar
-Default DVR Setting (Hold it while powering on DVR)
Right Button: Decrease value
Press both Left and Right Button: Open REC and Playback Mode Control Bar
75ΩTermination Dip-Switch Setting
4ch DVR
8ch DVR
16ch DVR
You MUST set 75 ohm dipswitch “OFF” when the LOOP of the camera is connecting to a 3rd device!
Connect to nothing -> 75 ohm termination switch: ON
Connect to camera only-> 75 ohm termination switch: ON
Connect to camera + Loop (Monitor) -> 75 ohm termination switch: OFF Back to Contents

9
Telexper International Inc.
3F-3, No.2, Chien Pa Rd., Chung Ho City,
Taipei 235, Taiwan, R.O.C.
Tel: 886-2-6620-5898 Fax: 886-2-6620-6909
E-mail: sales@telexper.com
http://www.telexper.com ISO 9001:2000
A member of VisionSoft
Chapter 3 Installation and Setup
INSTALLATION FLOW CHART
Prepare a hard disk (HDD),
Maxtor 80/120/160/250GB is recommended
FAT32 Format
recording?
Prepare a FAT32-format HDD
Refer to Chapter8 - SOP how to make a FAT32 HDD
Install the HDD inside the caddy
Set the 75-ohm dipswitch setting for each channel.
Connect cameras to DVR
Connect the power cable to City Power Source
(90~264Vac, 50/60Hz); then power on
(Message shown as Fig 3.1 on the next page)
Hard disk scanning
FAT32-Format recording: Takes around 8 min (80GB HDD) to build the file template (Message shown as Fig. 3.1)
Non-FAT32 recording: Takes less than 5 seconds to build the file template (Message shown as Fig. 3.2)
End
DVR is working properly
Keypad Series: Message shown as Fig. 3.3
Mouse Series: Message shown as Fig 3.4
Parameter (OSD) setting
Insert caddy into HDD slot and lock the HDD
protection key
YESNO
10
Telexper International Inc.
3F-3, No.2, Chien Pa Rd., Chung Ho City,
Taipei 235, Taiwan, R.O.C.
Tel: 886-2-6620-5898 Fax: 886-2-6620-6909
E-mail: sales@telexper.com
http://www.telexper.com ISO 9001:2000
A member of VisionSoft
Fig. 3.1 Fig. 3.2
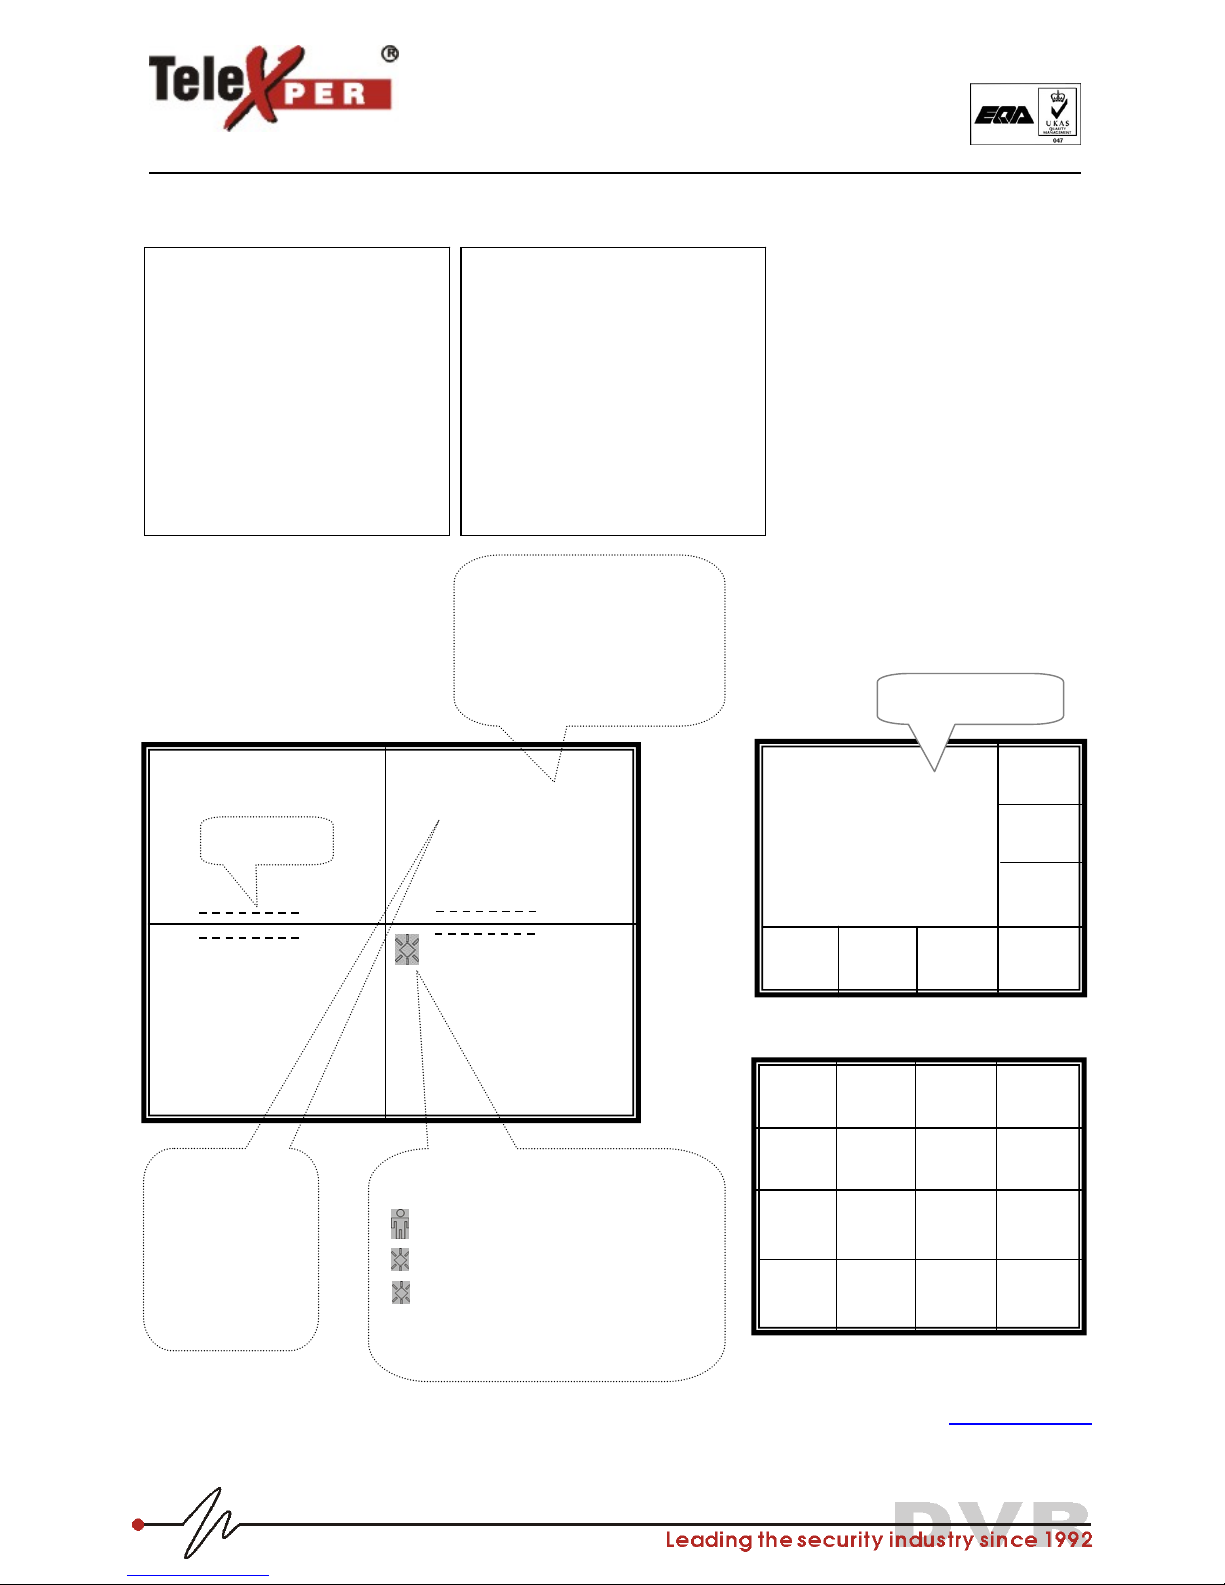
Fig. 3.3 (Keypad Series)
4ch DVR 8ch DVR
16ch DVR
Back to Contents
WAIT A MOMENT
TELEXPER DVR
COPYRIGHT© TELEXPER
INTERNATIONAL 1998 – 2005
VER 1.12E
1014
INIT IDE !
WAIT A MOMENT
TELEXPER DVR
COPYRIGHT© TELEXPER
INTERNATIONAL 1998 – 2005
VER 1.12E
1014
NON FAT 32
INIT IDE !
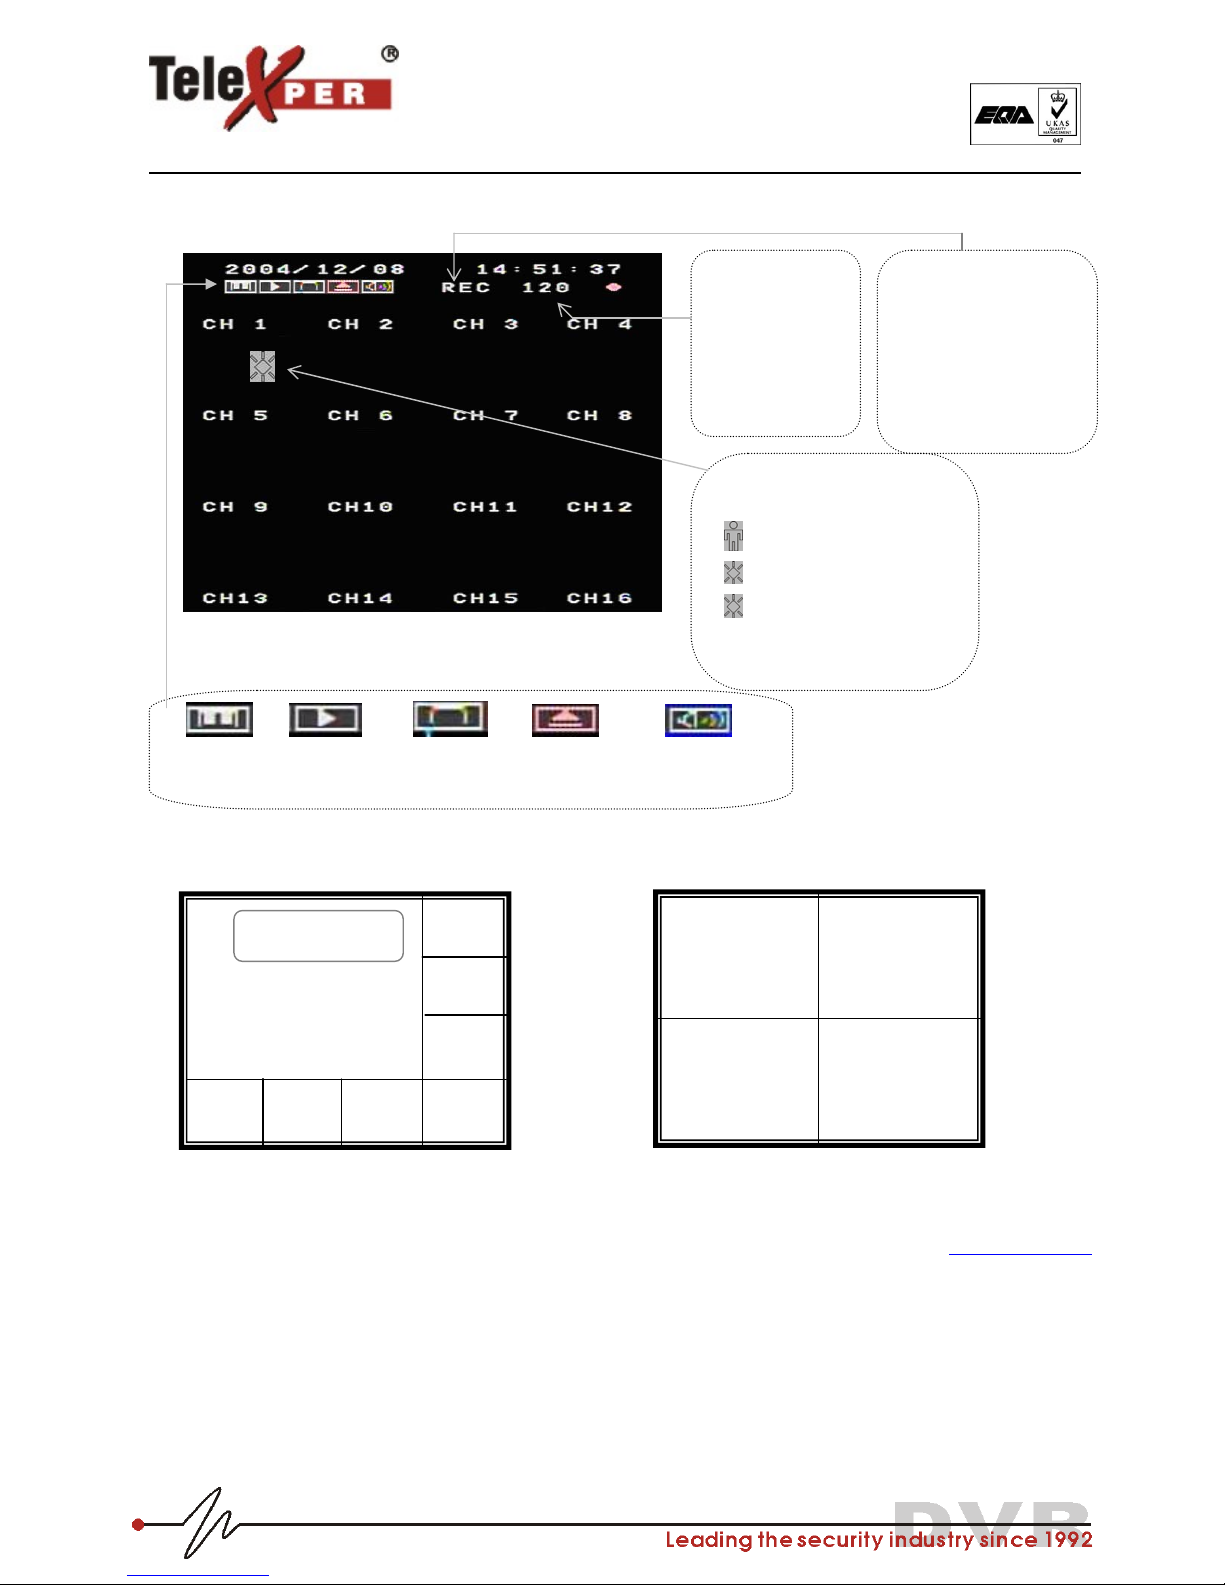
2004/01/13 13:58:03
120 REC
Status
zREC = Recording
Live = No recording
Audio Status: (Audio Feature Only)
Audio1/Audio2/AudioOFF/Audio1
.2 can be selected under the
REC/Live Status when pressing
Audio out
p
ut control button
Speed (PPS)
NTSC PAL
120/60
100/150
60/30 50/25
60/16 25/12
16/8 12/8
8/4 8/4
4 4
Camera Title
Alarm/ V-Loss/ Motion event will appear on
the screen when alarm detonates
Alarm
Motion (RED color)
Video Loss (WHITE color)
Press the corresponding channel button on
the front panel to acknowledge the event.
Supporting Screen
11
Telexper International Inc.
3F-3, No.2, Chien Pa Rd., Chung Ho City,
Taipei 235, Taiwan, R.O.C.
Tel: 886-2-6620-5898 Fax: 886-2-6620-6909
E-mail: sales@telexper.com
http://www.telexper.com ISO 9001:2000
A member of VisionSoft
Fig 3.4 (Mouse Series)
16ch DVR
8chDVR 4chDVR
Back to Contents
Status
zREC = Recording
Live = No recording
Audio Status: (Audio Feature
Only)
Audio1/Audio2/AudioOFF/
Audio1.2 can be selected
under the REC/Live Status
when clickingAudio output
control button
Alarm/ V-Loss/ Motion event will
appear on the screen when alarm
detonates
Alarm
Motion (RED color)
Video Loss (WHITE color)
Left click corresponding flashing
led to acknowledge the event.
Speed (PPS)
NTSC PAL
120/60 100/50
60/30 50/25
60/16 25/12
16/8 12/8
8/4 8/4
4/ 4/
OSD Menu Playback Hard Disk Space Remove Hard Disk Audio Control
(Hold>5sec)
Supporting Screen
12
Telexper International Inc.
3F-3, No.2, Chien Pa Rd., Chung Ho City,
Taipei 235, Taiwan, R.O.C.
Tel: 886-2-6620-5898 Fax: 886-2-6620-6909
E-mail: sales@telexper.com
http://www.telexper.com ISO 9001:2000
A member of VisionSoft
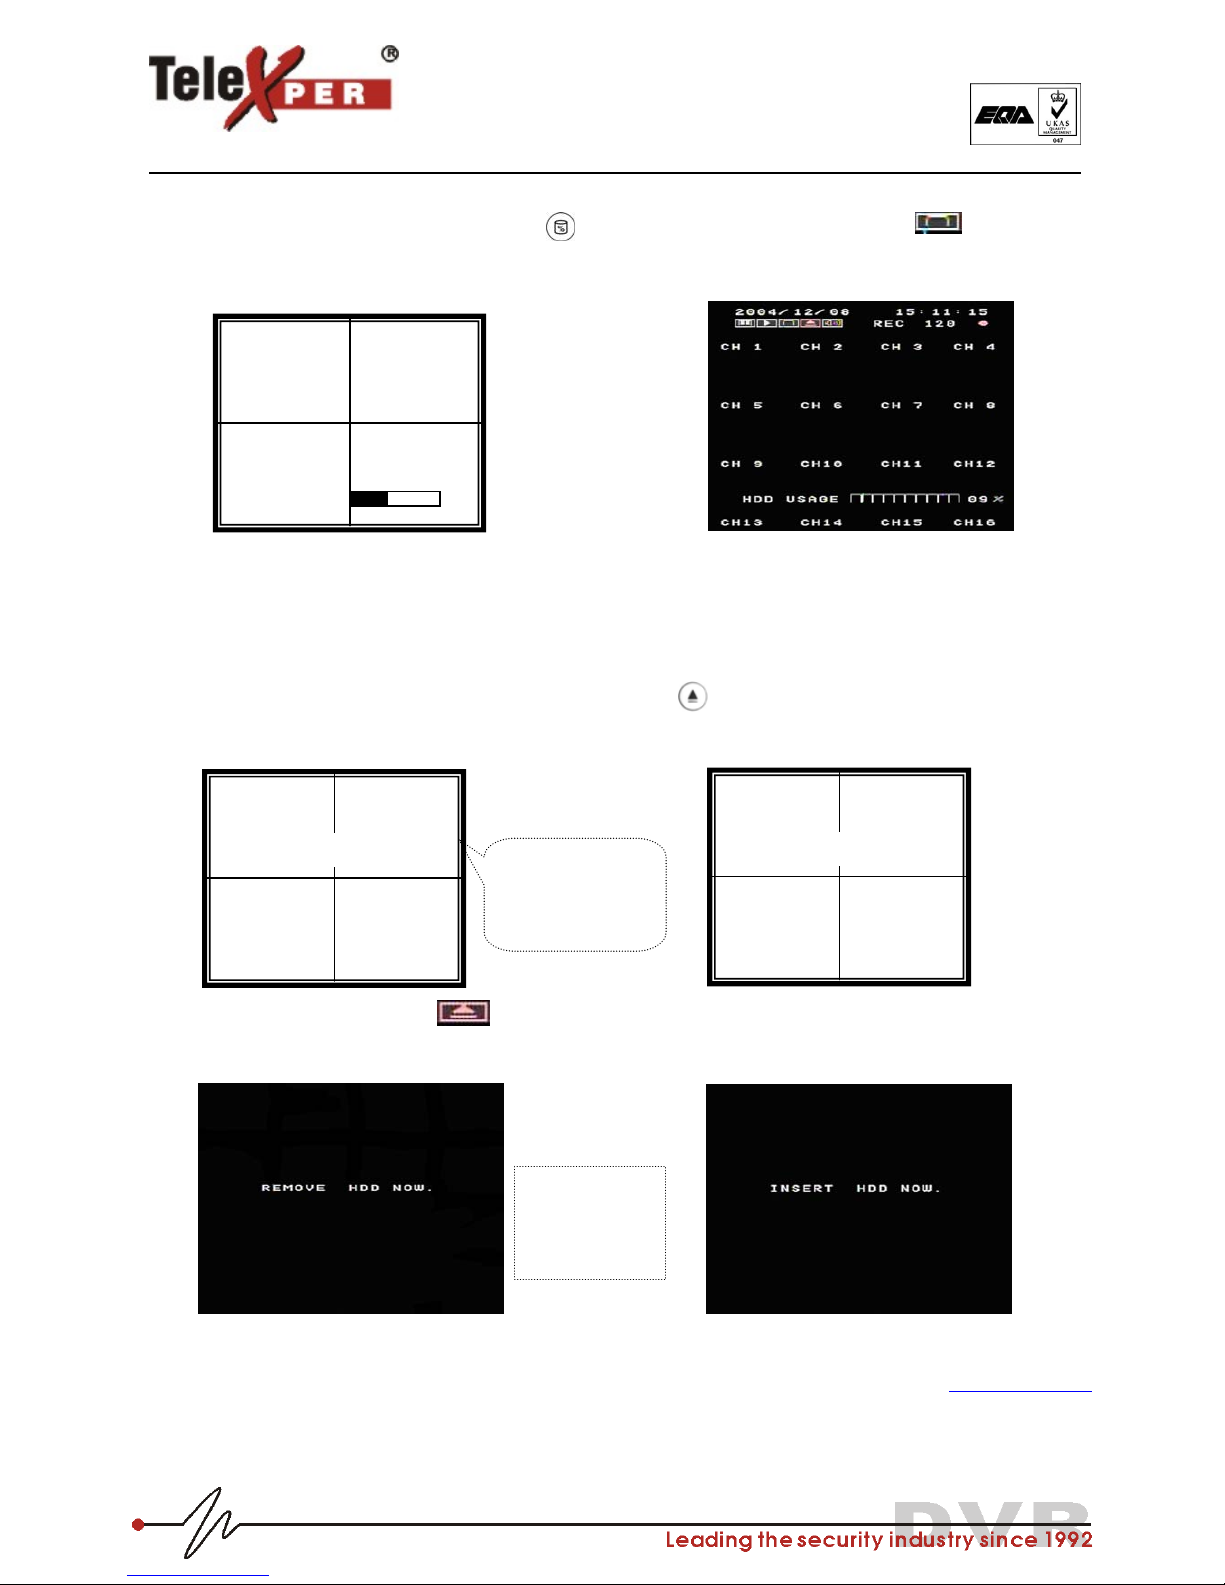
HARD DISK SPACE CHECK
Keypad Series: Press and hold (>2secs) ;
DVR will show the usage indication bar as
below.
Mouse Series: Left click on the screen;
DVR will show the usage indication bar as
below.
Note: If your “HDD Full” under Display/Record is set to “STOP,” the message, “HARD DISK FULL,” will be shown on
the screen and DVR will stop recording until the HDD is replaced or inserted again
TAKE OUT HARD DISK FOR REPLACEMENT
Keypad Series: Press and hold (>5secs) the button “ “
Note: Don’t remove the HDD until “Remove HDD now” message is shown.
DVR will keep beeping until you have inserted the hard disk back for recording.
Mouse Series: Left click
Note: Don’t remove the HDD until “Remove HDD now” message is shown.
DVR will keep beeping until you have inserted the hard disk back for recording.
Back to Contents
HDD USAGE 41%
REMOVE HDD NOW INSERT HDD NOW
DVR will keep
beeping after
HDD being
removed
DVR will keep
beeping after
HDD being
removed

13
Telexper International Inc.
3F-3, No.2, Chien Pa Rd., Chung Ho City,
Taipei 235, Taiwan, R.O.C.
Tel: 886-2-6620-5898 Fax: 886-2-6620-6909
E-mail: sales@telexper.com
http://www.telexper.com ISO 9001:2000
A member of VisionSoft
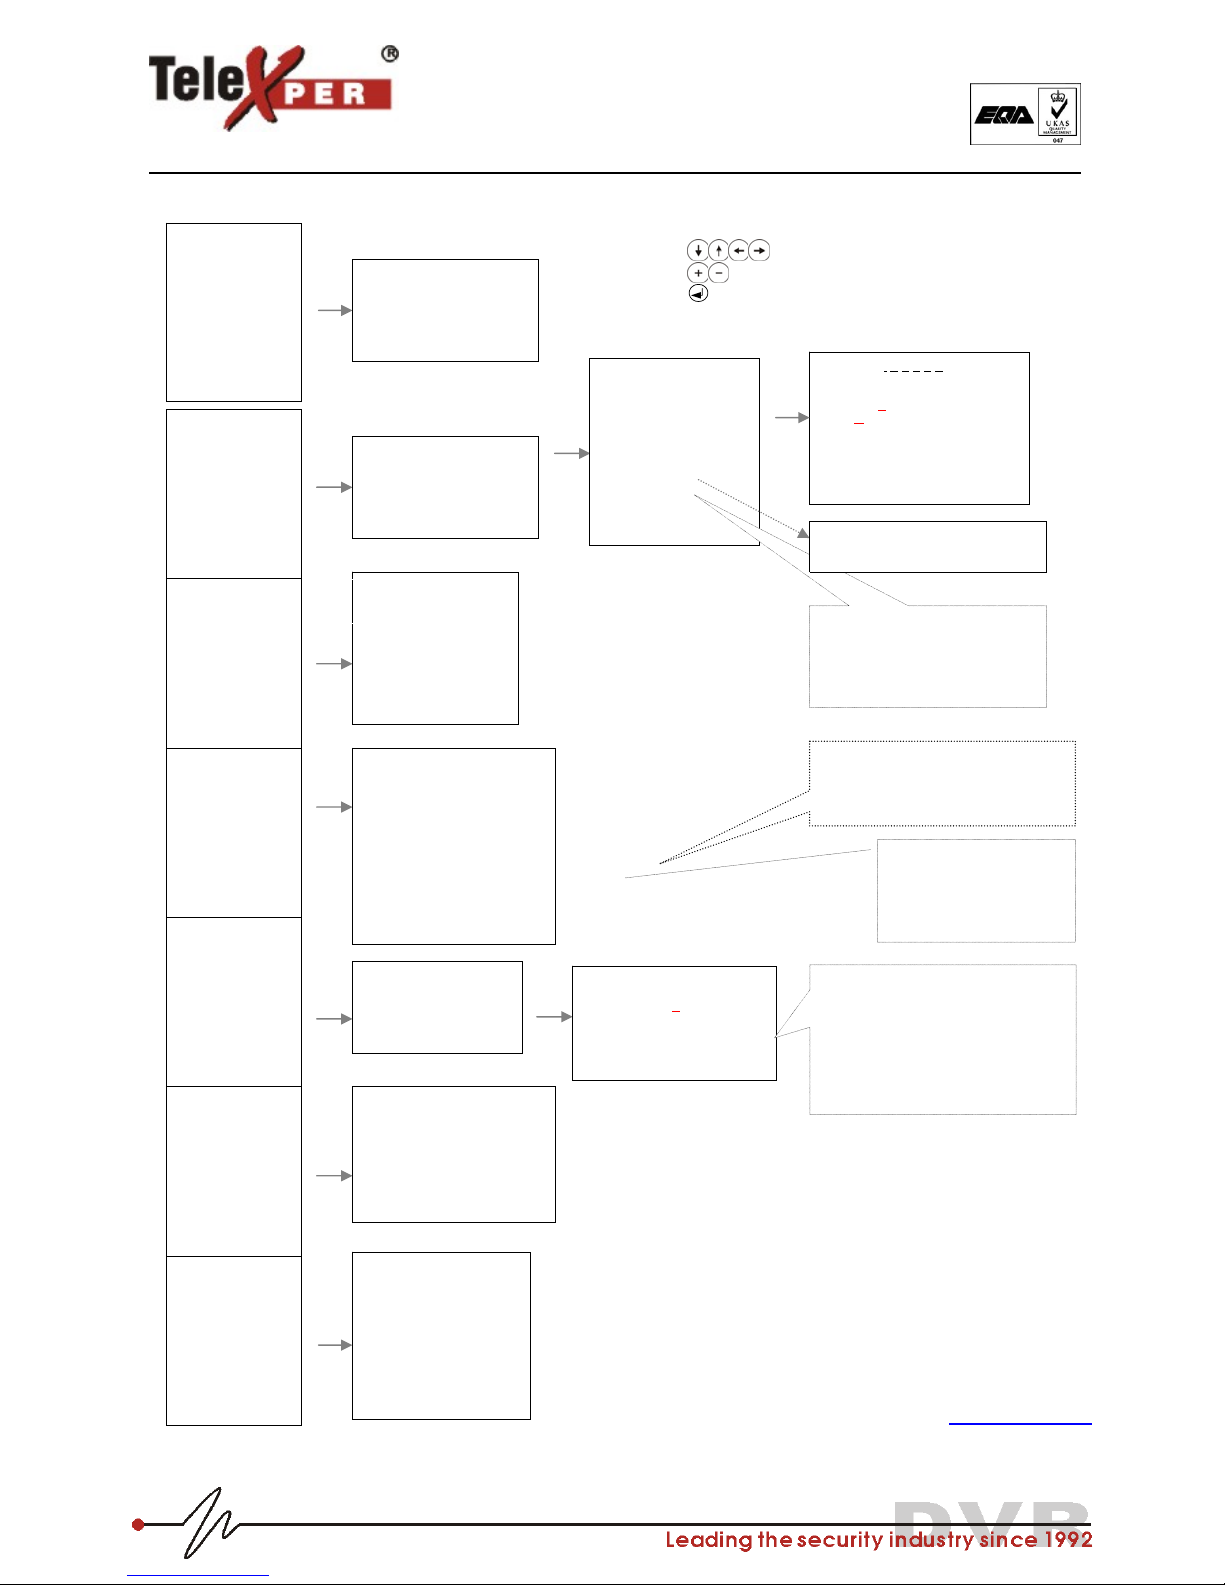
ON SCREEN DISPLAY (OSD) SETUP
4ch DVR
Back to Contents
MAIN MENU
Password
Channel 1
Channel 2
Channel 3
Channel 4
Date/Time
Display/Record
Others
Alarm Log
Internet
Exit
Password xxxx
New ID xxxx
Confirm New ID xxxx
Password Check OFF
Update New ID
Exit
CH1/Title: xxxxxxxx
Bright. : 50
Contr : 50
Color : 50
Hue : 50
Alarm : Off
V_Loss : Off
Motion : Off
Motion Area
Default
Exit
Date/Time
Format :YY/MM/DD
Year : xx
Month : xx
Day : xx
Hour : xx
Min : xx
Sec : xx
Update
Exit
REC Time start end
Schedule1: 00:00 23:59
Schedule2: 00:00 23:59
Schedule3: 00:00 23:59
Schedule4: 00:00 23:59
Exit
Others
Buzzer : ON
Setup REC Schedule
Exit
Alarm Log Page (1~64)
MM-DD-HH-MM-SS-CH-TP
12-18-19 -37-02-xxxxx
Xx -xx-xx -xx- xx-xx
Xx -xx-xx -xx- xx-xx
Xx -xx-xx -xx- xx-xx
Exit
Channel1: channel1
PAGE: 01/01
0 1 2 3 4 5 6 7 8 9 : / _ -- .
! A B C D E F G H I J K L M N O
P Q R S T U V W X Y Z a b c d e
f g h I j k l m n o p q r s t u
v w x y z
Exit
Username: telexpe
r
Password: 99999999
IP Address:
192.168.000.100
Getaway:
255.255.255.000
Sub mask
192.168.000.001
Exit
(9999, default)
(ON/ OFF)
Keypad Series:
Cursor movement
Change value
Enter
Mouse Series:
Left click-Increase value
Right click-Decrease value
Password
Channel 1
Channel 2
Channel 3
Channel 4
Date/Time
Display/Record
Others
Alarm Log
Internet
Exit
Password
Channel 1
Channel 2
Channel 3
Channel 4
Date/Time
Display/Record
Others
Alarm Log
Internet
Exit
Password
Channel 1
Channel 2
Channel 3
Channel 4
Date/Time
Display/Record
Others
Alarm Log
Internet
Exit
Password
Channel 1
Channel 2
Channel 3
Channel 4
Date/Time
Display/Record
Others
Alarm Log
Internet
Exit
Password
Channel 1
Channel 2
Channel 3
Channel 4
Date/Time
Display/Record
Others
Alarm Log
Internet
Exit
Password
Channel 1
Channel 2
Channel 3
Channel 4
Date/Time
Display/Record
Others
Alarm Log
Internet
Exit
You cannot set the end time past 23:59 for
schedule setting. E.g.
08:00 am - 02:00 am, the schedule should be
set as:
Schedule 1: 08:00-23:59
Schedule 2: 00:00-02:00
Note:
Schedule 00:00 – 00:00 will not be recorded.
Default: telexper (lower case)
Default: 99999999 (8 digits)
LAN Model ONLY
Motion sensitivity: From Off to 08.
Motion Area: The Alarm will be activated once there is motion in the
selected areas.
Motion Area Setup: Please see Chapter 4 General Operation
Display/Record
REC Setting
Title On/Off : OFF (On/Off)
REC Mode : 24hrs (24hrs/Schedule/Trigger)
HDD Full : Cyclic (Cyclic/Stop)
Alarm REC : 10 (01 – 60 secs)
REC Resume : OFF (On/Off)
AUDIO 1 Vol. : OFF (Off/1/2/3/4/5/6/7/8)
AUDIO 2 Vol. : OFF (Off/1/2/3/4/5/6/7/8)
Exit
REC Setting
Quality : Best (Best/Better/Good/Fair/Low)
REC Resolution : CIF (Half-D1/CIF)
Total Rate : 120 (120/60/30/16/8/4)
Exit
Alarm REC: Once the alarm is triggered under
Schedule/Trigger REC Mode, DVR will record any motion
and 01-60 sec after the motion occurred.
When REC Resume is set to “ON” under Playback mode
for more than 5 minutes without any action, the system
will exit to REC mode automatically
(DD/MM/YY)
Audio Volume: For DVR with Audio Feature Only

14
Telexper International Inc.
3F-3, No.2, Chien Pa Rd., Chung Ho City,
Taipei 235, Taiwan, R.O.C.
Tel: 886-2-6620-5898 Fax: 886-2-6620-6909
E-mail: sales@telexper.com
http://www.telexper.com ISO 9001:2000
A member of VisionSoft
8ch DVR
Back to Contents
MAIN MENU
Password
Channel 1-2
Channel 3-4
Channel 5-6
Channel 7-8
Date/Time
Display/Record
Others
Alarm Log
Internet
Exit
Password xxxx
New ID xxxx
Confirm New ID xxxx
Password Check OFF
Update New ID
Exit
Title : xxxxxxxx
Bright. : 50
Contr : 50
Color : 50
Hue : 50
Alarm : Off
V_ Loss : Off
Motion : Off
Motion Area
Default
Exit
Channel 1: Camera 1
Channel 2: Camera 2
Exit
Date/Time
Format :YY/MM/DD
Year : xx
Month : xx
Day : xx
Hour : xx
Min : xx
Sec : xx
Update
Exit
REC Time start end
Schedule1: 00:00 23:59
Schedule2: 00:00 23:59
Schedule3: 00:00 23:59
Schedule4: 00:00 23:59
Exit
Others
Buzzer : ON
Divided grid: ON
Setup REC Schedule
Exit
Alarm Log Page (1~64)
MM-DD-HH-MM-SS-CH-TP
12-18-19 -37-02-xxxxx
Xx -xx-xx -xx- xx-xx
Xx -xx-xx -xx- xx-xx
Xx -xx-xx -xx- xx-xx
Exit
Channel1: Channel1
PAGE: 01/01
0 1 2 3 4 5 6 7 8 9 : / _ -- .
! A B C D E F G H I J K L M N O
P Q R S T U V W X Y Z a b c d e
f g h I j k l m n o p q r s t u
v w x y z
Exit
(9999, default)
(ON/ OFF)
Password
Channel 1-2
Channel 3-4
Channel 5-6
Channel 7-8
Date/Time
Display/Record
Others
Alarm Log
Internet
Exit
Password
Channel 1-2
Channel 3-4
Channel 5-6
Channel 7-8
Date/Time
Display/Record
Others
Alarm Log
Internet
Exit
Password
Channel 1-2
Channel 3-4
Channel 5-6
Channel 7-8
Date/Time
Display/Record
Others
Alarm Log
Internet
Exit
Password
Channel 1-2
Channel 3-4
Channel 5-6
Channel 7-8
Date/Time
Display/Record
Others
Alarm Log
Internet
Exit
Password
Channel 1-2
Channel 3-4
Channel 5-6
Channel 7-8
Date/Time
Display/Record
Others
Alarm Log
Internet
Exit
Password
Channel 1-2
Channel 3-4
Channel 5-6
Channel 7-8
Date/Time
Display/Record
Others
Alarm Log
Internet
Exit
You cannot set the end time past 23:59 for
schedule setting. E.g.
08:00 am - 02:00 am, the schedule should
be set as:
Schedule 1: 08:00-23:59
Schedule 2: 00:00-02:00
Note:
Schedule 00:00 – 00:00 will not be
recorded.
Username: telexpe
r
Password: 99999999
IP Address:
192.168.000.100
Getaway:
255.255.255.000
Sub mask
192.168.000.001
Exit
Default: telexper (lower case)
Default: 99999999 (8 digits)
LAN Model ONLY
Motion sensitivity: From Off to 08.
Motion Area: TheAlarm will be
activated once there is motion in the
selected areas.
Motion Area Setup: Please see
Chapter 4 General Operation
Display/Record
Title On/Off : OFF
Quality : Best
REC Mode : 24hrs
REC Resolution : CIF
Total Rate : 120
HDD Full : Cyclic
Alarm REC : 10
REC Resume : OFF
AUDIO 1 GAIN : OFF
AUDIO 2 GAIN : OFF
Exit
(On/Off)
(Best/Better/Good/Fair/Low)
(24hrs/Schedule/Trigger)
(Half-D1/CIF)
(120/60/24/16/8/4)
(Cyclic/Stop)
(01 – 60 secs)
(On/Off)
(Off/1/2/3/4/5/6/7/8) Level 8 is the loudest volume
(Off/1/2/3/4/5/6/7/8) Level 8 is the loudest volume
Alarm REC: Once the alarm is triggered
under Schedule/Trigger REC Mode, DVR
will record any motion and 01-60 sec after
the motion occurred.
When REC Resume is set to
“ON” under Playback mode
for more than 5 minutes
without any action, the system
will exit from playback mode
automaticall
y
.
Keypad Series:
Cursor movement
Change value
Enter
Mouse Series:
Left click-Increase value
Right click-Decrease value
(DD/MM/YY)
15
Telexper International Inc.
3F-3, No.2, Chien Pa Rd., Chung Ho City,
Taipei 235, Taiwan, R.O.C.
Tel: 886-2-6620-5898 Fax: 886-2-6620-6909
E-mail: sales@telexper.com
http://www.telexper.com ISO 9001:2000
A member of VisionSoft
16ch DVR
Back to Contents
MAIN MENU
Password
Channel 1-4
Channel 5-8
Channel 9-12
Channel 13-16
Date/Time
Display/Record
Others
Alarm Log
Internet
Exit
Password xxxx
New ID xxxx
Confirm New ID xxxx
Password Check OFF
Update New ID
Exit
Title : xxxxxxxx
Bright. : 50
Contr : 50
Color : 50
Hue : 50
Alarm : Off
V_ Loss : Off
Motion : Off
Motion Area
Default
Exit
Channel 1: Camera 1
Channel 2: Camera 2
Channel 3: Camera 3
Channel 4: Camera 4
Exit
Date/Time
Format :YY/MM/DD
Year : xx
Month : xx
Day : xx
Hour : xx
Min : xx
Sec : xx
Update
Exit
Display/Record
Title On/Off : OFF
Quality : Best
REC Mode : 24hrs
REC Resolution : CIF
Total Rate : 120
HDD Full : Cyclic
Alarm REC : 10
REC Resume : OFF
AUDIO 1 Vol. : OFF
AUDIO 2 Vol. : OFF
Exit
REC Time start end
Schedule1: 00:00 23:59
Schedule2: 00:00 23:59
Schedule3: 00:00 23:59
Schedule4: 00:00 23:59
Exit
Others
Buzzer : ON
Divided grid: ON
Setup REC Schedule
Exit
Alarm Log Page (1~64)
MM-DD-HH-MM-SS-CH-TP
12-18-19 -37-02-xxxxx
Xx -xx-xx -xx- xx-xx
Xx -xx-xx -xx- xx-xx
Xx -xx-xx -xx- xx-xx
Exit
Channel1: Channel1
PAGE: 01/01
0 1 2 3 4 5 6 7 8 9 : / _ -- .
! A B C D E F G H I J K L M N O
P Q R S T U V W X Y Z a b c d e
f g h I j k l m n o p q r s t u
v w x y z
Exit
(9999, default)
(ON/ OFF)
Password
Channel 1-4
Channel 5-8
Channel 9-12
Channel 13-16
Date/Time
Display/Record
Others
Alarm Log
Internet
Exit
(On/Off)
(Best/Better/Good/Fair/Low)
(24hrs/Schedule/Trigger)
(Half-D1/CIF)
(120/60/24/16/8/4)
(Cyclic/Stop)
(01 – 60 secs)
(On/Off)
(Off/1/2/3/4/5/6/7/8) Level 8 is the loudest volume
(Off/1/2/3/4/5/6/7/8) Level 8 is the loudest volume
Password
Channel 1-4
Channel 5-8
Channel 9-12
Channel 13-16
Date/Time
Display/Record
Others
Alarm Log
Internet
Exit
Password
Channel 1-4
Channel 5-8
Channel 9-12
Channel 13-16
Date/Time
Display/Record
Others
Alarm Log
Internet
Exit
Password
Channel 1-4
Channel 5-8
Channel 9-12
Channel 13-16
Date/Time
Display/Record
Others
Alarm Log
Internet
Exit
Password
Channel 1-4
Channel 5-8
Channel 9-12
Channel 13-16
Date/Time
Display/Record
Others
Alarm Log
Internet
Exit
Password
Channel 1-4
Channel 5-8
Channel 9-12
Channel 13-16
Date/Time
Display/Record
Others
Alarm Log
Internet
Exit
You cannot set the end time past 23:59
for schedule setting. E.g.
08:00 am - 02:00 am, the schedule
should be set as:
Schedule 1: 08:00-23:59
Schedule 2: 00:00-02:00
Note:
Schedule 00:00 – 00:00 will not be
recorded.
Username: telexpe
r
Password: 99999999
IP Address:
192.168.000.100
Getaway:
255.255.255.000
Sub mask
192.168.000.001
Exit
Default: telexper (lower case)
Default: 99999999 (8 digits)
LAN Model ONLY
Alarm REC: Once the alarm is triggered
under Schedule/Trigger REC Mode,
DVR will record any motion and 01-60
sec after the motion occurred.
When REC Resume is set to
“ON” under Playback mode
for more than 5 minutes
without any action, the
system will exit from
p
la
y
back mode
Motion Area: TheAlarm will be
activated once there is motion in the
selected areas.
Motion Area Setup: Please see Ch4
General Operation
Keypad Series:
Cursor movement
Change value
Enter
Mouse Series:
Left click-Increase value
Right click-Decrease value
Motion sensitivity: From Off to 08.
(DD/MM/YY)

16
Telexper International Inc.
3F-3, No.2, Chien Pa Rd., Chung Ho City,
Taipei 235, Taiwan, R.O.C.
Tel: 886-2-6620-5898 Fax: 886-2-6620-6909
E-mail: sales@telexper.com
http://www.telexper.com ISO 9001:2000
A member of VisionSoft
Chapter 4 General Operations
MOTION AREA SETUP
Keypad Series:
1. Select “Motion Area” under the selected camera. The previous Motion Area setting will show on the
screen when enter.
2. Use to move the cursor to the beginning (upper left) point of the wanted detected zone then
press for confirmation
3. Move the cursor to the end (right bottom) point of the zone; then press for confirmation.
4. Repeat step 1, step 2 to have up to four (4) zones
5. Press to complete the motion setup
(“Motion setup OK!” will be shown on the screen)
6. Adjust Alarm REC if your DVR is not in 24-hr REC Mode
7. Video Motion Detection (VMD) function will be enabled ONLY if the “Motion” has been turned ON; and
one (min) detection zone has been setup.
Mouse Series:
1. Select “Motion Area” under the selected camera. The previous Motion Area setting will show on the screen when
enter.
2. Use the mouse to select the wanted detected zone from the beginning (upper left) to the end (right bottom).
3. Repeat step 2 to have up to four zones
4. Right click the mouse for confirmation
(“Motion setup OK!” will be shown on the screen)
5. Adjust Alarm REC if your DVR is not in 24-hr REC Mode
6. VMD will be enabled ONLY if the “Motion” has been turned ON; and one (min) detection zone has been setup.
REC SCHEDULE SETUP
Please make sure your REC Mode under Display/Record is in Schedule mode, and plug the desired recording
time into Setup REC Schedule under Others
AUDIO VOLUME (AUDIO MODEL ONLY)
1. Go to the main menu and select Display/Record
2. Change Audio volume by pressing buttons. Level 8 is the loudest volume.
CONFIRM ALARM BUZZER
Keypad Series: Push the button with the corresponding channel number
Mouse Series: Left click on the flashing led on the screen.
Back to Contents
Other manuals for tx168 series
1
Table of contents
Other Telexper DVR manuals


