Telkonet ecosmart EcoTouch+ Owner's manual
EcoTouch+ IO&M Guide
Telkonet, Inc.
For Use with Firmware Version 2.x
20800 Swenson Drive, Suite 175
Installation Process Overview
Waukesha, WI 53186
Revision 5
(414) 302-2299
Page i
www.telkonet.com
EcoTouch+
Installation, Operation & Maintenance Guide
Use this guide along with the IOM for EcoSource+ or EcoSource VRF Controller.

EcoTouch+ IO&M Guide
Telkonet, Inc.
For Use with Firmware Version 2.x
20800 Swenson Drive, Suite 175
Installation Process Overview
Waukesha, WI 53186
Revision 5
(414) 302-2299
Page ii
www.telkonet.com
Installation Process Overview.................................................................................................. iii
The EcoSmart Energy Management System ................................................................................... 1
Regulatory Compliance........................................................................................................ 1
Overview: EcoWave Remote Thermostat/Controller Package .......................................................... 2
Plan EcoTouch+ Location ........................................................................................................ 4
About Wiring Options............................................................................................................. 6
Equipment Needed................................................................................................................ 8
Install the EcoTouch+ ............................................................................................................ 9
Device Assn. Procedures Must Be Performed in Order .....................................................................13
Test Lutron Lighting Scenes (if applicable)..................................................................................14
Test EcoSmart/Saflok Communication (if applicable) .....................................................................16
Commission EcoTouch+ .........................................................................................................17
......................................................................................................................................17
If Commissioning Test Fails..................................................................................................20
......................................................................................................................................20
Regular Maintenance ............................................................................................................21
EcoTouch+ Configuration Changes ............................................................................................23
Change Channel ...............................................................................................................23
Activate “Display Mode” Option ............................................................................................23
System Status Screen.........................................................................................................23
EcoTouch+ FAQ’s.................................................................................................................24
Troubleshooting..................................................................................................................25
Troubleshooting..................................................................................................................26
Troubleshooting..................................................................................................................27
EcoTouch+ Guest Screen Controls & User Interface........................................................................28
Updated as Revision 5
Added Installation Process Overview (page iii).
Added testing Lutron lighting scenes (page 14).
Added testing Saflok lighting scenes (page16).
Added Commissioning EcoTouch+ (page 16).

EcoTouch+ IO&M Guide
Telkonet, Inc.
For Use with Firmware Version 2.x
20800 Swenson Drive, Suite 175
Installation Process Overview
Waukesha, WI 53186
Revision 5
(414) 302-2299
Page iii
www.telkonet.com
Installation Process Overview
Follow the EcoTouch+ installation steps in this order:
1. Set up EcoCommander.
2. Hard wire EcoConnect coordinators to the EcoCommander.
3. Create a network via the EcoConnect coordinator.
4. Plan location where devices to be installed, including EcoTouch+ location (page 4).
5. Install EcoSmart and third party devices, including EcoTouch+ (page 9).
6. Associate devices: join, pair, bind (page 13).
7. Test Lutron lighting scenes-if applicable (page 14).
8. Commission EcoTouch+ (page 16).
Company Headquarters: Customer Support:
EcoSmart Sales:
Telkonet, Inc. (800) 380-9640
(888) 703-9398
20800 Swenson Drive Email: Email
Suite 175 ecosmartsupport@telkonet.com
Waukesha, WI 53186
P (414) 302-2299

EcoWave Package Overview
EcoTouch+ IO&M Guide
Telkonet, Inc.
For Use with Firmware Version 2.x
20800 Swenson Drive, Suite 175
The EcoSmart Energy Management System
Waukesha, WI 53186
Revision 5
(414) 302-2299
Page 1
www.telkonet.com
The EcoSmart Energy Management System
The EcoSmart Energy Management System reduces
HVAC energy consumption without interfering with
occupant comfort.
EcoSmart thermostats such as the EcoTouch+
automatically learn and adapt to the heating and
cooling patterns of each room. For example, a
room on the east side of a building will receive
direct sunlight in the morning and will either need
less HVAC heating or more HVAC cooling. However,
as the day progresses, the room will need more
HVAC heating or less HVAC cooling as it moves into
the shade. An EcoSmart thermostat will continually
monitor the room, learn its patterns, and adjust its
heating and cooling profiles accordingly.
EcoSmart thermostats also learn and adapt to
occupant schedules. When a room is unoccupied,
the EcoTouch+ will enter an energy saving mode,
allowing the room to drift away from the desired
set point. During this drift period, the thermostat
will operate the HVAC unit less often, reducing
energy costs. When the room becomes occupied
again, the RecoveryTime™ technology built into
each EcoTouch+ will return the room to the set
point without occupant interaction.
The EcoWave is available in several configurations
to address specific requirements of multiple
applications including hotel, classroom, office,
university dormitory, military residence hall, retail,
public area, convention center, and a wide variety
of commercial and industrial spaces.
The firmware of standalone EcoWave thermostats is
identical to the firmware of networked versions.
Standalone Thermostats can be networked by
adding a network module to the base units at any
time.
Programming features used during installation,
maintenance, and troubleshooting are available in
the on-screen Maintenance Menu.
Regulatory Compliance
FCC ID: XV6SS6560
This device complies with Part 15 of the FCC Rules.
Operation is subject to the following two
conditions: (1) this device may not cause harmful
interference, and (2) this device must accept any
interference received, including interference that
may cause undesired operation.
This equipment has been tested and found to
comply with the limits for a class B digital device
pursuant to part 15 of the FCC Rules. These limits
are designed to provide reasonable protection
against harmful interference in a residential
installation. This equipment generates, uses and
can radiate radio frequency energy and if not
installed and used in accordance with the
instructions, may cause harmful interference to
radio communications. However, there is no
guarantee that interference will not occur in a
particular installation. If the equipment does
cause harmful interference to radio or television
reception, which can be determined by turning
the equipment off and on, the user is encouraged
to try to correct the interference by one or more
of the following measures:
Reorient or relocate the receiving antenna.
Increase the separation between the
equipment and the receiver.
Connect the equipment into an outlet on a
circuit different from that to which the
receiver is connected.
Consult the dealer or experienced radio/TV
technician for help.
In order to maintain compliance with FCC
regulations, shielded cables must be used with this
equipment. Operation with non-approved
equipment is likely to result in interference to
radio and TV reception. The user is cautioned that
changes and modifications made to the equipment
without the approval of the manufacturer could
void the user’s authority to operate the equipment.
To satisfy RF exposure requirements, this device
and its antennas must operate with a separation
distance of at least 20 cm from all persons and
must not be co-located or operating in conjunction
with any other antenna or transmitter.
EcoWave Package Overview
EcoTouch+ IO&M Guide
Telkonet, Inc.
For Use with Firmware Version 2.x
20800 Swenson Drive, Suite 175
The EcoSmart Energy Management System
Waukesha, WI 53186
Revision 5
(414) 302-2299
Page 2
www.telkonet.com
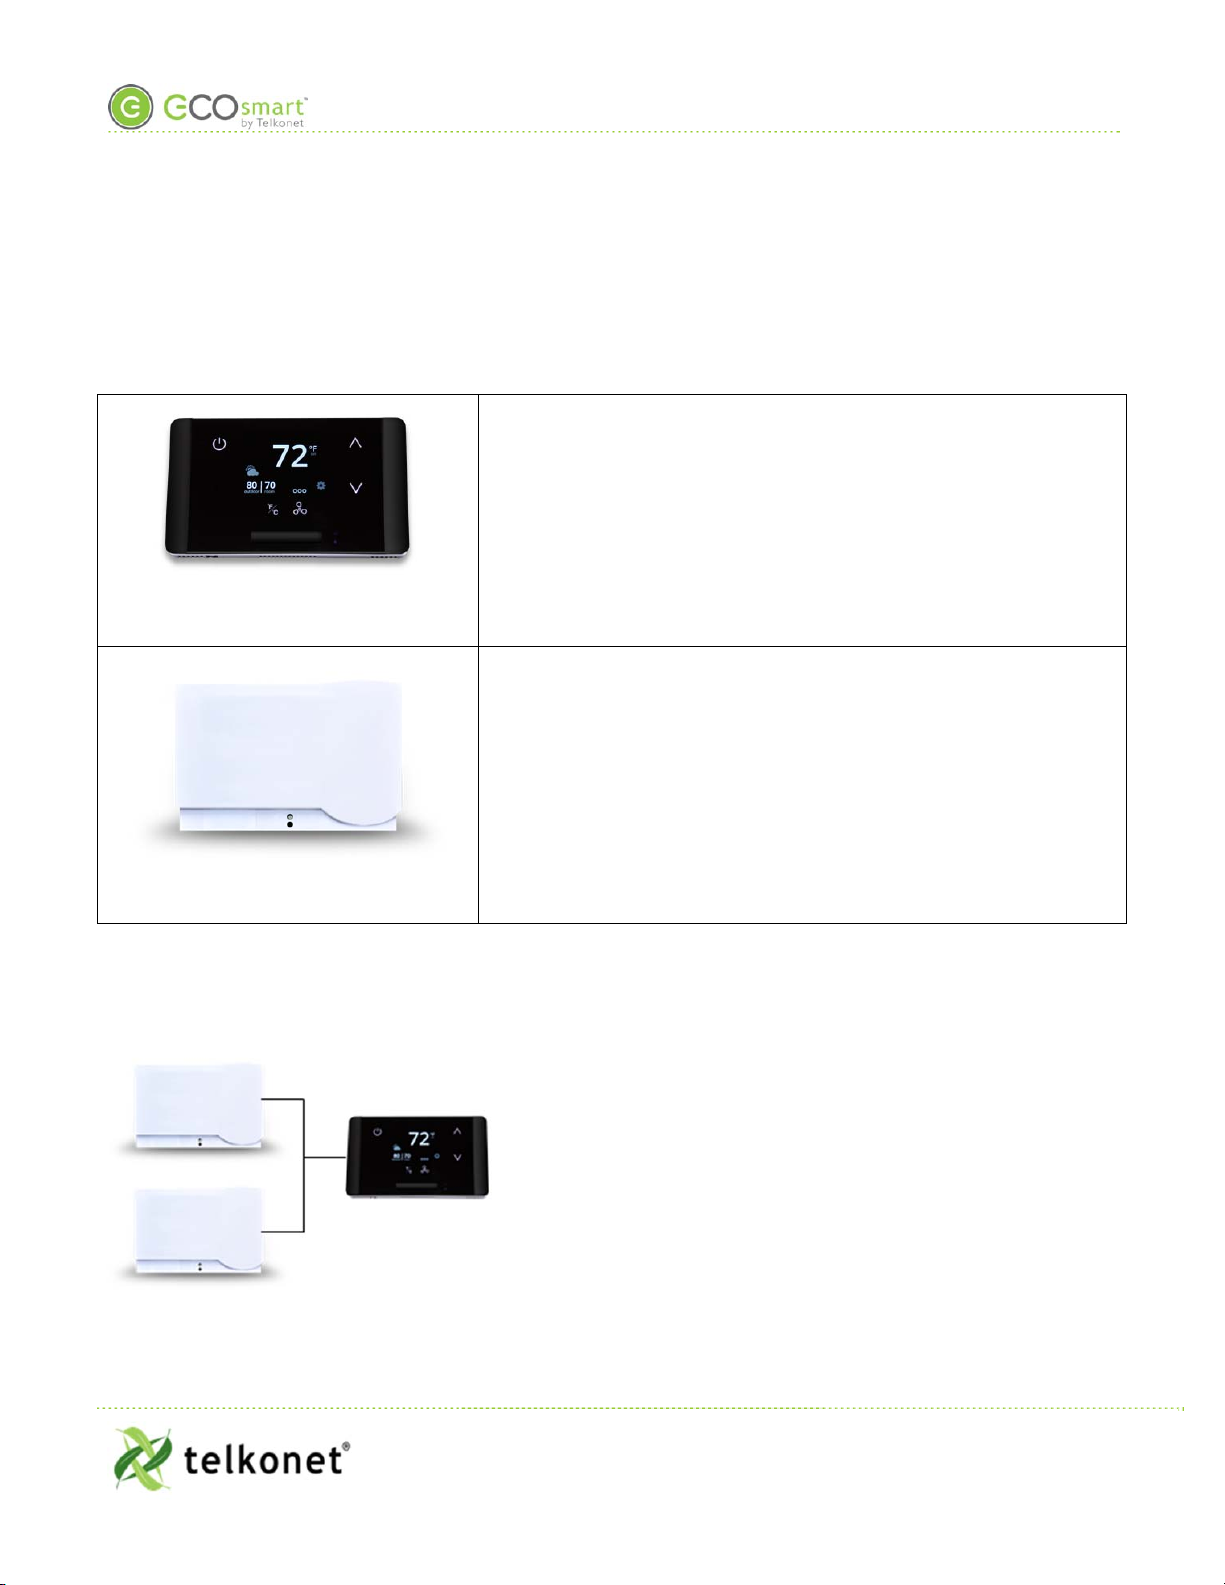
Overview: EcoWave Remote Thermostat/Controller Package
The EcoWave package is comprised of two hardware components as shown below. Together they form a
wireless programmable controllable thermostat. It can be easily installed on packaged terminal air
conditioners, fan coils, heat pumps, split systems, and more. With software-based relay control and fan speed
configuration, programming setup is simple and fast.
EcoTouch+
Display unit
Place in optimum location for temperature measurement and
ease of occupant use
EcoSource+
HVAC Controller
Install in or on HVAC unit
Accepts association with 15 total compatible wireless devices
Each compatible wireless device can be associated to
multiple EcoSource+ devices.
Accomodates a Variety of Configurations
The EcoWave Package can be configured for many different HVAC
scenarios. For example:
One EcoTouch+ can control multiple HVAC systems, each
equipped with an EcoSource+, but all directed by a single
EcoTouch+ display unit. This type of installation reduces the
complexity of running multiple HVAC units in a single large space
and eliminating the potential of opposing modes forcing
equipment to compete against each other.
EcoWave Package Overview
EcoTouch+ IO&M Guide
Telkonet, Inc.
For Use with Firmware Version 2.x
20800 Swenson Drive, Suite 175
The EcoSmart Energy Management System
Waukesha, WI 53186
Revision 5
(414) 302-2299
Page 3
www.telkonet.com
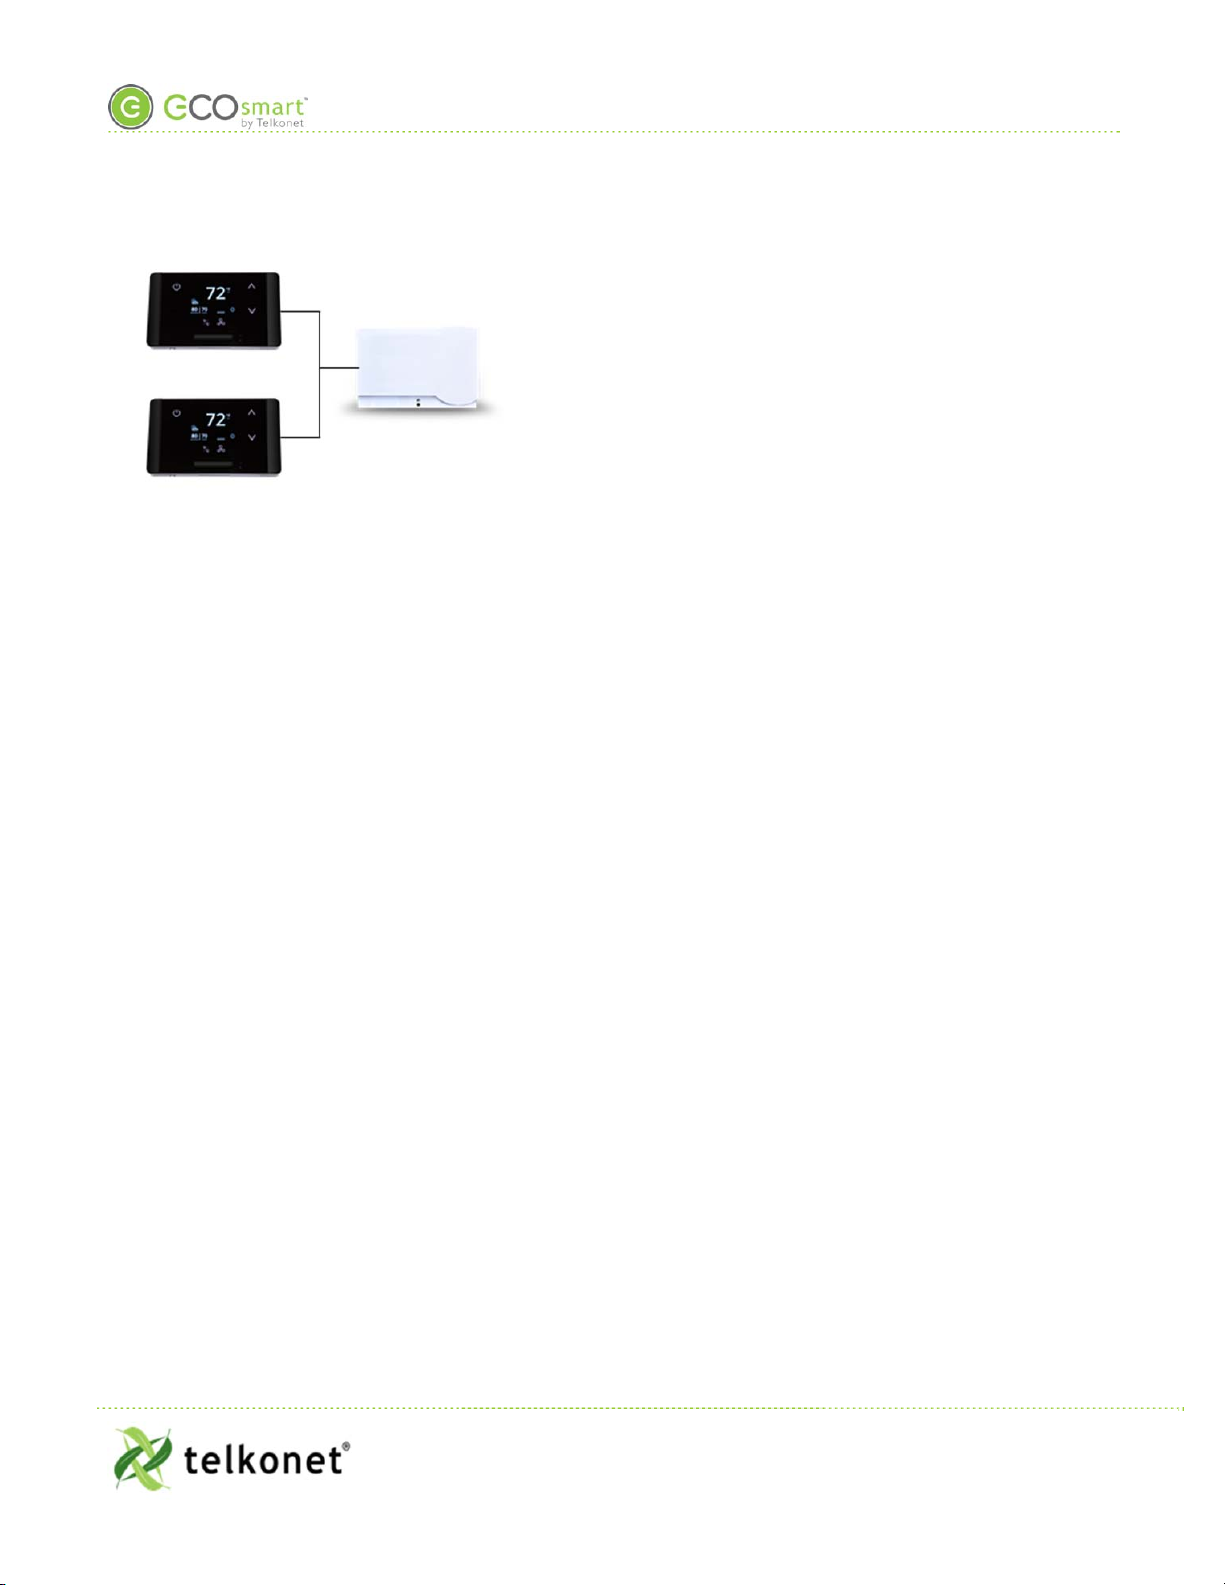
Multiple EcoTouch+ devices can control one HVAC system,
equipped with one EcoSource+.
The wiring interface conforms to industry standards. Telkonet
can develop specific wiring diagrams, if a complete specification
is provided for the HVAC unit(s) in use at the site.

Plan EcoTouch+ Location
EcoTouch+ IO&M Guide
Telkonet, Inc.
For Use with Firmware Version 2.x
20800 Swenson Drive, Suite 175
Plan EcoTouch+ Location
Waukesha, WI 53186
Revision 5
(414) 302-2299
Page 4
www.telkonet.com
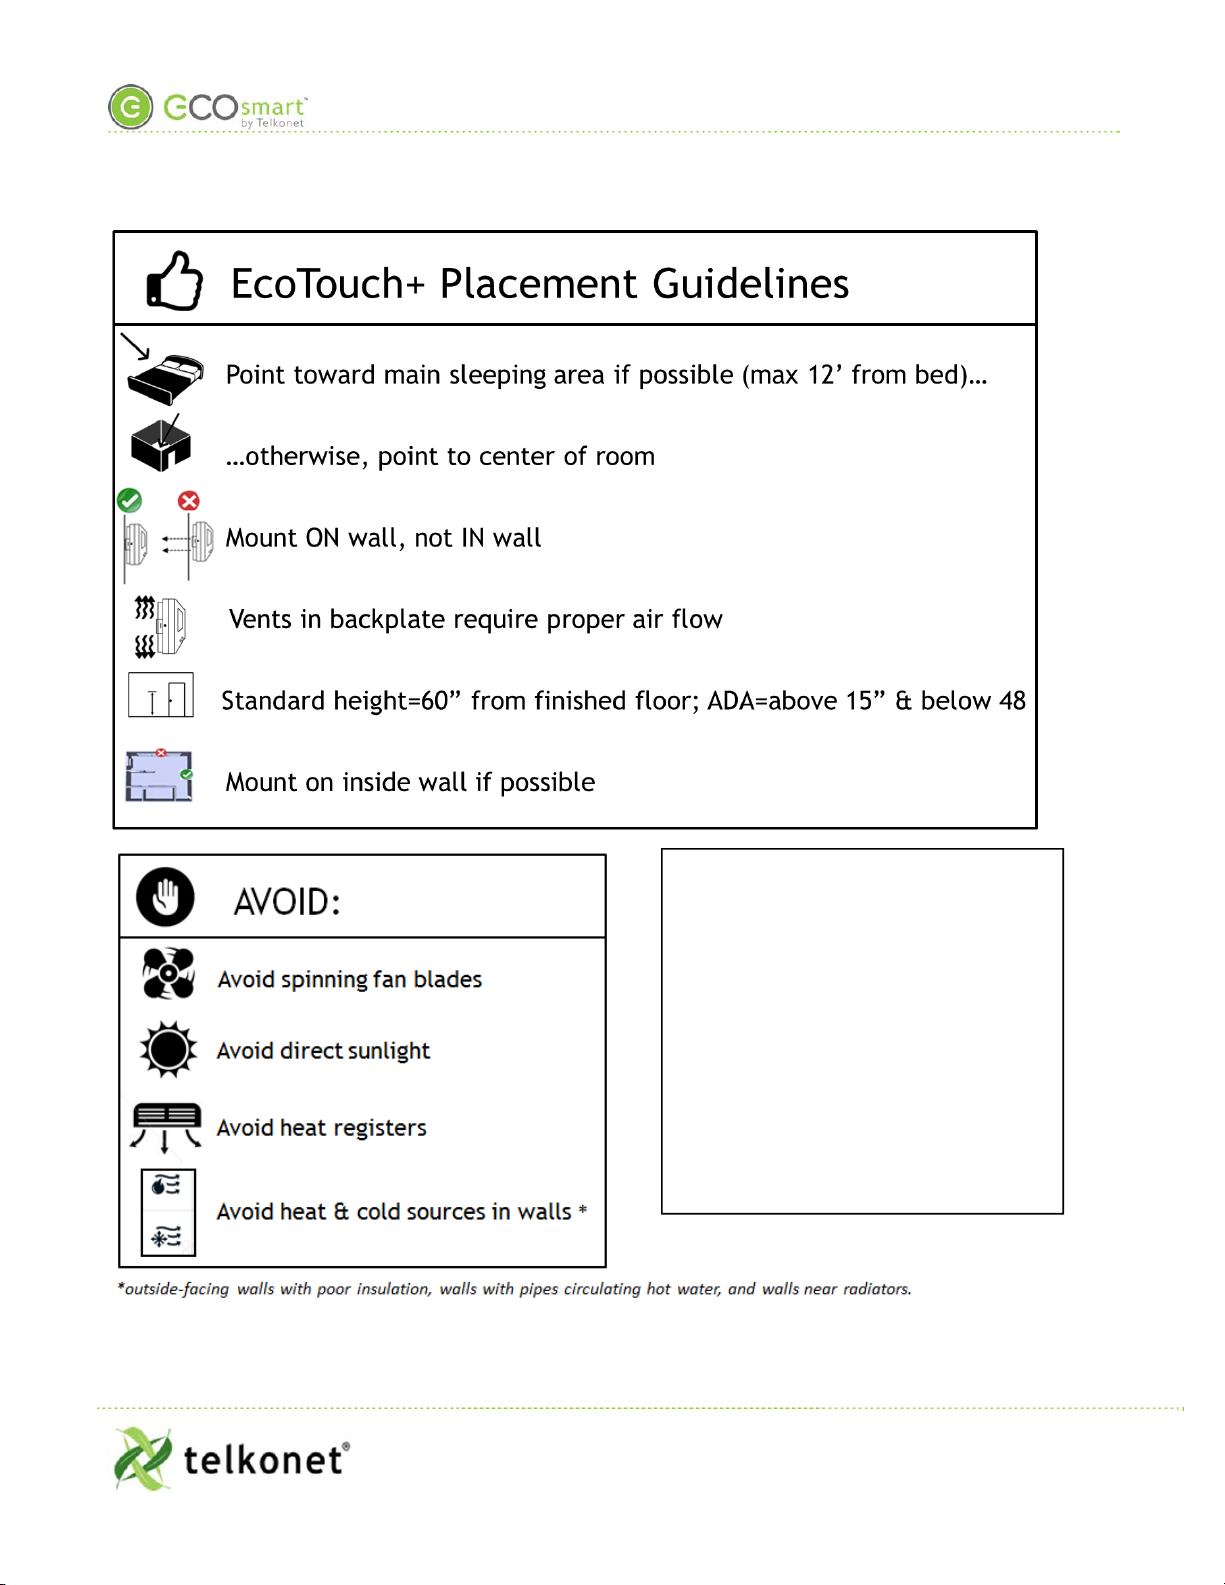
Plan EcoTouch+ Location
Table 1: EcoTouch+ Mounting-Best Practices
Mounting
Considerations
Best Practice
Wall Depth The depth of the battery pack is 2.34", therefore that is the minimum wall depth.
Distance to
Occupant
If the occupants will likely be stationary…
(e.g. sleeping in bed)
Position within 0 – 9 feet of their expected
location.
If the occupants will move occasionally…
(e.g. working at desk)
EcoTouch+: within 9-18 feet of their
expected location
If the occupants will move regularly…
(e.g. walking in hall)
EcoTouch+: within 18-25 feet of their
expected location
EcoTouch+ has 140° wide horizontal viewing angle
If no door contacts or remote occupancy sensors are used in the guest room then the bed
should always be positioned within a 12’ radius from the front of the thermostat
Other
Considerations
If a suitable location without a heat or cold source is not available, contact a Telkonet
Project Manager.
Plan EcoTouch+ Location
EcoTouch+ IO&M Guide
Telkonet, Inc.
For Use with Firmware Version 2.x
20800 Swenson Drive, Suite 175
Plan EcoTouch+ Location
Waukesha, WI 53186
Revision 5
(414) 302-2299
Page 5
www.telkonet.com
Q: Can the EcoTouch+ Battery version
be mounted to any wall?
A: No, the EcoTouch+ Battery was
designed to be mounted inside a jbox or
on any wall that has space behind the
surface for the battery pack to fit. The
battery pack sticks out perpendicular to
the backplate, which requires a hole to
be cut in the wall to accommodate.
Installers must cut into the wall at their
own risk and they must be cognizant of
any issues in doing so, such as breaking
the sound barrier or fire barrier seal
within the walls.

About Wiring Options
EcoTouch+ IO&M Guide
Telkonet, Inc.
For Use with Firmware Version 2.x
20800 Swenson Drive, Suite 175
About Wiring Options
Waukesha, WI 53186
Revision 5
(414) 302-2299
Page 6
www.telkonet.com
About Wiring Options
Pin Part Number Description Common Usage
J2 WA-P156900A00AK Pigtail SS6560 for J2
24V powe
r
J3 WA-P156900A01AK Pigtail SS6560 for J3
3.3V power (& Telkonet use only-programming)
About Wiring Options
EcoTouch+ IO&M Guide
Telkonet, Inc.
For Use with Firmware Version 2.x
20800 Swenson Drive, Suite 175
About Wiring Options
Waukesha, WI 53186
Revision 5
(414) 302-2299
Page 7
www.telkonet.com
Battery Pack Hard Wired Hard Wired Directly to EcoSource
J3 Pinout on EcoTouch+ J2 Pinout on EcoTouch+
J8 Pinout on EcoSource, and
J3 Pinout on EcoTouch+
Factory wired Field wired Field wired
3.3V 24V 3.3V
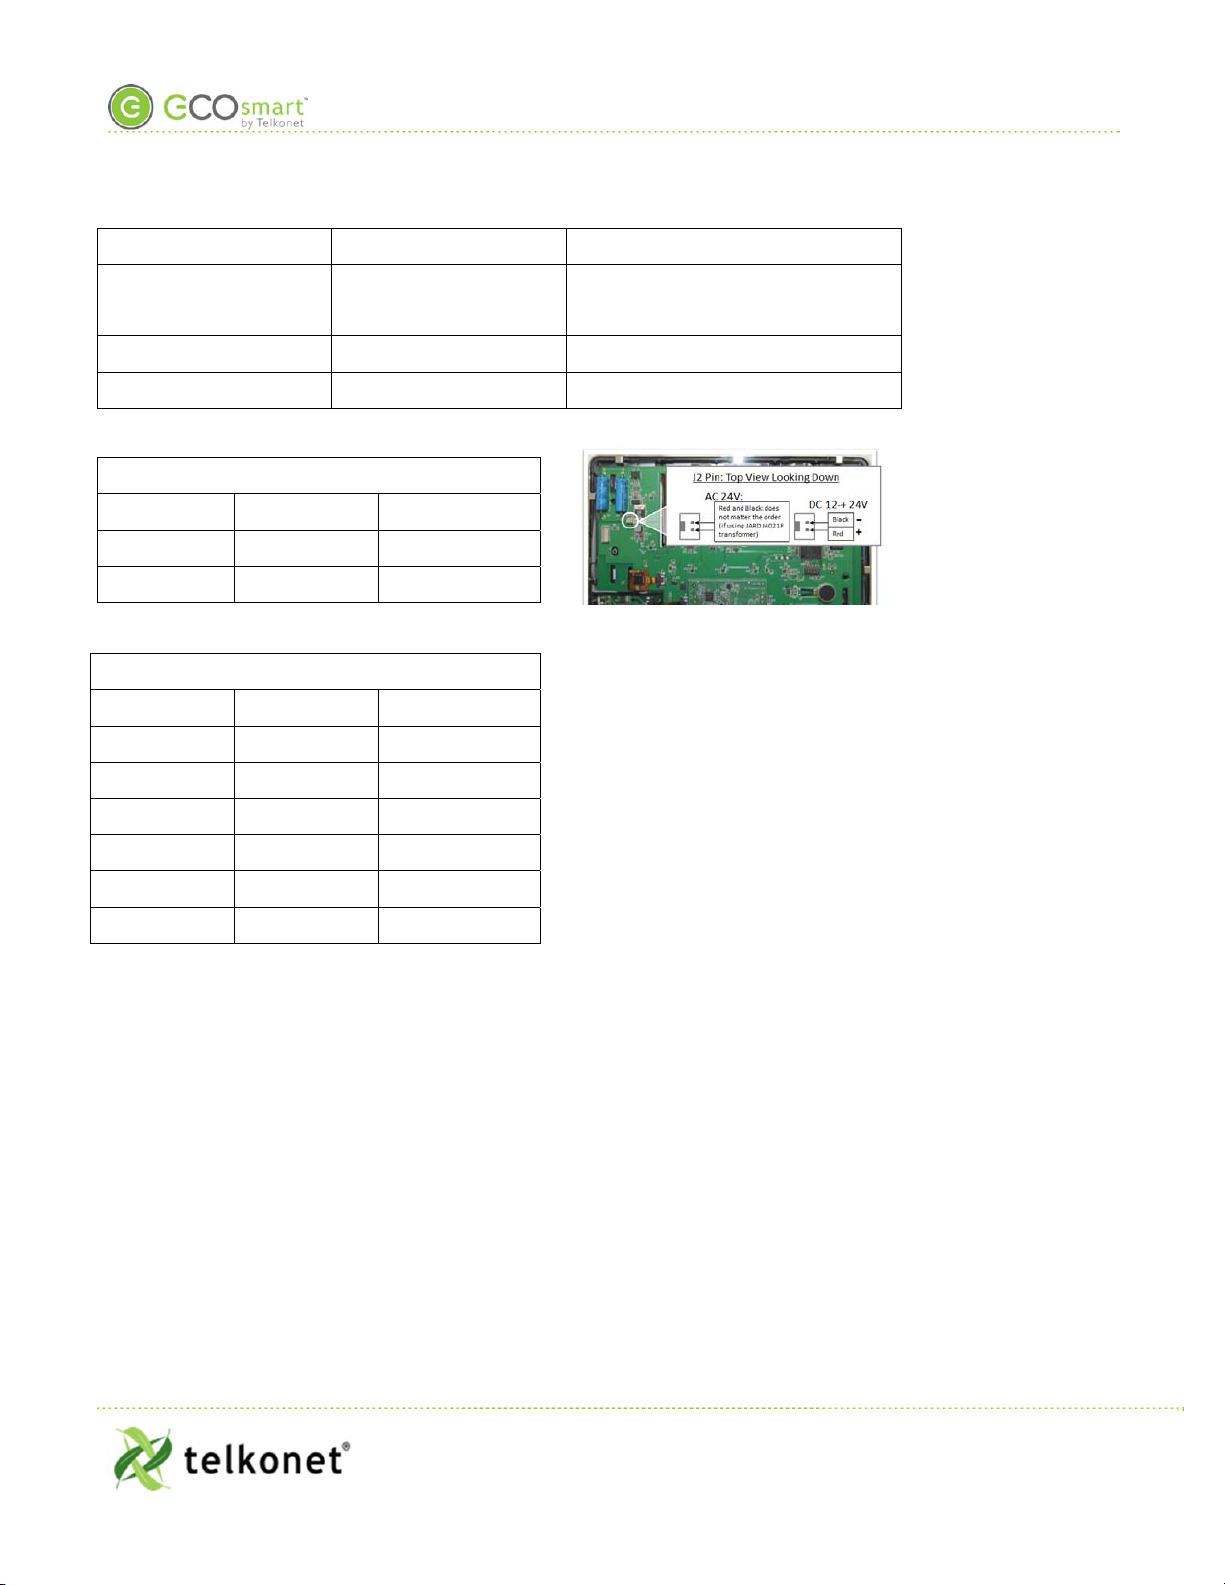
J2 Connector
PIN # SIGNAL COLOR
1 VAC RED
2 VACCOM BLACK
J3 Connector
PIN # SIGNAL COLOR
1 VBAT RED
2 GND BLACK
3 TXD ORANGE
4 RXD WHITE
5 EXTSIG YELLOW
6 GND BLACK
Figure 1-J2 Pin
Equipment Needed
EcoTouch+ IO&M Guide
Telkonet, Inc.
For Use with Firmware Version 2.x
20800 Swenson Drive, Suite 175
Equipment Needed
Waukesha, WI 53186
Revision 5
(414) 302-2299
Page 8
www.telkonet.com
Equipment Needed
EcoTouch+
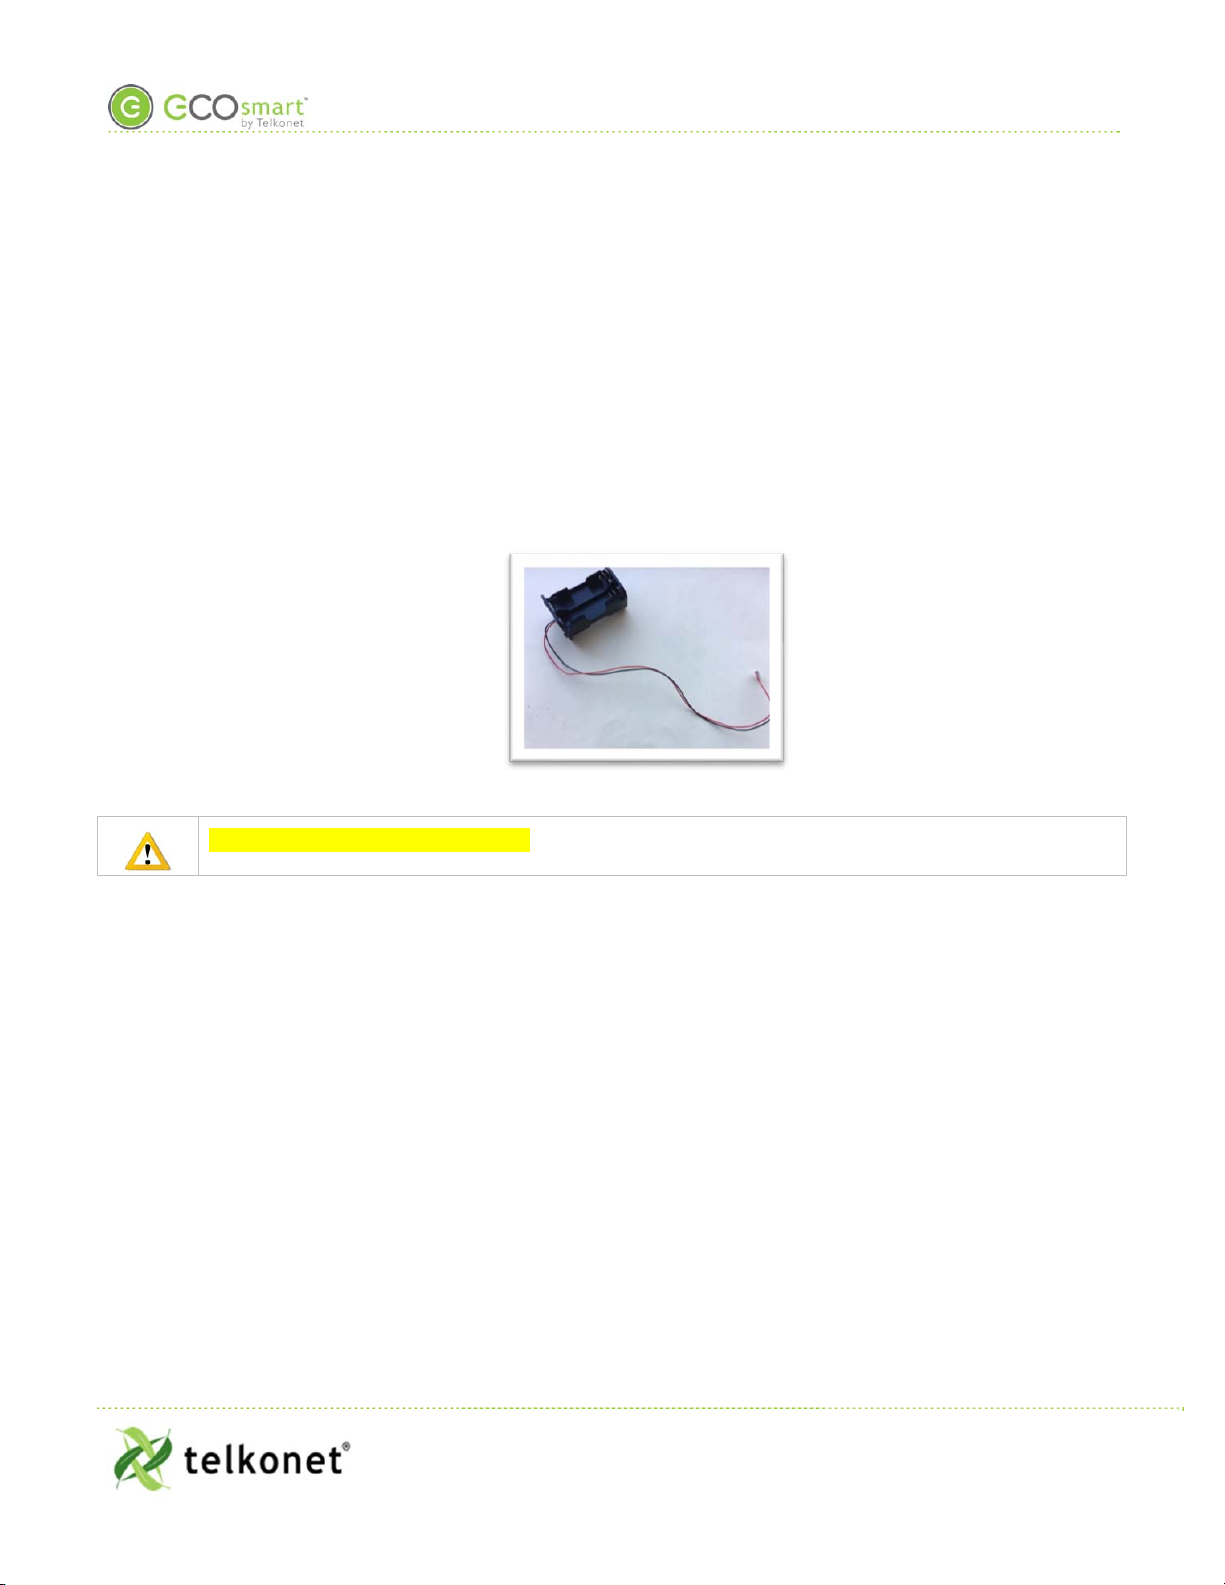
Battery Pack (if applicable) (see Figure 2)
4 AA Batteries (if applicable)
Level
Multi-screwdriver (or Phillips screwdriver)
UL rated insulating tape (if applicable)
4 Screws
oDrywall mounting: 4 #6 x 1.25 flathead screws & wall anchors , or
oMetal mounting: 4 self-tapping metal screws
oConcrete mounting: 4 self-tapping concrete screws
o
Figure 2-Battery Pack
Bracket and jbox are NOT required.

Install the EcoTouch+
EcoTouch+ IO&M Guide
Telkonet, Inc.
For Use with Firmware Version 2.x
20800 Swenson Drive, Suite 175
Install the EcoTouch+
Waukesha, WI 53186
Revision 5
(414) 302-2299
Page 9
www.telkonet.com
Install the EcoTouch+
EcoTouch+ can accept 24VAC or 12-14VDC on J2.
Tip: Switched Mode Power Supplies
A noisy supply voltage can interfere with the performance of the EcoTouch+ functionality (such as the
capacitive touch screen).
One way to resolve the problem is to tie the 12 VDC ground to the j-box ground.
Use wire harnesses with red and black stripped wires and JARD J4021F transformers, both provided
by Telkonet. (Exceptions may apply in certain circumstances.)
1. Review table on page 4 to determine where the EcoTouch+ will be mounted.
2. De-energize power from the circuit prior to making an electrical connection to the EcoTouch+.
3. Remove the security screw from the EcoTouch+ (see Figure 3).
Figure 3-Security Screw
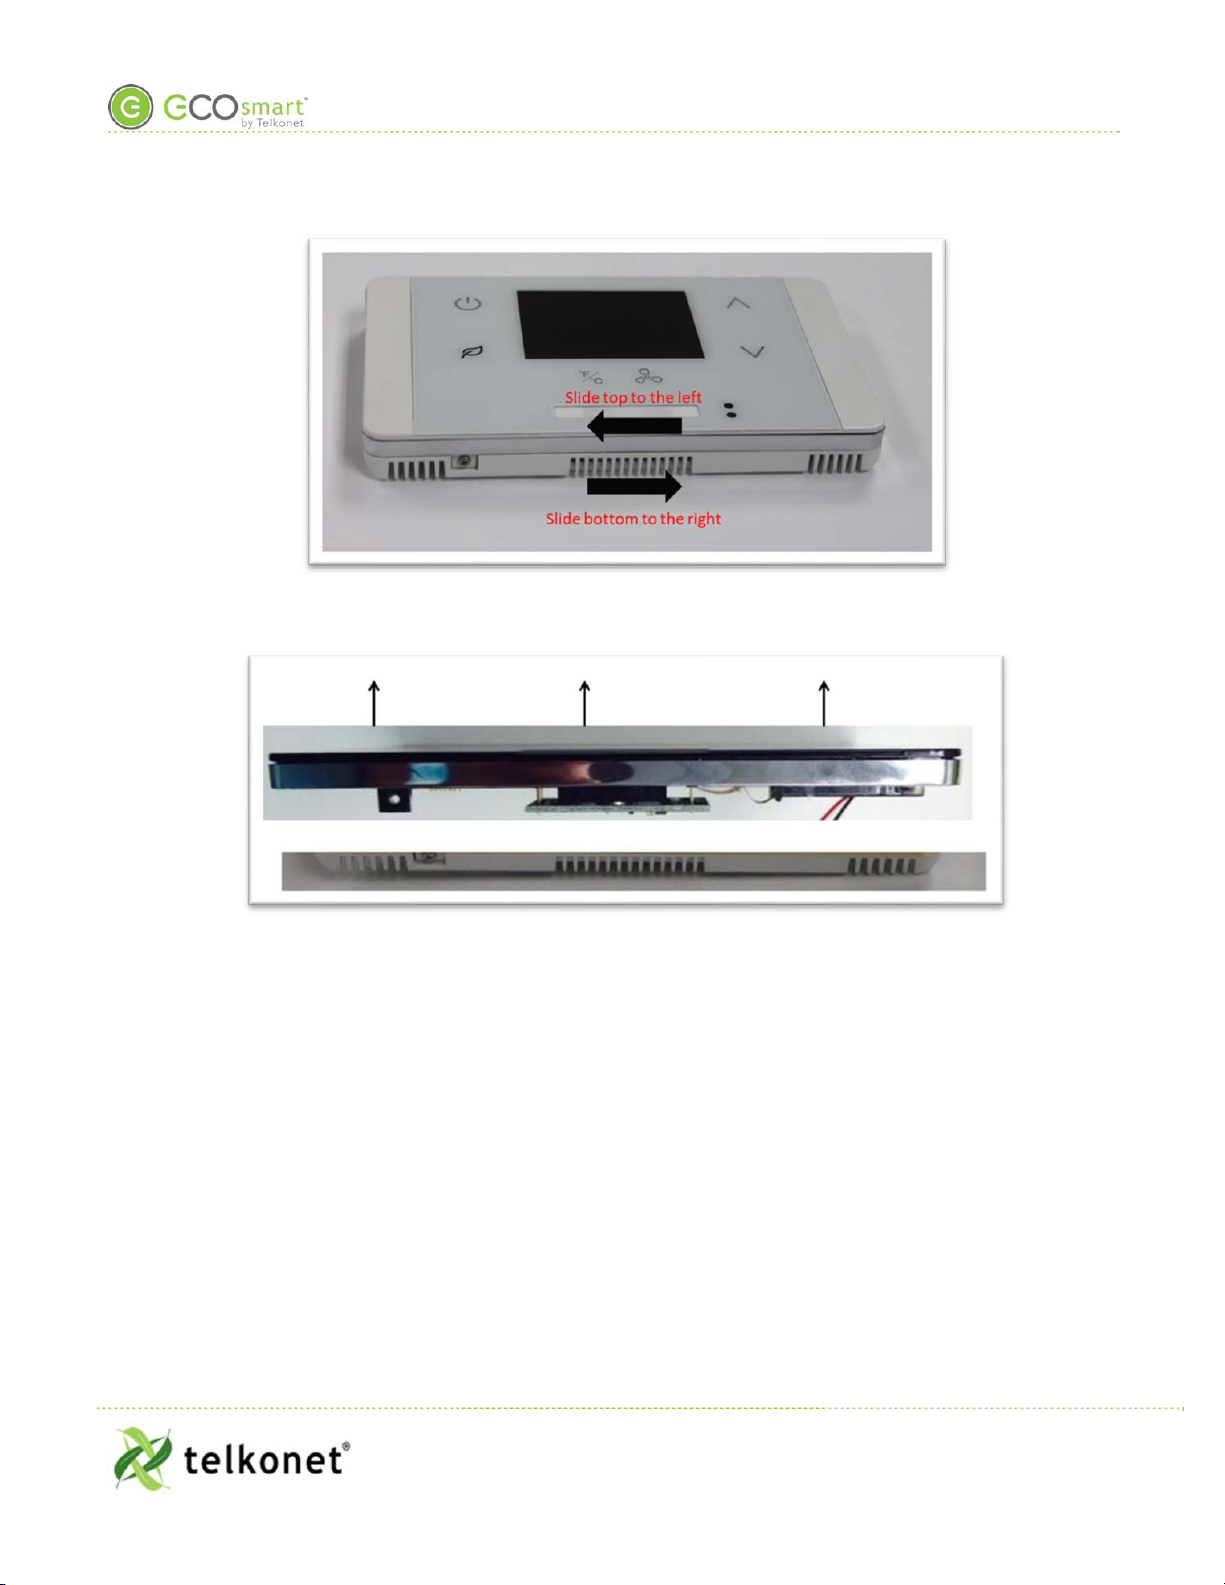
4. Separate the backplate from the EcoTouch+ by sliding the backplate to the right and the front plate
to the left (approximately ¼ inch), as shown in Figure 4.
Install the EcoTouch+
EcoTouch+ IO&M Guide
Telkonet, Inc.
For Use with Firmware Version 2.x
20800 Swenson Drive, Suite 175
Install the EcoTouch+
Waukesha, WI 53186
Revision 5
(414) 302-2299
Page 10
www.telkonet.com
Figure 4: Slide Top Left, Bottom Right
5. Lift the front plate up and off of the back plate as shown in Figure 5.
Figure 5: Lift Up and Off
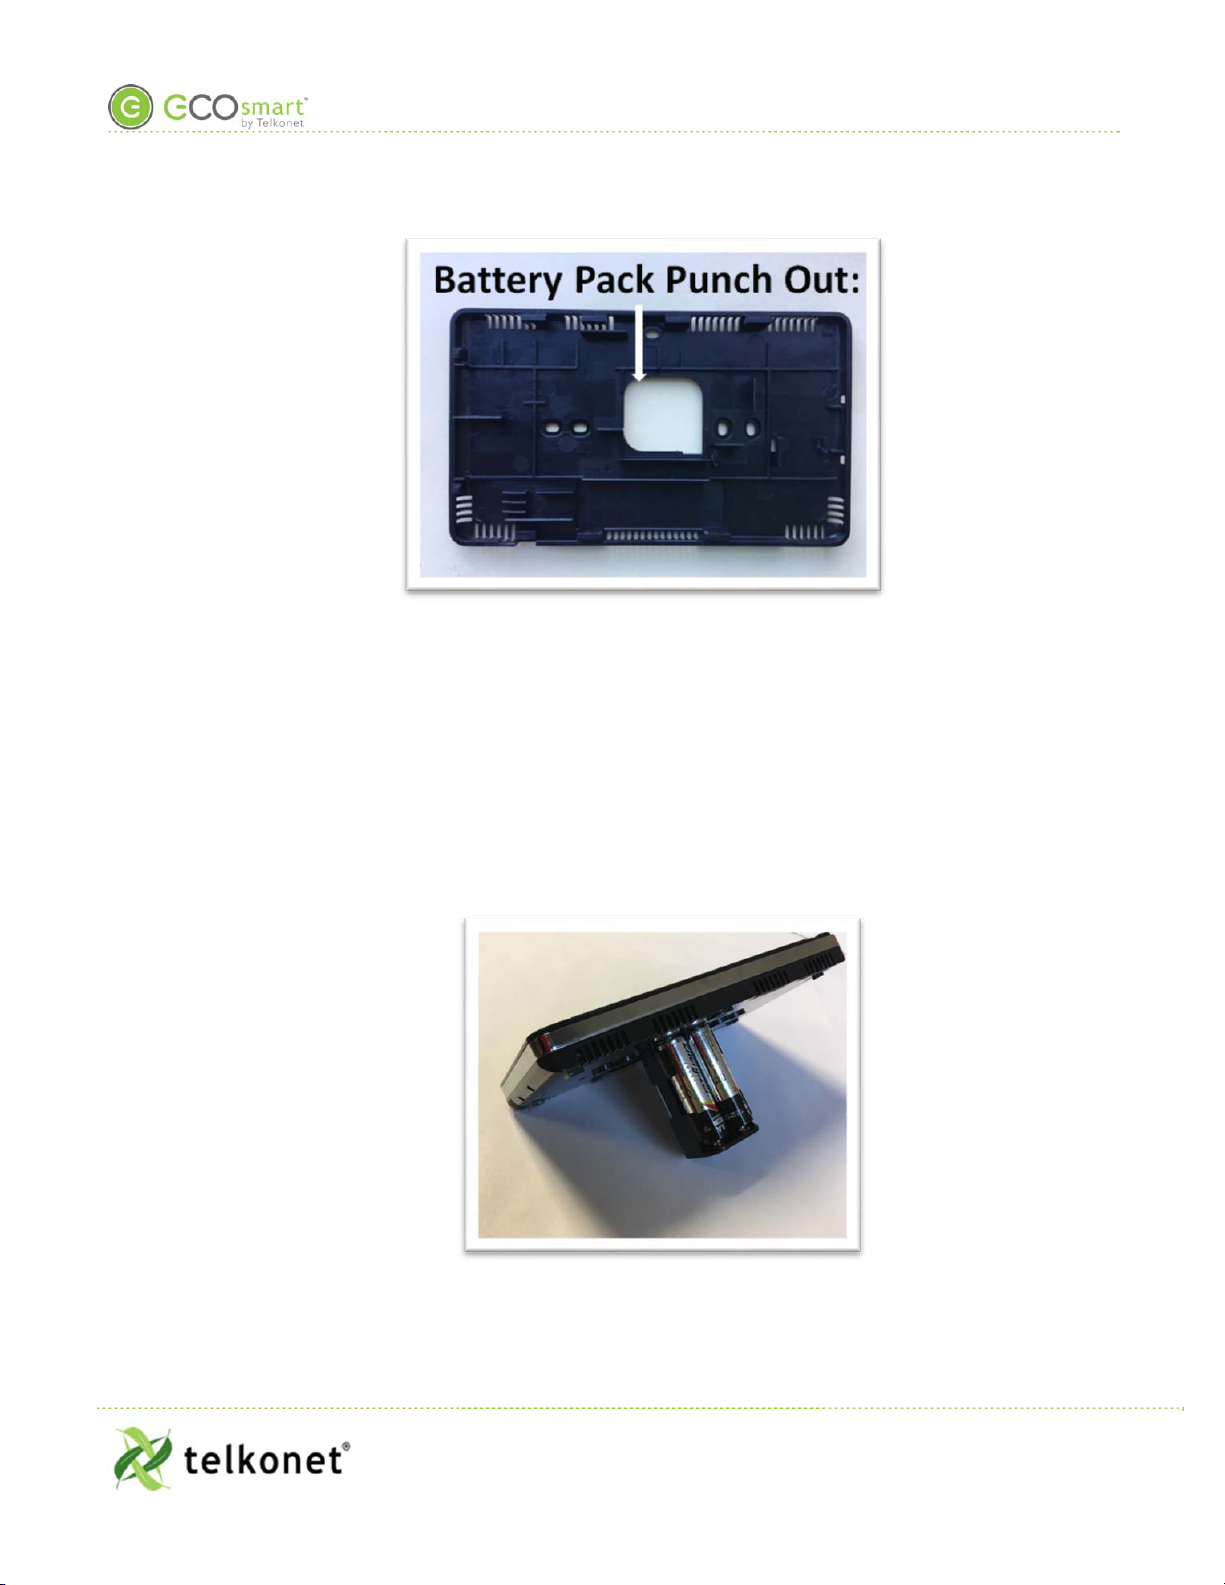
6. Remove all applicable punch outs from the EcoTouch+ backplate. Battery version: be sure remove
the battery pack punch out from the EcoTouch+ backplate (Figure 6).
Install the EcoTouch+
EcoTouch+ IO&M Guide
Telkonet, Inc.
For Use with Firmware Version 2.x
20800 Swenson Drive, Suite 175
Install the EcoTouch+
Waukesha, WI 53186
Revision 5
(414) 302-2299
Page 11
www.telkonet.com
Figure 6-Battery Pack Punch Out
7. Level the backplate on the wall.
8. Battery Version: mark the placement of the battery pack hole using battery pack punch out (again,
see Figure 6).
9. Mark the placement for the mounting screws.
10. Battery Version: cut out a 1.5” x 1.5” hole in the wall where you marked it Step 8.
11. Mount the backplate to the wall using the mounting screws.
12. Battery Version: Insert 4 batteries in the battery pack.
13. Battery version: slide battery pack through the punch out and into the wall (see Figure 7). (Neither
a mounting bracket nor jbox are required.)
Figure 7: Installed Battery Pack (Hidden from View)

Install the EcoTouch+
EcoTouch+ IO&M Guide
Telkonet, Inc.
For Use with Firmware Version 2.x
20800 Swenson Drive, Suite 175
Install the EcoTouch+
Waukesha, WI 53186
Revision 5
(414) 302-2299
Page 12
www.telkonet.com
14. Note the J2 pin as shown in Figure 1; this is the pin to which you will connect power.
15. Note the J2 wires coming out from the wall or battery pack.
16. You will attach the J2 wires to the J2 pin.
Do NOT apply wire nuts while the circuit is energized. Wire-nut the connection in a
de-energized state.
oIf your power is an AC 24V transformer, then connect the red wire and black wire to the top 2
pins; it does not matter whether the red wire is on top and the black wire is in the 2nd slot
from the top, or vice versa.
oIf your power is a 12-24VDC installation, then connect the black wire to the top pin (this is the
“Ground” or “Common” pin) and connect red wire to the 2
nd
pin-the pin just below the top pin
(this is the “Power” pin).
17. Place the cover over the backplate, about ¼” to the left as shown in Figure 8.
Figure 8: Replace Cover
18. Slide the cover to the right to secure it.
19. Screw in the security screw.
Your EcoTouch+ is now installed.
Next, associate your devices (join to network, bind, pair).
Device Assn. Procedures Must Be Performed in Order
EcoTouch+ IO&M Guide
Telkonet, Inc.
For Use with Firmware Version 2.x
20800 Swenson Drive, Suite 175
Device Assn. Procedures Must Be Performed in Order
Waukesha, WI 53186
Revision 5
(414) 302-2299
Page 13
www.telkonet.com
Device Assn. Procedures Must Be Performed in Order
See Device Association Guide for detailed instructions on associating devices.
See third party IOM’s for detailed instructions on associating third party devices.
Reminder: associating devices must be done in this order:
1. Set up EcoCommander.
2. Hard wire EcoConnect coordinators to the EcoCommander.
3. Create a network via the EcoConnect coordinator.
4. Join routers (e.g. EcoSources+) to the EcoConnect coordinator.
5. Join/ bind EcoTouch+ to EcoSource+.
6. Join/ bind EcoContact+ to EcoSource+ (if applicable).
7. Join/bind EcoSense+ to EcoSource+ (if applicable).
8. Bind third party devices (such as Control4, Saflok, etc.) in the room.

Test Lutron Lighting Scenes (if applicable)
EcoTouch+ IO&M Guide
Telkonet, Inc.
For Use with Firmware Version 2.x
20800 Swenson Drive, Suite 175
Test Lutron Lighting Scenes (if applicable)
Waukesha, WI 53186
Revision 5
(414) 302-2299
Page 14
www.telkonet.com
Test Lutron Lighting Scenes (if applicable)
Be aware of your property’s lighting “scene” details, so you can test them
properly. See next page for lighting “scene” explanation.
1) On the EcoTouch+, 3-finger
tap* anywhere on screen.
*i.e. touch screen using 3 fingers,
simultaneously; slightly spread out
your fingers so all three fingers are
recognized by screen.
2) Config
Back
3) Password C57A
Enter
4) Lutron
BackBack
Continued on next page.
Standard feature for all codes going
forward from this point:
•EcoSource+: 3.2.2.0 or greater
•EcoTouch+: 4.0.27.0 or greater (3-
finger-touch the screen for EcoTouch+
version#)
Test Lutron Lighting Scenes (if applicable)
EcoTouch+ IO&M Guide
Telkonet, Inc.
For Use with Firmware Version 2.x
20800 Swenson Drive, Suite 175
Test Lutron Lighting Scenes (if applicable)
Waukesha, WI 53186
Revision 5
(414) 302-2299
Page 15
www.telkonet.com
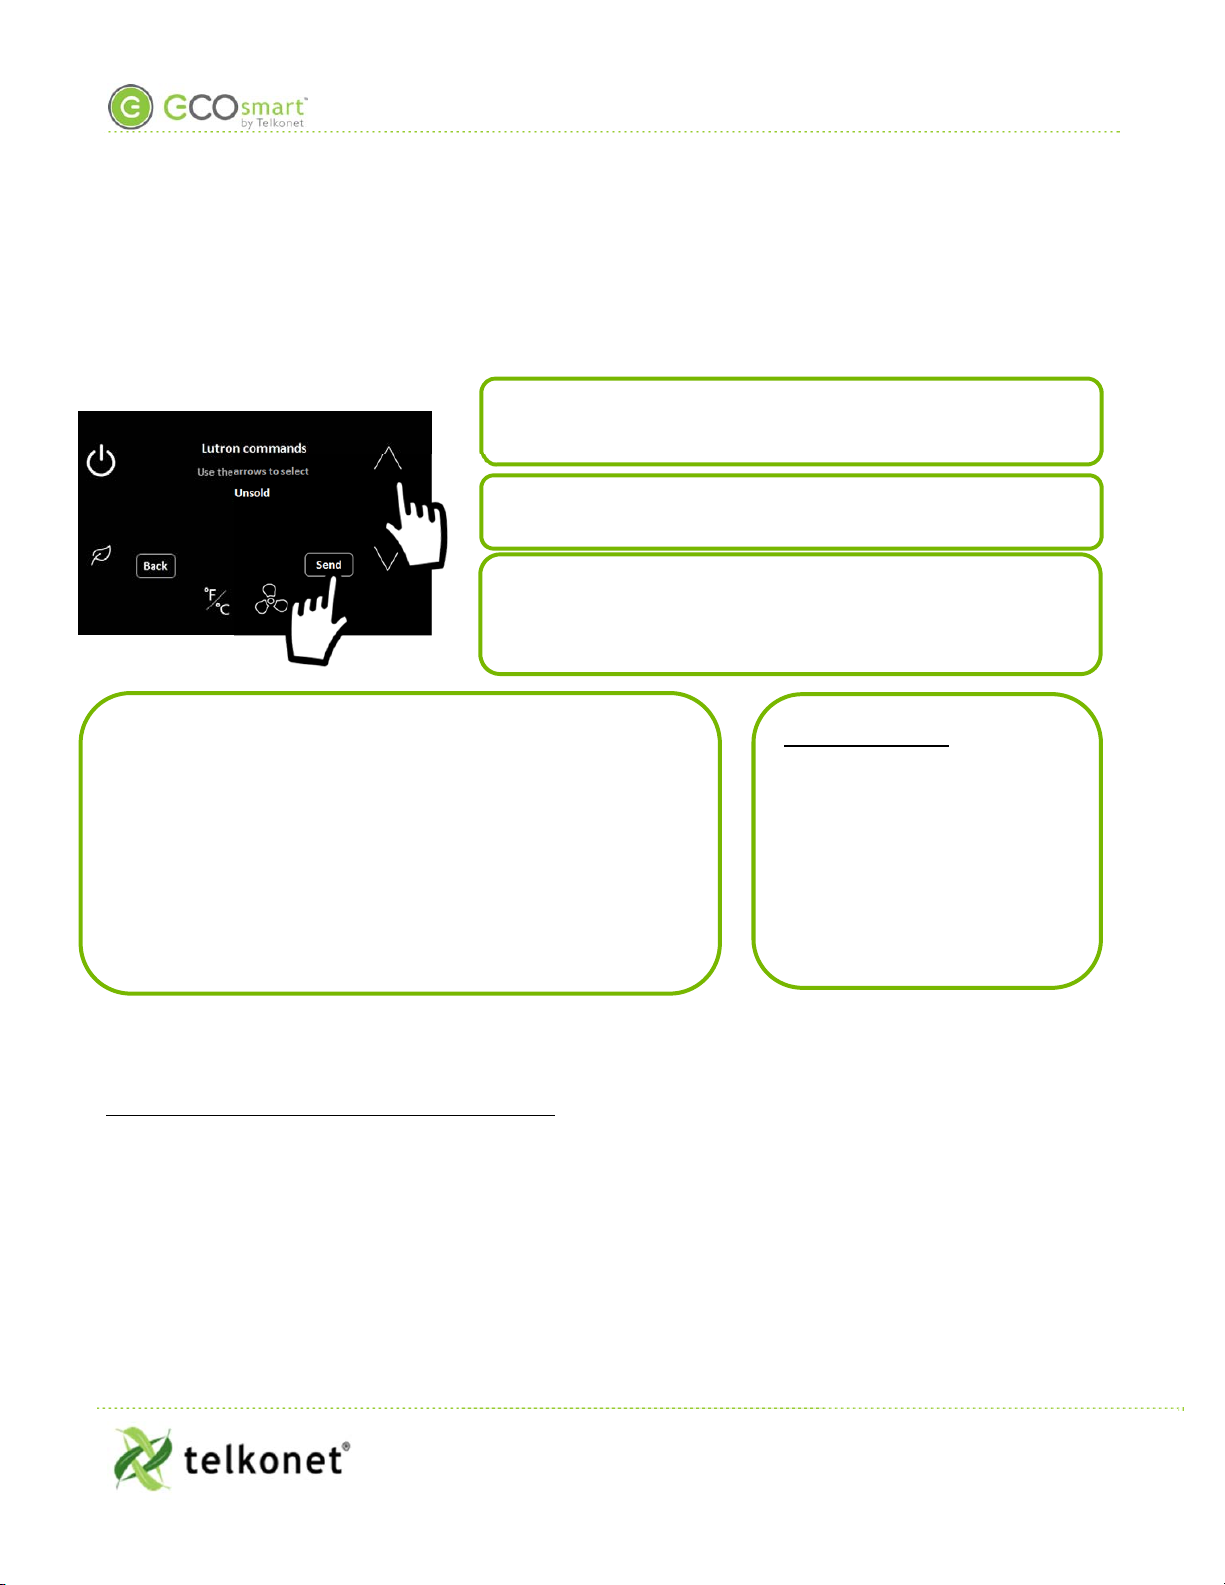
5) A “scene” will appear on the screen as shown here. (In this
example, it’s Unsold.) Touch Send.
9) If a Scene Fails
• Ensure the cable
connecting the Lutron
repeater to the
EcoSource+ is properly
connected.
• Ensure the Lutron
repeater and
EcoSource+ are
powered up.
*HowdoIknowwhatactionthelightsshouldtake?
Yourpropertypreviouslydeterminedwhichlightsshouldturnon/offforeach“scene”.Checkwithyour
property’sDOEorotherrepresentativefortheirLutronlighting“profiles”.
8) Verify the lights in the room turn on or off for this scene.
Repeat the process until all 4 scenes are successfully tested.
The 4 Lutron “scenes” are:
1. Unsold
2. Unoccupied
3. Guest re-entry scene
4. Guest first entry
7) After testing the first scene, select the next scene by
touching an arrow (up or down). The next “scene” appears on
the screen. Touch Send.
6) Verify the lights react to the scene as intended.*
Test EcoSmart/Saflok Communication (if applicable)
EcoTouch+ IO&M Guide
Telkonet, Inc.
For Use with Firmware Version 2.x
20800 Swenson Drive, Suite 175
Test EcoSmart/Saflok Communication (if applicable)
Waukesha, WI 53186
Revision 5
(414) 302-2299
Page 16
www.telkonet.com
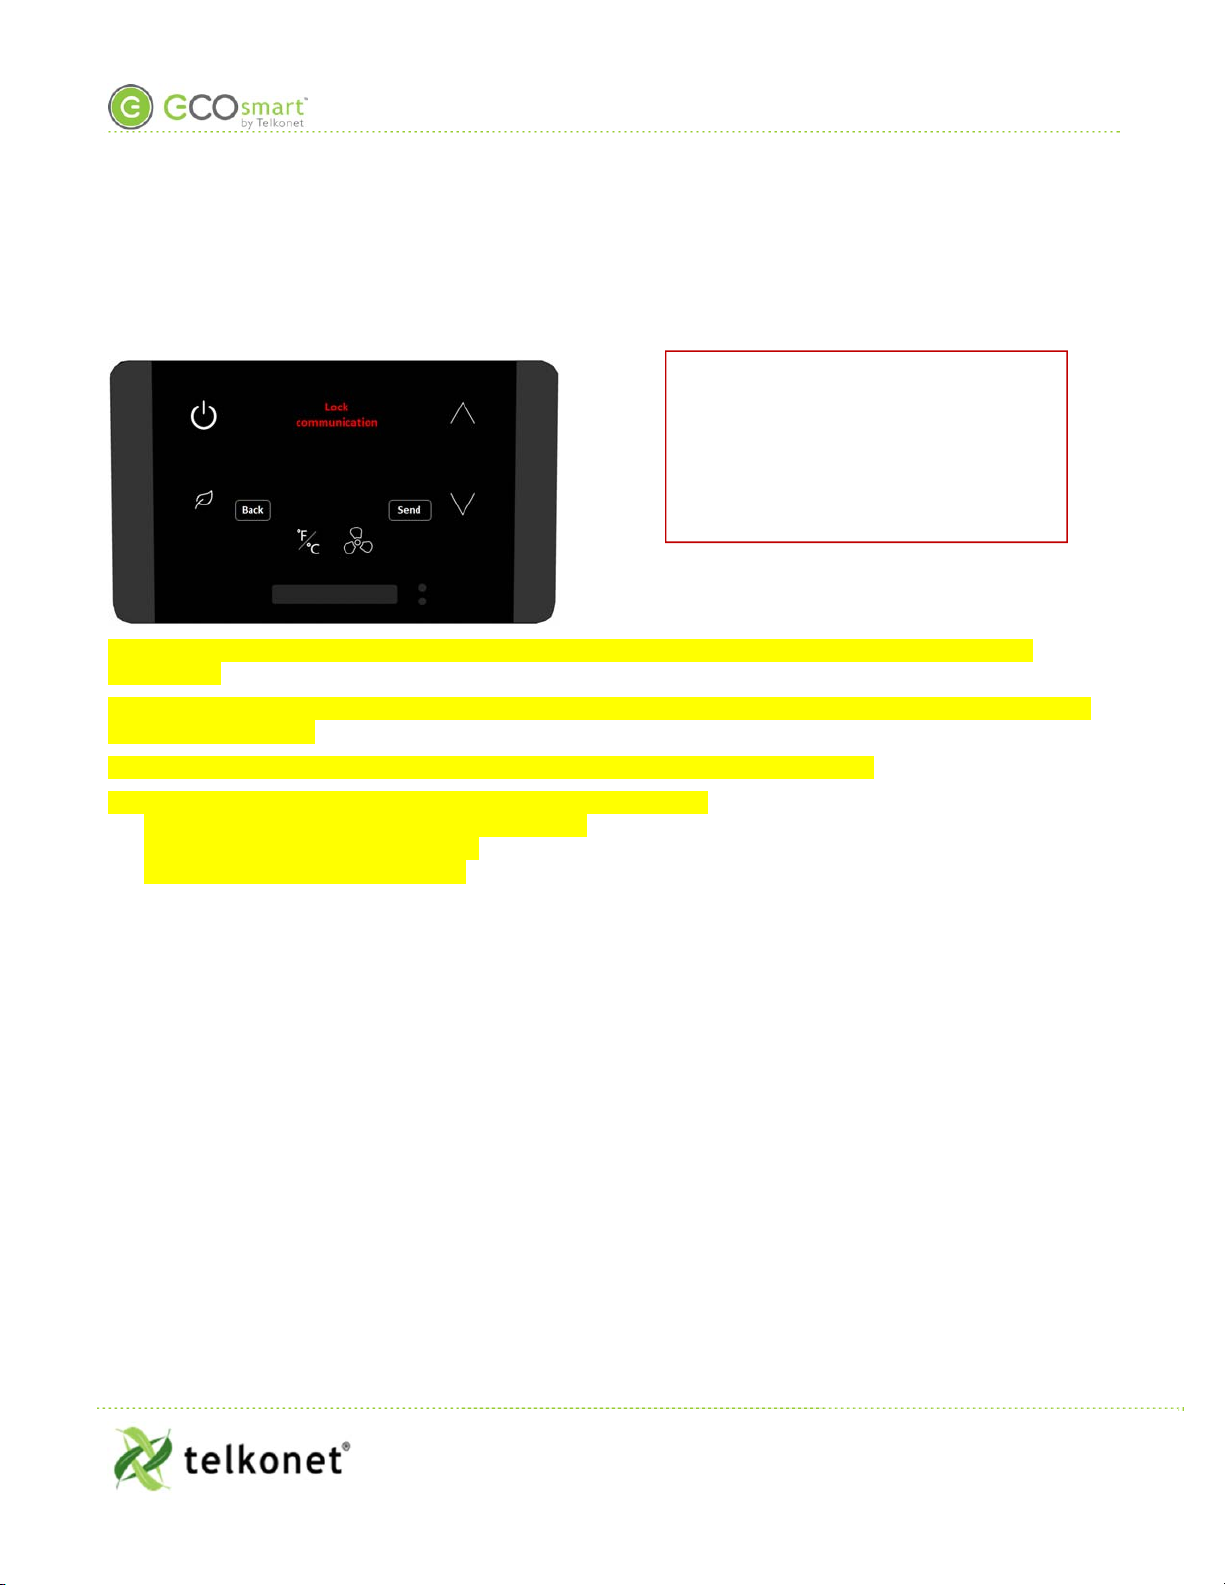
Test EcoSmart/Saflok Communication (if applicable)
The EcoTouch+ and Saflok door lock begin communicating with each other as soon as the thermostat is
powered on.
As long as the thermostat has power, it routinely sends messages to the Saflok door lock, and the Saflok door
lock returns responses.
If the door lock fails to respond, the above error message appears on the EcoTouch+.
If this error message appears, troubleshoot by doing the following:
1. Ensure the EcoSource+ and Saflok are joined.
2. Ensure the Saflok batteries work.
3. Rejoin Saflok to the EcoSource+
Standard feature for all codes going
forward from this point:
•EcoSource+: 3.2.2.0 or greater
•EcoTouch+: 4.0.27.0 or greater (3-
finger-touch the screen for EcoTouch+
version#)
Commission EcoTouch+
EcoTouch+ IO&M Guide
Telkonet, Inc.
For Use with Firmware Version 2.x
20800 Swenson Drive, Suite 175
Commission EcoTouch+
Waukesha, WI 53186
Revision 5
(414) 302-2299
Page 17
www.telkonet.com
Commission EcoTouch+
What is “Commissioning”?
A generic definition of “commissioning” is to bring a
new product into working condition.
“Commission” the EcoSmart thermostat to do 2 things:
1. Scan the room while the room is empty so it
recognizes even the smallest “movement”
(like flowing air from a fan, and even radio
waves) when the room is unoccupied.
2. Test the HVAC system functionality. If there’s
an HVAC problem, the thermostat will display
a message so you can fix it right away.
You simply complete the process described on below;
the thermostat does the work.
Continued on next page.
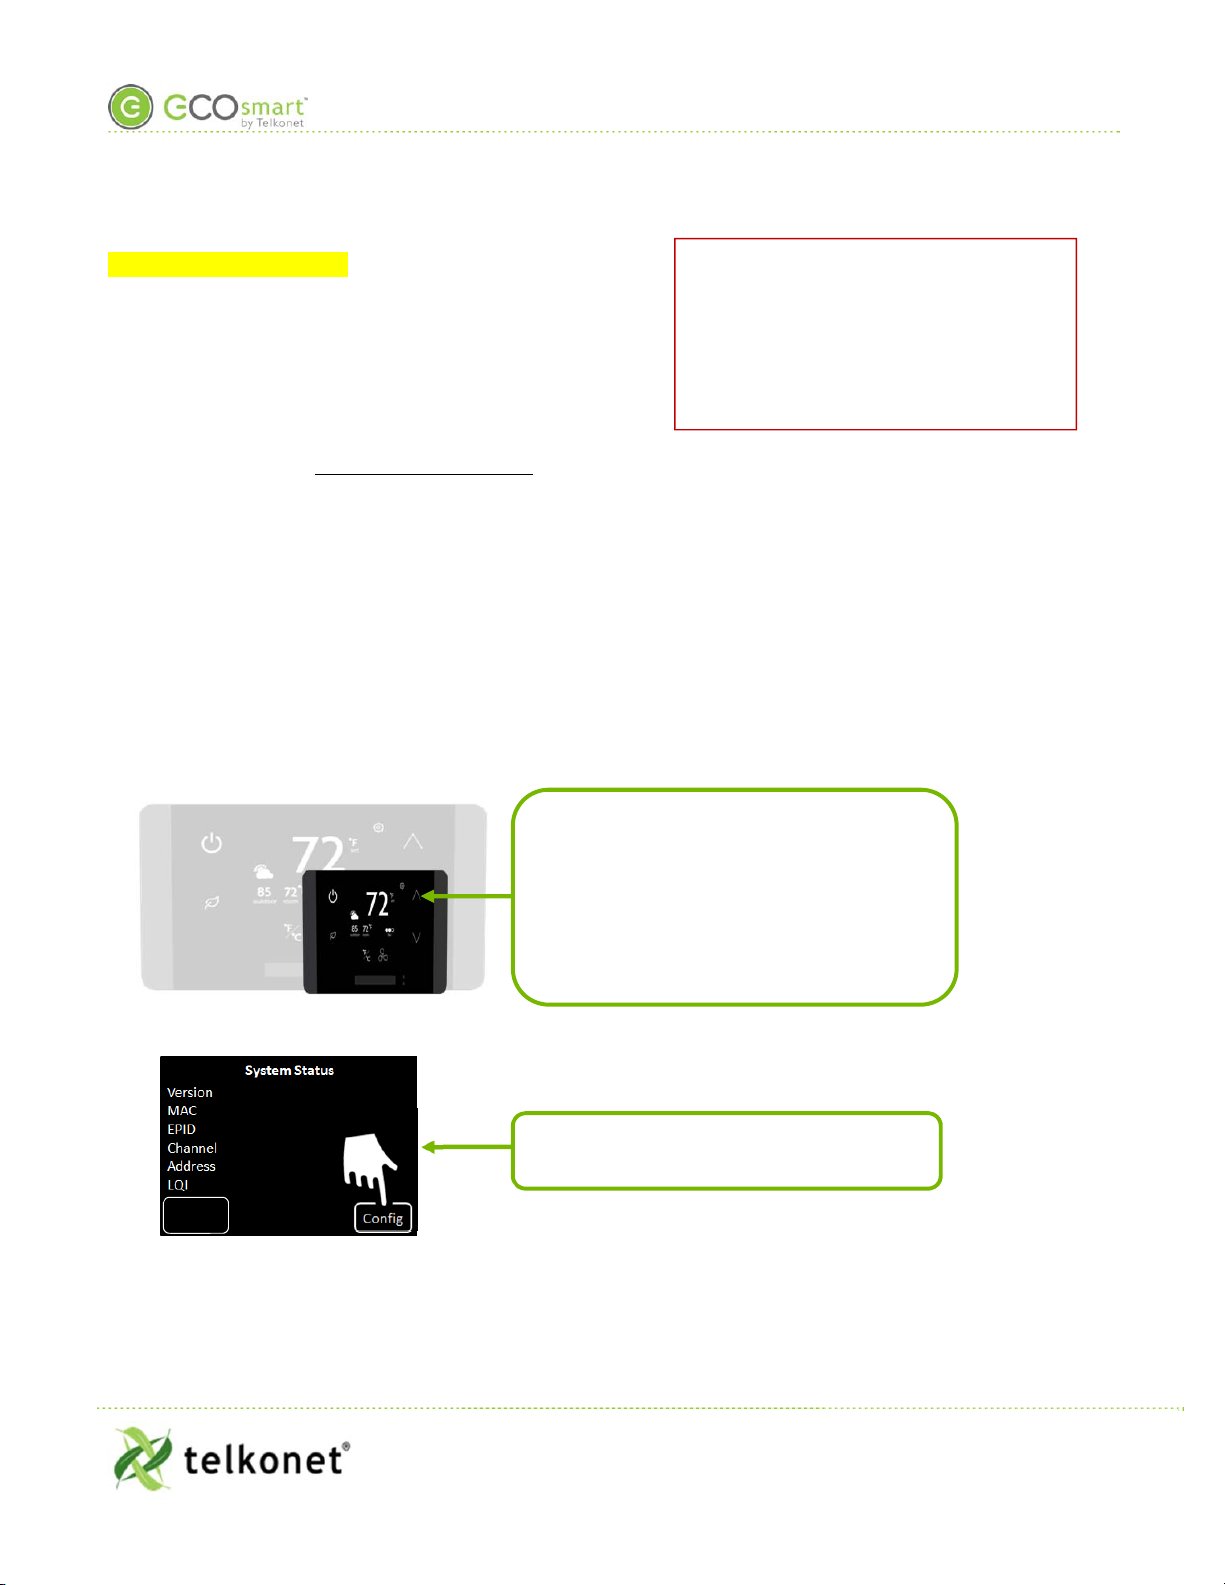
1) 3-finger tap* anywhere on screen.
*i.e. touch screen using 3 fingers,
simultaneously; slightly spread out your
fingers so all three fingers are recognized
by screen.
2) Config
Back
Standard feature for all codes going
forward from this point:
•EcoSource+: 3.2.2.0 or greater
•EcoTouch+: 4.0.27.0 or greater (3-
finger-touch the screen for EcoTouch+
version#)
Table of contents
Other Telkonet Thermostat manuals


