Telos Alliance iPort High Density User manual

Telos iPort High Density
iPort High Density
Telos iPort High Density is a networked multi-codec gateway that enables the transport of multiple channels
of stereo audio across any QoS-enabled IP network, including T1 and T3 connections and private WANs
with MPLS – perfect for large-scale distribution of audio to single or multiple locations.
iPort High Density is the workhorse of codecs, configurable with up to 64 bi-directional MPEG codecs.
Optionally, you can add aptX® encoding to any codec or use Linear PCM audio. iPort HD connects to Axia®
IP-Audio networks using a single ethernet cable for all I/O or can be used as a standalone multiple-stream
codec.
Coding algorithms include AAC, AAC-LD, HE-AAC (plus v2), MP2, MP3, optional aptX® Enhanced, or
Linear PCM. Bit rates range from 24 to 320 kbps for MPEG codecs, plus standard fixed rates for aptX, 24 bit
48k for Linear PCM. iPort High Density offers dual, parallel-path end-to-end streaming for ultra-reliability
and redundancy. Up to 20 unidirectional GPIO contact closures per codec are available in several modes to
allow considerable control flexibility. End-to-end GPIO is supported for each codec. An optional unique
Content Dealy feature allows independent local storage and scheduled delayed playout of any coded audio
channels.
Important - Content Delay requires additional installed hardware and a separate license for
activation. The base model iPort High Density does NOT include this hardware.
Quick Start Guide
Getting Started
Registration
We know you're anxious to mount your new Telos iPort High Density and get it running, but please take a
moment to register your product online to activate the warranty and ensure you will get quality support
should you have questions regarding installation, operation, or troubleshooting. Visit
to register.http://telosalliance.com/product-registration/
Hardware Installation
The 1RU iPort High Density hardware mounts in a standard 19-inch rack with supplied rack rails. The rear
of the unit must be supported. To prevent damage, if the supplied rack rails are not used, a supporting shelf
is recommended. Install iPort High Density in a location where cooling fan noise is not an issue.
Important - Please see the for important installation and
electrical safety information.
User Warnings and Cautions page
Front Panel
The front panel gives basic status indications including power, SSD drive activity, and connectivity
indicators for the NET 1 and NET 2 connections. There are no controls on the front panel. iPort High
Density will power on automatically once connected to power.
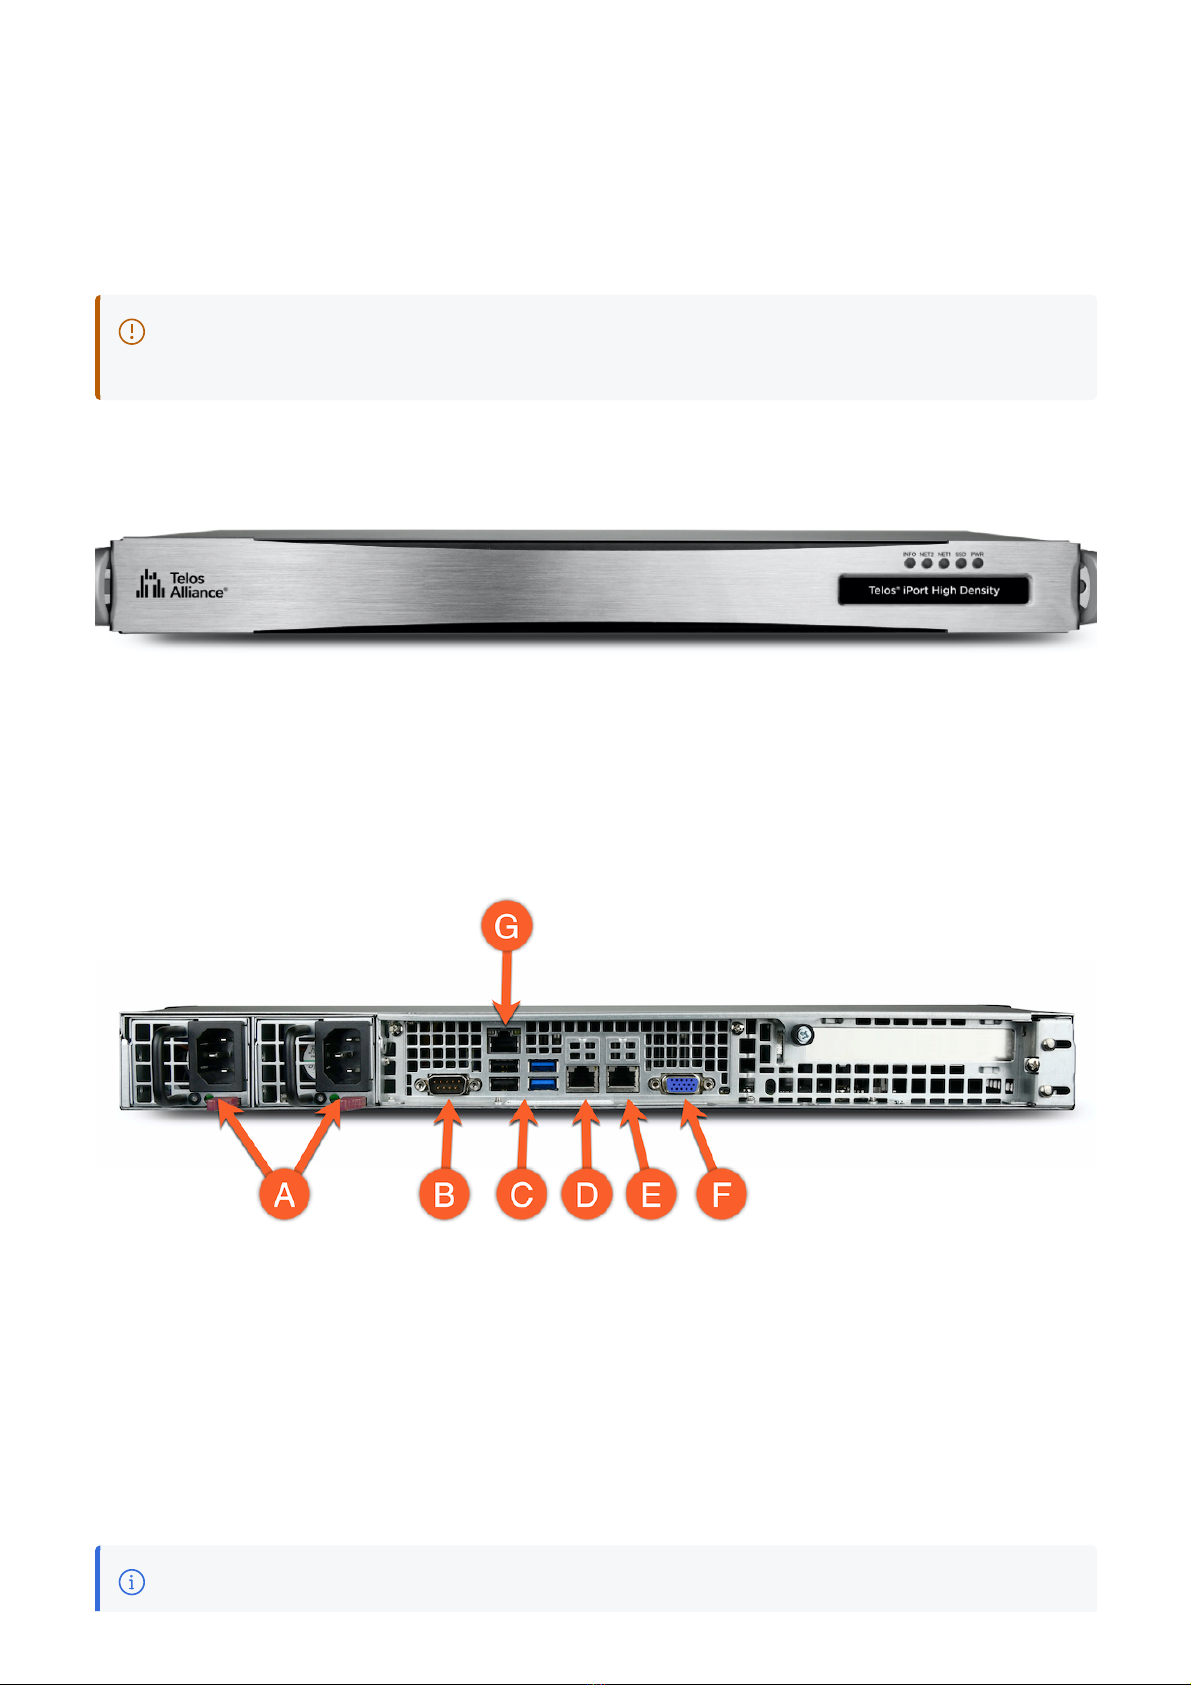
Rear Panel Connections
iPort High Density rear panel connections
A. Power
B. RS232 (Serial)
C. USB Ports
D. NET 1 (WAN)
E. NET 2 (Livewire - LAN)
F. VGA Connector
G. Intelligent Platform Management Interface (IPMI)
Note - USB and VGA port connections may be required for the initial IP address configuration. A

connection is not required for normal operation or configuration.
Initial Configuration
Power
Power is supplied by dual, redundant, internal, auto-ranging power supplies, 100-264 VAC, 50/60Hz, 100W
max. These supplies are auto-switching and easily field-replaceable for maximum uptime. A green LED
indicates a normal status. A red LED (or no light at all) indicates a fault.
Note - Using both power supplies - ideally fed from two different sources - is recommended for
redundancy, but iPort High Density can operate on a single power supply. If only one power
supply is connected, release the latch and remove the second power supply to prevent the alarm
from sounding.
Network
The Ethernet mode is set permanently to AUTO for both NICs, and so the switch or router to which they are
connected must be as well. Problems can result if the router or switch is set to a fixed 10, 100, or 1000BT
status.
CAT-5e cables may be used for the Livewire connection, though we recommend CAT-6 when possible for
all 1000BT (Gigabit) connections.
Important - The NET 2 (the Livewire LAN) connection requires a 1000BT full-duplex connection.
For the initial setup, you can connect iPort High Density to your switch or temporarily connect it directly to a
PC using a standard Ethernet cable (a cross-over cable is not required).
iPort High Density ships with network addresses pre-set as follows. If this fits your network scheme, you can
continue with the configuration via a web browser.
WAN (NET 1)
NET 1 has no configuration by default.
LAN (NET 2) Livewire or AoIP Network
IP Address (static): 192.168.2.100
Subnet Mask: 255.255.255.0

Gateway: Not offered on LAN interface
DNS: Not offered on LAN interface
If the pre-configured address scheme does not meet your needs, you will need to use a local monitor and
keyboard and follow the instructions in the section of the User Manual. Alternate Method for IP Addressing
Connecting to the Web Interface
iPort High Density can be remotely accessed from a web browser on any PC on the network.
1. Connect the iPort High Density to your network using NET 2.
2. From a computer connected to the same network, point your browser to the iPort by entering the unit’s IP
address (http://192.168.2.100).
3. When prompted, enter the user name "user".
4. The default password is blank (no password).
After login, the Home screen is displayed:
iPort High Density Home screen
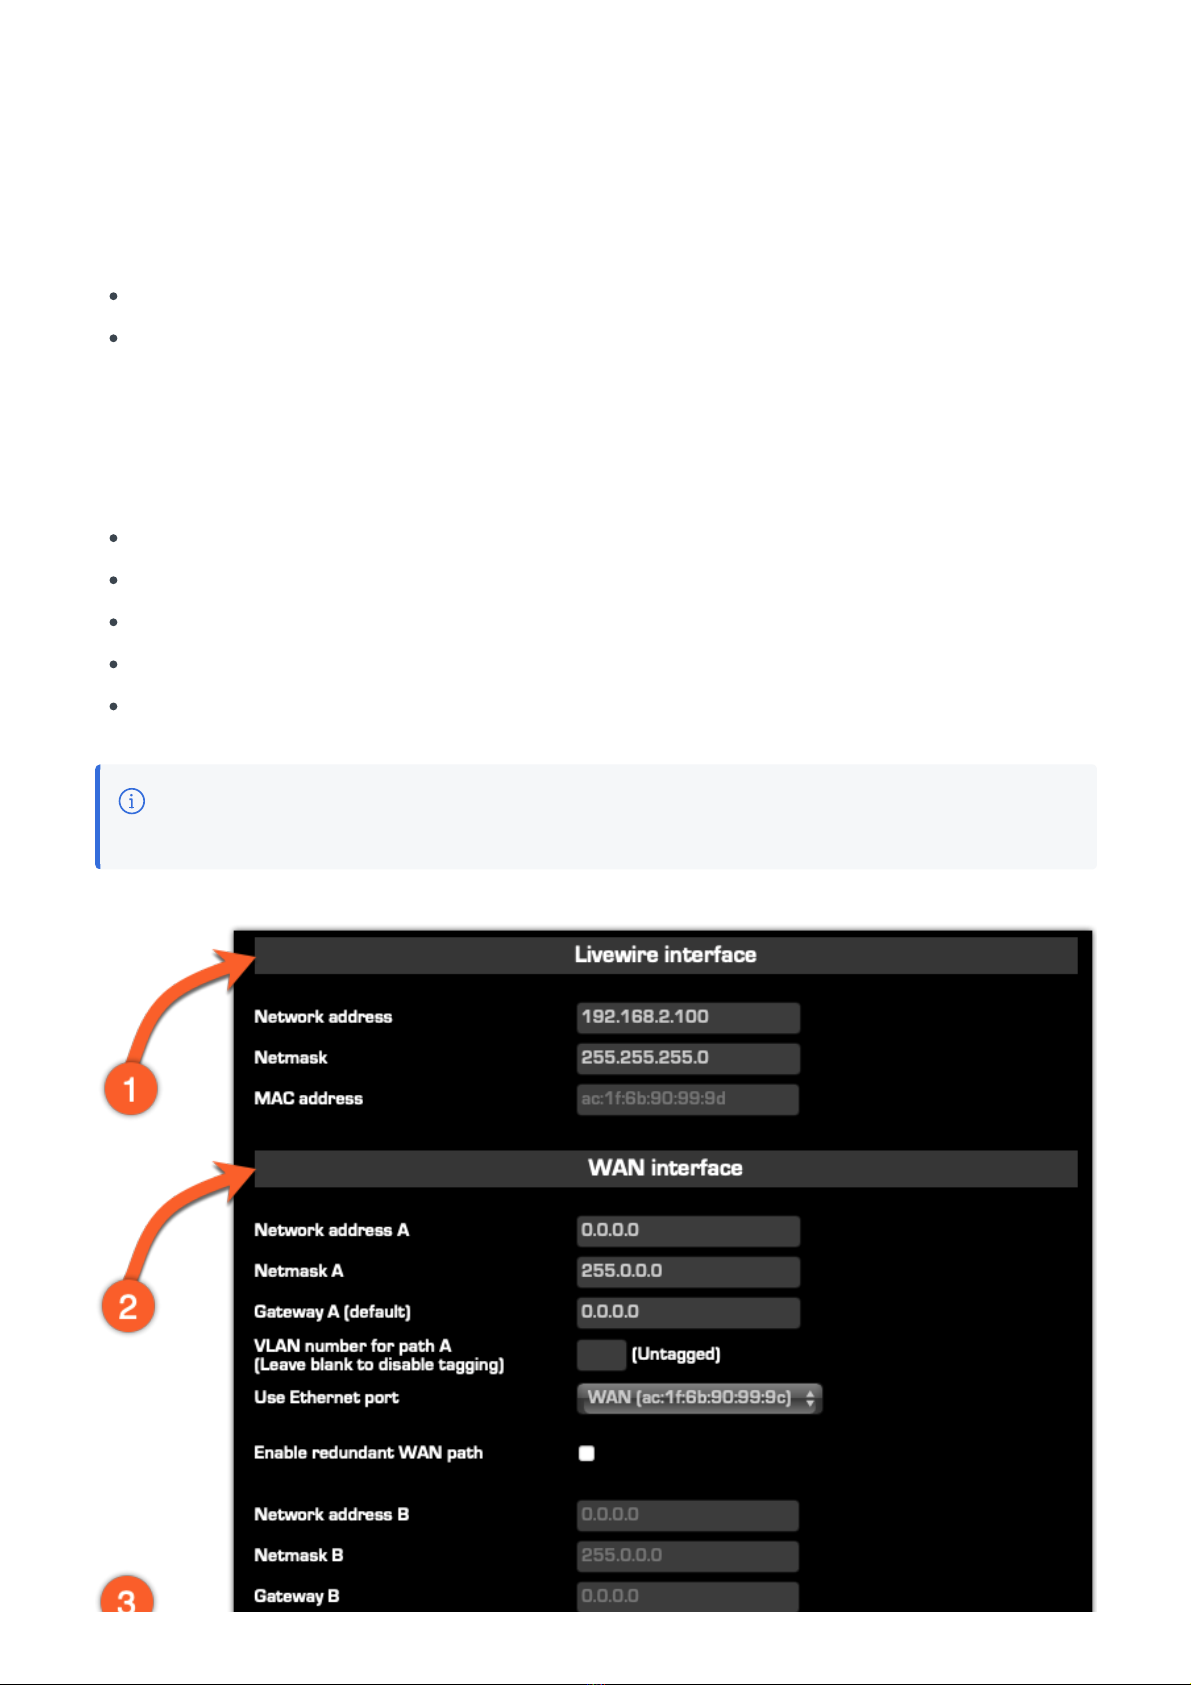
Completing Network Configuration
From the left side menu, choose Network under the Configuration heading. The current settings for the
Livewire (LAN) and WAN interfaces are displayed.
Configuring the Livewire (LAN) Interface (1)
Set the Network address
Set the Netmask
Note that the Livewire interface does not require or support a Gateway or DNS.
Configuring the WAN Interface (2)
Set Network Address A
Set Netmask A
Set Gateway A
Check the "Enable Configuration Access from WAN" if desired (3)
Click "Apply", then answer "Yes" to allow the system to restart
Note - Using the "B" network configuration is an advanced topic covered in detail in the User
Manual.

Livewire (LAN) and WAN interface configuration
Adding Feature Licenses
iPort High Density comes with eight codecs pre-licensed. No additional steps are required if you did not
purchase additional options.
To add additional licenses, please refer to the User Manual. Additional licenses may include additional
codecs, aptX encoding options, or Content Delay features.
Congratulations! You have completed the initial setup. Please proceed to the User Manual for further
instructions.
User Manual
Notices and Cautions
CAUTION:
The installation and service instructions in this manual are for use by qualified personnel only. To avoid
electric shock, do not perform any servicing other than that contained in the operating instructions unless
you are qualified to do so. Refer all servicing to qualified personnel.
This instrument has an auto-ranging line voltage input. Ensure the power voltage is within the specified
range of 100-240v. The ~ symbol, if used, indicates an alternating current supply.
This symbol, wherever it appears, alerts you to the presence of uninsulated, dangerous voltage
inside the enclosure – voltage which may be sufficient to constitute a risk of shock.
This symbol, wherever it appears, alerts you to important operating and maintenance instructions.
Read the manual.
CAUTION: DOUBLE POLE/NEUTRAL FUSING

The instrument power supply incorporates an internal fuse. Hazardous voltages may still be present on
some of the primary parts even when the fuse has blown. If fuse replacement is required, replace the fuse
only with the same type and value for continued protection against fire
WARNING:
The product’s power cord is the primary disconnect device. The socket-outlet should be located near the
device and easily accessible. The unit should not be located such that access to the power cord is impaired.
If the unit is incorporated into an equipment rack, an easily accessible safety disconnect device should be
included in the rack design.
To reduce the risk of electrical shock, do not expose this product to rain or moisture. This unit is for indoor
use only.
This equipment requires the free flow of air for adequate cooling. Do not block the ventilation openings in
the top and sides of the unit. Failure to allow proper ventilation could damage the unit or create a fire hazard.
Do not place the units on a carpet, bedding, or other materials that could interfere with any panel ventilation
openings.
If the equipment is used in a manner not specified by the manufacturer, the protection provided by the
equipment may be impaired.
WARNUNG:
Die Installations-und Serviceanleitung in diesem Handbuch ist für die Benutzung durch qualifiziertes
Fachpersonal. Um Stromschläge zu vermeiden führen Sie keine andere Wartung durch als in dieser
Betriebsanleitung aufgeführt, es sei denn Sie sind dafür qualifiziert. Überlassen Sie alle Reparaturarbeiten
qualifiziertem Fachpersonal.
Dieses Gerät hat eine automatische Bereichseinstellung der Netzspannung.
Stellen sie sicher, dass die verwendete Netzspannung im Bereich von 100-240V liegt.
Das Symbol ~, falls verwendet, bezeichnet eine Wechselstromversorgung.
Dieses Symbol, wo immer es auftaucht, macht Sie auf nicht isolierte, gefährliche elektrische
Spannung (ausreichend um einen Stromschlag hervorzurufen) innerhalb des Gehäuses aufmerksam.
Spannungen.
Dieses Symbol, wo immer es auftaucht, weist Sie auf wichtige Bedienungs-und Wartungsanleitung
hin. Lesen Sie die Bedienungsanleitung.
ACHTUNG: ZWEIPOLIGE ABSICHERUNG / NULLEITER ABSICHERUNG
Das Netzteil des Gerätes hat eine interne Sicherung eingebaut. Auch wenn die Sicherung durchgebrannt
ist, können auf einigen primären Bauteilen noch gefährliche Spannungen vorhanden sein. Wenn ein
Austausch der Sicherung erforderlich ist, ersetzen Sie die Sicherung nur mit gleicher Art und Wert für den
kontinuierlichen Schutz gegen Feuer.

WARNUNG:
Das Gerätenetzkabel ist die Haupttrennvorrichtung. Die Steckdose sollte sich in der Nähe des Gerätes
befinden und leicht zugänglich sein. Das Gerät sollte nicht so angeordnet sein, dass der Zugang zum
Netzkabel beeinträchtigt ist. Wird das Gerät in ein Rack eingebaut, sollte eine leicht zugängliche
Sicherheitstrennvorrichtung in den Rack-Aufbau mit einbezogen werden.
Um die Gefahr von Stromschlägen zu verringern, darf dieses Produkt nicht Regen oder Feuchtigkeit
ausgesetzt werden. Dieses Gerät ist nur für die Benützung im Innenbereich. Dieses Gerät erfordert freie
Luftzirkulation für eine ausreichende Kühlung. Blockieren sie nicht die Lüftungsschlitze auf der
Geräteoberseite und den Seiten des Gerätes. Unzureichende Belüftung kann das Gerät beschädigen oder
Brandgefahr verursachen. Platzieren Sie das Gerät nicht auf einem Teppich, Poster oder andere Materialien
welche die Lüftungsöffnungen beeinträchtigen könnten.
Wird das Gerät anders als in der, vom Hersteller angegebenen Weise verwendet, kann der, durch das Gerät
gegebene Schutz beeinträchtigt werden.
USA CLASS A COMPUTING DEVICE INFORMATION TO USER. WARNING:
This equipment generates, uses, and can radiate radio-frequency energy. If it is not installed and used as
directed by this manual, it may cause interference to radio communication. This equipment complies with
the limits for a class-A computing device, as specified by FCC rules, part 15, subpart j, which are designed
to provide reasonable protection against such interference when this type of equipment is operated in a
commercial environment. Operation of this equipment in a residential area is likely to cause interference. If it
does, the user will be required to eliminate the interference at the user’s expense. Note: objectionable
interference to TV or radio reception can occur if other devices are connected to this device without the use
of shielded interconnect cables. FCC rules require the use of shielded cables.
CANADA WARNING:
“This digital apparatus does not exceed the Class-A limits for radio noise emissions set out in the radio
interference regulations of the Canadian department of communications.”
“Le présent appareil numérique n’émet pas de bruits radioélectriques dépassant les limites applicables aux
appareils numériques (de class a) prescrites dans le règlement sur le brouillage radioélectrique édicté par
le ministère des communications du Canada.”
CE CONFORMANCE INFORMATION:
This device complies with the requirements of the EEC council directives:
93/68/EEC (CE MARKING)
73/23/EEC (SAFETY – LOW VOLTAGE DIRECTIVE)
89/336/EEC (ELECTROMAGNETIC COMPATIBILITY)
Conformity is declared to those standards: EN50081-1, EN50082-1.

Telos iPort High Density USER MANUAL
© 2021 TLS Corp. Telos Alliance®. All Rights Reserved
TRADEMARKS
Telos®, Zephyr, Axia, the Telos Systems logo, and Telos Alliance®, are trademarks of TLS Corp. All other
trademarks are the property of their respective holders.
NOTICE
All versions, claims of compatibility, trademarks, etc. of hardware and software products not made by Telos
Alliance which are mentioned in this manual or accompanying material are informational only. Telos
Alliance makes no endorsement of any particular product for any purpose, nor claims any responsibility for
operation or accuracy. We reserve the right to make improvements or changes in the products described in
this manual that may affect the product specifications or to revise the manual without notice.
WARRANTY
This product is covered by a two-year limited warranty, the full text of which can be viewed or downloaded
from .https://www.telosalliance.com/warranty-information
UPDATES
The operation of iPort High Density is determined largely by software. We routinely release new versions to
add features and fix bugs. Check the Telos Alliance website at for the latest. We
encourage you to sign-up for the email notification service offered on the site.
www.TelosAlliance.com
FEEDBACK
We welcome feedback on any aspect of iPort High Density, or this manual. In the past, many good ideas
from users have made their way into software revisions or new products. Please contact us with your
comments.
SERVICE
You must contact Telos Alliance before returning any equipment for factory service. We will need your unit’s
serial number, located on the back of the unit. We will issue a return authorization number, which must be
written on the exterior of your shipping container. Please do not include cables or accessories unless
specifically requested by the Technical Support Engineer. Be sure to adequately insure your shipment for its
replacement value. Packages without proper authorization may be refused. US customers, please contact
Telos Alliance Technical Support at +1-216-622-0247. All other customers should contact local
representatives to make arrangements for service.

WE SUPPORT YOU...
BY PHONE:
You may reach our 24/7 Support team anytime around the clock by calling +1-216-622-0247.
For billing questions or other non-emergency technical questions, call +1-216-241-7225 between 9:30
am to 5:00 PM, USA Eastern time, Monday through Friday.
BY E-MAIL:
Technical support is available at support@TelosAlliance.com.
All other questions, please email inquiry@TelosAllinace.com.
VIA WORLD WIDE WEB:
The Telos website has a variety of information that may be useful for product selection and support. The
URL is .www.TelosAlliance.com
REGISTER YOUR PRODUCT
Did you know that all Telos Alliance products come with a 5-Year Warranty? Take a moment to activate your
coverage online at .http://telosalliance.com/product-registration/
Telos Systems
1241 Superior Avenue E.
Cleveland, OH., 44114
USA
+1-216-241-7225 (phone)
+1-216-241-4103 (fax)
+1-216-622-0247 (24/7 technical support)
Introduction
Welcome to Telos iPort High Density
Welcome to your new Telos iPort High Density, a Multi-Codec Gateway designed on an IP backbone that is
used by broadcasters worldwide, featuring built-in resilience and reliability even with challenging

connections. Worldwide networks use iPort for both Distribution and Contribution spanning multiple time
Now, the iPort legacy continues with the more powerful iPort High Density, which transports multiple
channels of stereo, mono, and dual-mono audio across IP networks, including private WANs, IP-radio links,
and over good quality Public Internet connections—perfect for large-scale distribution of audio to single or
multiple locations.
iPort High Density is the workhorse of codecs and comes with eight bi-directional stereo codecs,
configurable to run in MPEG or Linear PCM mode. You can license additional codecs up to a maximum of
64, as well as add Enhanced aptX™ encoding. iPort High Density connects to your existing Livewire®
Network using a single ethernet cable (CAT-6 recommended) for all I/O. It can also pair with
via an adequately configured ethernet switch for use as a standalone multi-stream codec.
Telos Alliance
xNodes
Coding algorithms include AAC, AAC-LD, HE-AAC (plus v2), MP2, MP3, linear PCM, and optional
Enhanced aptX™. 24 to 320 kbps for MPEG codecs, standard fixed rates for Enhanced aptX™, and 24-bit
PCM at 48kHz, mono, or stereo are supported. Dual, diverse-path, end-to-end connections are available for
ultra-reliability and redundancy. Built-in streaming servers use SHOUTcast/ICEcast formatting at the output.
iPort High Density offers MPEG-standard ancillary data transport, up to three transparent control and
metadata channels per codec and direction, and enhanced GPIO options with up to 20 end-to-end GPIO
channels per codec and direction, all bundled and synchronized with the respective audio content. An
optional Content Delay feature allows independent local storage and scheduled delayed playout of any or
all coded audio channels.
Configuration
The first step is to configure the network parameters. Click on the Network link under the Configuration
heading to open that page.
Network Configuration
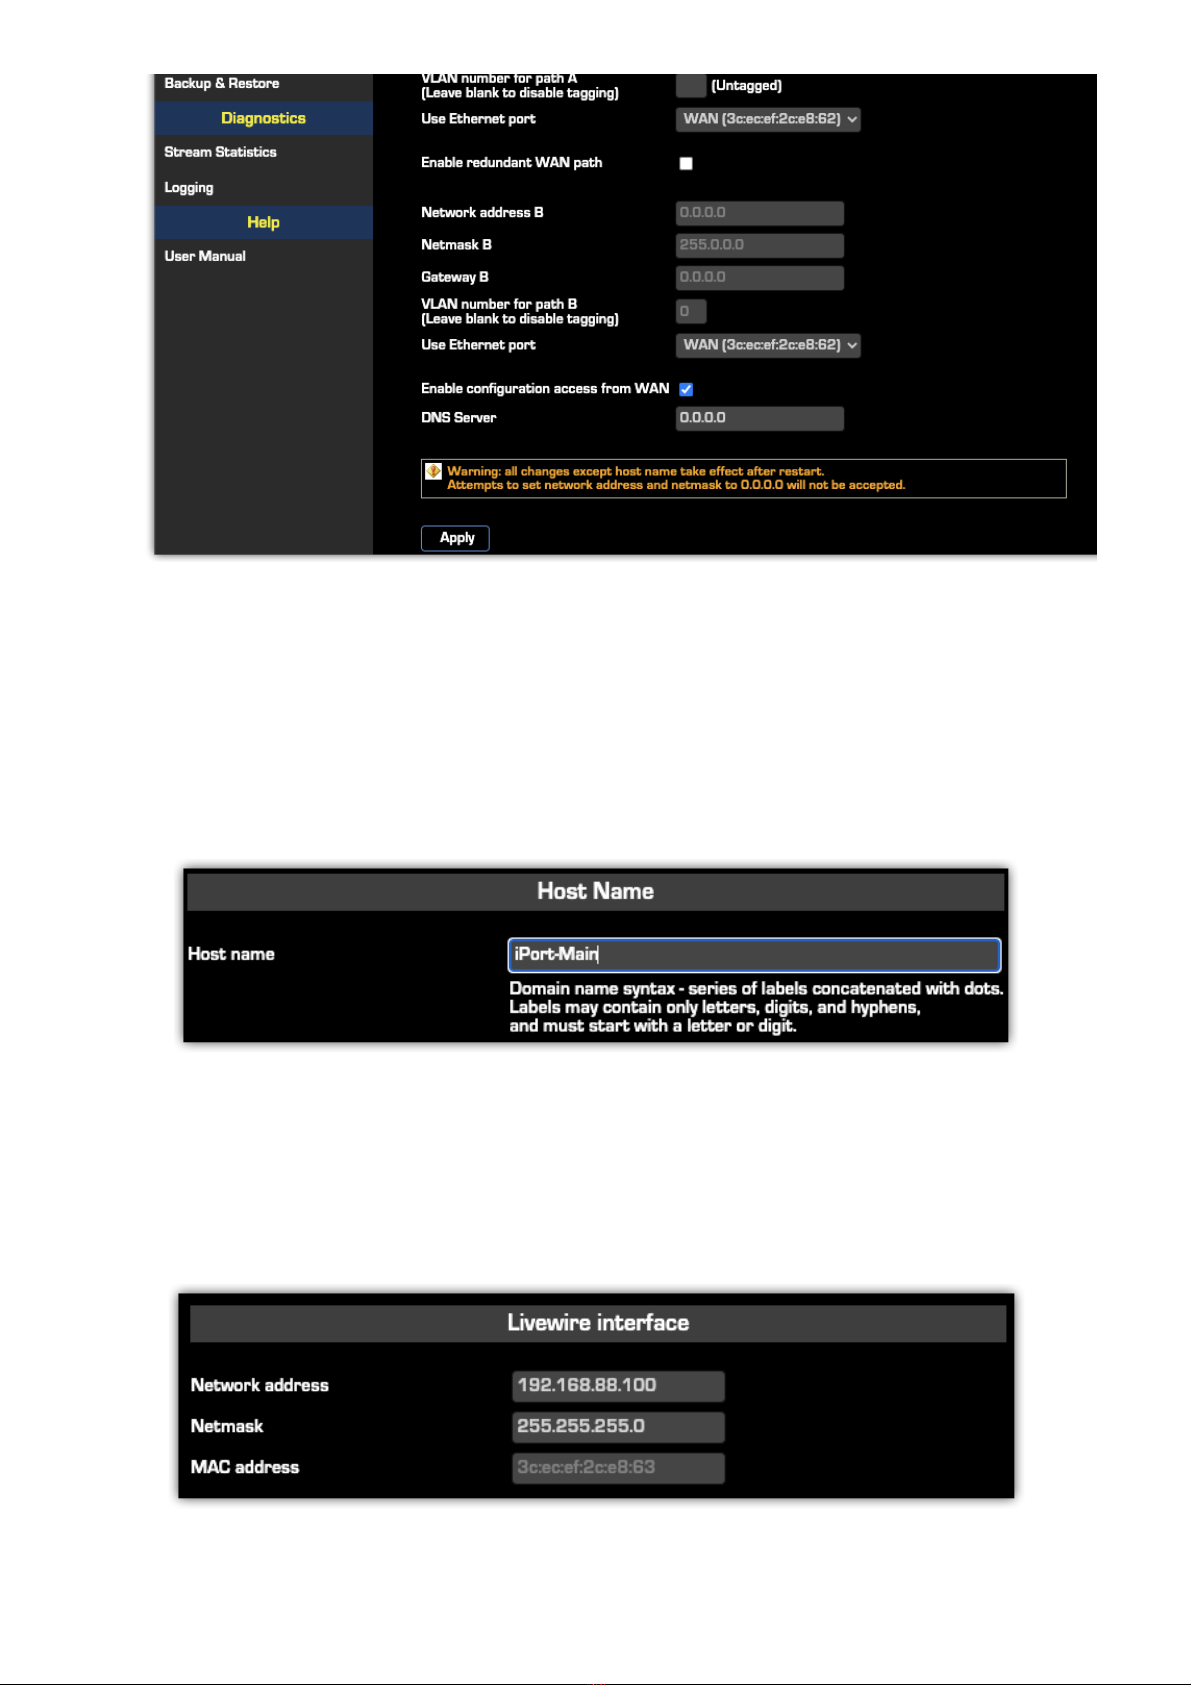
Host Name
This is the Linux host name that is used for device identification, for example, when system logs are being
sent to an external machine. These should be unique for each device in your network. If you have more than
one iPort, you will want to change this from the default ‘iPort’ text., as we have done here. If this will be your
only iPort, you can keep the default.
Livewire interface
This is the value for the Livewire Ethernet port. Normally, this is set to a value in the same address space as
the Livewire network to which the iPort PLUS will connect. Note that the netmask value needs to correspond
with that of your other Livewire AoIP equipment.
WAN interface
With iPort High Density, you may configure two IP addresses (A and B) on the same WAN port or each of the
WAN and LAN ports for enhanced redundancy.
The WAN port may be set to any needed value for compatibility with the network to which it’s connected.
Here, you must enter a correct gateway IP address for the iPort to work correctly. The gateway address will
typically be the router's IP address to access the Internet or other WAN.
You may use redundant WAN Paths by enabling the redundant path options, specifying its IP address,
netmask, and gateway, and selecting the desired ethernet port.
By default, Web access via the WAN port is disabled. Click the box if you want to enable it.
When you are finished making entries, remember to click the button at the bottom of the page.
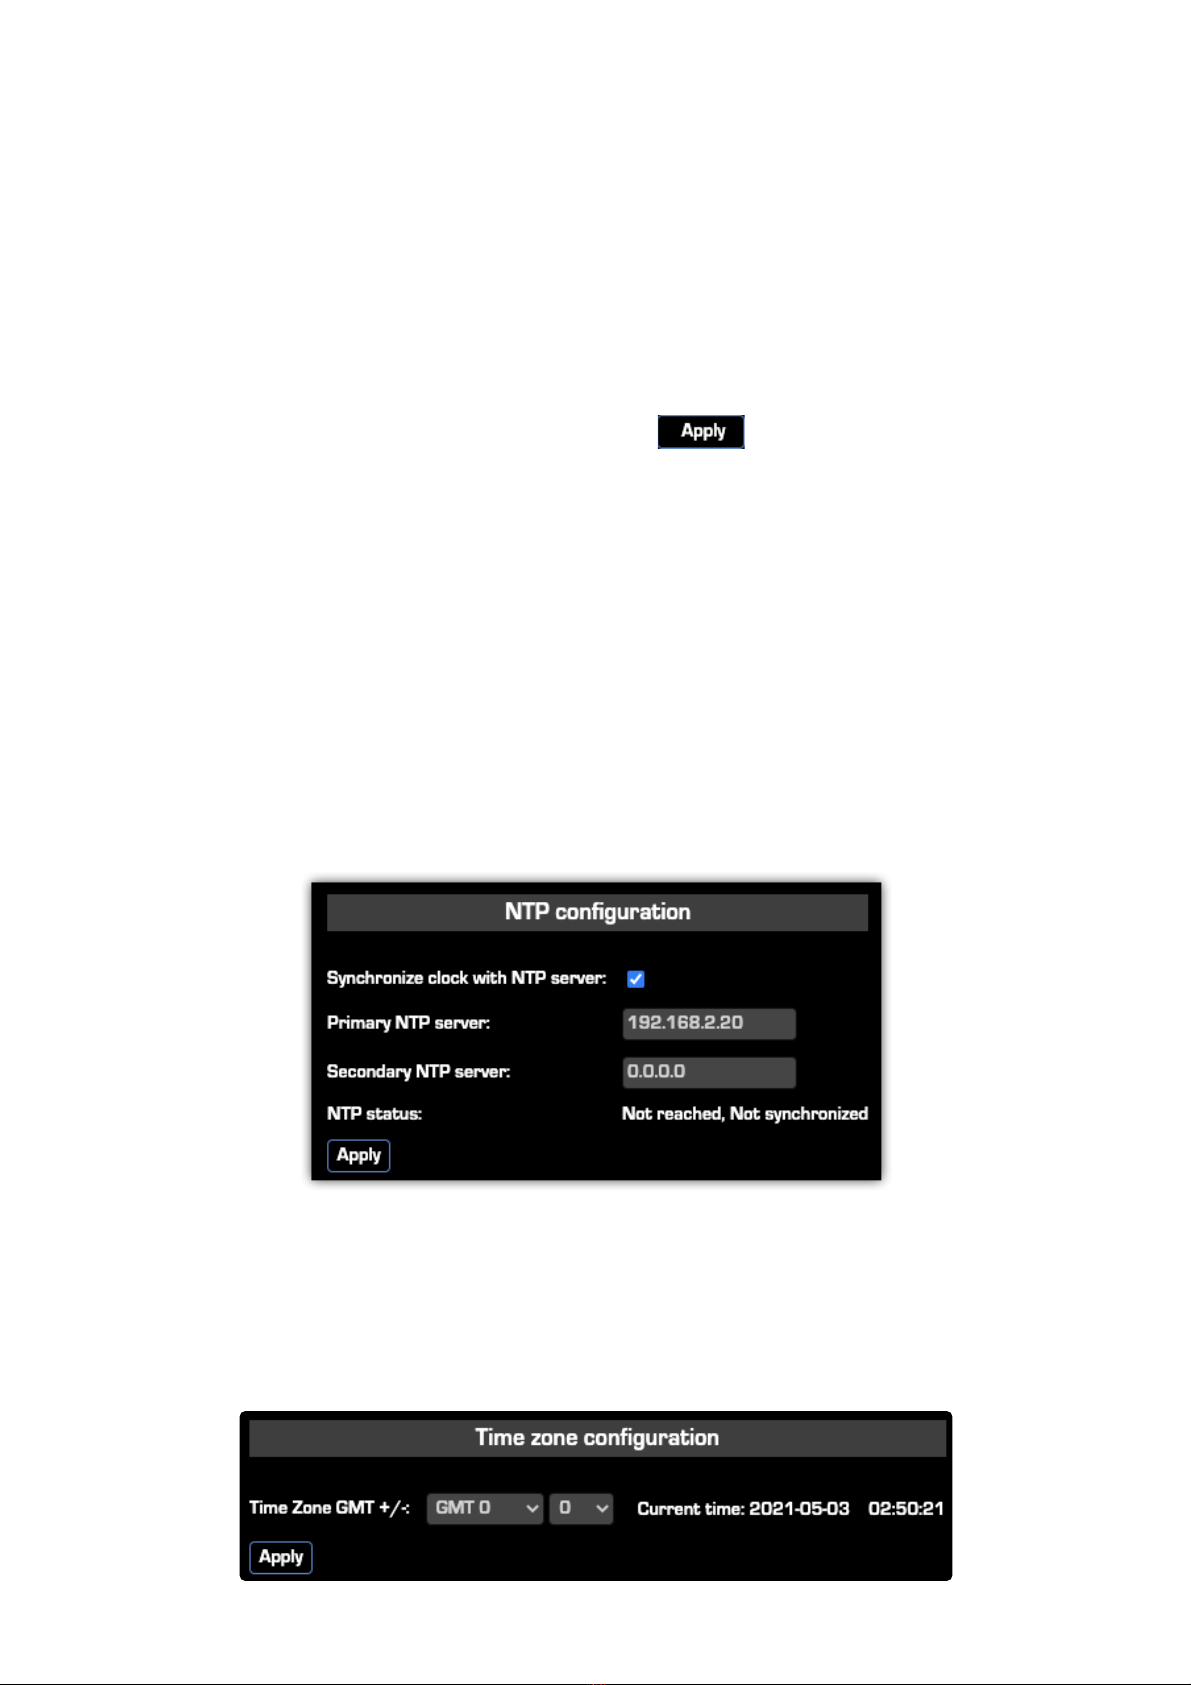
Setting the Time
iPort High Density maintains a very accurate clock by connecting to an NTP time server. Once the network
connections are established, you can set them up.
Server Configuration
1. From the main menu, click on the AoIP and Options link under the Configuration heading.
2. Enter the IP address for the Primary and Secondary NTP servers
3. Click the Synchronize Clock with NTP Server box
After a few minutes, you should see the NTP status change to 'Reached, SYNC'.
Time Zone Configuration
On the AoIP and Options page, Under Time zone configuration, set your GMT offset and click Apply.

Adjusting Leap Seconds
From time to time, the leap seconds file needs to be updated. This is particularly important if your iPort uses
the optional Content Delay feature where accurate playback time is needed.
A leap second is a one-second adjustment that is occasionally applied to Coordinated Universal Time
(UTC), to accommodate the difference between precise time (as measured by atomic clocks) and imprecise
observed solar time. For more information on leap time, visit .https://en.wikipedia.org/wiki/Leap_second
To set leap seconds, upload a leap file to the NTP Configuration page. To obtain a leapfile, follow the
instructions and links on the NTP Configuration webpage.
For web addresses and status information about time servers maintained in the United States by NIST, visit
< >.http://tf.nist.gov/tf-cgi/servers.cgi
To find out more about NTP time servers globally, visit < >.http://www.pool.ntp.org/en/
Changing Passcodes
User passcodes may be changed from their default settings on the Software page under the Remote
Access Password section.
The default for the Web interface is <blank>, meaning no password is needed
Backing-up and Restoring Configuration
Backup and Restore of the iPort High Density system configuration is done on the Backup & Restore
webpage
Backup - Saves your settings to an XML file on your computer.
Restore - Click Choose File, browse for and locate the XML file backup, then click Restore.
Reset cfg - Used to factory reset iPort High Density. You will be given the option to;
Restore all
Restore all except netowrk configuration
Cancel
Make sure that you have copies of any licenses before proceeding with a reset.
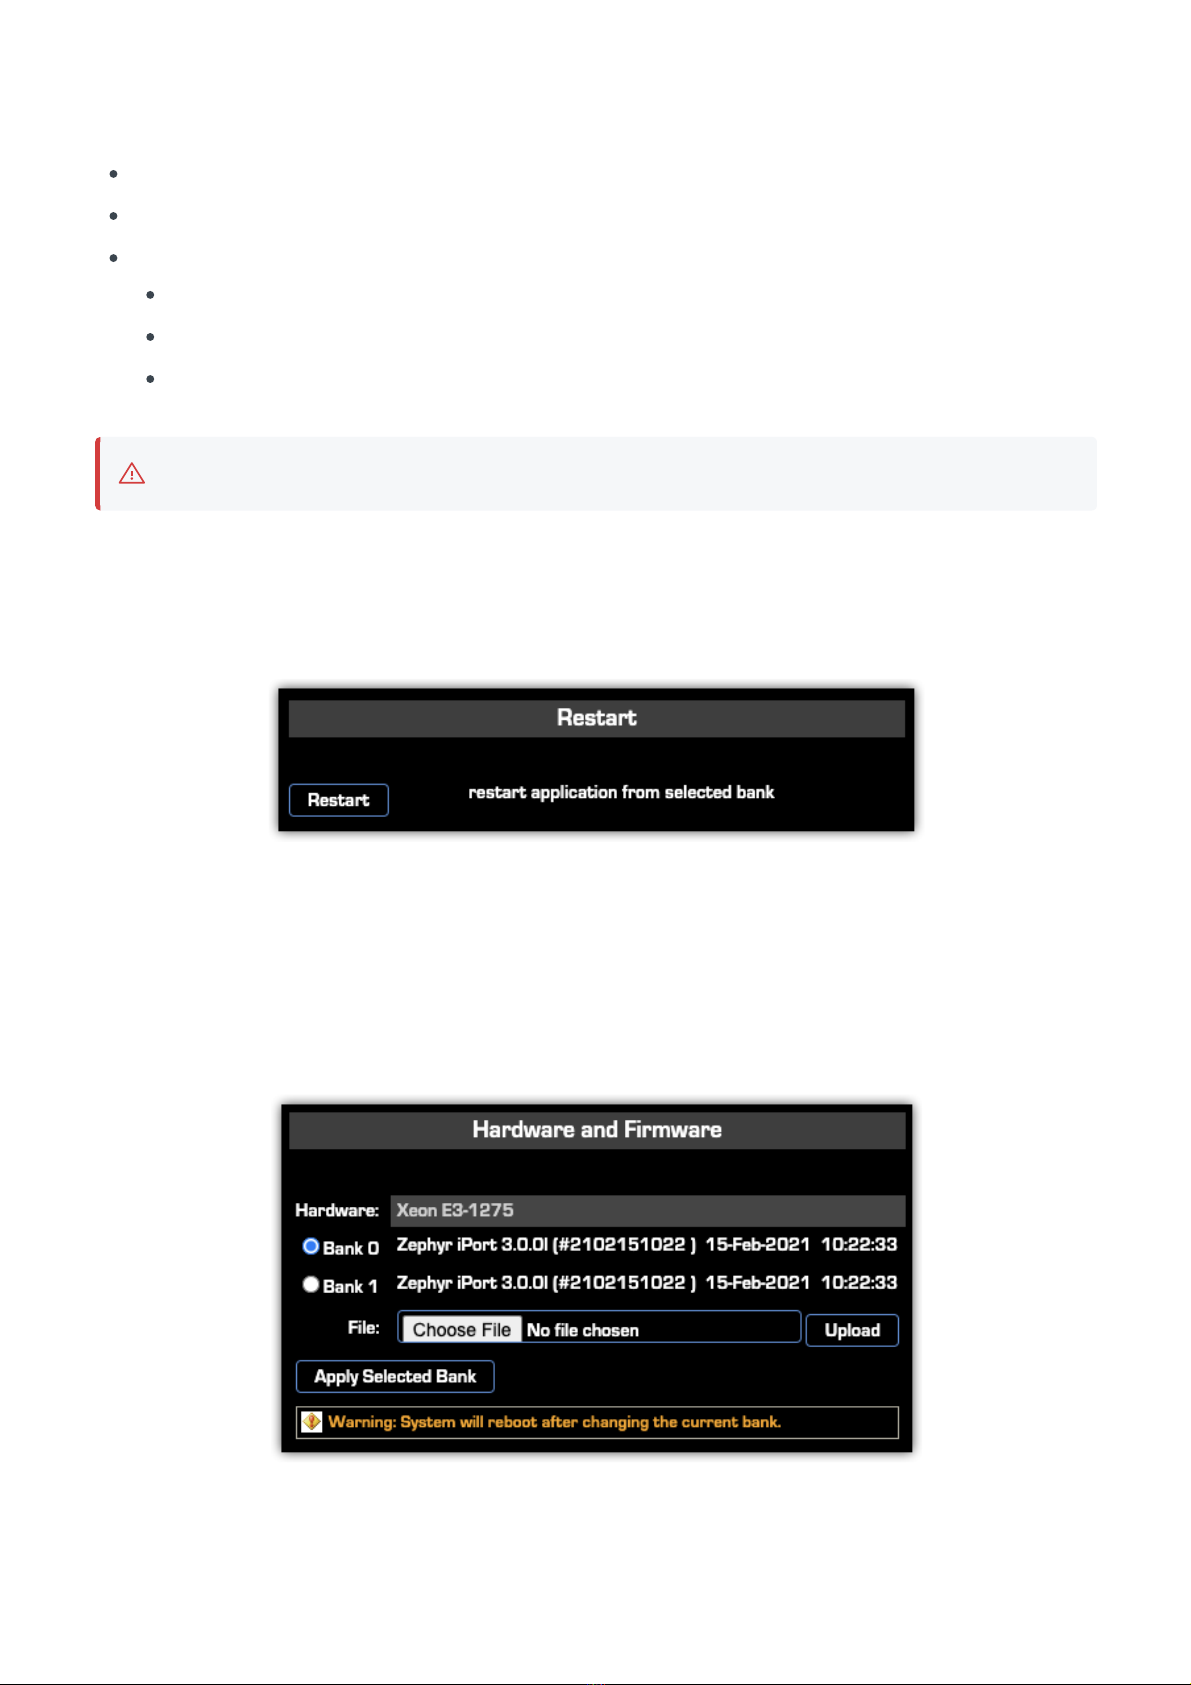
Restart
iPort High Denstity can be restarted from the Software page.
After answering yes to the Continue? prompt, iPort High Density will restart retaining all current
configuration values. Answer NO to cancell the restart.
Firmware Upgrade
This is on the Software page.
You might receive this via email from our support department, or you might find it on our website. To install
new firmware, the first step is to download it to your PC. Then browse to locate it, then click the Upload
button to install it into the iPort.

To ensure a smooth upgrade, this procedure must be strictly followed. New firmware can only be uploaded
to Bank 1, after switching the operation to Bank 0.
If the upload is started but does not succeed, Bank 1 will become unusable, and you will continue on Bank 0
which is working. You can attempt to upload to Bank 1 any number of times, and you can still reboot from
Bank 0.
In case booting starts from a corrupted bank and does not succeed after the third unsuccessful attempt the
bootloader would automatically switch the system to using the other bank.
When the firmware has been successfully uploaded, click the Apply Selected Bank button to activate it.
The iPort High Density will be offline for 2 to 4 minutes while the firmware updates.
What's Next?
We've just covered the nuts and bolts of getting iPort High Density installed and connected to the network,
and discussed how to update and maintain its firmware. You also learned how to set up your unit's
configuration files.
Since the main function of iPort High Density is sending high-quality audio from point A to point B, we'll next
discuss how to do that with the MPEG or optional aptX® Enhanced encoders.
Feature Licensing
Covers entry of additional feature licenses and activation for both on-line and off-line methods
Depending on what options you purchased for your iPort, you will have one to three different licenses that
need to be entered.
Codec expansion licenses - adds additional non-aptX codecs up to 64 total.
aptX license - enables aptX encoding on licensed codecs
Time Zone delay license (additional hardware required)
Additional licenses are provided to you as a PDF generally by email. If you have obtained a license, please
proceed to the License Management page. If you do not have one yet, please contact a Telos dealer.
An internet connection is required from the computer completing the activation of any additional
licenses.
Feature licenses are activated and deactivated on the License Management webpage.

Audio Transport
Audio Transport via MPEG or Optional Enhanced aptX™
Livewire is a professional-grade IP Audio system, used over controlled local-area networks (LAN). It is a
modern replacement for older analog or TDM digital systems. There are a wide range of products made for
broadcast studio facilities that take advantage of Livewire: interface nodes for analog and AES3 audio,
routers, mixing consoles, dynamics processors, ISDN and POTS telephone interfaces, delay units, satellite
encoders and receivers, PC-based delivery systems, and – of course – codecs. Facilities span the gamut
from a single interface xNode to multi-studio installations with dozens or even hundreds of connected
devices.
If you already have a Livewire-based installation, the iPort High Density is a simple and low-cost way to
extend it over a wide-area IP network. Connect the local network to one of the iPort jacks and the WAN to
the other, make some configuration choices, and you are ready to go. This application nicely illustrates the
advantages of IP Audio – were you to do the same thing with traditional equipment, you’d have a rack full of
codec boxes, expensive router interface cards, and a plethora of cables.

If you don’t already have a Livewire installation, no problem. You can use an xNode audio interface or two
(available from The Telos Alliance) and still benefit from the iPort High Density's simplicity and low cost
Because Livewire is uncompressed, it requires a lot of bandwidth - up to 5 Mbps for a stereo channel. And
because Livewire needs to be very low delay, it cannot tolerate a network with too much latency or jitter.
These conditions are easily fulfilled with a switched Ethernet LAN, but they don’t generally exist for wide
area networks.
iPort High Density bridges the two environments. It reduces the needed bandwidth and accommodates the
delay and jitter caused by WANs. Remember that 5 Mbps data rate? After MPEG AAC compression, a
typical rate might be 256 kbps – about 20 times less. For most ears, a 256 kbps AAC compression rate is
unimpeachable, meaning near full quality. Most of the reduction comes from the compression process, but
some reduction comes from iPorts ability to use larger packets with comparatively less header overhead.
iPort High Density uses state-of-the-art MPEG codec technology to conserve network bandwidth while
preserving excellent audio quality.
Codec Types
The following tables list the codec types in iPort High Density, along with their related bitrates, sample rates,
and input samples per channel:
MP3 Codecs
Codec/Mode Bitrate Sample Rate Input Samples
per Channel
MP3 Stereo 24 Kbps 16 kHz 3458 (3456)
32 Kbps 16 kHz 3458 (3456)

40 Kbps 24 kHz 2304
48 Kbps 24 kHz 2304
56 Kbps 24 kHz 2304
64.Kbps 24 kHz 2304
80 Kbps 24 kHz 2304
96 Kbps 32 kHz 3458 (3456)
112 Kbps 48 kHz 2304
128 Kbps 48 kHz 2304
160 Kbps 48 kHz 2304
192.Kbps 48 kHz 2304
256 Kbps 48 kHz 2304
320 Kbps 48 kHz 2304
MP3 Mono 24 kbps 24 kHz 1152
32 kbps 24 kHz 1152
40 kbps 24 kHz 1152
48 kbps 24 kHz 1152
56 kbps 48 kHz 1152
MP2 Codecs

Codec/Mode Bitrate Sample Rate Input Samples
per Channel
MP2 Stereo/Dual
mono 64 kbps 48 kHz 2304
96 kbps 48 kHz 2304
112 kbps 48 kHz 2304
128 kbps 48 kHz 2304
160 kbps 48 kHz 2304
192 kbps 48 kHz 2304
256 kbps 48 kHz 2304
320 kbps 48 kHz 2304
384 kbps 48 kHz 2304
MP2 Mono 32 kbps 48 kHz 1152
48 kbps 48 kHz 1152
56 kbps 48 kHz 1152
64 kbps 48 kHz 1152
80 kbps 48 kHz 1152
96 kbps 48 kHz 1152
112 kbps 48 kHz 1152
128 kbps 48 kHz 1152
160 kbps 48 kHz 1152
192 kbps 48 kHz 1152
AAC-LC Codecs (LC = Low Complexity)
Codec/Mode Bitrate Sample Rate Input Samples
per Channel
AAC-LC Stereo/Dual
Mono (MP2-AAC) 32 kbps 24 kHz 4096
40 kbps 32 kHz 3072
48 kbps 32 kHz 3072
Other manuals for iPort High Density
1
Table of contents
Other Telos Alliance Gateway manuals


