Telycam NDI HX3 User manual

NDI®|HX3 FHD PTZ Camera
User Manual
V1.0
J.BC.0205.0183


NDI®|HX3 FHD PTZ Camera
User Manual
V1.0
J.BC.0205.0183


〓〓〓〓〓〓 CONTENT 〓〓〓〓〓〓
— 1 —
CONTENT .........................................................................................................1
SAFETY GUIDES .............................................................................................2
USE CHECK ..................................................................................................... 4
PRODUCT HIGHLIGHTS ............................................................................... 6
CAMERA SPEC ................................................................................................7
INTERFACE DESCRIPTION ...........................................................................9
CAMERA DIMENSION .................................................................................10
INSTALLATION ............................................................................................. 11
IR REMOTE CONTROLLER ........................................................................ 13
VISCA IN(RS232 PORT) ................................................................................15
VISCA PROTOCOL ....................................................................................... 17
PELCO-D PROTOCOL .................................................................................. 29
PELCO-P PROTOCOL ................................................................................... 30
OSD MENU .................................................................................................... 31
UVC CONTROL .............................................................................................35
WEB SETTING ...............................................................................................36
VIEW RTSP VIDEO VIA VLC .......................................................................42
NDI TOOLS .................................................................................................... 43
VISCA OVER IP ............................................................................................. 45

〓〓〓〓〓 SAFETY GUIDES 〓〓〓〓〓
— 2 —
●Before operation, please fully read and follow all instructions in the manual.
For your safety, always keep this manual with the camera.
●The camera power voltage is 12V DC, rated currency is 2A. We suggest you
use it with the original power supply adapter supplied by the factory.
●Please keep the power cable, video cable and control cable in a safe place.
Protect all cables especially the connectors.
●Operational environment: -10℃~50℃, humidity less than 80%.
●To avoid any danger, please keep the camera away from the corrosive liquid.
●Avoid stress, vibration and damp during transportation, storage and
installation.
●Do not remove the camera housing and cover. For any service, please
contact authorized technicians.
●Video cable and control cable should be individually shielded, and cannot
be substituted with other cables. Do not direct the camera lens towards strong
light, such as the sun or the intensive light.
●Use a dry and soft cloth to clean the camera housing. When cleaning is
needed, apply with a neutral cleaner. To avoid damage to the camera lens, never
use strong or abrasive cleaning agents on the camera housing.
●Do not move the camera by holding the camera head. To avoid mechanical
trouble, do not rotate the camera head by hand.
●Put the camera on a fixed and smooth desk or platform, avoid leaned
installation.
●Power Supply Polarity:

〓〓〓〓〓 SAFETY GUIDES 〓〓〓〓〓
— 3 —
Attention!
▲The video quality may be affected by the specific frequencies of
electromagnetic field.
▲Never grasp the head of the camera, and never move the camera by hand
when it is working, otherwise, mechanism maybe destroyed.
Declaration:
█Instructional Manual is for reference only. Please refer to the actual
product.
█Please contact Customer Service staff for the latest programs and
supplementary documentations.
█In case of any doubt or dispute in the instruction manual, the final
interpretation of the company shall prevail.

〓〓〓〓〓〓 USE CHECK 〓〓〓〓〓〓
— 4 —
PACKING LIST
Check all below items when open the package
Camera ················································· 1PCS
Power Adapter········································· 1PCS
Power Cable··········································· 1PCS
Remote Controller···································· 1PCS
USB Type-C Cable····································1PCS
RS232 Cable··········································· 1PCS
User Manual··········································· 1PCS
QC PASS··············································· 1PCS
Shock-absorbing Pad································· 1PCS
QUICK START

〓〓〓〓〓〓 USE CHECK 〓〓〓〓〓〓
— 5 —
Dial Switch Setting (at the bottom of the camera)
Dial Switch (ARM)
SW-1
SW-2
Instruction
1
OFF
OFF
Upgrading mode
2
ON
OFF
Debugging mode
3
OFF
ON
Undefined
4
ON
ON
Working mode
Dial Switch
SW-3
SW-4
Instruction
1
OFF
OFF
Reserved
2
ON
OFF
Reserved
3
OFF
ON
Reserved
4
ON
ON
Reserved
Dial Switch
SW-5
SW-6
Instruction
1
OFF
OFF
Undefined
2
ON
OFF
Working mode
3
OFF
ON
Undefined
4
ON
ON
Undefined

〓〓〓 PRODUCT HIGHLIGHTS 〓〓〓
— 6 —
★Adopting the most advanced image processing DSP, 1/1.8-inch 12MP sensor.
★High-Definition Optical Lens: 30x optical zoom, with 60-degree field of
view.
★FHD 1080P60 video output from NDI®|HX (or Ethernet) , while supporting
H.264, H.265 encoding.
★Support POE+: one single ethernet cable to get video, control, and power
supply.
★Fast video format switch.
★Special Focusing Algorithm: fast and precise focusing performance when
zooming or moving.
★Unique camera design with patent.
★Smooth PTZ mechanical design, accurate pan tilt motor control.
★Support field upgrade, one-click software upgrade through WebUI.
★Support Line in input.
★Support NDI®|HX, HDMI, SDI high-quality audio output.
★NDI®|HX, HDMI, SDI, USB Type-C outputs, fit for different scenarios.
★Standard VISCA, PELCO-D, PELCO-D control protocol, quickly set up
through OSD menu.
★Supplied with multi-functional IR remote controller, can set IP address via
OSD menu.
★Standard Sony VISCA over IP protocol, support network video, and control
transmission simultaneously.
★Support SRT protocol for secure transmission of high-quality, low-latency
video over WANs.
★Support for the latest NDI®|HX3, easy plug and play for live streaming.
★Support RTMP protocol directly streaming to Youtube Live, Facebook Live
and other platforms.
★Multi-language menu: support Chinese, English and Russian.

〓〓〓〓〓 CAMERA SPEC 〓〓〓〓〓
— 7 —
NDI®|HX3 FHD PTZ Camera
Sensor
1/1.8inch high quality, 1200 MP CMOS Sensor
Video Format
HDMI
1920*1080P60/59.94/50/30/29.97/25/24/23.98
1920*1080I60/59.94/50
1280*720P60/59.94/50/30/29.97/25
SDI
1920*1080P60/59.94/50/30/29.97/25/24/23.98
1920*1080I60/59.94/50
1280*720P60/59.94/50/30/29.97/25
USB
MJPG, H.264, HEVC: 3840*2160P30; 1920*1080P60;
1280*720P60; 1024*576P60; 800*448P60
NV12, YUY2: 1920*1080P5; 1280*720P15;
1024*576P25; 800*448P30
NDI®|HX
1920*1080P15~60; 1280*720P15~60;
1024*576P15~60; 640*360P30
Video Interface
HDMI, SDI, NDI®|HX, USB Type-C
Audio Interface
3.5mm Line in
Focal Length
6.91mm~214.64mm
Lens
magnifications
30X optical zoom + 4X digital zoom
Aperture
F1.35~4.6
View Angel
60°(Wide)~2°(Tele)
Rotation Angle
Pan: ±170°; Tilt: -30°~+90°;
Rotation Speed
Pan: 0.1°~80°/s; Tilt: 0.1°~60°/s
Preset
Remote controller: 10; RS232: 128; Accuracy: 0.1°
Control Port
RS232 IN, NDI®|HX
Network Speed
1000M
Video encode
H.264 / H.265
Bit Rate Control
Variable Bit Rate, Constant Bit Rate
Video Bit Rate
1024~61440kbps
Protocol
HTTP, RTSP, RTMP, ONVIF, Visca TCP, Visca UDP, Visca over IP,
NDI®|HX, Visca Serial, Pelco-P, Pelco-D

〓〓〓〓〓 CAMERA SPEC 〓〓〓〓〓
— 8 —
POE+
Supported
Daisy Chain
Support RS232 serial daisy chain
Minimum Lux
0.01lux
White Balance
Auto / Manual / ATW / Push / Indoor / Outdoor / Color Temperature
Exposure
Auto / Manual / Iris / Bright
Focus
Auto / Manual
Iris
Auto / Manual
Shutter
Auto / Manual
Gamma select
Supported
BLC
Supported
2D Noise
Reduction
Supported
3D Noise
Reduction
Supported
Anti-flicker
OFF, 50Hz, 60Hz
Pan Tilt Flip
Supported
Mirroring
Supported
Input Voltage
DC12V/POE+(IEEE802.3at)
Dimension
220mm×190mm×193.5mm
Net Weight
1.9kg(4.2LBS)
Working
Temperature
-10℃~50℃
Working
Humidity
≤80%
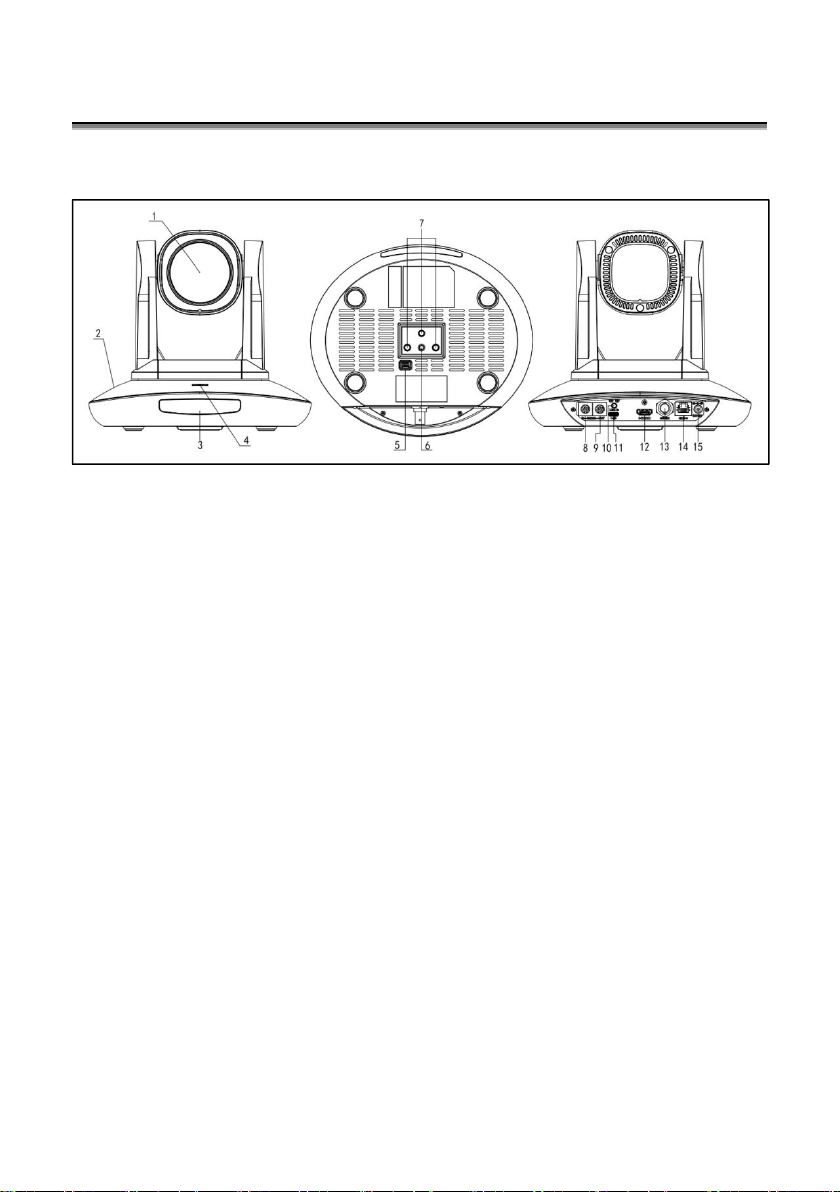
〓〓 INTERFACE DESCRIPTION 〓〓
— 9 —
1.Camera Lens
6.Tripod Screw Hole
11.USB Type-C port
2.Camera Base
7.Installation Hole
12.HDMI port
3.IR Receiver Panel
8.RS232 ((IN) port
13.3G-SDI port
4.Power Indicator Light
9.RS232 (OUT) port
14.NDI®|HX port
5.Dial Switch
10.Line in port
15.DC 12V plug

〓〓〓〓 CAMERA DIMENSION 〓〓〓〓
— 10 —

〓〓〓〓〓 INSTALLATION 〓〓〓〓〓
— 11 —
Wall-Mount Installation:
1.Drill the hole on the wall referring to the wall mounting bracket hole position,
hole diameter of φ6mm, position the four φ6mm plastic expansion screws in the
drilled hole.
2.Use four M4*30 self-tapping screws to mount the wall-mount bracket on the
wall.
3.Fix the lower cover of the bracket to the base of the camera with imperial
screws(SIZE 1/4-20UNC*3/8)
Note:A layer of silicone shock-absorbing pad should be positioned between
the camera base and the bracket. (It is included in the package)

〓〓〓〓〓 INSTALLATION 〓〓〓〓〓
— 12 —
Ceiling-Mount Installation :
1.Referring to the position of the cover plate holes on the bracket in the
concrete ceiling, drill a hole of φ6, and position 3 plastic expansion screws of φ6
in the hole.
2.Use three M4*30 self-tapping screws to mount the bracket the upper cover
plate on the ceiling.
3.Fix the lower cover of bracket to the base of the camera with imperial screws
(Size 1/4-20UNC*3/8)
Note:A layer of silicone shock-absorbing pad should be positioned between
the camera base and the bracket. (It is included in the package).
4.Istall the camera with both upper and lower cover of the bracket, fix the side
with M3*6 screws to prevent the camera from falling off.

〓〓 IR REMOTE CONTROLLER 〓〓
— 13 —
POWER
Short press POWER key to enter standby mode from
normal working mode. Press it again, the camera will do
self-checking, then go back to HOME position. It will go
to preset position if power on mode has been set before.
FREEZE
Short press FREEZE key to freeze/unfreeze the image.
IRT (IR Transfer/IR Pass)
Open/Close the IR pass function. Once press the IRT key,
the camera will receive and pass the IR remote control
signal to the codec/terminal.(via VISCA IN port)
Set 1 ~ Set 4 ADDRESS SETTING
Long press for 3 seconds until the key light ON, to set
camera address.
CAM1 ~ CAM4(CAMERA SELETING)
Short press to select the relative camera.
NUMBER KEY (1-9)
Set Preset:Long press the number key (3 seconds) to set preset.
Run Preset:Short press the number key to run preset.

〓〓 IR REMOTE CONTROLLER 〓〓
— 14 —
CLR PRE (CLEAR PRESET)
CLR PRE+number key:to clear the relative preset.
Long press to clear all presets.
FOCUS KEY: +/-
Manual focus, only valid under manual focus mode.
ZOOM KEY: +/-
Set the Zoom rate.
NAVIGATE KEY:UP/DOWN/LEFT/RIGHT
Under working mode, use navigate key to set the pan tilt, and select menu when
enter OSD.
OK/ HOME KEY:Under working mode, short press OK to make the camera go
back to HOME position; and confirm the selection when enter OSD.
AF/MF:AUTO FOCUS/ MANUAL FOCUS
RESET: Press 3 seconds to reset camera.
MENU: Enter OSD menu under working mode. Use as Go-Back function after
entering the menu.
LIMIT L/ LIMIT R/ LIMIT CLR:
LEARN+LIMIT L:Set the pan tilt left limit position.
LEARN+LIMIT R:Set the pan tilt right limit position.
LEARN+LIMIT CLR:Clear the limit position.
BLC OFF/ BLC ON:To turn off/on the back light compensation
BRIGHT-/ BRIGHT+:Set image brightness, only valid under bright priority
exposure mode.
VIDEO FORMAT KEYS:
Long press 3 seconds to select different video format
output.

〓〓〓 VISCA IN (RS232 PORT) 〓〓〓
— 15 —
NO.
V_IN
V_OUT
1
DTR
DTR
2
DSR
DSR
3
TXD
TXD
4
GND
GND
5
RXD
RXD
6
A
7
IR
OUT
8
B
V_IN
RS485
1
2
3
4
5
6
A(+)
7
IR
OUT
8
B(-)
VISCA IN 与Mini DIN
Connection
Camera VISCA IN
Mini DIN
1
DTR
1
DSR
2
DSR
2
DTR
3
TXD
5
RXD
4
GND
4
GND
5
RXD
3
TXD
6
A(+)
6
NC
7
IR OUT
7
NC
8
B(-)
8
NC
VISCA IN 与DB9 Connection
CameraVISCA IN
Windows DB-9
1
DTR
6
DSR
2
DSR
4
DTR
3
TXD
2
RXD
4
GND
5
GND
5
RXD
3
TXD
6
A(+)
7
IR OUT
8
B(-)

〓〓〓 VISCA IN (RS232 PORT) 〓〓〓
— 16 —
VISCA Network Construction:
SERIAL PORT CONFIGURATION:
Parameter
Value
Baud rate
2400/4800/9600/115200
Start bit
1bit
Date bit
8bits
Stop bit
1bit
Check bit
无
This manual suits for next models
1
Table of contents
Other Telycam Security Camera manuals

Telycam
Telycam TLC-300-IP-12 User manual

Telycam
Telycam Vision+N330X User manual

Telycam
Telycam Vision+N320X User manual

Telycam
Telycam TLC-300-IP-20NDI User manual

Telycam
Telycam Vision+4KN30X User manual

Telycam
Telycam TLC-600-S User manual

Telycam
Telycam TLC-700-H User manual

Telycam
Telycam TLC-700-S User manual

Telycam
Telycam TLC-100-HU2-10 User manual

Telycam
Telycam 20X NDI User manual


