Telycam TLC-100-HU2-10 User manual

10X HDMI+USB Type C
HD PTZ Camera
User Manual
V1.0
J.BC.0205.0190


〓〓〓〓〓〓 CONTENT 〓〓〓〓〓〓
— 1 —
CONTENT .........................................................................................................1
SAFETY GUIDES .............................................................................................2
USE CHECK ..................................................................................................... 4
PRODUCT HIGHLIGHTS ............................................................................... 6
CAMERA SPEC ................................................................................................7
INTERFACE DESCRIPTION ...........................................................................9
CAMERA DIMENSION .................................................................................10
IR REMOTE CONTROLLER ........................................................................ 11
VISCA IN(RS232 PORT) ................................................................................13
VISCA PROTOCOL ....................................................................................... 14
PELCO-D PROTOCOL .................................................................................. 21
PELCO-P PROTOCOL ................................................................................... 22
OSD MENU .................................................................................................... 23
UVC CONTROL .............................................................................................26

〓〓〓〓〓 SAFETY GUIDES 〓〓〓〓〓
— 2 —
●Before operation, please fully read and follow all instructions in the manual.
For your safety, always keep this manual with the camera.
●The camera power voltage is 12V DC, rated currency is 2A. We suggest you
use it with the original power supply adapter supplied by the factory.
●Please keep the power cable, video cable and control cable in a safe place.
Protect all cables especially the connectors.
●Operational environment: -10℃~50℃, humidity less than 80%.
●To avoid any danger, please keep the camera away from the corrosive liquid.
●Avoid stress, vibration and damp during transportation, storage and
installation.
●Do not remove the camera housing and cover. For any service, please
contact authorized technicians.
●Video cable and control cable should be individually shielded, and cannot
be substituted with other cables. Do not direct the camera lens towards strong
light, such as the sun or the intensive light.
●Use a dry and soft cloth to clean the camera housing. Applied with neutral
cleaning agent when there is need to clean. To avoid damage on the camera lens,
never use strong or abrasive cleaning agents on the camera housing.
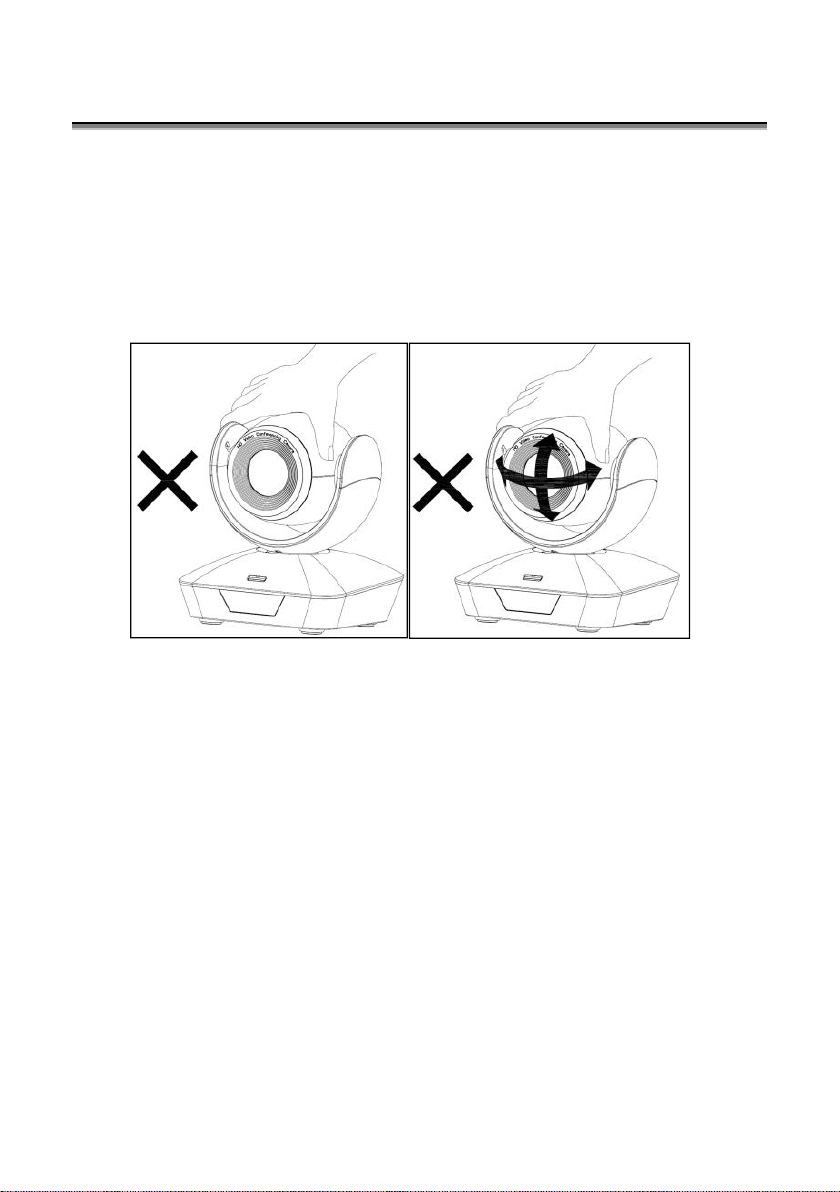
●Do not move the camera by holding the camera head. To avoid mechanical
trouble, do not rotate the camera head by hand.
●Put the camera on fixed and smooth desk or platform, avoid leaned
installation.
●Power Supply Polarity:
〓〓〓〓〓 SAFETY GUIDES 〓〓〓〓〓
— 3 —
Attention!
▲The video quality may be affected by the specific frequencies of
electromagnetic field.
▲Never grasp the head of the camera, and never move the camera by hand
when it is working, otherwise, mechanism maybe destroyed.
Declaration:
█Instructional Manual is for reference only. Please refer to the actual
product.
█Please contact Customer Service staff for the latest programs and
supplementary documentations.
█In case of any doubt or dispute in the instruction manual, the final
interpretation of the company shall prevail.

〓〓〓〓〓〓 USE CHECK 〓〓〓〓〓〓
— 4 —
PACKING LIST
Check all below items when open the package
Camera ················································· 1PCS
Power Adapter········································· 1PCS
Power Cable··········································· 1PCS
Remote Controller···································· 1PCS
USB Type-C Cable····································1PCS
RS232 Cable··········································· 1PCS
User Manual··········································· 1PCS
QC PASS··············································· 1PCS
QUICK START

〓〓〓〓〓〓 USE CHECK 〓〓〓〓〓〓
— 5 —
Dial Switch Setting (at the bottom of the camera)
Dial Switch (ARM)
SW-1
SW-2
Instruction
1
OFF
OFF
Upgrading mode
2
ON
OFF
Debugging mode
3
OFF
ON
Undefined
4
ON
ON
Working mode
Dial Switch
SW-3
SW-4
Instruction
1
OFF
OFF
Reserved
2
ON
OFF
Reserved
3
OFF
ON
Reserved
4
ON
ON
Reserved
Dial Switch
SW-5
SW-6
Instruction
1
OFF
OFF
Reserved
2
ON
OFF
Reserved
3
OFF
ON
Reserved
4
ON
ON
Reserved

〓〓〓 PRODUCT HIGHLIGHTS 〓〓〓
— 6 —
★With the most advanced HD DSP, 1/2.8-inch 2.4 million image sensor.
★High-quality 10x 62.5-degree wide-angle optical lens, to ensure the smooth
and transparent HD images.
★Independent intellectual property rights of the focus algorithm, fast and
accurate focus performance, to ensure that the image remains clear in the process
of zooming, focusing process is fast and smooth.
★USB and HDMI output simultaneously.
★HDMI maximum resolution support 1920*1080P60 output, suitable for a
variety of occasions.
★USB Type-C multiple compression output, the maximum resolution support
MJPG1920*1080P60, suitable for different video software applications.
★USB Type-C support Windows, MAC OS, Android, Linux and other
operating systems.
★Using the standard UVC protocol, compatible with most video conferencing
software.
★Support image flip function: can be front-mounted, inverted, to meet the
requirements of different occasions video framing.
★High-precision motor positioning, quiet and smooth mechanical rotation.
★Support 128 preset bits.
★Support RS232/485 serial port control.
★Standard Sony Visca and Pelco-P/D control protocol.
★Support WDR wide dynamic, 3D noise reduction function.
★Brightness, contrast, hue, saturation, sharpness, gamma, exposure, white
balance, gain and other parameters can be adjusted.
★Support user's own program upgrade.
★Support USB Type-C interface power supply.
★Comes with a multi-functional infrared remote control, easy and fast for
users to use.
★Multi-language menu: support Chinese, English, Russian.

〓〓〓〓〓 CAMERA SPEC 〓〓〓〓〓
— 7 —
10X HD PTZ Camera
Sensor
1/2.8inch high quality, 2.4 MP CMOS Sensor
Video Format
HDMI
1920*1080P60/59.94/50/30/29.97/25/24
1920*1080I60/59.94/50
1280*720P60/59.94/50/30/29.97/25
USB
Type-C
MJPG: 1920*1080P60; 1280*960P60; 1280*720P60;
1024*768P60; 800*600P60; 640*480P30; 320*240P60
YUY2:640*480P30;320*240P30
Video Interface
HDMI, USB Type-C
Focal Length
4.7mm~47mm
Aperture
F1.6~3.0
View Angel
62.5°(Wide)~6.43°(Tele)
Lens
Magnifications
10x optical zoom + 4x digital zoom
Rotation Angle
Pan: ±170°; Tilt: -30°~+90°;
Rotation Speed
Pan: 0.1°~120°/s; Tilt: 0.1°~80°/s
Preset
Remote controller: 10; RS232: 128; Accuracy: 0.1°
Control Port
RS232
Protocol
Visca Serial, Pelco-P, Pelco-D
Minimum Lux
0.1lux
White Balance
Auto / Manual / ATW / Push / Indoor / Outdoor / Color Temperature
Exposure
Auto / Manual /Shutter / Iris / Bright
Focus
Auto / Manual
Iris
Auto / Manual
Shutter
Auto / Manual
Gamma select
Supported
WDR
Supported
BLC
Supported

〓〓〓〓〓 CAMERA SPEC 〓〓〓〓〓
— 8 —
2D Noise
Reduction
Supported
3D Noise
Reduction
Supported
Anti-flicker
OFF, 50Hz, 60Hz
Pan Tilt Flip
Supported
Mirroring
Supported
Input Voltage
DC 12V / USB 5V
Dimension
148mm×132mm×162mm
Net Weight
0.9kg(2LBS)
Working
Temperature
-10℃~50℃
Working
Humidity
≤80%
〓〓 INTERFACE DESCRIPTION 〓〓
— 9 —
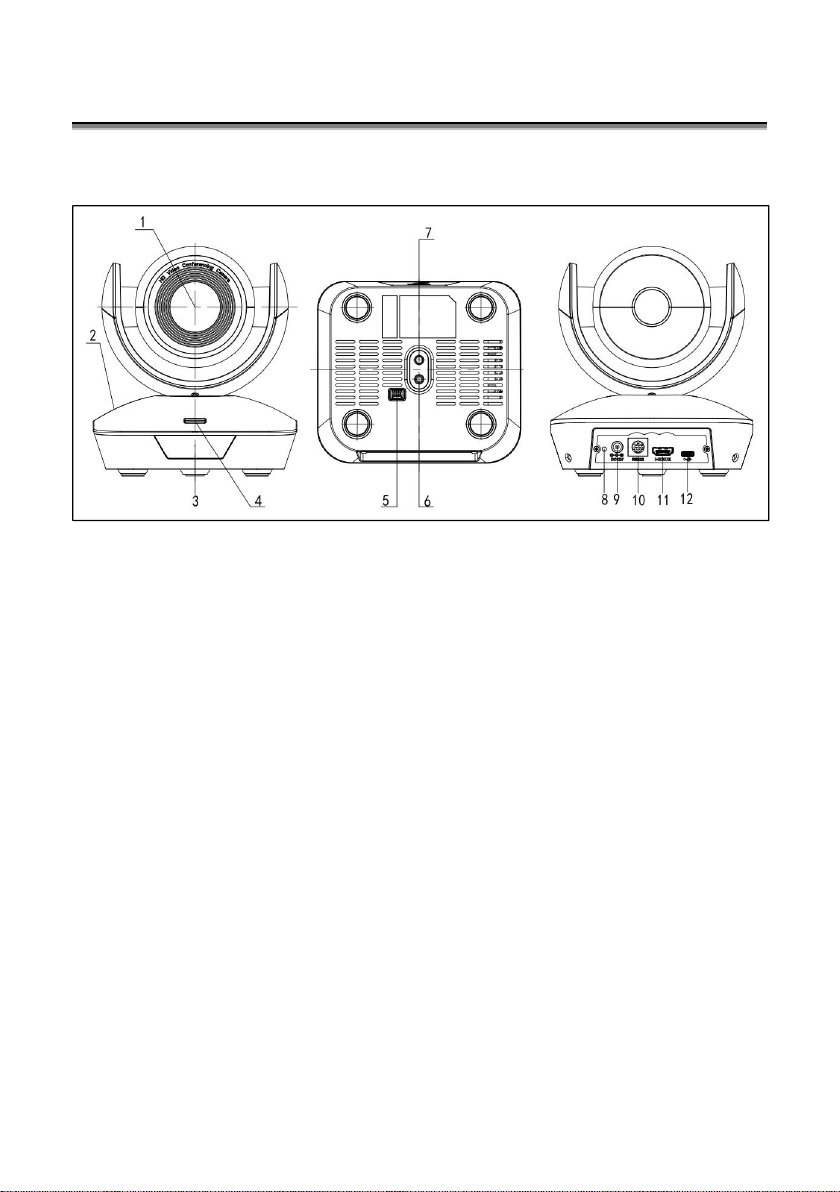
1.Camera Lens
5.Dial Switch
9.DC 12V plug
2.Camera Base
6.Tripod Screw Hole
10.RS232 port
3.IR Receiver Panel
7.Installation Hole
11.HDMI port
4.Power Indicator Light
8.Power Indicator
12.USB Type-C port

〓〓〓〓 CAMERA DIMENSION 〓〓〓〓
— 10 —
〓〓 IR REMOTE CONTROLLER 〓〓
— 11 —
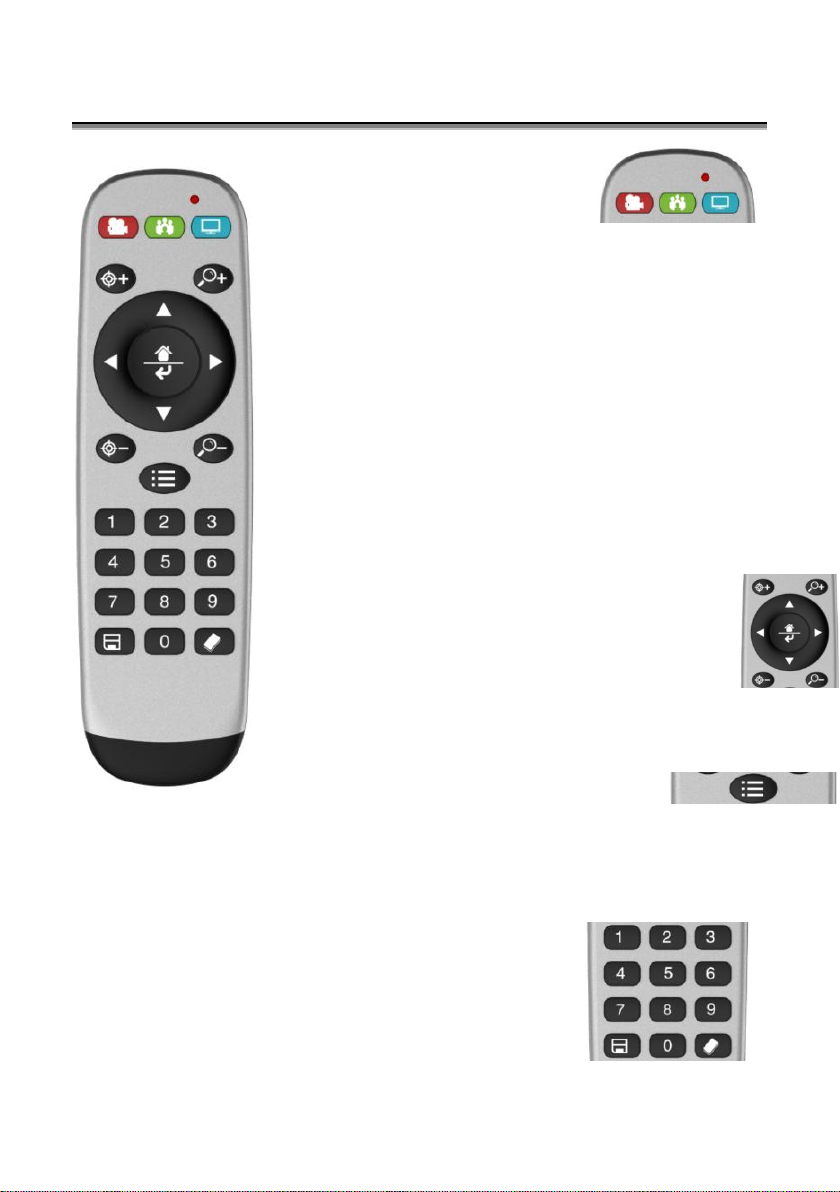
LED Function Instruction
Press any button and shows in red color: Current selection is to
control the camera;
Press any button and shows in green color: Current selection is to
control the codec;
Press any button and shows in blue color: Current selection is to
control the TV;
Power button
Red button: in normal work mode, short press one time, camera
will enter standby mode; short press again, the camera will start
self-configuration and go to HOME position; it will go to No.0
preset position if that was set;
Green button: Codec power button(need to learn the button
coding);
Blue button: TV power button( need to learn the button coding);
Focus (Left): +/-
Manual focus, only valid under manual focus model;
Zoom (Right): +/-
Control the lens zoom rate;
Navigate : Up/Down/Left/Right
In normal working mode, use navigate key to control pan/tilt;
Confirm/Home button:
In normal working mode, short press to let the camera go back to
Home position.
Menu button: show the camera version.
Number buttons
Set Preset: Long press(3seconds) the number button to save preset;
Clear Preset: Clear+number button to clear the relative preset;
Long press(3seconds) the Clear button to clear all preset;
Run Preset: Short press the number button to run the relative preset.

〓〓 IR REMOTE CONTROLLER 〓〓
— 12 —
LEARNING FUNCTION:
1. Press the green button, the LED indicator light will show in green color for 1 second, means
switch to video terminal/codec control mode;
2. Single Button Coding: long press(3seconds) Home +number"1" button simultaneously, the
green indicator LED will light, enter button learning mode, press the buttons which need to be
learned, LED will start flickering(1HZ), now can start button learning: get the codec remote
point to the camera remote’s infrared tube( about 10cm distance), then press the button which
need to be learned, the LED re-flickering when learning finishes ; press other buttons which
also need to be learned; Press the Home+"0" buttons simultaneously to exit and save all remote
data.
If the button learning fails, the camera will enter normal working mode after 15seconds,
LED will extinguish.
3. All Button Coding: long press (3seconds) Home+number"2" button simultaneously, the
green indicator LED will start flickering(1HZ), to enter all button learning mode: get codec
remote point to the camera remote’s infrared tube( about 10cm distance), to start all button
coding mode, the LED will extinguish when learning finished.
If the button learning fails, the camera will enter normal working mode after 15seconds, LED
will extinguish.
4. All Button Sending Mode: long press (3seconds) the Menu + number "3" button
simultaneously, the remote will enter all button sending mode.
5. Similar operation for the TV control mode learning.

〓〓〓 VISCA IN (RS232 PORT) 〓〓〓
— 13 —
SERIAL PORT CONFIGURATION:
NO.
Functions
1
DTR
2
DSR
3
TXD
4
GND
5
RXD
6
A
7
IR OUT
8
B
VISCA IN 与Mini DIN
Connection
Camera VISCA IN
Mini DIN
1
DTR
1
DSR
2
DSR
2
DTR
3
TXD
5
RXD
4
GND
4
GND
5
RXD
3
TXD
6
A(+)
6
NC
7
IR OUT
7
NC
8
B(-)
8
NC
VISCA IN 与DB9 Connection
CameraVISCA IN
Windows DB-9
1
DTR
6
DSR
2
DSR
4
DTR
3
TXD
2
RXD
4
GND
5
GND
5
RXD
3
TXD
6
A(+)
7
IR OUT
8
B(-)
Parameter
Value
Baud rate
2400/4800/9600/115200
Start bit
1bit
Date bit
8bits
Stop bit
1bit
Check bit
None

〓〓〓〓 VISCA PROTOCOL 〓〓〓〓
— 14 —
Part1 Camera Return Command
Ack/Completion Message
command
Note
ACK
z0 41 FF
Returned when the command is accepted.
Completion
z0 51 FF
Returned when the command has been executed.
Error Messages
command
Note
Syntax Error
z0 60 02 FF
Returned when the command format is different or when a command
with illegal command parameters is accepted.
Command Not
Executable
z0 61 41 FF
Returned when a command cannot be executed due to current
conditions. For example, when commands controlling the focus manually
are received during auto focus.
Part2 Camera Control Command
Command type
function
command
Address Set
Broadcast
88 30 01 FF
Address setting
IF_Clear
Broadcast
88 01 00 01 FF
I/F Clear
Command Cancel
8x 21 FF
CAM_Power
On
8x 01 04 00 02 FF
Power ON/OFF
Off
8x 01 04 00 03 FF
Address setting
CAM_Zoom
Stop
8x 01 04 07 00 FF
Tele(Standard)
8x 01 04 07 02 FF
Wide(Standard)
8x 01 04 07 03 FF
Tele(Variable)
8x 01 04 07 2p FF
p = 0(low)~7(high)
Wide(Variable)
8x 01 04 07 3p FF
Direct
8x 01 04 47 0p 0q 0r 0s FF
pqrs: Zoom Position (0(wide)
~0x4000(tele))
Direct with
speed
8x 0A 04 47 0t 0p 0q 0r 0s FF
t: spd 0~7
pqrs: Zoom Position (0(wide)
~0x4000(tele))
CAM_DZoom
ON
8x 01 04 06 02 FF
OFF
8x 01 04 06 03 FF
Combine Mode
8x 01 04 36 00 FF
Combine with optical zoom
control
Separate Mode
8x 01 04 36 01 FF
Separate with optical zoom
control
Stop
8x 01 04 06 00 FF
Enable In separate mode
Tele (Variable)
8x 01 04 06 2p FF
Enable In separate mode
Wide (Variable)
8x 01 04 06 3p FF
Enable In separate mode
Direct
8x 01 04 46 0p 0q 0r 0s FF
Enable In separate mode
CAM_Focus
Stop
8x 01 04 08 00 FF
Far(Standard)
8x 01 04 08 02 FF
Near(Standard)
8x 01 04 08 03 FF
Far (Variable)
8x 01 04 08 2p FF
p=0 (Low) to 7 (High)
Near (Variable)
8x 01 04 08 3p FF
p=0 (Low) to 7 (High)

〓〓〓〓 VISCA PROTOCOL 〓〓〓〓
— 15 —
Command type
function
command
Direct
8x 01 04 48 0p 0q 0r 0s FF
pqrs: Focus Position
Auto Focus
8x 01 04 38 02 FF
Manual Focus
8x 01 04 38 03 FF
One Push AF
8x 01 04 18 01 FF
CAM_Zoom Focus
Direct
8x 01 04 47 0p 0q 0r 0s 0t 0u
0v 0w FF
pqrs: Zoom Position
(0(wide)~ 0x4000(tele))
tuvw: Focus Position
CAM_WB
Auto
8x 01 04 35 00 FF
Indoor
8x 01 04 35 01 FF
Outdoor
8x 01 04 35 02 FF
One Push
8x 01 04 35 03 FF
ATW
8x 01 04 35 04 FF
Manual
8x 01 04 35 05 FF
Sodium lamp
8x 01 04 35 08 FF
fluorescent
8x 01 04 35 09 FF
One Push
Trigger
8x 01 04 10 05 FF
CAM_R Gain
Reset
8x 01 04 03 00 FF
Manual Control of R Gain
Up
8x 01 04 03 02 FF
Down
8x 01 04 03 03 FF
Direct
8x 01 04 43 00 00 0p 0q FF
pq: R Gain (0~0xFF)
CAM_B Gain
Reset
8x 01 04 04 00 FF
Manual Control of B Gain
Up
8x 01 04 04 02 FF
Down
8x 01 04 04 03 FF
Direct
8x 01 04 44 00 00 0p 0q FF
pq: B Gain (0-0xFF)
CAM_AE
Full Auto
8x01 04 39 00 FF
Automatic Exposure mode
Manual
8x 01 04 39 03 FF
Manual Control mode
Shutter Priority
8x 01 04 39 0A FF
Shutter Priority
Automatic Exposure mode
Iris Priority
8x 01 04 39 0B FF
Iris Priority Automatic
Exposure mode
Bright
8x 01 04 39 0D FF
Bright Mode (Manual control)
CAM_Shutter
Reset
8x 01 04 0A 00 FF
Shutter Setting
Up
8x 01 04 0A 02 FF
Down
8x 01 04 0A 03 FF
Direct
8x 01 04 4A 00 00 0p 0q FF
pq: Shutter Position (0~0x15)
CAM_Iris
Reset
8x 01 04 0B 00 FF
Iris Setting(0~0xD)
Up
8x 01 04 0B 02 FF
Down
8x 01 04 0B 03 FF
Direct
8x 01 04 4B 00 00 0p 0q FF
pq: Iris Position (0~ 0x11)
CAM_Gain
Reset
8x 01 04 0C 00 FF
Gain Setting (0~0x0F)
Up
8x 01 04 0C 02 FF
Down
8x 01 04 0C 03 FF
Direct
8x 01 04 0C 00 00 0p 0q FF
pq: Gain Positon (0~0x0E)
CAM_Bright
Reset
8x 01 04 0D 00 FF
Bright Setting
Up
8x 01 04 0D 02 FF
Down
8x 01 04 0D 03 FF
Direct
8x 01 04 4D 00 00 0p 0q FF
pq: Bright l Positon
(0~0x1B)

〓〓〓〓 VISCA PROTOCOL 〓〓〓〓
— 16 —
Command type
function
command
CAM_WDR
On
8x 01 04 3D 02 FF
Exposure Compensation
ON/OFF
Off
8x 01 04 3D 03 FF
Direct
8x 01 04 D3 pq FF
pq: ExpComp Position
(0~0x6)
CAM_Back Light(BLC)
On
8x 01 04 33 02 FF
BackLight On
Off
8x 01 04 33 03 FF
BackLight Off
CAM_Sharpness
Reset
8x 01 04 02 00 FF
Aperture Control
Up
8x 01 04 02 02 FF
Down
8x 01 04 02 03 FF
Direct
8x 01 04 42 00 00 0p 0q FF
pq: Aperture Gain (0~0x0F)
CAM_Memory(preset)
Reset
8x 01 04 3F 00 pp FF
pp: Preset Number(=0 to 127)
Corresponds to 0 to 9 on the
Remote Commander
Set
8x 01 04 3F 01 pp FF
Recall
8x 01 04 3F 02 pp FF
CAM_LR_Reverse
On
8x 01 04 61 02 FF
Image Flip Horizontal
ON/OFF
Off
8x 01 04 61 03 FF
CAM_Picture Flip
On
8x 01 04 66 02 FF
Image Flip Vertical ON/OFF
Off
8x 01 04 66 03 FF
CAM_RS485Ctl
On
8x 01 06 A5 02 FF
Off
8x 01 06 A5 03 FF
CAM_Saturation
Saturation
8x 01 04 A1 00 00 0p 0q FF
pq:saturation level
0x00~0x0f
CAM_Contrast
Contrast
8x 01 04 A2 00 00 0p 0q FF
pq:Contrast level 0x00~0x0f
CAM_Speed By Zoom
On
8x 01 06 A0 02 FF
Off
8x 01 06 A0 03 FF
CAM_PT Speed
PT Speed
8x 01 04 C1 00 00 0p 0q FF
pq:PT speed 0x05~0x18
CAM_Zoom Speed
Zoom Speed
8x 01 04 D1 00 00 0p 0q FF
pq:Zoom speed 0x01~0x07
CAM_Freeze
Freeze
8x 01 04 75 0p FF
p: Freeze switch 3=OFF,
2=ON
CAM_Preset Freeze Set
Preset Freeze Set
8x 01 04 76 0p FF
p: Preset Freeze switch
3=OFF, 2=ON
CAM_Preset PT Speed
Set
Preset PT Speed
Set
8x 01 7E 01 0B 00 qq FF
qq:Preset PT Speed 02~24
default:15
CAM_Preset Zoom
Speed Set
Preset Zoom
Speed Set
81 01 7E 01 2B 00 qq FF
qq:Preset Zoom Speed 01~07
default:5
CAM_Preset Speed Adj
Preset Speed Adj
8x 01 7E 01 1B 0p FF
p: Adjustment of direction
3=down, 2=up
CAM_IR address
IR address
8x 01 06 D8 0p FF
p:IR address 1~4
CAM_Gamma
Gamma set
8x 01 04 5B 0p FF
P:Gamma NO. (0~4)
CAM_2D
Noise Reduction
Direct
8x 01 04 A5 0p FF
(0~0x01)
CAM_3D
Noise Reduction
Direct
8x 01 04 53 0p FF
(0~0x05)
FLICK
50HZ
8x 01 04 23 01 FF
60HZ
8x 01 04 23 02 FF
OFF
8x 01 04 23 00 FF

〓〓〓〓 VISCA PROTOCOL 〓〓〓〓
— 17 —
Command type
function
command
Video System
Set(Factory)
8x 01 06 35 00 pp FF
pp: Video format
1080P60 0x00
1080P50 0x01
1080I60 0x02
1080I50 0x03
1080P30 0x04
1080P25 0x05
720P60 0x06
720P50 0x07
720P30 0x08
720P25 0x09
1080P59.94 0x0E
1080I59.94 0x0F
1080P29.97 0x10
720P59.94 0x13
720P29.97 0x14
1080P24 0x11
1080P23.98 0x12
Video System Set(Sony)
8x 01 04 24 72 0p 0q FF
pq: Video format
1080P60 0x2e
1080P50 0x2f
1080I60 0x01
1080I50 0x04
1080P30 0x06
1080P25 0x08
720P60 0x09
720P50 0x0c
720P30 0x0e
720P25 0x11
1080P59.94 0x13
1080I59.94 0x02
1080P29.97 0x07
720P59.94 0x0a
720P29.97 0x0f
1080P24 0x2a
1080P23.98 0x2b
CAM_ID Write
8x 01 04 22 0p 0q 0r 0s FF
pqrs: Camera ID (=0000 to
FFFF)
SYS_Menu
Menu On
8x 01 06 06 02 FF
Turn on the menu
Menu Off
8x 01 06 06 03 FF
Turn off the menu
Menu Back
8x 01 06 06 10 FF
Menu step back
Menu OK
8x 01 7E 01 02 00 01 FF
Menu ok
IR_Receive
On
8x 01 06 08 02 FF
IR(remote commander)receive
ON/OFF
Off
8x 01 06 08 03 FF
On/Off
8x 01 06 08 10 FF
Pan_tilt Drive
Up
8x 01 06 01 VV WW 03 01 FF
VV: Pan speed 0x01 (low
speed) to 0x18 (high speed)
WW: Tilt speed 0x01 (low
speed) to 0x14 (high speed)
YYYY: Pan Position(TBD)
ZZZZ: Tilt Position(TBD)
Down
8x 01 06 01 VV WW 03 02 FF
Left
8x 01 06 01 VV WW 01 03 FF
Right
8x 01 06 01 VV WW 02 03 FF
Up left
8x 01 06 01 VV WW 01 01 FF

〓〓〓〓 VISCA PROTOCOL 〓〓〓〓
— 18 —
Command type
function
command
Up right
8x 01 06 01 VV WW 02 01 FF
Down Left
8x 01 06 01 VV WW 01 02 FF
Down Right
8x 01 06 01 VV WW 02 02 FF
Stop
8x 01 06 01 VV WW 03 03 FF
Absolute
Position
8x 01 06 02 VV WW 0Y 0Y
0Y 0Y 0Z 0Z 0Z 0Z FF
Relative Position
8x 01 06 03 VV WW 0Y 0Y
0Y 0Y 0Z 0Z 0Z 0Z FF
Home
8x 01 06 04 FF
Reset
8x 01 06 05 FF
Pan-tilt Limit Set
Set
8x 01 06 07 00 0W
0Y 0Y 0Y 0Y 0Z 0Z 0Z 0Z FF
W: 1: Up Right
0: Down Left
YYYY: Pan Limit
Position(TBD)
ZZZZ: Tilt Limit
Position(TBD)
Clear
8x 01 06 07 01 0W
07 0F 0F 0F 07 0F 0F 0F FF
Part3 Camera Inquiry Command
Command type
command
return
note
CAM_Power Inq
8x 09 04 00 FF
y0 50 02 FF
On
y0 50 03 FF
Off(Standby)
CAM_Zoom Pos Inq
8x 09 04 47 FF
y0 50 0p 0q 0r 0s FF
pqrs: Zoom Position
CAM_DZoom On Off
Inq
8x 09 04 06 FF
y0 50 0p FF
p: 2: ON 3: OFF
CAM_DZoom Mode
Inq
8x 09 04 36 FF
y0 50 0p FF
p: 0:combination mode
1:separate mode
CAM_DZoom Posi Inq
8x 09 04 46 FF
y0 50 0p 0q 0r 0s FF
pqrs: Zoom Position
CAM_Speed By Zoom
Inq
8x 09 06 A0 FF
y0 50 0p FF
p: 2: ON 3: OFF
CAM_PT Speed
Inq(IR)
8x 09 04 C1 FF
y0 50 pp FF
pp: 0x05~0x18
CAM_Zoom Speed
Inq(IR)
8x 09 04 D1 FF
y0 50 0p FF
p:0x00~0x07
CAM_Focus Mode Inq
8x 09 04 38 FF
y0 50 02 FF
Auto Focus
y0 50 03 FF
Manual Focus
CAM_Focus Pos Inq
8x 09 04 48 FF
y0 50 0p 0q 0r 0s FF
pqrs: Focus Position
CAM_2D_Inq
8x 09 04 A5 FF
y0 50 03 FF
(0~0x01)
p: 0: off 1: on
CAM_3D_Inq
8x 09 04 53 FF
y0 50 03 FF
(0~0x05)
p:0:off 1: auto
2~5: noise level
CAM_WB Mode Inq
8x 09 04 35 FF
y0 50 00 FF
Auto
y0 50 01 FF
Indoor mode
y0 50 02 FF
Outdoor mode
y0 50 03 FF
OnePush mode
y0 50 04 FF
ATW
y0 50 05 FF
Manual
CAM_RGain Inq
8x 09 04 43 FF
y0 50 00 00 0p 0q FF
pq: R Gain
CAM_BGain Inq
8x 09 04 44 FF
y0 50 00 00 0p 0q FF
pq: B Gain
CAM_Saturation Inq
8x 09 04 A1 FF
y0 50 00 00 0p 0q FF
pq: saturation
CAM_Contrast Inq
8x 09 04 A2 FF
y0 50 00 00 0p 0q FF
pq: contrast
This manual suits for next models
1
Table of contents
Other Telycam Security Camera manuals

Telycam
Telycam Vision+4KN30X User manual

Telycam
Telycam TLC-300-IP-20NDI User manual

Telycam
Telycam TLC-300-IP-12 User manual

Telycam
Telycam TLC-700-H User manual

Telycam
Telycam Vision+N320X User manual

Telycam
Telycam NDI HX3 User manual

Telycam
Telycam 20X NDI User manual

Telycam
Telycam TLC-1000-DS User manual

Telycam
Telycam TLC-700-S User manual

Telycam
Telycam Vision+N330X User manual


