Temelsan KN-40 S-MN User manual
KN-40 S-MN BUTT WELDING
MACHINE USER MANUAL
Congratulation to your new TEMELSAN Butt Welding Machine KN-40 S-MN

P a g e | 1
TEMELSAN MAKİNA SAN. VE TİC. LTD. ŞTİ.
Akçaburgaz Mah. Muhsin Yazıcıoğlu Cad. No:55/1 Esenyurt / İstanbul / TÜRKİYE
INDEX
BASIC INFORMATIONS........................................................................................................................3
APPROPRIATE USE........................................................................................................................3
WARRANTY AND LIABILITY...........................................................................................................4
SAFETY.............................................................................................................................................4
QUALIFIELD PERSONNEL .............................................................................................................4
PLANNING ANG SET-UP................................................................................................................4
OPERATIONS...................................................................................................................................4
SAFETY DEVICES ...........................................................................................................................4
AREAS OF USAGE..........................................................................................................................5
MAINTENANCE................................................................................................................................5
ISSUES..............................................................................................................................................5
SAFETY MEASURED RELATED WITH THE MACHINE...............................................................6
TRANSPORTATION - STORAGE - PACKAGING .....................................................................7
STANDART ACCESSORIES...........................................................................................................9
OPTIONAL ACCESSORIES ............................................................................................................9
REQUIREMENTS OF WORKING PLACE......................................................................................9
FIRST CONNECTIONS........................................................................................................................11
POWER SUPPLY (WIRING DRAW SEE AT FOLLOWING PAGE)............................................11
PRESS-AIR REQUIREMENTS......................................................................................................13
FIRST INSTALLATION AND ADJUSTMENTS.....................................................................................13
FIRST CLEANING ..........................................................................................................................13
OPERATOR PANEL AND BUTTONS...........................................................................................14
GENELRAL USE OF BUTTONS ON KEYBOARD.......................................................................14
START-UP THE MACHINE............................................................................................................15
CALIBRATION OF JAW SPACE ...................................................................................................16
BASIC SETTING OF STOPPERS AND SUPPORT PLATE LEVEL ...........................................16
SERVICING THE JAWS ( PLEASE SERVICE THE JAWS FREQUENTLY )............................18
CLAMPİNG JAW GRİNDİNGİNSTRUCTİONS
.........................................................................19
INSTALLATİON OF CLAMPİNG JAWS .......................................................................................19
CLAMPİNG DEVİCE
...................................................................................................................19
UPSET PRESSURE .......................................................................................................................20
USING THE ADJUSTMENT HANDLE .................................................................................................21
JAW LEVEL CALIBRATION (CLAMPING JAW ANNEALING PRESSUREPOINT)..................22
CLAMPING JAW CALIBRATION BY CARBON PAPER..............................................................27
SUMMARY OF FUNCTIONALITY TYPES.........................................................................................29
WELDING STOP POINT
....................................................................................................................30

P a g e | 2
TEMELSAN MAKİNA SAN. VE TİC. LTD. ŞTİ.
Akçaburgaz Mah. Muhsin Yazıcıoğlu Cad. No:55/1 Esenyurt / İstanbul / TÜRKİYE
QUICK MANUAL CHART.....................................................................................................................31
MACHINE SERVICE............................................................................................................................32
CLAMPING JAW SERVICING / GRINDING INSTRUCTIONS.............................................................32
SYSTEM DRAWINGS..........................................................................................................................33
SPARE PART DRAWINGS..................................................................................................................42

P a g e | 3
TEMELSAN MAKİNA SAN. VE TİC. LTD. ŞTİ.
Akçaburgaz Mah. Muhsin Yazıcıoğlu Cad. No:55/1 Esenyurt / İstanbul / TÜRKİYE
BASIC INFORMATIONS
This manual user guide is prepared to be useful in order to get familiar with the machine and
the functions of the machine. By the help of this manual guide, the operator becomes a
capable to use the machine in an optimal way in order to operationalize safely, ergonomically
and properly.
This manual user guide allows the operators not to take risk, minimize the idle and repair time.
It also helps to increase lifetime of the machine.
This manual user guide should be kept in a proper place and be accessible easily when
needed. The local regulations included safety and environmental requirements must be
followed in addition to the statements based on this manual user guide.
In case of an issue, complaint, request, demand on spare parts etc. please note the following
information along with the below message
Concerning following Object:
Machine Model:
TEMELSAN KN-40 S-MN
Mfg. year: 2018
Serial Number:
APPROPRIATE USE
The machine is designed to weld the steel and band saw blades min. 6x0.65mm and max.
41x1.10mm.
In the event of using the machine rather than described in which case the machine would be out
of warranty situation of Temelsan.
Upset welding
/resistance butt welding is a welding technique that produces coalescence
simultaneously over the entire area of abutting surfaces or progressively along a joint, by the
heat obtained from resistance to electric current through the area where those surfaces are in
contact. Pressure is applied before heating is started and is maintained throughout the heating
period. The equipment used for upset welding is very similar to that used for flash welding.
Flash welding
is a type of resistance welding that does not use any filler metals. The pieces of
metal to be welded are set apart at a predetermined distance based on material thickness,
material composition, and desired properties of the finished weld. Current is applied to the
metal, and the gap between the two pieces creates resistance and produces the arc required
to melt the metal. Once the pieces of metal reach the proper temperature, they are pressed
together, effectively forging them together. You will be faced with technical words like Upset
Pressure, Weld-Space, Welding-Ready Position. This will be explained later in this Manual.
(Some Text here is copied from Wikipedia, which explains very well the Butt Welding procedure, many
thanks to the writer)

P a g e | 4
TEMELSAN MAKİNA SAN. VE TİC. LTD. ŞTİ.
Akçaburgaz Mah. Muhsin Yazıcıoğlu Cad. No:55/1 Esenyurt / İstanbul / TÜRKİYE
WARRANTY AND LIABILITY
In the event of involving a personal injury or physical damages are not covered by the warranty if the
following events occur as below.
-
Using the machine for a purpose rather than intended
-
Technically, improper installation, start-up operation or maintenance of the machine
-
In the act of using the machine while any of safety equipment is a broken or
protective device inappropriately running.
-
Making constructional changes on running parameters.
-
Insufficient control of abrasion parts
-
Inappropriate repairs
-
The catastrophic failures due to the action of foreign objects / Bodies and excessive force applied
SAFETY
Below safety requirements must be applied without skipping anything and priority case to carry
out.
QUALIFIELD PERSONNEL
Certain tasks must be carried out on the machine by a professional qualified personnel. Not
third parties neither the children should be near the machine working area.
PLANNING ANG SET-UP
Planning, transportation, installation, programming, start-up, maintenance, repairs and other
works must be done by qualified personnel. Authorized technician must check it also.
The following matters must be noted:
-
Technical data and details concerning the permissible use of the machine and its
accessories.
-
General and specific local preparation and safety measures.
-
Personal usage and the use of general safety equipment must be related the norms.
-
Especially listed on this manual guide but specifically not listed in the operating instructions
that has been explicitly forbidden. Such as a handicapped to use the machine is such
cases it is necessary to contact the manufacturing company.
OPERATIONS
Dangers hidden in disregards of safety regulations.
SAFETY DEVICES
The machine is equipped with the safety devices corresponding to current state of the art. In the
matter of safety equipment, the machine may not be disabled, removed, dismantled, damaged.
It applies in particular to:
-
Safety switches (Emergency Stop Button)
-
Electrical and electronic fuses

P a g e | 5
TEMELSAN MAKİNA SAN. VE TİC. LTD. ŞTİ.
Akçaburgaz Mah. Muhsin Yazıcıoğlu Cad. No:55/1 Esenyurt / İstanbul / TÜRKİYE
AREAS OF USAGE
The butt-welding machine Temelsan KN40S-MN is used for low-alloyed and high-alloyed steel
bands and band saw blades or bi-metal or carbide tipped band saw blades.
The welding capacity for Band Saw Blades is from minimum 6x0.65mm up to a maximum 41
x1.10mm. The machine is capable to weld all kinds of band saw blades which are called
carbon, wood, bi-metal, CT Work on the electrical power supply is only to be done by
professional electrician.
The machine is a single piece and no need to be assembled.
The machine can be set-up by the customer’s own staff if officially approved by Temelsan.
Please read the following sections thoroughly and carefully before the initial start-up and ensure
that you clearly understand it.
MAINTENANCE
In order to insure a safe operation on the machine and prevent accidents, the job listed in the
section “Servicing” must be carried out regularly. If the owner of machine is not in a position to
do that also must be arranged by an authorized service agent.
ISSUES
The machine must be switched off at once in case of any problem occurs during the operation
and then locked for not being restarted accidently by an unauthorized person.
The machine must be switched off in this case.
-
Unusual sounds, vibrations, smells
-
Unusual operations on the monitoring device
-
Increased temperatures or power consumption
-
Unusual reaction during the manual or automatic operation
-
Strange behavior and error messages displayed
WARNING!
Only suitably qualified personnel must service the machine!
EMERGENCY
P a g e | 6
TEMELSAN MAKİNA SAN. VE TİC. LTD. ŞTİ.
Akçaburgaz Mah. Muhsin Yazıcıoğlu Cad. No:55/1 Esenyurt / İstanbul / TÜRKİYE
ATTENTION!
Note the following at emergent cases (fire, water, explosions, breakage):
•
Cut the machine off from the mains power supply at an external main switch or external
fuses
•
Switch off the compressed air supply
•
Use the fire extinguishers of a suitable type to deal with the fire
SAFETY MEASURED RELATED WITH THE MACHINE
WEAR PROTECTIVE GLASSES!
Welding beads produced during welding work could damage your eyes.
WEAR GLOVES!
The sharp edges of the blades can cause hand injuries.
DANGER OF FIRE!
Easily inflammable materials could be set alight if they come in to contact with
welding sparks
SWITCH OFF THE MACHINE!
Cut off machine from the main supply before carrying out setting-up maintenance
and servicing work on the machine. Kind of inflammable materials should keep far
away from welding area constantly during the operation!
DANGEL OF BEING CRUSHED!
There is a degree of danger if being crushed when in the proximity of the
clamping jaws during inserting parts. There is a degree of danger being crushed
between the clamping jaws during the setting-up operations.
ATTENTION!
It’s dangerous when contacting parts of the power supply, control and transformer.
IN CASE OF EMERGENCY;
Push the emergency stop button.
The emergency stop button is to use by emergency issues only!

P a g e | 7
TEMELSAN MAKİNA SAN. VE TİC. LTD. ŞTİ.
Akçaburgaz Mah. Muhsin Yazıcıoğlu Cad. No:55/1 Esenyurt / İstanbul / TÜRKİYE
TRANSPORTATION - STORAGE - PACKAGING
The machine may not be handled with special care in transport so as to prevent damage from
impacts to careless loading and unloading. The measures listed below are essential. The
following measures that must be taken only cover the transport within the company. Road, rail,
airline transport and sea transport require additional measures to be taken.
Transport in assembled state (see figure below)
•
Use only the lifting eyelets for transport by crane (Picture below)

P a g e | 8
TEMELSAN MAKİNA SAN. VE TİC. LTD. ŞTİ.
Akçaburgaz Mah. Muhsin Yazıcıoğlu Cad. No:55/1 Esenyurt / İstanbul / TÜRKİYE
•The use by forklift (pictured blow)
Attention:RISK OF TIPPING OVER
The higher center of gravity requires a special view for transportation even the
Machine should be fixed by screws to the pallet.
CENTER OF GRAVITY

P a g e | 9
TEMELSAN MAKİNA SAN. VE TİC. LTD. ŞTİ.
Akçaburgaz Mah. Muhsin Yazıcıoğlu Cad. No:55/1 Esenyurt / İstanbul / TÜRKİYE
STANDART ACCESSORIES
6-41mm Width Bi-Metal and CT-Band welding capacity
10-50mm Width Wood-Band welding capacity
One type jaws Both side usable and turn able for small widths
Adjustable Manuel stoppers for cambered band saw blades
3 Program Memories For 3 fully range of band saw blade dimensions
Air Pistol For manual cleaning
Support Tools Pre-Adjustment tools
OPTIONAL ACCESSORIES
1 Set Spare Upper and Lower Jaws (2 pcs of upper + 2 pcs of lower jaws)
Please check the Packing when arrived before unloading the machine from truck.
Do not accept the delivery if packaging is damaged or broken by transportation.
In case of broken or damaged packing of machine, it’s possible with agreement of Transportation
Company to unpack and check the machine condition before down loading
As soon you unload the machine, you accept the condition of machine, you take any responsibility for
damages and eventually repairs.
REQUIREMENTS OF WORKING PLACE
-Flat and smooth desk
-Required big enough area around the machine
-Environmental conditions
-The running of the machine is not permitted if flammable liquids and objects are near to welding
machine
-Enough air circulation is required
-The client is obliged to local electrical distributor notified technical requirements

P a g e | 11
TEMELSAN MAKİNA SAN. VE TİC. LTD. ŞTİ.
Akçaburgaz Mah. Muhsin Yazıcıoğlu Cad. No:55/1 Esenyurt / İstanbul / TÜRKİYE
FIRST CONNECTIONS
POWER SUPPLY (Wiring draw see at following page)
A qualified electrician must do the connection.
The input voltage (standard norm) is 400V AC (3 Phase + Neutral + Ground) 50Hz.
The input voltage (US Norm) is 600 V AC (3 phase + Neutral + Ground) 60 Hz. (optional)
The recommended fusing for power supply is
40 Amp fuse
,
sluggish type
The Diameter of each wire for power supply it's very important, please use the chart by
selecting the Machine Type
Do not switch ON the machine before the all setup instruction is read and work performed
Pay special attention to protect yourself from the energized cables moreover the
control panel
while operating the machine. Keep closed the cover of electrical control panel
and do not forget
to take out all the foreign objects in the cabinet which might cause short circuit.
-
Working on the electrical power supply has to be only done by professional electrician.
-
The electrical equipment of the machine must be checked regularly
-
Always keep the switching cabinet locked. Access is only permitted to authorized personnel
with the key or special tool.
-
Remove at once any loose or worncables
-
If it is essential to work on parts carrying a current there must be a second person present to
turn off the main switch in case of anemergency
-
The customer is required to comply with the technical conditions and requirements of the
relevant electrical power supplycompany
Make sure that the main switch of the machine is on OFF
position and prevent to be turned on by an accident.
ATTENTION!
WARNING!


P a g e | 13
TEMELSAN MAKİNA SAN. VE TİC. LTD. ŞTİ.
Akçaburgaz Mah. Muhsin Yazıcıoğlu Cad. No:55/1 Esenyurt / İstanbul / TÜRKİYE
PRESS-AIR REQUIREMENTS
The machine needs dry and clean air pressure, which needs 6-8 bars.
After some time the air becomes wet and dirty, then please clean the conditioner of air right
behind the machine.
Connect air hose supply coming from the compressor through at the rear side of the machine.
FIRST INSTALLATION AND ADJUSTMENTS
Authorized professionals, who must read this user guide, must do first installation and
adjustments. In case of questions, is an immediately contact with manufacturer/supplier
required.
FIRST CLEANING
Unpainted parts on the machine are slushed with conservation oil and have to be cleaned
before the operation can start. Especially the jaws and around them must be cleaned properly.
Check Points
1.
Power is connected through the instructions above, All fuses are ON also inside the
electrocabinet
2. Air is connected and adjusted with 8 Bar
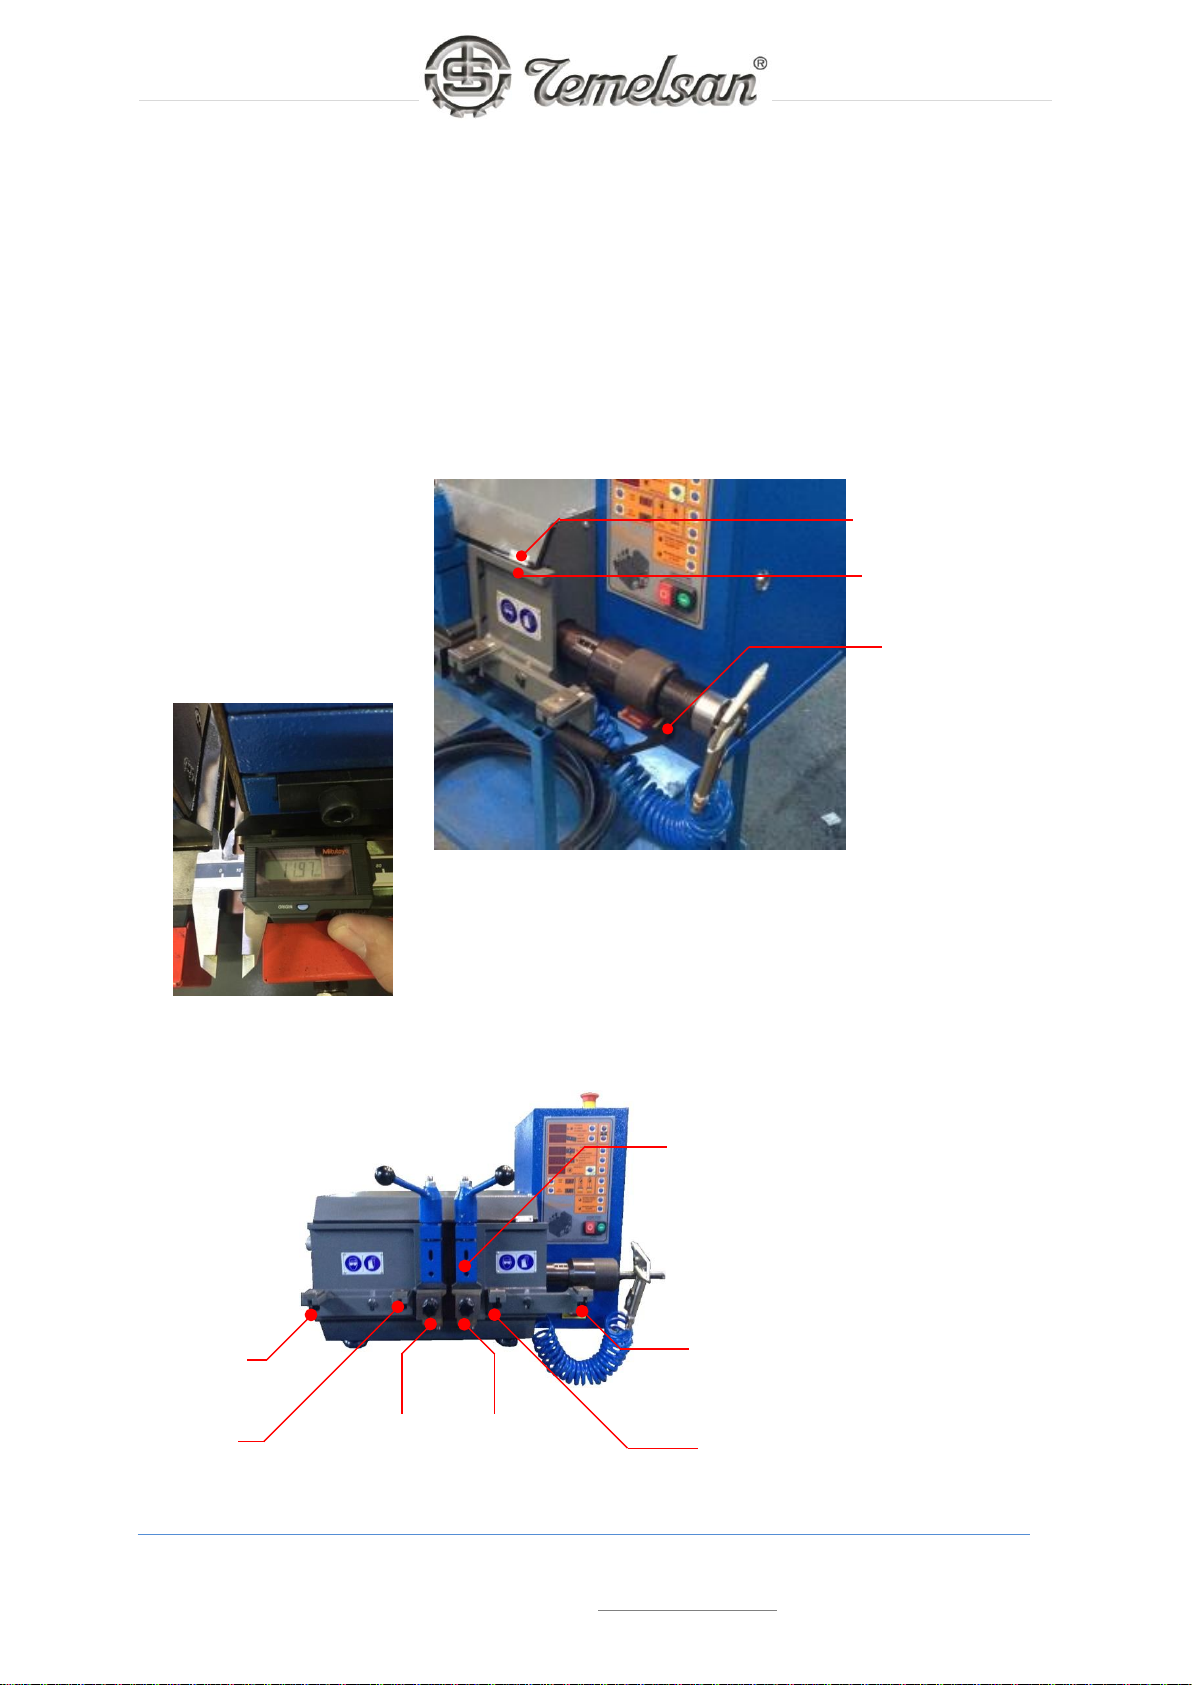
EMERGENCY STOP BUTTON
OPERATOR KEYBOARD
HAND WHEEL FOR JAW SPACING
ELECTRIC CABINET
MAIN POWER SWITCH
JAWS
BLUE START BUTTON
RIGHT SIDE CLAMPING HANDLE
LEFT SIDE CLAMPING
HANDLE

P a g e | 14
TEMELSAN MAKİNA SAN. VE TİC. LTD. ŞTİ.
Akçaburgaz Mah. Muhsin Yazıcıoğlu Cad. No:55/1 Esenyurt / İstanbul / TÜRKİYE
OPERATOR PANEL AND BUTTONS
GENELRAL USE OF BUTTONS ON KEYBOARD
Push the button (Program, Bandsaw, Welding Current, Annealing Current, Annealing Timer) to
make selection on which value you want to change. When you press the selection buttons the screen
next to button the light will blink. While screen is blinking you can adjust with “VALUE ADJUSTMENT
BUTTON (+) or (-)”. When you reach the value, press the “SET BUTTON”to save your settings.
PROGRAM SELLECTION BUTTON
VALUE ADJUSTMENT BUTTON (+)
VALUE ADJUSTMENT BUTTON (-)
BANDSAW SELLECTION BUTTON
WELDING CURRENT SELL. BUTTON
ANNEALING CURRENT SELL. BUTTON
ANNEALING TIMER SELL. BUTTON
SET BUTTON
WELDING READY BUTTON
ANNEALING READY BUTTON
OPERATION START BUTTON
OPERATION STOP BUTTON
PROGRAM SCREEN
BANDSAW SCREEN
WELDING CURR. SCREEN
ANNEALING CURR. SCREEN
ANNEALING TIMER SCREEN
WIDE ANNEALING
SPACE BUTTON
NARROW ANNEALING
SPACE BUTTON

P a g e | 15
TEMELSAN MAKİNA SAN. VE TİC. LTD. ŞTİ.
Akçaburgaz Mah. Muhsin Yazıcıoğlu Cad. No:55/1 Esenyurt / İstanbul / TÜRKİYE
START-UP THE MACHINE
(Very important to follow step by step, do not proceed to next step when check point is not
confirmed for proper functionality)
1.
Turn the main power switch to
ON
2.
Check and unlock the Emergency Stop Button (to unlock turn on Button to left side)
3.
Press the
“BLUE RESET BUTTON”
to start the machine.
4.
Press the
“PROGRAM SELLECTION BUTTON”
and use
“(+) or (-) VALUE ADJUSTMENT
BUTTONS”
to find your program and press the
“SET BUTTON”
5.
Press the
“BANDSAW SELLECTION BUTTON”
and use
“(+) or (-) VALUE ADJUSTMENT
BUTTONS”
to find your band saw type and press the
“SET BUTTON”
6.
Press the
“WELDING CURRENT SELLECTION BUTTON”
and use
“(+) or (-) VALUE
ADJUSTMENT BUTTONS”
to find your current value and press the
“SET BUTTON”
7.
Press the
“ANNEALING CURRENT SELLECTION BUTTON”
and use
“(+) or (-) VALUE
ADJUSTMENT BUTTONS”
to find your current value and press the
“SET BUTTON”
8.
Press the
“ANNEALING TIMER SELLECTION BUTTON”
and use
“(+) or (-) VALUE
ADJUSTMENT BUTTONS”
to find your timer value and press the
“SET BUTTON”
9.
Choice your annealing space and press the button
“WIDE ANNEALING”
or
“NARROW
ANNEALING”
button to set it.
10.
Push on Operator Keyboard the Button "
WELDING READY
" The right jaw should move on
position
11.
Check the space between the Jaws; it should be same as on indicator
12.
Push on Operator Keyboard the Button "Annealing Ready"
Congratulation, your Machine is correct connected and is ready to Calibrate several
following equipment
a.
StopperPositions
b.
Jaw Level and spacing
P a g e | 16
TEMELSAN MAKİNA SAN. VE TİC. LTD. ŞTİ.
Akçaburgaz Mah. Muhsin Yazıcıoğlu Cad. No:55/1 Esenyurt / İstanbul / TÜRKİYE
CALIBRATION OF JAW SPACE
1.
Adjust the space of jaws by turning the hand wheel to 10mm (use a caliper) Hand Wheel
can be only turned when jaws are in Welding Ready Position!
2.
Adjust the space indicator also to 10mm by using a screwdriver Check the indicator
frequently.
BASIC SETTING OF STOPPERS AND SUPPORT PLATE LEVEL
Turn the CSL and CSR stoppers to find proper adjustment for band saw teeth size.
HAND WHEEL FOR JAW SPACING
SPACE INDICATOR
SCREW TO ADJUST INDICATOR
Adjust the space between the Jaws in Welding Ready
Position to a specific slot width and measure it proper.
Position on Space indicator should be same.
PLEASE CONTROL THIS FREQUENTLY!
MSR
OSR
OSL
MSL
JAW LEVEL
ADJUSTMENT HOLE
Outside Stopper Left
Center Stopper Left
Center Stopper Right
Outside Stopper Right
Middle Stopper Right
Middle Stopper Left
OSL
CSL
CSR
OSR
MSR
MSL
CSR
CSL
P a g e | 17
TEMELSAN MAKİNA SAN. VE TİC. LTD. ŞTİ.
Akçaburgaz Mah. Muhsin Yazıcıoğlu Cad. No:55/1 Esenyurt / İstanbul / TÜRKİYE
CSL AND CSR STOPPERS DRAWING
Unscrew the OSL, OSR, MSL and MSR stoppers to be free move.
Put the Band saw be sure the teeth of band saw touch the stoppers on proper way.
Turn the clamping handles to clamp.
Set the OSL, OSR, MSL and MSR stoppers to touch the band saw.
Screw the OSL, OSR, MSL and MSR stoppers.
Please check and service the Stoppers frequently!

P a g e | 18
TEMELSAN MAKİNA SAN. VE TİC. LTD. ŞTİ.
Akçaburgaz Mah. Muhsin Yazıcıoğlu Cad. No:55/1 Esenyurt / İstanbul / TÜRKİYE
SERVICING THE JAWS (PLEASE SERVICE THE JAWS FREQUENTLY )
3.
unscrew the "Lower Jaw retaining screw (3)"
4.
move up the Lower Jaw block (1)
5.
pull out the "Lower Jaw”to front
6.
unscrew the “Upper Jaw retaining screw”
7.
move down the Upper Jaw block (2)
8. pull out the “Upper Jaw to front”
JAW LEVEL ADJUSTMENT TOOL
UPPER JAW (STEEL)

P a g e | 19
TEMELSAN MAKİNA SAN. VE TİC. LTD. ŞTİ.
Akçaburgaz Mah. Muhsin Yazıcıoğlu Cad. No:55/1 Esenyurt / İstanbul / TÜRKİYE
9.
CLAMPING JAW GRINDINGINSTRUCTIONS
The lowerjaws (Bronze) -just to grind on top surface until any crack on weld edge is out
-Both lower jaws have to be same thickness; it's
recommended to grind it together as a pair
The upperjaws (Steel) -just to grind on bottom surface until any crack on weld edge
is out
-Both upper jaws should have the same thickness
We recommend to grind the surface of jaws frequently, that has the advantage of
-Better power connectivity
-Straight surface
-Higher weld precision
As earlier you take it out to grind, as less material have to be grinded, the life of jaws will
increase.
10. INSTALLATION OF CLAMPING JAWS
Please make sure that the touch points between Jaws and Jaw-blocks are clean and
free from grease.
When you place the Jaw to position it, check if all surface has contact, very clean
between. Do not create the contact by tighten the screws.
When fixing the screws, not too tight please!
11.
CLAMPING DEVICE
The clamping devices are Manual system to clamp Metal Band or Band Saw Blade
for butt-welding procedure.
.
Table of contents


