Temper Koban KCB-240 User manual

Manual de instrucciones
Cortadora de Cables a Batería KCB-240
Debido a los mejoramientos continuos, el producto real puede diferirse
ligeramente del producto descrito en este documento.
Lea este documento antes de utilizar el producto.
De lo contrario puede provocar lesiones graves.
GUARDE ESTE MANUAL

GARANTÍA LIMITADA DE 1 AÑO
Hacemos todo lo posible para garantizar que los productos cumplen con los estándares de
alta calidad y durabilidad, y garantizar al comprador original que este producto está libre de
defectos en materiales y mano de obra durante el periodo de un año desde la fecha de
compra (90 días si se utiliza por un contratista profesional o si se utiliza como equipo de
alquiler). Esta garantía no se aplica a los daños resultantes directa o indirectamente, al mal
uso, abuso, negligencia o accidentes, reparaciones o alteraciones fuera de nuestras
instalaciones, el uso y desgaste normal, o la falta de mantenimiento. En ningún caso
seremos responsables por la muerte o lesiones de personas o bienes, o por daños
incidentales, contingentes, especiales o consecuentes derivados del uso de nuestro
producto. Algunos estados no permiten la exclusión o limitación de daños incidentales o
consecuentes, por lo que la limitación de exclusión anterior puede no aplicarse a usted.
ESTA GARANTÍA ESTÁ EXPRESAMENTE EN LUGAR DE CUALQUIER OTRA
GARANTÍA, EXPRESA O IMPLICADA, INCLUYENDO LAS GARANTÍAS DE
COMERCIALIZACIÓN YAPTITUD.
Para beneficiarse de esta garantía, el producto o pieza deben ser devueltos a nosotros con
gastos de transporte ya pagados. La prueba de la fecha de compra y la explicación de la
queja deben acompañar a la mercancía. Si nuestra inspección verifica el defecto, se
reparará o reemplazará el producto, a nuestra elección, o podemos optar a la devolución del
precio de compra si no podemos fácilmente y rápidamente proporcionarles un reemplazo.
Le devolveremos los productos reparados a costa nuestra, pero si determinamos que no hay
defecto, o que el defecto fue ocasionado por causas que no son competencia de la garantía,
deberá asumir el costo de la devolución del producto.
La garantía le otorga derechos legales específicos y usted también puede tener otros
derechos que varían de estado a estado.

SOLUCIÓN DE PROBLEMAS
FALLA
ANÁLISIS
SOLUCIÓN
A. La
herramienta
no funciona
1. Residuos,
contaminantes, etc.
en el área de pistón
de la herramienta.
2. La batería se agotó.
3. Los componentes de
la herramienta están
gastados o dañados.
1. Limpie el sistema hidráulico
2. Cargue la batería
3. Devuelva la herramienta al
fabricante o al distribuidor.
B. Sin potencia
durante la
operación o
sin la potencia
nominal
requerida.
1. Sin aceite.
2. Residuos,
contaminantes al
interior del
contenedor de
aceite.
3. Fuga interior.
1. Llene de aceite el contenedor.
2. Devuelva la herramienta al
fabricante o distribuidor.
3. Devuelva la herramienta al
fabricante o distribuidor.
C. Fuga en el
cabezal de
corte o
émbolo
1. Juegos de sellado
desgastados.
1. Devuelva la herramienta al
fabricante o distribuidor.
D. Motor en
marcha pero
sin potencia
de salida.
1. No hay aceite en el
contenedor de aceite.
2. Aire en el sistema
hidráulico.
3. Aceite frío.
1. Llene de aceite el contenedor o
cambie el aceite.
2. Devuelva la herramienta al
fabricante o distribuidor.
3. Use la herramienta entre -20°y
40°C
E. Alarma de
error.
1. La batería no tiene
energía.
1. La batería necesita ser cargada.
GUARDE ESTE MANUAL
Guarde este manual para las advertencias y precauciones de seguridad, montaje,
funcionamiento, inspección, mantenimiento y procedimientos de limpieza. Escriba el mes y
el año de compra. Guarde este manual y el recibo en un lugar seco y seguro para referencia
futura.
INFORMACIÓN IMPORTANTE DE SEGURIDAD
En este manual, en el etiquetado, y toda la información
proporcionada con este producto:
Este es el símbolo de alerta de seguridad. Se utiliza para advertirlos
de posibles riesgos de lesiones personales. Obedezca todos los
mensajes de seguridad que siguen a este símbolo para evitar posibles
lesiones o la muerte.
PELIGRO indica una situación peligrosa que,
si no se evita, resultará en muerte o lesiones graves.
ADVERTENCIAindica una situación peligrosa, que, si no
se evita, podría resultar en muerte o lesiones graves.
PRECAUCIÓN, utilizado con el símbolo de alerta de
seguridad, indica una situación peligrosa, que, si no se evita,
podría resultar en
lesiones leves o graves.

REGLA GENERAL DE SEGURIDAD
PARA TRABAJAR EN CONDICIONES SEGURAS CON ESTA HERRAMIENTA, ES
IMPERATIVO A LEER CUIDADOSAMENTE LAS INSTRUCCIONES DE USO Y
SEGUIR LAS REGLAS QUE CONTIENE. SI NO RESPETA LA INFORMACIÓN
ESCRITA EN EL MANUAL DE INSTRUCCIONES, LA GARANTÍA SERÁ
CANCELADA.
1. Seguridad del área de trabajo
a. Mantenga el área de trabajo limpia y bien iluminada. Las áreas desordenadas u
oscuras pueden provocar accidentes.
b. Esta herramienta no tiene aislamiento; por favor, no la use cerca de un conductor
de fase.
c. Por favor, no use o guarde la herramienta bajo altas temperaturas, o con un fluido
corrosivo que lo rodee. Preste atención cuando los juegos de sellado estén
envejecidos.
d. Mantenga a los niños y curiosos alejados mientras utiliza el cortador de cable a
batería. Las distracciones pueden hacer que usted pierda el control.
e. No use o cargue la herramienta en un ambiente inflamable o explosivo.
2. Seguridad eléctrica
f. Asegúrese de que el enchufe coincida con el tomacorriente. Nunca intente hacer
cambios en el enchufe.
g. No ponga la herramienta, la batería y el cargador bajo condiciones de lluvia o
humedad, es fácil provocar un accidente por descarga eléctrica si entra agua al
sistema eléctrico de la herramienta.
h. No use un cable eléctrico para llevar, jalar, o desenchufar el enchufe y no conecte
el ―-―al ―+‖, un cable dañado o torcido puede causar un accidente por descarga
eléctrica.
i. Si el cargador fuera severamente golpeado, o se haya caído, o cualquier daño le
hubiese ocurrido, por favor no intente repararlo usted mismo. Envíelo de vuelta al
centro de servicios autorizado lo más pronto posible. El cargador dañado puede
causar un accidente por descarga eléctrica.
La mejor temperatura para cargar es entre 10°C y 40°C. Asegúrese de que la
entrada de aire.
j. Si la herramienta no ha sido usada por un periodo muy largo, por favor asegúrese
de que el pistón esté colocado su posición de inicio, limpie la herramienta y pinte
con aceite antioxidante tanto el pistón como los accesorios de la herramienta.
Retire la batería y póngala en una caja y guarde la herramienta en un ambiente
seco, como se muestra a continuación:
Añada gotas de aceite
lubricante al pistón

MANTENIMIENTO Y SERVICIOS DE REPARACIÓN
Un equipo dañado puede causar serias lesiones corporales. No utilice un equipo
dañado. Si se produjeran ruidos o vibraciones anormales, haga corregir el problema
antes de continuar el uso.
1. Antes de cada uso, inspeccione las condiciones generales de la herramienta. Revise si
hay tornillos sueltos, desalineación o atascamiento de piezas movibles, piezas rotas o
partidas, o cualquier otra condición que pueda afectar su funcionamiento seguro.
2. Después de su uso, limpie las superficies externas de la herramienta, limpie la
humedad y las marcas, el óxido que previene el aceite en la parte metálica de la
herramienta y las matrices para evitar el óxido. Guarde la herramienta en un ambiente
seco.
3. Las reparaciones de la herramienta deben ser hechas sólo por un Técnico de Servicio
calificado.
4. Con el fin de prolongar la vida de la herramienta, por favor, cambie el aceite cada año.
Asegúrese de que el aceite haya sido filtrado por una malla de 120 o un filtro superior
a 30µm. Y, evite que entre el polvo al contenedor de aceite.
5. Después de un largo tiempo de uso, los juegos de sellado resultarán dañados. Si hay
fugas, por favor, contáctese con el fabricante y/o el distribuidor para cambiar los
juegos de sellado.
k. Por favor, desconecte la corriente del cargador cada vez que lo use para reducir el
riesgo que pueda sufrir un niño o una persona que no sea experta en el uso de la
herramienta.
l. No espere a que la batería se agote para recargarla, la recarga hará que la batería
no funcione más. Por favor, mantenga la batería fuera de la herramienta para
evitar la descarga de energía.
m. Por favor, no incinere la batería o haga un corto circuito con ella, puede causar
una explosión.
n. No use residuo de batería, ya que podría causar una descarga eléctrica.
o. No desarme la batería y el cargador. Si existiese algún problema, por favor
contacte al fabricante o agente.
3. Seguridad personal
p. Manténgase alerta, observe lo que está haciendo y use su sentido común cuando
esté operando la herramienta. No use la herramienta cuando esté cansado o aún
bajo la influencia de fármacos, alcohol o medicamentos. Un momento de falta de
atención puede causar serias lesiones corporales.
q. Use equipos de seguridad. Siempre use equipos de seguridad tales como
máscaras, cascos, gorras de seguridad, calzado con aislamiento, etc. para reducir
el riesgo de lesiones corporales.
r. Vístase apropiadamente. No use ropa holgada o joyas. Mantenga su cabello, su
ropa y sus guantes lejos de las piezas movibles. La ropa suelta, las joyas o el
cabello largo pueden quedar atrapados en las piezas movibles.
s. Haga un mantenimiento a sus herramientas eléctricas. Revise si hay una
desalineación o atascamiento de piezas movibles, rotura de piezas o cualquier
otra condición que pueda afectar el funcionamiento de la herramienta. Si se
dañara, lleve a reparar la herramienta antes de su uso. Muchos accidentes son
causados por herramientas eléctricas con un mantenimiento deficiente.
t. Por favor, utilice la herramienta apropiadamente, la herramienta con la energía
correcta hará mejor el trabajo y con mayor seguridad a la velocidad para la que
fue diseñada.
u. No ponga sus dedos en el cabezal de la herramienta durante su funcionamiento.
Sus dedos podrían ser apretados severamente.
Finalice el trabajo.
Presione para desconectar
la corriente o espere 30
segundos para que se apague
automáticamente.

4. Servicio
Mantenga su Herramienta Cortadora a Batería revisada por un servicio técnico
calificado que sólo utilice piezas de repuesto idénticas. Esto garantizará que la
seguridad del Juego de Herramienta Cortadora a Batería será mantenida.
REGLAS ESPECÍFICAS DE SEGURIDAD
1. Mantenga las etiquetas y las placas de la herramienta. Estas contienen información
importante de seguridad. Si ilegibles o faltan, póngase en contacto con el agente para
reemplazarlas.
2. Este producto no es un juguete, manténgalo fuera del alcance de los niños.
3. No ponga los dedos en la cabeza de la herramienta al deslizar las palas en su interior.
Sus dedos podrían quedar aprisionados muy severamente.
4. Asegúrese de que el cabezal haya sido asegurado firmemente durante el
funcionamiento.
5. No utilice la herramienta sin palas.
6. No corte en los cables vivos o conductores.
7. No golpee ninguna parte de la herramienta, de lo contrario causará daños.
8. No opere la máquina a su antojo, eso dañará el MCU y el sistema eléctrico.
9. El diseño del tornillo limitador en el cabezal es para prevenir que el cabezal se caiga
o se salga.
10. Asegúrese de que el cabezal haya sido asegurado firmemente durante el
funcionamiento.
11. No emplee esta herramienta para un uso continuo. Después de 30 a 40 ciclos, deje
que la herramienta enfríe por 15 minutos.
12. No asegure esta herramienta a un tornillo de banco. Esta herramienta está diseñada
para un uso manual.
13. La válvula de seguridad incorporada pasa por una estricta prueba de presión antes de
salir al Mercado; por favor, no ajuste la presión por una persona no profesional. Si la
presión no es suficiente, por favor devuelva las herramientas al centro de servicio. La
herramienta solo podrá ser reusada después de ser revisada y probada por una
persona capacitada.
14. Las advertencias, precauciones e instrucciones descritas en este manual de
instrucciones no pueden cubrir todas las condiciones y situaciones posibles que
puedan ocurrir. Se debe entender por el operador que el sentido común y la
precaución son factores que no se pueden incluir en este producto, sino que deben ser
suministrados por el operador.
Encienda la herramienta.
Inspeccione la configuración.
(1) Retire la clavija.
(2) Separe la cuchilla
movible.
(3) Coloque el cable al interior..
(1) Cierre la cuchilla movible.
(2) Inserte la
clavija
completamente
(1) Presione el
disparador
El pistón sale.
(2) El pistón avanza
para hacer el corte.
Suelte el disparador.
El pistón se retrae.
En caso de un error al
soltar el disparador..

polvo,sin aceite, olimpias yesténpiezastodas lasqueAsegúrese de
laqueevitarparaespecialmente en el mango y en las piezas de control,
herramienta se caiga fácilmente durante su funcionamiento.
Primero, presione por 3 s para encenderla, la herramienta estará en el modo
de auto-inspección por 1 s. los datos mostrarán el último registro, y la herramienta
estará lista para trabajar.
1) inspeccione si la batería está saturada o agotada.
No ponga en funcionamiento la herramienta sin cuchillas.
2) Abra el cabezal sacando la clavija, luego el cable/conductor debe estar colocado en el
cabezal de corte que deberá ser cerrado después.
3) Un proceso de corte es iniciado al accionar el disparador. Está definido por el
acercamiento y la penetración de la cuchilla en movimiento sobre el cable/conductor.
La cuchilla en movimiento debe acercarse al cable/conductor desde una dirección
vertical para evitar fuerzas de cizallamiento indeseadas que podrían causar que la
cuchilla se atasque o se dañe.
4) Un ciclo de corte es finalizado cuando las cuchillas se cierran completamente o
cuando la fuerza de corte máxima ha sido alcanzada.
El proceso de corte puede ser interrumpido en cualquier momento soltando a medias
el disparador, pero el pistón queda en pausa por un momento.
No ponga sus dedos en el cabezal de la herramienta durante su funcionamiento. Sus
dedos podrían ser apretados severamente.
ENTIENDA SU HERRAMIENTA
La KCB-240
es para cortar cables de Cu/Al y cables armados. La energía está
suministrada
por Li-ion, accionada por un motor y controlada por MCU. Con un sistema
hidráulico
de
alta
presión,
iluminación
LED,
LCD,
alarma
de
advertencia
de
errores,
muestra de
presión, funciones, etc. es una herramienta perfecta para ser usada en obras de
construcciones eléctricas.
1. Especificaciones
Ítem No. KCB-240
Máx. fuerza de corte: 60KN
Rango de cortes: 45mm
(Cable Cu/Al y cable armado)
Golpe: 50mm
Ciclo de cortes: 130 veces
Aceite hidráulico: Shell Tellus T15#
Capacidad de aceite: 115ml
Temperatura ambiental: -10 a 40°C
Tensión: DC 18V, 3Ah
Tensión de carga: AC 100V~240V ; 50~60Hz
Tiempo de carga: Aprox. 2 horas
Accesorios:
Cuchilla: 1 juego
Batería: 2 pzs.
Cargador: 1 pz.
Aro sellador del cilindro: 1 juego
Aro sellador de la válvula de
seguridad.
1 juego

2. Descripción de los componentes:
KCB-240
No. de
Pieza Descripción Función
1 Soporte de cuchilla Para fijar la cuchilla
2 Cuchilla Para cortar
3 Clavija Para bloquear/desbloquear la cuchilla
4 Mango Para llevar
5 LCD Para mostrar los datos (tiempos de crimpado,
capacidad eléctrica, información de errores)
6 Teclado Para el interruptor de energía, el interruptor de
funciones, el interruptor de luz LED
7 Tornillos limitados Para prevenir que el cabezal se caiga o se salga
8 Indicador LED Para iluminación
9 Disparador Para operar o retraer el pistón en caso de una
incorrecta operación.
10 Batería Para suministrar energía, Li-ion recargable(18V
).
Configure la
fuerza de salida Presione por 3 s y entre al estado de configuración,
los datos son mostrados de forma parpadeante. Presione
para el tiempo, los datos de salida son un aumento de
10 KN (o 5 KN, de acuerdo a lo requerido), esta acción va
desde Mín. KN a Máx. KN. Presione por 3 s o déjelo
15 s, regresará a su estado inicial.
Configuración
LED Conveniente para el trabajo en ambientes oscuros, con un
símbolo de luz mostrado en el LCD, mantenga presionado por
largo tiempo el botón para ir al estado de inicio.
Visualización de e iluminación. La iluminación de
fondo LCD, presione el botón de encendido, la iluminación de
fondo LED, después de 20 s, la luz se apagará
automáticamente. Durante la iluminación LED, mantenga
presionado para apagar el LED aún para la
iluminación de fondo LCD.
Energía de la
batería energía completa.
, destellos y zumbidos. Cargue la batería a tiempo.
Mensaje de
error Ocurrió un error, tal como el motor dañado, error en el sistema
de accionamiento y problemas en el sistema hidráulico… la
herramienta deja de funcionar. El LCD muestra ―datos de
error‖ de la siguiente forma: significa ―sobre la capacidad de
la energía‖
Apagado Presione por 3 s o deje la herramienta 30 mins. para
desconectar la energía automáticamente.
Puerto USB en
la computadora Retire la batería de la herramienta, conecte el USB a una
computadora para intercambiar los datos. El LCD muestra el
símbolo

La batería puede ser usada cientos de veces, cuando la vida útil se haya reducido de
manera obvia, por favor cambie de batería.
Por favor, cargue la batería a tiempo para evitar que sea agotada completamente; de lo
contrario quedará inservible para siempre. Si la batería no va a ser usada por largo tiempo,
se descargará automáticamente, así que retire la batería de la herramienta y asegúrese de
cargarla una vez por/cada trimestre.
2. Uso de la herramienta
1. Instrucciones del tablero LCD:
2. Datos mostrados y configuración del tablero LCD:
Nota: Si la herramienta está apagada, no hay datos para
mostrarse.
Encendido
Presione por 3 s, la herramienta en estado de inicio, el
teclado muestra todos los datos por 1 s, luego la herramienta
para auto-inspección por 1 s. Los datos mostrarán el último
registro, la herramienta estará lista para trabajar.
Intercambie los
datos
En el estado de encendido , presione , para el
intercambio de datos
3. Descripción de las funciones
MCU –detecta automáticamente la presión durante el funcionamiento y
provee protección segura, apaga el motor y se restablece automáticamente
después del funcionamiento.
Auto restablecimiento- Libera la presión automáticamente, retrae el pistón a
la posición inicial cuando alcanza la energía de salida máxima.
Control de una tecla- presione el disparador para empezar a trabajar, soltar a
medias el disparador significa que se deja de hacer presión, soltar
completamente significa que el pistón va a regresar a la posición original.
La unidad está equipada con una bomba de doble pistón que se caracteriza
por un rápido acercamiento de la matriz al conector y un movimiento de
crimpado lento.
El cabezal puede girar suavemente 350º alrededor del eje longitudinal para
tener un mejor acceso a esquinas estrechas y a otras áreas difíciles de
trabajo.
Suspensión—si se terminó el trabajo, o se retiró la mano del disparador, u
ocurrió algún accidente, el dispositivo dentro de la herramienta puede
detener el suministro de energía.
Un sonido fuerte será escuchado y se mostraran destellos rojos si algún
error ocurriera o si la energía estuviera baja. (Ref. tabla 1).
Con presión en el disparador, la luz LED iluminará por 20 s.
Batería de Li-ion de alto rendimiento para suministro de potente energía.
Sin descargas ni ―efecto memoria‖. El diseño en modo de espera hace que
la herramienta pueda ser guardada por 6 meses, el dispositivo de
descarga prolonga la vida útil de la batería.
Un sensor de temperatura hace que la herramienta deje de trabajar
automáticamente cuando la temperatura está sobre 60°C por un largo
tiempo de trabajo, la señal de falla suena, esto significa que la herramienta no podrá seguir
trabajando hasta que la temperatura se reduzca a lo normal.
Sistema de control de micro computador que incluye el detector de la
propia presión, doble protección durante el funcionamiento, hace cálculos
y realiza el intercambio de la computadora con datos del conversor.
Indicador LED
Salida
DATOS
Tecla de configuración
Tecla de encendido
USB
ENERGIA
TIEMPO
UNIDAD
Tecla de luz LED
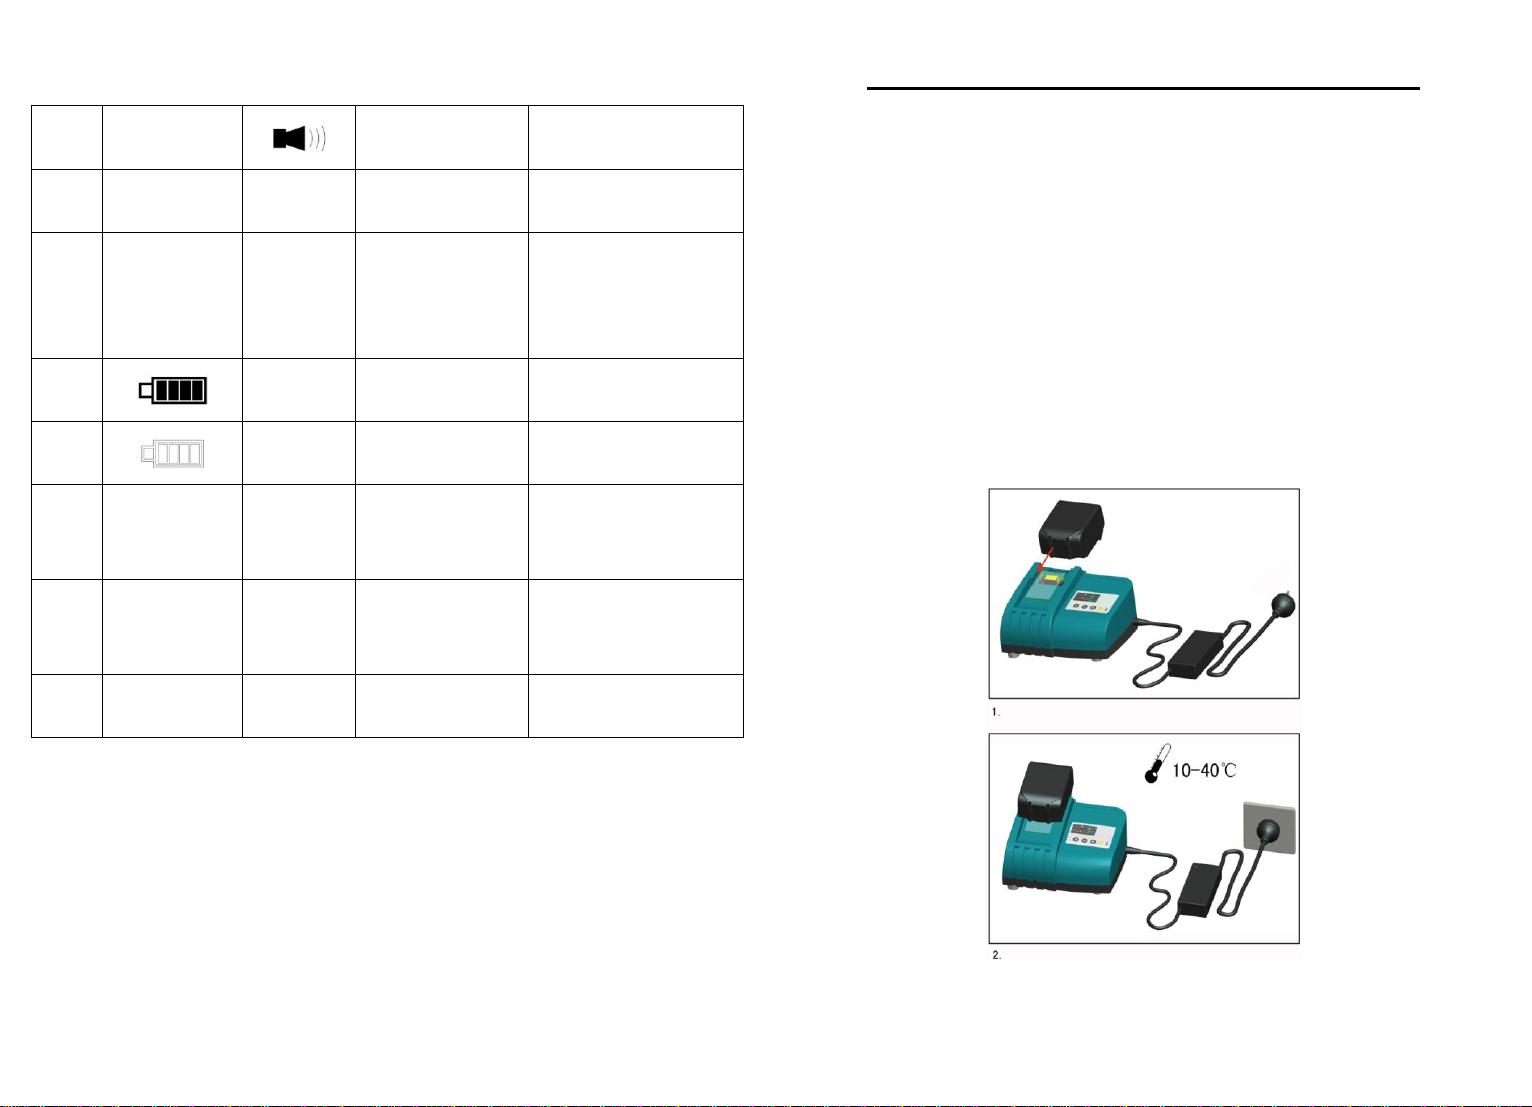
Tabla 1.
No. de
Serie
Código de error
Instrucción
Qué significa
1
On ---
Autocomprobación
Autocomprobación para
asegurar que todo esté OK
2
E01
Sobrecarga
El sistema hidráulico
puede estar dañado y
necesita una revisión
inmediatamente
3
●●●
Señal de carga
Falta de energía y necesita
ser cargada
4
●—5seg
Advertencia sobre
falta de energía
Sin energía y necesita ser
cargada inmediatamente
5
E02
Error en el sensor
Error en el sensor de la
temperatura e inspección
de la energía
6
E03
●●●●
Advertencia sobre la
temperatura
Temperatura muy alta, la
herramienta necesita ser
enfriada.
7
E04
●●●●●
Sin presión
El motor está funcionando
pero sin presión.
INSTRUCCIONES DE FUNCIONAMIENTO
Lea la sección completa de INFORMACION DE SEGURIDAD al inicio de este
manual, incluyendo todo el texto bajo los subtítulos de esa sección, antes de usar este
producto.
Use esta herramienta únicamente para los fines previstos por el fabricante. Cualquier
uso distinto al que se describe en este manual puede causar lesiones o daños a la
propiedad.
1. Carga
Inserte la batería en el cargador y conecte el enchufe al tomacorriente. Asegúrese de que la
temperatura del recinto esté entre 10°C y 40°C. El tiempo de carga es alrededor de 2 horas.
Por favor, vea la ilustración de abajo.
En cuanto a los detalles sobre la información de la carga, por favor consulte el manual
(MANUAL PARA CARGADOR).
Insertar
3.0 Ah, tiempo de carga
apróx. 2 horas

Instruction Manual
Due to continuing improvements, actual product may differ
slightly from the product described herein.
Read this material before using this product.
Failure to do so can result in serious injury.
SAVE THIS MANUAL
SAVE THIS MANUAL
Keep this manual for the safety warnings and precautions, assembly, operating, inspection,
maintenance and cleaning procedures. Write the month and year of purchase. Keep this
manual and the receipt in a safe and dry place for future reference.
IMPORTANT SAFETY INFORMATION
In this manual, on the labeling, and all other information
provided with this product:
This is the safety alert symbol. It is used to alert you to potential
personal injury hazards. Obey all safety messages that follow this
symbol to avoid possible injury or death.
DANGER indicates a hazardous situation which,
if not avoided, will result in death or serious injury.
WARNING indicates a hazardous situation which,
if not avoided, could result in death or serious injury.
CAUTION, used with the safety alert symbol,
indicates a hazardous situation which, if not avoided,
could result in minor or moderate injury.

KCB 240-ST
Battery Crimping Tool
www.grupotemper.com
GENERAL SAFETY RULES
TO WORK IN SAFE CONDITIONS WITH THIS TOOLING, IT IS IMPERATIVE TO
READ CAREFULLY THE DIRECTIONS FOR USE AND TO FOLLOW THE
INSTRUCTIONS IT CONTAINS. IF YOU DO NOT RESPECT THE INFORMATION
WRITTEN IN THAT INSTRUCTION MANUAL THE WARRANTY WILL BE
CANCELLED.
1. Work area safety
a. Keep work area clean and clear. Cluttered or dark areas invite accidents.
b. This tool is not insulated; please do not use it on live conductor.
c. Please do not use or store the tool under high temperature, or one surrounding
filling with corrosive fluid. Pay attention to the sealing kits becoming aging.
d. Keep children and bystander away while operating the Battery powered cutting
tool. Distractions will cause you to lose control.
e. Do not use or charging the tool around flammable, explosive environment
2. Electrical safety
f. Make sure the plug matches with the plug seat. Never try any changes on the
plug.
g. Do not put tool, battery and charger under a rainy or humid surroundings, it is
easy to trigger an electric shock accident if any water goes into the electric
system of the tool.
h. Do not use electric wire to carry, pull, or to draw out the plug and do not connect
the ―-‖and ―+‖, the damaged or twined wire may cause an electric shock accident.
i. If the charger was strongly crashed, or dropping down or any other damages
happening, please do not try to repair it by yourself, send it back to the authorized
service center as soon as possible. The damaged charger may cause an electric
shock accident.
j. The best temperature for charging is between 10℃-40℃. Make sure the air hole
of the battery and charger are uncovered during charging.
k. Please cut off the power of the charger each time to reduce the hazard from child
or the person who not expert on the tool.
l. Do not wait until the battery runs over for recharging, the recharging will caused
the battery does not working anymore. Please keep the battery out of the tool to
avoid the power discharge.
m. Please do not burn the battery or make it being short-circuited, it may cause
explosion.
n. Do not use the waste battery otherwise it will caused the electric shock.
o. Do not disassemble the battery and charger. If any problem please contact with
manufacture or agent.
3. Personal safety
p. Stay alert, watch what you are doing and use common sense when operating the
tool. Do not use the tool while you are tired or still under the influence of drugs,
alcohol or medication. A moment of inattention may result in series personal
injury.
q. Use safety equipment. Always use safety equipment such as mask, helmet, safety
cap, insulating shoes and etc to reduce the risk of personal injury.
r. Dress properly. Do not wear loose clothing or jewelry. Keep your hair, clothing
and gloves away from moving parts. Loose clothes jewelry or long hair can be
caught in moving parts.
s. Maintain power tools. Check for misalignment or binding of moving parts,
breakage of parts and any other condition that may affect the tool operation. If
damaged, have the tool repaired before use. Many accidents are caused by poorly
maintained power tools.
t. Please use the tool properly, the tool with correct power will do the job better and
safer at the rate for which it was designed.
u. Do not put your fingers into the head of the tool during operating. Your fingers

KCB 240-ST
Battery Crimping Tool
www.grupotemper.com
could be pinched very severely.
4. Service
Have your Battery Cutting Tool serviced by a qualified service technician using only
identical replacement parts. This will ensure that the safety of the Battery Cutting
Tool Kit is maintained.
SPECIFIC SAFETY RULES
1. Maintain labels and nameplates on the tool which carry important safety information.
If unreadable or missing, contact the agent to replace.
2. This product is not a toy, keep it out of reach of children.
3. Do not put your fingers into the head of the tool during operating. Your fingers could
be pinched very severely.
4. Make sure the head was locked firmly during operation.
5. Do not use the tool without blade
6. Do not cutting on live cables or conductors
7. Do not knock any parts of the tool, otherwise it will cause injury.
8. Do not operate at will, it will damage the MCU and electric system
9. The design of the limit screw on the head is for preventing the head from dropping or
popping.
10. Make sure the head was locked firmly during operation.
11. Do not use this tool for continuous use. After 30 to 40 cycles, allow the tool to cool for
15 minutes.
12. Do not secure this tool in a vise. This tool is designed for hand-held operation.
13. The built-in safety valve goes through strict pressure test before marketing; please do
not adjust the pressure by unprofessional person. If the pressure is not enough please
return the tools back to the service center. The tool only can be reused after checking
and testing by trained person.
14. The warnings, precautions, and instructions discussed in this instruction manual
cannot cover all possible conditions and situations that may occur. It must be
understood by the operator that common sense and caution are factors which cannot
be built into this product, but must be supplied by the operator.
UNDERSTAND YOUR TOOL
KCB-240 is for cutting Cu/Al cable and armored cable . It is powered by Li -ion,
actuated by motor and controlled by MCU. With a high pressure hydraulic system, LED
light, LCD , error warning alarm, pressure showing..etc function, it is a perfect tool to be
used in electrical construction site.
1. Specification
Item No. KCB-240
Max. cutting force: 60KN
Cutting range: 45mm
(Cu/Al cable and armoured cable)
Stroke: 50mm
Cutting cycle 130 times
Hydraulic oil: Shell Tellus T15#
Oil Capacity: 115ml
Ambient temperature -10-40℃
Voltage: DC 18V,3Ah
Charging voltage: AC 100V~240V ;50~60Hz
Charging time: Approx.2 hours
Accessories:
Blade: 1 set
Battery: 2 pcs
Charger: 1 pc

KCB 240-ST
Battery Crimping Tool
www.grupotemper.com
Sealing ring of cylinder:
1 set
Sealing ring of safety valve.
1 set
2. Description of components:
Parts No.
Description
Function
1
Blade holder
For fixing blade
2
Blade
For cutting blade
3
Pin
For locking/unlocking cutting blade.
4
Handle
For bring
5
LCD
Showing the data (crimping times, electricity
capacity, error information)
6
Keyboard
For power switch, function switch, LED light switch
7
Limited screw
For prevent head from dropping or popping.
8
LED indicator
For lighting
9
Trigger
For operating or retracting the piston in case of
incorrect operation.
10
Battery
For supplying power, rechargeable Li-ion(18V).
3. Function description
MCU –automatically detect the pressure during operation and provide
Security protect, shut off the motor and reset automatically after
operation.
Auto reset- Release the pressure automatically, retract the piston to the
starting position when reached the max output.
One key control- press the trigger to start working, half loosing the trigger
means stop forcing pressure, loosing fully means piston return to the
original position.
The unit is equipped with a double piston pump which is characterized
by a rapid approach of the die towards the connector and a slow crimping
motion
The head can be smoothly turned by 350° around the longitudinal axis
in order to gain better access to tight corners and other difficult working
areas.
Suspend—finish working or withdraw the hand from the trigger or any
accident happened, the device inside of the tool can stop power supply.
One significant sound will be heard and a red display flashes if any error
occurs or lower power being.( Ref. table 1)
Per time pressing on the trigger, the LED will lighting for 20 s.
High-performances Li-ion battery in strong power supply, No discharge
memory effect., Ultra lower power consumption standby design keep the
tool 6 months storage, meanwhile over discharge device prolong the life
span of the battery.
A temperature sensor makes the tool stop working automatically when
the temperature over 60℃under long time working, the fault signal
sounds, it means the toll can’t continue work until the temperature reduce

KCB 240-ST
Battery Crimping Tool
www.grupotemper.com
to the normal.
Micro computer control system with the feature of self-pressure detecting,
double protection during operation, counting and realize the exchange
between computer with data by the converter.
Table 1.
Series
No
Error code
Instruction
What it means
1
On ---
Self-checking
Self-checking to assure
everything is ok
2
E01
Overload
Hydraulic system may
damaged and need
check immediately
3
●●●
Charging
signal
Lacking power and need
charging.
4
●—5sec
Power lacking
warning
No power and need
charging immediately
5
E02
Sensor error
Temperature sensor and
power inspecting error
6
E03
●●●●
Temperature
warning
Temperature too high,
tool need to be cold
7
E04
●●●●●
No pressure
Motor working but
without pressure
OPERATING INSTRUCTION
Read the entire SAFETY INFORMATION section at the beginning of this manual
including all text under subheadings therein before using this product.
Use this tool for the manufacture’s intended purpose only. Use other than that which is
described in this manual can result injury or property damage.
1. Charging
Push battery into charger and connect the plug with the plug seat. Make sure the room
temperature is between 10℃-40℃。The charging time is around 2 hours. Please see the
illustration below.

KCB 240-ST
Battery Crimping Tool
www.grupotemper.com
The detail of the charging information, please refer the manual (MANUAL FOR
CHARGER)
The battery can be used for hundreds of times, when the life span reduced obviously,
change to a new battery please.
Please charging the battery in time to avoid it to be used up absolutely; otherwise it will
become useless forever. if the battery not be used for a long time, it will discharge
automatically, so take out the battery from the tool and make sure to charge it one time
per/each quarter.
2. Usage of the tool
1. LCD board instruction:
2. LCD board showing and setting:
Please note: tool in power off , there is no any data showing.
Power on
Press for 3 s, the tool into starting status, the
keyboard showing all the data for 1 s, then the tool on the self
inspecting for 1 s. the data will show last record, the tool is
ready for working.
Exchange the
data
In the power on status, press , the data exchange
Set the output
force
Press for 3 s enter into setting status, the data display
by twinkling. Press the per time, output data increase
by 10 KN (or 5 KN, according to required), this action is
circulated from Min KN to Max KN. Press for 3 s or
leave it 15 s, it return to initial state.
LED set
Convenient in dark enviroment working, with a light symbol
showing on the LCD, long press button to get into start
status. display, and lighting. LCD background
lighting, meanwhile press the power button, the front LED
lighting, after 20 s, the light turn off automatically. During
LED lighting, keep for pressing to turn off the LED
even for the LCD background light.
Battery power
full power.
, meanwhile flash and buzzing according to the flash
frequently .Do charge the battery in time.
Error showing
Error happened, such as motor damaged, drive system error
and hydraulic system problem…the tool stop working. LCD
showing ―error data‖as following: it stands for ―over power
capacity‖

KCB 240-ST
Battery Crimping Tool
www.grupotemper.com
Power off
Press for 3 s or leave the tool 30 mins to off the power
automatically.
USB pot with
computer
Take the battery away from the tool, connect the USB with a
computer to exchange the data. LCD showing symbol
Make sure that all the parts are clean without any oil, dust, especially on the
handle and control parts, to avoid the tool drop easily during the operation.
First press the for 3 s to turn on the power, the tool on the self inspecting for
1 s. the data will show last record, the tool is ready for working.
1) inspect the battery saturated or run out.
Don’t operate the tool without blade.
2) Open the head by pull out the pin, then the cable/conductor must be positioned in the
cutting head which must be closed thereafter.
3) A cutting process is initiated by switching the trigger. It is defined by the approach and
penetrate on of the moving blade into the cable/conductor. The moving blade must
approach the cable/conductor from a vertical direction to avoid undesired shearing
forces which might cause the blade to stuck or get damaged.
4) A cutting cycle is terminated when the blades closed completely or when the
maximum cutting force is reached.
The cutting process can be interrupted at any moment by half releasing the trigger,
but the piston keep paused at moment.
Do not put your fingers into the head of the tool during operating. Your fingers could
be pinched very severely.

KCB 240-ST
Battery Crimping Tool
www.grupotemper.com
MAINTENANCE AND SERVICING
Damaged equipment may cause serious personal injury. Do not use damaged
equipment. If abnormal noise or vibration occurs, have the problem corrected before
further using.
1. Before each using, inspect the general condition of the tool. Check for loose screws,
misalignment or binding of moving parts, cracked or broken parts, or any other
condition that may affect its safe operation.
2. After using, clean external surfaces of the tool with clean, moist, smear the rust
preventing oil on the metal surface of the tool and the dies to avoid rusty. Store the
tool in the dry environment.
3. Service to the tool should only be done by a qualified Service Technician.
4. In order to prolong the life of the tool please change the oil per year. Make sure the oil
filtered by 120 mesh net or over 30µm strainer. Meantime avoid the dusty into the oil
cup.
5. After a long time using, the sealing kits will be damaged, if there is leakage please
contact with the manufacturer and/or the distributor to change the sealing kits.

KCB 240-ST
Battery Crimping Tool
www.grupotemper.com
6. If the tool not used for a long time, please make sure the piston stay on its starting
position, clear up the tool and paint the rustproof oil both to the tool piston and
accessories. Take out the battery and put them into box and store the tool in a dry
surrounding. As following:
TROUBLESHOOTING
FAULT
ANALYSIS
SOLUTION
A. Tool
is inoperative
1. Dirt, contaminants,
etc in ram area of
tool.
2. The battery run out
3. Tool components
worn or damaged.
1. Clean hydraulic system
2. Charging the battery
3. Return tool to manufacture or
distributor
B. No power
during
operation or
not up to the
rated power
1. No oil
2. Dirt, contaminants
inside of oil sac.
3. Inner leakage
1. Fill oil
2. Return tool to manufacture or
distributor
3. Return tool to manufacture or
distributor
C. Leakage on
the cutting
head o
plunger
1. Worn on the sealing
kits
1. Return tool to manufacture or
distributor
D. Running of
the motor but
no power
output
1. No oil in the oil sac
2. Air into the
hydraulic system
3. Cold oil
1. Fill or change the oil
2. Return tool to manufacture or
distributor
3. Use the tool under -20℃-40℃
E. Error alarm
1. No power of the battery
1. The battery need to charge

KCB 240-ST
Battery Crimping Tool
www.grupotemper.com
LIMITED 1 YEAR WARRANTY
We make every effort to assure that its products meet high quality and durability standards,
and warrants to the original purchaser that this product is free from defects in materials and
workmanship for the period of one year from the date of purchase(90 days if used by a
professional contractor or if used as rental equipment). This warranty does not apply to
damage due directly or indirectly, to misuse, abuse, negligence or accidents, repairs or
alterations outside our facilities, normal wear and tear, or to lack of maintenance. We shall
in no event be liable for death, injuries to persons or property, or for incidental, contingent,
special or consequential damages arising from the use of our product. Some states do not
allow the exclusion or limitation of incidental or consequential damages, so the above
limitation of exclusion may not apply to you. THIS WARRANTY IS EXPRESSLY IN
LIEU OF ALL OTHER WARRANTIES, EXPRESS OR IMPLIED, INCLUDING THE
WARRANTIES OF MERCHANTABILITYAND FITNESS.
To take advantage of this warranty, the product or part must be returned to us with
transportation charges prepaid. Proof of purchase date and an explanation of the complaint
must accompany the merchandise. If our inspection verifies the defect, we will either repair
or replace the product at our election or we may elect to refund the purchase price if we
cannot readily and quickly provide you with a replacement. We will return repaired
products at our expense, but if we determine there is no defect, or that the defect resulted
from causes not within the scope of our warranty, then you must bear the cost of returning
the product.
The warranty gives you specific legal rights and you may also have other rights which vary
from state to state.
Table of contents
Languages:
Other Temper Crimping Tools manuals


Popular Crimping Tools manuals by other brands

Central Hydraulics
Central Hydraulics 66150 Instructions and precautions

ODU
ODU 080.000.064.000.000 instruction manual

Hirose
Hirose HRS HT801/DF51K-30S instruction manual

TE Connectivity
TE Connectivity PRO-CRIMPER III instruction sheet

Staubli
Staubli M-PZ-T2600 operating instructions

molex
molex 63811-9370 Specification sheet

molex
molex CR60622B Operating Instruction and Specifications Sheet

molex
molex 207129 Series Specification sheet

molex
molex 207129 Series Specification sheet

molex
molex 63825-6070 Specification sheet

Burndy
Burndy HYTOOL MD6 Series SAFETY OPERATING & MAINTENANCE INSTRUCTIONS

LAPP
LAPP EPIC 11147000 operating instructions


