manuals.online logo
Brands
  1. Home
  2. •
  3. Brands
  4. •
  5. LAPP
  6. •
  7. Crimping Tools
  8. •
  9. LAPP EPIC 11147000 User manual

LAPP EPIC 11147000 User manual

11147000
Bedienungsanleitung/
Operating Instructions
Gültig ab:
05.04.2019
EPIC®HANDCRIMPZANGE /
HAND CRIMP TOOL
Ersteller: STKU3/PDP
Freigegeben: IVSE1/PDP
Dokument: L11147000DE_EN
Version: 02
Seite 1 von 9
Wir behalten uns alle Rechte gemäß DIN ISO 16016 vor.
PD 0019/05_04.18DE
Handcrimpzange Artikel Nr. 11147000
Für gedrehte/gestanzte Einzelkontakte; Lieferung im handlichen Koffer mit Maulschlüssel, Inbusschlüssel und zwei
Schrauben
Hand Crimping Tool Part N° 11147000
For machined contacts/stamped contacts
Delivery in handy case with key, Allen key and two screws
Crimpbacken für
Crimp dies for
gedrehte Kontakte gestanzte Kontakte Aderendhülsen KOAX Kontakte
machined contacts stamped contacts End sleevs COAX contacts
Art.-Nr. /
Part N°
Art.-Nr. /
Part N°
Art.-Nr. /
Part N°
Art.-Nr. /
Part N°
11147100 11147170 11147140 11147130
11147110 11147180 11147150
11147120 11147190
Locator für
Locator for
gedrehte Kontakte gestanzte Kontakte
machined contacts stamped contacts
Art.-Nr. /
Part N°
Art.-Nr. /
Part N°
11147200 11147300
11147210
11147000
Bedienungsanleitung/
Operating Instructions
Gültig ab:
05.04.2019
EPIC®HANDCRIMPZANGE /
HAND CRIMP TOOL
Ersteller: STKU3/PDP
Freigegeben: IVSE1/PDP
Dokument: L11147000DE_EN
Version: 02
Seite 2 von 9
Wir behalten uns alle Rechte gemäß DIN ISO 16016 vor.
PD 0019/05_04.18DE
Wichtige Hinweise zum richtigen Umgang mit der
Handcrimpzange
Umgang mit der Bedienungsanleitung
Die Bedienungsanleitung muss ständig bei der
Handcrimpzange verfügbar sein.
Jeder, der mit der Handcrimpzange arbeitet muss die
Bedienungsanleitung kennen und Beachten.
Die Firma CONTACT GmbH lehnt jede Haftung für
Schaden ab, der durch Nichtbeachten von Hinweisen auf
der Handcrimpzange oder in der Bedienungsanleitung
entsteht.
Die Bedienungsanleitung ist vom Benutzer der
Handcrimpzange um Anweisungen aufgrund bestehenden
national Vorschriften zur Unfallverhütung und zum
Umweltschutz zu ergänzen.
Grundlegende Sicherheitshinweise
Die Handcrimpzange ist nach dem Stand der Technik und
den anerkannten sicherheitstechnischen Regeln gebaut.
Die Handcrimpzange ist ausschließlich für den in der
Bedienungsanleitung beschriebenen Zweck zu verwenden.
Hinweis:
Kumulative traumatische Beschwerden können die Folge
einer Dauerhaften Anwendung von Handcrimpzangen sein.
Handcrimpzangen sind für gelegentliche Anwendungen
und relativ geringe Stückzahlen vorgesehen.
Wartung und Instandhaltung
Zur täglichen Wartung sind folgende Schritte
durchzuführen:
Entfernen Sie vom Werkzeug Staub, Feuchtigkeit und
andere Rückstände mit einer sauberen weichen Bürste
oder einem fusselfreien Tuch. Verwenden Sie keine harten
oder abschleifenden Mittel, mit denen das Werkzeug
beschädigt werden könnte.
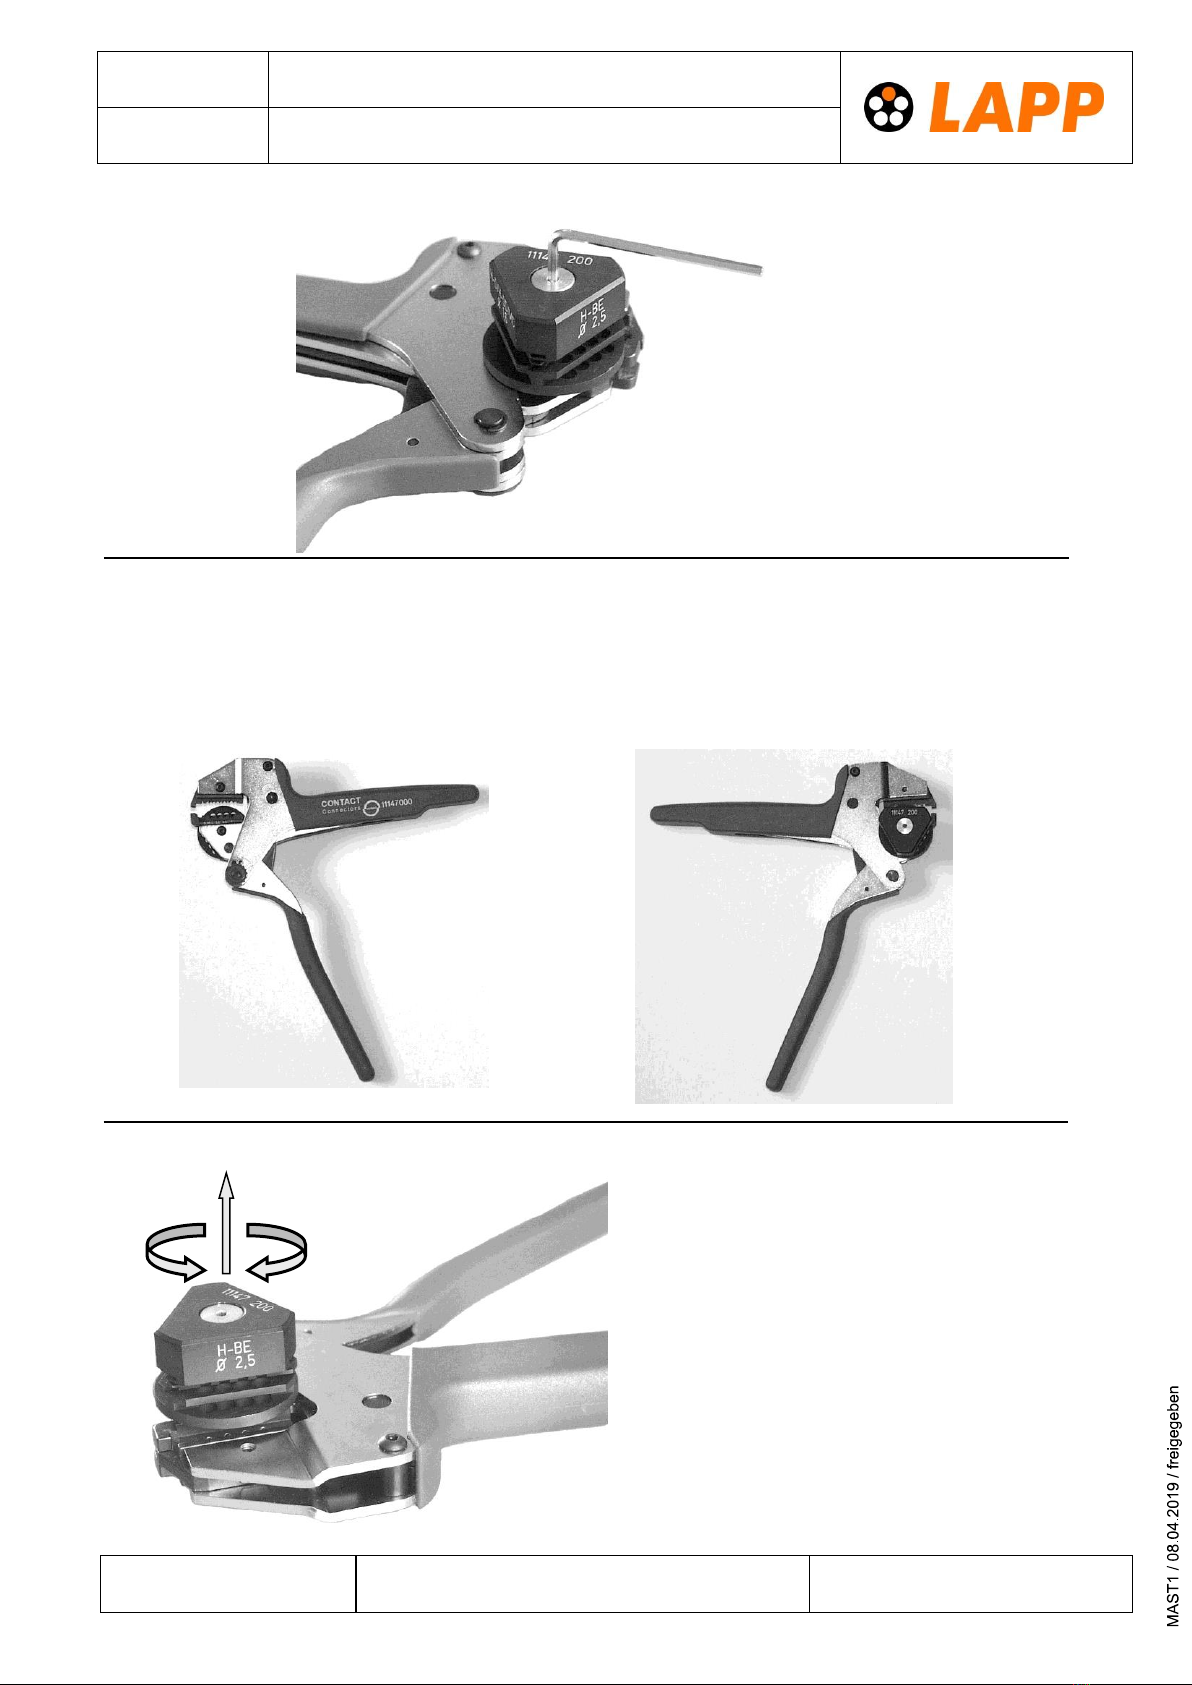
Stellen Sie sicher, dass der Lagerbolzen eingesetzt und
durch die Sicherungsscheibe gehalten wird und die
Schaftschraube zur Sicherung des Einstellrades fest ist.
Versehen Sie alle Stifte, Drehpunkte und Lageroberflächen
mit einem dünnen Ölfilm eines guten SAE 20 Motorenöls.
Ölen Sie nicht übermäßig.
Wird die Zange nicht benötigt, dann schließen Sie die
Zangengriffe und lagern Sie diese sauber und trocken in
dem dafür vorgesehenen Koffer.
Important instructions for the correct handling of the
crimping tool
Handling of the Operating Instructions
The Operating Instructions must always be within reach of
the hand crimping tool.
The Operating Instructions must be known and followed by
everyone who works with the hand crimping tool.
CONTACT declines any responsibility for damages that
result from the disregard of instructions on the hand
crimping tool or of the Operating Instructions.
The Operating Instructions are to be supplemented by the
users of the crimping tool should there exist national
regulations concerning accident prevention and
environmental offences.
Basic safety precaution
The hand crimping tool was designed according to the latest
state of the art and according to renowned safety
regulations.
The hand crimping tool is to be used exclusively for the
function described in the Operations Instructions.
Attention:
Cumulative traumatic troubles can result from the
permanent use of hand crimping tools. Hand crimping tools
are merely made for occasional use and for relatively small
quantities.
Maintenance
For the daily maintenance please carry out the following
steps:
Remove dust, moistness and other remains with a clean,
soft brush or a non-fluffy cloth. Do not use hard or abrasive
objects –the tool could be damaged.
Make sure that the fixing bolt is inserted and hold by the
locking washer and that the shank secures the adjusting
wheel.
Oil all pins, pivots and surfaces carefully with a good SAE 20
motor oil. Do not oil excessively.
If you do not use the tool, close the handles and store the
tool in the tool case in dry and clean condition.
11147000
Bedienungsanleitung/
Operating Instructions
Gültig ab:
05.04.2019
EPIC®HANDCRIMPZANGE /
HAND CRIMP TOOL
Ersteller: STKU3/PDP
Freigegeben: IVSE1/PDP
Dokument: L11147000DE_EN
Version: 02
Seite 3 von 9
Wir behalten uns alle Rechte gemäß DIN ISO 16016 vor.
PD 0019/05_04.18DE
BESCHREIBUNG /
DESCRIPTION
Ratschen-Notauslösung
Emergency adjustment wheel
Befestigungsschrauben für die
Crimpbacken
Fastening screws for
the crimp dies
Einstellrad zum nachjustieren der
Presskraft
Adjusting wheel for pressure force
MONTAGE DER ANBAUTEILE FÜR GEDREHTE KONTAKTE
ASSEMBLY OF ADD-ON PIECES FOR MACHINED CONTACTS
Mittellange Befestigungsschraube (20 mm),
zum Befestigen der unteren Crimpbacke und
des Locators
Semilong fastening screw (20 mm) to fix the
lower die and the locator
Kurze Befestigungsschraube (12 mm) zum
Befestigen der oberen Crimpbacke
Bevor Sie die Befestigungsschrauben fest
anziehen, schließen Sie die Crimpzange
(Crimpbacken müssen genau ausgerichtet
sein)!
Short fastening screw (12 mm) for fixing the
upper crimp die
Before tightening the fastening screws, close
the tool (the crimp dies must be exactly
adjusted)!
Locator für gedrehte Kontakte
Locator for machined contacts
11147200 / 11147210
Locator auf die Befestigungsschraube setzen
und mit dem Inbusschlüssel fest anziehen.
Set the locator on the fastening screw and
tighten with Allen key.
Crimpbacken
Crimp dies
11147100
11147110
11147120
11147000
Bedienungsanleitung/
Operating Instructions
Gültig ab:
05.04.2019
EPIC®HANDCRIMPZANGE /
HAND CRIMP TOOL
Ersteller: STKU3/PDP
Freigegeben: IVSE1/PDP
Dokument: L11147000DE_EN
Version: 02
Seite 4 von 9
Wir behalten uns alle Rechte gemäß DIN ISO 16016 vor.
PD 0019/05_04.18DE
Befestigen des Locators durch
Anziehen der Mutter mit dem
Inbusschlüssel
Fastening tightening the of the
locator by nut with the Allen key
Abbildungen zeigen:
Vorder- und Rückansicht der betriebsbereiten
Crimpzange mit den Befestigungsschrauben, den
eingebauten Crimpbacken und dem befestigten
Locator für gedrehte Kontakte.
Anpassung des Locators an den
Kontakttyp
Heben Sie den locator an (nach oben
ziehen) und drehen Sie in
um 120º in die gewünschte Stellung.
Adjustment of the locator to the
type of contact
Lift the locator and turn it by 120
Into the desired position
The pictures show:
Front and back view of the operatable crimping
tool with fastening screws, crimp dies and
locator for machined contacts.
11147000
Bedienungsanleitung/
Operating Instructions
Gültig ab:
05.04.2019
EPIC®HANDCRIMPZANGE /
HAND CRIMP TOOL
Ersteller: STKU3/PDP
Freigegeben: IVSE1/PDP
Dokument: L11147000DE_EN
Version: 02
Seite 5 von 9
Wir behalten uns alle Rechte gemäß DIN ISO 16016 vor.
PD 0019/05_04.18DE
Crimpvorgang /
Crimping mechanism
1gedrehter Kontakt vor der Crimpung
machined contact before crimping
2Kontakte entsprechend dem Querschnitt
in den Locator einführen (bis zum
Anschlag)
Introduce contact into the locator –to
the buffer –according to the cross
section.
3Abisolierten Leiter in den Kontakt
einführen und crimpen.
Introduce stripped conductor into
the contact and crimp it.
4Leiter und Kontakt nach korrekt erfolgten Crimpung
Conductor and contact after well-done crimping
11147000
Bedienungsanleitung/
Operating Instructions
Gültig ab:
05.04.2019
EPIC®HANDCRIMPZANGE /
HAND CRIMP TOOL
Ersteller: STKU3/PDP
Freigegeben: IVSE1/PDP
Dokument: L11147000DE_EN
Version: 02
Seite 6 von 9
Wir behalten uns alle Rechte gemäß DIN ISO 16016 vor.
PD 0019/05_04.18DE
Gegenmutter
counter nut
Kurze Befestigungsschraube (12 mm) zum
Befestigen der unteren Crimpbacke
Short fastening screw (12 mm) to fix the lower
crimp die
Locator
Locator
11147300
Crimpbacken
crimp dies
11147170
11147180
11147190
Lange Befestigungsschraube (27 mm) zum Befestigen der oberen
Crimpbacke und des Locators.
Long fastening screw (27 mm) to fix the upper crimp die and the
locator.
Schraube zum Nachjustieren des
Drahtstops
Screw to adjust the wire stop
Gegenmutter zum Befestigen des Locators so anziehen, dass
der Drahtstop beweglich bleibt!
Tighten the counter nut that fastens the locator so that the wire
stop remains flexible!
MONTAGE DER ANBAUTEILE FÜR
GESTANZTE KONTAKTE
ASSEMBLY OF ADD-ON PIECES FOR STAMPED CONTACTS
Drahtstop
wire stop
11147000
Bedienungsanleitung/
Operating Instructions
Gültig ab:
05.04.2019
EPIC®HANDCRIMPZANGE /
HAND CRIMP TOOL
Ersteller: STKU3/PDP
Freigegeben: IVSE1/PDP
Dokument: L11147000DE_EN
Version: 02
Seite 7 von 9
Wir behalten uns alle Rechte gemäß DIN ISO 16016 vor.
PD 0019/05_04.18DE
Abbildungen zeigen:
Vorder- und Rückansicht der betriebsbereiten
Crimpzange mit den Befestigungsschrauben, den
eingebauten Crimpbacken und dem befestigten
Locator (für gestanzte Kontakte).
Crimpvorgang /
Crimping mechanism
A–beweglicher Drahtstop
flexible wire stop
B –Crimpbereich der
Litzen
crimping range of
the conductor
Positionierung des Kontakts im Crimpwerkzeug
Positioning of the contacts in the tool
C–Crimpbereich
für die Isolation
crimping range
for insulation
gestanzter Crimpkontakt
stamped contact
The pictures show:
Front and back view of the operable crimping tool
with fastening screws, crimp dies and locator for
stamped contacts.
11147000
Bedienungsanleitung/
Operating Instructions
Gültig ab:
05.04.2019
EPIC®HANDCRIMPZANGE /
HAND CRIMP TOOL
Ersteller: STKU3/PDP
Freigegeben: IVSE1/PDP
Dokument: L11147000DE_EN
Version: 02
Seite 8 von 9
Wir behalten uns alle Rechte gemäß DIN ISO 16016 vor.
PD 0019/05_04.18DE
2 Fixierung der Kontakte in den Crimpbacken: schließen Sie die
Zange bis zum ersten „KLICK“ (Vorderansicht).
Fastening of the contacts in the crimp dies: close the tool to
the first „CLICK“ (front view).
1 Positionierung der Kontakte am Locator
Positioning of the contacts in the locator
Crimpvorgang / Crimping mechanism
A
beweglicher Drahtstop
flexible wire stop
B
Crimpbereich der Litzen
crimping range of the
conductor
C
Crimpbereich für die Isolation
crimping range for insulation
11147000
Bedienungsanleitung/
Operating Instructions
Gültig ab:
05.04.2019
EPIC®HANDCRIMPZANGE /
HAND CRIMP TOOL
Ersteller: STKU3/PDP
Freigegeben: IVSE1/PDP
Dokument: L11147000DE_EN
Version: 02
Seite 9 von 9
Wir behalten uns alle Rechte gemäß DIN ISO 16016 vor.
PD 0019/05_04.18DE
3Leiter und Kontakt vor der Crimpung
Conductor and contact before crimping
Fixierung der Kontakte in den Crimpbacken (Rückansicht)
Fastening of the contacts in the crimp dies (back view).
4Leiter und Kontakt nach korrekt erfolgten Crimpung
Conductor and contact after well-done crimping

Other LAPP Crimping Tools manuals

LAPP EPIC 11148000 User manual

LAPP

LAPP EPIC 11148000 User manual

LAPP EPIC SF-Z0025 User manual

LAPP

LAPP EPIC SF-Z0025 User manual

LAPP EPIC 11148001 EPIC 11148004 User manual

LAPP

LAPP EPIC 11148001 EPIC 11148004 User manual

Popular Crimping Tools manuals by other brands

Glomar Dr. Peters EKS-3-PRO instruction manual

Glomar

Glomar Dr. Peters EKS-3-PRO instruction manual

molex CR60927A Specification sheet

molex

molex CR60927A Specification sheet

molex 200218-4500 Application Tooling Specification Sheet

molex

molex 200218-4500 Application Tooling Specification Sheet

Textron Klauke K 14 instruction manual

Textron

Textron Klauke K 14 instruction manual

HRS HT601/TM21P-88P operating instructions

HRS

HRS HT601/TM21P-88P operating instructions

Cembre B1350-CA Operation instructions

Cembre

Cembre B1350-CA Operation instructions

Tyco Electronics 90015 instruction sheet

Tyco Electronics

Tyco Electronics 90015 instruction sheet

Klauke TEXTRON K502 instruction manual

Klauke TEXTRON

Klauke TEXTRON K502 instruction manual

molex 207129 Series Specification sheet

molex

molex 207129 Series Specification sheet

Panduit CT-2002CH manual

Panduit

Panduit CT-2002CH manual

TE Connectivity 2063525-1 instruction sheet

TE Connectivity

TE Connectivity 2063525-1 instruction sheet

GRUPO temper KOBAN KEH-2600B manual

GRUPO temper

GRUPO temper KOBAN KEH-2600B manual

Stanley DUBUIS KW Hydraulik BPL031 instruction manual

Stanley

Stanley DUBUIS KW Hydraulik BPL031 instruction manual

Elpress V611 Directions for use

Elpress

Elpress V611 Directions for use

TE Connectivity SDE-SA instruction sheet

TE Connectivity

TE Connectivity SDE-SA instruction sheet

molex 207129 Series specification

molex

molex 207129 Series specification

TE Connectivity 69069 instruction sheet

TE Connectivity

TE Connectivity 69069 instruction sheet

KIMBALL MIDWEST 84-013 Operating instructions manual

KIMBALL MIDWEST

KIMBALL MIDWEST 84-013 Operating instructions manual

manuals.online logo
manuals.online logoBrands
  • About & Mission
  • Contact us
  • Privacy Policy
  • Terms and Conditions

Copyright 2025 Manuals.Online. All Rights Reserved.