Tempo Fitness B902 User manual

1
UPRIGHT BIKE OWNER’S MANUAL
FOR MODEL :
B902
B903

3
Introduction
Important Precautions
Before You Begin
Bike Operation
Assembly Instructions
Conditioning Guidelines
Troubleshooting & Maintenance
3
4
5
6
12
23
29
CONGRATULATIONS and THANK YOU for your purchase of this Tempo Fitness Upright Bike!
Whether your goal is to win a race or simply enjoy a fuller, healthier lifestyle, a Tempo Fitness Upright Bike
can help you attain it with the ergonomics and innovative features you need to get stronger, healthier and
faster. We’re committed to designing fitness equipment from the inside out.
You want exercise equipment that offers the most comfort, the best reliability and the quality in its class.
A Tempo Fitness Upright Bike delivers!
INTRODUCTION
TABLE OF CONTENTS
3

45
SAVE THESE INSTRUCTIONS
When using an electrical product, basic precautions should always be followed, including the following:
Read all instructions before using this bike. It is the responsibility of the owner to ensure that all users
of this bike are adequately informed of all warnings and precautions.
•
If you experience chest pains, nausea, dizziness, or shortness of breath, stop exercising immediately
and consult your physician before continuing.
•
Maintain a comfortable pace. Do not sprint above 80 rpms on this machine.
•
To maintain balance, it is recommended to keep a grip on the handlebars while exercising, mounting
or dismounting the machine.
•
Do not wear clothes that might catch on any part of the bike.
•
Do not turn crank arms by hand.
•
Make sure handlebars are secure before each use.
•
Do not insert or drop any object into any opening.
•
Unplug bike before moving or cleaning it. To clean, wipe surfaces down with soap and slightly damp
cloth only; never use solvents. (See MAINTENANCE)
•
This bike should not be used by persons weighing more than130kg. Failure to comply will void
the warranty.
•
Thie Upright bike complies with EN957-1/-5 standard, class HB; brake system is adjustable.
•
This bike is intended for in-home use only. Do not use this bike in any commercial, rental, school or
institutional setting. Failure to comply will void the warranty.
•
Do not use bike in garages, porches, pool rooms, bathrooms, car ports or outdoors. Failure to
comply may void the warranty.
•
Use the bike only as described in this manual.
IMPORTANT PRECAUTONS
To reduce the risk of burns, fire, electrical shock or injury to persons:
CONGRATULATIONS!
on choosing your bike. You’ve taken an important step in developing
and sustaining an exercise program! Your bike is a tremendously effective tool for achieving your
personal fitness goals. Regular use of your bike can improve the quality of your life in so many ways.
HERE ARE JUST A FEW OF THE HEALTH BENEFITS OF EXERCISE:
• Weight Loss
• A Healthier Heart
• Improved Muscle Tone
• Increased Daily Energy Levels
The key to reaping these benefits is to develop an exercise
habit. Your new bike will help you eliminate obstacles that
prevent you from exercising. Inclement weather and darkness
won’t interfere with your workout when you use your bike in
the comfort of your home. This guide provides you with basic
information for using and enjoying your new machine.
LOCATION OF THE BIKE
Place the bike on a level and stable surface. There should be
183 cm (6 feet) of clearance behind the bike, 91cm (3 feet)
on each side and 30 cm (1 foot). See diagram to the right. Do
not place the bike in any area that will block any vent or air
openings. The bike should not be located in a garage, covered
patio, near water or outdoors.
BEFORE YOU BEGIN
It is essential that your bike is used only indoors, in a climate controlled room. If your bike has been exposed to
colder temperatures or high moisture climates, it is strongly recommended that the bike is warmed up to room
temperature before first time use. Failure to do so may cause premature electromic failure.
WARNING
At NO time should pets or children under the age of 12 be closer to the bike than 3 meters
.
At NO time should children under the age of 12 use the bike.
Children over the age of 12 should not use the bike without adult supervision.
91 cm
30 cm (1 foot )
183 cm (6 feet )
(3 feet )
91 cm
(3 feet )

67
ADJUSTING THE SEAT
To adjust the seat by rotating the knob and loosen the screw. Pull out the knob and adjust the seat to
a comfortable pedaling position (one that keeps a slightly bend in your knee while your legs are in the
extended position). Lock the screw by rotating knob clockwise until it tightens.
NOTE: It is recommended that you do not sit on the seat while adjusting its position. Pay special attention
to the minimum insertion depth of the seat post:the”Stop” shall be permanently Marked above the end of
the seat post.
ADJUSTING THE HANDLEBAR
To adjust the handlebar by rotating the knob and loosen the screw. Then, pull out the knob and adjust the
handlebar to a position you prefer. Lock the screw by rotating knob clockwise until it tightens.
LEVELING THE BIKE
Your bike should be leveled for optimum use. Once you have placed your bike where you intend
to use it, rotate and adjust your levelers located at the end of the front stabilizer.
MOVING
Your bike has a pair of transport wheels built into the FRONT
STABILIZER TUBE. To move, first remove the power supply
and firmly grasp the CONSOLE MAST Handle Bar, carefully
tilt and roll.
BIKE OPERATION B902 CONSOLE DISPLAY
Do not operate the bike if the power cord or plug is damaged.
Our bikes are well built and heavy, weighing up to 30 kg ! Use care and
additional help if necessary when moving.
WARNING
WARNING
A
B E
C D
B902 CONSOLE OPERATION
A) MONITOR DISPLAY: Automatically displays preset Date, Temperature and current Time at stand-by
mode. At the exercise mode the LCD Monitor will display the following SPEED-RPM- TIME-DISTANCE-
CALORIE-PULSE. If the machine is unused the console will enter stand by mode.
B) RECOVERY: If heart rate data is available, you can press RECOVERY key to start the Recovery function.
C) RESET: Press RESET key to default value while setting or hold the RESET key for 3 seconds to reset
all system value at anytime during workout.
D) SET: To set the values of Hour- Minute- Year- Month-Date after install 2 x AAA 1.5V batteries and press
MODE key to confirm the setting.
E) MODE: Pressing the MODE key will start setting values of TIME, DISTANCE, and CALORIES, press
SET key to change target values. During the exercise mode, press the MODE key to change display
between SPEED-RPM- TIME-DISTANCE-CALORIE-PULSE and SCAN function.

89
B903 CONSOLE DISPLAY
C
A
E
B
F
D
QUICK START
1) Turn on console by pressing any key.
2) Press MODE key to set target values, then start.
3) When you exercise without setting any target values, the console display will count up from ZERO.
4) The resistance level can be adjusted during your workout by using the resistance Knob.
Note: 1 to 8 resistance levels available.
WORKOUT RECOVERY
After you have exercised ( more than 30 seconds), press RECOVERY key, place your hands on the heart
rate grips and a fitness recovery value will be calculated (Note: This is guide or formula created from
recovery pulse readings). Time will count down from 60 seconds to zero and give you a recovery status
reading from F1 to F6, with F1 being the best result.
TARGET HEART RATE
Once PULSE has been selected, and the target heart rate value input using the SET key, you can start to
exercise whilst holding onto the heart rate grips. Your pulse rate will be displayed on the LCD screen in
beats per minute. Once your heart rate reading set value ( THR ) is reached, the console will beep until
your heart rate is under the set value.
ENERGY SAVER
The console will display Temperature, Time & Date if machine or console becomes inactive for around
260 seconds. Press any key to return to workout display screen.
FOOTPLATE POSITIONING
Adjust footplate position by loosening both pedal knobs and re-position footplate in one of three location
points. This position will vary angle of footplate rotation and stride pattern angle. B903 CONSOLE OPERATION
A) MONITOR DISPLAY: At the exercise mode the LCD Monitor will display the following SPEED-RPM-
TIME-DISTANCE-CALORIE-PULSE.
B) START/STOP: Simply press to begin exercising or starts your workout. Press to pause/end your
workout. Hold for 3 seconds to reset the console.
C) TOTAL RESET: Press to reset all current value while setting or exercising.
D) Recovery: If heart rate data is available, you can press RECOVERY key to start the Recovery function.
(Refer to workout recovery for more information)
E) RESET: Press RESET key to default value while setting or hold the RESET key for 3 seconds to reset
all system value at anytime during workout.
F) UP/DOWN key
1) Rotate to increase and decrease the value when setting, press to confirm value setting.
2) Rotate to browse items/programs when selecting, press to confirm.
3) Rotate to increase and decrease the resistance.

10 11
BASIC OPERATION
1) Make sure the power is on.
2) Scroll the UP/DOWN key to select workout between manual, preset programs, user and T.H.R., press
UP/DOWN key to confirm.
3) To choose preset programs please select program and use UP/DOWN key to select between 12 workouts.
4) After workout selection, you may scroll UP/DOWN key to set the workout targets.
5) Press StART key to start the workout.
QUICK START
1) Turn on Bike by pressing any key.
2) Press Start key to enter manual mode and start.
3) Scroll the UP/DOWN key to adjust resistance level during the workout.
TARGET HEAR RATE
1) Select T.H.R.program at main menu and press UP/DOWN key to enter setting.
2) Select among 55%, 75% and 90% target or choose T.H.R. to set your desired number between 30 to 230.
USER PROGRAM
1) Select User program at main menu and use up/down and mode key to set your own workout.
2) Press UP/DOWN key confirming setting and press start to begin.
WORKOUT RECOVERY
After exercising for a period of time(more than 30 seconds), Press RECOVERY key, hold onto the
handgrips to conduct a workout recovery test. TIME will be counting down from 00:60 to 00:00 and then
show your heart rate recovery status from F1,F2….to F6. (F1-F6 stands for your Fitness quotient, as F1
being the best result) User may keep exercising to improve the heart rate recovery status. (Press the
RECOVERY button again to return the main display)
ENERGY SAVER
To minimize energy consumption, your machine will enter energy saver mode automatically when not in
use and could be quickly waken up with a touch of a button.
1) Pressing STOP key will bring the console to stand-by mode and will be shown on the console.
2) Pressing TOTAL RESET will reset the computer toally and enter energy saving mode by shut-down all
display after 5 mins.
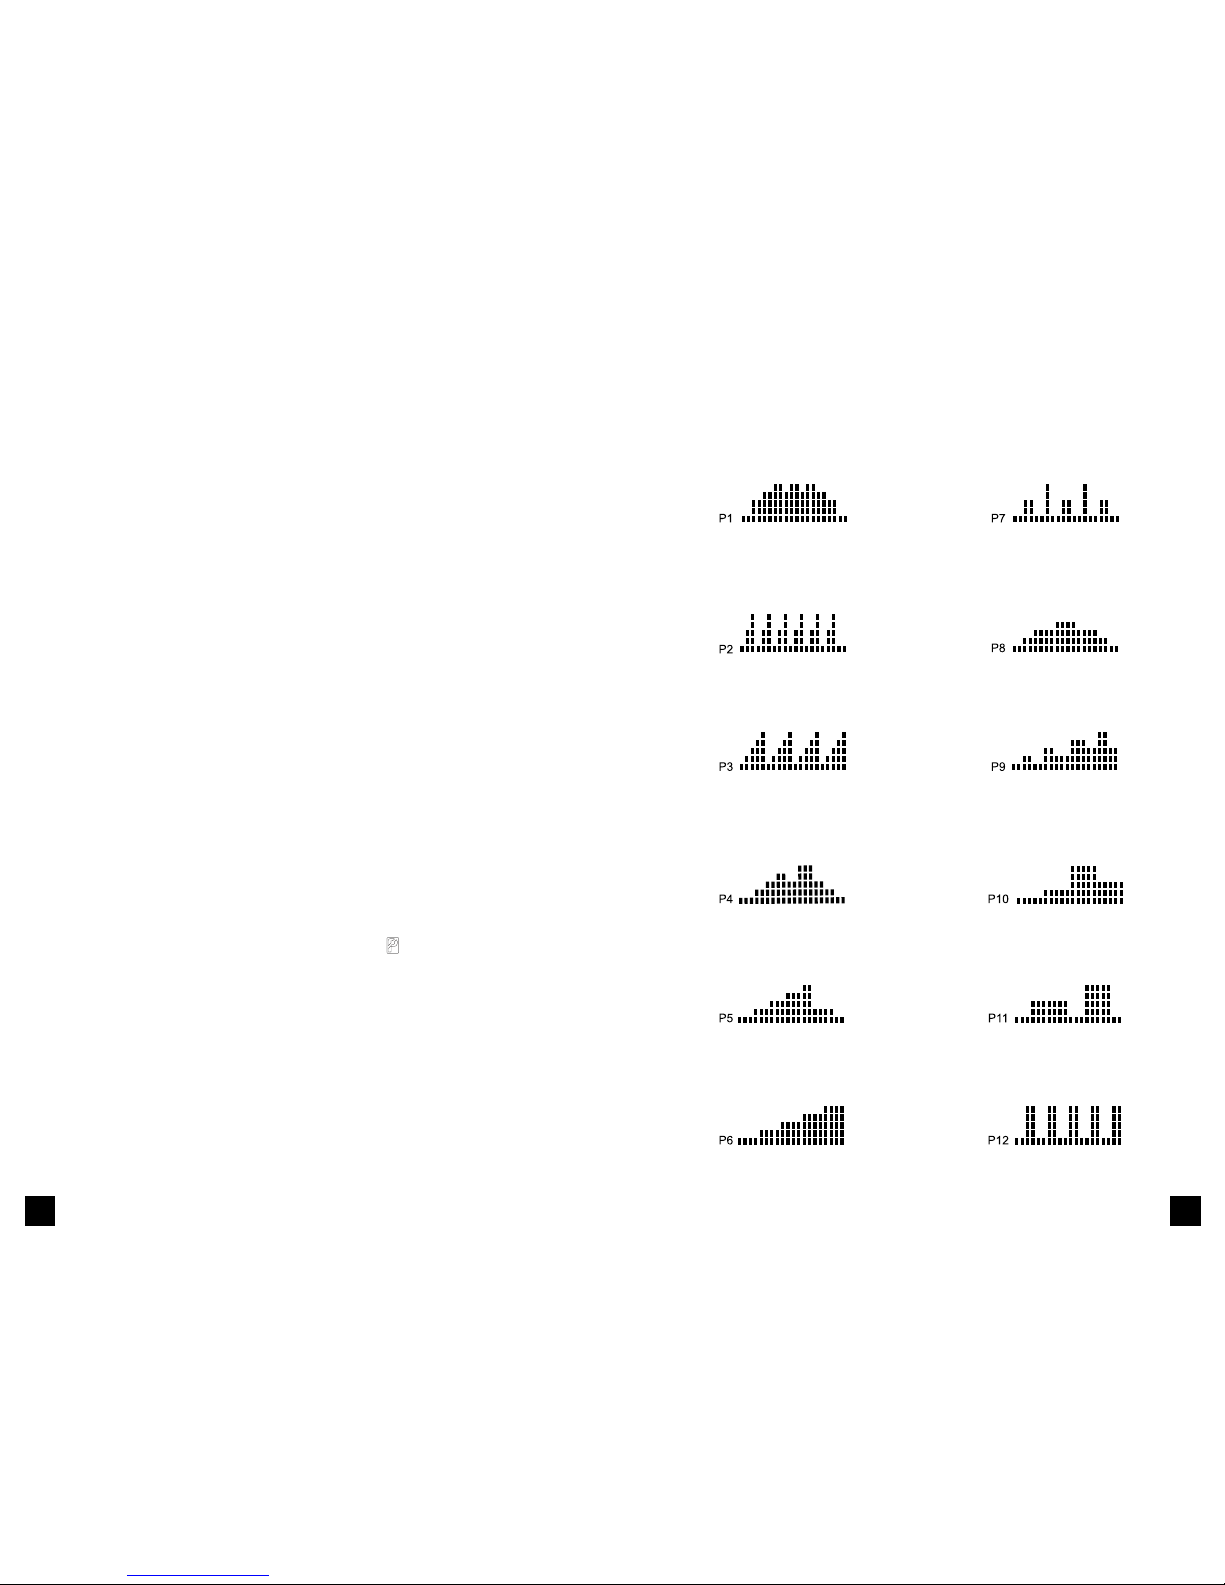
• P1WEIGHTLOSS: Promotes weight loss
by raising and lowering the resistance level,
while keeping you in your fat burning zone.
• P2INTERVALS:Improves your strength,
speed,
and endurance by raising and lowering the
resistance levels throughout your workout to
involve both your heart and muscles.
• P3FATBURN: Challenges with various
combinations of hills and valleys (resistance)
to burn more fat when exercising.
• P4MOUNTAINCLIMB: Improves performance
and stamina by raising the resistance level
to high peaks to simulate the most difficult
outdoor terrains.
• P5ATHLETETRANING:
Complete exercise
program to help you enhance body
performance.
• P6PEAKPERFORMANCE: Increasing
resistance for advanced users to tones your
muscles, and challenges yourself.
• P7AFTER BURNER: Recover your heart and
muscles after intensive workout.
• P8 PLATEAU: Simulates plateau hiking by
increasing and decreasing the resistance
gradually.
• P9FATBURNINTERVAL: Gradually increasing
resistance with hills and valleys allows user to
reach their daily target.
• P10 HILL: Improves performance and stamina
by raising the resistance level to high peaks to
simulate the hill environment.
• P11JOGGING: Improve heart and lung capacity
by simulates daily jogging.
• P12ROLLING: Improves your strength, speed
and endurance by automatically changing the
resistance levels through-out your workout.
B903 PRESET WORKOUT PROFILES

12 13
Seat Pad Nut
M8 3 pcs
Spring Washer
M8 3 pcs
Screw
M5x10 4 pcs
Flat Washer
8.5x16xT1.2 3 pcs
Long Bolt (A)
M8x70 4 pcs
wave Washer (B)
Φ8.5xΦ22xT1.5 8 pcs
Flat washer (F)
Φ8.5xΦ16xT1.5 1 pc
Nut (C)
M8 4 pcs
Hex Screw (E)
M8x15 4 pcs
Seat adjusting knob (D)
1 pc
L Hex Wrench with
screwdriver M6
15mm 2 ends wrench
13/17
15mm Wrench
Handlebar
adjusting knob 1 pc
Handlebar cover
ASSEMBLY INSTRUCTIONS
MAIN PARTS:
PRE-ASSEMBLED PARTS:
(B902) (B903)
ST EP 1
ST EP 2
HARDWARE CONTENTS:
HARDWARE CONTENTS:
MAIN FRAME
MAIN FRAME
C
C
B
B
A
A
FRONT STABILIZER TUBE
Long Bolt (A)
M8x70 2 pcs
Long Bolt (A)
M8x70 2 pcs
wave Washer (B)
Φ8.5xΦ22xT1.5 2 pcs
wave Washer (B)
Φ8.5xΦ22xT1.5 2 pcs
Nut (C)
M8 2 pcs
Nut (C)
M8 2 pcs
A. Open hardware for step 1.
B. Attach the FrontStabilizerTube to the
MainFrameusing 2LongBolts(A), 2Wave
Washers(B) &2Nuts(C).
A. Open hardware for step 2.
B. Attach the RearStabilizerTube to the
MainFrame using 2LongBolts(D), 2 Wave
Washers(B) & 2Nuts(C).

14 15
ST EP 3 ST EP 5
ST EP 4 ST EP 6
HARDWARE CONTENTS:
A. Open hardware for step 3.
B. Connect UpperSensorCable to Lower
SensorCable.
C. Then connect UpperResistanceKnob
AdjustmentCable into LowerAdjustment
Cradle. Position ball end of UpperCable wire
into LowerCradle, pull up extend wire and
locate into top of Cradle.
D. Once all cables are connected, position
ConsoleMast and assemble using 4 Hex
screws(E) and 4 Wavewashers(B).
A. Remove Pre-assembledScrews from Console.
B. Connect sensor cable & hand pulse grip cable
at the rear of Console.
C. Carefully tuck away all cables into Console
Mast and fix Console in place using
PreassembledScrews & Washers.
NOTE: All hardware are pre-assembled.
A. Remove Pre-assembledScrew with bracket
and position Handlebar in place. Carefully
locate hand pulse grip cable through Console
Mastopening and pull both cables out of top of
ConsoleMast.
B. Re-positionBracket and assemble in place
with Pre-assembledScrew.
C. Place HandlebarCover on handlebar and
secure in place using HandlebarAdjusting
Knob. To adjust handlebar position loosen
HandlebarAdjustingKnob rotate handlebar
to correct position and re-tighten.
NOTE: All hardware are pre-assembled.
A. Attach the SeatPost to the MainFrame.
B. Tighten SeatPost with Pre-assembledSeat
HeightAdjustingKnob.
Wave Washer (B)
Φ8.5xΦ22xT1.5 4 pcs
Hex Screw (E)
M8x15 4 pcs
CONSOLE
MAST
HANDLEBAR
CONSOLE MAST
BRACKET
PRE-ASSEMBLED SCREW
SENSOR
CABLE
RESISTANCE KNOB
ADJUSTMENT CABLE
BE
CONSOLE
PRE-ASSEMBLED
SCREW
PRE-ASSEMBLED
WASHER
SEAT POST
PRE-ASSEMBLED
SEAT HEIGHT
ADJUSTMENT KNOB

16 17
ST EP 7
ST EP 8
HARDWARE CONTENTS:
A. Open hardware for step 7.
B. Remove Pre-assembledScrews, Spring
Washers & FlatWashersfromSeat.
C. Attach Seat to seat bracket using Pre-
assembledScrews, SpringWashers & Flat
Washers.
D. Fix Seat to seat stem using SeatAdjusting
Knob and 1 FlatWasher.
A. Attach Pedals to Crank. RightPedal with R
decal to right hand Crank and LeftPedal with L
decal to left hand Crank.
Flat washer (F)
Φ8.5xΦ16xT1.5
1pc
ASSEMBLY COMPLETE!
SEAT
FLAT WASHER
PRE-ASSEMBLED
SPRING WASHER
PRE-ASSEMBLED
FLAT WASHER
PRE-ASSEMBLED NUT
SEAT ADJUSTING KNOB
PEDAL
CRANK
B902
Max. User Weight: 130 kg / 286 lbs
Product Weight: 30 kg / 66 lbs
Overall Dimension: 104 x 55 x 133 cm / 41” x 35” x 52”
(B902)

18 19
ST EP 1 ST EP 3
ST EP 2
HARDWARE CONTENTS:
HARDWARE CONTENTS:
MAIN FRAME
MAIN FRAME
C
C
B
B
A
A
FRONT STABILIZER TUBE
Long Bolt (A)
M8x70 2 pcs
Long Bolt (A)
M8x70 2 pcs
wave Washer (B)
Φ8.5xΦ22xT1.5 2 pcs
wave Washer (B)
Φ8.5xΦ22xT1.5 2 pcs
Nut (C)
M8 2 pcs
Nut (C)
M8 2 pcs
A. Open hardware for step 1.
B. Attach the FrontStabilizerTube to the
MainFrameusing 2LongBolts(A), 2Wave
Washers(B) &2Nuts(C).
A. Open hardware for step 2.
B. Attach the RearStabilizerTube to the
MainFrame using 2LongBolts(D), 2 Wave
Washers(B) & 2Nuts(C).
ST EP 4
HARDWARE CONTENTS:
A. Open hardware for step 3.
B. Carefully connect lower and upper Console
Cable.
C. Once all cables are connected, position
ConsoleMast and assemble using 4 Hex
Screws(D) & 4 WaveWashers(C).
A. Remove Pre-assembledScrew with bracket
and position Handlebar in place. Carefully
locate hand pulse grip cable through Console
Mastopening and pull both cables out of top of
ConsoleMast.
B. Re-positionBracket and assemble in place
with Pre-assembledScrew.
C. Place HandlebarCover on handlebar and
secure in place using HandlebarAdjusting
Knob. To adjust handlebar position loosen
HandlebarAdjustingKnob rotate handlebar
to correct position and re-tighten.
NOTE: All hardware are pre-assembled.
Wave Washer (B)
Φ8.5xΦ22xT1.5 4 pcs
Hex Screw (E)
M8x15 4 pcs
CONSOLE
MAST
HANDLEBAR
CONSOLE MAST
BRACKET
PRE-ASSEMBLED SCREW
SENSOR
CABLE
B E

20 21
ST EP 5
ST EP 6
A. Remove Pre-assembledScrews from Console.
B. Connect sensor cable & hand pulse grip cable
at the rear of Console.
C. Carefully tuck away all cables into Console
Mast and fix Console in place using
PreassembledScrews & Washers.
NOTE: All hardware are pre-assembled.
A. Attach the SeatPost to the MainFrame.
B. Tighten SeatPost with Pre-assembledSeat
HeightAdjustingKnob.
CONSOLE
PRE-ASSEMBLED
SCREW
PRE-ASSEMBLED
WASHER
SEAT POST
PRE-ASSEMBLED
SEAT HEIGHT
ADJUSTMENT KNOB
ST EP 7
ST EP 8
HARDWARE CONTENTS:
A. Open hardware for step 7.
B. Remove Pre-assembledScrews, Spring
Washers & FlatWashersfromSeat.
C. Attach Seat to seat bracket using Pre-
assembledScrews, SpringWashers & Flat
Washers.
D. Fix Seat to seat stem using SeatAdjusting
Knob and 1 FlatWasher.
A. Attach Pedals to Crank. RightPedal with R
decal to right hand Crank and LeftPedal with L
decal to left hand Crank.
Flat washer (F)
Φ8.5xΦ16xT1.5
1pc
SEAT
FLAT WASHER
PRE-ASSEMBLED
SPRING WASHER
PRE-ASSEMBLED
FLAT WASHER
PRE-ASSEMBLED NUT
SEAT ADJUSTING KNOB
PEDAL
CRANK

22 23
CONDITIONING GUIDELINES
ALWAYS CONSULT YOUR PHYSICIAN BEFORE BEGINNING AN EXERCISE PROGRAM.
HOW OFTEN? (Frequency of Workouts)
The American Heart Association recommends that you exercise at least 3 to 4 days per week to maintain
cardiovascular fitness. If you have other goals such as weight or fat loss, you will achieve your goal faster
with more frequent exercise. Whether it’s 3 days or 6 days, remember that your ultimate goal should be to
make exercise a lifetime habit. Many people are successful staying with a fitness program if they set aside
a specific time of day to exercise. It doesn’t matter whether it’s in the morning before breakfast, during
lunch hour or while watching the evening news. What’s more important is that it’s a time that allows you to
keep a schedule, and a time when you won’t be interrupted. To be successful with your fitness program,
you have to make it a priority in your life. So decide on a time, pull out your day planner and pencil in your
exercise times for the next month!
HOW LONG? (Duration of Workouts)
For aerobic exercise benefits, it’s recommended that you exercise from between 24 and 60 minutes per
session. But start slowly and gradually increase your exercise times. If you’ve been sedentary during the
past year, it may be a good idea to keep your exercise times to as little as five minutes initially. Your body
will need time to adjust to the new activity. If your goal is weight loss, a longer exercise session at lower
intensities has been found to be most effective. A workout time of 48 minutes or more is recommended
for best weight loss results.
HOW HARD? (Intensity of Workouts)
How hard you workout is also determined by your goals. If you use your machine to prepare for a 5K
workout, you will probably work out at a higher intensity than if your goal is general fitness. Regardless
of your long term goals, always begin an exercise program at low intensity. Aerobic exercise does not
have to be painful to be beneficial! There are two ways to measure your exercise intensity. The first is
by monitoring your heart rate(using the grip pulse handlebars), and the second is by evaluating your
perceived exertion level(this is simpler than it sounds!).
PERCEIVED EXERTION LEVEL
A simple way to gauge your exercise intensity is to evaluate your perceived exertion level. While
exercising, if you are too winded to maintain a conversation without gasping, you are working out too
hard. A good rule of thumb is to work to the point of exhilaration, not exhaustion. If you cannot catch your
breath, it’s time to slow down. Always be aware of these warning signs of overexertion.
(B903)
ASSEMBLY COMPLETE!
B903
Max. User Weight: 130 kg / 286 lbs
Product Weight: 30 kg / 66 lbs
Overall Dimension: 104 x 55 x 133 cm / 41” x 35” x 52”

24 25
HEART RATE
TARGET HEART RATE ZONE CHART
HANDLEBARS
Place the palm of your hands directly on the grip pulse handlebars. Both hands must grip the bars for your
heart rate to register. It takes 5 consecutive heart beats (15-20 seconds) for your heart rate to register. When
gripping the pulse handlebars, do not grip tightly. You may experience an erratic readout if consistently
holding the grip pulse handlebars. Make sure to clean the pulse sensors to ensure proper contact can be
maintained.
WARNING:
Do not press excessively hard on the sensor as this may cause damage.
What is Target Heart Rate Zone?
Target Heart Rate Zone tells you the number
of times per minute your heart needs to beat to
achieve a desired workout effect. It is represented
as a percentage of the maximum number of times
your heart can beat per minute. Target Zone will vary
for each individual, depending on age, current level
of conditioning, and personal fitness goals. The
American Heart Association recommends working-
out at a Target Heart Rate Zone of between 60%
and 75% of your maximum heart rate. A beginner
will want to workout in the 60% range while a more
experienced exerciser will want to workout in the
70-75% range. See chart for reference.
EXAMPLE:
For a 42-year-old user: Find age along the bottom of the chart (round to 40), follow age column up to the
target zone bar. Results: 60% of maximum Hear Rate = 108 Beats Per Minute, 75% of maximum Heart Rate
= 135 Beat Per Minute.
ALWAYS CONSULT YOUR PHYSICIAN BEFORE BEGINNING AN EXERCISE PROGRAM.
WARNING
The heart rate reading is intended only as an exercise aid and not for medical
purpose. Your heart rate monitoring systems may be inaccurate. Various
factors may affect the accuracy of your heart rate reading. Over exercise may
result in serious injury or death. If you feel faint stop exercise immediately.
STRETCH FIRST
Before using your product, it is best to take a few minutes to do a few gentle stretching exercises.
Stretching prior to exercise will improve flexibility and reduce chances of exercise related injury. Ease
into each of these stretches with a slow gentle motion. Do not stretch to the point of pain. Make sure
not to bounce while doing these stretches.
1. STANDING CALF MUSCLE STRETCH
Stand near a wall with the toes of your left foot about 18" from the wall,
and the right foot about 12" behind the other foot. Lean forward, pushing
against the wall with your palms. Keep your heels flat and hold this position
for a count of 15 seconds. Make sure that you do not bounce while
stretching. Repeat on the other side.
2. STANDING QUADRICEP STRETCH
Using a wall to provide balance, grasp your left ankle
with your left hand and hold your foot against the back
of your thigh for 15 seconds. Repeat with your right
ankle and hand.
3. SITTING HAMSTRING & LOWER BACK MUSCLE STRETCH
Sit on the floor with your legs together and straight out in front of you. Do
not lock your knees. Extend your fingers towards your toes and hold for a
count of 15 seconds. Make sure that you do not bounce while stretching.
Sit upright again. Repeat one time.
STRETCHING
TIPS
%001
%57
%06
ETUNIM REP STAEB
20 25 30 35 40 45 50 55 60 65
AGE
ENOZ TEGRAT
21 0 11 7 11 4 11 1 01 8 01 5 01 2 99 79 39
51 0 41 6 41 3 31 9 31 5 31 1 21 8 21 4 21 0 11 6

26 27
WARM UP
The first 2 to 5 minutes of a workout should be devoted to warming up. The warm-up will limber your
muscles and prepare them for more strenuous exercise. Make sure that you warm-up on your product
at a slow pace. The warm up should gradually bring your heart rate into your Target Heart Rate Zone.
COOL DOWN
Never stop exercising suddenly! A cool-down period of 3-5 minutes allows your heart to readjust to the
decreased demand. Make sure that your cool down period consists of a very slow pace to allow your
heart rate to lower. After the cool-down, repeat the stretching exercises listed previously to loosen and
relax your muscles.
An important step in developing a long term fitness program is to determine your goals. Is your
primary goal for exercising to lose weight? Improve muscle? Reduce stress? Prepare for the spring
racing schedule? Knowing what your goals are will help you develop a more successful exercise
program. Below are some common exercise goals:
•
Weight Loss - lower intensity, longer duration workouts
•
Improve Body Shape and Tone - interval workouts, alternate between high and low intensities
•
Increased Energy Level - more frequent daily workouts
•
Improved Sports Performance - high intensity workouts
•
Improved Cardiovascular Endurance - moderate intensity, longer duration workouts
If possible try to define your personal goals in precise, measurable terms, and then put your goals
in writing. The more specific you can be, the easier it will be to track your progress. If your goals are
long term, divide them up into monthly and weekly segments. Longer term goals can lose some of the
immediate motivation benefits. Short term goals are easier to achieve. Your console provides you with
several readouts that can be used to record your progress. You can track Distance, Calories or Time.
KEEPING AN EXERCISE DIARY
To make your personal exercise log book, photocopy the weekly and monthly log sheets, which are
located on the following pages.
As your fitness improves, you can look back and see how far you’ve come!
ACHIEVING YOUR FITNESS GOALS
THE IMPORTANCE OF A WARM-UP & COOL DOWN
TIPS
TIPS
WEEKLY LOG SHEETS
WEEK # WEEKLY GOAL
WEEKLY TOTALS :
D AY
SUNDAY
MONDAY
TUESDAY
WEDNESDAY
THURSDAY
FRIDAY
SATURDAY
DATE DISTANCE CALORIES TIME COMMENTS
WEEK # WEEKLY GOAL
WEEKLY TOTALS :
D AY
SUNDAY
MONDAY
TUESDAY
WEDNESDAY
THURSDAY
FRIDAY
SATURDAY
DATE DISTANCE CALORIES TIME COMMENTS
WEEK # WEEKLY GOAL
WEEKLY TOTALS :
D AY
SUNDAY
MONDAY
TUESDAY
WEDNESDAY
THURSDAY
FRIDAY
SATURDAY
DATE DISTANCE CALORIES TIME COMMENTS

28 29
MONTHLY LOG SHEETS TROUBLESHOOTING
Tempo Fitness upright bike is designed to be reliable and maintenance-free. However, if you do
experience problems with your bike, please refer to the troubleshooting guide listed below.
PROBLEM:
The console does not light up.
SOLUTION:
Verify the following:
•
Check the batteries.
•
Is the outlet of the machine fuctional? Double check that the breaker has not tripped.
•
The correct adapter is being used. Only use the adapter provided or authorized by Treo Fitness.
•
The adapter is not pinched or damaged and is properly plugged into the outlet AND the machine.
•
The power switch is turned to the ON position (may not apply to all models).
•
Turn off the machine and unplug power cord. Remove the console and check that all connections
to the console are secure and not damaged or pinched
PROBLEM:
The console lights up but the Time/RPM’s do not count.
SOLUTION:
Verify the following:
•
Turn off machine and unplug power cord. Remove the console and check that all connections to the
console are secure and not damaged or pinched.
•
If doing the above does not fix the problem, the speed senor and/or magnet may have become
dislodged or damaged.
PROBLEM:
The resistance levels seem to be incorrect, seeming too hard or too easy.
SOLUTION:
Verify the following:
•
The correct adapter is being used. Only use the adapter provided or authorized by Tempo Fitness.
•
Reset the console and allow the resistance to reset to the default position. Restart and retry the
resistance levels.
PROBLEM:
The bike makes a squeaking or chirping noise.
SOLUTION:
Verify the following:
•
The bike is on a level surface.
•
Loosen all bolts attached during the assembly process, grease the threads, and tighten again.

30 31
PROBLEM:
There is no heart rate reading.
SOLUTION:
Remove the console and verify that the heart rate cables are attached properly, making
sure that the cables are securely inserted into the console.
Check your exercise environment for sources of interference such as high power lines, large motors, etc.
YOU MAY EXPERIENCE AN ERRATIC READOUT UNDER THE FOLLOWING CONDITIONS:
•
Gripping the heart rate handlebars too tight. Try to maintain moderate pressure while holding
onto the heart rate handlebars.
•
Constant movement and vibration due to constantly holding the heart rate grips while exercising.
•
When you are breathing heavily during a workout.
•
When your hands are constricted by wearing a ring.
•
When your hands are dry or cold. Try moistening your palms or rubbing them together to warm.
•
Anyone with heavy arrhythmia.
•
Anyone with arteriosclerosis or peripheral circulation disorder.
•
Anyone whose skin on the measuring palms is especially thick.
NOTE: Outside interference sources such as computers and fluorescent lights may cause the heart rate
reading to be erratic.
If the above troubleshooting section does not remedy the problem, discontinue use.
The following information may be asked of you when you call. Please have these items readily available:
•
Model Name
•
Serial Number
•
Date of Purchase (receipt or credit card statement)
In order for your local dealer to service your bike, they may need to ask detailed questions about the
symptoms that are occurring. Some troubleshooting questions that may be asked are:
•
How long has this problem been occurring?
•
Does this problem occur with every use? With every user?
•
If you are hearing a noise, does it come from the front, back or inside? What kind of noise is it
(thumping, grinding, squeaking, chirping etc.)?
•
If you are having a resistance problem what is occurring? Is the resistance always too hard or too easy?
Does the resistance respond when pushing the buttons on the console? Does the resistance constantly
cycle through the levels during the workout?
•
Has the machine been maintained per the maintenance schedule?
•
Does the problem occur when using the handlebars? Without using the handlebars?
Answering these and other questions will give the technicians the ability to send proper replacement parts
and the service necessary to get you and your Tempo Fitness upright bike running again!
HEART RATE TROUBLESHOOTING
PLEASE CALL YOUR LOCAL DEALER FOR SUPPORT.
ARE THE SOUNDS MY BIKE MAKES NORMAL?
WHY IS THE BIKE I HAD DELIVERED LOUDER THAN THE ONE AT THE STORE?
HOW LONG WILL THE DRIVE BELT LAST?
CAN I MOVE THE TRAINER EASILY ONCE IT IS ASSEMBLED?
Our bikes are some of the quietest available because they use belt drives and friction free magnetic
resistance. We use the highest grade bearings and belts to minimize noise. However, because the
resistance system itself is so quiet, you will occasionally hear other slight mechanical noises. These
mechanical noises, which may or may not be intermittent, are normal and are caused by the transfer
of
significant amounts of energy to a rapidly spinning flywheel. All bearings, belts and other rotating
parts will generate some noise which will transmit through the casing and frame. It is also normal
for these sounds to change slightly during a workout and over time because of thermal expansion
of the parts.
All fitness products seem quieter in a large store showroom because there is generally more
background noise than in your home. Also, there will be less reverberation on a carpeted concrete
floor than on a wood overlay floor. Sometimes a heavy rubber mat will help reduce reverberation
through the floor. If a fitness product is placed close to a wall, there will be more reflected noise.
The computer modeling we have done indicated virtually thousands of maintenance free hours. Belts
are now commonly used in far more demanding applications such as motorcycle drives.
Your bike has a pair of transport wheels built into the front legs. It is easy to move your bike by rolling
it on the front transport wheels. It is important that you place your bike in a comfortable and inviting
room. Your bike is designed to use minimal floor space. Many people will place their bikes facing the
TV or a picture window. If at all possible, avoid putting your bike in a unfinished basement. To make
exercise a desirable daily activity for you, the bike should be in a comfortable setting.
COMMON PRODUCT QUESTIONS

32
WHAT KIND OF ROUTINE MAINTENANCE IS REQUIRED?
HOW DO I CLEAN MY BIKE?
We use sealed bearings throughout our bikes so lubrication is not needed. The most important
maintenance step is to simply wipe your perspiration off the trainer after each use.
Clean with soap and water cleaners only. Never use solvents on plastic parts.
Cleanliness of your bike and its operating environment will keep maintenance problems and service calls
to a minimum. For this reason, Tempo Fitness recommends that the following preventive maintenance
schedule be followed.
AFTER EACH USE (DAILY)
Turn off the bike by unplugging the power cord from the wall outlet
• Wipe down the bike with a damp cloth. Never use solvents, as they can cause damage to the bike.
• Inspect the power cord. If the power cord is damaged, contact your local dealer.
• Make sure the power cord is not underneath the bike or in any other area where it can become
pinched or cut.
WEEKLY
Clean underneath the bike, following these steps:
•
Turn off the bike.
•
Move the bike to a remote location.
•
Wipe or vacuum any dust particles or other objects that may have accumulated underneath the bike.
•
Return the bike to its previous position.
EVERY MONTH
•
Inspect all assembly bolts and pedals on the machine for proper tightness.
MAINTENANCE
To remove power from the bike, the power cord must be disconnected from
the wall outlet.
WARNING


B902 B903 102711’ © 2011 Tempo Fitness Products | Made in China
This manual suits for next models
1
Table of contents
Other Tempo Fitness Exercise Bike manuals