Temptek VETERAN LXG-300 Series User manual

LXG-300 Series
I.O.M. #147 updated : 11/01/2018
INSTRUCTION MANUAL • INSTALLATION • OPERATION • MAINTENANCE
TEMPTEK, INC.
525 East Stop 18 Road Greenwood, IN 46142
317-887-6352 fax: 317-881-1277
Service Department fax: 317-885-8683
www.Temptek.com
E-mail: [email protected]
Model:
Serial Number :
Models with LXG-300
Series Instruments


COVERING
INSTALLATION
OPERATION
MAINTENANCE
LXG-300 Series
TEMPTEK, INC. 525 East Stop 18 Road Greenwood, IN 46143
Phone: 317-887-6352 Fax: 317-881-1277 Service Department fax: 317-885-8683
www.Temptek.com E-mail: [email protected]
INSTRUCTION MANUAL
Veteran VT with
LXG-300 SERIES INSTRUMENT

Temperature Control Units : Veteran with LXG-300 Series Instrument
Page: 4
TEMPTEK, INC.
525 East Stop 18 Road Greenwood, Indiana 46142
317-887-6352 Fax: 317-881-1277
Email: [email protected]
TABLE OF CONTENTS
1.0 GENERAL 7
1.1 Receiving Instructions 8
1.2 Introduction 8
1.3 Safety 8
1.4 Efficiency 9
1.5 Water Treatment 9
1.6 Components 10
2.0 INSTALLATION 13
2.1 General 14
2.2 To and from process connections 14
2.3 Water supply connection 15
2.4 Drain connection 15
2.5 Electrical connection 17
3.0 START UP SEQUENCE 21
3.1 General 22
3.2 System Fill / Operations 22
3.3 Instrument Operation : Basic Use 27
3.4 Instrument Operation : Basic Setup 33
3.5 Instrument Operation : Advanced Setup 34
3.6 Instrument Operation : Machine Setup 38
3.7 Instrument Operation : Tools and Status 42
3.8 Shut Down / Disconnect 45
4.0 TROUBLESHOOTING 47
4.1 Unit will not start (Display is not Illuminated) 48
4.2 Unit will not start (Display is Illuminated) 48
4.3 Unit Stops 48
4.4 Unit Overheats 49
4.5 Unit Underheats 50
4.6 Pressure Relief Valve Leaks 51
4.7 Cooling Valve Fault 52
5.0 MAINTENANCE 53
5.1 Pump Seal Replacement 54
5.2 Heater Replacement 57
5.3 Cooling Valve Service 59
5.4 Voltage Change 61
5.5 Pressure Switch Service 64
5.6 Electronic Instrument Repair Policy And Procedure 65
6.0 COMPONENTS 69
6.1 Mechanical system 70
6.2 Electrical system 71

Temperature Control Units : Veteran with LXG-300 Series Instrument
Page: 5
TEMPTEK, INC.
525 East Stop 18 Road Greenwood, Indiana 46142
317-887-6352 Fax: 317-881-1277
Email: [email protected]
7.0 RELATED DRAWINGS 73
7.1 Physical 74
7.2 Circuit Schematic 75
7.3 Regulator / Bypass Installation 76
7.4 Dual Zone Dolly 77
7.5 Stacking Rack 78
8.0 APPENDIX 81
8.1 Model # And Suffix Coding 82
8.2 Interpretation Of Process Pressure Gauges 83
8.3 Mold Purge Operation 84
8.4 SPI Commands 86
8.5 Communications Cable 88
8.6 Optional Alarm Operation 89
8.7 AS5 Pump Parts List - 1/2 HP to 1 HP 91
8.8 AS5 Pump Parts List - 1 1/2 HP to 3 HP 92

Page: 6
THIS PAGE INTENTIONALLY BLANK

Temperature Control Units : Veteran with LXG-300 Series Instrument
Page: 7
TEMPTEK, INC.
525 East Stop 18 Road Greenwood, Indiana 46142
317-887-6352 Fax: 317-881-1277
Email: [email protected]
1.0 GENERAL
1.1 Receiving Instructions
1.2 Introduction
1.3 Safety
1.4 Water Treatment
1.5 Components
Temperature Control Units : Veteran with LXG-300 Series Instrument
Page: 8
TEMPTEK, INC.
525 East Stop 18 Road Greenwood, Indiana 46142
317-887-6352 Fax: 317-881-1277
Email: [email protected]
1.1 RECEIVING INSTRUCTIONS
A. Temperature control units are generally shipped skid mounted, boxed and wrapped in
plastic prior to shipment.
B. Unbox the unit before accepting delivery. Check for visible damage and document any
evident damage on the delivery receipt or refuse the shipment. Shipping damage is the
responsibility of the carrier.
C. In order to expedite payment for damages, should they occur, follow proper procedures
and keep detailed records. Take photographs of any suspected damage.
1.2 INTRODUCTION
A. This manual covers temperature control units from 10 to 34 kW of heating capacity using
the LXG-G300 Series microprocessor control instrument. The standard uid operating
temperature range for this temperature control unit is 32°F to 300°F for units. Consult the
factory if you have questions about the operating range of your temperature control unit.
B. The intent of this manual is to serve as a guide in the installation, operation and
maintenance of your temperature control unit. Improper installation can lead to equipment
damage and poor performance. Failure to follow the installation, operation and
maintenance instructions may result in damage to the unit that is not covered under the
limited warranty. This manual is for standard products. The information contained in this
manual is intended to be general in nature. The information is typical only and may not
represent the actual unit purchased.
C. When calling for assistance from the Manufacturer’s Service Department, it is important
to know the model and serial number of the particular unit. The model number includes
critical unit information which is helpful when troubleshooting operating difculties. The
serial number allows the service team to locate manufacturing and testing records which
can have additional information relating to a particular unit.
1.3 SAFETY
A. It is important to become thoroughly familiar with this manual and the operating
characteristics of the unit.
B. It is the owner’s responsibility to assure proper operator training, installation, operation,
and maintenance of the unit.
C. Observe all warning and safety placards applied to the unit. Failure to observe all
warnings can result in serious injury or death to the operator and severe mechanical
damage to the unit.
WARNING: This equipment contains hazardous voltages that can cause severe injury or
death. Disconnect and lock out incoming power before installing or servicing the equipment.

Temperature Control Units : Veteran with LXG-300 Series Instrument
Page: 9
TEMPTEK, INC.
525 East Stop 18 Road Greenwood, Indiana 46142
317-887-6352 Fax: 317-881-1277
Email: [email protected]
D. Observe all safety precautions during installation, startup and service of this equipment
due to the presence of high voltage. Only qualified personnel should install, startup and
service this equipment.
E. When working on this equipment, observe precautions in literature and on tags, stickers
and labels located on the equipment. Wear work gloves and safety glasses.
F. Before installing and operating the unit, be aware of and follow any local laws and codes
that apply to the installation.
G. Samples of Warning Labels applied to typical temperature control units.
1. Alerts users to the danger of high voltage.
2. Alerts the user to possible explosive danger.
3. Alerts the user to a hot surface danger due to high operating temperatures.
CAUTION
WARNING
J5318-BF

Temperature Control Units : Veteran with LXG-300 Series Instrument
Page: 10
TEMPTEK, INC.
525 East Stop 18 Road Greenwood, Indiana 46142
317-887-6352 Fax: 317-881-1277
Email: [email protected]
WARNING: Improper water treatment will void unit warranty.
1.4 WATER TREATMENT
A. The fluid used in your temperature control unit will greatly effect its short and long-
term operation. Lack of as well as improper water treatment can damage the
temperature control unit by causing scale build-up, excessive corrosion and/or bacterial
contamination. It is the equipment owner’s responsibility to prevent damage caused by
poor water quality. The services of a water treatment professional is recommended.
B. The use of untreated or improperly treated water in a temperature control unit may result
in scaling, erosion, corrosion, algae, bacteria or slime. The manufacturer recommends
ltering the process water to prevent solids from plugging critical parts.
C. It is recommended that the services of a qualied water treatment specialist be engaged
to determine what water treatment is required.
D. The Factory assumes no responsibility for equipment failures which result from untreated
or improperly treated water.
E. Do not use deionized water in this unit. Some customized units may be compatible with
deionized water. Consult the factory before using deionized water.
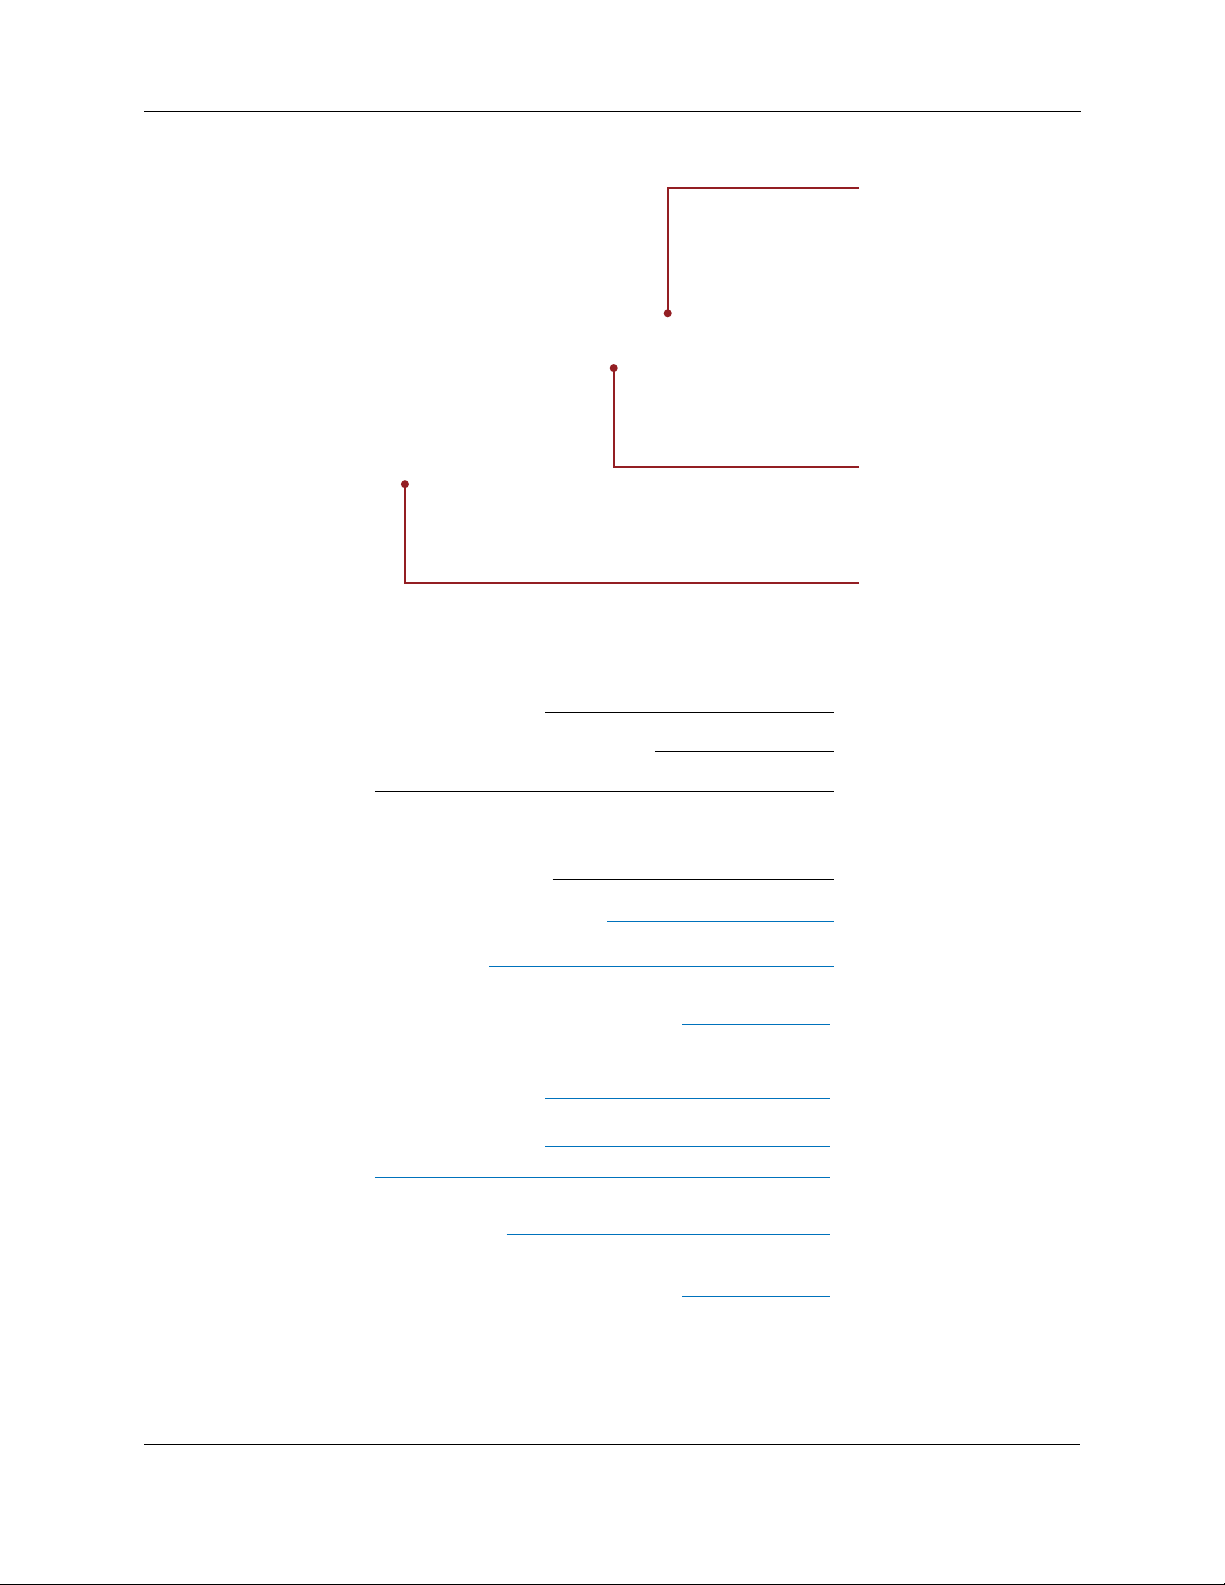
1.5 COMPONENTS
Models with 10 & 16 kW heaters
and 3/4 - 3 HP pumps.
(typical)
Models with 24 & 34 kW heaters
and 5 - 7.5 HP pumps.
(typical)
Temperature Control Units : Veteran with LXG-300 Series Instrument
Page: 11
TEMPTEK, INC.
525 East Stop 18 Road Greenwood, Indiana 46142
317-887-6352 Fax: 317-881-1277
Email: [email protected]
Pump
Thermoformed Cover
Panel
Vented Stainless
Steel Cabinet
Pump Motor
Caster
Cooling Cylinder
Heating Cylinder
Temperature Sensor
Electrical Panel
(Inside stainless steel cabinet.)
Cooling Valve
Heater
Instrument
Pressure Gauges
Manual & Quick
Start Guide
Lift-Off Cover
Panel
Electrical Panel

Temperature Control Units : Veteran with LXG-300 Series Instrument
Page: 12
TEMPTEK, INC.
525 East Stop 18 Road Greenwood, Indiana 46142
317-887-6352 Fax: 317-881-1277
Email: [email protected]
Process Connection Label
Details process connections hook-up.
Unit Data Tag
Details unit Serial Number, voltage and
other important unit information.

Temperature Control Units : Veteran with LXG-300 Series Instrument
Page: 13
TEMPTEK, INC.
525 East Stop 18 Road Greenwood, Indiana 46142
317-887-6352 Fax: 317-881-1277
Email: [email protected]
2.0 INSTALLATION
2.1 General
2.2 To and From Process Connections
2.3 Water Supply Connection
2.4 Drain Connection
2.5 Electrical Connection

Temperature Control Units : Veteran with LXG-300 Series Instrument
Page: 14
TEMPTEK, INC.
525 East Stop 18 Road Greenwood, Indiana 46142
317-887-6352 Fax: 317-881-1277
Email: [email protected]
2.1 GENERAL
A. Care should be taken to use materials (hose, rigid piping, valves or filters) rated for
the temperature and pressure duty of your unit. Most units have a maximum operating
temperature of 300°F or less and a maximum pressure of 150 PSI. The unit is most
efficient when full size plumbing is run from the unit connections to and from the process.
If necessary, reduce the plumbing size at your process, not at the unit.
B. Be certain all process piping materials have the equivalent or larger diameter of the
particular process connection.
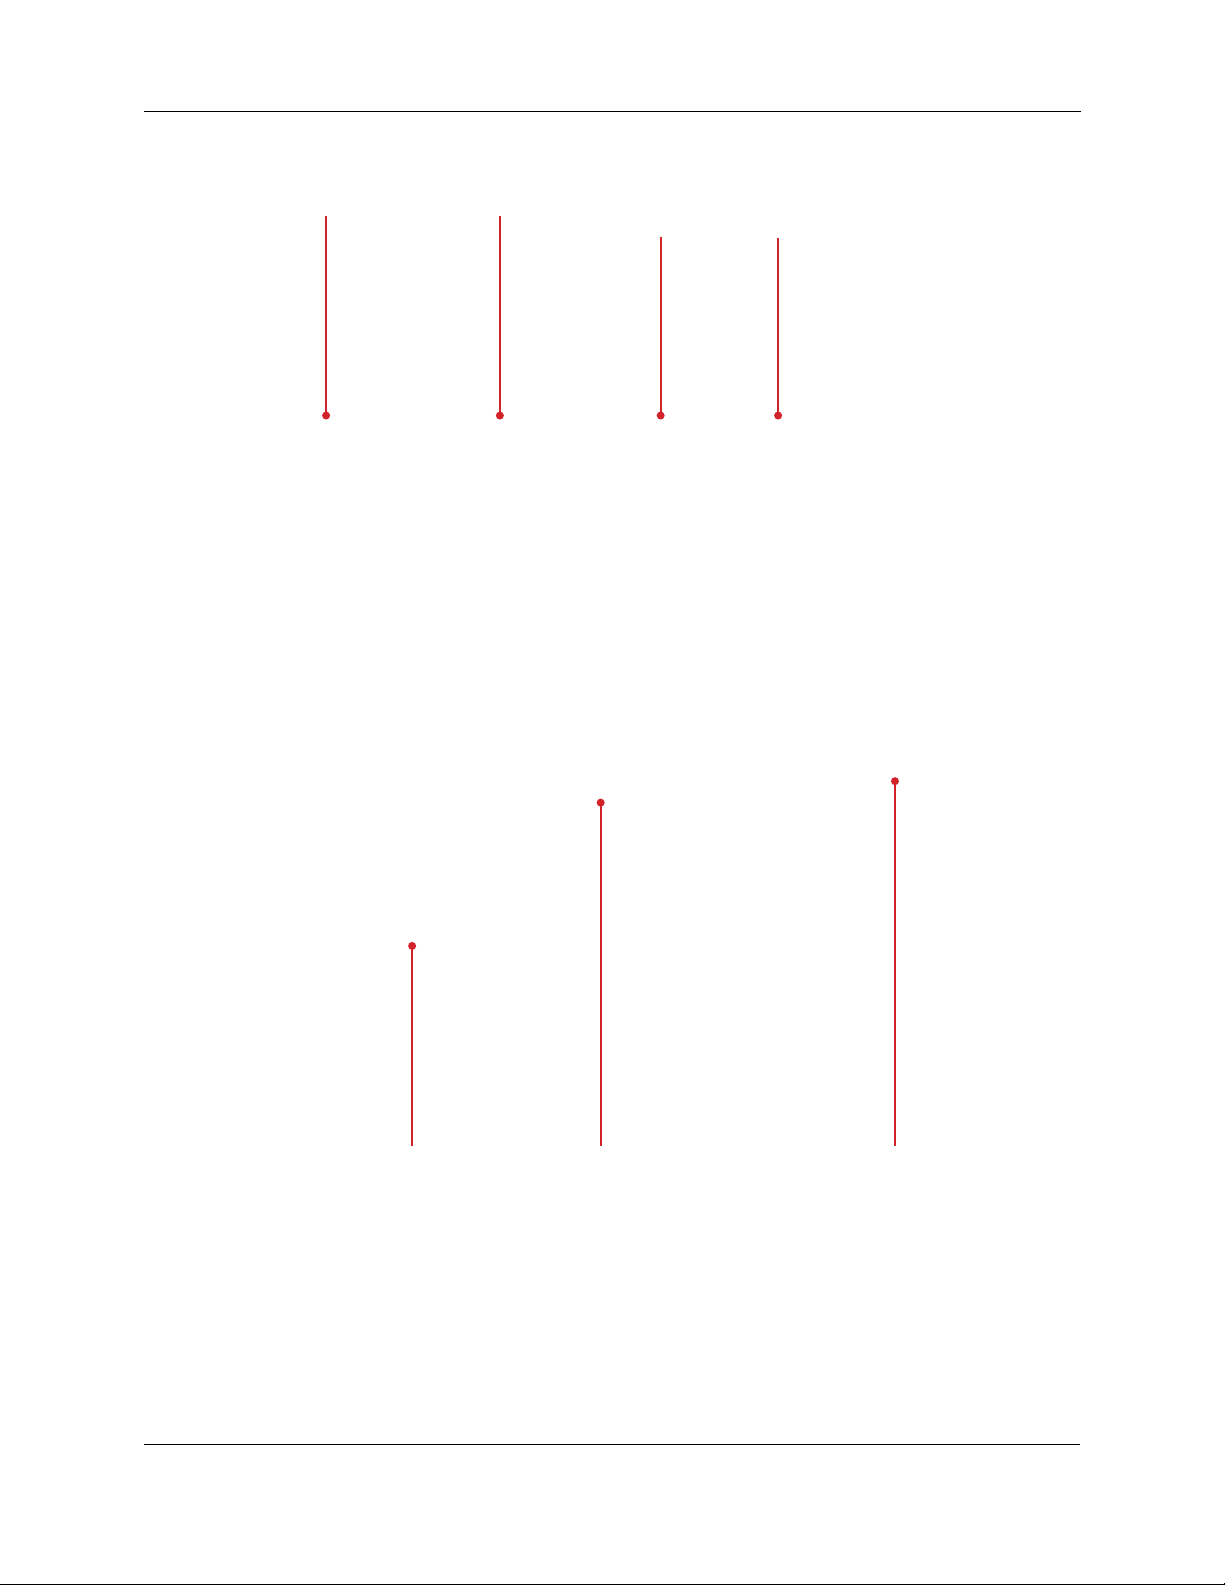
2.2 TO AND FROM PROCESS CONNECTIONS
A. Connect the unit’s To Process port to the Water In port on the process manifold.
B. Connect the unit’s From Process port to the Water Out port on the process manifold.
C. Please note: Process water piping circuitry should be designed to avoid an excessive
use of elbows and/or lengths of pipe or hose. If hose is the material of choice, avoid tight
twists or curls and excessive lengths.
D. Valves and lters may be installed in the process water piping circuitry to facilitate service
and maintenance, provided that such devices maintain the full inside diameter of the
process connection. If installed, all such devices must be open and clean during unit
operation.
Drain*
To Process
From Process
Water Supply**
*Connect Unit drain to plant’s
open drain or tower water
system return or chilled water
system return.
**Connect Unit water supply
to plant’s city water or well
water source or tower water
supply or chilled water supply.
*Drain
To Process
From Process
**Water Supply
Typical unit with 5 - 7½ horsepower pump
and/or 24 - 34 kW heater.
Typical unit with ¾ - 3 horsepower pump and/or
10 - 16 kW heater.

Temperature Control Units : Veteran with LXG-300 Series Instrument
Page: 15
TEMPTEK, INC.
525 East Stop 18 Road Greenwood, Indiana 46142
317-887-6352 Fax: 317-881-1277
Email: [email protected]
2.3 WATER SUPPLY CONNECTION
A. Connect the unit’s Water Supply port to the plant’s city water, well water, tower water or
chilled water supply.
B. The factory recommended minimum operating water supply pressure requirement is
60 PSI. The required water supply pressure retains process water in a liquid state at
temperatures over 180°F. Failure to maintain the required water supply pressure will
cause premature failure of and increase maintenance in susceptible areas such as the
shaft seal and heater.
C. Static water supply pressure can be determined at the unit’s
location by reading the unit’s 0-160 PSI pressure gauges
when the unit’s pump motor is OFF.
D. If water supply pressure as read on the unit’s pressure
gauges exceeds 75 PSI, a pressure reducing valve
must be installed in the water supply line (refer to section
7.3 of this manual for installation information). The factory
recommended ‘regulated pressure out’ is 60 PSI.
2.4 DRAIN CONNECTION:
A. Connect the unit’s DRAIN port to one of the following, determined by the water supply
source:
1. Open drain for well or city water supply.
2. Tower water system return for tower system water supply.
3. Chilled water system return for chilled water system supply.
B. The factory recommends a minimum of 10 psi pressure differential between the water
supply and drain line for proper cooling.
1. The amount of cooling provided by the unit depends on:
a. The cooling valve size
b. The pressure differential across the valve
c. The temperature difference between the unit set point and the cooling
water temperature
d. The cooling valve position
2. Consult factory when selecting the correct cooling valve for your application.
Typical pressure reducing valve
installation (shown on S-925 model).
WARNING: Check local codes to determine proper use of back flow prevention device in
water supply line.

Temperature Control Units : Veteran with LXG-300 Series Instrument
Page: 16
TEMPTEK, INC.
525 East Stop 18 Road Greenwood, Indiana 46142
317-887-6352 Fax: 317-881-1277
Email: [email protected]
3. In general the standard ½” cooling valve will provide approximately 24,0000
Btu/hr (7 kW) of cooling per every 10°F difference between the cooling water
temperature and the process set point based on 25 psi delta p across the cooling
valve with ½” supply & return connections. Connecting the unit with ¾” or 1”
cooling water supply and return connections will increase the cooling capacity of
the unit.
C. For most applications, the drain line should not be valved. However, for installations
with a pressurized drain system, it may be necessary to install a valve in the drain line.
In such cases, the installed valve must be fully opened after installation and the valve
handle removed to prevent operating the unit with a closed drain valve. The valve handle
can be reattached to the valve body when it is necessary to close the valve.
D. CAUTION: The unit must never be operated with a closed drain line valve. A closed
drain line valve prevents adequate system cooling and will lead to unit overheating.
Overheating of the unit may lead to unit damage and/or serious personal injury.
2.5 ELECTRICAL CONNECTION
A. Standard Models
1. Electrical power supply requirements for standard units are identied on the
equipment data tag. Verify that available voltage supply is the same as the unit’s
voltage requirements.
WARNING: DO NOT CONNECT THE UNIT TO A VOLTAGE SUPPLY SOURCE
NOT EQUAL TO THE UNIT’S VOLTAGE REQUIREMENTS AS SPECIFIED ON
THE UNIT’S DATA PLATE.
Use of incorrect voltage will void the unit’s warranty and cause a signicant
hazard that may result in serious personal injury and/or unit damage.
2. For standard units with 10 and 16 KW heaters and up to 3 horsepower pumps, a
four conductor cable, 10 foot in length, is provided for connection to an operator
supplied fused disconnect.
3. For units with 24 and 34 KW heaters, the operator must provide a four conductor
power cable and the fused disconnect.
4. The owner supplied fused disconnect must be sized and installed according to
the unit’s power supply requirements and local electrical codes.
B. Models With Factory Included Disconnect Switch and Other Custom Features
1. Some units may be customized and include a factory supplied power disconnect
WARNING: Never operation the Temperature Control Unit with a closed drain.

Temperature Control Units : Veteran with LXG-300 Series Instrument
Page: 17
TEMPTEK, INC.
525 East Stop 18 Road Greenwood, Indiana 46142
317-887-6352 Fax: 317-881-1277
Email: [email protected]
switch and/or higher specication electrical enclosure. Electrical power supply
requirements are identied on the equipment data tag. Verify that available
voltage supply is the same as the unit’s voltage requirements.
WARNING: DO NOT connect the unit to a voltage supply source not equal
to the unit’s voltage requirements as specied on the unit’s data plate. Use
of incorrect voltage will void the unit’s warranty and cause a signicant
hazard that may result in damage to the unit or serious personal injury.
2. Appropriate conduit and ttings should be selected which will maintain the
integrity of the cabinet.
3. Supply a power conductor sized according to the unit’s power supply
requirements. Connect the power conductor to the unit’s power supply entry
terminal block.
C. Control Circuit Wiring
1. The unit’s supplied control circuit is 110 volt, 1
phase, 60 cycle. The control circuit is supplied
by the factory installed transformer. A control
circuit fuse is provided.
D. General
1. Make certain all ground connections to the unit
are properly affixed. A proper connection to
earth ground is required. A conduit ground is
not a reliable conductor!
2. Make certain the power conductor, disconnecting means, and fusing are
properly sized according to the unit’s power supply requirements.
3. Make certain all electrical connections are tightly affixed. Any loose wiring
connections must be tighten before engaging the power supply.
4. Make certain no moisture or standing water is present inside the electrical
cabinet.
WARNING: Do not connect the unit to a voltage supply not equal to the unit’s voltage
requirements as specified on the unit’s data plate. Use of incorrect voltage will void the unit’s
warranty and cause a significant hazard that may result in serious personal injury and unit
damage.
WARNING: Electric Shock Hazard. High Voltage is present in the electrical cabinet.
Disconnect power before servicing. Follow all facility lock-out tag-out procedures.
Control circuit transformer fuse

Temperature Control Units : Veteran with LXG-300 Series Instrument
Page: 18
TEMPTEK, INC.
525 East Stop 18 Road Greenwood, Indiana 46142
317-887-6352 Fax: 317-881-1277
Email: [email protected]
WARNING: Check that all electrical connections are tight before starting.
Disconnect power before servicing. Follow all facility lock-out tag-out procedures.
Typical electrical panel. Shown with
thermoformed panel removed.
Temperature Control Units : Veteran with LXG-300 Series Instrument
Page: 19
TEMPTEK, INC.
525 East Stop 18 Road Greenwood, Indiana 46142
317-887-6352 Fax: 317-881-1277
Email: [email protected]
Power Entry
Low Water
Pressure Switch
Control Transformer Pump Motor
Controller
Terminal Strip Heater
Contactor
Transformer
Fuse Blocks
Typical Electrical Panel

Page: 20
THIS PAGE INTENTIONALLY BLANK
Table of contents
Other Temptek Temperature Controllers manuals


Popular Temperature Controllers manuals by other brands


ABB
ABB 6134-24-102-500 operating instructions

Elko
Elko iNels RFSTI-11/G Assembly instructions

Trane
Trane X1379088401 Installation, operation and maintenance

ABB
ABB Caldion FCR-F-2-4.2.21.1 Series product manual

EMKO
EMKO ESM-3770-D User information

Palazzetti
Palazzetti GLH110 Installation, user and maintenance manual