TentBox CLASSIC User manual

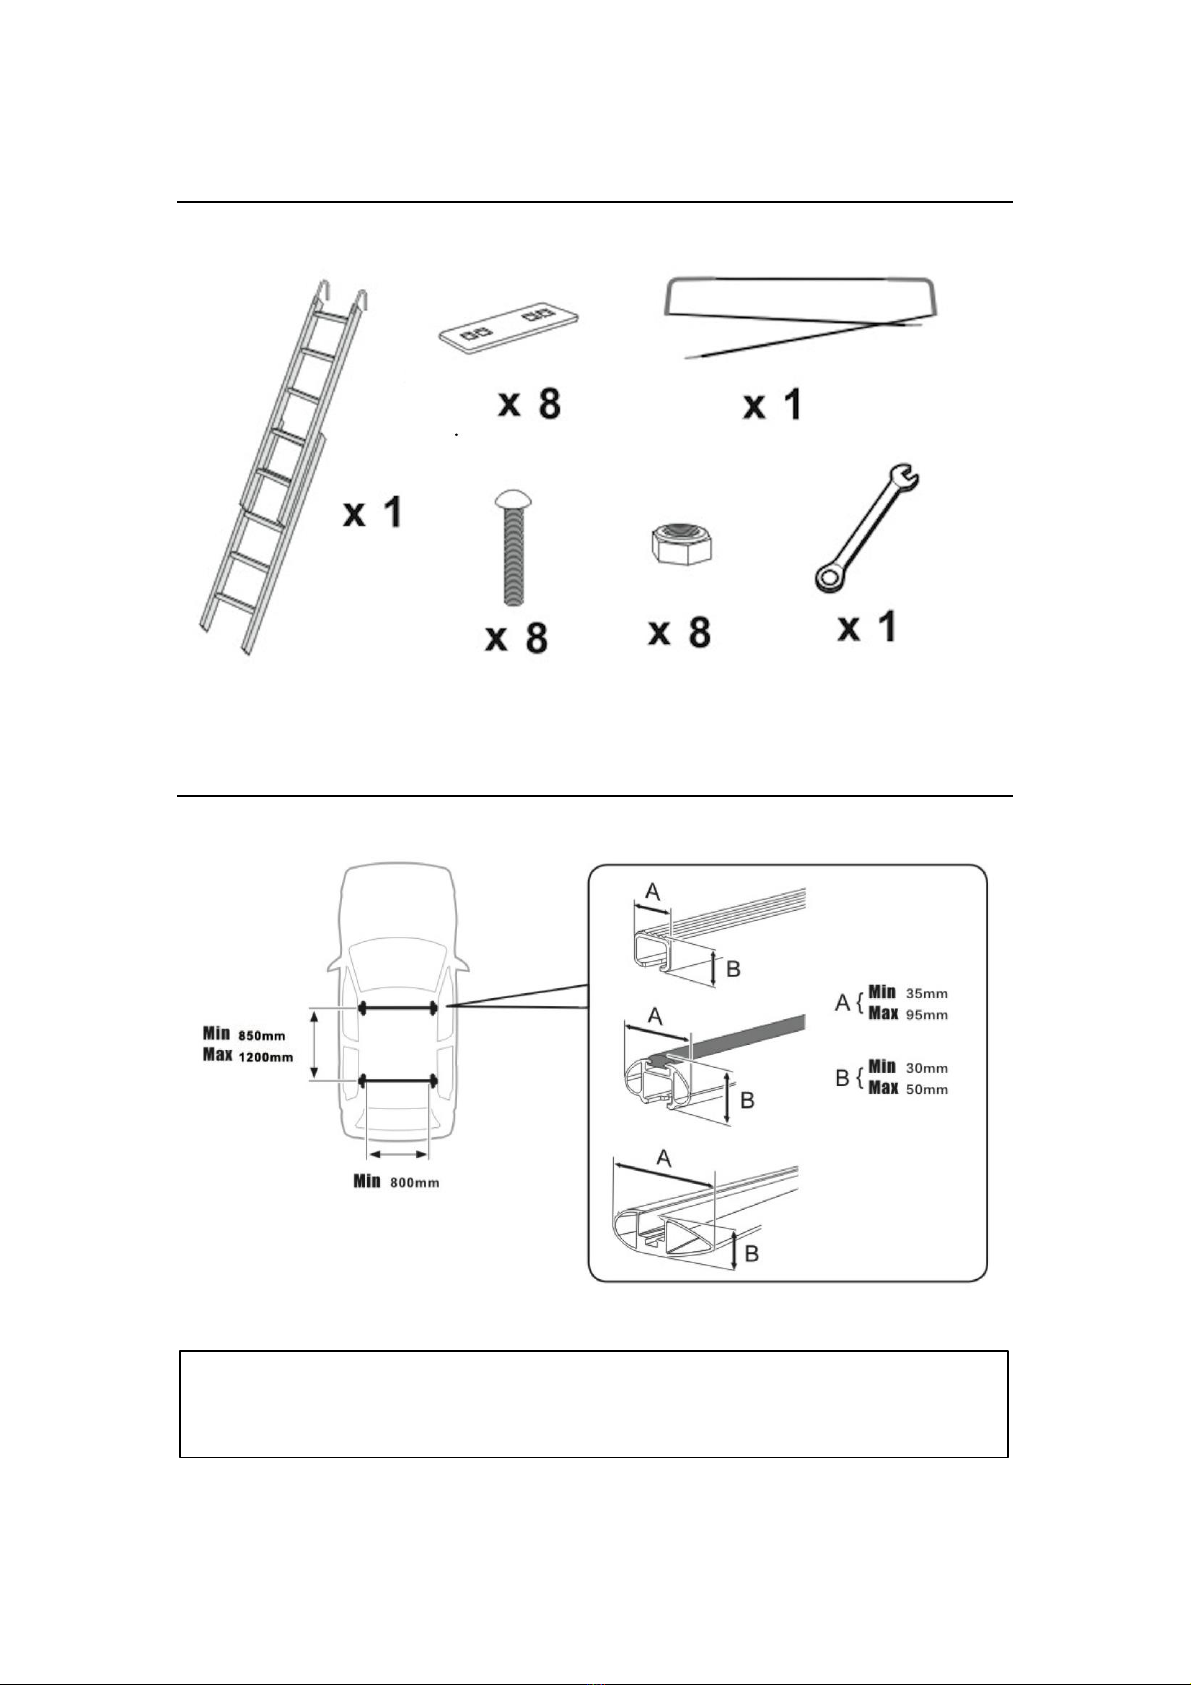
What’s in the box?
Roof Bar Requirements
You must consult your vehicle and roof bar manufacturers manual to
ensure that your TentBox is compatible with your vehicle set-up before
mounting or using it.
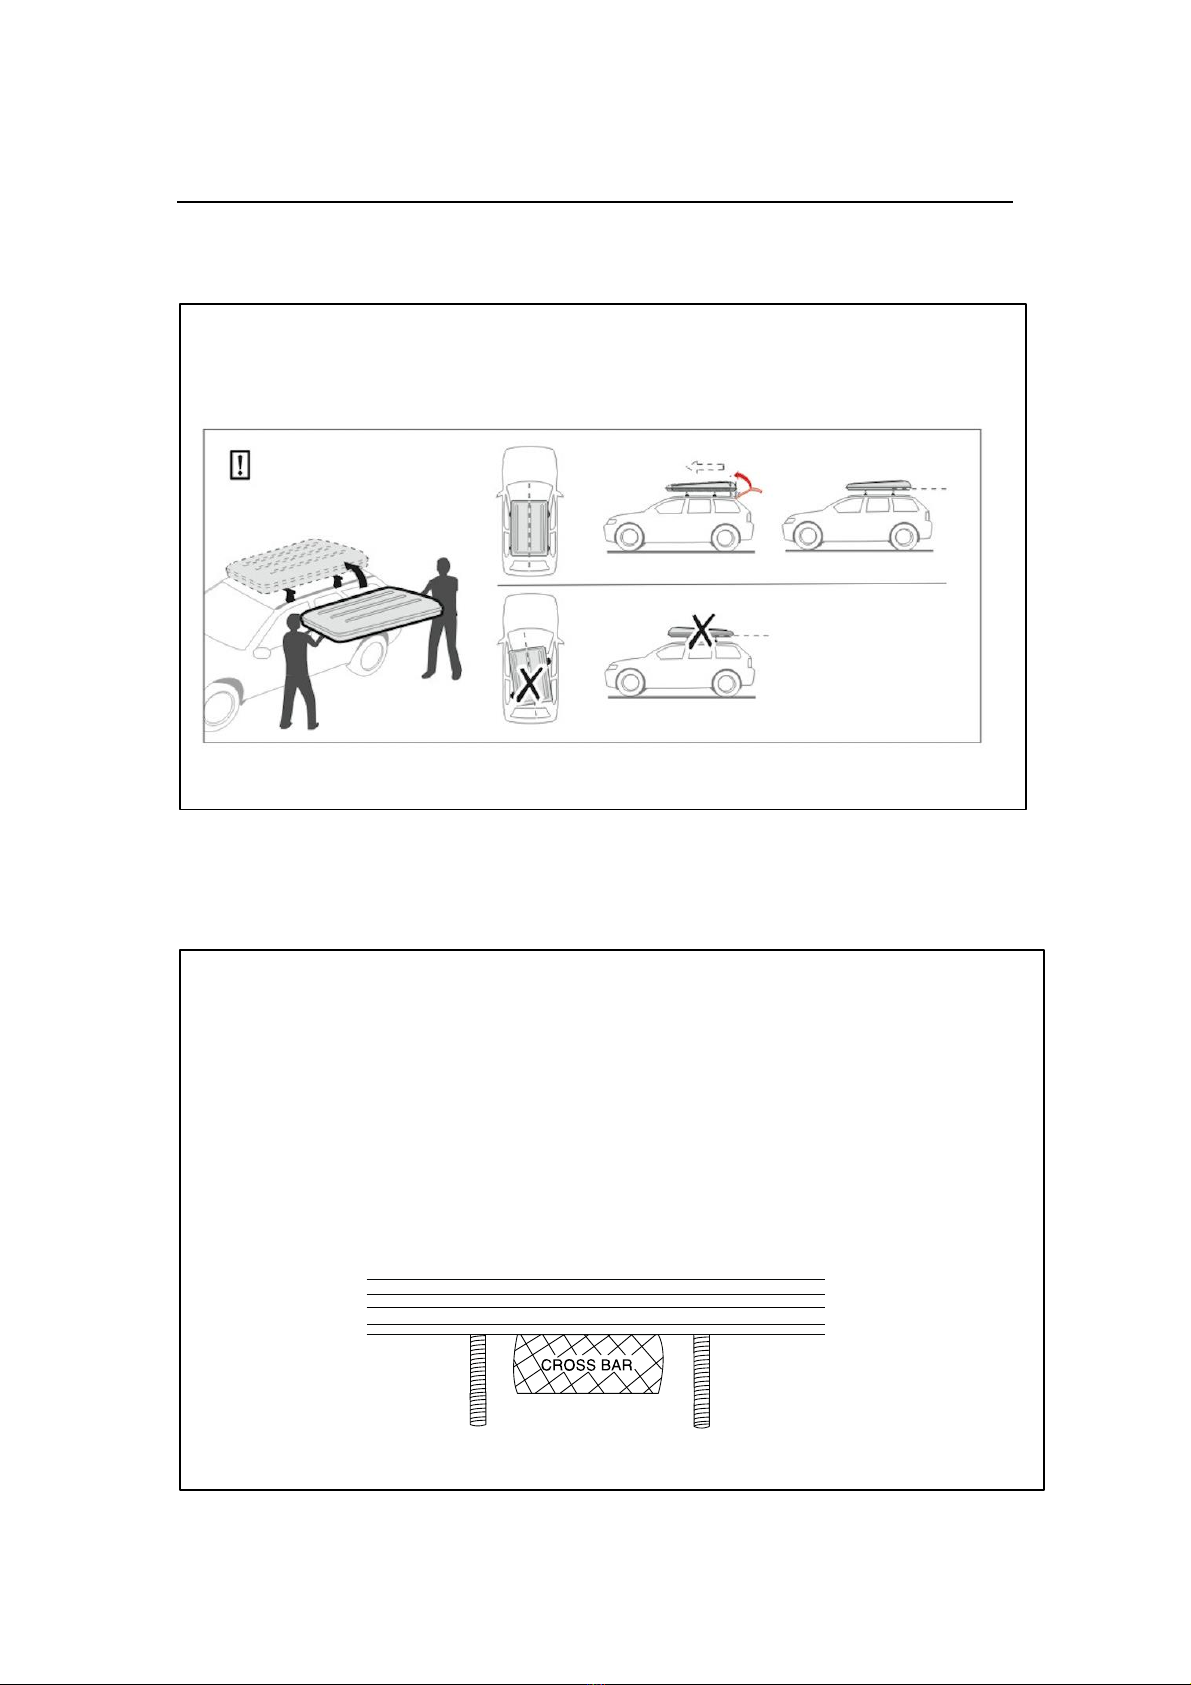
Mounting your TentBox
Requires two people
STEP 1: With the help of another person, lift your TentBox onto the top of
your Cross Bars so that it sits straight and well centred on top of your car.
STEP 2: Drop the 8 bolts into 4 of the fixing plates, making sure the square
under the bolt head fits snugly into the square hole. If your roof bars are
narrow enough, use the two inside holes. If they are wider, use the two outside
holes.
STEP 3: Slide two of these fixing plates onto one of rails underneath your
TentBox. You want to push them along so that you have a bolt hanging down
on either side of each cross bar, as shown below. You then repeat this
process on the other rail. You should now have 4 fixing points like the diagram
below.

Opening and closing your TentBox
STEP 4: Starting with one of the fixing points you have just created, push
another one of the fixing plates onto the hanging bolts - use the inner two
holes of the fixing plate if possible, or if your cross bars are too thick you
must use the outer two holes.
Now secure the fixing plate to the cross bar using the spanner and nuts
provided. Ensure that the flat side of the nut is facing towards the fixing
plate. Make sure you tighten the nuts on evenly on each side so that the
fixing plate is flat against the cross bar.
The nuts should be tightened evenly on each side until the fixing plate
starts to bend ever so slightly. At this point you must stop tightening.
Make sure that all 4 fixing plates have been correctly installed and that
your TentBox is secure on top of your cross bars.
OPENING: To open your TentBox simply unbuckle the straps on each of
the four corners.
Then, starting from the either the front or back of your TentBox, push the
upper shell gently upwards until it self-erects. Do the same on the opposite
side.
You are now set-up and ready to go!

Closing your TentBox
CLOSING: To close your TentBox, first make sure that the front and back
internal windows are at least half open. This allows air to escape for a
smoother and easier close.
Now, position yourself towards the front of your TentBox and pull evenly
downwards on the strap provided. Once the front side is down, use the ‘ski
boot-style’ straps to keep it in place. Now do the same on the rear side.
You will usually have to walk around and tuck the canvas material in before
you can fully close the TentBox.
Once you have the TentBox in a closed position, you can use the ‘webbing
and buckle’ strap to securely fasten your TentBox on each corner. It is
these straps that provide the most security, so make sure these are done
up tightly and properly. You can then go round and gently tighten the ‘ski
boot-style’ straps, do not over tighten the ‘ski boot-style’ straps, as it will
put too much strain on the rubber.

Using the ladder
Please turn over for important
safety and warranty information.
When extending the ladder, make sure that you have securely locked it in
place with the metal locking catches. Also, use the Velcro straps provided
to further secure the two ladder sections.
Then simply hook the ladder onto the edge of either doorway, check that it
is stable and that the locking mechanism is still correctly applied, and climb
in!

Safety Information
•We recommend that you DO NOT drive over 70mph (110kmh) whilst using
your TentBox and that you always adhere to speed limits.
•DO at the start of every journey and at regular intervals during every journey
check that your TentBox is firmly fixed to your roof bars and that all of the
locking straps are securely fastened. Only ever check your TentBox in a safe
and suitable location.
•DO NOT use your TentBox if there is any visible damage to any part of it or its
components, instead contact us to see how we can help. This is especially
applicable to the locking straps and buckles.
•Understand that secured loads and incorrectly mounted roof bars can come
lose during journeys and can cause serious accidents.
•Make sure that you give due consideration to the change in your vehicle
height and drive behaviour (side-wind sensitivity, corner and braking
behaviour).
•You must always consult your vehicle and roof bar manuals to ensure you are
following their advice, these must be always be carried in your vehicle along
with your TentBox safety and fitting instructions.
•Do not use bleach, alcohol or ammonia based cleaning liquids on your
TentBox otherwise the surface of your TentBox may get damaged
•Please note the following when using your TentBox: -
- The height of your vehicle can increase by up to 90cm (dependant on your
roof bars).
-Beware of low entrances, low hanging branches, etc.
-Wind noise may be generated when travelling with a TentBox
-When using an automatic car-wash facility your TentBox and must first be
removed.
-In addition to these usage instructions, due consideration should also be
given to mounting instructions for your roof bars and the operating instructions
of your vehicle.
-For reasons of fuel economy and the safety of other road users, your
TentBox and roof bars should be removed when not in use.
-For your safety, you should only use tested (e.g. GS-tested) roof bars that
are authorised for usage in conjunction with your vehicle.
-In order to avoid generating excessive lifting forces, your TentBox should be
mounted parallel to the line of the road and not at an angle
•When climbing in and out of your TentBox always use the ladder with due
caution and never allow children to use it alone. Make sure the ladder hooks
are in good condition, contact us if you need replacements.
•You must not allow any naked flames in or near your TentBox
Important Information
The manufacturer is not liable for any damage or accident that may occur as a result of non-
compliance with these usage instructions, modifications made to parts or the usage of any
parts other than the manufacturer’s original parts. The warnings, cautions and instructions in
this document can’t cover every possible situation, so it is understood by the operator that
common sense and caution must be applied. It is your responsibility to pass these
instructions on to any third party who uses this TentBox, including second hand sales.
Warranty
The manufacturer’s warranty covers manufacturing faults and lasts one year from the
point of purchase. It is only valid if the instructions and recommendations in this
document are adhered to and only applies to the first owner. Second hand sales are
not covered.
This manual suits for next models
1
Table of contents
Other TentBox Automobile Accessories manuals


