INSTALACIÓN: Lea todas las instrucciones antes de comenzar la instalación.
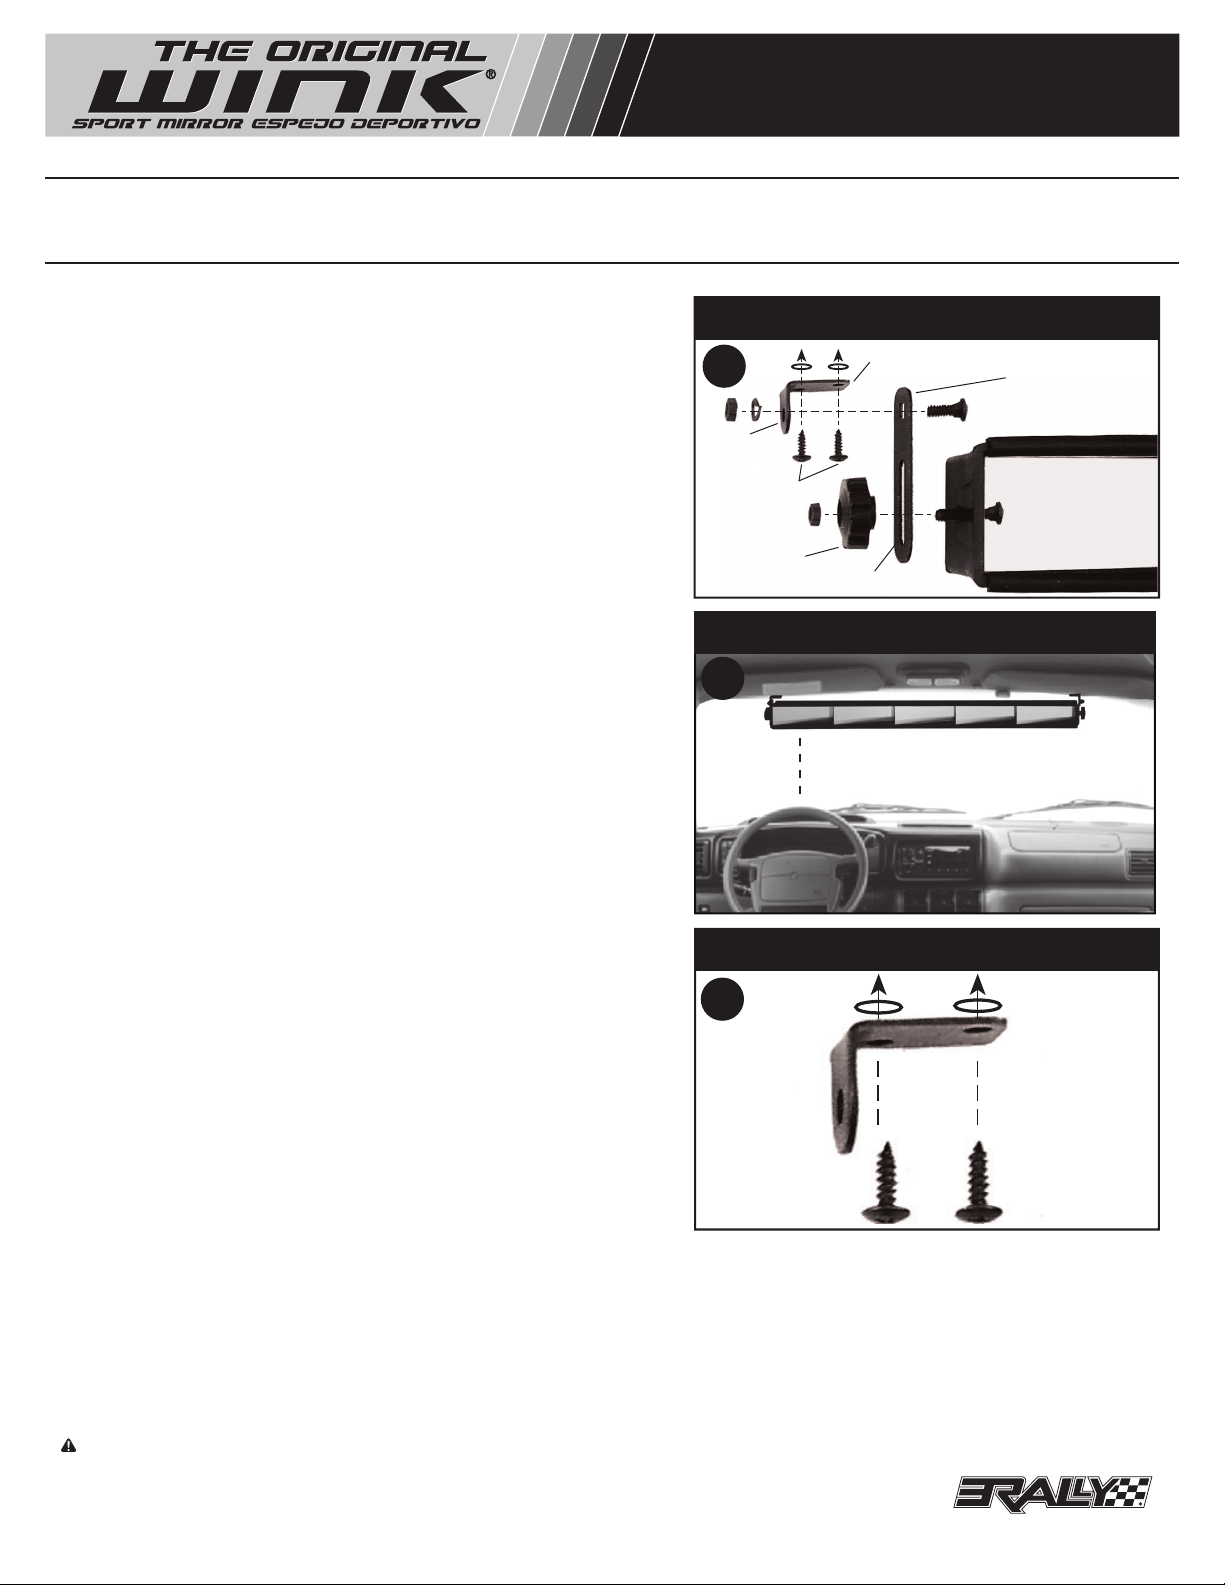
1. Ensamble las partes como se muestra en el Diagrama A.
2. Ajuste en forma manual todos los pernos y perillas hasta que queden firmes.
3. Con su dedo, toque la lámina metálica que está por debajo de la tela del techo
y justo por encima del parabrisas. Su Espejo Deportivo deberá sujetarse a esta
lámina metálica. Si su automóvil no tiene este cabezal, sujételo a la lámina
metálica que está alrededor del parabrisas, asegurándose de evitar el área del
parabrisas.
4. Coloque el espejo ensamblado en su posición como se muestra en el Diagrama B.
Generalmente, el borde derecho del primer espejo debe alinearse con el centro
de la columna de dirección. Dependiendo de su preferencia, usted puede mover
el espejo ligeramente hacia la derecha de centro de la columna de dirección.
5. Antes de marcar las ubicaciones del agujero de montaje para comenzar a taladrar,
asegúrese de evitar tocar el borde o la superficie del parabrisas. Si tocara el
parabrisas con la punta del taladro o el tornillo podría causar rajaduras en el
mismo. Sostenga el espejo en su posición con una mano y usando los soportes
como plantilla, marque las 4 posiciones del tornillo (2 en cada extremo) para
taladrar la lámina metálica bajo el tejido del techo. Taladre cuidadosamente (4)
agujeros de 1/8"( 0,3175 mm).
6. Quite los soportes del Espejo Deportivo ya ensamblado y ajústelos en su posición
con los tornillos de rosca chapa como se muestra en el Diagrama C. Asegúrese
que estos soportes estén firmemente ajustados para evitar que el espejo se
caiga. No los sobre ajuste para evitar romper las roscas.
7. Sujete el Espejo Deportivo a los soportes que están ahora en su lugar y ajústelos
en una posición conveniente. Ajuste todas las tuercas. No los sobreajuste para
evitar romper las roscas o las perillas.
8. Cuando ajuste el Espejo Deportivo para otros conductores, es esencial aflojar
ambas perillas de los extremos antes de ajustar el espejo, para evitar que usted
afloje o arranque los soportes de la lámina metálica.
C
PRIMERO, SUJETE EL SOPORTE A LA LÁMINA METÁLICA AL REDEDOR DEL
PARABRISA O EL TECHO! ASEGÚRESE DE DESPEJAR EL AJUSTE DEL PARASOL.
A LA LÁMINA
METÁLICA
SOPORTE
AGUJEROS
DE 1/8”
(0,3175 mm)
B
ALINEE EL BORDE DEL PRIMER ESPEJO
CON EL CENTRO DE LA COLUMNA DE DIRECCIÓN
AJUSTE EN FORMA MANUAL TODAS
LAS PIEZAS DE ENSAMBLAJE
AA LA LÁMINA METÁLICA
Tornillo Corto
Tornillo Largo
Abertura Larga
Insert Into End
Knob Opening
SOPORTE
SOPORTE VERTICAL
ESPEJO
PERILLA
TERMINAL
TORNILLOS DE
ROSCA CHAPA
SERVICIO AL CLIENTE: Lunes a viernes 8:30 am - 5:30 pm Tiempo del Este.
Para preguntas o comentarios, contáctenos en www.rallymfg.com o llame 1-800-965-4407
TWO YEAR LIMITED WARRANTY
© 2019 RALLY MANUFACTURING, INC.
Hecho en Taiwan R.O.C..
Rally Manufacturing, Inc. está dedicado a producir productos de alta calidad para todos los consumidores. La confianza que tenemos de la calidad de nuestros productos nos permite ofrecer una garantía de dos años a este
producto. Si usted encuentra algún defecto con el producto que usted compró, nosotros lo repararemos o reemplazaremos. Comprobante de compra (recibo) es necesario para validar garantía. Envíe el producto defectuoso a
Rally Manufacturing Inc., 7200 Corporate Center Drive, Suite 308, Miami, FL 33126. Attn: Customer Service. (Servicio al Cliente). Adicione una carta con su información de contacto que incluya su dirección de correo electrónico
(si posee alguno), nombre, dirección, número teléfonico y el problema que presenta el producto. No envíe ningún producto a Rally Manufacturing, Inc. sin haberse contactado previamente el departamento de Servicio al
Cliente.LAS REPARACIONES O SUSTITUCIONES DE LOS PRODUCTOS O PARTES DEFECTUOSAS NO APLICAN SI EL PRODUCTO (a) ES USADO PARA PROPÓSITOS COMERCIALES Y/O ES UTILIZADO INAPROPIADAMENTE EN UN
AMBIENTE INAPROPIADO; (b) ES MODIFICADO O FORZADO INTERNA O EXTERNAMENTE; (c) ESTÁ DAÑADO COMO RESULTADO DE USO ÉRRONEO, NEGLIGENCIA, FALTA DE MANTENIMIENTO RAZONABLE Y CUIDADO, O POR OTRAS
CAUSAS NO RELACIONADAS CON MATERIALES DEFECTUOSOS O MANUFACTURA; (d) SI EL PRODUCTO HA SIDO EXPUESTO AL AGUA, FUEGO O CORROSIÓN GENERAL. Esta garantía le da derechos legales específicos, y usted
puede tener otros derechos, que varían de Estado a Estado en los Estados Unidos o de provincia a provincia en Canadá.
ADVERTENCIA: Este producto puede exponerlo a sustancias químicas, incluido el plomo, que según el estado de California es causante de cáncer y defectos de nacimiento u otros daños reproductivos. Para obtener más
información, visite www.P65Warnings.ca.gov
Usted también puede montar el espejo directamente al parabrisas con el Equipo de Montaje para
el Parabrisas #93503. (Se requieren 2. Se venden por separado )
P# 91515


