TEQSAS Speakerchecker TQX User manual
Overview:
The battery-powered Speakerchecker TQX is used to check loudspeakers and their cabling. Audio
signals stored on an internal SD e ory card are alternately routed to one of the four speaker
outputs.
Sy etrical LineIn and LineOut connectors, as well as an internal onitor speaker, headphone jack
and cable test function ake the device an indispensable tour co panion.
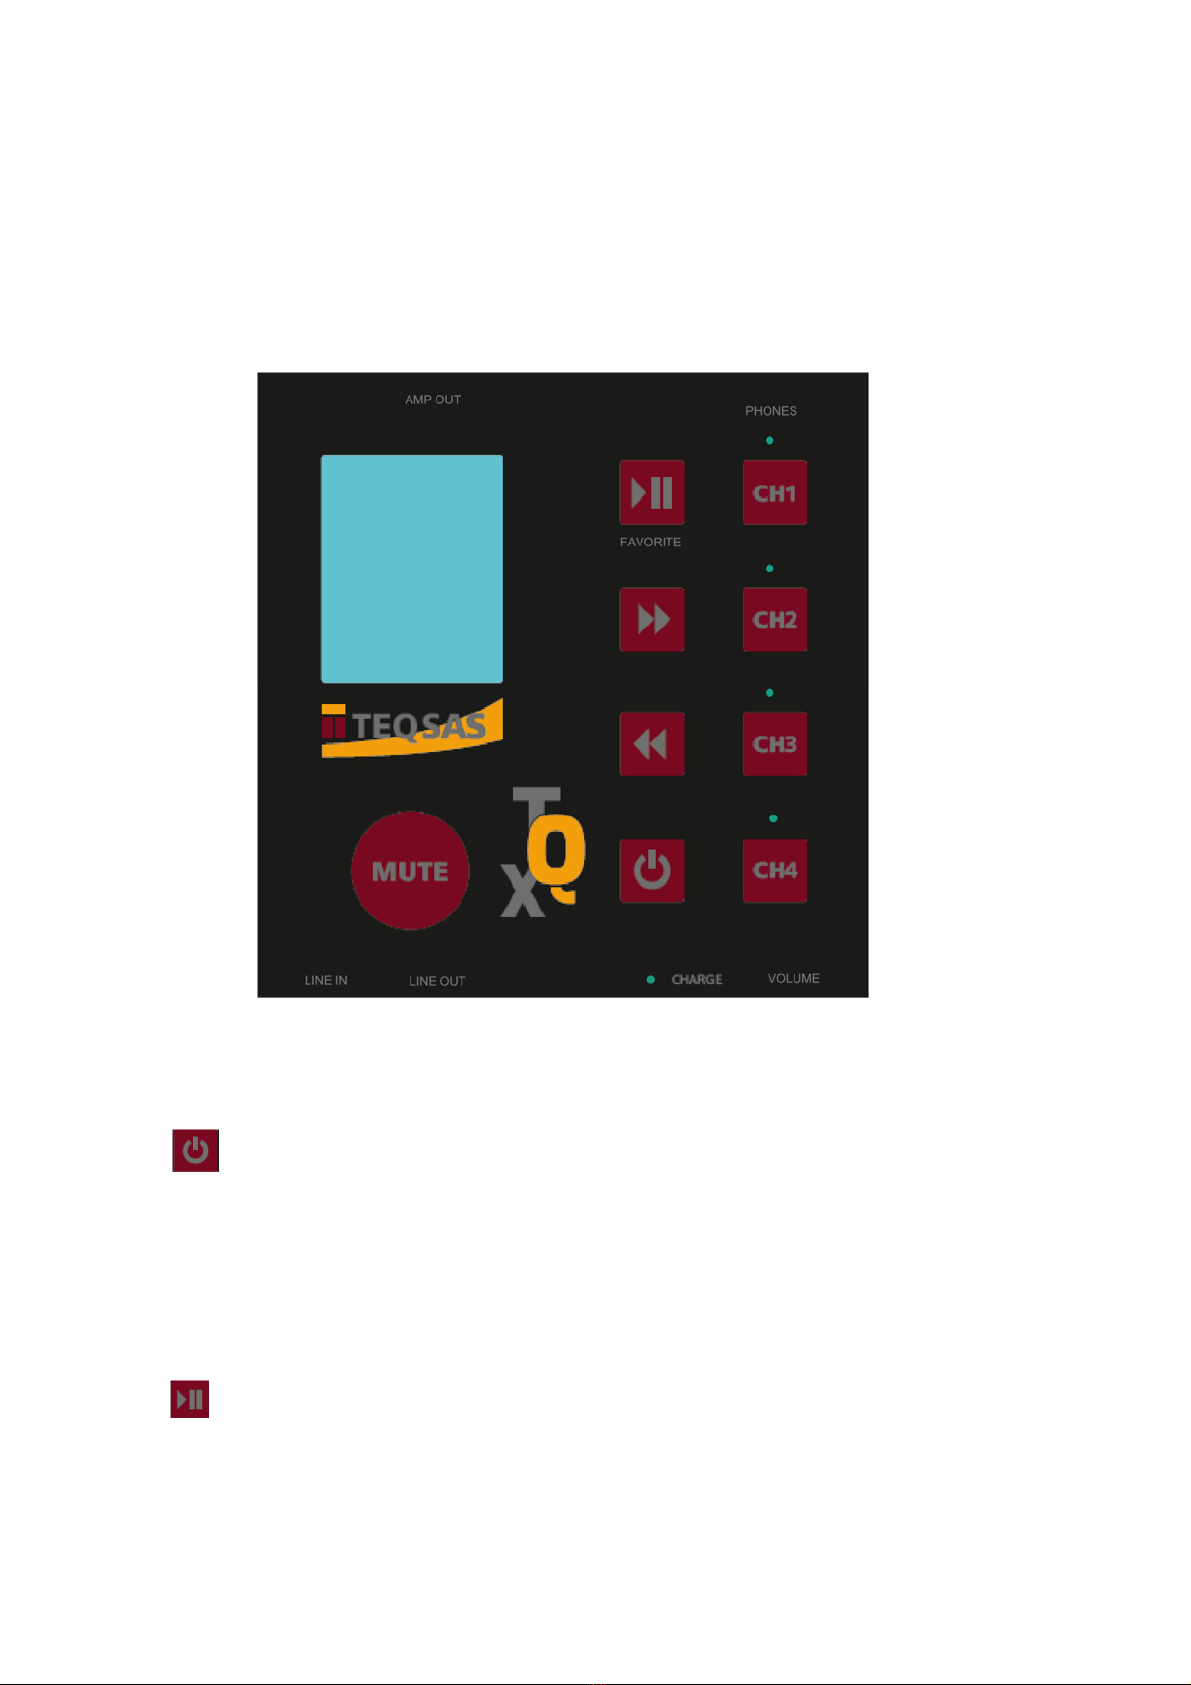
: Used to switch on/off the device.
Notice:
To prevent accidental switching on by a short touch, the "Power" button must be held
down for 3 seconds!
-: Starts the audio player or puts it into pause ode.
- If the TQX is in Pause ode, the XLR input is on the
- Headphone output / internal loudspeaker respectively the power a plifier outputs (CH1 -
CH4)
- are assigned to the The routing is shown at the botto of the display.
Notice:
A started track runs in an audio loop as long as no other action is selected. n
addition, it is not possible to call a new track in pause mode.
For DeepL access ("FAVORITE") to up to four selected audio files, press the ">II" key.
si ultaneously with one of the 4 channel keys ("CH1" - "CH4").
-: Calls the next track
-: Ju ps to the previous track
Notice:
The "<<" and ">>" buttons are only active in Play mode.
f both buttons are pressed together, the menu is displayed.
-: Activating output channel 1 (LK08/NL8 & NL4)
-: Activating output channel 3 (LK08/NL8)
-: Activating output channel 4 (LK08/NL8)
Notice:
Only one channel can be activated at a time. An active channel is indicated by a green
LED above the corresponding keys "CH1" - "CH4".
f none of the four outputs is selected, the internal loudspeaker/headphone output is
automatically switched on. n this way, the tracks can be previewed by the player and
signals from the external XLR input can be listened to.
-: All speaker outputs, the internal speaker, the headphone output as well as the XLR-
Out are uted. The TQX is auto atically switched to pause ode transferred.
Notice:
The "CH" active at the time of muting is indicated by flashing of the green LED above
the respective button.
Pressing the "Mute" button again cancels the uting of the outputs.
The signal is then sent directly to the loudspeaker output, without a
to have to press the "CH" key.
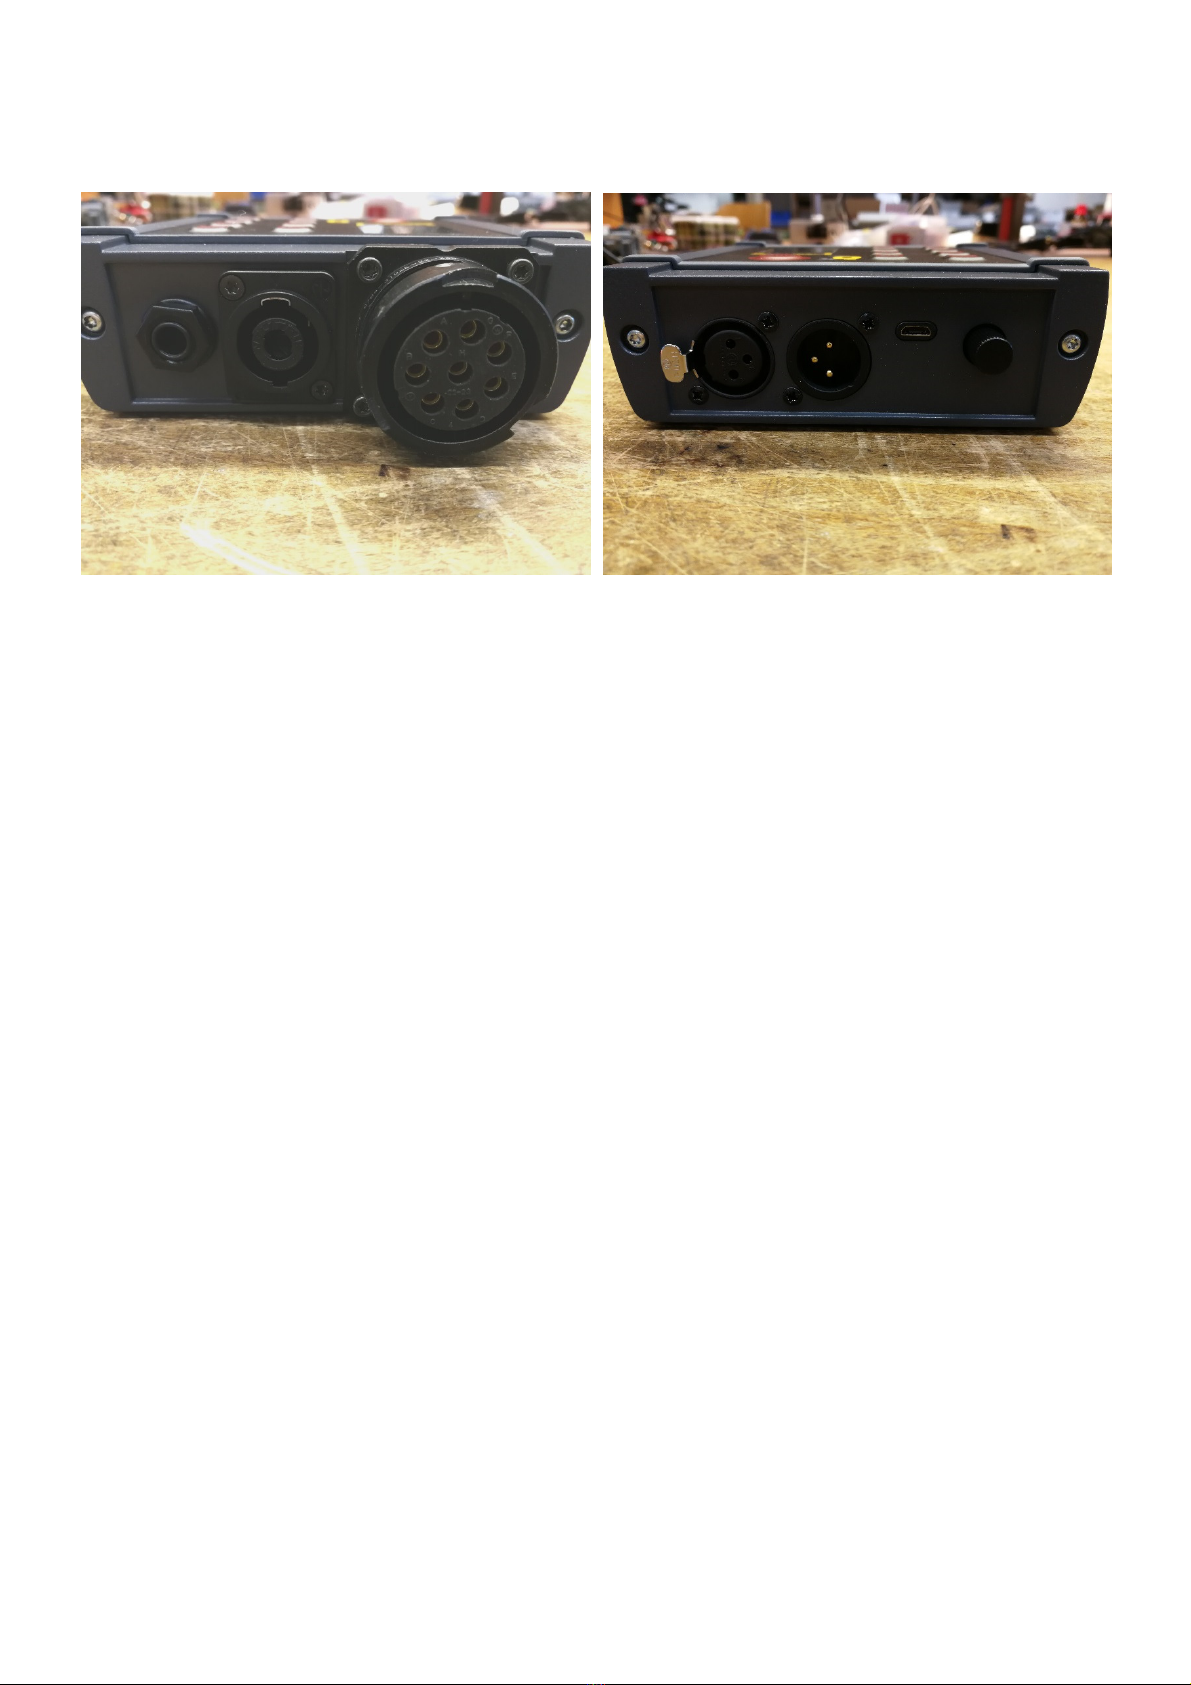
Ports:
Jack socket (top): For connecting headphones
Notice:
Plugging in the headphone plug switches off the internal speaker. The signals
are output evenly to the left and right headphone channels.
SpeakON (top): Loudspeaker output for direct connection of loudspeakers.
The signals stored on the device are output here. Speakers
can be directly connected here. Which of the two SpeakON channels
(1+/1- or 2+/2-) can be selected via the keys "CH1" and "CH2" turn.
LK08/ NL8 (top): Loudspeaker output for direct connection of loudspeakers.
The signals stored on the device are output here.
Speakers can be connected directly here. Which of the four channels
of the LK08/NL8 can be selected via the keys "CH1" to "CH4".
will be.
Notice:
f "CH1" is active, both the SpeakON 1+/1- and the LK8 /NL8 (A+B) are supplied with a
signal.
f "CH2" is active, both the SpeakON 2+/2- and the LK8 /NL8 (C+D) are supplied with a
signal.
XLR input (bottom): Sy etrical line signals can be fed in here.
Notice:
The signal is galvanically isolated via an internal transformer.
If the internal playback is paused by pressing the ">II" key, the input of the built-in a plifier
auto atically switches to the XLR input.

XLR output (bottom): For output of balanced line signals
Notice:
The XLR output is transformer-balanced. A signal fed to the XLR input is output to
the XLR output when the unit is switched off. Thanks to the galvanic isolation, the
device offers the characteristics of a D box with the additional option of level
adjustment via the volume control.
US socket (bottom): This can be used to charge the battery of the device with the included charger.
The internal e ory card can also be accessed.
Notice:
To access the internal SD memory card, the unit must be turned on. As soon as the
USB cable is connected to a computer, you can choose between "Storage Mode"
or "Power Mode" in the display.
To access the memory, select "Storage Mode".
To charge the TQX during operation using the supplied power supply, select
"Power Mode". The device can continue to be used as normal.
The charging process via a computer interface can only take place when the unit is
switched off. We recommend a USB 3.0 interface.
Volume control (bottom): The volu e control can be used to adjust the signal strength at the
Speaker outputs, on headphone output/internal speaker
and at the XLR output.
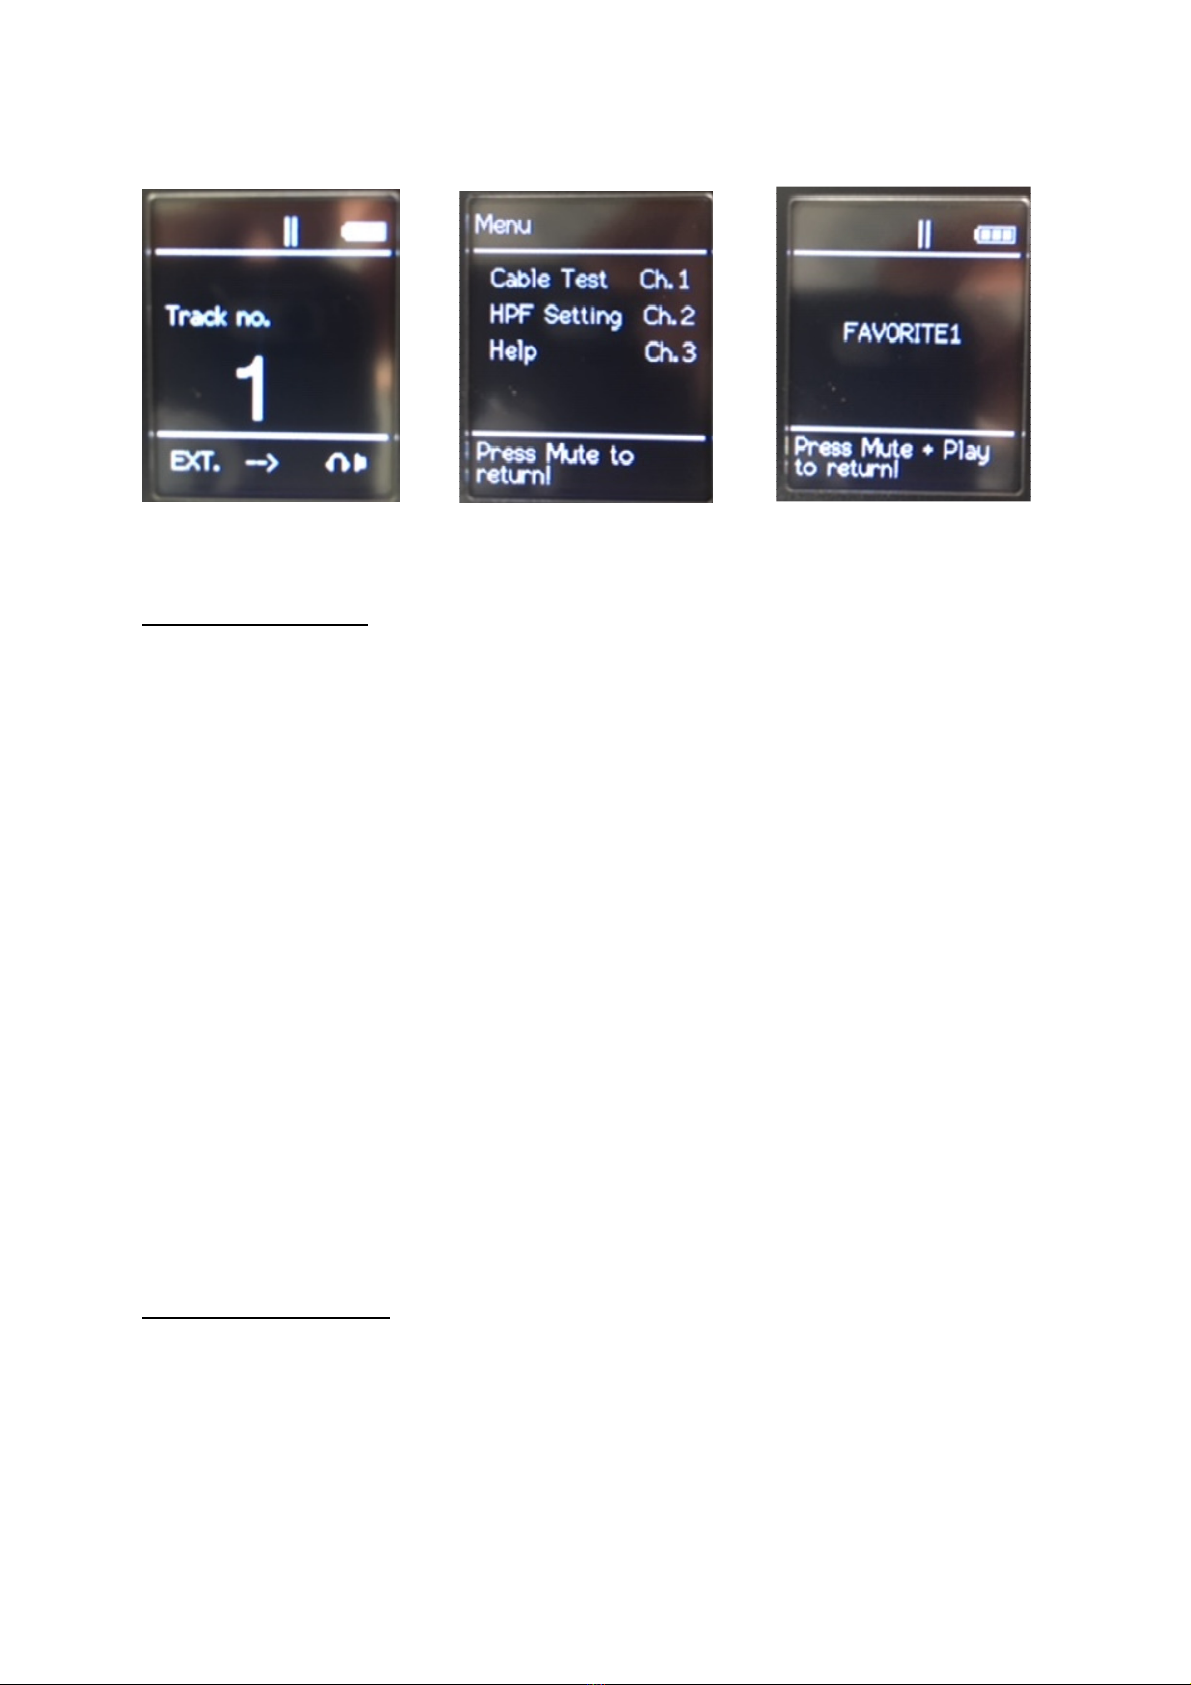
Different modes:
fig. 1 fig. 2 fig.. 3
Playback mode (fig. 1):
The displayed title (fro the internal e ory) is played back in a continuous loop and
output via the selected speaker output as well as the XLR output. The signal level can be
adjusted with the volu e control.
Loudspeakers can be tested for their function with a pink noise, for exa ple.
With passive loudspeakers, the internal loudspeaker crossover splits the signal so that the
functionality of the woofer (TT) and the tweeter (HT) can be checked si ultaneously. In
active syste s, TT and HT are controlled separately via the "CH1" to "CH4" keys one after the
other.
Notice:
n a separate menu, a high pass filter can be switched per speaker output to protect
connected tweeters.
The XLR output is a galvanically isolated balanced line output that can be adjusted via the volu e
control.
It can be used to test signal sinks and their connecting leads. To do this, connect the XLR output to
the supply line to an a plifier. If the signal can be heard via the loudspeaker connected to the
a plifier, the supply line and a plifier are functional.
Application example: Before a flown line array can be lifted up, all the
Supply lines and drivers already checked for functionality during asse bly /
and the police will intercept it.
Call up the menu (Fig. 2):
Press the ">>" and "<<" keys si ultaneously to enter the enu. This allows you to access the cable
test function, the high pass filter (HPF) and the help function.

Favorite mode (Fig. 3):
The Favorites ode allows up to four favorites to be called up quickly and selectively.
By holding down the ">II" key and then pressing the "CH1" keys for
"Favorit 1" to "CH4" for "Favorit 4" the device plays the selected track in a continuous loop.
Use the ">>" and "<<" buttons to switch between the four favourite tracks.
Cable test function:
Call up the enu (Fig. 2).
Connect one end of the cable to be tested to the appropriate speaker output.
on your TQX (CA-COM/NL8, NL4). Connect the other end to the appropriate easuring adapter.
Now the easure ent can be started by pressing the "CH1" key. The instru ent runs through
auto atically tests all connected channels. In the display, these are displayed by eans of
of a atrix. During this process the keys "CH1" to "CH4" light up.
one after the other.
As soon as all four channel keys light up continuously, the easure ent is finished. Now the
Test result based on corresponding arkings in the atrix (GREEN = intact / RED = defective)
can be read.
Notice:
Perform the cable measurement only with the enclosed measuring adapter. f a loudspeaker is
connected to the outputs during cable measurement, the cable will be detected as faulty and
the loudspeaker could be damaged.
f the device is set to cable test mode by simultaneously pressing the ">>" & "<<" keys, an XLR
cable can also be checked "acoustically" for its function (a signal output at the XLR output is fed
back into the XLR input via the cable to be tested and can be listened to via the internal
loudspeaker or the headphone output).
Press the "Mute" button to exit the cable easure ent function.

High pass filter (HPF):
Call up the enu (Fig. 2).
Press the "CH2" button and select the HPF for each channel using the "CH1" to "CH4" buttons.
In the HPF settings you can switch one high pass filter per output channel. This is useful if you want
to actively connect separate speakers to your TQX while protecting the tweeter.
Help function:
Call up the enu (Fig. 2).
The help function can be called up by pressing the "CH3" key.

Access to memory and formatting:
if the device is connected to a co puter
(and "Storage Mode" is enabled), can access the
internal e ory (2GB). Here
. p3 and .wav files can be stored.
Auf de Speicher befinden sich die beiden Ordner
„MP3“ und „01“. Hier dürfen auch keine weiteren
Ordner und Unterordner hinzugefügt werden.
The folder "01" is intended for your 4 favourite titles (favourite ode).
By default, a pink noise is stored here. This can be replaced by other titles.
Please note that the default for at "001 - Title na e" ust be retained.
Der Ordner „MP3“ enthält die Daten für den regulären Abspiel-Modus.
This folder contains by default a Pink Noise, a Sine Sweep, a Sine 1k and a signal for STI
easure ent. Here, too, you can use the specified for atting to
("0001 - Title na e") Replace any title.
Notice:
Although the folder has the name "MP3", lossless WAV files can also be saved here.
Files are stored
Table of contents


