Tera Gear TER 25K BTU PRO User manual

- 1 -
Model Number GPC2700JD-6(1401 3001)
TER 25K BTU PRO 2-Burner Grill
SAVE THESE INSTRUCTIONS FOR FUTURE USE.
IF YOU ARE ASSEMBLING THIS UNIT FOR SOMEONE ELSE,
GIVE THIS MANUAL TO HIM OR HER FOR FUTURE USE.
FOR CUSTOMER SERVICE:
CALL 1-877-630-5396 (TOLL-FREE)
10:00 A.M. – 7:00 P.M. (EST),
MONDAY-FRIDAY
- 2 -
GrillOperation1‐2‐3
BeforeGrilling
Step1 Keepyourgrillasafedistanceawayfromyourproperty.*
Step2 AlwaysperformaLeakTestonallconnectionsandhoses.*
Step3 Keepchildrenawayfromthegrill.
DuringGrilling
(Toavoidtrippingsafetyvalves,pleasefollowtheseinstructionscarefully!)
Step1 Firstopenlidandturngastankonslowly.
Step2 Turnonlyoneknobonatatimewhenlightingupthegrill.
Step3 Useprotectivegloveswhengrillgetshot.
Step4Neverleavealitgrillunattended.
AfterGrilling
Step1 Alwaysburngrillfor10‐15minutestoburnofffoodresiduesafteruse.
Step2 Waituntilthegrilliscompletelycooledbeforeclosinglid.
Step3 Cleanupgreasebuild‐uptoavoidgreasefireandcoveryourgrilltopreventrust.
*Pleaserefertothisowner’smanualfordetails.
AlwaysreadandunderstandtheWARNINGSandINSTRUCTIONSthatarecontainedinthismanualbeforeattemptingtousethis
gasbarbecuegrilltopreventpossiblebodilyinjuryorpropertydamage.
NOTE:Thisgrillmustbeusedwithpropanegasonly(propanegascylindernotincluded).
Installer:Leavethismanualwiththeconsumer.
Consumer:Retainthismanualforfuturereference.
DANGER
IF YOU SMELL GAS
1. TURN OFF gas at grill and cylinder
2. Extinguish any open flame
3. Open the lid
4. If odor continues, keep away from the
appliance immediately. Call your gas
supplier or dial 911.
WARNING
1. DO NOT use or store gasoline or other
flammable liquids or vapours in the
vicinity of this appliance
2. DO NOT store any other spare liquid
propane(LP) cylinder in the vicinity of
this appliance

- 3 -
TableofContents
ForYourSafety.........................................................................................................................4
IllustratedPartsList.................................................................................................................6
HardwareList...........................................................................................................................7
AssemblyInstructions…..……………….........................................................................................8
OperatingYourGrill................................................................................................................11
Connecting&DisconnectingGasCylinder.............................................................................11
CheckingforLeaks..................................................................................................................12
LightingYourGrill...................................................................................................................12
Excessflowsafetyvalveresetprocedure...............................................................................14
CareandMaintenance...........................................................................................................15
Troubleshooting.....................................................................................................................16
WarrantyProgram..................................................................................................................18

- 4 -
ForYourSafety
IMPORTANTNOTICE:READALLINSTRUCTIONSPRIORTOASSEMBLYANDUSE
SafetyFirst!
Readandunderstandallwarningsandprecautionspriortooperatingyourgrill.
WARNING
1. Thisgrillisforoutsideuseonly.Itshouldnotbeusedinabuilding,garageoranyotherenclosedarea.
2. Theuseofalcohol,prescriptionornon‐prescriptiondrugsmayimpairanindividual’sabilitytoproperlyassembleorsafely
operatethisappliance.
3. Alwaysopenthegrilllidcarefullyandslowlyasheatandsteamtrappedwithinthegrillcouldcausesevereburns.
4. Alwaysplaceyourgrillonahardandlevelsurfacefarawayfromcombustiblematerialsandstructures.Anasphaltor
blacktopsurfacemaynotbeacceptableforthispurpose.
5. Donotleavealitgrillunattended.
6. Keepchildrenandpetsawayfromthegrillatalltimes.
7. Thisisnotatabletopgrill.Donotplacethisgrillonanytypeoftabletopsurface.
8. Donotusethegrillinhighwinds.
9. Thisgrillmustbeusedwithpropanegasonly(propanegascylindernotincluded).
10. Donotattempttoattachthisgrilltotheself‐containedpropanesystemofacamper,trailer,motorhomeorhouse.
11. Donotusecharcoalorlighterfluid.
12. Donotusegasoline,keroseneoralcoholforlighting.Theliquidpropane(LP)gassupplycylindermustbeconstructedand
markedinaccordancewiththespecificationsforLPgascylindersoftheNationalStandardoftheTransportationof
DangerousGoodsCommissionofCanadaforCylinders,SpheresandTubes(CAN/CSA‐B139).
13. Thisoutdoorgasapplianceisnotintendedtobeinstalledinoronrecreationvehiclesand/orboats.
14. Donotattempttomovethegrillwhileitislit.
15. DonotusethegrillunlessitisCOMPLETELYassembledandallpartsaresecurelyfastenedandtightened.
16. Keepcombustibleitemsandsurfacesatleast6feetawayfromthegrillatalltimes.DONOTusethisgasgrilloranygas
productunderanyoverheadenclosureornearanyunprotectedcombustibleconstructions.
17. Donotuseinanexplosiveatmosphere.Keepgrillareaclearandfreefromcombustiblematerials,gasolineandother
flammablevapoursandliquids.
18. Donotattempttouseorassemblewithmissingordamagedparts.Contactcustomerserviceforreplacementparts.
CAUTION‐PreventionofBurns
1. Toavoidburns,donottouchmetalpartsofthegrilluntiltheyhavecompletelycooledforatleast45minutesorunlessyou
arewearingprotectivegearsuchaspotholders,protectiveglovesormittens.
2. Donotalterthegrillinanymanner.
3. Cleanandinspectthehosebeforeeachuse.Ifthereisevidenceofabrasion,wear,cutsorleaks,thehosemustbe
replacedpriortooperation.Thereplacementhoseassemblyshouldbeinaccordancewiththemanufacturer’s
specifications.
4. Movegashosesasfarawayaspossiblefromhotsurfacesanddrippinghotgrease.
5. Neverkeepafilledgascontainerinahotcarorcartrunk.Heatwillcausethegaspressuretoincrease,whichcouldopen
thereliefvalveandallowgastoescape.
SafeLocationsforUseofThisOutdoorGrill
CAUTION
Neverusethisoutdoorgrillinsideanybuilding,garage,shedorbreezeway,orinsideanyboat,trailerorrecreationalvehicleto
preventapossiblefireandtopreventthepossibilityofcarbonmonoxidepoisoningorasphyxiation.
WARNING
Donotusethisapplianceunderoverheadcombustiblesurfaceorcoveredarea(e.g.,awnings,umbrellas,porchesorgazeboes).

- 5 -
Alwaysconfirmthatthisgrillisnotpositionedundertheoverhangofahouse,agarageorotherstructurebeforelightingit.An
overhangwillservetodeflectflare‐upsandradiatedheatintothestructureitself,whichcouldresultinafire.
Alwaysconfirmthatthisgrillispositionedmorethan50inches(1.27M)awayfromanybuildingorcombustible
materialsorsurfacebeforelightingit,andthatnogasolineorothervolatilesubstancesarestoredinthevicinity
ofthisgrill.(Seediagramtoright).Thetemperatureofagreasefireoroftheradiatedheatmightotherwise
besufficienttoignitenearbycombustibleorvolatilesubstances.Alwayslocatethisgrillwhere
therewillbeamplecombustionandventilationair,butneverpositionitinthedirectpathofastrongwind.
Neverallowthegrilltooperatewhileunattendedtopreventuncontrolledgreasefiresfromerupting.
Neverattempttomovethisgrillwhileitisinoperationorwhileitisstillhottopreventpossiblepersonalinjury.
Neverstoreorusegasolineorotherflammableorvolatilesubstancesinthevicinityofthisgrillorinthevicinityofanyother
heat‐generatingappliancebecauseofthedangerofstartingafire.
Alwaysconfirmthattheinstallationofthisgrillconformstotherequirementsofalllocalcodesor,intheabsenceofapplicable
localcodes,withthetheCanadianStandardsAssociation'sNaturalGasandPropaneInstallationCodeCAN/CGA‐B149.1.
DANGER–GasSafety
Liquidpropane(LP)gasisflammableandhazardousifhandledimproperly.Becomeawareofitscharacteristicsbeforeusingany
propaneproduct.
● PropaneCharacteristics:Flammable,explosiveunderpressure,heavierthanairandsettlesinpoolsinlowareas.
● Initsnaturalstate,propanehasnoodor.Foryoursafety,anodoranthasbeenadded.
● Contactwithpropanecouldcausefreezeburnstotheskin.
● Thisgrillisshippedfromthefactoryforpropanegasuseonly.
● Neveruseapropanecylinderwithadamagedbody,valve,collarorfooting.
● Dentedorrustedpropanecylindersmaybehazardousandshouldbecheckedbyyourpropanegassupplier.
CAUTION
● Itisessentialtokeepthegrill’svalvecompartment,burnersandcirculatingairpassagesclean.
● Inspectthegrillbeforeeachuse.
Step1.Inspectallhosesandconnectionsandmakecertaintheyaresecure.
Step2.Checkandcleantheburnerventuritubesforinsectsandinsectnests
byremovingtheburnerandinsertingabottlebrushcleanerintoeach
tubetomakesurethepassageisclear.
***Acloggedtubecanleadtoafirebeneaththegrill.***
Step3.Ensurethatthevalvenozzleispointingstraightandcompletelyinsertedintotheventuritube.
GENERALINFORMATION
1. Apropanegascylinderisrequiredforoperation.
2. ThisgasgrillisNOTintendedforcommercialuse.
3. Don'tobstructtheventilationopeningofthecylinderenclosure.
- 6 -
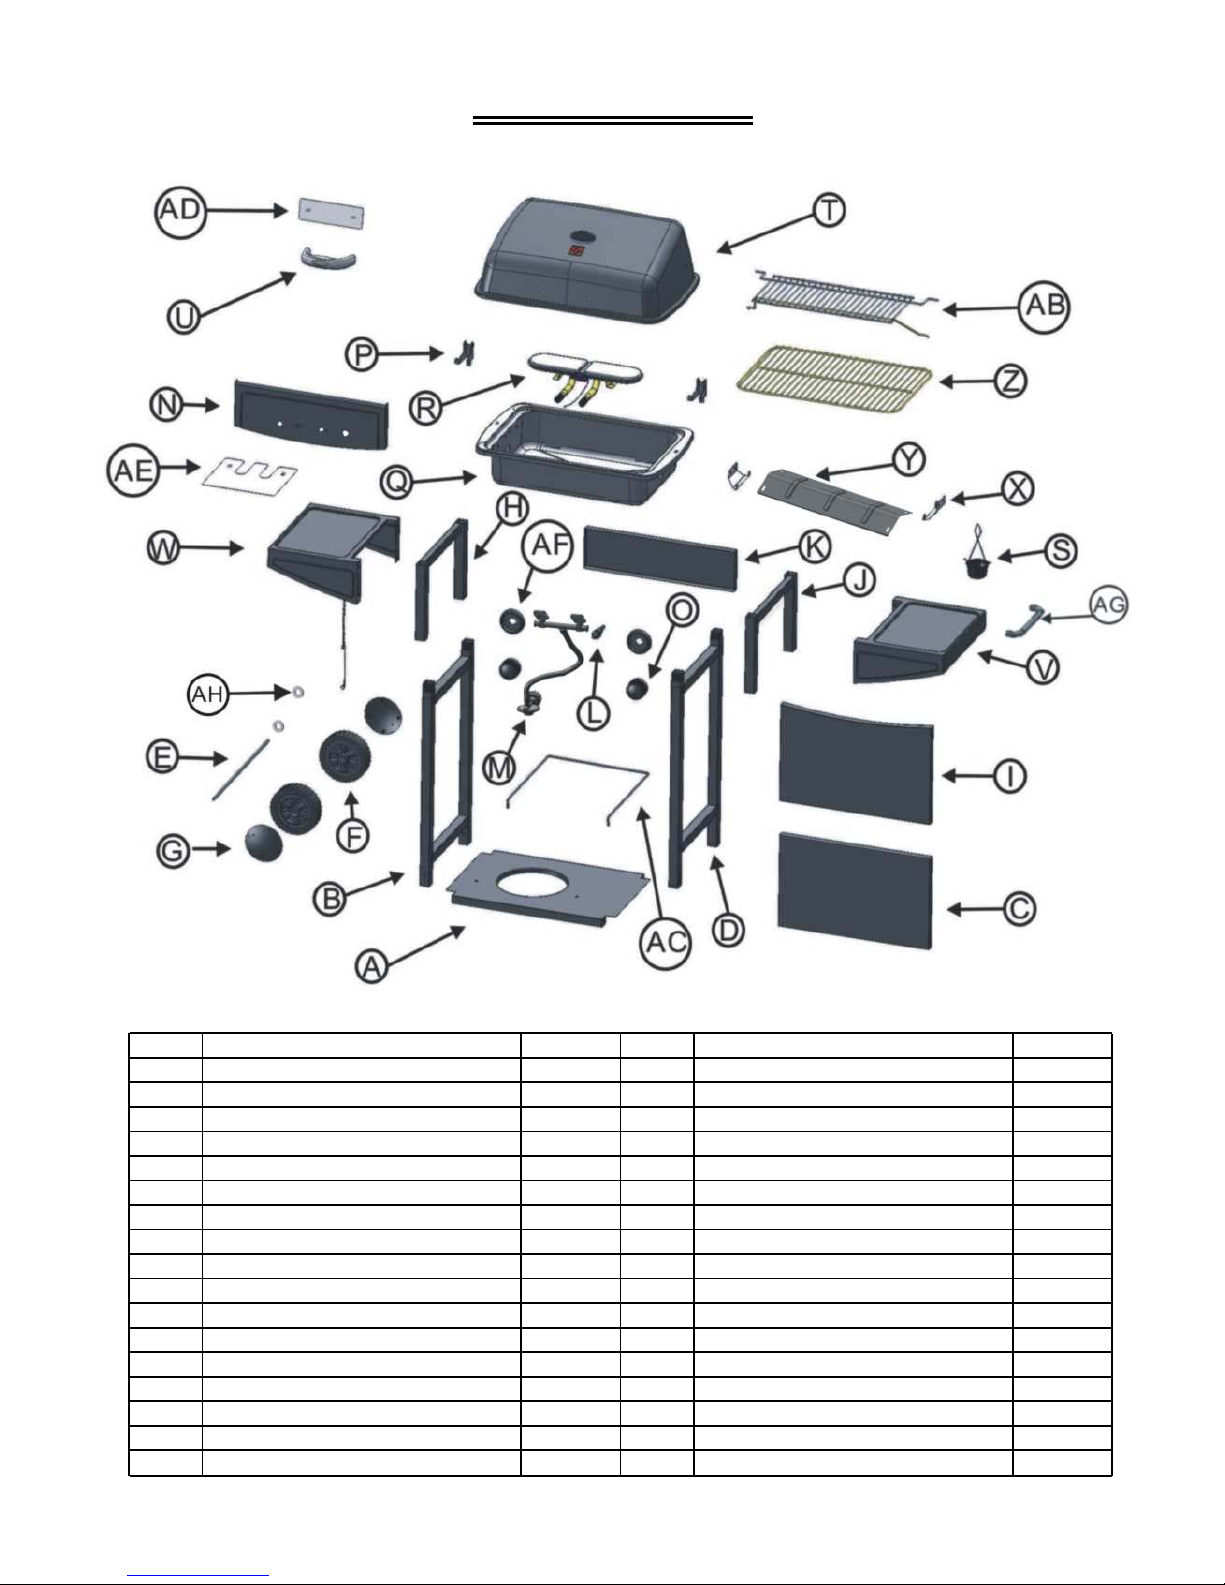
Part Descri
p
on QTY Part Descri
p
on QTY
ABoom
p
anel 1 PC
Q
Grill bod
y
1 PC
BLelower frame 1 PC Rburner 1 PC
C
Front lower
p
anel 1 PC SGrease cu
p
1 PC
DRi
g
ht lower frame 1 PC TLid 1 PC
EWheel axle 1 PC ULid handle 1 PC
FWheel 2 PCS
V
Ri
g
ht side shelf 1PC
GWheel ca
p
2 PCS WLeside shelf 1 PC
HLeu
pp
er frame 1 PC XHean
g
p
late su
pp
ort 2 PCS
IFront u
pp
er
p
anel 1 PC
Y
Hean
g
p
late 1 PC
JRi
g
ht u
pp
er
p
anel 1 PC ZCookin
g
g
rid 1PC
KBack
p
anel 1 PC AB Warnin
g
rack 1 PC
LI
g
niter 1 PC A
C
C
y
linder cli
p
1 PC
MRe
g
ulator & Valve assembl
y
1 PC AD Heat insulaon
p
anel 1 PC
NControl
p
anel 1 PC AE Heat insulator 1 PC
Oknob 2 PCS AF bezel 2 PCS
PBod
y
Hin
g
PCS AG Ri
g
ht side handle 1 PC
AH Wheel Pad 2 PCS
Illustrated Parts List
2

- 7 -
Hardware List
tloBAA M6 x 15 24 talFKKscp Washer M5 8 pcs
tloBBB M6 x 10 2 pcs LL Heat Insulaon
Washer 5mm 8 pcs
tloBCC M6 x 50 4 gniWMMscp Nut M5 8 pcs
kcoLDD Washer M6 30 pcs NN Heat resistant
washer 30mm 2 pcs
talFEE Washer M6 24 riaHOOscp Pin 2 pcs
tloBFF M5 x10 4 pcs 2niPPP pcs
talFGG Washer M6 6 2hcnerWQQscp pcs
leehWHH Nut 2 1revirdwercSRRscp pc
tloBII M5 x 10 8 pcs
kcoLJJ Washer M5 8 pcs
Hardware listed above is not scaled to exact size. (A screwdriver is required for assembly and is included
for your convenience).
SS Bolt M4 4 pcs

-8-
Assembly Instructions
Remove all contents from the carton packaging. Make sure all parts are present before attempting assembly. Once the grill is
full
y
assembled, go back and check to make certain all the bolts are secure. Tighten again using the screwdriver provided i
f
necessary.
Estimated Assembly Time: 30 minutes.
Step 1
a) Align the holes on the bottom panel (A) with the holes on the left lower frame (B)
and right lower frame (D).
b) Screw a bolt (CC) along with a lock washer (DD) and a flat washer (GG) into each
pre‐drilled hole. Tighten by screwdriver until secure.
c) Align the holes on the front lower panel (C) with the holes on the left lower frame
(B) and the right lower frame (D). Screw a bolt (AA) along with a lock washer (DD)
and a flat washer (EE) into each pre‐drilled hole. Tighten by screwdriver until
secure.
d) Align the hole on the wheel (F), and the wheel pad (AH) with the hole on left
lower frame (B), insert the wheel axle (E) into the hole. Then seal with a wheel nut
(HH).
e) Cover a wheel cap (G) on each wheel.
Step 2
a) Insert the feet of the right upper frame (J) into the hole on the right
lower frame.
b) Insert the feet of the left upper frame (H) into the hole on the left
lower frame.
Step 3
a) Place the front upper panel (I) on the front lower panel. Align the
holes on the front upper panel (I) with the holes on the cart frame,
screw a bolt (AA) along with a lock washer (DD) and a flat washer (EE)
into each pre‐drilled hole. Tighten by screwdriver until secure.
b) Align the holes on the cart back panel (K) with the holes on the cart frame and screw a bolt (AA)
along with a lock washer (DD) and a flat washer (EE) into each pre‐drilled hole.
c) Tighten all bolts by screwdriver until secure.
Step 4
a) Insert the valve shafts of the regulator
&
valve assembly (M) into the pre‐drilled
holes on the control panel (N), insert the bezels (AF) onto the shafts then screw a
bolt (SS) into each holes, tighten bolts by screwdriver until secure.
b) Insert the Knobs (O) on the valve shafts.
c) Insert the igniter (L) into the pre‐drilled hole in the control panel (N). Tighten by
hand until secure.
d) Align the holes on the control panel (N) with
the holes on the upper frame, and then screw a
bolt (AA), along with a lock washer (DD) and a
flat washer (EE) into each pre‐drilled hole.
Tighten by hand until secure.
e) Tighten all bolts by screwdriver until secure.
Step 5
a) Align the holes on the heating plate support (X) with the holes on the grill body (Q), then
screw a bolt (FF) from the outside of grill body into each pre‐drilled hole. Seal with a
heating insulation washer (LL), a flat washer (KK) and a lock washer (JJ) onto each bolt,
then screw a wing nut (MM) onto each bolt. Tighten by hand until secure.
b) Tighten all bolts by screwdriver until secure.
SS

- 9 -
Step6
a)
Aligntheholesonbodyhinge(P)withtheholesonthegrillbody,thenscrewa
bolt(II),alongwithaheatinsulationwasher(LL)intothepre‐drilledhole,and
thensealwithaflatwasher(KK),alockwasher(JJ)andawingnut(MM).Tighten
byhanduntilsecure.
b)
Aligntheholesongrillbodywiththeholesontheupperframe,thenscrewabolt
(AA),alongwithalockwasher(DD)andaflatwasher(EE)intoeachpre‐drilled
hole.Tightenbyhanduntilsecure.
c)
Tightenallboltsbyscrewdriveruntilsecure.
Step7
a)
Puttheburner(R)insidethegrillbody.Makecertainthevalvenozzleisinserted
intotheburnerventuritubeproperlyandcompletely.
b)
Aligntheholesonheatinsulationpanel(AE)withtheholesunderthebottomof
grillbody.
c)
Screwabolt(BB),alongwithalockwasher(DD)andaflatwasher(GG)through
theheatinsulationpanel,thebottomofgrillbodyandintotheburner.Tighten
byhanduntilsecure.
d)
Connecttheignitionwirewiththeigniter.
e)
Tightenallboltsbyscrewdriveruntilsecure.
f)
Hookthegreasecup(S)underthegrillbody.
Step8
a)
Aligntheholesontheheatinsulationpanel(AD)withtheholesonthelid(T).
b)
Insertthepre‐assembledboltinlidhandle(U)withaheatresistantwasher(NN)through
theholesonlid(T)andtheheatinsulationpanel(AD),thensealwithaflatwasher(EE),a
lockwasher(DD)andabolt(AA).
c)
Tightenallboltsbyhanduntilsecure.
Step9
a)
Puttheliduponthegrillbody.
b)
Aligntheholesonthelidhingewiththeholesonthegrill
bodyhinge,theninsertthepin(PP)intothehingehole.
c)
Insertahairpin(OO)intotheholeoneachendofthepinstofastenthelidandgrillbody.
Step10
a)
Aligntheholesontherighthandle(AG)withtheholeonthe
rightsideshelf(V),thenscrewabolt(AA),aflatwasher(EE)
andalockwasher(DD)intoeachpre‐drilledhole.Tightenby
handuntilsecure.
b)
Loosenthefourpre‐installedboltsontherightupperframe(J)
andallow1/4bolt’slengthtoextendfromrightupperframe.
c)
Aligntheholesontherightsideshelf(V)withthebolts
extendedfromtherightupperframe.Pushdowntherightside
shelfuntilitlocksintoplace.
d)
Repeattheprocedurefortheassemblyofleftsideshelf(W).
e)
Tightenallboltsbyscrewdriveruntilsecure.

- 10 -
Step11
a)
Puttheheatingplate(Y)ontotheheatingplatesupport.
b)
Putthecookinggrid(Z)ontotheheatingplate.
c)
Insertthefeetofwarmingrack(AB)intotheholesonthetoplid.
Step12
a)
Putthegastankonthetanksupport.
b)
Connecttheregulatorwiththetank.
c)
Insertthetankclip(AC)intotheholesonthebottompanelandclipthetank
usingthetankclip.
Fully Assembled View

- 11 -
Operang Your Grill
CAUTION
Use only the regulator provided. If a replacement is necessary, call our customer service center. The use of unauthorized parts
can create an unsafe condion and environment.
The liquid propane gas (LP-gas) supply cylinder(s) to be used must be:
a) Constructed and marked in accordance with the specificaons for LP gas cylinders of the Naonal Standard of the
Transportaon of Dangerous Goods Commission of Canada for Cylinders, Spheres and Tubes (CAN/CSA-B139), as applicable;
b) Provided with a listed over-filling prevenon device;
c) Provided with a cylinder connecon device compable with the connecon for outdoor cooking appliances.
Only the pressure regulator and hose assembly supplied with the outdoor cooking gas appliance must be used. Replacement
pressure regulators and hose assembly must be those specified by the outdoor cooking gas appliance manufacturer. Use only
20-pound cylinders equipped with a cylinder connecon device compable with the connecon for outdoor cooking appliances.
The cylinder must include a collar to protect the cylinder valve. Do not drop or handle the cylinder roughly. Disconnect the
propane cylinder from the regulator valve when the grill is not in use.
Storage of the appliance indoors is permissible ONLY if the cylinder is disconnected and removed from the appliance. Store
cylinder outdoors and keep out of the reach of children. Do not store the cylinder in a building, garage or other enclosed areas.
Never store your cylinder where temperatures can reach over 51.7℃.
Before connecng, make sure there is no debris caught in the head of the gas cylinder, regulator valve or in the head of the
burner and burner ports. Connect regulator valve and hand ghten firmly. DO NOT obstruct the flow of combuson air or
venlaon air to the grill. Ensure the propane cylinder is in an upright posion to allow the gas to leave the cylinder. Otherwise
the overfill prevenon device within the cylinder will prevent proper gas flow.
DANGER
A fire causing death or serious injury may occur if the following is not followed exactly:
Never store or use gasoline or other volale substances in the vicinity of this grill.
Never store a spare propane cylinder in the vicinity of this grill, or in the vicinity of another potenal heat source.
Never fill the propane cylinder beyond 80% full.
This grill is designed to connect to a standard 20 lb cylinder only. Please refer to Step 12 of the Assembly Instrucons for
installaon.
WARNING
Don’t store spare gas cylinder in or near grill.
Connecng & Disconnecng the Gas Cylinder
LP (Propane) Gas Supply Connecon & Disconnecon
1. Always place the propane cylinder on the tank brackets located on the right side of the cart.
2. Always confirm all burner control knobs are in the OFF posion before acvang the gas supply.
3. Before connecon, be sure that there is no debris caught in the head of the gas cylinder, head of
the regulator valve, or in the head of the burner and burner ports.
4. Always connect the gas supply regulators as follows: Insert the nipple of the valve coupling into the
tank valve and ghten the connecon collar by turning it clockwise with one hand while holding the
regulator with the other hand.(See diagram to right.)
5. Disconnect the propane cylinder from the regulator valve when the grill is not in use.
6. Always confirm all burner control knobs are in the OFF posion before disconnecng the gas supply.
7. Before disconnecng, be sure that the tank valve is in OFF posion.
8. Always disconnect the gas supply regulators as follows: Loosen the connecon collar by turning it
counter-clockwise with one hand while holding the regulator with the other hand and take the nipple
of the valve out of the tank valve (See diagram to right.) Do not obstruct the flow of combuson air and venlaon air to
the grill. Keep venlaon openings of the cylinder enclosure free and clear from debris.

- 12 -
9. Placedustcaponcylindervalveoutletwheneverthecylinderisnotinuse.Installonlythetypeofdustcaponcylinder
valveoutletthatisprovidedwiththecylindervalve.Othertypesofcapsorplugsmayresultinleakageofpropane.
DANGER
Topreventfireorexplosionhazardwhentestingforaleak:
1. Alwaysperformthe“leaktest“asbelowbeforelightingthegrillandeachtimethecylinderisconnectedforuse.
2. Donotsmokeorallowothersourcesofignitionintheareawhileconductingaleaktest.
3. Conducttheleaktestoutdoorsinawell‐ventilatedarea.
4. Donotusematches,lightersoraflametocheckforleaks.
5. Donotusegrilluntilallleakshavebeenstopped.Ifyouareunabletostopaleak,disconnectthepropanesupply,callfor
gasapplianceserviceoryourlocalpropanegassupplier.
CheckingforLeaks
1. Make2‐3oz.ofleaksolutionbymixingonepartliquiddishwashingsoapwiththreepartswater.
2. Makesurecontrolknobsareinthe“OFF”position.
3. Spraysomesolutiononthetankvalveuptotheregulatorconnection.(Seediagramtoright.)
4. Inspectthesolutionattheconnectionsforbubbles.Ifnobubblesappear,theconnectionissecure.
5. Ifbubblesappear,youhavealeak.Proceedtostep6.
6. Disconnecttheregulatorfromthetankandreconnect.Makesuretheconnectionissecured.
7. Retestwithsolution.
8. Ifyoucontinuetoseebubbles,replacethecylinder.
LightingYourGrill
DANGER
Failuretoopenlidwhileignitingthegrill’sburnersornotwaitingfiveminutestoallowgastoclearifthegrilldoesnotlight,may
resultinanexplosion,whichcouldcauseseriousbodilyinjuryordeath.
WARNING
Neverstandwithyourheaddirectlyoverthegrillwhenpreparingtolightthemainburners,topreventpossiblebodilyinjury.
LightingMainBurner
WARNING:
Attemptingtolighttheburnerwiththelidclosedmaycauseanexplosion.Makesuretherearenoobstructionsofairflowtothe
gasunit.Spidersandinsectscannestandclogtheburner/venturitubeattheorifice.Acloggedburnertubecanleadtoafire
beneaththeappliance.
1. Openlidwhilelightingburners.
2. Makesureallcontrolknobsareinthe“OFF”position.
3. Turnongassourceorcylindervalve.
4. Igniteonlytheburnersyouwishtouse.Pushandturntheknobto“HIGH”thenpresstheigniterbuttonimmediately.The
burnershouldlight.Iftheburnerdoesnotlight,repeatpressingthelighterbutton2or3times.
5. IfignitiondoesNOToccurin5seconds,turntheburnercontrolstoOFF,wait5minutes,andrepeatthelightingprocedure.
6. Toigniteremainingburners,repeatSteps4and5foreachburner.
7. Adjustvalveknob(s)todesiredcookingtemperature.
UsingtheLightingSticktoLighttheMainBurners
1. Insertamatchintotheendoflightingstick.Lightthematch.
2. Oncelit,putthelightingstickthroughtheholeonthegrillbodytoreachtheburner
ports(Seediagramtoright.)
- 13 -
3. Pressthevalveknobandrotateitcounterclockwisetothe‘’HIGH’’position.Theburnershouldlightimmediately.Ifmore
thanoneburnerisdesired,repeattheSteps2and3untilalldesiredburnersarelit.
4. Adjustburnerstothedesiredcookingtemperature.
PRECAUTIONS:
1. Beforecookingonthegrillforthefirsttime,operatethegrillforapproximately15minuteswiththelidclosedandthegas
turnedon“HIGH”.Thiswill“heatclean”theinternalparts,dissipateodorfromthemanufacturingprocessandpainted
finish.
2. Afterlighting,observetheburnerflame.Makesureallburnerportsarelit.
3. Iftheburnerflamegoesoutduringoperation,immediatelyturnthegas“OFF”.Openlidtoletthegasclearforatleast5
minutesbeforere‐lighting.
4. Cleanthegrillaftereachuse.DONOTuseabrasiveorflammablecleaners.Thismaydamagepartsofthegrillandcausea
fire.
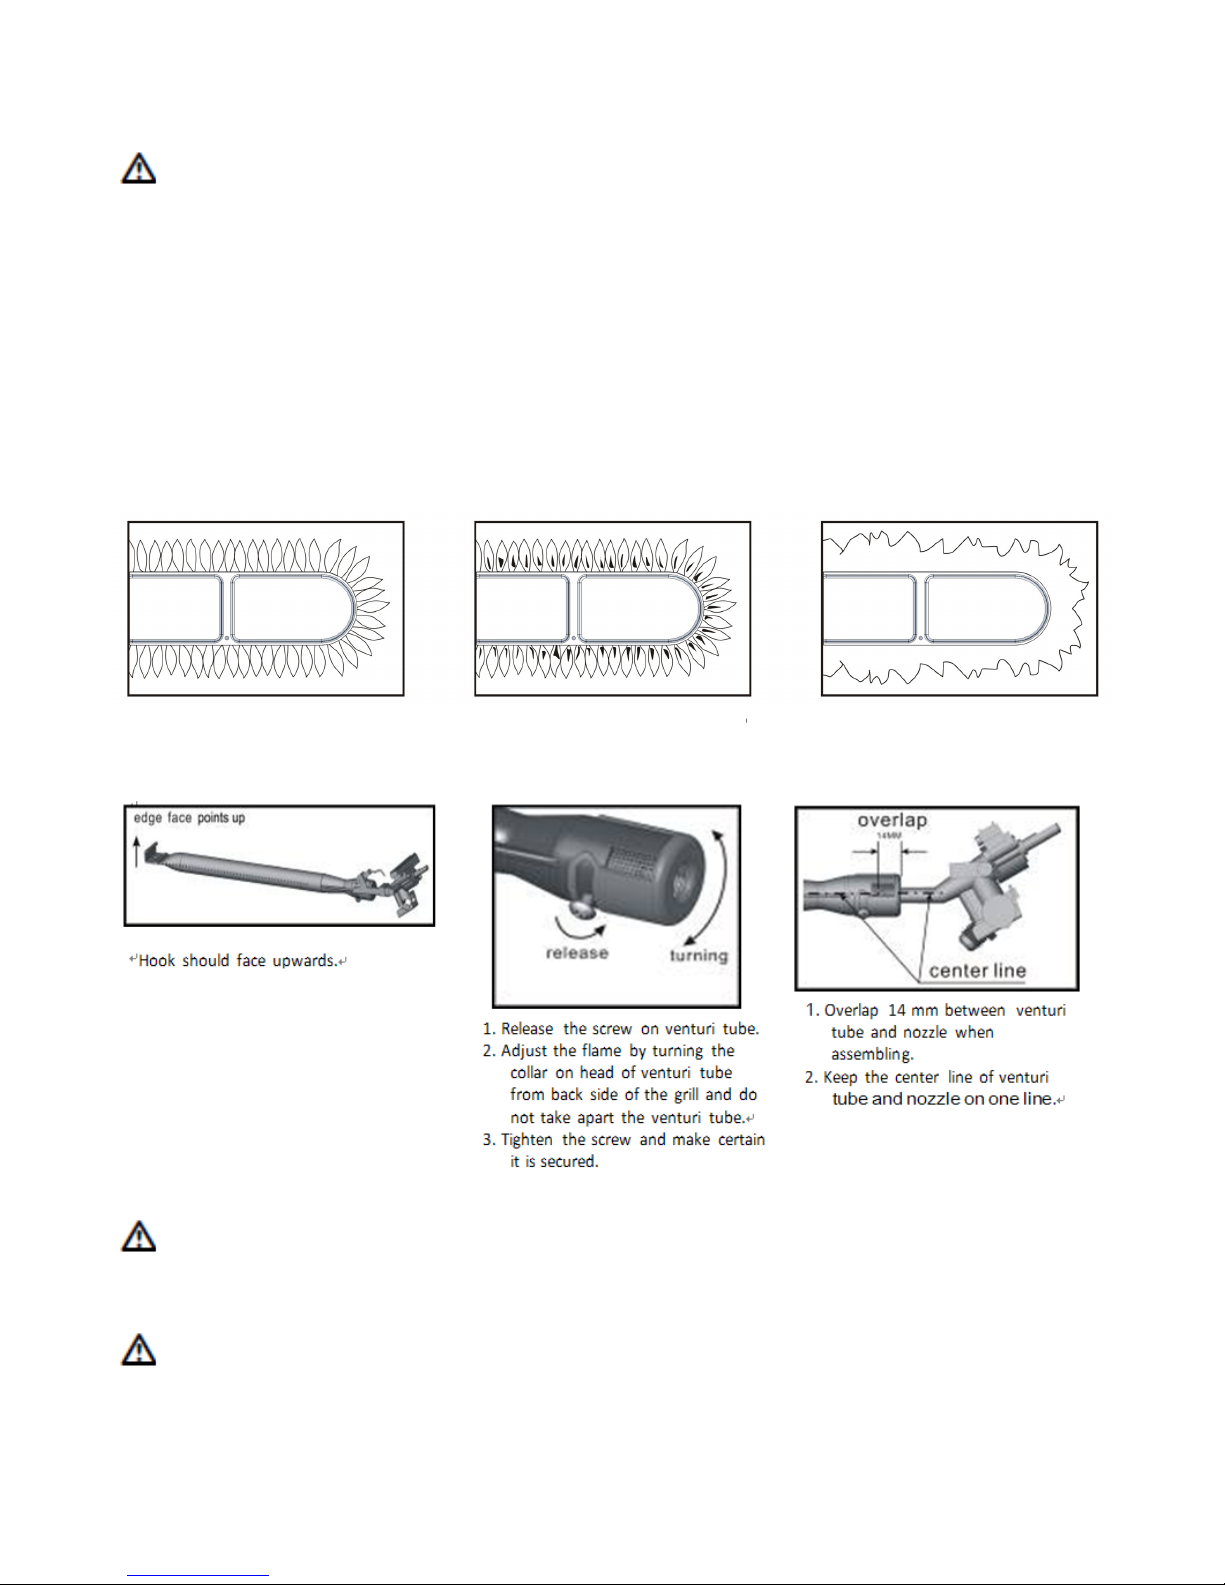
Confirmthattheburnerisproperlylitandthattheflamepatternisasdesired(seefig.A,BandCbelowfortheproperflame
patterns).Iftheflamepatternisotherthannormal,consulttheTroubleshootingforcorrectiveaction.
FIG.A FIG.B FIG.C
Burnerinstallationandadjustment
WARNING
DONOTAdjusttheair‐shutteronburnertubewhilethegrillisoperating.Ifthegrillisstillhot,pleasewearprotectivegearand
becareful.Failuretofollowthisinstructioncouldcausepersonalinjury.
Flare‐Ups
“Flare‐ups”sometimesoccurwhenfooddrippingsfallontothehotheatdistributionplateorburnersandignite.Someflaringis
normalanddesirableasithelpsimparttheuniqueflavorsassociatedwithgrilledfoods.Controllingtheintensityoftheflare‐ups
isnecessary,however,inordertoavoidburnedorunevenlycookedfoodsandtopreventthepossibilityofaccidentalfire.
Normal:Softblueflameswithyellowtips
between1inch
–
2incheshigh
Poorcombustion:Wavy,yellow
f
lames
–
toolittleair
Outofadjustment:Noisyhardblue
flames
–
toomuchair

- 14 -
WARNING
AlwaysmonitorthegrillcloselywhencookingandturntheflameleveldowntoLOWorOFFifflare‐upsintensify.
ShuttingOffBurners
1. Alwaysturnthevalveknob(s)clockwisetothe‘’HIGH’’position,andthenpressandturnitto‘’OFF’’.Neverforcetheknob
withoutpressingit.Thiscoulddamagethevalve.
2. Promptlyturnthegassupplytothe“OFF”positionatthepropanecylinder.
3. Closethelidofthegrill.
ExcessFlowSafetyValveResetProcedure
● Thenewregulatorsareequippedwithasafetydevicethatrestrictsthegasflowintheeventofagasleak.However,
unsafepracticesofgrilloperationcouldactivatethesafetydevicewithouthavingagasleak.
● Asuddenshutoffofthegasflowtypicallyoccursifyouopentheliquidpropane(LP)tankvalverapidly,orifoneormore
oftheburnercontrolknobsisinanopenpositionwhenopeningtheLPtankvalve.
● ThisprocedureiseffectivewithallsizesofLPtank.
● Toensuretheprocedureissafelyandsuccessfullyperformed,pleasecarefullyfollowtheseinstructions:
1. ClosetheLPtankvalve.
2. TurnallburnercontrolknobstotheOFFposition.
3. DisconnecttheregulatorfromtheLPtank.
4. Openthelidofthegrill.
5. TurnburnercontrolknobstoHIGH.
6. Waitatleast1minute.
7. TurnburnercontrolknobsOFF.
8. Waitforatleast5minutes.
9. Re‐connecttheregulatortotheLPtank.
10.SlowlyturntheLPtankvalve¼turnatatimeandhavethevalveallthewayopen.
11.Withthelidopen:Forgrillwithignitionbutton:turnononlyONEfrontburnercontrolknobtotheHIGHposition.
Ignitethegrillbypushingtheignitionbutton.Forgrillwithanautomaticignition:Pushdownthecontrolknobyou
wanttolight,turncounterclockwiseuntilyouheartheignitionclick.
12.Afterthefirstfrontburnerislit,turnontheothercontrolknob(s)totheHIGHposition.**Ifyouhavemorethantwo
burners,turnthemononlyONEATATIME.
13.Whenallfrontburnersarelit,closethegrilllid.
14.Waitfor10‐15minutes;thetemperatureshouldreach400–450°F
WARNING
Thecylindervalvealwayshastobeinthehorizontalposition,toensurethatonlythepropanevapouriswithdrawn.
CORRECTWRONGWRONGWRONG
Vapour
Vapour Vapour Vapour
Va
p
our

- 15 -
CareandMaintenance
IMPORTANT
Alwaysallowtocompletelycooloffbeforecoveringyourgrilltopreventcorrosionfromcondensation.
CAUTION
Allcleaningandmaintenanceshouldbedonewhenthegrilliscool,withthefuelsupplyturnedoffatthecontroldialandthe
propanecylinderdisconnected.DONOTcleananygrillpartinaself‐cleaningoven.Theextremeheatwilldamagethefinish.
Cleaning
Burningoffthegrillaftereveryuse(approx.15minutes)willkeepexcessivefoodresiduefrombuildingup.Cleanthegrillbefore
andaftercookingisrecommended.
Recommendedcleaningmaterials
MilddishwashingliquiddetergentHotwater
NyloncleaningpadWirebrush
PaperclipPuttyknife/scraper
Compressedair
DONOTusecleanersthatcontainacid,mineralspiritsorxylene.
Outsidesurfaces:
Useamilddishwashingdetergentandhotwatersolutiontoclean.Rinsethoroughlywithwater.
Insidesurface:
Iftheinsidesurfaceofthegrilllidhastheappearanceofpeelingpaint,bakedongreasehasturnedtocarbonandisflakingoff.
Cleanthoroughlywithastrongsolutionofdetergentandhotwater.Rinsewithwaterandallowittocompletelydry.
Interiorofgrillbottom–Removeresidueusingbrush,scraperand/orcleaningpad.Washwithadishwashingdetergentand
hotwatersolution.Rinsewithwaterandletdry.
CookingGrates–Theporcelaingrateshaveaglass‐likecompositionthatshouldbehandledwithcare.Useamilddishwashing
detergentorbakingsodaandhotwatersolution.Non‐abrasivescouringpowdercanbeusedonstubborn
stains.Rinsewithwater.
HeatPlates–Cleanresiduewithwirebrushandwashwithsoapywater.Rinsewithwater.
GreaseCup–Periodicallyemptythegreasecupandcleanwithadishwashingdetergentandhotwatersolution.
CleaningtheBurnerAssembly
1. Turngasoffatthecontrolknobsandpropanetank.
2. Removecookinggratesandheatplate.
3. Removegreasecup.
4. Removeburnerbyunscrewingnutfrombeneathburner“foot”usingascrewdriverandpliers.
5. Liftburnerupandawayfromthegasvalveorifice.
6. Cleaninlet(venturitube)ofburnerwithsmallbottlebrushorcompressedair.
7. Removeallfoodresidueanddirtonoutsideofburnersurface.
8. Cleananycloggedportswithastiffwire(suchasanopenedpaperclip).
9. Inspectburnerfordamage(cracksorholes).Ifdamageisfound,replacewithanewburner.Reinstallburner.Makecertain
thegasvalveorificesarecorrectlypositioned,pointingstraightintoburnerinlet(venturitube).Also,checkpositionof
sparkelectrode.
- 16 -
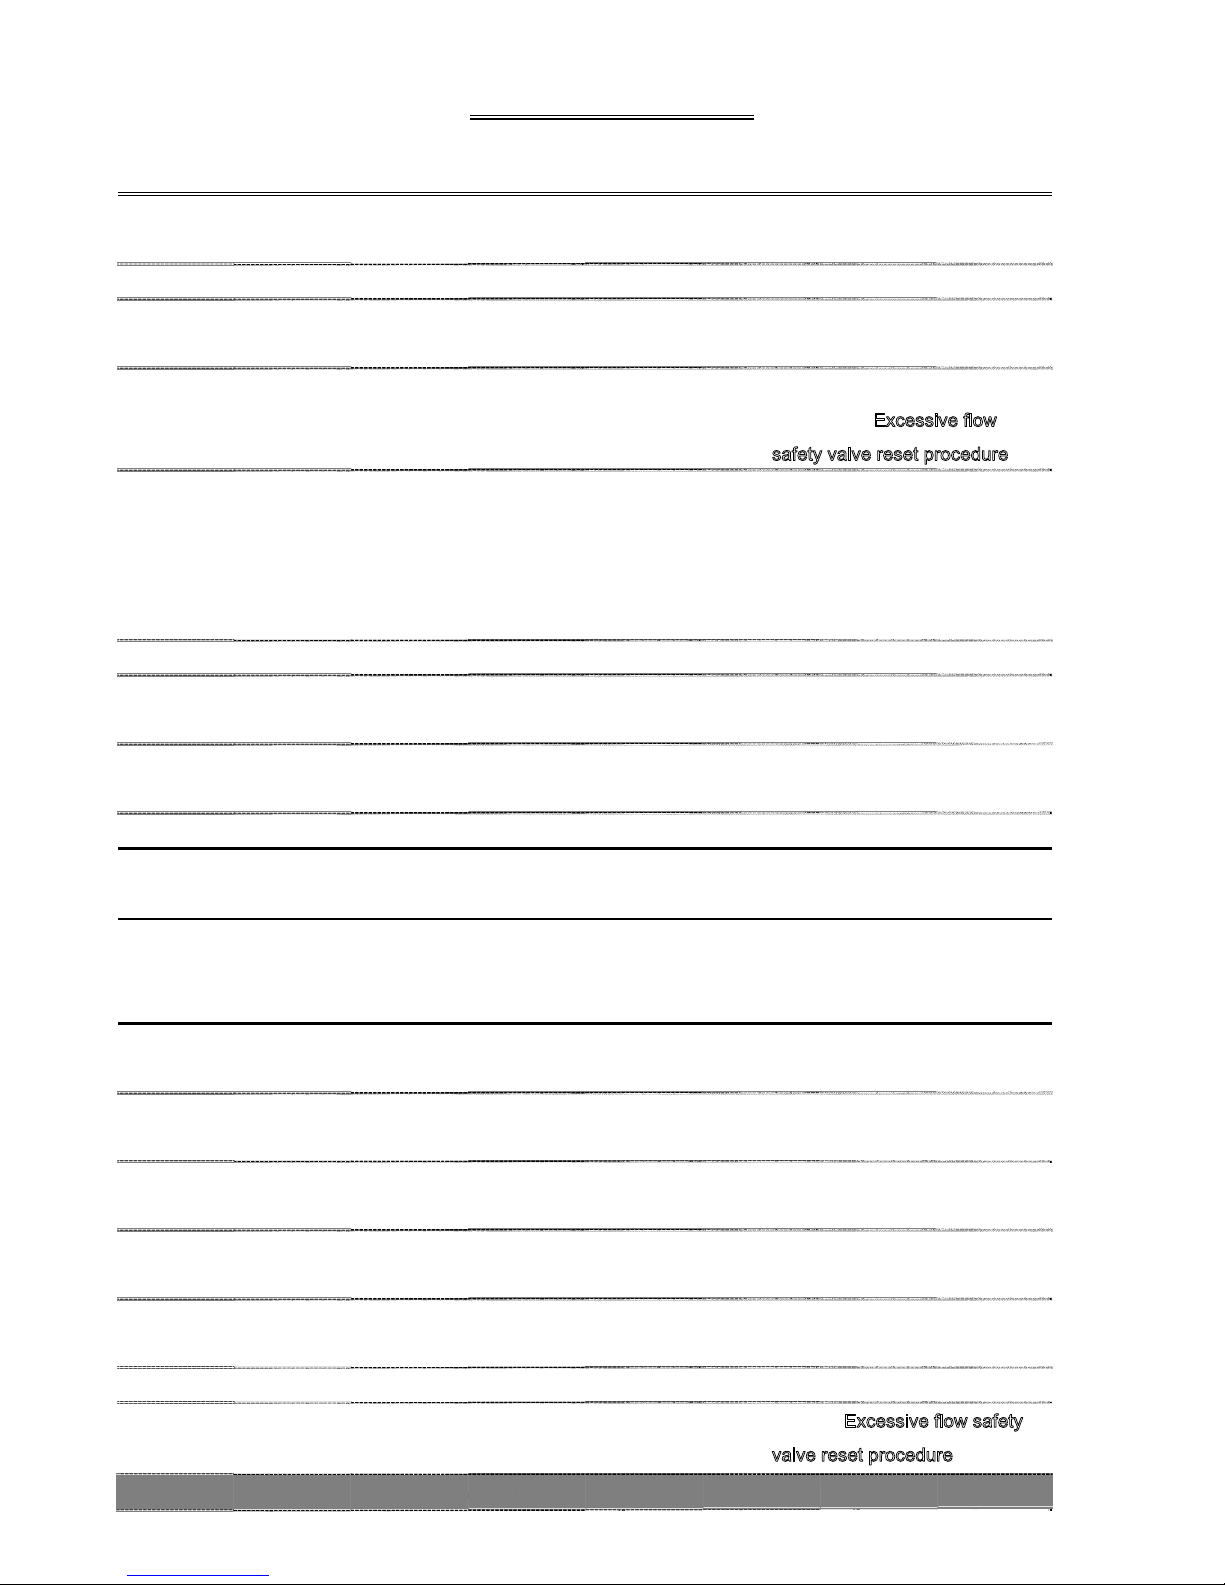
TROUBLESHOOTING
Problem Possible cause Prevention/Cure
Burner doesn't light using knobs
or igniter
Wires or electrode is covered
by cooking residue
Clean wire or electrode by
rubbing alcohol
elitxetybepiwtewerasrenrubdnaedortcelE
-nekorbrodekcarcedortcelE
sparks at crack
Replace electrode
Burner doesn't light using a
match
No gas flow Check if propane tank is empty. If
not, refer to Excessive flow
safety valve reset procedure
erarotalugerdnatungnilpuoC
not fully connected
Turn off coupling nut about
one-half to three quarters
additional turn until solid stop.
Tighten by hand ONLY - DO
NOT use tools
esohdnaebutrenrubkcehCwolfsagfoegakcolB
dnarenrubfonoitcennocsiD
valve
Reconnect
nitsentcesnirosbewredipS
venturi
Clean venturi
stroprenrubnaelCdekcolbrodeggolcstroprenruB
Sudden drop in gas flow or
reduced flame height
rednilycecalpeRsagfotuO
Irregular flame pattern, flame
does not run the full length of
burner
Burner ports are clogged or
blocked.
Clean burner ports
Flames turn yellow or orange New burner may have residual
manufacturing oils
Burn your grill for 15 minutes with
the lid closed
nitsentcesnirosbewredipS
venturi
Clean venturi
roesaerg,eudiserdooF
seasoning salt on burner
Clean burner
otevlavfonoitcennocrooP
burner venturi
Assure burner venturi is properly
connected with valve
Flame blow out High or gusting winds Turn front of grill to face wind or
increase flame height
rednilycecalpeRsagenaporpnowoL
otrefeRdeppirtevlavwolfssecxE Excessive flow safety
valve reset procedure
llirgnaelCpu-llifesaerGpu-eralF
on P14.
on P14 .

- 17 -
gnillirgerofebtaemmorftafmirTtaemnitafevissecxE
erutarepmet)rewol(tsujdAerutarepmetgnikoocevissecxE
Persistent grease fire Grease trapped by food was
filled up to burner system
Turn knobs to OFF. Turn gas
OFF at propane tank. Leave lid in
closed position and let fire burn
out. After grill cools, remove and
clean all parts
Flashback(fire in burner tubes) Burners or tubes are block Clean burners or tubes
Inside lid peeling or paint peeling The lid is stainless Baked on grease fill-up has
turned to carbon and flaking off.
Clean thoroughly
Irregular flame Air flow is not correct. Correct
Flame blue with yellow tips, 1-2”
high.
Too little air: wavy yellow or
orange flames.
Too much air: noisy blue flames
If flames are yellow or orange –
open flap at the end of the venturi
tubes in 3mm(1/8 in.) increments until
flames are correct.
If flames are blue and noisy –
close flap at the end of the
venturi tubes in 3 mm(1/8 in.) increments
until flames are correct.
*Propane Models must be open a
minimum of 3 mm(1/8 in.).

-18-
Warranty Program
Proof of purchase is required to access this warranty program, which is in effect from the date of purchase. If unable to
provide proof of purchase or after the warranty has expired, customers will be subject to parts, shipping and handling fees.
Full 30‐Day Warranty
Any missing parts can be replaced at no charge within 30 days from the date of purchase with a valid proof of purchase.
Customers will be subject to shipping and handling fees.
Limited Warranty
Every grill cannot be returned or refunded after using.
1‐Year Limited Warranty on all grill parts in regards to damage affecting the operation of the gas grill.
Warranty Provisions:
This warranty is non‐transferable and does not cover failures due to misuse or improper installation or maintenance.
This warranty is for replacement of defective parts only. We are not responsible for incidental or consequential damages
or labor costs.
This warranty does not cover chips and scratches of porcelain or painted surfaces, nor does it cover corrosion or
discoloration due to misuse, lack of maintenance, hostile environment, accidents, alterations, abuse or neglect.
This warranty does not cover damage caused by heat, abrasive and chemical cleaners, resulting in chipped porcelain
enamel parts or any damage to other components used in the installation or operation of the gas grill.
The original consumer purchaser will be charged for all shipping and handling fees o
f
replacement under the terms o
f
limited
warranty. I
f
customers unable to provide proo
f
o
f
purchase or after the warranty has expired, customers will be also subject
to parts fees.
Some provinces do not allow the limitation or exclusion o
f
incidental or consequential damages, so the above limitations or
exclusions may not apply to you. This warranty gives you specific legal rights, and you may also have other rights that vary
from province to province.
If you have any questions about our products or warranty, please visit our website www.bbqtek.com,or
–
7:00 P.M. (EST), MONDAY‐FRIDAY.
Manufactured by : Lucas BBQ Co., Ltd.
FOR CUSTOMER SERVICE:
CALL 1‐877‐630‐5396 (TOLL‐FREE)
10:00 A.M.
–
Table of contents
Other Tera Gear Grill manuals

Tera Gear
Tera Gear GSS2520JA User manual

Tera Gear
Tera Gear NG 993066 User manual

Tera Gear
Tera Gear 13 01 3008TG Quick start guide

Tera Gear
Tera Gear GSF2818A User manual

Tera Gear
Tera Gear TER 75K BTU GSS3418N-2L User manual

Tera Gear
Tera Gear 13 01 3007TG Quick start guide

Tera Gear
Tera Gear PC14 User manual

Tera Gear
Tera Gear TG 1201 2561 User manual

Tera Gear
Tera Gear GSS2020 User manual

Tera Gear
Tera Gear GSF2616AC Operation and maintenance manual


