Terapin MCR-TX3300 User manual
MP3 Audio CD Recorder
& Data CD Duplicator
Product Manual
MCR-TX3300
Before operating, please read all the instructions thoroughly.
150 songs in just one cd...
Copyright Notice
All rights reserved. No part of these written materials or software may be reproduced or used in any form or by any means, electronic or mechanical,
including photocopying and recording and the use of any kind of information storage and retrieval system, without prior permission in writing from Serial
System Ltd. No liability is assumed with respect to written materials or software, or for damages resulting from the use of the information contained in
these written materials or of the software. Serial System Ltd reserves the right to alter the features and contents of this publication or software without
obligation or advanced notice.
Version 1.12

Contents
1) Safety Information ........................................... 01
2) About CD Recording
Different Types of Discs .................................... 02
CDR Terminology .............................................. 02
3) Names & Functions
Front Panel ......................................................... 03
Display Window ................................................. 04
Back Panel ........................................................ 05
Remote Control ................................................. 06
4) Connecting the TX3300
Analog Connections .......................................... 08
Digital Coaxial Connections .............................. 09
Digital Optical Connection ................................. 10
USB Connections .............................................. 10
Serial Port Connection ...................................... 11
5) Basic Operations ............................................. 12
6) Playback Functions
Audio CD Playback ........................................... 14
MP3 CD Playback ............................................. 17
7) Recording Functions (Internal)
Important Information ........................................ 24
Dubbing from Deck A to Deck B ....................... 24
Audio CD track to Audio CD track ..................... 25
MP3 track to MP3 track ..................................... 28
Audio CD track to MP3 track ............................. 32
MP3 track to Audio CD track ............................. 35
Program Dub ..................................................... 38
Disc Dub ............................................................ 39
Editing of MP3 titles ........................................... 41
8) Recording Functions (External)
Important Information ........................................ 42
Recording from Analog Source ......................... 42
Recording from External Coaxial
or Optical Source ............................................... 48
9) Finalizing & Unfinalizing
Finalizing a CDR or CDRW ............................... 56
Unfinalizing a CDRW ......................................... 56
10) Erasing
Erasing an Audio CDRW ................................... 58
Erasing a MP3 CDR or CDRW ......................... 59
11) Connecting with a PC via USB
Installing the USB Device Driver ....................... 62
Installing the TX3300 Explorer .......................... 63
Using the TX3300 Explorer ............................... 65
12) Upgrading the TX3300
Upgrade via CD-ROM ....................................... 70
Upgrade via USB Connection ............................ 70
Upgrade via Serial Port ..................................... 72
13) Recovery
Recovering using the Utility CD ........................... 73
Recovering using the Serial Port ......................... 73
14) Troubleshooting Guide ....................................... 74
15) Maintenance ..................................................... 75
16) Error Messages ............................................... 75
17) Specifications .................................................. 77
18) Provisions of Warranty ................................... 78
19) Contact Information
About Terapin Technology ................................. 79
Contacting Us .................................................... 79
Other Terapin Products ..................................... 79
Note:
This product is designed to help you record and
reproduce audio tracks to which you own the copyright,
or where you have obtained permission from the
copyright holder or the rightful licensor. Unless you own
the copyright, or have obtained the appropriate
permission from the copyright holder or the rightful
licensor, your authorized recording, reproduction or
distribution thereof may result in severe criminal
penalties under copyright laws and international
copyright treaties. If you are uncertain about your rights,
contact your legal advisor. Under no circumstances will
Terapin Technology be responsible for the consequences
of any illegal copying performed using the TX3300.

Safety
Information
1) To reduce the risk of fire or electric shock, do not
expose the TX3300 to rain or moisture.
2) To avoid electric shock, do not open up the TX3300.
Servicing is to be done by qualified personnel only.
3) Read all of the instructions in this product manual,
observe warnings and retain this manual for future
reference.
4) Follow all warnings and instructions marked on the
TX3300.
5) Cleaning - Unplug the TX3300 from the wall outlet
before cleaning. Do not use liquid or aerosol
cleaners. Use a damp cloth.
6) Attachments - Do not use attachments that are not
recommended by Terapin as they may cause
hazards.
7) Water and Moisture - Do not use the TX3300 near
water, for example, near a kitchen sink, laundry tub
or near a swimming pool.
8) Accessories - Do not place the TX3300 on an
unstable stand, tripod, bracket or any support. This
may cause the TX3300 to fall, causing serious
injury to a child or adult and serious damage to the
unit.
9) Ventilation - Slots and openings in the TX3300 are
provided for ventilation and to ensure reliable
operation of the TX3300 and to protect it from
overheating. These openings must not be blocked
or covered. The openings should never be blocked
by placing the TX3300 on a bed, sofa, rug or other
similar surface. This product should not be placed
in a built-in installation such as a bookcase or rack
unless proper ventilation is provided or the
manufacturer’s instructions have been followed.
10) Power Source - The TX3300 should be operated
only from the type of power source indicated on the
marking label. If you are not sure of the type of power
supply to your home, consult your local dealer or
local power company.
11) Power-Cord Protection - Power supply cords
should be routed so that they are not likely to be
walked on or pinched by items placed upon or
against them, paying particular attention to cords at
plugs, convenience receptacles, and the point where
they exit from the TX3300.
12) Heat - The TX3300 should be situated away from
heat sources such as radiators, heat registers,
stoves or other products (including amplifiers) that
produce heat.
13) Installation Location - It is recommended that the
TX3300 is not placed in a location that is subject to
direct sunlight or extreme heat or cold, as these
conditions may damage the unit and/or the discs.
Because audio amplifiers and high-power
receivers generate significant heat, do not place the
unit directly on top of an amplifier or other heat
source. Always allow at least one inch of free space
on all sides of the unit as well as other electronic
products to allow for proper ventilation.
_________________________________________________________
The lightning flash with arrowhead
symbol within an equilateral triangle, is
intended to alert the user to the presence
of uninsulated ‘dangerous voltage’ within
the product’s enclosure that may be of sufficient
magnitude to constitute a risk of electric shock to
persons.
The exclamation mark within an
equilateral triangle is intended to alert the
user to the presence of important
operating and maintenance (servicing)
instructions in this product manual.
CAUTION
RISK OF ELECTRIC
SHOCK. DO NOT OPEN
Page 01Page 01
Page 01Page 01
Page 01

About CD
Recording
The TX3300 plays all standard Audio CDs. For
recording, the TX3300 requires special CDR/CDRW
designed only for audio use. CDR/CDRWs designed for
computer use will not record in Audio format in the
TX3300.
For MP3 CDs, you will be able to use any kind of
discs, including those designed for computer use.
The last step in making a CDR recording is the
finalization process. Until this step is completed, the disc
will not work in other players.
Once finalized, CDR discs will play in most CD
players, but CDRW discs will only play in the TX3300
and certain other CDRW compatible players.
Check the specifications of your CD player if you
have questions about compatibility with CDRW discs.
Do not move the TX3300 when there is a disc
inside one of the decks. Never move the unit until discs
have stopped playing or recording in both decks.
Different Types of Discs
1) Digital Audio discs
Known as Audio Discs, the TX3300 is able to play
back any conventional CD that bears this logo.
2) Recordable Digital Audio and Consumer discs
Discs that bear these 2 logos may be recorded on
once, and when they are finalized, they will play in
the TX3300 or in any conventional CD player,
including home, car and portable models.
Deck B may also be used to record on these discs,
and it will play these discs even if they have not
been finalized.
These discs are suitable for both Audio and MP3
formats.
3) Rewritable Digital Audio and Consumer discs
Discs that bear these 2 logos may be recorded on,
and they may also be erased or reused. They may
be recorded on or played in Deck B and in other
CDRW recorders or CDRW compatible players.
They will not play back in most current CD players
unless the player is CDRW compatible.
Deck B will also play these discs even if they have
not been finalized.
These discs are suitable for both Audio and MP3
formats. However, it cannot be used on the TX3300
for 1x recording in the Audio format.
4) Data discs
Discs that are designed for use in computer CDR
and CDRW drives cannot be used for recording in Audio
format in the TX3300. When blank discs of this type are
inserted, a message ‘Professional Disc’ will appear on
the Display Window. These discs, although cannot be
used for recording Audio CDs, can be used to record
MP3 CDs.
CDR Terminology
1) Finalize
This term refers to the process that completes the
recording of a disc by recording a final Table of
Contents and preparing the disc so that it may be
played back on other machines. A CDR or CDRW
disc may not be played on other CD players until it
is finalized. Once the finalization process is
complete, a CDR disc cannot be recorded on again.
Only CDRW discs can be unfinalized so that
additional tracks may be recorded on the disc.
2) TOC
This term stands for Table of Contents and it refers
to the data recorded on each CD that tells the player
the total number of tracks, albums and time of each
track.
Page 02Page 02
Page 02Page 02
Page 02
Front Panel
1 POWER Standby button
Press to switch the player on or to put it on standby.
2 Open/Close button for DECK A
Press to open and close the disc tray.
3 DECK A (Playback Deck)
This deck is for playback only. When loading a disc,
make sure that the label side is facing up.
4 DECK B (Record/Playback Deck)
This deck is for playback, as well as for recording.
5 Open/Close button for DECK B
Press to open and close the disc tray.
6 Display Window
This window displays system information.
7 SELECT button
Press to confirm your selection.
8 Function JOG Dial
Turn this jog dial clockwise or anti-clockwise to toggle
between different options.
9 SETTING button
Press to select either Audio CD or MP3 format, as
well as to change the Dub Speed. Applicable only
for blank CDs in Deck B.
10 DUB button
Press to duplicate individual tracks or the whole CD
from Deck A to Deck B, or to convert from Audio CD
tracks to MP3 tracks and vice versa. For Data CDs,
the whole disc will be duplicated at 4x speed.
11 UTILITY button
Press to erase a recorded track or to finalize/
unfinalize a CD. This option is only applicable for
CDRWs recorded using the TX3300.
12 A/B Switch button
Press to switch from Deck A to Deck B and vice
versa.
13 SOURCE button
Press to select the recording source from Analog
input, Optical input or Coaxial input. Applicable only
for recording from an external source.
14 STOP button
Press to stop the current operation.
15 RECORD button
Press to start recording from external sources.
16 PLAY button
Press to play the Audio CD or MP3 CD in the active
deck.
17 USB Master port
This port is for connection to supported USB
devices such as MP3 players via a USB cable.
(Not supported yet)
18 USB Slave port
This port is for connection to a PC or laptop to
download MP3s to the TX3300 or to upgrade the
TX3300 via a USB cable. Applicable only for PCs or
laptops running Windows 98 SE, Windows 2000 or
Windows ME.
19 Recording Level control
This control is used to adjust the input level when
making recordings from external sources.
20 Volume control
Turn this dial to increase or decrease the playback
volume. Applicable only for connections via the
headphone jack.
21 Headphone jack
This jack is for connections to earphones,
headphones or speakers with a 3.5mm stereo plug.
Output from rear connections will be muted.
22 Remote Control sensor
Point the remote control towards this sensor to
operate the TX3300. Ensure that this sensor is not
blocked by any objects.
Names &
Functions
Page 03Page 03
Page 03Page 03
Page 03
Display Window
1. Message Display
This panel will display information about the current
operation.
2 MANUAL Indicator
When the MANUAL indicator is on, this will indicate
that during recording, increasing of tracks is done
by the user. (Refer to Page 42 for more details)
3 FINALIZED Indicator
When the FINALIZED indicator is on, this will
indicate that this is a finalized CD or a commercial
pressed CD.
4 AUTO Indicator
When the AUTO indicator is on, this will indicate
that during recording, there will be an increase in
tracks whenever there are 3 seconds of
silence.(Refer to Page 42 for more details)
5 High Audio Level Indicator
When the audio level is high, this indicator will come
on. A high audio level may result in saturation and
cause distortion.
6 Audio Level Indicator
This indicates the volume of the current track. The
higher the number of dots, the higher the volume.
7 ANALOG Indicator
This indicates that the source of the recording is
from the Analog Audio In source. (Refer to Back
Panel)
8 OPTICAL Indicator
This indicates that the source of the recording is
from the Optical In source. (Refer to Back Panel)
9 COAXIAL Indicator
This indicates that the source of the recording is
from the Digital Coaxial In source. (Refer to Back
Panel)
Page 04Page 04
Page 04Page 04
Page 04
Display Window
Back Panel
1 AC Power In port
Connect the power cord from the wall outlet to this
port.
2 Analog Audio In jack (Stereo)
This connection is for input from a two-channel
analog audio source. E.g. TV, DVD players, VCD
players, Stereo Hi-Fi systems and etc.
This connection is for recording from an external
source.
3 Analog Audio Out jack (Stereo)
This connection is for a two-channel output to the
stereo inputs on a TV or stereo amplifier.
4 Digital Coaxial In jack
This jack is for connecting a Coaxial input from
digital audio players for high-fidelity digital audio
recording.
This connection is for recording from an external
source.
5 Digital Coaxial Out jack
This jack is for connecting to a stereo Hi-Fi system
or amplifier for high-fidelity audio playback.
6 Ethernet jack
This jack is for connection to a Local Area Network,
for uploading or downloading of MP3 tracks in a
network.This function is not available yet, and will
be activated via an upgrade provided in the future.
7 Optical In jack
This jack is for connecting a Digital input from
digital audio players for high-fidelity digital audio
recording.
This connection is for recording from an external
source.
8 Serial port
This port is for connecting to a PC or laptop to
perform any upgrading for the TX3300.
Page 05Page 05
Page 05Page 05
Page 05
Back Panel

3 Numeric Keys*
Press to access a specific track for playback or to
select a specific track during programming. In MP3
recording mode, press to access the text edit
function.
4 FORMAT
Press to select either Audio CD or MP3 format.
Applicable only for blank CDs in Deck B.
5 SPEED
Press to select the CD Dubbing speed from 1x,
2x and 4x. Depending on the format and recording
mode, some speed mode may not be applicable.
6 SOURCE
Press to select the recording source from Analog
input, Optical input or Coaxial input. Applicable only
for recording from an external source.
7DUB
Press to duplicate individual tracks or the whole CD
from Deck A to Deck B, or to convert from Audio CD
tracks to MP3 tracks and vice versa. For Data CDs,
the whole disc will be duplicated at 4x speed.
8 FINALIZE
Press to close a recorded CD so as to allow
playback on other stereo systems such as Hi-Fi
systems and common CD players.
9 RECORD
Press to start recording audio from an external
source.
10 REW (Rewind)
Press to reverse the audio track that is playing.
11 SEL (Select)
Press to confirm the selected function that you wish
to perform. This is a safety feature to prevent
accidental damage to a CDR or CDRW. Functions
where you need to Select includes [Finalize],
[Erase], [Record] and [Dub].
12 (Previous Track)
Press to go to the previous track in playback mode.
In text edit mode, press to go to previous space.
13 FWD (Forward)
Press to fast-forward the audio track that is playing.
14 PAUSE*
Press to pause the current track in playback mode.
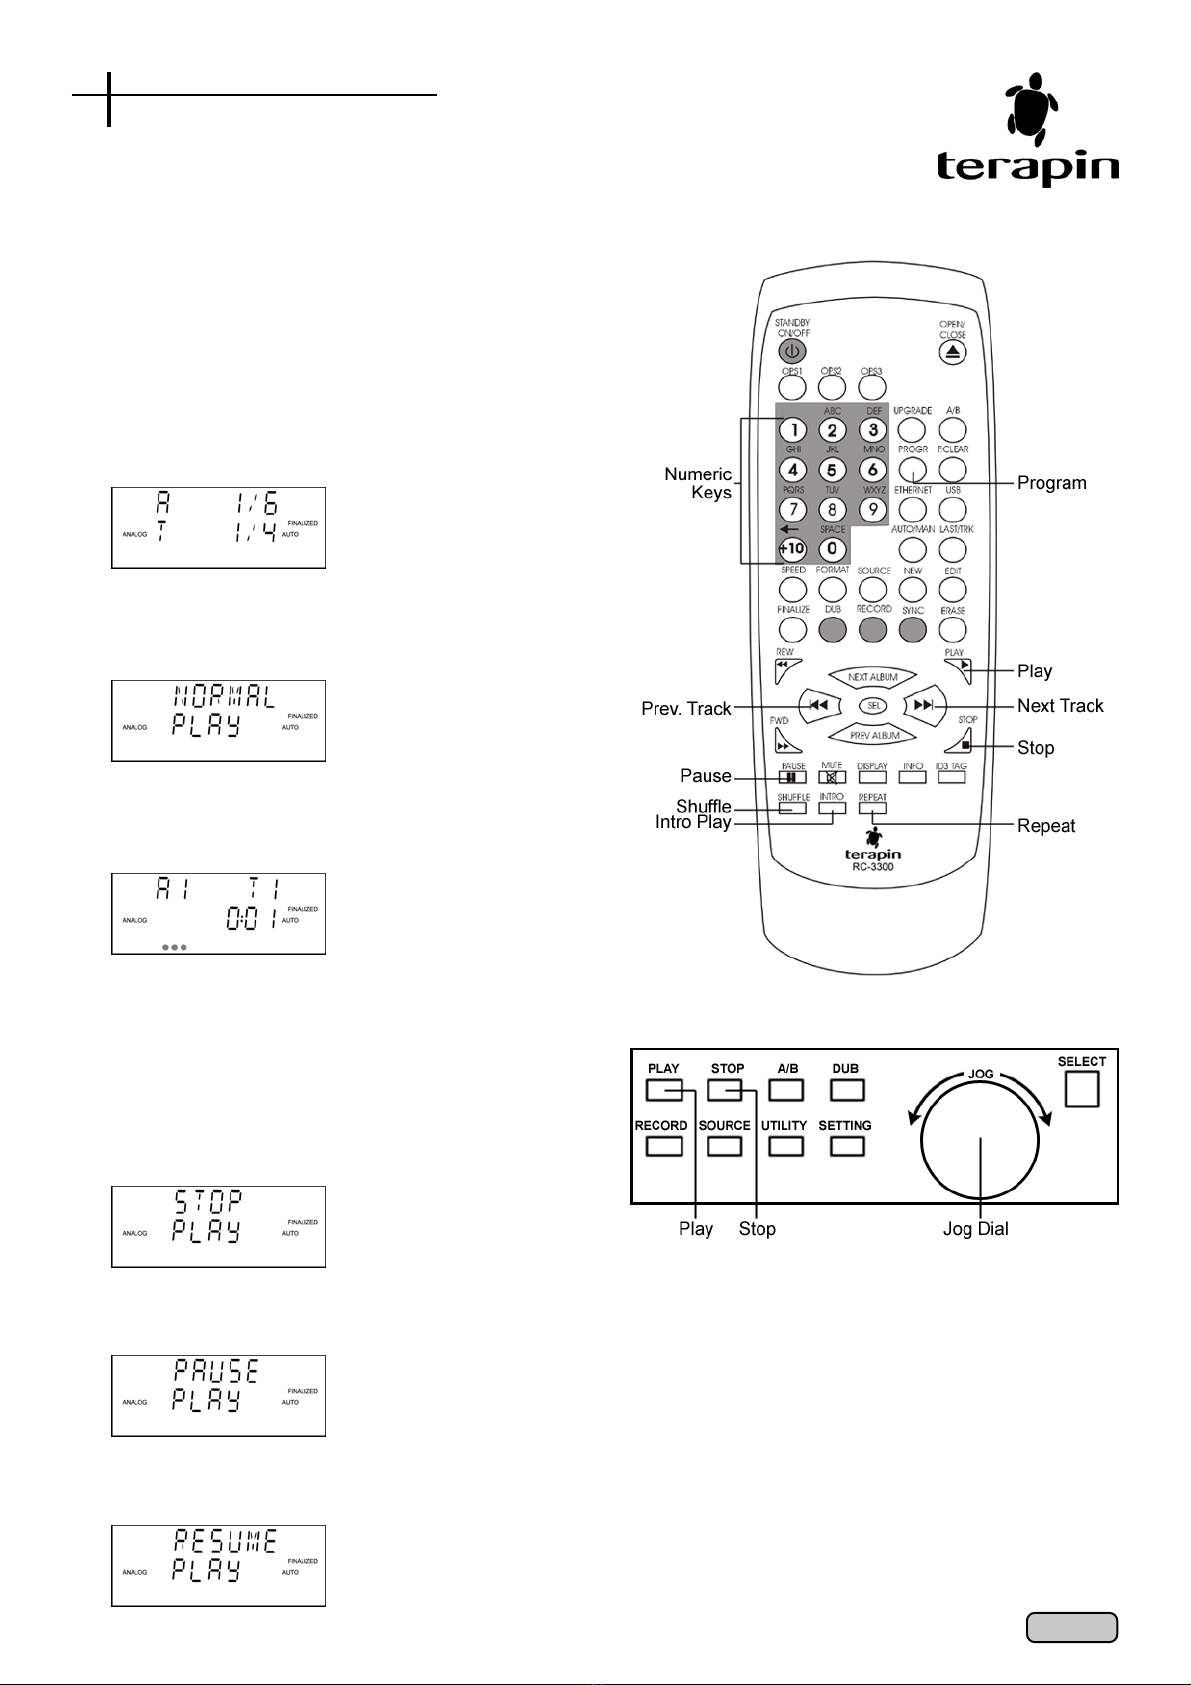
Remote Control
1 STANDBY ON/OFF
Press to power on the TX3300 from the standby
mode and vice versa.
2 OPS1 / OPS2 / OPS3 *
These 3 buttons are reserved for future functions
when upgrades and new functions for the TX3300
are available.
Page 06Page 06
Page 06Page 06
Page 06
Remote Control

15 MUTE*
Press to mute the audio. To undo the mute function,
press this button again.
16 SHUFFLE*
Press to activate the Shuffle play mode and to
select between [Album Shuffle], [Disc Shuffle] or
[Shuffle Off].
17 INTRO*
Press to play the first 10 seconds of each track in a
Audio CD or MP3 CD.
18 OPEN/CLOSE
Press to open and close the disc tray of the active
deck.
19 A/B
Press to switch from Deck A to Deck B and vice
versa.
20 UPGRADE*
When there are upgrades for the TX3300 available,
press this button to perform the upgrade via a
CD-ROM, a USB connection or via the Serial port.
21 P.CLEAR (Program Clear)*
Press to clear the current programmed playback.
22 PROGR (Program)*
Press to program a list of up to 50 of your favorite
songs.
23 USB*
Press to connect the TX3300 to a PC for transfer of
Audio CD tracks and MP3 tracks.
24 ETHERNET*
Press to connect the TX3300 to a Local Area
Network. This function is not available yet, and will
be activated via an upgrade provided in the future.
25 LAST/TRK (Last Track)*
During recording, press to indicate the current song
as the last track to be recorded. Applicable only for
recording in Auto mode or CD-Sync recording.
26 AUTO/MAN (Automatic/Manual)
Press to select either the [Automatic] or [Manual]
recording mode.
27 EDIT*
Press to edit the current song filename, album name
or disc name. Applicable only for an unfinalized MP3
CD.
28 NEW*
Press to create a new album. Applicable only for
MP3 recording.
29 ERASE
Press to erase the last track or the last album on a
recorded CD. You can also choose to erase the
whole album or the whole disc. Not applicable for
Audio CDRs.
30 SYNC
Press to perform a CD-Synchronization between
an external digital source and the TX3300.
31 PLAY
Press to play the current track.
32 NEXT ALBUM
Press to go to the next album. Applicable only for
MP3 CDs.
33 (Next Track)
Press to go to the next track in playback mode. In
text edit mode, press to go to the next space.
34 PREV ALBUM (Previous Album)
Press to go to the previous album. Applicable only
for MP3 CDs.
35 STOP
Press to stop playing the current track or to exit from
the current function.
36 ID3 TAG*
Press to view the Title, Album, Genre, Artist or
Year of the current song. Applicable only for MP3
tracks with ID3 v1.1 tags.
37 INFO*
Press to view the Disc, Album or Track information
of the Audio CD in the active deck. You can also
view the System information of the TX3300 and the
copyright status of the CD.
38 DISPLAY*
For MP3 CD, when not playing, press to display
either Album Navigation or Track Navigation.
During playback, press to display either Playing Time
or Remaining Time.
39 REPEAT*
For MP3 CDs, during playback, press to repeat the
current track, the current album, the whole CD or
both Deck A and Deck B. Press again to cancel.
For Audio CDs, during playback, press to repeat
the current track, the whole CD or both Deck A and
Deck B. Press again to cancel.
(Buttons indicated with * are advanced functions which
are available only with the remote control)
Page 07Page 07
Page 07Page 07
Page 07
Remote Control
Connecting the
TX3300
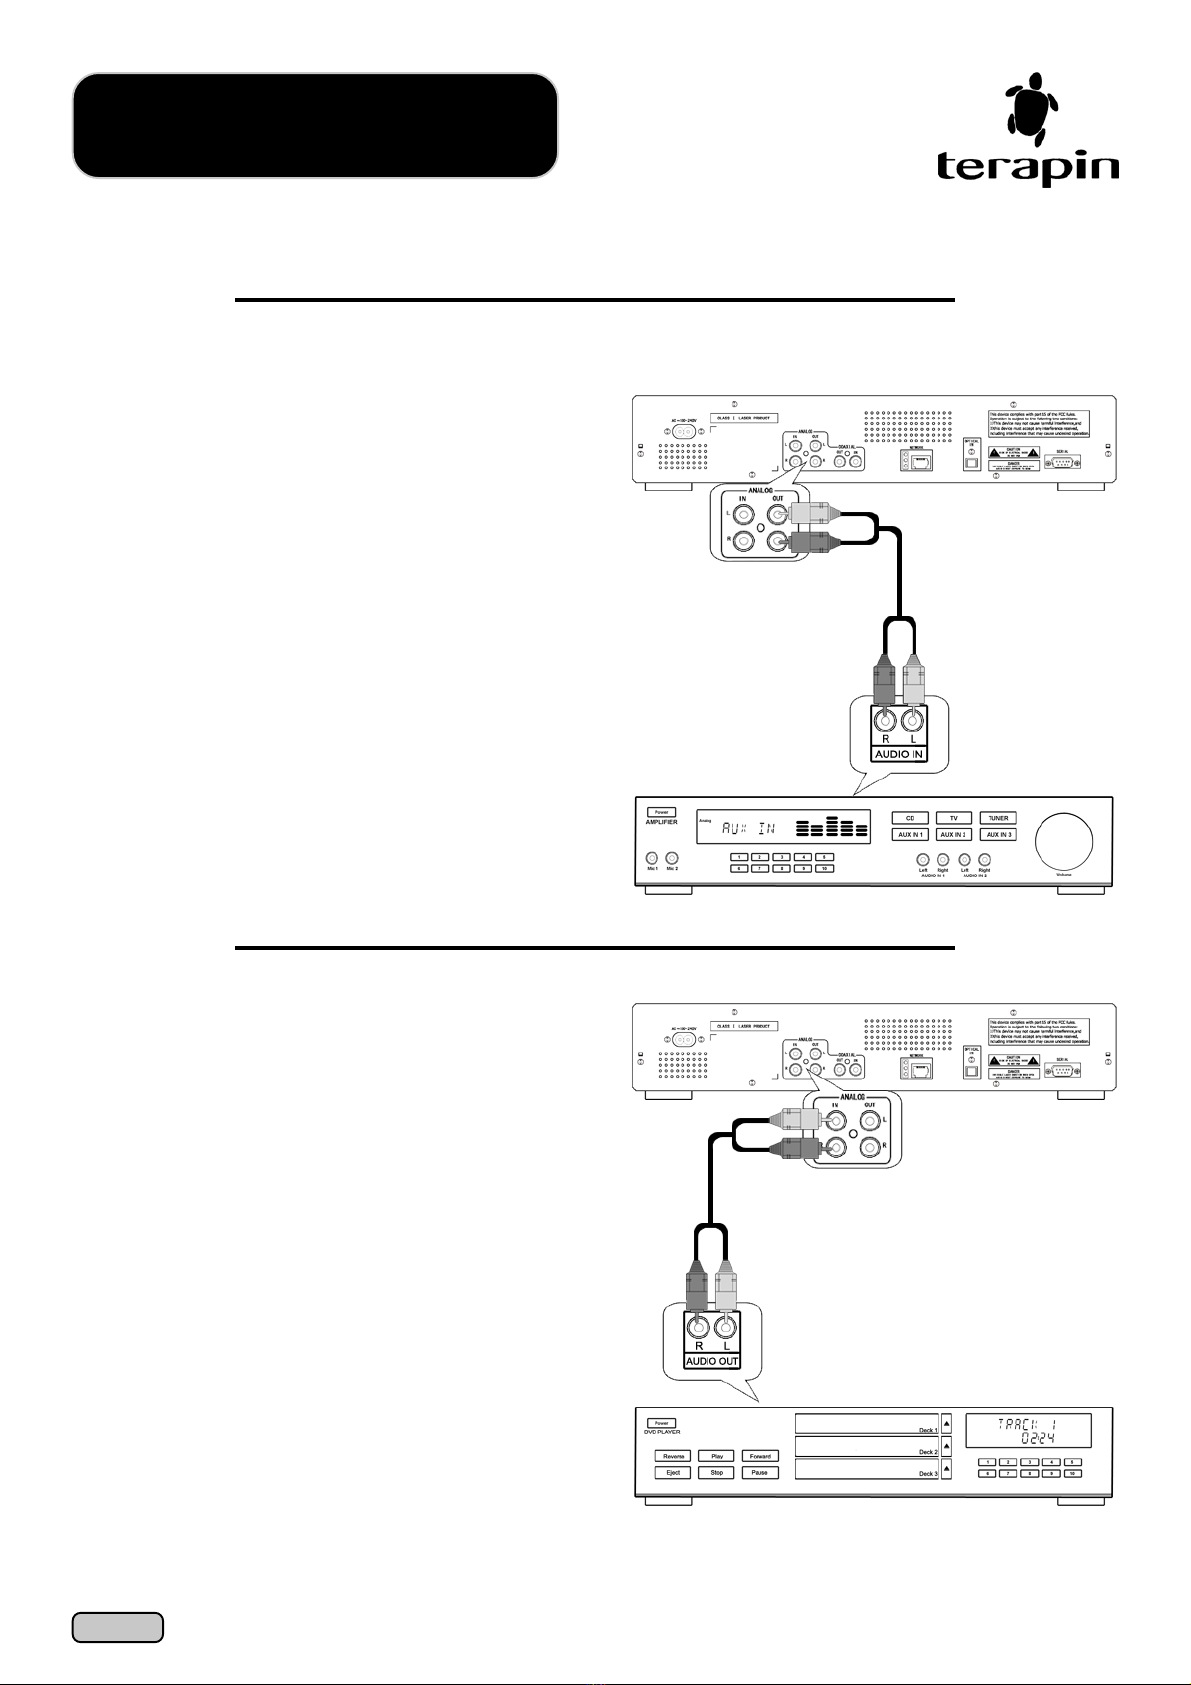
Analog Connections
1) Analog Playback
Connect the left/right TX3300 outputs to the Audio
In of your amplifier as shown in the diagram on the
right. This will allow you to playback CDs from Deck
A and Deck B, and from a external device.
Please ensure that you match the colour of the jack
to the colour of the port. For example, white jack to
white port, and red jack to red port.
The TX3300 is able to support several connections.
Your choice will depend on your needs and the
availability of ports on your particular external device.
Examples of external devices includes DVD, CD,
VCD and LD players, Radio and Hi-Fi Stereo systems,
among others.
2) Analog Recording
Connect the left/right TX3300 inputs to the Audio
Out of your external device as shown in the
diagram on the right. This will allow you to record
on a blank CDR or CDRW any tracks from this
external device.
Please ensure that you match the colour of the jack
to the colour of the port. For example, white jack to
white port, and red jack to red port.
Page 08Page 08
Page 08Page 08
Page 08
TX3300
TX3300
Amplifier
External Analog Device
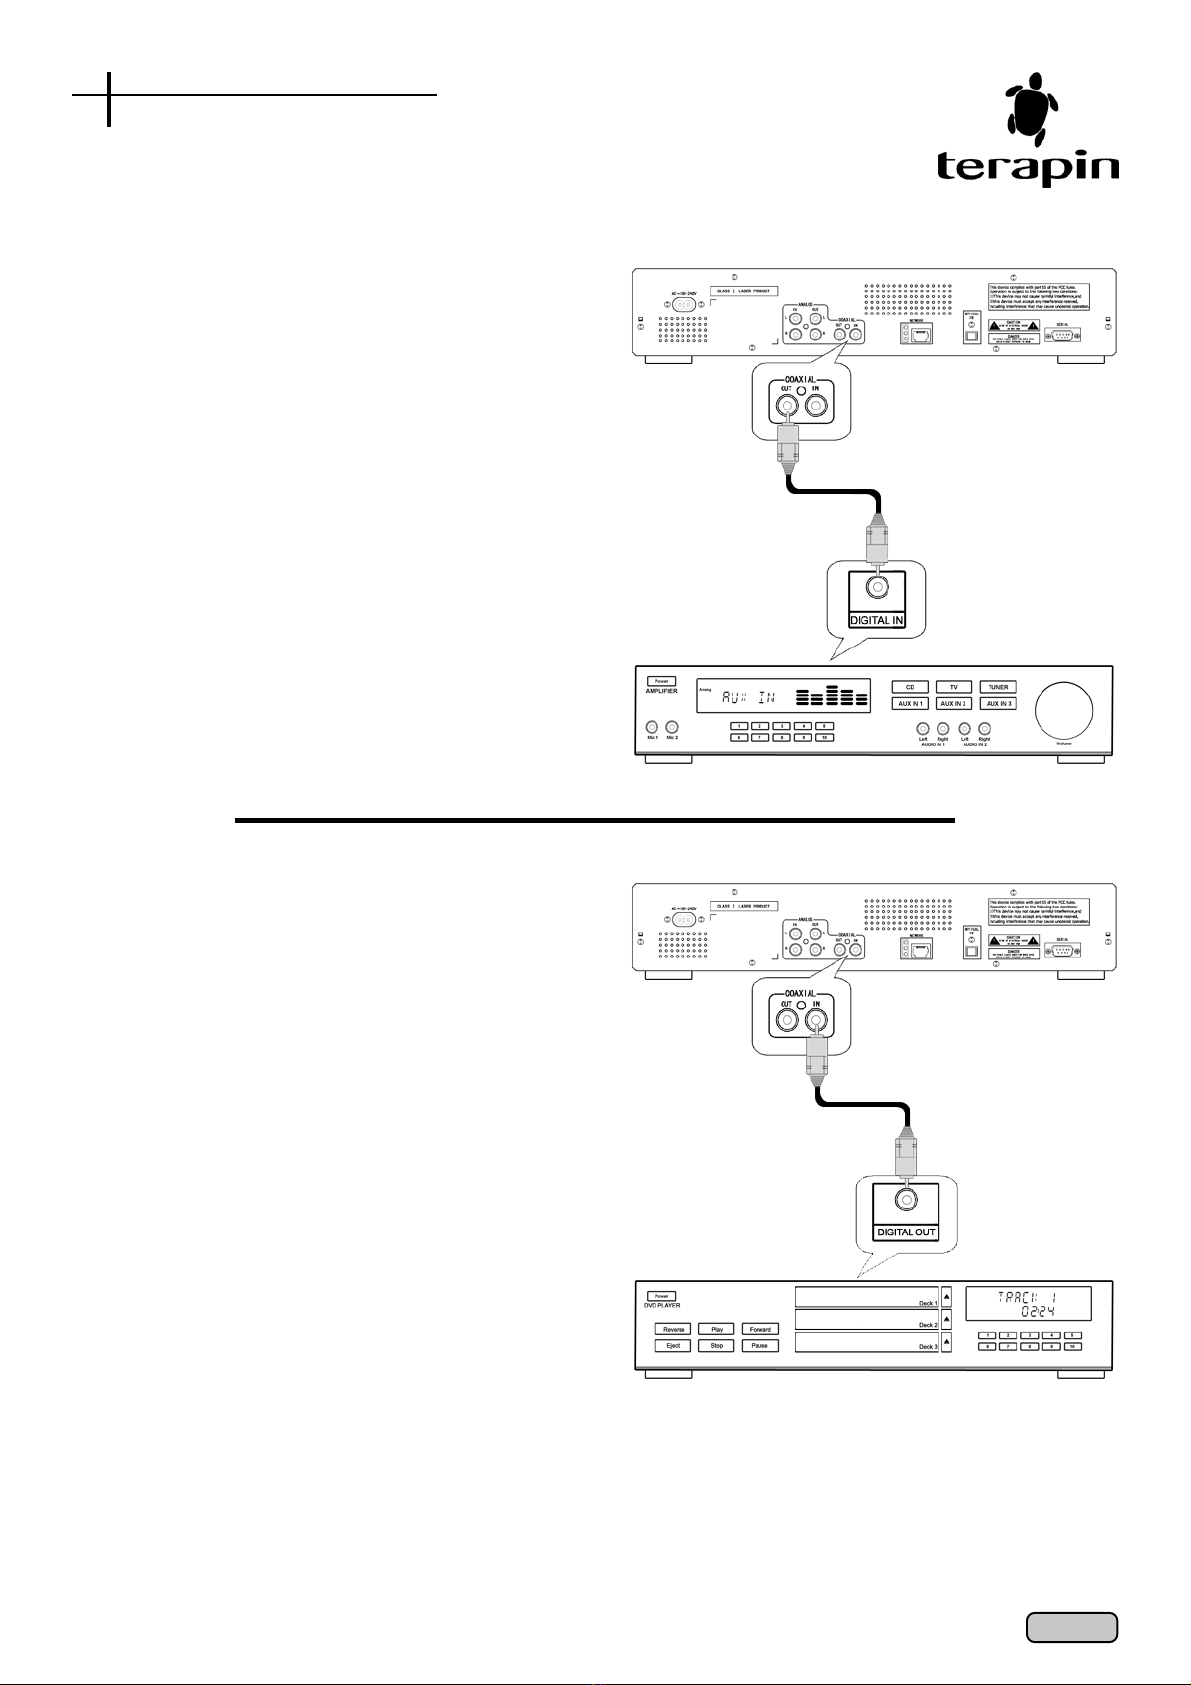
Digital Coaxial Connections
3) Digital Coaxial Playback
For digital coaxial playback of Audio or MP3 CDs
from Deck A and Deck B, connect the Coaxial Out
of the TX3300 to the Digital In of your amplifier or
stereo systems as shown in the diagram on the right.
Note:
Digital Coaxial connections use the same type of RCA
jacks. Hence, please ensure that you connect digital
signals only to digital jacks. Do not use RCA cables even
though they have the same jacks, as they are not
appropriate for digital signal use.
If you are using the TX3300 as a digital source to
connect to another digital recorder, the TX3300 does not
have the channel information (or sub-code) necessary
for your recorder device to perform a CD-Sync. Please
refer to your digital recorder’s product manual for more
information.
4) Digital Coaxial Recording
To record from an external device using a digital
coaxial connection, connect the Coaxial In of the
TX3300 to the Digital Out of your external device as
shown in the diagram on the right.
Note:
If you wish to perform a CD-Sync from your external
device, you will need the channel information (or sub-
code). Some devices do not have such features, and
you will be unable to perform a CD-Sync if your external
device does not support it. Please refer to your device’s
product manual for more information.
Page 09Page 09
Page 09Page 09
Page 09
TX3300
TX3300
Amplifier
External Digital
Coaxial Device
Digital Coaxial Connections

Digital Optical Connection
5) Digital Optical Recording
To record from an external device using an optical
connection, connect the Optical In of the TX3300 to
the Optical Out of your external device as shown in
the diagram on the right.
Note:
There are different types of optical connections that are
available. Please ensure that you only use ‘TOS’ type
optical cables with the unit.
When using optical cables, do not route the cord around
sharp angles. When storing, wind the cord so that they
have a diameter of at least 15cm.
When connecting, push all the way into the terminal. Do
not use cords with a length of over 3m.
If moisture or dust has collected on the plug, wipe it with
a soft cloth before connecting.
USB Connections
6) USB Connections
The TX3300 has a USB Master port and a USB
Slave port.
The USB Master port is for connection to supported
USB devices such as MP3 players.
(Not supported yet)
The USB Slave port is for connection to a PC or
laptop to upload or download MP3s to and from the
TX3300 or to upgrade the TX3300 via a USB cable.
Applicable only for PCs or laptops running Windows
98 SE, Windows 2000 or Windows ME.
Page 10Page 10
Page 10Page 10
Page 10
TX3300
TX3300
External Digital
Optical Device
PC or
Laptop
MP3
Player
Digital Optical Connection
USB Connection
Serial Port Connection
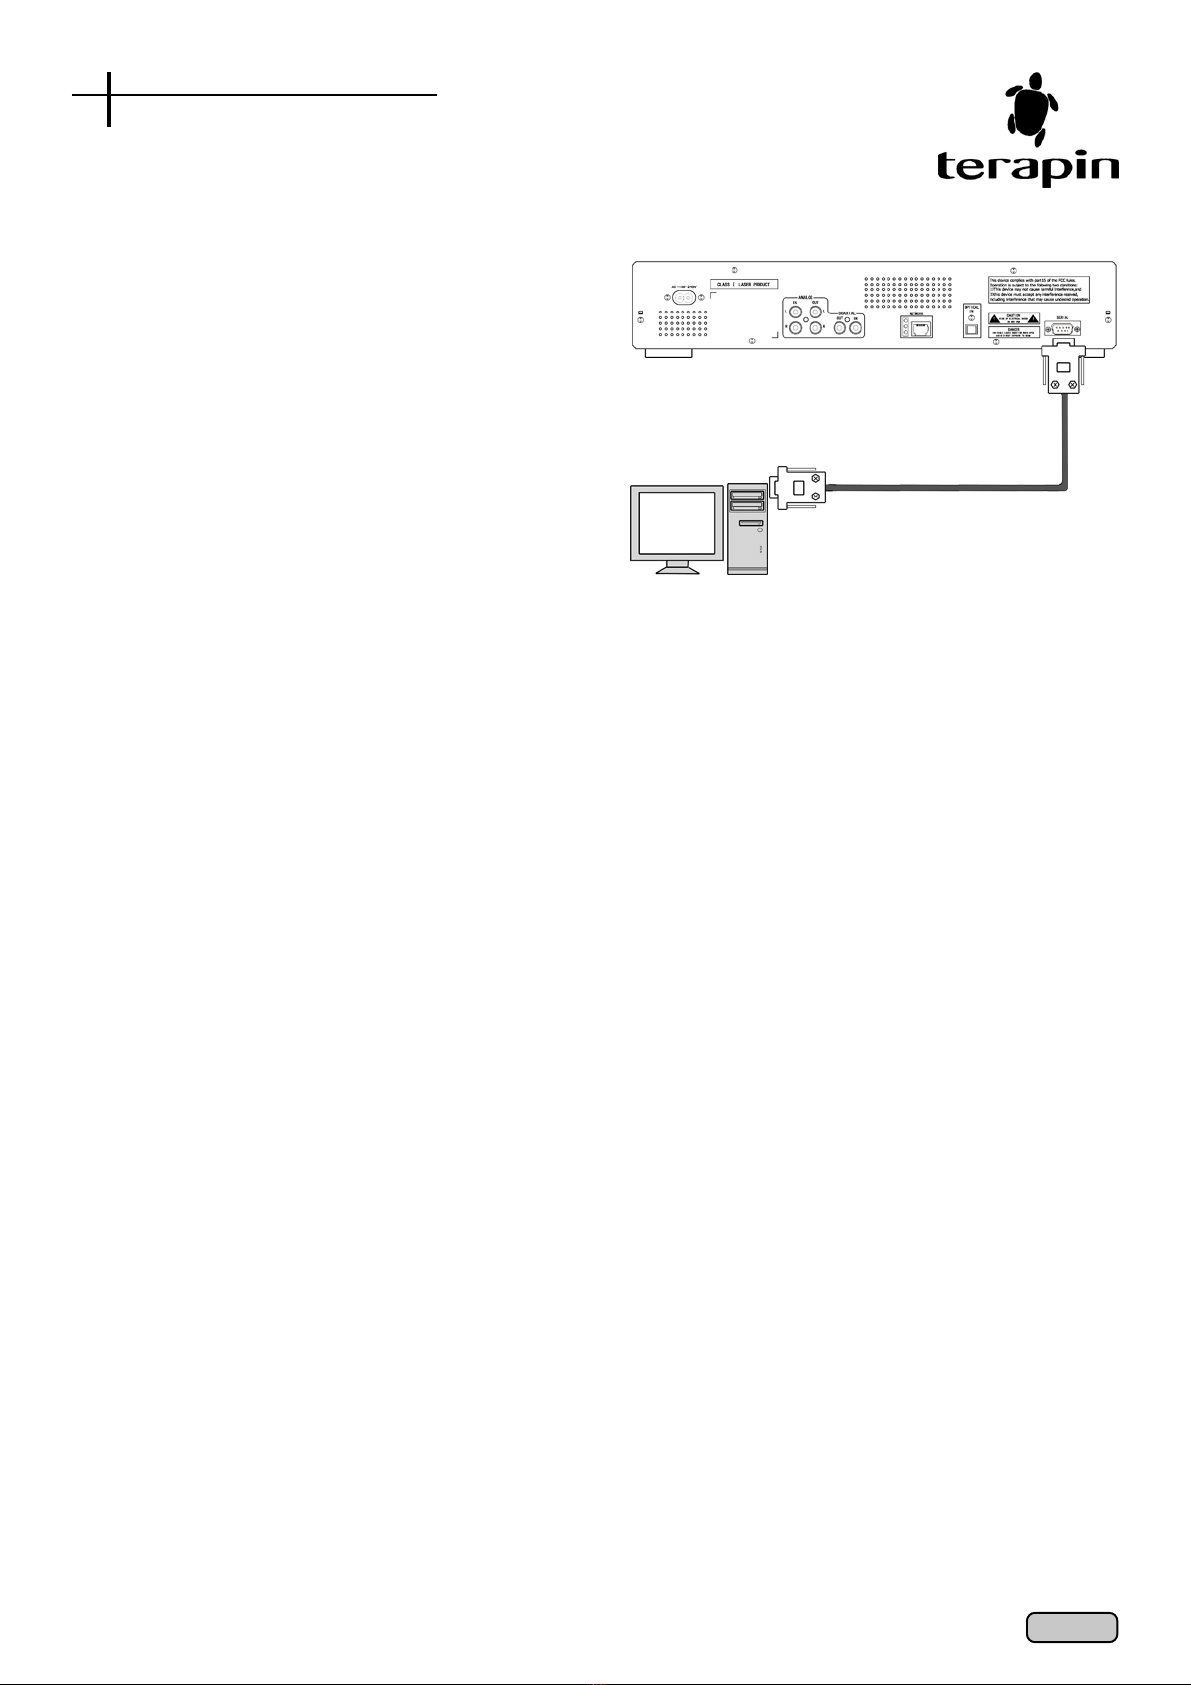
7) Serial Port Connection
This connection is meant to be used only for
upgrading the TX3300 or for recovery purposes.
For this connection, attach a Serial Cable to the
Serial Port of the TX3300 and attach the other end
to the COM Port of your PC or laptop.
Page 11Page 11
Page 11Page 11
Page 11
TX3300
PC or
Laptop
Serial Port Connection

Basic
Operations
1 Inserting Discs
1) Connect the power cord and power-on the TX3300
by pressing the Power button. (Press Standby On/
Off button for remote control) The TX3300 will
initialize and the following screen will appear
flashing.
Please note that when the display screen is
flashing, it means that the TX3300 is performing an
operation. Please wait for the screen to stop
flashing before continuing.
2) If there is no disc in the active deck, the display will
show NO DISC.
3) Press the Open/Close button to open the disc tray
of the active deck.
4) Insert a disc with the printed side facing up.
5) Press the Open/Close button to close the disc tray.
6) The TX3300 will start to read the inserted disc.
_________________________________________________________
2 If the disc is a standard CD or a finalized CDR or
CDRW disc (Audio CDs and MP3 CDs).
1) Once the disc has been read, the display window
will display briefly the type of disc and whether it is
an Audio CD or a MP3 CD. The ‘FINALIZED‘
indicator will also appear on the display.
Audio CD MP3 CD
2) If the disc is an Audio CD, the display window will
show the total number of tracks and the total time of
all the tracks on the disc. If there are more than 20
tracks, the disc will take a longer time to be read.
3) If the disc is a MP3 CD, the display window will show
the total number of albums and the total number of
tracks in the first album. If there are a lot of albums
and tracks, the disc will take a longer time to be
read.
_________________________________________________________
3 If the disc is not finalized.
The display will show the same information as a
finalized one, except that the FINALIZED indicator
will not appear. NEVER load an unfinalized disc into
Deck A as this can damage the disc and the TX3300.
Audio CD MP3 CD
You can continue to record additional tracks as long
as the disc is not finalized, subject to a maximum of
74 minutes for Audio recording or 650MB for MP3
recording.
_________________________________________________________
4 If the disc is a blank CDR or CDRW.
The following display will appear to indicate that the
inserted disc is blank:
Blank CDR Blank CDRW
If a blank disc that is of non-Audio grade is inserted,
the message PROFESSIONAL DISC will be scrolled
briefly across the display window.
This disc is only suitable for MP3 recording and
duplicating of computer CD-ROMs, and cannot be
used to make an Audio CD.
Page 12Page 12
Page 12Page 12
Page 12

Please note that only Deck B will be able to
recognize blank discs. Blank discs inserted in Deck
A will result in a ‘NO DISC’ message.
_________________________________________________________
5 If the disc is a computer CD-ROM.
The display will indicate that it is a data disc and
you will not be able to do any playback. However,
you will still be able to do a disc dub.
However, if there are any Audio or MP3 tracks in
the CD-ROM, the disc will be recognized as an
Audio or MP3 CD respectively.
_________________________________________________________
6 If the disc is not recognized by the TX3300.
The display will indicate that it is an unknown disc.
Examples includes discs recorded in an Apple
Macintosh format or spoilt discs.
_________________________________________________________
7 Switching off the TX3300
When the TX3300 is not in use, you can choose to
make it go into Standby mode. Press Power on the
front panel or Standby On/Off on the remote
control. The TX3300 will also go into standby mode
automatically if it is idle after 30 minutes.
Page 13Page 13
Page 13Page 13
Page 13
Quick Reference
Basic Operations
The TX3300 is able to playback both Audio CDs
and MP3 CDs. Only one deck can be active at any one
time, and the active deck is indicated by an amber light
at the top of the Open/Close button of the active deck
on the TX3300.
Playback
Functions
Audio CD Playback
1 Normal Playback
1) Insert an Audio CD with the printed side facing up
and wait for the TX3300 to finish detecting the
inserted disc. Once the Audio CD is detected, the
display window will show the total number of tracks
and the total playing time on the disc.
2) Press Play on the front panel control or remote
control to start playing the first track.
The TX3300 will then play in sequence from the first
track till the last track.
The Audio Level indicator at the bottom of the
display window will increase according to the
playback volume of the Audio CD. The more
segments that are lighted, the higher the playback
volume.
To stop playing at any time, simply press the Stop
button.
3) To pause the playback of the current track, press
the Pause button.
(Remote Control only)
4) To resume playback, press Play or the Pause
button again.
_________________________________________________________
2 Playback of a particular track
Front Panel Control:
1) To skip to the next track, turn the Function Jog Dial
clockwise.
2) To skip to the previous track, turn the Function Jog
Dial anti-clockwise.
Remote Control:
1) To skip to the next track, press .
2) To skip to the previous track, press twice. To play
the current track again, press once.
Alternatively, you can also use the Numeric Keys
to select the desired track. To select tracks 10 and
above, press the +10 button.
_________________________________________________________
3 Changing the Display mode
(Remote Control only)
You can select the mode of display from the
following options:
The default display shows the current playing time
of the current track.
1) To show the playing time remaining in the current
track, press Display once on the remote control.
2) To show the total current playing time of the current
disc, press Display twice on the remote control.
Page 14Page 14
Page 14Page 14
Page 14

3) To show the total playing time remaining of the
current disc, press Display thrice.
4) To revert to the default display, press Display again.
_________________________________________________________
4 Intro Play
(Remote Control only)
The TX3300 allows you to play the first 10 seconds
of each track in the Audio CD. This is useful when
you wish to find a particular track but do not know
which track is the one that you are looking for.
1) Press Intro on the remote control to enter into Intro
Play mode.
2) Press Play to start playing the first 10 seconds of
each track.
3) To start playing from a particular track, use the
Numeric Keys to select the desired track.
4) When you have found the track that you are looking
for, to switch into Normal Play mode, press Intro
again.
The track will then play again from the beginning.
Note:
If Shuffle mode is on, it will be automatically switched
off. The Repeat mode is also not allowed during Intro
Play mode.
Page 15Page 15
Page 15Page 15
Page 15
Quick Reference
Audio CD Playback

5 Shuffle Play
(Remote Control only)
The TX3300 allows you to play all the tracks on an
Audio CD in a random sequence. Each track will be
played once till all the tracks have finished playback.
1) Press Shuffle to play all the tracks of an Audio CD
randomly.
2) Press Play to start playing the Audio CD in Shuffle
mode.
3) To skip the current track and play the next track (not
in sequence), press or . You will not be able to
use the Numeric Keys to select a track in Shuffle
mode.
4) To switch back to Normal Play mode, press Shuffle
again. The Display Window will show SHUFFLE
OFF and continue playing the current track.
Thereafter, remaining tracks will be played in order.
Note:
If Intro Play mode is on, it will be automatically switched
off.
_________________________________________________________
6 Program Play
(Remote Control only)
This function allows you to create a playlist of your
favorite songs in your desired sequence from either Deck
A, Deck B, or both. You can program up to 50 tracks.
As this function includes playback of MP3 CDs,
please refer to Page 20 for more details.
7 Repeat Play
(Remote Control only)
This function allows you to play the same track, the
same disc, or both Deck A and Deck B again.
1) Press Repeat once on the remote control to play
the same track again.
2) Press Repeat twice to play the whole disc again.
3) If both Deck A and Deck B have discs inserted, press
Repeat 3 times to play both Deck A and Deck B
again.
4) Press Repeat again to cancel the repeat function.
5) Once you have selected your desired option, press
Play to start the playback.
Note:
The illustrations shown above are for selections before
playback only. The Repeat function is also valid during
playback.
Page 16Page 16
Page 16Page 16
Page 16
Audio CD Playback
MP3 CD Playback
1 Normal Playback
1) Insert a MP3 CD with the printed side facing up and
wait for the TX3300 to finish detecting the inserted
disc.
Once the MP3 CD is detected, the display window
will show the total number of albums in the disc (first
line) and the total number of tracks in that album
(second line).
2) Press Play on the front panel control or remote
control to start playing the first track of the first
album.
The TX3300 will then play in sequence from the first
track till the last track of the first album (or the
album that was selected).
The Audio Level indicator at the bottom of the
display window will increase according to the
playback volume of the MP3 CD. The more
segments that are lighted, the higher the playback
volume.
3) To stop playing at any time, simply press the Stop
button.
4) To pause the playback of the current track, press
the Pause button.
5) To resume playback, either press Play or the Pause
button again.
Page 17Page 17
Page 17Page 17
Page 17
Quick Reference
MP3 CD Playback

2 Playback of a particular track
Front Panel Control:
1) To skip to the next track, turn the Function Jog Dial
clockwise.
2) To skip to the previous track, turn the Function Jog
Dial anti-clockwise.
Remote Control:
1) To skip to the next track, press .
2) To skip to the previous track, press twice. To play
the current track again, press once.
Alternatively, you can also use the Numeric Keys
to select the desired track. To select tracks 10 and
above, press the +10 button.
_________________________________________________________
3 To select a particular album
(Not applicable if the TX3300 is currently playing)
Front Panel Control:
1) To go to the first song on the next album, press the
Select button once and turn the Function Jog Dial
clockwise.
2) To go to the first song of the previous album, press
the Select button once and turn the Function Jog
Dial anti-clockwise.
Remote Control:
1) To go to the first song on the next album, press the
Next Album button once.
2) To go to the first song of the previous album, press
the Prev Album button once.
_________________________________________________________
4 Changing the Display mode
(Remote Control only)
1) The default display is Album Display, where both
the Album and Track information is shown.
During playback, the display will show which track
of which album that the TX3300 is currently
playing.
2) You can change the display to show the time
remaining on the current track by pressing Display
once. To change back to show the current playing
time, press Display again.
3) You can also change the default Album Display to
Track Display to show the total number of tracks
on the disc, regardless of how many albums there
are.
4) Press Display before playback to change to Track
Display mode.
During playback, the display will show which track
is playing and the current playing time.
5) You can change the display to show the time
remaining on the current track by pressing Display
once. To change back to show the current playing
time, press Display again.
6) To change back to Album Display mode, ensure
that the disc is not playing, and press Display.
_________________________________________________________
5 Intro Play
(Remote Control only)
The TX3300 allows you to play the first 10 seconds
of each track in a MP3 CD. This is useful when you wish
to find a particular track but do not know which track is
the one that you are looking for.
Page 18Page 18
Page 18Page 18
Page 18
MP3 CD Playback
Table of contents
Other Terapin Recording Equipment manuals

Popular Recording Equipment manuals by other brands


Klementz
Klementz NANOPRE user manual

Lexicon
Lexicon 224X Service manual

Mercury Security
Mercury Security MR62e Installations and specifications

aci
aci DRN4 - V2 Installation & operation instructions

weintek
weintek cMT2078X Series Installation instruction

Ensemble Designs
Ensemble Designs TC400D TBC Application note