Termometerfabriken Viking 03601 User manual
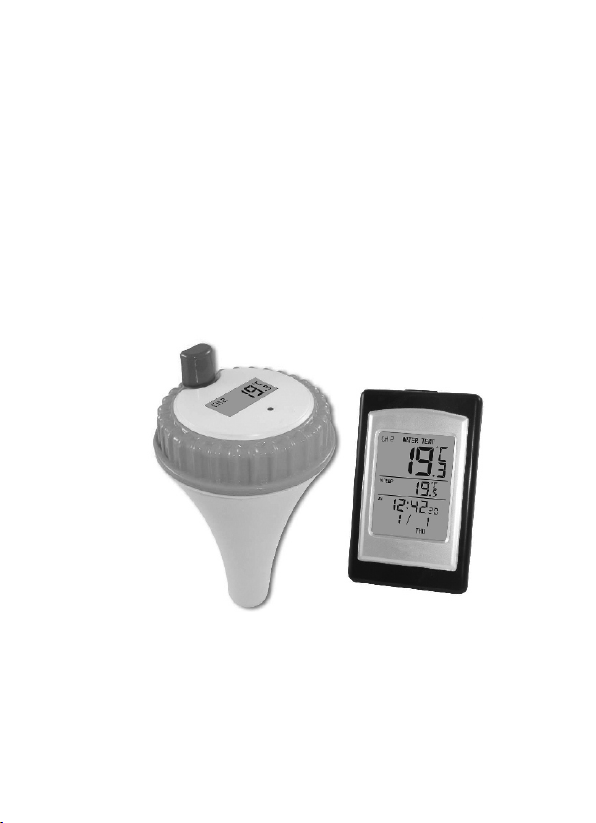
WIRELESS POOL THERMOMETER
Trådlös pooltermometer
ART. 03601
- User’s manual –
Användarmanual

1. INTRODUCTION
Thank you for your purchase of the Wireless Pool Thermometer with time,
date, and indoor temperature. The following user guide provides step by step
instructions for installation, operation and troubleshooting.
IMPORTANT NOTES:
- ONLY INSTALL IN FRESH WATER. DO NOT INSTALL IN SALT WATER.
- DO NOT EXCEED THE OPERATIONAL RANGE (-40 °C TO 35°C )
-NOT FOR USE IN SPA BATHS.
2.GETTING STARTED
The Wireless Poo Thermometer consists of a display station (receiver), and a
wireless thermometer (remote transmitter).
2.1 Remote Pool Thermometer Sensor Set Up
Note: To avoid permanent damage, please take note of the battery polarity
before inserting the batteries.
1. Twist off the transmitter cover (counterclockwise), as shown in
Figure 1. Be careful not to stress the sensor wire.
Figure 1
2. Insert two AA batteries and close the battery door, as shown in
Figure 2.
Figure 2

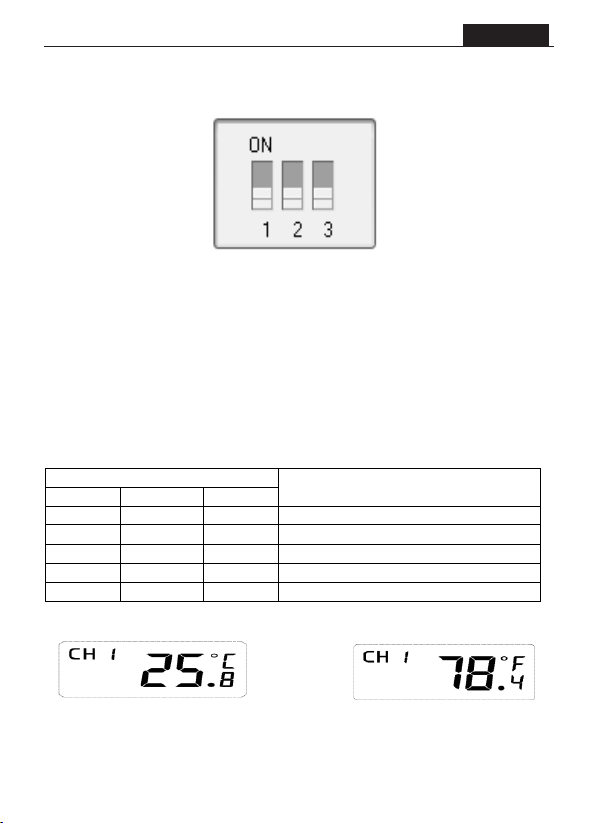
3. Locate the dip switches on the inside cover of the lid of the
transmitter.
Figure 3 displays all three switches in the OFF position (down).
Figure 3
Note: The default setting is as follow: Dip Switches 1 and 2 are down, this
transmitter is as Channel 1; Dip Switch 3 is up, the temperature unit of this
transmitter is °C .
4. Channel Number: The display console supports up to 3
transmitters. To set each channel number, change Dip Switches 1
and 2, as referenced in Table .
5. Temperature Units of Measure: To choose the transmitter display
units of measure (°F / °C), change Dip Switch 3, as referenced in
Table .
Table 1
6. Verify the correct channel number (CH) and temperature units of
measure (°F /°C) are other display, as shown in Figure 4 and Figure
DIP SWITCH
FUNCTION
1
2
3
DOWN
DOWN
---
Channel 1 (factory default setting)
UP
DOWN
---
Channel 2
DOWN
UP
---
Channel 3
---
---
DOWN
°F
---
---
UP
°C (factory default setting)

Figure4 Figure 5
Note: The following illustration shows the full segments of the transmitter LCD
for description purposes only and will not appear like this during normal
operation.
Figure 6
1. Transmitter channel number, total 3 channels
2. Water temperature
3. Water temperature units (°F/ °C)
4. Transmitter indication (flashes when sent)
Verify the gasket is properly seated in the guide on transmitter cover. Twist on
the transmitter cover (clockwise), as shown in Figure .
Figure 7
2.2 Display Console Set Up
Note: To avoid permanent damage, please take note of the battery polarity
before inserting the batteries.

Remove the battery door on the back of the display. Insert 2 AAA 1.5V (alkaline
or lithium, avoid rechargeable) batteries in the back of the display console.
All of the LCD segments will light up for a few seconds to verify all segments
are operating properly, and the unit will beep.
Replace the battery door, and fold out the desk stand and place the console in
the upright position.
The console will instantly display indoor temperature, and the default date and
time. The thermometer transmitter will display --, then update remote
temperature on the display within a few minutes. Do not touch any buttons
until the remote sensor reports in, otherwise the remote sensor search mode
will be terminated, and you must power down and power up the console again
by removing batteries.
When the remote sensor data has been received, the console will
automatically switch to the normal mode, and all further settings can be
performed.
If the remote does not update, please reference the troubleshooting guide in
Section 7.
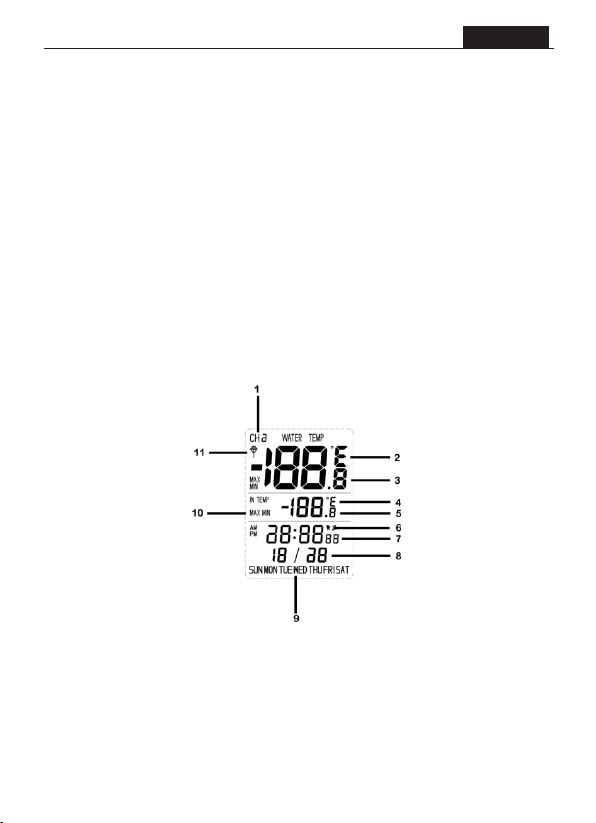
2.3 Display Console Layout
Note: The following illustration shows the full segments of the receiver LCD for
description purposes only and will not appear like this during normal
operation.
Figure8

1. Transmitter channel number
2. Water temperature units (°F/°C)
3. Water temperature
4. Indoor temperature units (°F /°C)
5. Indoor temperature
6. Time and snooze alarm
7. Time of day
8. Date
9. Day of week
10. Min/max icon
11. Transmitter reception (flashes when received)
The normal display mode, as shown in Figure 9.
Figure 9
3REMOTE SENSOR INSTALLATION
Place the remote sensor into the water (pool, spa, etc). The temperature will
take a few hours to stabilize. There is bracket on the thermometer to optionally
tether the float.

CONSOLE OPERATION
4.1 Buttons
The display console includes the following buttons (and location)
1. MODE: on the back of the display
2. C/F: on the back of the display
3. MAX/MIN: on the back of the display
4. SET: on the back of the display
5. CHANNEL: on the top of the display
6. CLEAR: on the top of the display
Set (Program) Mode
Press the MODE button to switch between TIME -> ALARM -> DATE
The following section defines how to set the time, alarm and date.
Notes:
- After 60 seconds of inactivity, the display will automatically revert to the
normal display mode (automatic time out).
- Press and hold the C/F button for two seconds to advance rapidly.
4.2.1 Set Time
1. While in the TIME mode, press the SET button, and the hour will
begin flashing. Press the C/F button to advance the hour. Make
special note of the AM / PM icon.
2. Press the SET button again, and the minute will begin flashing.
Press the C/F button to advance the minute.
3. Press the SET button again, and the second will begin flashing.
Press the C/F button to toggle between 12 hour and 24 hour
display mode.
4. Press the SET button again to return to normal mode.
4.2.2 Set Alarm Time
1. While in the ALARM mode, press the SET button, and the alarm
hour will begin flashing. Press the C/F button to advance the
alarm hour. Make special note of the AM / PM icon.
2. Press the SET button again, and the alarm minute will begin
flashing. Press the C/F button to advance the alarm minute.

3. Press the SET button again to return to normal mode.
4.2.3 Set Date
1. While in the DATE mode, press the SET button, and the year will
begin flashing. Press the C/F button to advance the year.
2. Press the SET button again, and the month will begin flashing. Press
the C/F button to advance the month.
3. Press the SET button again, and the day will begin flashing. Press
the C/F button to advance the day.
4. Press the SET button again to return to normal mode.
4.3 Alarm Mode
4.3.1 Activating / Deactivating the Alarm
1. While in the ALARM mode, press the C/F button to activate the
alarm. The alarm icon will appear .
2. Press the C/F button again to deactivate the alarm. The alarm icon
will disappear.
4.3.2 Cancelling the Alarm
When an alarm has been triggered, the alarm will sound and the alarm icon
will flash for 60 seconds. Press any button on the back of the display to
silence the alarm.
Snooze Alarm
When an alarm has been triggered, the alarm will sound and the alarm icon
will flash for 60 seconds. Press the CHANNEL button on the top of the
display or allow the alarm to time out to enter the snooze mode. The snooze
icon will flash (ZZ). After five minutes, the alarm will sound again. After five
consecutive snooze alarms, the snooze alarm mode will be deactivated.

4.4 Min/Max Mode
Notes:
- If you have multiple remote temperature sensors, select the Channel you
wish to view the min/max data before you enter the min/max mode.
- Resetting the minimum and maximum values resets all three channels at the
same time for multi-channel operation.
1. Minimum Values. While in Normal Mode, press the MIN/MAX
button to enter the min/max mode. The minimum water
temperature and indoor temperature will be displayed. Press the
CLEAR button (on the top of the display) to clear the minimum
values to the current measured values.
2. Maximum Values. Press the MIN/MAX button again, and the
maximum water temperature and indoor temperature will be
displayed. Press the CLEAR button (on the top of the display) to
clear the maximum values to the current measured values.
3. Press the MIN/MAX button again to exit the min/max mode.
4.5 °C/°F Units of Measure
To toggle between °C/°F temperature units of measure on the display, press
the C/F button on the back of the display.
4.6 Multi-Channel Operation
The station supports up to 3 remote thermometers (one is included).
4.6.1 Multi-channel Sensor Initialization
Place the multiple remote sensors about 10 feet from the console. Power up
the sensors and console in the following order:
1. Power up the first remote thermometer and set the channel number dip
switches, as described in Section 2.2. Verify the display reads
Channel 1.
2. Power up the second remote thermometer and set the channel number
dip switches, as described in Section 2.2. Verify the display reads
Channel 2.
3. Power up the third remote thermometer (if available) and set the
channel number dip switches, as described in Section 2.2. Verify the
display reads Channel 3.

4. Power up the console last and wait about 3 minutes. Press the
CHANNEL button on the top of the display to verify all three sensors
are communicating to the console.
5. Once verified, you are ready to install the remote thermometers.
Allow about 30 minutes for all sensors to stabilize.
4.7 Maintenance
We recommend inspecting the gasket inside the lid of the floating
thermometer with each battery change. Moisten with pool gasket lubricant
available from most pool stores. Inspect for any moisture inside the floating
thermometer. Replace the gasket every 1 year .
To replace the gasket, slide the gasket over the float potion of the floating
thermometer and insert into the gasket guide on the lid.
5. GLOSSARY OF TERMS
Term Definition
Accuracy Accuracy is defined as the ability of a
measurement to match the actual value of the
quantity being measured.
Range Range is defined as the amount or extent a
value can be measured.
6. SPECIFICATIONS
6.1 Wireless Specifications
Wireless Transition Range without obstacle (in the open air): 165
feet (50 meters) under ideal conditions; 100 feet (30 meters) in the
majority of the conditions.
Frequency: 433 MHz
6.2 Measurement Specifications
The following table provides specifications for the measured parameters.

Measurement
Range
Accuracy
Resolution
Indoor
Temperature
-40 to 35°C
± 1 °C
0.1 °C
Water
Temperature
-40 to 35°C
± 1 °C
0.1 °C
6.3 Power Consumption
Station : 2 x AAA 1.5V Alkaline batteries
Pool thermometer (Remote sensor) : 2 x AA 1.5V Alkaline batteries
Battery life: Minimum 12 months for base station
Minimum 12 months for remote thermometer sensor (use lithium
batteries in cold water climates)
7. TROUBLESHOOTING GUIDE
Problem
Solution
Wireless remote not reporting
in to station.
- The maximum line of sight
communication range is 50m. Move the
display console closer to the remote
sensor.
- Cycle power on the station by removing
and re-inserting the batteries. The station
may have exited the search mode.
- Install a fresh set of batteries in the
remote thermo-hygrometer. For cold
weather environments, install lithium
batteries.
- Make sure the remote sensors are not
transmitting through solid metal (acts as an
RF shield), or earth barrier (down a hill).
- Move the station away from electrical
noise emitting devices, such as computers,
TVs and other wireless transmitters or
receivers.
- Radio Frequency (RF) Sensors cannot
transmit through metal barriers (example,
aluminum siding) or multiple, thick walls.
Display station contrast is weak
Replace station batteries with a fresh set of

batteries.
Temperature on remote sensor
and station disagree
- The remote sensor updates every 10
seconds.
- The display reads the sensor every 60
seconds.
- If transmission is intermittently lost, the
sensor and station temperature values will
disagree.
8.LIABILITY DISCLAIMER
Please help in the preservation of the environment and return
used batteries to an authorized depot.
The electrical and electronic wastes contain hazardous substances.
Disposal of electronic waste in wild country and/or in unauthorized
grounds strongly damages the environment.
Reading the “User manual” is highly recommended. The
manufacturer and supplier cannot accept any responsibility for any
incorrect readings and any consequences that occur should an
inaccurate reading take place.
This product is designed for use in the home only as indication of
weather conditions. This product is not to be used for medical
purposes or for public information.
This product is not a toy. Keep out of the reach of children.
8. DETAILS AND PRECAUTIONS ON THE USE OF
BATTERIES
- Discard a used battery in nature or garbage pollutes and prevents the
recovery of recyclable materials.
It is therefore important to limit consumption of batteries and follow these
guidelines:
focus on alkaline batteries (that last longer than the saline batteries)
and when possible, rechargeable batteries
deposit batteries and accumulators in specific containers arranged
among traders.
For example, metals will be valued and polluted the environment because they

INTRODUKTION
Tack för ditt köp av Wireless Pool Thermometer med tid, datum och
inomhustemperatur. Följande användarhandbok innehåller stegvisa
instruktioner för installation, drift och felsökning.
VIKTIGA ANTECKNINGAR:
Använd endast produkten i färskvatten. Använd inte produkten i saltvatten
Används endast inom angivet temperaturområde (-40 °C TO 35°C )
Ej för användning i spa-bad
ATT KOMMA I GÅNG
Pooltermometern består av en displaystation (mottagare) och en trådlös
poolsensor (fjärrgivare).
Uppstart av poolsensorn
Obs! För att undvika permanent skada, var vänlig observera batteripolariteten
innan du sätter i batterierna.
Vrid av sensorlocket (moturs), som visas i Figur 1. Var försiktig så att
sensortråden inte spänns.
Figure 4
Sätt i två AA-batterier och stäng batteriluckan, som visas i Figur 2.
Figure 5
SVENSKA
Se dom tre strömbrytarna på insidan av locket.
Figur 3 visar alla tre strömbrytare i läge OFF (nedåt)
Figure 6
Obs! Standardinställningen är som följer: Strömbrytare 1 och 2 är nere,
Sändaren ligger på kanal 1; Strömbrytare 3 är upp, temperaturenheten hos
denna sändare är °C.
Kanalnummer: Displaykonsolen stöder upp till 3 sändare. För att
ställa in varje kanalnummer, ändra Strömbrytarna 1 och 2, enligt
referens i Tabellen nedan.
Temperaturenheter: För att välja måttenhetens sändningsenheter
(°F / °C), ändra strömbrytare 3, som refereras i Tabellen nedan.
Table 1
Kontrollera att rätt kanalnummer (CH) och temperaturenheter (° F / ° C) visas
på displayen.
Figure4 Figure 5
Obs! Följande illustration visar de fullständiga segmenten av sändarens
DIP SWITCH
FUNCTION
1
2
3
DOWN
DOWN
---
Channel 1 (factory default setting)
UP
DOWN
---
Channel 2
DOWN
UP
---
Channel 3
---
---
DOWN
°F
---
---
UP
°C (factory default setting)
SVENSKA

LCD-skärm endast för beskrivningsändamål och visas inte så här under normal
drift.
Figure 6
1. Sändarens kanalnummer, totalt 3 kanaler
2. Vatten temperatur
3. Vattentemperaturenheter (°F / °C)
4. Sensorindikering (blinkar vid sändning)
Kontrollera att packningen sitter ordentligt i styrningen på sensorkåpan. Vrid
på sensorns lock (medurs), som visas i Figur 7.
Figure 7
Uppstart av inomhusdisplayen.
Obs! För att undvika permanent skada, var vänlig observera batteripolariteten
innan du sätter i batterierna.
Ta bort batteriluckan på baksidan av displayen. Sätt i 2 AAA 1.5V-batterier
(alkaliska eller litium, undvik uppladdningsbara) på baksidan.
Alla LCD-segmenten tänds i några sekunder för att verifiera att alla segment
fungerar korrekt och enheten piper.
Sätt tillbaka batteriluckan och vik ut bordsstativet och placera konsolen i
SVENSKA
upprätt läge.
Konsolen visar omedelbart inomhustemperatur och standard datum och tid.
Displayen för poolsändaren kommer att visa streck. Poolsensorns temperatur
kommer att dyka upp på displayen inom några minuter Rör inte några knappar
förrän poolsensorn har rapporterat, annars avbryts displayens sökläge, och du
måste stänga av och starta om den igen genom att ta bort batterierna.
När poolsensorns data har tagits emot växlar inomhusdisplayen automatiskt till
normalt läge, och alla ytterligare inställningar kan utföras.
OBS! Ha dom båda delarna intill varandra tills den trådlösa kontakten har
etablerats.
Om fjärrsensorn inte uppdateras, vänligen se felsökningsguiden.
Layout inomhusdisplay.
Obs! Följande illustration visar endast de fullständiga segmenten på
mottagarens LCD-skärm endast för beskrivningsändamål och visas inte så här
under normal drift.
Figure8
1. Sändarens kanalnummer
2. Vattentemperaturenheter (°F / °C)
3. Vattentemperatur
4. Inomhustemperaturenheter (°F / °C)
5. Inomhustemperatur
7. Tid och snooze alarm
SVENSKA

7. Klocka
8. Datum
9. Veckodag
10. Max/Min ikon
11. Symbol för trådlös mottagning (blinkar vid mottagning)
Normalt visningsläge, som visas i Figur 9.
Figure 9
Placera fjärrkontrollen i vattnet . Temperaturen tar några timmar att stabilisera.
Inomhusdisplayens funktioner
Knappar
Displaykonsolen innehåller följande knappar (och placering)
MODE: på baksidan av displayen
C/F: på baksidan av displayen
MAX/MIN: på baksidan av displayen
SET: på baksidan av displayen
CHANNEL: högst upp på displayen
CLEAR: högst upp på displayen
Tryck på MODE knappen för att växla mellan TID -> ALARM -> DATUM
I följande avsnitt definieras hur du ställer in tid, larm och datum
OBS:
- Efter 60 sekunder av inaktivitet återgår displayen automatiskt till det normala
SVENSKA

visningsläget.
- Håll C / F-knappen intryckt i två sekunder för ändra i snabbare takt.
Ställ in klockan
Tryck på SET-knappen när tiden visas på displayen. Tryck på C / F-knappen för
att ändra på inställningarna. Gör inställningar för tiden i följande ordning. 12/24
timmars visning, Timmar, minuter.
Använd C/F knappen för att ändra till önskad inställning och tryck sedan på
SET-knappen för att hoppa vidare. Tryck ytterligare en gång på SET-knappen
efter inställning av minuter så återgår displayen till normalt visningsläge.
Ställ in alarmtid
Använd Modeknapen för att visa alarmtiden i displayen (ett A visars bredvid
tiden) Tryck sedan på SET och C/F knapparna för att ställa in alarmtiden på
samma sätt som för klockan.
Ställ in Datum
Använd modeknappen för att visa datum i displayen. När datum visas andvänd
SET och C/F knapparna för att göra inställningar på samma sätt som för
klockan och alarmtid. Ordningen på inställningarna är: år, månad och veckodag.
Alarmläge
Aktivera / avaktivera alarmet
Använd modeknappen för att gå till alarmläget på displayen, tryck sedan på C /
F-knappen för att aktivera larmet. Larmikonen visas .
Tryck på C / F knappen igen för att avaktivera larmet. Larmikonen försvinner.
SVENSKA
Avbryta alarmet
När ett larm har utlösts ljuder larmet och larmikonen blinkar i 60
sekunder. Tryck på valfri knapp på skärmens baksida för att tysta larmet.
Snooze Alarm
När ett alarm har utlösts ljuder larmet och larmikonen blinkar i 60
sekunder. Tryck på channel-knappen överst på displayen eller låt alarmet
ljuda klart för att gå in i snooze-läget. Snooze-ikonen blinkar (ZZ). Efter fem
minuter ljuder larmet igen. Efter fem på varandra följande snooze-larm
avaktiveras larmläget för snooze.
Min/Max Läge
Notes:
- If you have multiple remote temperature sensors, select the Channel you
wish to view the min/max data before you enter the min/max mode.
- Resetting the minimum and maximum values resets all three channels at the
same time for multi-channel operation.
Anmärkningar:
- Om du har flera fjärrsändare, välj den kanal du vill visa min/max-data innan
du går in i
min/ max-läget.
- Återställning av minimi- och maximivärden återställer alla tre kanaler
samtidigt för flerkanalig drift.
Min värde. I normalläge, tryck på MIN / MAX-knappen för att gå till min /
max-läget.
Den lägsta uppmätta vattentemperatur och inomhus temperaturen visas. Tryck
på CLEAR-knappen (högst upp på displayen) för att radera minimivärdena och
påbörja en ny mätperiod.
Maxvärden. Tryck på MIN / MAX knappen igen, och den högsta uppmätta
SVENSKA
Table of contents
Languages:


