Tesla DVB-T2 User manual

D-LED TV 32 DVB-T2
Model: K32D301B2
OPERATING INSTRUCTION
ENG
Please read these instructions before operating your set and retain them for future reference.


3
ENG
Features � � � � � � � � � � � � � � � � � � � � � � � � � � � � �3
Safety Warning and Notice � � � � � � � � � � � � � � �4
Mounting and Connecting � � � � � � � � � � � � � � � �5
Packing list � � � � � � � � � � � � � � � � � � � � � � � � �5
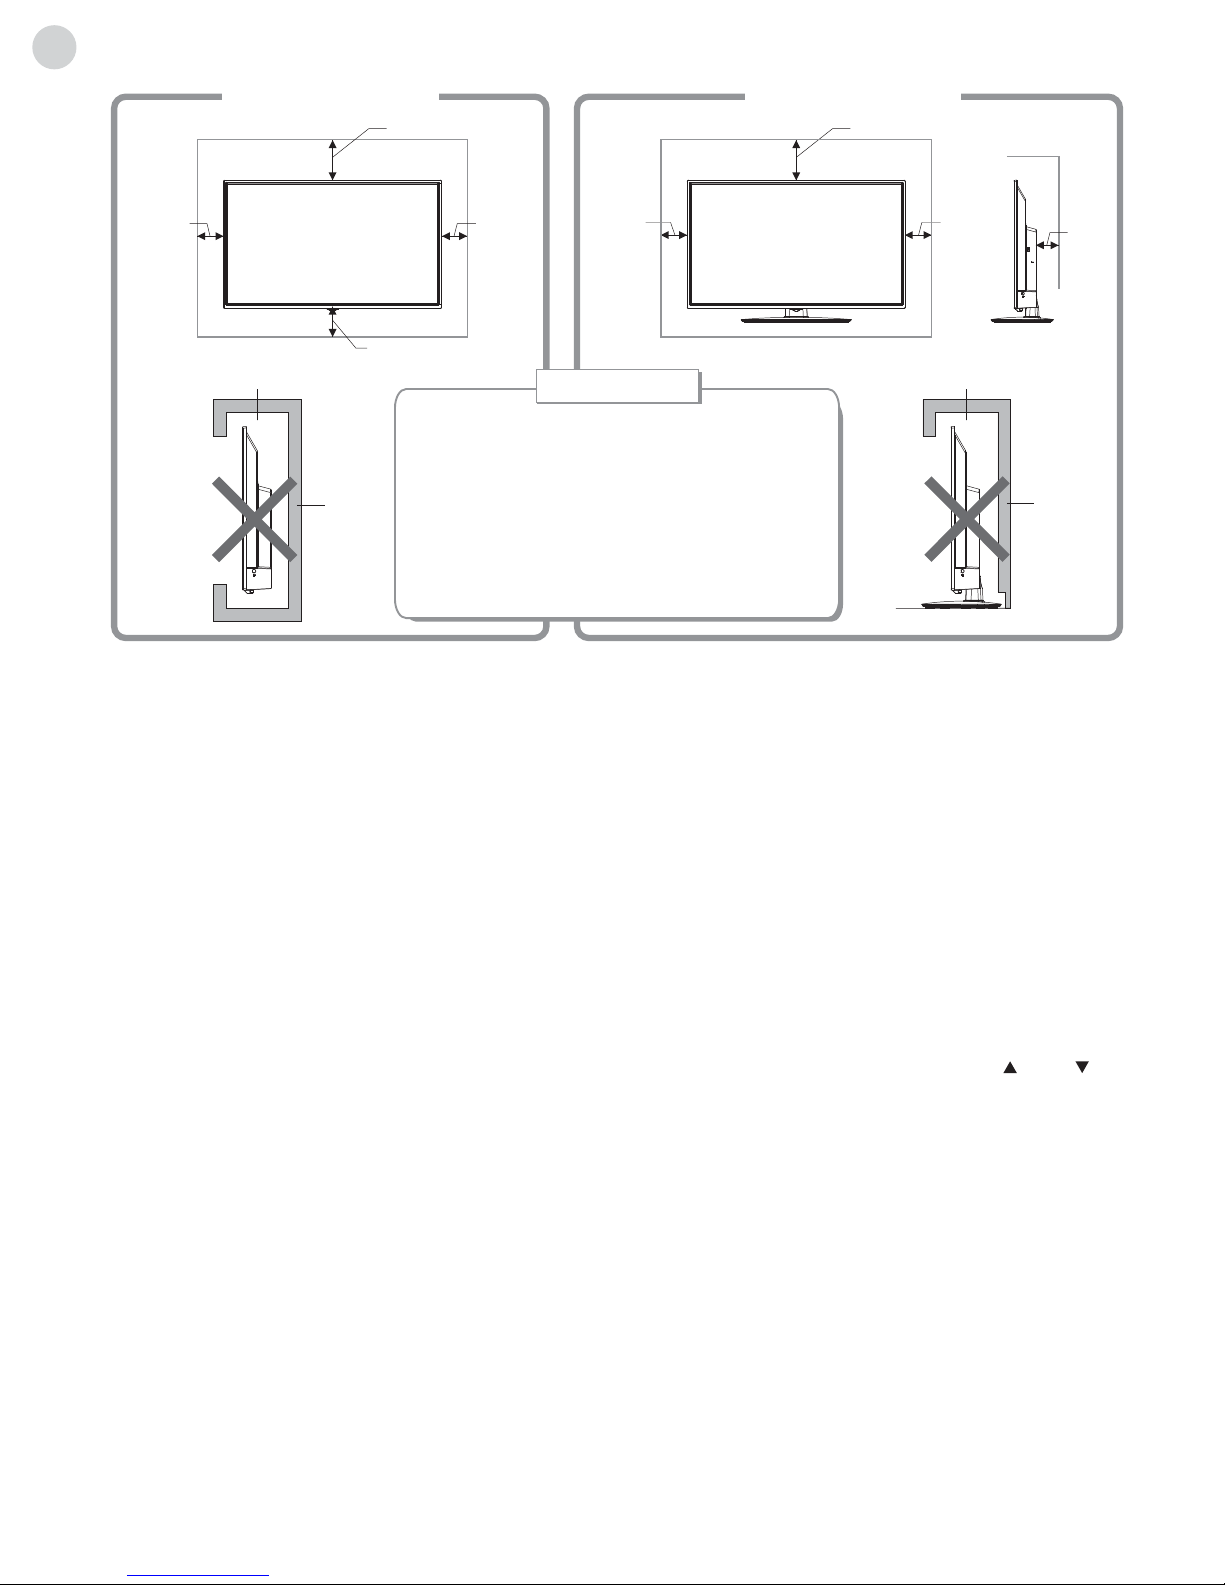
Mounting the TV set � � � � � � � � � � � � � � � � � �5
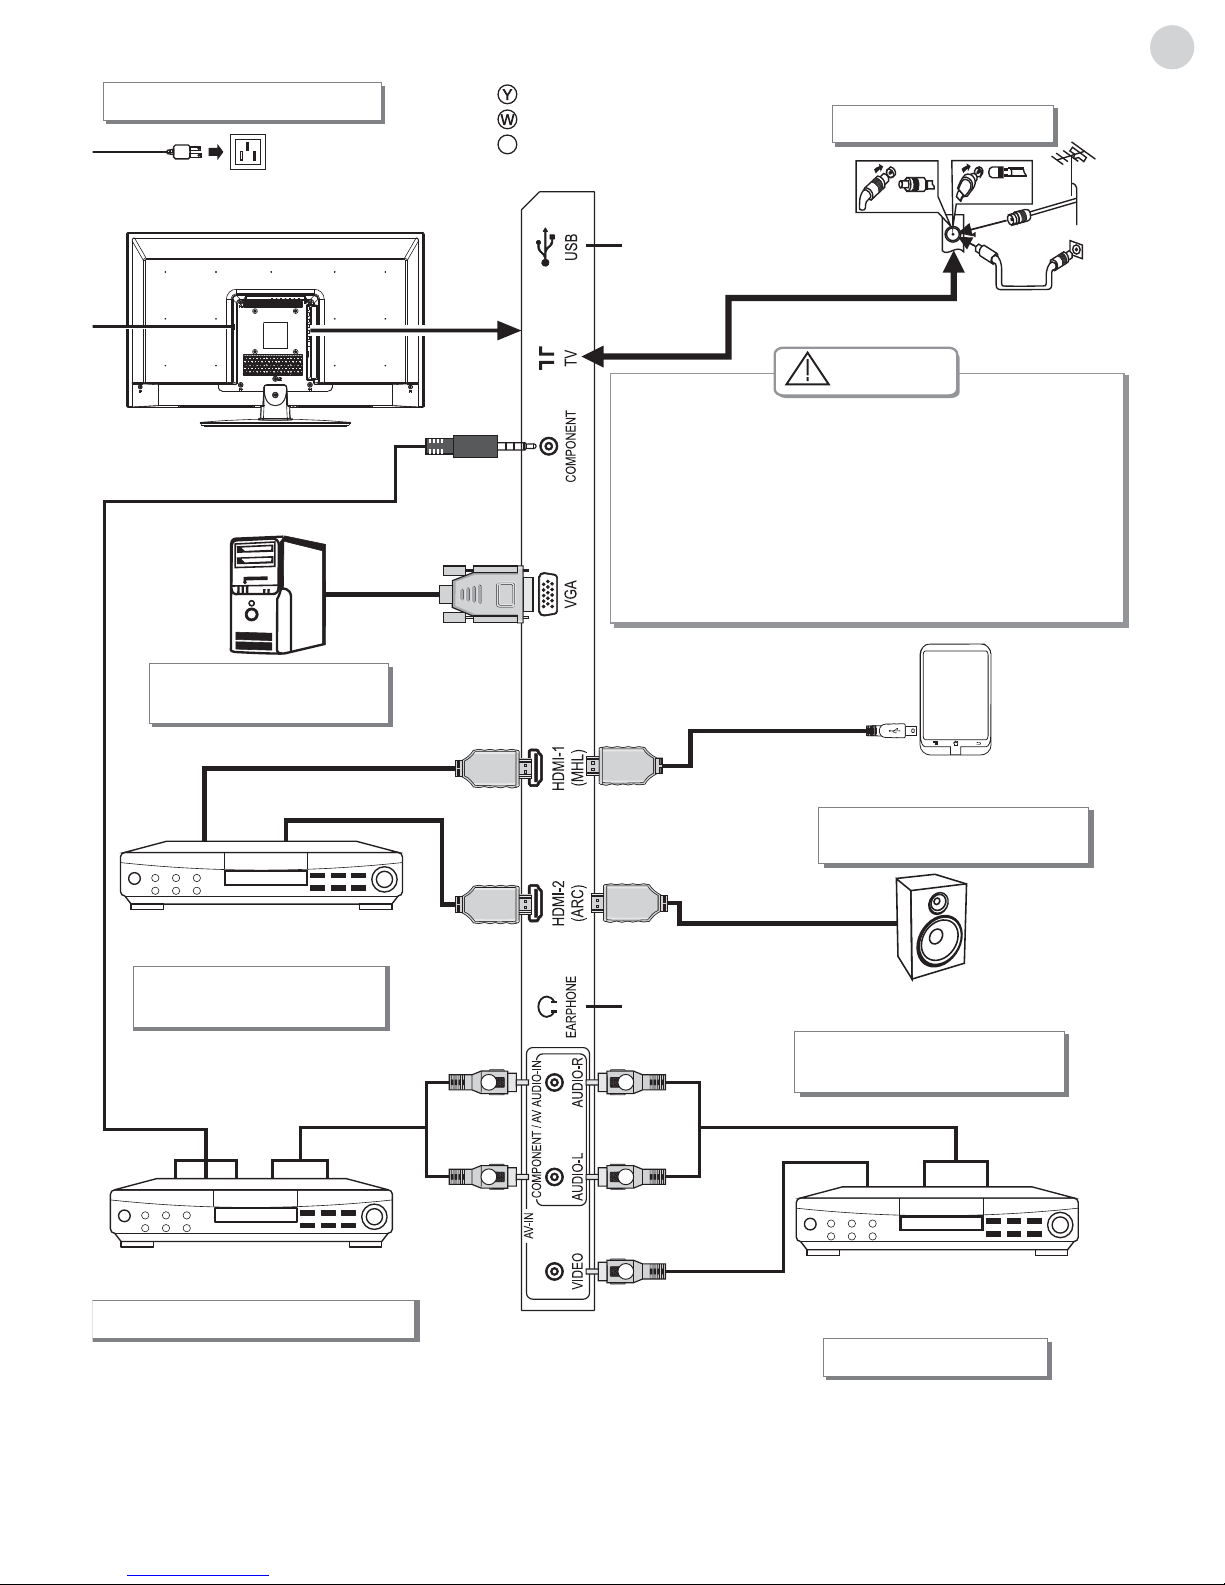
Connecting peripheral equipment � � � � � � � �6
Control Panel Keys � � � � � � � � � � � � � � � � � � � � �8
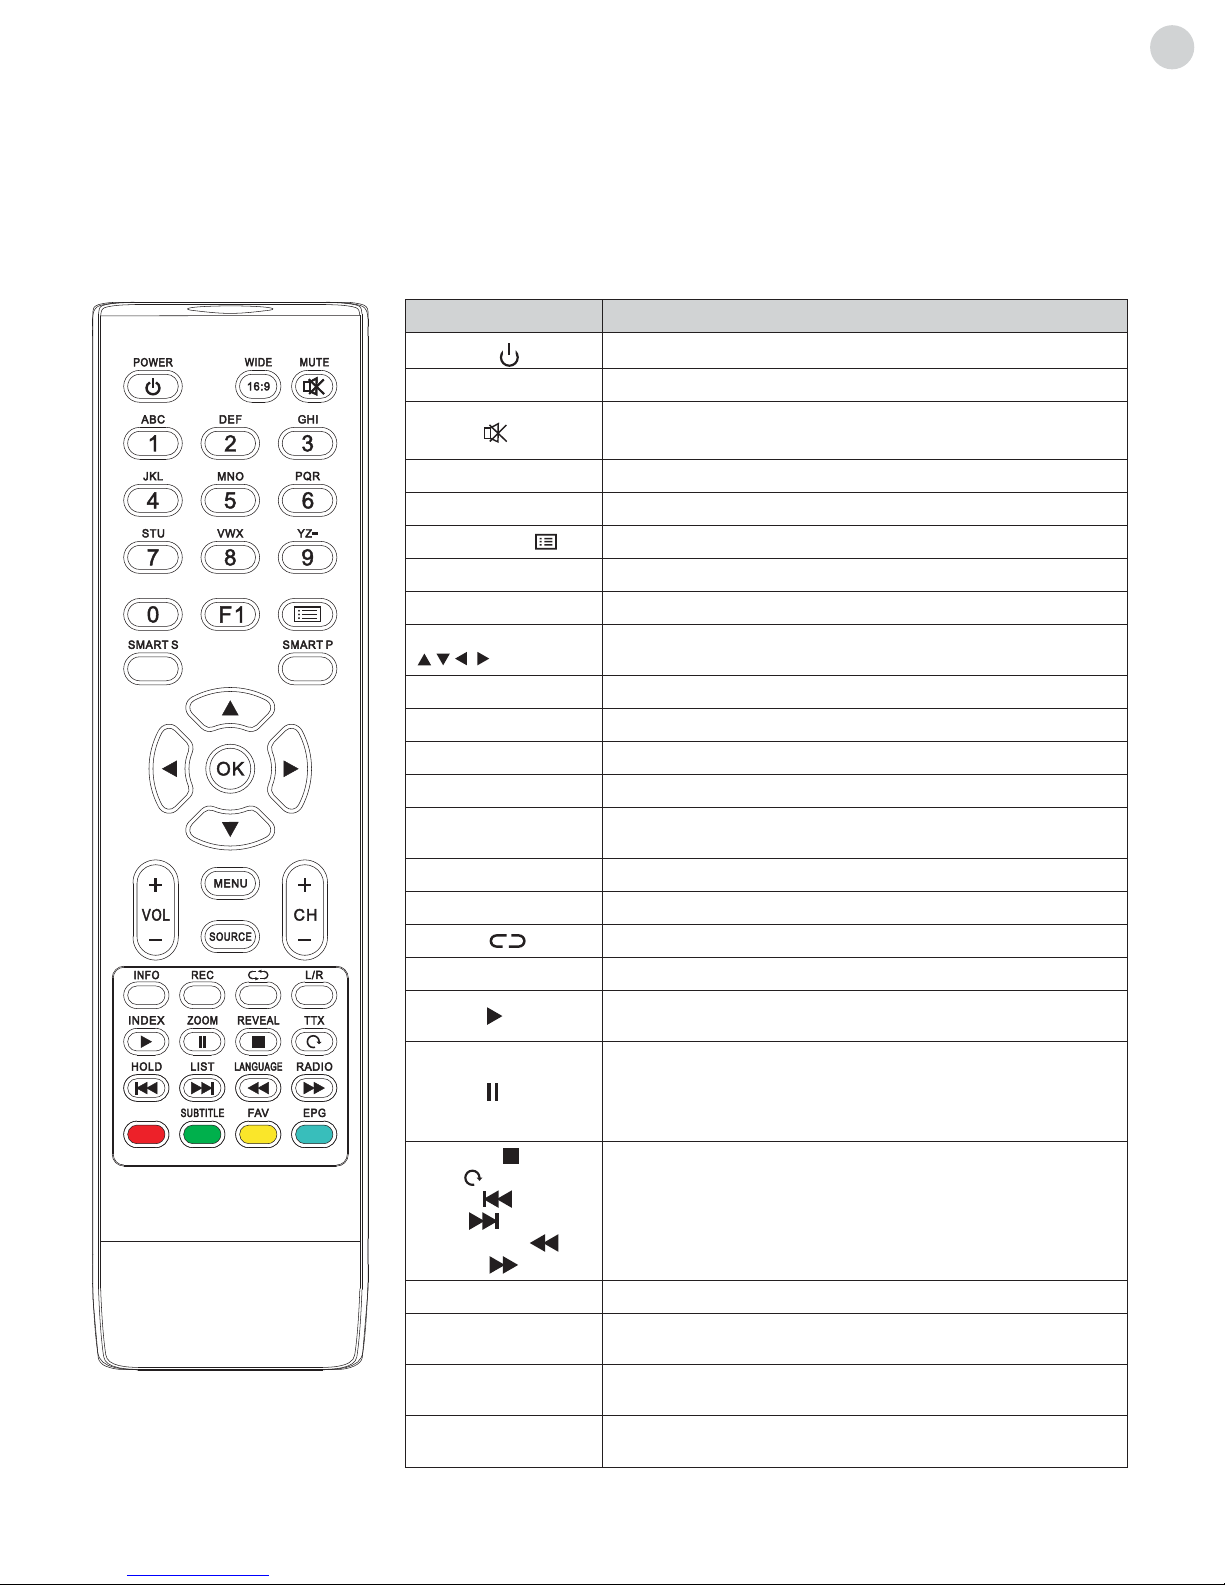
Remote Control � � � � � � � � � � � � � � � � � � � � � � � �8
General Operating Instructions � � � � � � � � � � �10
Power On � � � � � � � � � � � � � � � � � � � � � � � � �10
Standby � � � � � � � � � � � � � � � � � � � � � � � � � �10
Signal Source Selection� � � � � � � � � � � � � � �11
Menu Operation Instruction � � � � � � � � � � � �11
CHANNEL� � � � � � � � � � � � � � � � � � � � � � � � �11
PICTURE� � � � � � � � � � � � � � � � � � � � � � � � � �12
SOUND � � � � � � � � � � � � � � � � � � � � � � � � � � �13
OPTIONS � � � � � � � � � � � � � � � � � � � � � � � � �14
TIME � � � � � � � � � � � � � � � � � � � � � � � � � � � � �14
LOCK � � � � � � � � � � � � � � � � � � � � � � � � � � � �15
REC option � � � � � � � � � � � � � � � � � � � � � � � �15
Time-shift option � � � � � � � � � � � � � � � � � � � �16
EPG option � � � � � � � � � � � � � � � � � � � � � � � �16
Hotel Function (optional) � � � � � � � � � � � � � �16
USB Media Function � � � � � � � � � � � � � � � � �17
Simple troubleshooting � � � � � � � � � � � � � � � � �19
Technical Specifications� � � � � � � � � � � � � � � � �20
Base Installation Instructions � � � � � � � � � � � � �21
Contents
FEATURES
1� High-quality LED backlight LED screen, energy saving, environment-friendly, ultra-thin, with brilliant features�
2� With built-in high quality speakers that will give you pure audio-visual enjoyment and save your table space�
3� Has many connectors� You can directly connect your DVD, vidicon etc� to appropriate input connectors and enjoy
beautiful image� The product can be used as a computer monitor with VGA and HDMI connectors� Also it can be
used as a TV device when you insert the antenna�
4� Much faster response time completely eliminates shadow on picture� Seeing film and playing game will be more
fluent�
5� Enough colours�
6� Wider viewing angle, higher brightness, higher contrast, lower consumption�
7� Intelligent image mode and sound mode offer you intelligent audiovisual effect�
8� Built-in the latest digital comb filter, which makes image clearer� The internal 3D De-Interlace technique can totally
eliminate the screen dithering caused by interlace signals�
9� Has perfect timing functions, you can set time to turn off� It will also be turned off in state of no signals�
10� Automatic operation is made convenient with a telecontrol device�
11� Auto-setup function helps you set the image to best performance in several seconds in VGA mode�
12� Auto colour balance adjustment technology equips your device with the best colour setting for all different
kinds of display adapters in VGA mode�
13� Automatic noise reduction can significantly eliminate background noise caused by menu interference and the noise
caused by weak signals, making the picture on the screen clear�
14� Supports USB interface�
15� Supports H�264 FULL HD receiver and supports PVR functionality�
16� Ultra-thin and super narrow design

4
ENG
Warning Attention
May result in casualties
Indicate the behaviours that must be prohibited
May result in personal injury or
property losses
Indicate the operations that must be performed
SAFETY WARNING AND NOTICE
Thank you for choosing the LED TV with LED backlight made by our company, a valuable product with excellent quality
and multiple functions� This device will bring you more audiovisual enjoyment� Its design ensures user’s safety� All
devices are strictly tested before leaving factory� However, incorrect use can lead to electric shock or fire� In order to
ensure safety and extend its life, please read the manual and marking label carefully before using it and comply with the
following safety instructions� Please keep the user manual for later use�
WARNING
• Power failure or unstable voltage�
• Abnormal sound or smell coming from the device�
• Damaged AC power cord�
• Damages to the TV set due to falling off, knocking or impact�
• Liquid or foreign matters entering into the TV set�
• Only use 240VAC 60/50Hz power supply�
• This TV must be connected to a three pin socket outlet for safety�
• All cables can be connected or disconnected only after power supply is turned off�
• Do not fix the TV set on instable position, or else it may cause falling off, damage, or even fire�
• Do not put the TV set in the environment:
1� With direct sunshine, moisture, overheating, undercooling or heavy dust;
2� With flammable or explosive substances;
3� With flammable or corrosive gases;
4� In bathroom, kitchen, etc�
• Do not use damaged or improper power socket, and ensure that the plug and socket are connected
properly�
• Keep the power plug and socket free from dust and metal pieces�
• Do not damage the power cord:
1� It is prohibited to refit the power cord;
2� Do not put heavy objects on the power cord;
3� Keep the power cord away from heat sources;
4� Do not drag the power cord when unplugging�
• Do not connect too many appliances to one power strip, or else it may cause fire due to high power
consumption�
• Do not put open flame (e�g� lit candle) near the TV set, or else it may cause electric shock or fire�
• Do not put the container filled with water on the TV set, to avoid electric shock or fire caused by water splash�
• Do not insert any sharp objects, metals or liquids into the signal connector or air vents, to avoid short circuit
and product damage as well as electric shock�
• The slots on the case are designed to release heat, prevent all inside components from reaching extra high
temperatures and to enable long-term normal operation� Please do not cover the holes during the positioning�
Turn off the TV set
immediately, unplug the
power cord from the
power outlet, and contact
authorized maintenance
personnel�
If coal gas or other flammable gases leak, do not unplug the power cord of the TV set or other electric
appliances; instead, close the valve of the gas immediately and open the doors and windows.
Under Following Conditions:

5
ENG
ATTENTION
Mounting and Connecting
Packing list
Mounting the TV set
• Do not let children climb onto the TV set�
• Keep the small accessories away from children’s reach to avoid swallowing�
• If the TV set is not going to be used for a long time, please turn off the device and unplug the power cord�
• Before cleaning the TV set, unplug the power cord and wipe with soft cloth; do not use chemical reagents and avoid
situations in which foreign substances can enter the device� The incorrect cleaning agents (such as cleaning fluid,
water, etc) can damage product’s appearance, erase information provided on the product, even enter the device and
damage components and result in the device inability to display programme�
• To adjust the position or angle of the TV set, please disconnect all wires and move them slowly to avoid falling off�
• Do not rub with hard objects and do not hit, bend or squeeze the screen�
• Do not use device immediately after transferring it from low to high temperature environment as this can cause
condensation inside your device and its failure�
• If the screen breaks and the liquid splashes on your skin, immediately wash with clean water for 15 minutes and visit
your doctor�
• To carry the TV set with hands, please grasp its bottom corners; do not apply force on the panel�
• When the same image or active image with fixed words is displayed for a long time, icons will leave image
persistence on screen which will not disappear long after powering off� This undesirable effect is not covered by
warranty�
• Healthy TV watching:
1� Watch in appropriate light; poor light or long-term watching can hurt your eyes�
2� If a headset is used, adjust the volume appropriately to avoid hurting your hearing�
• Unplug the power cord of the device to cut off the power supply�
• If a power plug or appliance coupler is used as a disconnecting device, easy operation should be ensured�
• Power plug should be connected firmly� Loose power plugs may cause sparkle and fire�
• All the technical specifications stated in the user manual and on the package are subject to changes without prior
notice� If there are slight deviations between the user manual and actual operation, consider the latter to be valid�
Do not touch the plug with wet hands, or else it may cause electric shock�
Do not turn on the TV set in thunderstorm weather; instead, unplug the power plug and antenna connector to
avoid lightning strike�
Do not disassemble the TV set by yourself as this can cause electric shock or fire� Contact qualified personnel
for maintenance�
1� The TV set� 2� User Manual� 3� Remote control� 4� Power cord (or attached to TV set)�
5� Component Transfer Cable (Optional)
• The TV set should be mounted near the AC power socket for easy plugging and unplugging�
• For your safety, please select appropriate wall mount bracket or base�
• To avoid injuries, place the TV set on a stable surface or fix it on a firm wall�
• Ask qualified personnel to mount the TV set on the wall� Improper mounting may result in instable TV set�

6
ENG
10cm
30cm
10cm
10cm
10cm
10cm 7cm
30cm
Mount on the wall
Ventilation
Obstructs the air circulation Obstructs the air circulation
Wall Wall
Mount on the base
• Please keep the minimum space around the
TV as shown in the figure�
• Do not cover air vents or insert any objects
into the enclosure�
• Do not put the device in limited space, e�g�
bookcases or embedded closets, unless the
TV set is properly ventilated�
TIPS ON INSTALLATION
Connecting peripheral equipment
You can connect various devices to the TV set and view high quality images� If a video device has HDMI, AV, PC and
other output/input ports, select one of them and connect to the corresponding input or output ports of the TV set� After
connecting it, press the “SOURCE”” key and signal source menu will be displayed on the screen� Press “ ”and “ ”key
to select the input signal and press “OK” key to confirm� The connecting mode is shown in the figure�
Remarks:
1� After connecting to equipment with MHL function, please select HDMI1 as input signal source�
2� ARC function is optional, please refer to the device�
3� COMPONENT interface is optional, please refer to the device�
4� If there is a COMPONENT interface, component and AV share AUDIO-IN interface�
5� The peripheral equipment and cables described in this manual should be purchased separately�
• Do not place the TV set in an area with mechanical vibrations�
• Do not place the TV set in an area where insects may enter�
• Do not mount the TV set against air conditioner as internal panel of the display can condense and cause failure�
• Do not place the TV set in an area with strong magnetic field as electromagnetic waves can interfere with it and
damaged it�

7
ENG
To power socket
(100-240VAC 60/50Hz)
Yellow (Video signal cable)
White(AUDIO-L signal cable)
Red (AUDIO-R signal cables)
USB interface
Earphone port
Video cable
YPbPr/YCbCr cable
VGA cable
Connect to the AV device
with HDMI interface
Mobile phone or other
equipment with MHL function
Connect to the audio devices
with ARC function
Connect to the devices
with AV output interface
(e�g� DVD, VCR, game console)
Connect to the device with
YPbPr/YCbCr output interface
HDMI signal cable
MHL signal cable
Audio cable
HDMI signal cable
HDMI signal cable
Audio cable
Power cord
Connecting power supply
Antenna connection
VGA input connection
HDMI input connection
YPbPr/YCbCr input connection
MHL function connection
AV input connection
ARC function connection
When connecting outdoor antenna to signal port
of the TV set, please turn off the main power
switch of the TV set first. Do not place the outdoor
antenna near high voltage main power line to
avoid electric shock. The wired network antenna
connected to this TV set must be isolated from the
protective grounding; otherwise it will cause fire
or other hazards.
R
Warning

8
ENG
Control Panel Keys
Remote Control
Remote control battery installation method
Precautions for use of remote control
Take off the cover of battery box, insert two AAA batteries with 1�5 volts, and adjust with the polarity of the remote
control battery box�
1� Power LED indicator and remote receiving window�
2� Standby: To switch the TV on or back to standby�
3� MENU ( ): Press this key to enter main menu�
4� VOL-, VOL+ ( ): Press these two keys to add or reduce volume� In OSD menu, press the two keys to adjust
the analogue value of the selected item� These keys have the same functions as t/ ukey on the remote control�
5� CH-, CH+ ( ): Press these two keys to select the channel� In OSD menu, press the two keys, sharing the
function with /key on the remote control, to adjust the items�
6� SOURCE ( ): Press this key to enter the menu of signal source and choose signal source�
Note: Different models may have different appearances; please refer to the actual device.
1� When using the remote control you should point it to the remote-control inductive window� The objects between the
remote control and inductive window may hinder normal operation�
2� Do not expose the remote control to fierce vibrations� Furthermore, do not expose the remote control to direct
sunlight, for the thermal energy will cause the distortion of the remote control�
3� If the remote-control inductive window of the main device is exposed to direct sunlight or intense illumination, the
remote control can malfunction; please change the angle of illumination or this device, or approach the inductive
window to operate the remote control�
4� Low battery voltage influences the remote control distance� You should replace the battery� If you do not use the
remote control for long or if the battery is exhausted, please take out the battery, in order to avoid battery leakage
causing corrosion of the remote control and its damage�
2345 6
1
2
3
4
56
1

9
ENG
Remote Control Key Instruction
Note: Appearance of the remote control can differ from the one shown in the figure. Adjust the provided information to
match the actual remote control.
5� Do not use different batteries� Combining new and old batteries is not allowed� You should use batteries in pair�
6� Do not throw batteries into fire, do not charge or disassemble, especially do not charge, assemble or disassemble,
heat or burn used batteries� Please observe the related environmental protection regulations on used batteries�
Name Function Description
POWER ( )Switching the receiver in and out of standby mode�
WIDE (16:9) Switching picture ratio�
MUTE ( ) Switching off sound when viewing programme�
Numerical Entering numbers�
F1 Picture freeze on or off�
Channel list ( ) Searching through channel list�
SMART S Smart sound mode selection�
SMART P Smart image mode selection�
Cursor key
(, , , )
Moving cursor up/down/left/right across menu items or
change date of EPG�
OK Confirmation of current settings�
VOL+/VOL- Press to adjust the volume�
MENU Press this key to display menu�
SOURCE Press this key to display signal source selection menu�
CH+/CH- Channel changing keys� Changing different pages of
current channel EPG�
INFO Displaying current programme information�
REC Programme recording�
Return ( ) Press this key to return to the last channel watched�
L/R Selecting NICAM mode (in ATV signal source)
INDEX ( ) In DTV mode, press “INDEX” key to display a list of
recorded programmes�
ZOOM ( )
In DTV mode, press “ZOOM” key to zoom aspect ratio if
there is a graphic display; if there are no graphic displays
and USB port is connected to memory, press this key to
delay broadcast of currently played television programmes�
REVEAL ( ),
TTX ( ),
HOLD ( ),
LIST ( ),
LANGUAGE ( ),
RADIO ( )
For teletext operation or USB operation�
Red key Muti-function red key�
SUBTITLE
(Green key)
Teletext green key or displaying subtitle message if current
channel has subtitle option�
FAV (Yellow key) Teletext yellow key or Favourite key used for setting or
displaying your favourite programmes�
EPG (Blue key) Teletext blue key, or showing the Electronic Program Guide
of current channel during no-menu state�

10
ENG
Remote control user manual about teletext
TeleText: Press ‘’Teletext’’ key, it loops in 3 modes: Mix Display > Text Mode > TeleText Off�
Thereinto: TText Mode is Automatic Mode� In Automatic mode, the system automatically selects TOP, Fastext, or
Default mode as appropriate, depending on the data being received� In Text Mode or Mix Display, press number 0~9,
“/’’ key to select text page�
Reveal: All hidden characters are displayed for 6 seconds�
Hold: Toggle hold on or off for current display pages� If the page is not held, it will become held, which will prevent its
update� If the page is currently held, the hold will be removed thus allowing the page to update� When the page is held,
this is indicated by a Hold prompt�
Index: In Fastext mode, request the index page if the index link is valid, or the Packet 8/30 initial page if valid, or page
100� In TOP mode, if the Hitlist option is enabled, toggle the system between the current text page and the Hitlist menu;
otherwise, request page 100� In List mode, reset the list of preferred pages either to that of the current channel as read
from the EEPROM if fitted, or to the default list (pages 100, 101, 102, 899), and request the first page in the list� In
Default mode, request the Packet 8/30 initial page if valid, or page 100�
List: Toggle between L ist mode and the current acquisition mode (Fastext, TOP, or Default)�
Red, Green, Yellow, Blue: Request the associated page in the display block according to the acquisition mode�
In TOP Hitlist mode, the Red, Green, and Blue commands control selections from the Hitlist menu, while the Yellow
command is ignored�
General Operating Instructions
Power On
Standby
Fig� 1 Fig� 2
Before switching on the device, please make sure that the power supply is stable and that the antenna cable is well
connected�
Plug the power cord into electrical socket� Press “ ” key on the remote control or on the TV set to turn on the TV�
‘’Please select an OSD Language’’ menu (Fig�1) is displayed on the screen� Press “//t/u’’ key on the remote
control to select desired language, then press “OK” key on the remote control to confirm� “Select DVB type’’is
displayed on the screen� Press “/” key on the remote control to select desired DVB type, then press “OK”
key to continue to the next step (Fig�2)� (The provided example shows channel searching DVB type under DVB-T�)
Press “t/u” key to select Tune Type: DTV + ATV, ATV, DTV. Press “” key� You can select country where you are by
pressing “//t/u”, then press “OK” key to confirm�The device will initiate auto tuning�
Press “ ” key on the remote control, TV will be in standby�
Special Attention:
1� The TV set will automatically switch to standby if there is no signal input for 5 minutes after switching the TV on�
2� The TV set will automatically switch to standby when the preset time for turning off is reached�
3� If you do not use it for a long time, please turn off the power supply of the device� Do not let the device
work in standby state for a long time�
OK: Enter
Please select an OSD Language
English
Croatian
Dutch
Russian
Arabic
Farsi
Spanish Italian
French German
Portuguese Polish
Tune Type
Germany
MENU: Return
Greece
Hungary
DTV + ATV
Netherlands
Norway
Poland
Italy
Ireland
Luxembourg

11
ENG
Press “SOURCE” key either on the remote control or on the panel� ‘’Input Source’’ will be displayed on the
screen (Fig�3)� Then press “/’’ key on remote control or “CH+/CH-” key on the panel to select the signal
source� Press “OK”key on the remote control and the TV will replace the current signal source with the source you
selected�
(Note: YPBPR signal source is optional, please refer to the device.)
Press “MENU” key on the remote control or on the panel� The screen will display the main menu (Fig�4)�
1� Press “t/u” key on the remote control or “VOL+/VOL-” key on the panel to select the adjustment sort
menu, which includes 6 sorts: CHANNEL, PICTURE, SOUND, OPTION, TIME, LOCK�
2� Press “/” key on the remote control or “CH+/CH-” key on the panel to select what you want to adjust in
sort menu�
3� Press “OK” key on the remote control to set or enter into next menu�
4� Press “MENU” key to exit the main menu when the TV displays the Main Menu� Press “MENU” key to return to
the previous menu when the TV displays the sub-menu� Press “SOURCE” key to display the signal source
menu�
5� During the operation, the options which cannot be adjusted at current mode will be hidden automatically and the
colour of these options will be changed into gray�
6� Menu Operation Instructions provided in this manual is explained according to TV mode� The operations in other
modes are similar to the one in TV mode� Users can take it as reference�
Note: “//t/u’’ keys in this Manual stand for the direction cursor keys on the remote control unless
specifically defined otherwise. The operating instructions in the text below are all based on keys on the remote control.
Please understand the keys on the panel by yourself.
Press “MENU” key and CHANNEL menu will be displayed on the screen (Fig�4)� Press “/” key to select the item
you want to adjust or set�
Auto Tuning
Press “MENU” key and CHANNEL menu will be displayed on the screen� Press “/”
keys to select Auto Tuning� Press “OK” key and the ‘’DVB Select type’’ will be displayed
on the screen� Press “/” keys on the remote control to select desired DVB type,
then press “OK” key to continue to the next step (Fig�2)� (The provided example shows
channel searching DVB type under DVB-T�) Press “t/u” keys to select Tune Type:
DTV + ATV, ATV, DTV� Press “” key� You can select desired country by pressing
“//t/u”, then press “OK” key to confirm� The device will start auto tuning (Fig�5)�
During the auto tuning, you can press “MENU” key to return and exit auto tuning�
Signal Source Selection
Menu Operation Instruction
CHANNEL
Fig� 3 Fig� 4
Fig� 5
Input Source
DTV
AV
YPBPR
HDMI 1
HDMI 2
VGA
USB
ATV
OK:Enter
Auto Tuning
CHANNEL
DTV Manual Tuning
ATV Manual Tuning
Programme Edit
Signal Information
OK: Enter MENU: Return
1 %... 63.25 MHz
MENU
Exit
Channel Tuning
ATV
DTV
Radio
Data
0 Programme(s)
0 Programme(s)
0 Programme(s)
0 Programme(s)
:
:
:
:

12
ENG
DTV Manual Tuning
Press “MENU” key and CHANNEL menu will be displayed on the screen� Press
“/” key to select DTV Manual Tuning� Press “OK” key to enter into DTV
Manual Tuning menu (Fig�6)� Press “t/u” key to select channel, then press
“OK” key to conduct search� After searching, the DTV Manual Tuning menu
will close automatically�
ATV Manual Tuning
Press “MENU” key and CHANNEL menu will be displayed on the screen�
Press “/” key to select ATV Manual Tuning� Press “OK” key to enter ATV
Manual Tuning menu (Fig�7)� Press “/” key to select the Current CH� Press
“t/u” key to search manually� After searching, you can save the searched
channel to other positions� At this time, press “t/u” key to select Storage To,
and then press “/” key to choose the channel number� After selecting
Fine-Tune, press“t/u” key to tune from low frequency or high frequency�
During manual searching, you can also press “MENU” key to interrupt the
search and return to the last menu�
Programme Edit
Press “MENU” key and CHANNEL menu will be displayed on the screen� Press
“/” key to select Programme Edit � Press “OK” key to enter Programme
Edit menu (Fig�8), then press “/” key to select the channel you want to edit�
Delete: : Select a channel and press “Red” key to delete it�
Move: Select a channel and press “Green” key, press “/” key to select
the channel position where you want to move the channel� Press “OK” key to
confirm� You can press “MENU” key to return last menu�
Favourite: Choose a channel and press “Yellow” key� Favourite icon will appear
behind the selected channel� Press “Yellow”key again to cancel it� Press
“MENU” key to return main menu�
Skip: Select a channel and press “Blue” key� SKIP icon will appear behind the
selected channel� Press “Blue” key again to cancel it� Press “MENU” key to
return to main menu�
Signal Information
Press “MENU” key and CHANNEL menu will be displayed on the screen� Press
“/” key to select Signal Information� Press “OK” key to enter into Signal
Information menu� You can look through signal information�
Note: Before you press “MENU” key, please select the input source first. You can
select it only in DTV mode.
Press “MENU” key and CHANNEL menu will be displayed
on the screen� Press “t/u” key to select PICTURE
(Fig�9), then press “/” key to choose the item you want
to adjust or set�
Picture Mode: Press “OK” key to enter into Picture
Mode submenu� Press “/” key to select item want to
adjust or set�
PICTURE
DTV Manual Tuning
UHF CH 21
Bad
Normal Good
NO SIGNAL
ATV Manual Tuning
Frequency 175.25 MHz
Storage To 1
DK
Current CH 1
Search
Fine-Tune
MENU: Return
Save
OK: Enter
1 C-01
2 S-42
3 C-06
4 C-11
5 S-11
6 S-13
7 C-21
8 C-51
MENU: Return
Programme Edit
Delete Move
Skip
Favourite
ATV
ATV
ATV
ATV
ATV
ATV
ATV
ATV
Fig� 6
Fig� 7
Fig� 8
Fig� 9
Picture Mode User
Color Temperature Standard
Aspect Ratio Full
Noise Reduction Middle
PC Setting
PICTURE
OK: Enter
MENU: Return

13
ENG
Press “MENU” key and CHANNEL menu will be
displayed on the screen� Press “t/u” key to select
SOUND (Fig�10), then press “/” key to select the
item you want to adjust or set�
Sound Mode: Press “OK” key to enter Sound Mode
submenu� Press “/” key to select item you want to
adjust or set�
Surround Sound: Press “OK” key to enter Surround Sound submenu� Press “/” key to select surround sound
mode: Off, Surround, SRS Trusurround XT�
AD Switch: Press “OK” key to enter AD Switch submenu� Press “t/u” key to select ‘’On’’ or ‘’Off’’� If you select
‘’On’’, you can adjust AD volume by pressing “t/u” key (only available in DTV)�
SOUND
Fig� 10
OK: Enter MENU: Return
Sound Mode Music
Surround Sound Off
AD Switch Off
SOUND
Item Function Description
Picture Mode Selecting picture mode “Standard”, “Soft”, “User Dynamic” four modes�
Contrast Adjusting contrast of whole picture Increasing analogue value increases Contrast;
Decreasing analogue value decreases Contrast (0~ 100)�
Brightness Adjusting brightness and black level
of whole picture
Increasing analogue value increases brightness;
Decreasing analogue value decreases brightness (0~ 100)�
Saturation Adjusting colour depth of images Increasing analogue value increases green;
Decreasing analogue value increases purple (0~100)�
Sharpness Adjusting sharpness of whole
picture
Increasing analogue value increases definition;
Decreasing analogue value decreases definition (0~100)�
Tint Adjusting tint of whole picture Increase the analogue value to improve the depth;
Decrease the analogue value to reduce the depth (0 ~100)�
Item Function Description
Sound Mode Selecting Sound Temperature “Standard”, “Music”, “Movie”, “User” five modes�
Treble Adjusting treble value Increasing analog value increases treble;
Decreasing analog value decreases treble (0~100)�
Bass Adjusting bass value Increasing analogue value increases bass;
Decreasing analogue value decreases bass (0~100)�
Balance djusting balance between left
and right speaker
Increasing analogue value decreases left volume;
Decreasing analogue value decreases right volume (L50 ~R50)�
Note: Tint can be adjusted only in NTSC system.
Color Temperature: Press “OK” key to enter Colour Temperature submenu� Press “t/u” key to select colour
temperature mode: Standard, Warm, Cool�
Aspect Ratio: Press “OK” key to enter Aspect Ratio submenu� Press “/” key to select aspect ratio mode: Auto,
4:3, Full, Film, Subtitle, PC Mode�
Noise Reduction: Press “OK” key to enter Noise Reduction submenu� Press “/” key to select Noise Reduction
mode: Off, Low, Middle, High�

14
ENG
OPTIONS
TIME
Press “MENU” key and CHANNEL menu will be
displayed on the screen� Press “t/u“ key to select
OPTIONS (Fig�11), then press “/” key to select the
item you want to adjust or set�
OSD Language: Press “OK” key to enter OSD
language submenu� Press “//t/u’’ key to select
desired language� Press “MENU” key to return to the
previous menu�
Note: The operation method of the Audio Language is the
same as that of OSD Language (Only available in DTV).
Hearing Impaired: Press “OK” key to select “On” or
“Off” (only available in DTV)�
Press “MENU” key and CHANNEL menu will be displayed
on the screen� Press “t/u“ key to select TIME (Fig�13),
then press “/” key to select the item you want to
adjust or set�
Clock: When in DTV input source, the clock will be
synchronized with TV programme�
Off Time: Press “OK” key to enter Off Time submenu�
Press “/” key to select Off Time, Hour and Minute,
then press “t/u“ key to adjust the off timer values� The
TV will switch off automatically at the time you select�
Note: You can set Hour and Minute only if the Off Time is not in ‘’Off’’ mode.
On Time: Press “OK” key to enter On Time submenu� Press “/” key to select On Time, Hour and Minute,
Source, Channel, Volume, then press “t/u“ key to adjust value to set the on timer values� The TV will switch on
automatically and tune to the mode of your choice at the time you select�
Sleep Timer: Press “OK” key to enter Sleep Time submenu� Press “/” key to select sleep time: Off, 10min,
20min, 30min, 60min, 90min, 120min, 180min, 240min�
Time Zone: Press “OK” key to enter into Time Zone submenu� Press “//t/u’’ key to select your time zone� (Only
available in DTV)�
PVR File System: Press “OK” key to enter PVR File System submenu (Fig�12)�
Choose storage disc in “select disc” submenu� Press “/” key to select “Check
PVR File System” and, after pressing “OK” key, the device will initiate the check� After a
successful check, press “MENU” key to exit the menu� Press “REC” key to record�
Note: Insert a U disc into the device interface before operating the PVR File
System function.
Restore User Default: After pressing “OK” key, “Are you sure?” will be displayed
on the screen� Press “t“ key to resume to the factory setting or “ukey to cancel
the current operation�
Blue Screen: Press “OK” key to select “On” or “Off”� Open or close Blue Screen function�
Software Update (USB): Update software by a U disc�
OSD Language
Audio Language English
Hearing Impaired Off
PVR File System
Restore User Default
Blue Screen On
Software Update(USB)
OPTION
English
OK: Enter MENU: Return
Clock
Off Time Off
On Time Off
Sleep Timer Off
Time Zone Berlin +1
TIME
-- -- -- --
Check PVR File System
Format
Free Record Limit
USB Disk
Time Shift Size
Speed
Start
6 Hr.
Select Disk
C:
Fig� 11
Fig� 13
Fig� 12

15
ENG
LOCK
REC option
Press “MENU” key and CHANNEL menu will be
displayed on the screen� Press “t/u“ key to select
LOCK� After pressing “OK” key, press Numerical key
to input default password 0000 and enter LOCK menu
(Fig�14)� Then press “/” key to select the item you
want to adjust or set�
Lock System: Press “OK” key to select “On” or “Off”�
Block program option can work when Lock System option
is activated�
In DTV mode, press “REC” key and REC option menu
will be displayed on the screen (Fig�15)� The system will
immediately start recording� Press “REVEAL” key to stop
and quit recording� After completing the recording process,
press “INDEX” key and the recorded list will pop up� Select
the file you want to play� You can read the file information
by pressing ‘’Green’’ key or you can delete it by pressing
“Red” key� Press “OK” key to play it�
Note: The recording function can only support memory
devices with Fat32 file system. Memory devices with other
file systems need to be formatted. Before formatting a
memory device, back-up useful data because the content
of memory devices cannot be recovered after formatting.
Set Password: Press “OK” key and “Set Password” dialogue box will appear on the screen� Press the numerical
key to input old password, input new password twice to complete the password change and return to last
menu� Note: Please make sure you remember your new password after changing. Otherwise, the system will lock
forever.
Block Program: Press “OK” key and “Block Program” menu will appear on the screen� Press “/” key to select
the channel that you want to lock, and then press the green key to lock or unlock� Finally press “MENU” key to exit
menu operation�
OK: Enter
MENU: Return
Lock System
Set Password
Block Program
LOCK
[00:00:29]
14:21
Play FB FF FB 30S FF 30S Pause Stop
(0003:10:24)
Fig� 14
Fig� 15
Icon Description
Indicates that the system is recording a programme�
Indicates the current programme number�
Indicates the recorded programme duration�
Indicates the longest duration that a U disc can provide (relevant to the capacity of U disc)
Indicates the current programme time�
Play: Select this icon� Press "OK" key to play the video or set A-B repeat�
FB: Select this icon� Press "OK" key to fast back� Press "INDEX" key to play normally�
FF: Select this icon� Press "OK" key to fast forward� Press "INDEX" key to play normally�
FB 30s: Select this icon� Press "OK" key to play backward 30 seconds�
FF 30s: Select this icon� Press "OK" key to play forward 30 seconds�
Pause: Select this function� Press "OK" key to play or pause�
Stop: Select this icon� Press "OK" key to stop and quit the display window�

16
ENG
Time-shift option
EPG option
Hotel Function (optional)
In DTV mode, press “ZOOM” key� Time-shift option
menu will be displayed on the screen (Fig� 16) and the
programme will be in suspended state� Press “INDEX”
key to resume the programme� Press “REVEAL” key
to stop and quit time-shift� When user leaves programme
for a short time, time-shift function can suspend
and cache the playing programme to a U disc� The
programme can be resumed when user decides to play it�
In DTV mode, press “EPG” key and EPG option menu will be displayed on the
screen (Fig�17)� User can perform the following operations with the red, green,
yellow, and blue multifunction keys�
Press “MENU” key on the remote control to display the main TV menu and
then press “4578” on the remote control to display the hotel function menu�
Press “Up/DOWN” key to enter the menu and select the item you want to
adjust� Then press “Left/Right” key to adjust the value or state (Fig� 18)�
[00:00:00/00:00:08/01:20:00]
14:23
Play FB FF FB 30S FF 30S Pause Stop
TimeShift
34
2
1
Fig� 16
Fig� 17
Fig� 18
Icon Description
Indicates that the programme is in suspended state�
Indicates the Current programme time�
Indicates the time when the programme was suspended�
Indicates the longest cache time that a U disc can provide�
Play: Select this icon� Press "OK" key to play the video or set A-B repeat�
FB: Select this icon� Press "OK" key to fast back� Press "INDEX" key to play normally�
FF: Select this icon� Press "OK" key to fast forward� Press "INDEX" key to play normally�
FB 30s: Select this icon� Press "OK" key to play backward 30 seconds�
FF 30s: Select this icon� Press "OK" key to play forward 30 seconds�
Pause: Select this function� Press "OK" key to play or pause�
Stop: Select this icon� Press "OK" key to stop and quit the display window�
Icon Description
Record Press the red key to enter the sub-menu� You can choose the
time of the programme you want to record�
Info Press the green key to display the detailed information about
the programme�
Schedule Press the yellow key to see your previous settings�
Remind Press the blue key to set the time when you want to be
reminded about the programme you want to see�
PROGRAMME GUIDE
TIME
Record Info Schedule Remind
MENU:Return
31 Aug
14:23
1 DR1
2 DR2
3 Tegnsprogstol...
4 TV 2 (Fyn)
No Information
Folk og fae (32)
Ingen tegnsprogstolkning
Vild med dig
ON
D

17
ENG
USB Media Function
Please insert USB storage device into USB interface of TV and press
“SOURCE” key� “Input Source” menu will be displayed on the screen�
Then press “/” key to select USB� Press “OK” key to enter USB
(Fig�19)�
PHOTO MUSIC MOVIE TEXT
USB 2.0
Fig� 19
Icon Description
Play/Pause: Press “t/u“ key to select this function� Press "OK" key to play or pause�
Prev.: Press “t/u“ key to select this function� Press "OK" key to read the previous photo�
Next: Press “t/u“ key to select this function� Press "OK" key to read the next photo�
Stop: Press “t/u“ key to select this function� Press "OK" key to stop playing and to return to the previous
menu�
Repeat: Press “t/u“ key to select this function� Press "OK" key to select Repeat 1 or Repeat ALL or
Repeat None�
Random Off: Press “t/u“ key to select this function� Press "OK" key to turn on/off random playing�
Music: Press “t/u“ key to select this function� Press “OK” key to play background music� (Music and
photos should be placed in the same folder, or you can select a piece of music from your music file first�)
Note:
1. USB function supports file formats with video file/sound file/graphic file/text file. Certain nonstandard USB storage
devices may not be recognised. Please replace these with a standard USB storage device.
2. When playing a file, streaming media system has certain limitations for each format. If a file exceeding the system
limit is played, then its reproduction will be wrong.
3. Do not pull out USB storage devices while the system is working. This may cause problems to the system or
equipment.
4. The system supports USB1.1 and USB2.0 connector and the standard transport protocol, such as U discs and
removable hard disc storage devices. USB device file format must be FAT or FAT32. It does not support
NTFS.
5. The USB interface of this TV set can supply a voltage of 5V and the maximum current is 500mA; accurate
identification of the multimedia player will be affected when a storage device over 500mA is used, which is a normal
phenomenon.
Remote Control Shortcut Keys
The “INDEX”, “ZOOM”, “REVEAL”, “TTX”, “HOLD”, “LIST”, “LANGUAGE”, “RADIO” keys on the remote
control are used for USB operation�
Press “t/u“ key to select the adjustment sort menu, which includes 4 sorts: PHOTO, MUSIC, MOVIE, TEXT�
Press “t/u“ key to select PHOTO� Then press “OK” key to read your photo documents� Press “//t/u’’ key to
select photo and press “OK” key (After the photo was selected, the file lower right corner displays a red hook� You can
choose photos to join them to the playlist�)� Press “INDEX” key on the remote control to play� If you do not choose
anything, the device will automatically join all the photos from the file in a playlist�
Note: The operation method of the MUSIC, MOVIE and TEXT are the same as that of PHOTO. Please refer to PHOTO
options.
Basic Function: When displaying photos, press “INFO” key� A toolbar will be displayed at the bottom of the screen�
(Press “” key to hide toolbar)

18
ENG
Icon Description
Playlist: Press “t/u“ key to select this function� Press “OK” key to view playlist�
Info. : Press “t/u“ key to select this function� Press “OK” key to view photo information, including
resolution, size and so on�
Rotate: Press “t/u“ key to select this function� Press “OK” key to rotate photos clockwise�
Rotate: Press “t/u“ key to select this function� Press “OK” key to rotate photos counter-clockwise�
Zoom In: Press “t/u“ key to select this function� Press “OK” key to enlarge photos�
Zoom Out: Press “t/u“ key to select this function� Press “OK” key to reduce photos�
Move View: If photo exceeds the screen, use this function to move across the photo�
FB: Press “t/u“ key to select this function� Press “OK” key to fast back� Press "INDEX" key to play
normally�
FF: Press “t/u“ key to select this function� Press “OK” key to fast forward� Press "INDEX" key to play
normally�
MUTE: Press “t/u“ key to select this function� Press “OK” key to fast back� Press "MUTE" key to switch
off sound�
Goto Time: Press “t/u“ key to select this function� Press “OK” key to select the time to play�
Set A-B repeat: Press “t/u“ key to select this function� Press “OK” key to set A and B� The film will be
repeated during A to B interval�
Slow Forward: Press “t/u“ key to select this function� Press “OK” key to slow down play speed�
Press “INDEX” key to play normally�
Step Forward: Press “t/u“ key to select this function� Press “OK” key to play step by step� Press
“INDEX” key to play normally�
Aspect Ratio: Press “t/u“ key to select this function� Press “OK” key to select Auto, 4:3, Full�

19
ENG
Simple troubleshooting
Symptom Cause Solution
Snowflake speckle and
sound noise�
1� Antenna cable connector is loose,
cable is damaged�
2� Antenna cable type does not match�
3� Direction or position of antenna is
incorrect�
4� Signal is weak�
1� Check if the antenna cable connector plug is
loose and if the cable is perfect�
2� Check antenna cable type (VHF/UHF)
3� Adjust direction or position of antenna�
4� Attempt to use signal amplifier�
TV image is better, but
has noise�
Antenna cable connector is loose,
cable is damaged�
Check if the antenna cable connector plug is
loose and check cable condition�
No image� No sound� Power plug is loose, or power supply is
not connected� Check if the power cord is well connected�
TV image has stripes� Signal is exposed to interference, such
as car, neon light, electric blower etc�
Do not use electric blower around the device
and adjust antenna cable direction to reduce
interference�
TV image has shadows�
1� TV signal is reflected against a valley
or building�
2� Direction of antenna is incorrect�
1� Use high directional antenna�
2� Adjust direction of antenna�
TV has no sound� 1� Volume setting is too low�
2� Sound is muted�
1� Adjust volume to proper value�
2� Press “MUTE” key on remote control to
eliminate mute�
Computer does not
display anything and it
does not prompt any
signal input, red indicator
LED twinkling�
Signal cable is loose or disconnected� Check if the signal cable is loose or
disconnected, and reconnect it�
Remote control distance
is short; it loses control�
1� Receive window of remote control is
covered by objects�
2� The battery energy of remote control
is too low�
1� Remove objects obstructing the receiver
window of remote control�
2� Change batteries�
Computer display is
faint�
1� Adjustment is incorrect�
2� Display mode is incorrect�
1� Use auto-adjustment function�
2� Use recommended mode�
Computer display image
does not fill the screen�
1� Adjustment is incorrect�
2� Display mode is incorrect�
1� Use Auto-adjustment function�
2� Enter “PICTURE” to adjust horizontal or
vertical position�
3� Use recommended mode�
Noise Signals while
turning off� Electrical discharge while turning off� It is normal�
Cannot operate this
device�
Exterior influence, for example
lightning, static electricity and so on,
which can potentially interfere with
normal operation of this device�
First disconnect the power supply and reconnect
it after about 1-2 minutes, then turn on the TV
again�

20
ENG
Technical Specifications
Master unit
Dimension (L x H x W) and Weight
Operating environment: temperature: 5°~40°; RH: 10%~85%; atmospheric pressure: 86kPa~104kPa
Storage environment: temperature: -20°~55°; RH: 5%~95%; atmospheric pressure: 86kPa~104kPa
Technical specifications for TV
1� Supported Systems: ATV: PAL D/K, I, B/G, SECAM D/K, B/G, L DTV: DVB-T/C/T2
2� TV(RF): 75Ω Imbalance
3� AV Video-Input: 75Ω, 1VP-P, RCA
4� AV Audio-Input: 20KΩ, 500mV RMS
5� HDMI Video Input: 480i, 480p, 576i, 576p, 720p, 1080i, 1080p
VGA display mode
32”
Power management
Recommended mode: 1360X768@60Hz
Panel size 32"
Max� Resolution 1366×768
Best Resolution 1360×768@60Hz
Pixel Pitch 0�51075mm×0�51075mm
Active Area 697�685mm×392�256mm
Power Supply 100-240VAC 60/50Hz
Power Consumption of Speaker 6W+6W
Panel size The base Unpacking Packing Net Weight Gross Weight
32” Excluding base 730×430×75 (mm3) / / /
Including base 730×481×75 (mm3) 830×514×132 (mm3) 4�0 kg 6�0 kg
NO� Mode Resolution Refresh rate
1VGA 720×400 70Hz
2 640×480 60Hz
3 SVGA 800×600 60Hz
4 XGA 1024×768 60Hz
5 WXGA 1360×768 60Hz
Mode Power Consumption
32”
Normal working ≤55W
Standby ≤0�5W
Table of contents
Other Tesla TV manuals

Tesla
Tesla TV T609 User manual

Tesla
Tesla 43T319 User manual

Tesla
Tesla 32M312BH User manual

Tesla
Tesla T607 Series User manual

Tesla
Tesla 32T303BH User manual

Tesla
Tesla T617 User manual

Tesla
Tesla 32M325BHS User manual

Tesla
Tesla M325 SMART User manual

Tesla
Tesla 32T300BH User manual

Tesla
Tesla 32T315BH User manual