Tesvor R5 User manual
(Note: Please read this User Manual carefully before using to avoid danger or damage to the Product caused by improper operation.)
R5 Cordless Wet-Dry Vacuum Cleaner
User Manual
www.tesvor.com


Contents
1. Safety Instruction
2. Packing list
3. Product Figure
3.1 Mop Assembly
1
P2
P4
P5
5. Instructions for Charging and Auto-cleaning
6. Instructions for Cleaning Sewage Bucket
7. Introduction of LED Indicator Light
P9
P10
P11
8. Introduction of Function Buttons
9. Product Specifications
P12
P13
10. Information on disposal and recycling P14
P6
4. Assemble Product P6
4.1 Assemble Machine Body and Handle Assembly P6
4.2 Assemble Clean Water Bucket Assembly P7
4.3 Assemble Sewage Bucket Assembly P8
4.4 Assemble Roller Brush Assembly P8
4.5 Assemble Roller Brush Cover P9

Please read the following safety instructions before using this product, and follow all routine safety
precautions.
Please read this manual carefully. Please keep this manual. Any operation inconsistent with this
manual may cause damage to the product.
Be careful
01. Do not touch the product with wet hands, otherwise electric shock may occur.
02. Please do not put this product in the place where it is easy to fall
03. This product is precision electronic equipment, which should avoid long time exposure to the sun.
04. Do not use this product in humid environment, such as in the bathroom.
05. Do not put this product near cigarette ends, lighters and other open flame.
06. Please clean the product after charging. Make sure that the product is not powered on before
cleaning and maintaining the equipment.
07. Please remove battery when not using for a long time.
08. Please check carefully whether the power adapter has been connected with the socket before use,
otherwise the machine will be unable to charge.
09. Before using this product, please make sure that all vulnerable items on the ground are removed,
such as glasses, lamps, and items that may entangle the roller, such as wires and curtains.
10. Please empty the garbage box first when it is full, and then use the Intelligent Electronic Control Mop.
11. Do not use the intelligent electric mop to clean construction waste.
12. The temperature range of this product is between 0℃ and 40℃. Do not use it in high or low
temperature environment.
13. Before the product is scrapped, please remove the battery from the Intelligent Electronic Control Mop.
Please make sure that the product is not connected to the power supply when removing the battery.
Please recycle the waste battery in a safe and environmental way.
Warnings
01. Do not disassemble, repair or refit the Intelligent Electronic Control Mop by yourself, otherwise
the product will be damaged and danger may occur.
02. Do not use this product in an environment where there is a possibility of fire or explosion.
03. This product can only be matched with the original power adapter, otherwise damage and fire
may happen.
04. Do not stand or sit on this product, otherwise the product may be damaged or you may fall.
05. When there is dust around the metal part of the power plug, do wipe it with dry cloth.
06. The power adapter uses 100-240V AC voltage. Please insert the plug into the socket correctly to avoid
the touch of children.
07. It is forbidden to wash and soak the machine body and electronic parts, otherwise short circuit damage
may occur.
08. Do not damage the processing power cable, and avoid pressing heavy objects on the power cable,
heating the power cable or pulling and bending the new power cable.
09. Please pay attention to the safety of the elders and children when the product is working and cleaning,
so as to avoid the risk of tripping(little children in particular).
10. This product is for indoor use only. Please do not use it outdoors.
11. It is forbidden to touch the battery contact with metal or any conductive material, short circuit
may occur.
1. Safety Instructions
2

Safety Precautions for Rechargeable Battery
Danger
01. Be sure to use the special battery adapter, otherwise leakage, heating or rupture may occur.
02. Do not make the battery short circuit or remove the battery, otherwise leakage, heating or rupture
may occur.
03. Do not transport or store the battery with metal items such as necklaces and hairpins, otherwise
leakage, heating or rupture may occur.
04. Do not put the battery into the fire or heat the battery, otherwise leakage, heating or rupture may occur.
Be Careful
01. In case of abnormal overheating during charging, please stop using it immediately, otherwise leakage,
heating or rupture may occur.
02. Please pull out the battery when it is not used for a long time and place it in a cool and dry environment
in order to prolong the service life of the battery, otherwise leakage, heating or rupture may occur.
03. Do not immerse the battery in water or contact with liquid, otherwise leakage, heating or rupture
may occur.
04. In case of abnormal situation (such as discoloration or deformation), please stop using, otherwise
leakage, heating or rupture may occur.
05. When recycling or disposal the battery, be sure to insulate the electrode with tape.
06. If leakage happens, please clean the battery with a dry rag, recycle it in time, or discard it.
07. The recycled batteries should be placed in the battery recycling boxes or hazardous trash cans set
up in communities, hotels, schools, large shopping malls, supermarkets, etc.and collected by
professional recycling agencies. Waste product batteries must be removed and discarded in
accordance with local laws and regulations.
Warning
How to Remove Battery
01. If the battery leakage touches the skin or clothing, be sure to wash it with clean water immediately.
If it is ignored, skin inflammation and other problems may occur.
02. Do not use the rechargeable battery of this product on other devices. This battery is only suitable
for Intelligent Electronic Control Mop.
03. It is forbidden to charge or continue to use the battery case when the battery case is deformed and
the electrolyte flows out, so as to avoid danger.
04. Do not hit or throw the battery hard, otherwise leakage, heating or rupture may occur.
05. It is forbidden to disassemble the battery pack, otherwise the battery pack will break and the
electrolyte will flow out, causing fire and explosion.
Tightly squeeze the bump buttons on both sides above battery (as indicated by the arrow in figure) with
thumb and index finger, gently pull upward to remove battery.
3
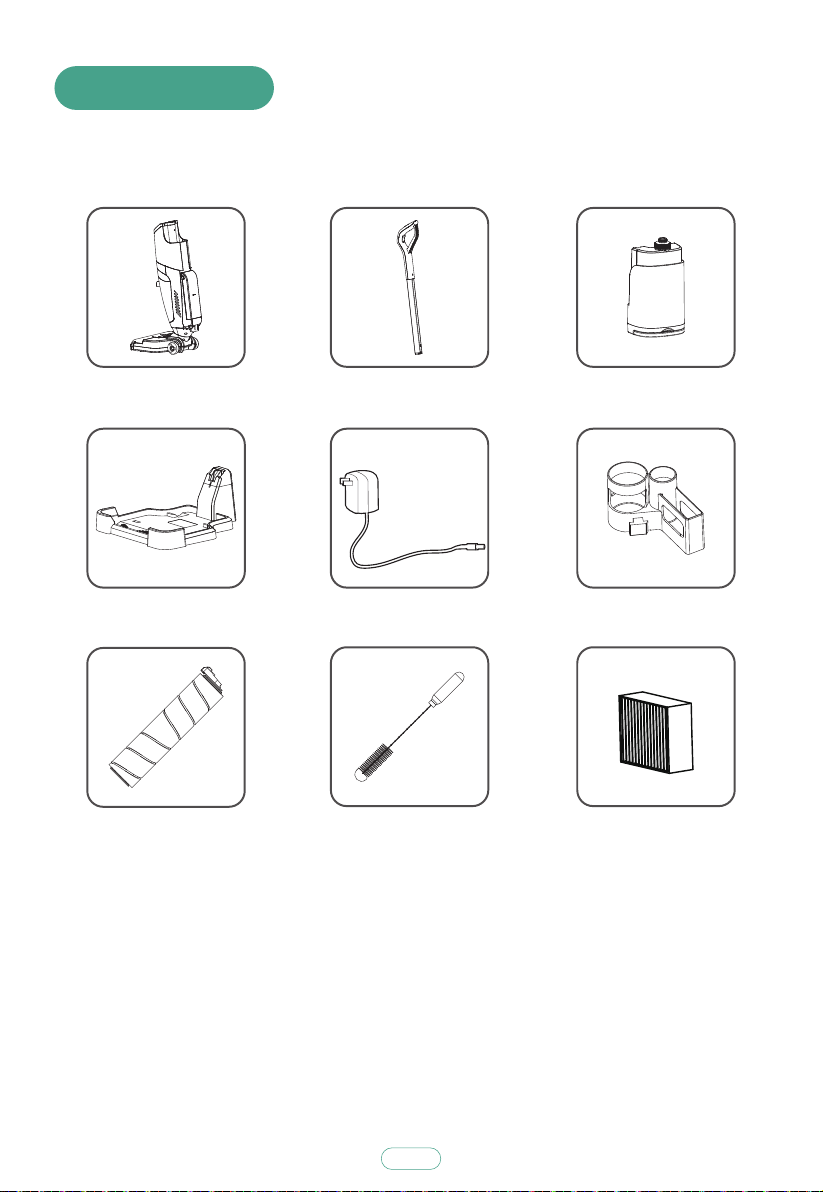
Accessories of some models may be slightly different and they are subject to the actual received products.
2. Packing list
Main Body
Power Adapter
Cleaning Tool High-efficient Filter
Roller Brush
Accessory box
Charging Stand
Handle Assembly Clean Water Bucket
4

Component Name
3. Product Figure
Voice Button
UV Disinfection/MAX
Switch Button Auto-cleaning Button
Handle Assembly
Display
Sewage Bucket
Battery
Clean Water Bucket
Charging Stand
Machine Body Assembly
Mop Assembly
Roller Brush
Roller Brush Cover
Adapter
5

3.1 Mop Assembly
4. Assemble Product
Insert handle assembly into top of machine body from the direction as shown in
figure; snap positioning is set inside; assembling is successful when a “ka”
sound is heard.
To disassemble handle assembly, insert a hard <4.5 mm-diameter column (such
as screwdriver, iron wire or wooden strip) into the snap hole on machine body
until it reaches bottom, slowly pull out handle assembly.
4.1 Assemble Machine Body and Handle Assembly
Snap Hole
6
UV Disinfection Lamp
Floor Penetrating
Rear Wheel
Small Wheel
Roller Brush
Scraper
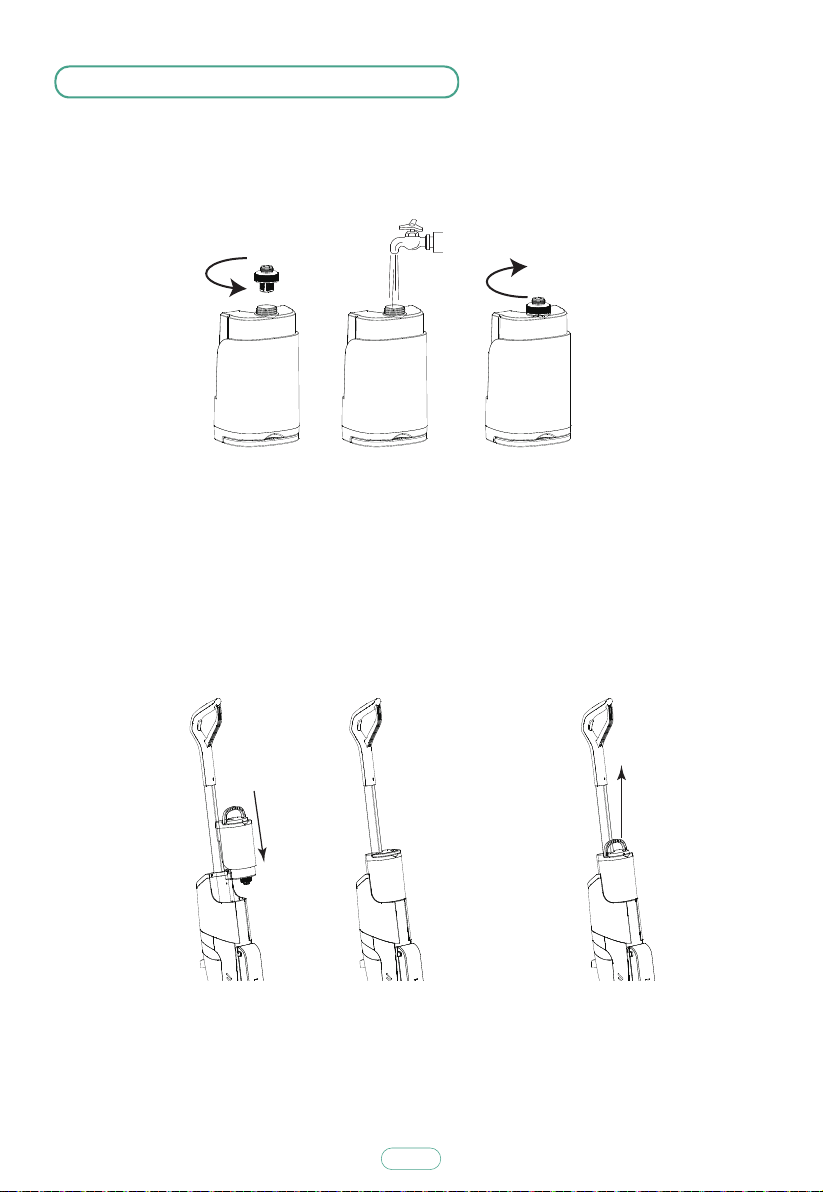
4.2 Assemble Clean Water Bucket Assembly
Turn cap of clean water bucket counterclockwise to open it, add appropriate amount
of clean water, turn cap clockwise to tighten it.
Insert clean water bucket assembly into corresponding position of machine body in
the direction as shown in figure. Snap positioning is set inside; assembling is
successful when a “ka” sound is heard. Gently pull handle of clean water bucket
upward to remove clean water bucket assembly.
7
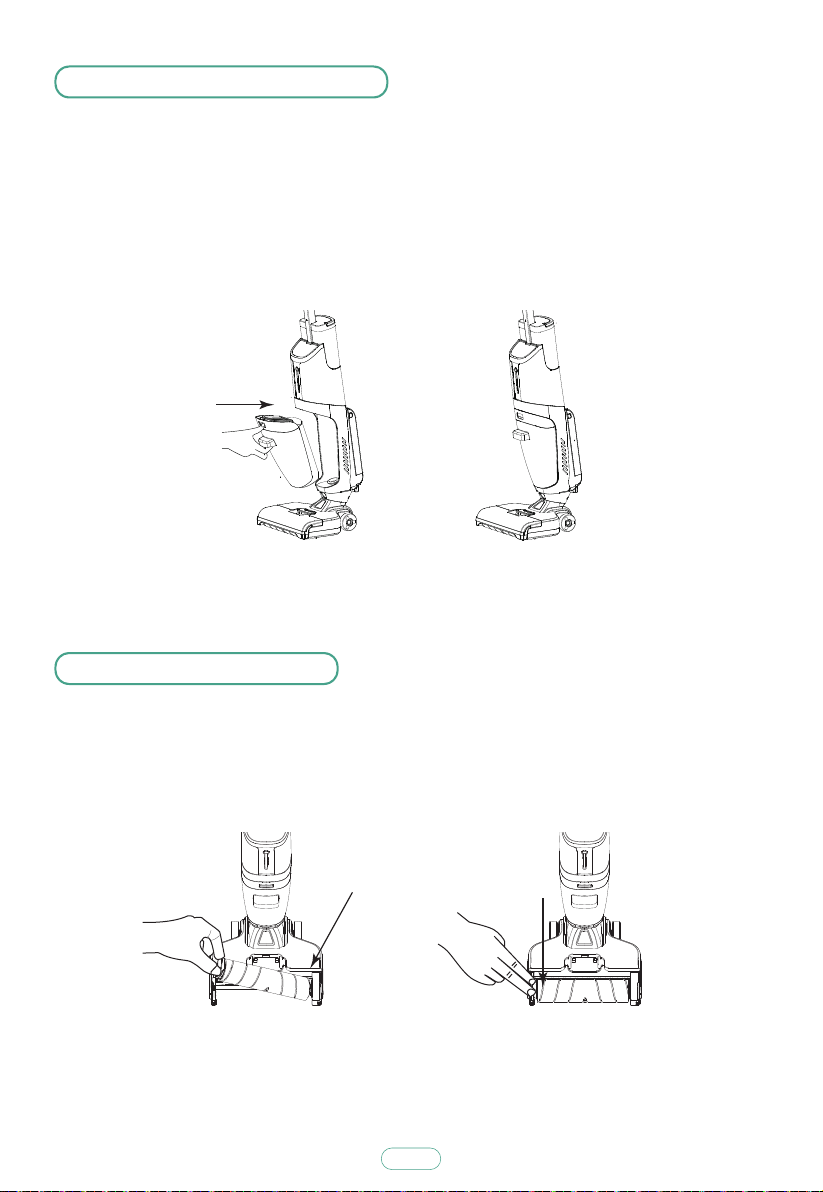
4.3 Assemble Sewage Bucket
Insert sewage bucket assembly into corresponding position of machine body in
the direction as shown in figure. Snap positioning is set in sewage bucket
assembly; assembling is successful when a “ka” sound is heard.
4.4 Assemble Roller Brush
Insert roller brush assembly into corresponding position of machine body in the
direction as shown in figure. Snap positioning is set mop assembly; assembling is
successful when a “ka” sound is heard.
8
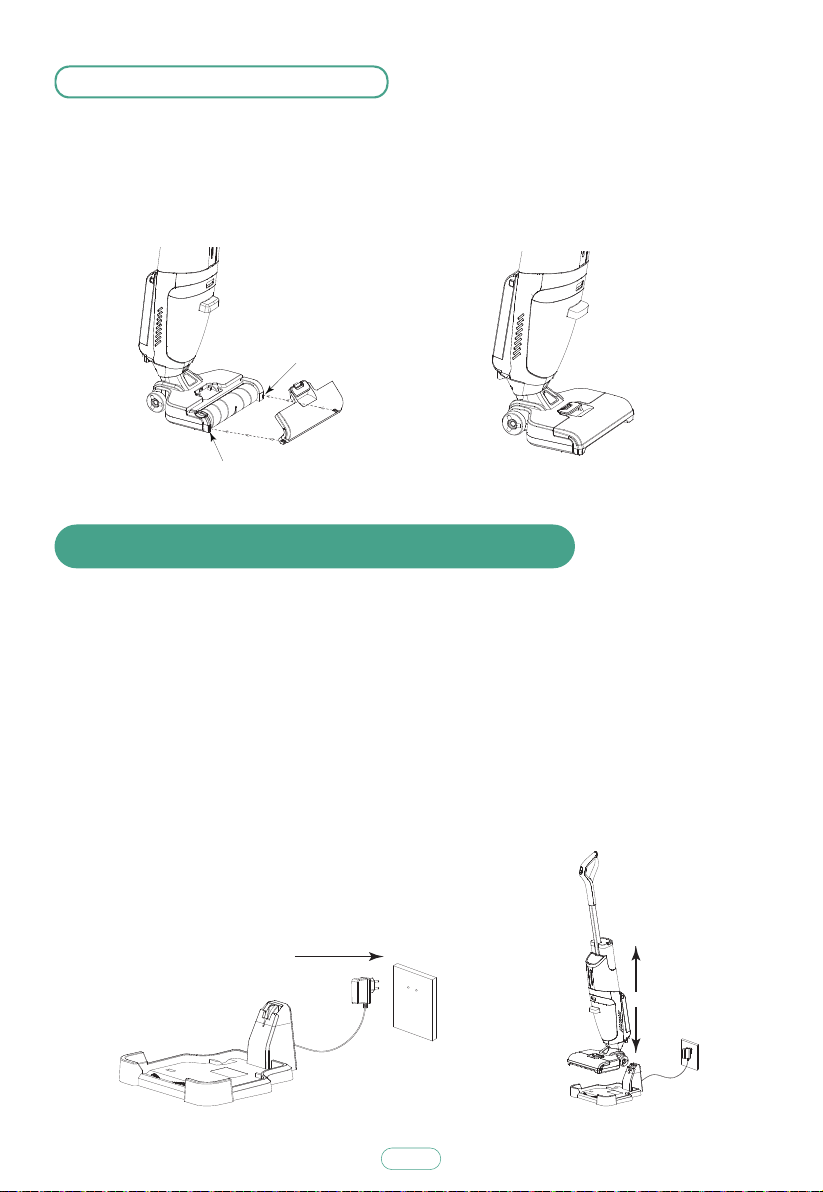
5. Instructions for Charging and Auto-cleaning
Plug adapter into socket in the direction as shown in figure.
Place machine onto charging stand as shown in figure, battery level indicator light
on display will flash, machine will be charged, charging is finished when indicator
light goes off. After cleaning is done, place machine onto charging stand, assure
sufficient water in clean water bucket, press Auto-cleaning Button to enter
auto-cleaning mode, cleaning and spin drying will be completed within 80 s,
and then machine will stop automatically.
After charging is finished, turn off power switch and unplug adapter.
Note: “Auto-cleaning function” can only be selected under charging mode.
4.5 Assemble Roller Brush Cover
Insert the roller brush cover into the corresponding position at the bottom of the
floor brush assembly in the direction shown in the figure. Then press the roller
brush cover until you hear a "ka" to complete the assembly.
Buttonhole
Buttonhole
9

6.Instructions for Cleaning Sewage Bucket
A hallow (as indicated by the arrow in figure) is set above sewage bucket, press
the button inside such hallow downward to remove sewage bucket.
Place sewage bucket on floor, hold bucket body with left hand, slowly pull bucket
cap upward (do not use to much force to avoid sewage splashing) to remove it;
slowly take filter frame outside of bucket, remove solid wastes off filter frame,
drain sewage; wash bucket cap, filter frame and sewage bucket, assemble filter
frame and bucket cap, assemble bucket back to machine body.
Sewage Bucket Cap
Filter Frame
10
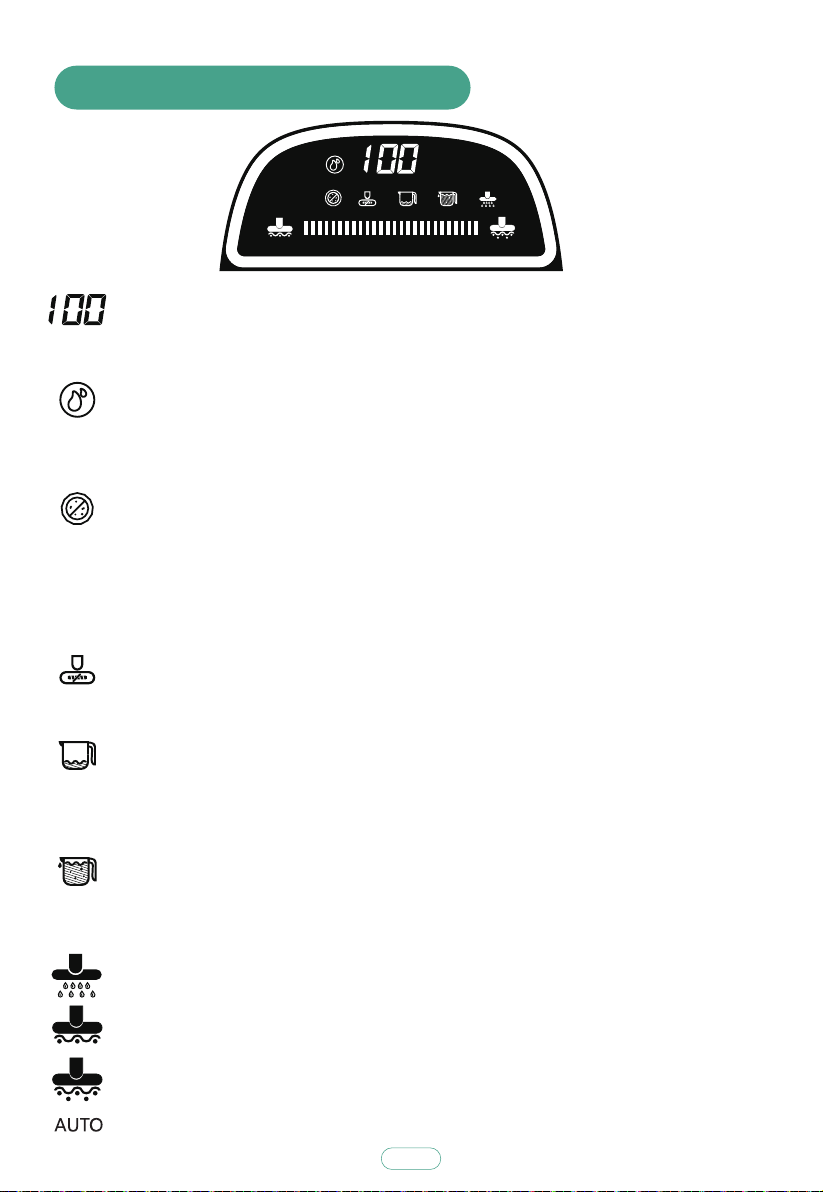
7. Introduction of Icons on Display
11
Energy-saving mode: The icon illuminates under auto-washing mode.
Strong mode: The icon illuminates under auto-washing mode.
Roller brush entangling: When roller brush is not assembled or is stuck or
entangled, voice prompt of “roller brush is not assembled” or “please
clean roller brush” will be heard, the icon will illuminate.
Insufficient water in clean water bucket: When water in clean water bucket
is insufficient, the icon will flash, voice prompt of “insufficient water in
clean water bucket” will be heard; after water is filled into bucket and
auto-washing is restarted, the icon will go out.
Sewage bucket is full: When sewage reaches warning line, the icon will flash,
machine will stop, voice prompt of “please empty sewage bucket” will be
heard; after sewage bucket is emptied and auto-washing is restarted, the
icon will go out.
Auto-cleaning: After auto-washing is finished, the icon will flash to remind
auto-cleaning. When machine is placed onto charging stand and its battery
level is above 30%, press “Auto-cleaning Button”, the icon will illuminate
and machine will enter auto-cleaning mode (auto-cleaning takes 80 s).
Battery level: Displayed from “0” to “100”, “0” indicates no power,
“100” indicates fully charged. Illuminating indicates working, flashing
indicates charging.
AUTO
Auto-washing mode: The icon illuminates under auto-washing mode.
Water outlet icon: Light on: water cleaning mode;Light off: dry suction mode.
UV disinfection: This is disabled by default under auto-washing mode, when
machine is lifted, UV lamp will turn out automatically, the icon will also turn
out; when machine is placed on floor, UV lamp will turn on, the icon will
illuminate. Long press UV Button for 2 s, machine will enter UV disinfection
mode, the icon will illuminate; long press UV Button again for 2 s, machine
will exit UV disinfection mode, the icon will turn out.

Double-color light ring for floor cleanness: Blue light illuminates by default;
when floor is dirty, light rings will illuminate red according to floor condition,
the more rings illuminate, the dirtier floor is, fan suction level will be raised
automatically. During charging, effect will be displayed dynamically upon
charging progress.
Fan suction level:
Under auto-washing mode, machine will automatically identify stains on floor
and intelligently adjust fan suction level, the more bars illuminate, the higher
fan suction level is.
Under auto-washing mode, short press UV Disinfection/MAX Button for 0.5 s
to enter MAX suction mode, progress bar will fully illuminate; under MAX
suction mode, short press UV Disinfection/MAX Button for 0.5 s to enter
auto-washing mode, suction level can be adjusted intelligently.
8. Introduction of Function Buttons
Long press "Switch Button" for 2 s to enter auto-washing mode; short press the button to stop machine.
short press the button for 0.5 s to enter MAX suction mode, short press the button again for 0.5 s to exit
such mode.
Long press "UV Disinfection/MAX Button" for 2 s to enter UV disinfection mode,long press the button again
for 2 s to exit such mode; short press the button for 0.5 s to enter MAX suction mode, short press the button
again for 0.5 s to exit such mode.Working mode:ln the working mode, the machine keeps outputs water by
default.
Short press the "self-cleaning button", the machine stops watering with voice prompt "turn off water
output"; short press the "self-cleaning button" again, the machine starts to output water with voice
prompt "turn off water output".
self-cleaning mode:When the machine is placed in the charging dock (make sure the charging dock is
connected to the power), when the balance battery power is over 30%, short press the "self-cleaning
button", it starts automatic cleaning mode, the mode takes 80 seconds.
Press“Voice Switch”to disable voice prompt, press the switch again to disable the function.
UV Disinfection/MAX
Switch Button
Auto-cleaning Button
Voice Switch
12
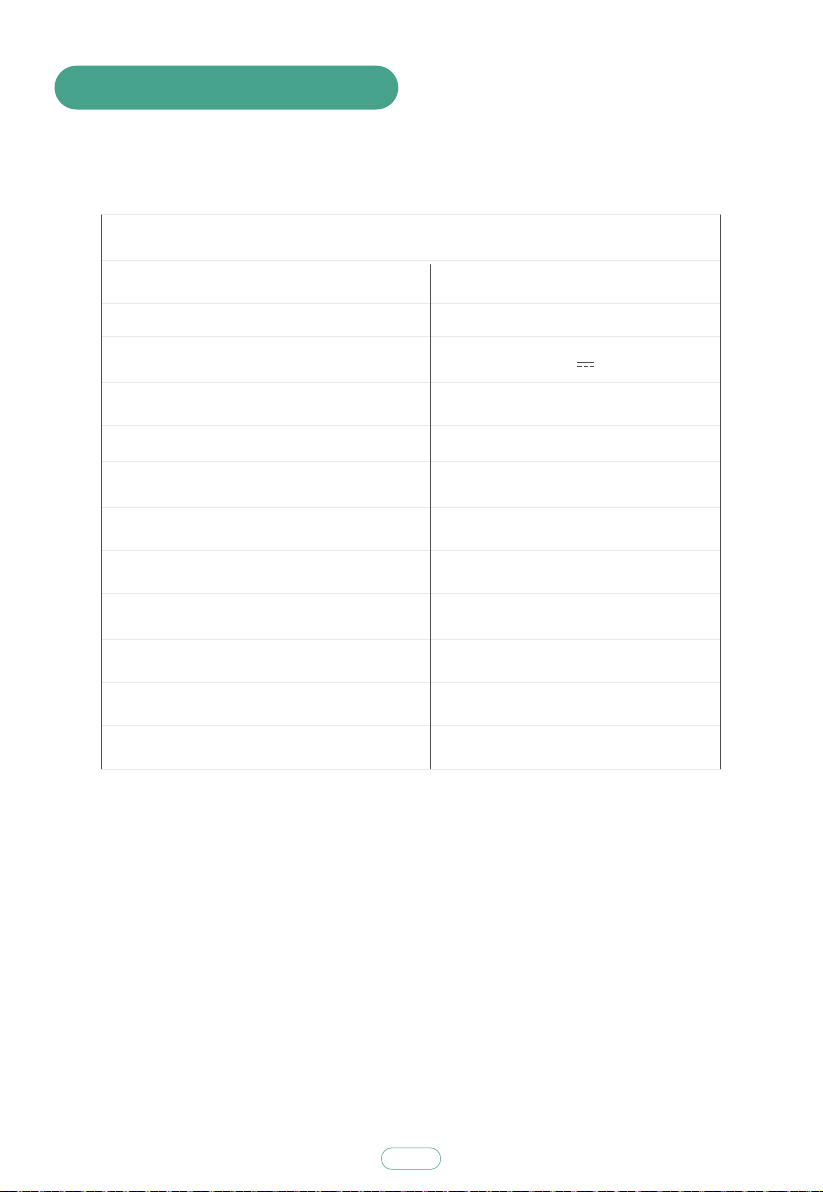
9. Product Specifications
Rated Voltage
Battery Capacity
Machine Power
Adapter Parameters
Effective Capacity of Sewage Bucket
Capacity of Clean Water Bucket
255W
3800mAh
Frequency Bands & Signal Transmission Bluetooth 5.0 BLE, 2,4GHz; 18dBm
DC 25.2V
700ml
900ml
Product Specifications
Net Weight of Machine 5.2Kg
Product Dimensions
Working Time (General Mode) ≥45min
Charging Time 240min
Working Time (Max Suction Mode) ≥15min
330(L)x350(W)x1190(H)mm
29.5V 1A
13

14
7. Information on disposal and recycling
The symbol means that this product must be disposed of separately
from normal household waste at the end of its useful life. Please
note that it is your responsibility to dispose of electronic equipment
at recycling centers to help conserve natural resources.
10. Information on disposal and recycling


Manufacturer: Tesvor, Shenzhen Tian You Intelligence Co., Ltd.
Address: Room 301,Building 5, Lixin Xinwei Industrial Park,Xili North
Road No.50, Licheng Community, Xili Street,Nanshan District, Shenzhen China
MORE FAMILY TIME. LESS CLEANING.
Table of contents
Other Tesvor Vacuum Cleaner manuals


