Tether Tools AIR DIRECT User manual

AIR DIRECT
Wireless Camera Shooting System
User's Manual

Chapter 1 Product Introduction.................................................................................................................................4
1.1 Packing list..................................................................................................................................................4
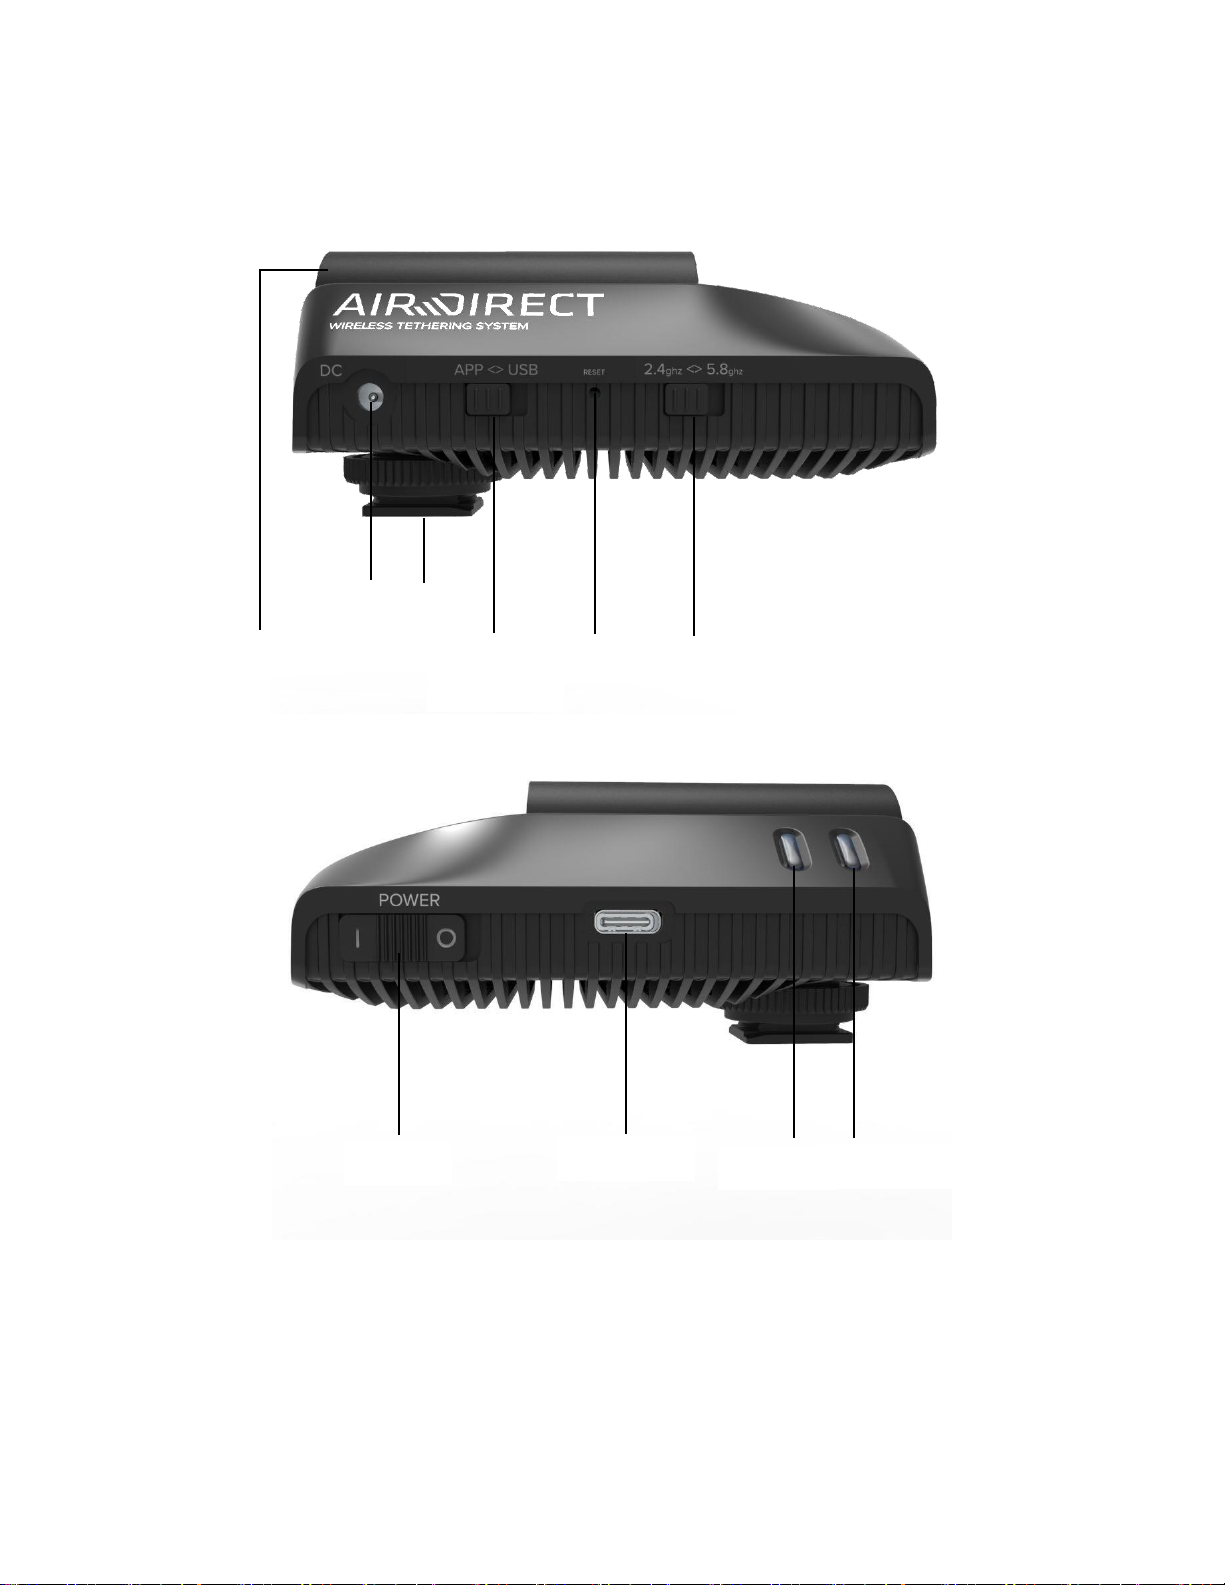
1.2 Overview......................................................................................................................................................5
Chapter 2 Getting Started..........................................................................................................................................7
2.1 Install battery.................................................................................................................................................7
2.2 Power on........................................................................................................................................................7
2.3 Connect Camera ..........................................................................................................................................7
2.3.1 Connect AIR DIRECT to camera....................................................................................................7
2.3.2 Get AIR DIRECT software...............................................................................................................8
2.4 Mode Switch..................................................................................................................................................8
2.4.1 Wi-Fi band switch..............................................................................................................................8
2.4.2 APP/USB mode switch.....................................................................................................................9
2.5 DC power supply..........................................................................................................................................9
2.6 System Reset................................................................................................................................................9
Chapter 3 APP Use ..................................................................................................................................................11
3.1 Remote shooting ........................................................................................................................................12
3.1.1 Live view...........................................................................................................................................12
3.1.2 Parameter settings..........................................................................................................................12
3.2 Browse mode..............................................................................................................................................12
Chapter 4 Online Shooting with Camera...............................................................................................................15
4.1 Connection................................................................................................................................................15
4.2 Open VirtualHere service........................................................................................................................15
Chapter 5 Cautions and FAQ..................................................................................................................................16
5.1 Cautions.....................................................................................................................................................16
5.1.1 Battery Charging..............................................................................................................................16
5.1.2 Transmission speed........................................................................................................................16
5.1.3 RF information .................................................................................................................................17
5.2 FAQ............................................................................................................................................................18
5.2.1 DC input............................................................................................................................................18
Catalogue

5.2.2 Battery LED......................................................................................................................................18
Warning......................................................................................................................................................................19

Chapter 1 Product Introduction
1.1Packing list
No.
Content
1
AIR DIRECT
2
Type-C Data Cable
➢Type-C To Type-C
➢Type-C To USB3.0
➢Type-C To Micro B
➢Type-C To Mini B
➢Type-C To Mini 8P
3
Battery
4
User’s Manual

1.2Overview
DC Jack
Hot Shoe
Socket
APP/USB SW
Reset Button
2.4G/5.8G SW
Battery
Power SW
USB Type-C
Wi-Fi LED
Battery LED

Battery LED
The green LED indicates that the battery exceeds 1/2 power or DC IN. The yellow LED indicates that the
battery is 1/4~1/2 power. The red LED indicates that the battery is 1/8~1/4 power. The red LED flicker
indicates that the battery is lower than 1/8 battery.
Wi-Fi LED
After the power is turned on for 10 seconds, the blue LED is on and flashes for 5 seconds in High-speed,
then flashes for 10 seconds in Low-speed and then lights up continuously, indicating that Wi-FI is booting
normally.
When the APP/USB mode switch is switched, or the 2.4G/5.8G mode switch is switched, the blue LED
will flash slowly after 10 seconds, indicating that the mode switch is successful.

Chapter 2 Getting Started
2.1 Install battery
Get the battery from the packing list and find the triangular arrow mark indicating the direction of the
battery. Push the battery into the AIR DIRECT battery compartment in the direction of the arrow as shown
below.
2.2 Power on
Turn the power switch OFF->ON, the battery LED will be light on according to the current battery level.
The Wi-Fi LED will enter the flashing state within 10 seconds, prompting Wi-Fi to initialize, and the
flashing state will be finished. The steady state indicates that the Wi-Fi is booting normally.
2.3 Connect Camera
2.3.1 Connect AIR DIRECT to camera
Connect AIR DIRECT to the camera using the Type-C data cable in the package list and turn on the
power switch of the camera.
Battery

2.3.2 Get AIR DIRECT software
You need to install AIR DIRECT software on your computer. AIR DIRECT software supports Windows
and Mac OS.
1. Access the following URL on your computer's browser:
http://www.xxx.com/download
2. Follow the prompts to install AIR DIRECT software on your computer.
3. Connect to AIR DIRECT's built-in Wi-Fi hotspot
While the Wi-Fi LED is constantly lit, you can search for and connect to AIR DIRECT's Wi-Fi hotspot
on your computer, starting with "AIR_DIRECT".
4. Run software
Open AIR DIRECT software and run it on your computer.
2.4 Mode Switch
2.4.1 Wi-Fi band switch
Toggle the 2.4G/5.8G mode switch, you can switch the Wi-Fi working frequency band at will. When the
switch is switched to the 2.4G side, the Wi-Fi works in the 2.4Ghz band. When the switch is switched to
the 5.8G side, Wi- Fi works in the 5.8Ghz band.

2.4.2 APP/USB mode switch
The APP/USB mode switch can switch the system working mode. When the switch is moved to the APP
side, the system works in the APP connection mode. You can connect and control the camera through
the provided software APP. When going to the USB side, the system works in wireless USB transfer
mode, you can connect to the camera through software such as Capture One.
2.5 DC power supply
AIR DIRECT supports direct power supply from DC IN(5V). After the DC power supply is connected, the
battery LED will keep the green light on. When the DC power supply is unplugged, the battery light will
light the corresponding color according to the battery power.。
2.6 System Reset
As shown in the figure below, there is a recessed button. You need to hold the button with a slender
object (such as a toothpick) for 5 seconds. The system enters the reset. After all the LED are off, the
system resets successfully.
※Note: It is recommended to use this button to reset the system when the system is abnormal and
cannot be recovered. In other cases, please do not touch this button.


Chapter 3 APP Use
【Connect and install the APP】
When connecting, please connect the camera and AIR DIRECT with the Type-C data cable in the
package list, then turn on the power of the camera and AIR DIRECT, and switch the APP/USB button to
APP mode.
In the Android application market, search for "Case Remote" and install the Case Remote APP.
Reflesh Connect
Camera Information
If the following message appears, reset your Wi-Fi
connection and press the refresh connection
button to connect your camera to AIR DIRECT.

3.1 Remote shooting
You can remotely control camera and shoot with your phone, tablet, computer, etc.
3.1.1 Live view
Open the live view by clicking the Live View
button in the lower right corner of the screen.
3.1.2 Parameter settings
The top of the screen can be set to the camera: gear, shutter, aperture, ISO, EV value.
Note: The camera that adjusts the gear position via the physical knob cannot adjust the gear via the APP.
3.2 Browse mode
You can view the photos in the camera, view EXIF information, delete in bulk, and save to mobile phone
in bulk.
Click on the album button below to enter "Browse Mode"
LiveView Button
Click to set: gear position, shutter, aperture, ISO, EV

Reflesh Image List
If the camera continues to take pictures, the image list will automatically refresh.
View large image
Click on the thumbnail to view the larger image. After opening the large image, you can:
⚫Share this photo
⚫Save the original image to the phone
⚫Delete this photo
⚫View the EXIF information of this photo
Share and save
Click the "Select" button at the top right to select the photo.
⚫Click the “Share” button at the bottom right
to pop up a list of options.
⚫Select “Share” to share to social networks。
⚫Click the “Save Photo” button at the bottom left
to save the photo to the local.
Browse Photos
Select photo

Batch deletion
In the picture list mode, select the photo you
want to operate and select "Delete" button,
The selected photo can be deleted and the photos
in the camera will be deleted too.
1
1
1
1
1
1
1
1
1
1
1
1
1
1
1
1
1
1
Share photo
Save photo
Delete photo
Save photo
Select all
Select All
Click the "Select All" button to select all
photos.

Chapter 4 Online Shooting with Camera
4.1Connection
When connecting, please connect the camera and AIR DIRECT with the Type-C cable in the package list,
then turn on the camera and AIR DIRECT, and switch the APP/USB button to USB transfer mode.
4.2Open VirtualHere service
Open the VirtualHere software folder and double-click "vhui64.exe" to start the VirtualHere shooting
service. After the VirtualHere service is enabled, you can remotely control the camera using software
such as Capture One.
Note: Please install the 32-bit version when use 32-bit system.
After opening VirtualHere service, you can use more than 500 kinds of cameras such as Canon, Nikon,
Sony, Fuji, Pentax, Panasonic, Olympus, etc.
Camera support list, see:https://www.xxx.com/support/
VirtualHere service

Chapter 5 Cautions and FAQ
5.1Cautions
5.1.1 Battery Charging
1. Please charge before use for the first time or after long-term idle. The charging requirement of the
charger is 5V-1A. Regular mobile phone chargers such as iPhone charger can be used.
2. AIR DIRECT's operating environment temperature is -20~50 degrees. Lower ambient temperature
may cause battery performance to drop.
3. When not in use for a long time, remember to take the battery out of the battery compartment and
store it in a dry environment.
5.1.2 Transmission speed
AIR DIRECT Wi-Fi uses the IEEE 802.11g standard when transmitting 2.4G band, its maximum
transmission speed is 54Mbps, and the IEEE 802.11ac standard is adopted in the 5.8G band. Its
maximum transmission speed is 867Mbps.The actual transmission speed is related to environmental
factors such as camera, wireless network environment, distance, etc. You can take the following
measures to improve the transmission speed.
1. Close the distance between AIR DIRECT and computer.
2. Reduce obstacles between AIR DIRECT and computer, especially cement walls, metal covers and
other obstructions.
3. Try to use the battery with sufficient battery or DC access. Insufficient power may cause unstable
transmission.

Operation Frequency:2412-2462MHz(802.11b/g/ht20),2422-2452MHz(802.11ht40),5725-5850MHz
5.1.3 RF information
1.
2. Max. Output Power
2.4G Band
-
5.8G Band
-
23.96dBm(802.11b/g/ht20/ht40)
5725-5850 MHz:13.45dBm

5.2FAQ
5.2.1 DC input
AIR DIRECT's DC input requirement is 5V/2A. Using a DC power supply below 5V/2A to access AIR
DIRECT will cause the system to restart abnormally.
5.2.2 Battery LED
When Wi-Fi is startup, it is normal for the battery LED to change color due to load changes.

Warning.
The working temperature for the CamFi is -20~50 Celsius degree and the relatively humidity is 0%~95%.
Low temperature may cause degradation to the battery.
Keep AIR DIRECT from high temperature, moisture and water.
Any Changes or modifications not expressly approved by the party responsible for compliance could void
the user’s authority to operate the equipment.
Operation is subject to the following two conditions: (1) This device may not cause harmful interference,
and (2) this device must accept any interference received, including interference that may cause
undesired operation.
This equipment should be installed and operated with minimum distance 20cm between the radiator&
your body. This transmitter must not be co-located or operating in conjunction with any other antenna or
transmitter.
Table of contents
Other Tether Tools Camera Accessories manuals