Tether Tools Case Air Wireless CAWTS03 User manual

Case Air Wireless
TETHERING AND CAMERA CONTROL SYSTEM
PRODUCT MANUAL
CAWTS03
v3.12 Windows

2
TABLE OF CONTENTS
3Features / Accessories / Specs
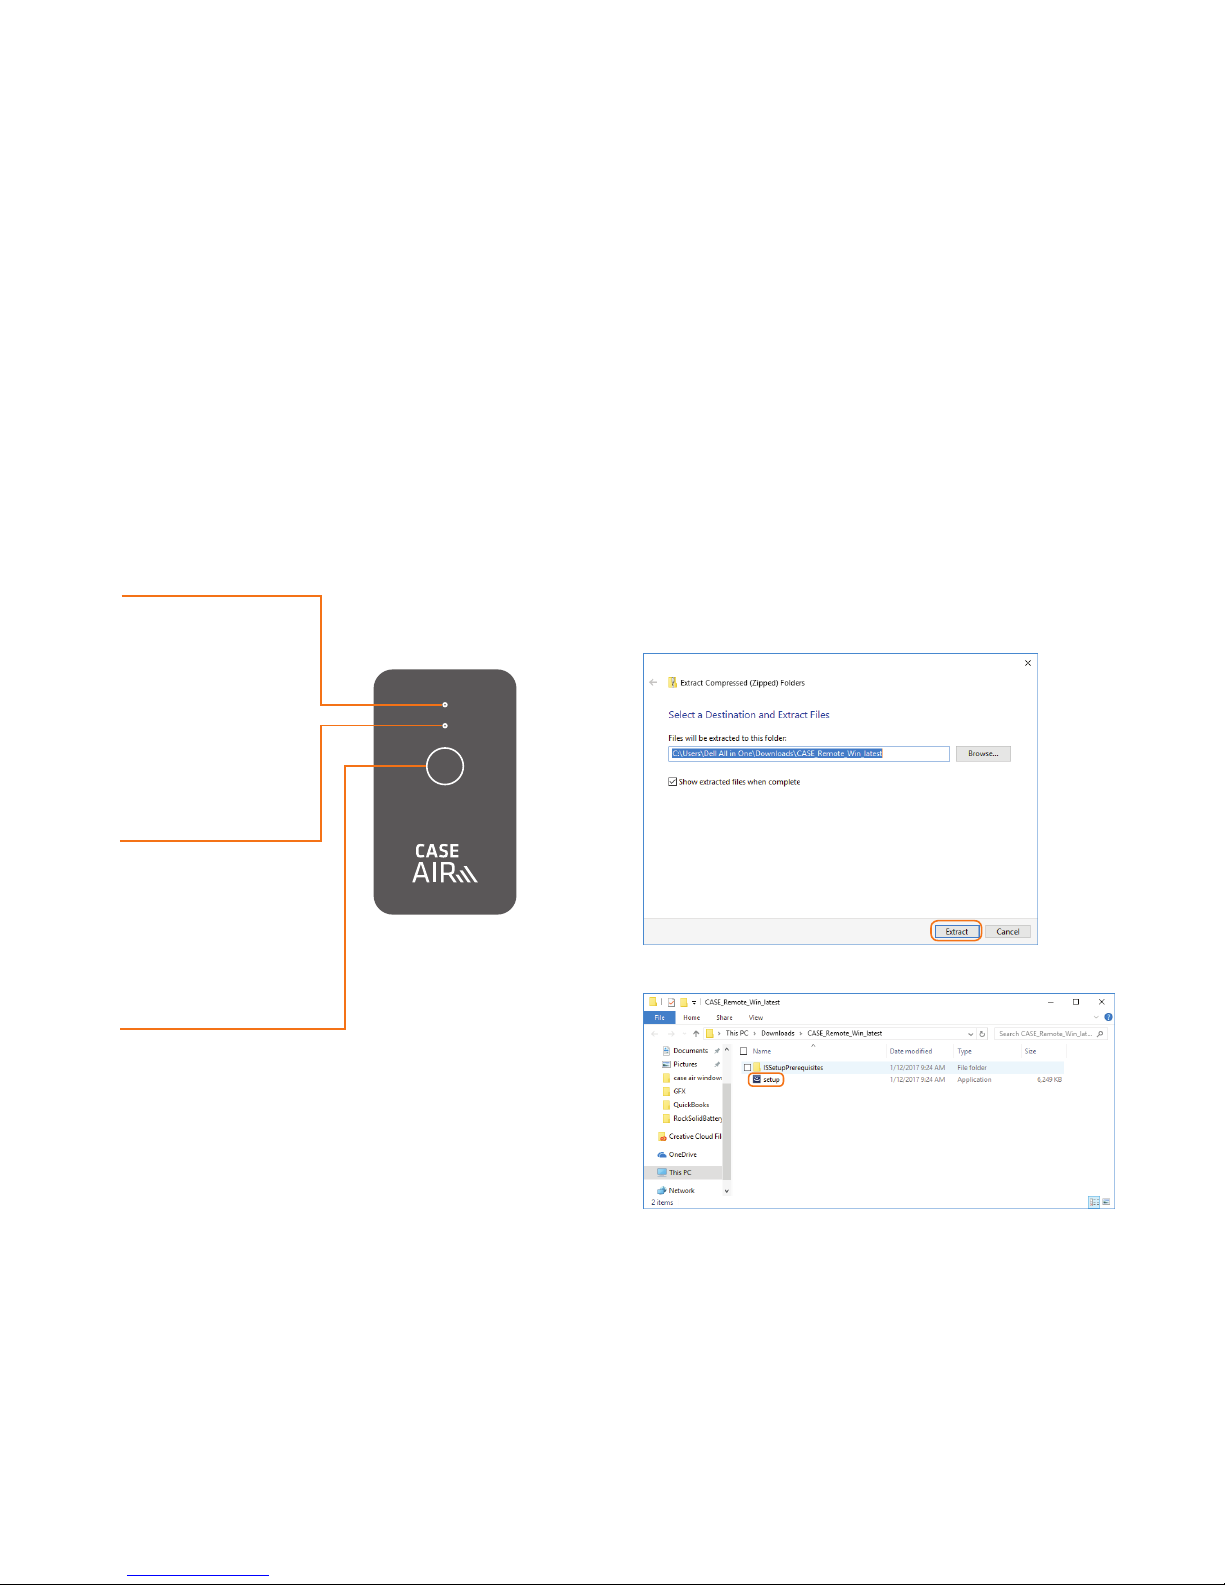
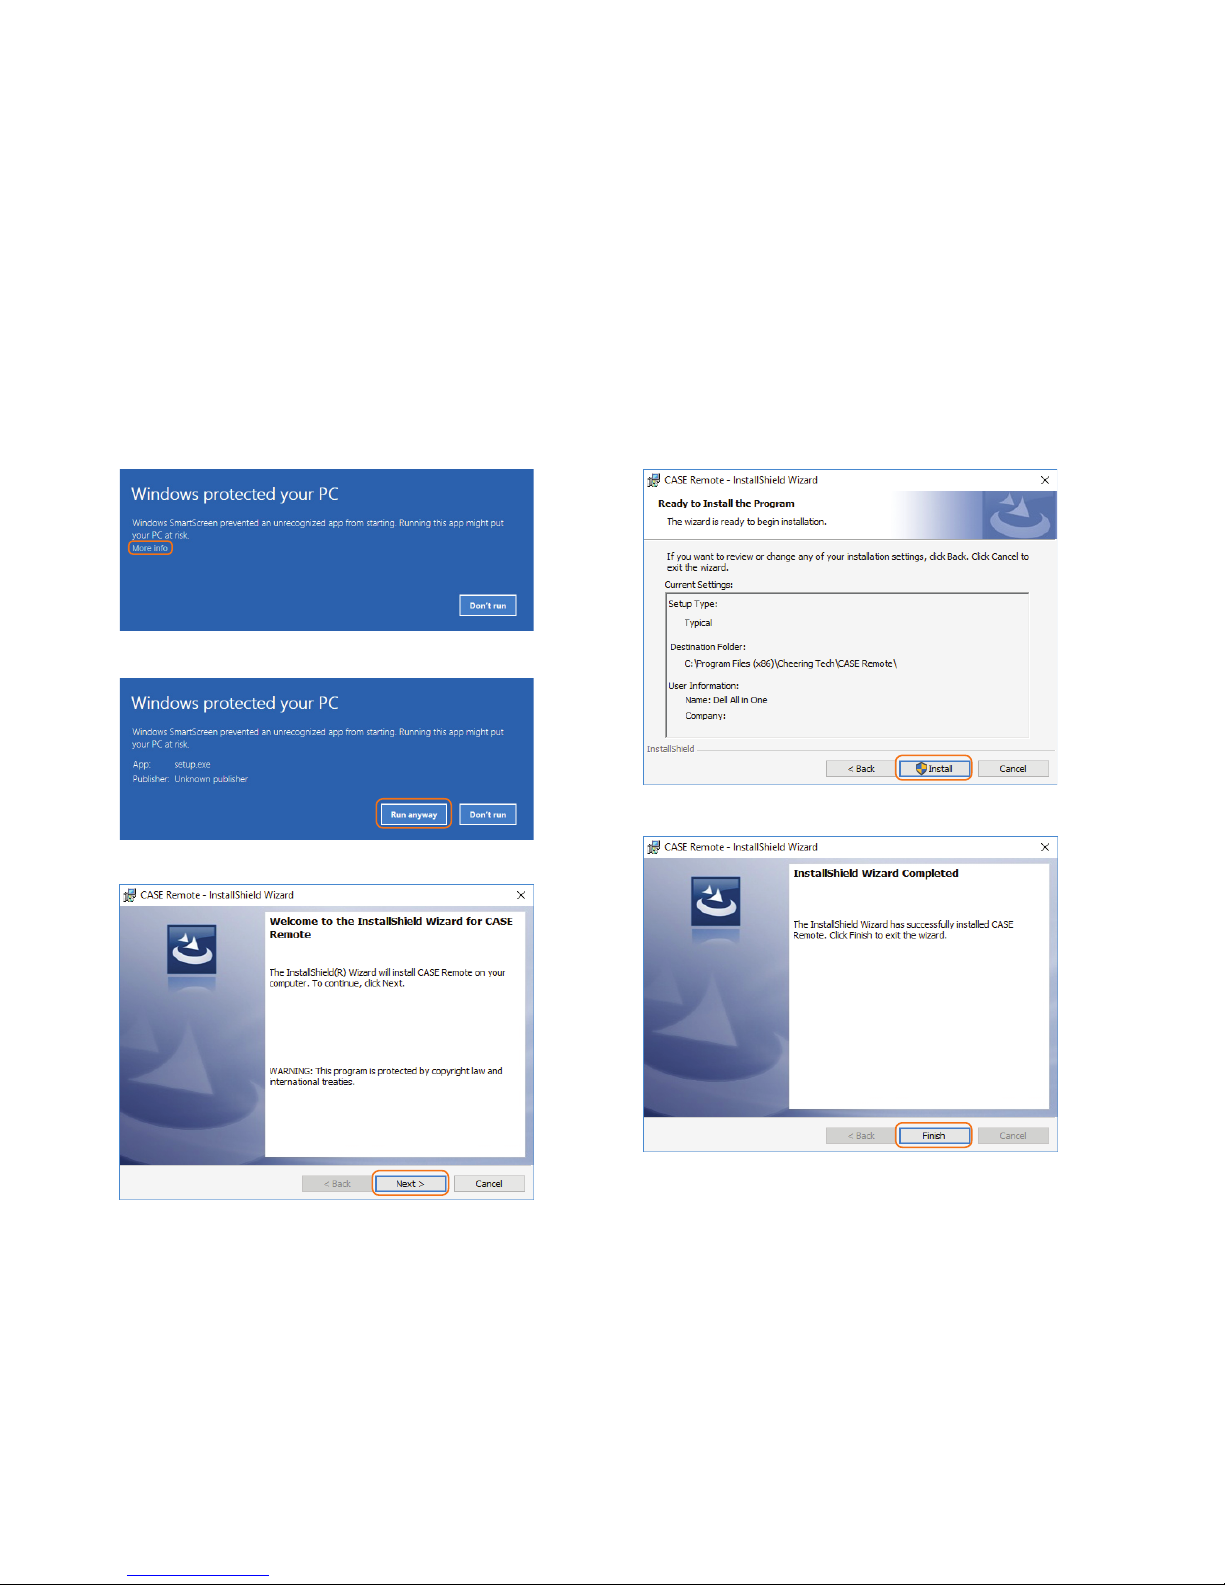
4Charging / Software Install
6Connecting
7Case Remote Program
8Firmware Update
9Capture Interface
10 Properties
11 Focus
12 Advanced Function
13 Time Lapse
14 Bulb Time
15 Focus Stacking
16 HDR
17 Movie
18 Gallery
19 Settings
ABOUT CASE AIR
The Case Air Wireless Tethering System connects and transfers images instantly from your camera to a phone, tablet
or computer using the downloadable Case Remote software/app. Case Air lets you control advanced camera settings
including focus points, exposure settings, bracketing/HDR, time-lapse, and more. View your images on a larger screen
to check critical focus and composition, or use Live View or movie mode for real-time capture to share and collaborate
as you create.
CAMERA COMPATIBILITYCAMERA COMPATIBILITY
CANON
EOS 1100D / T3 EOS 80D
EOS 1200D / T5 EOS 5D Mark II
EOS 100D / SLi EOS 5D Mark III
EOS 500D / T1i / X3 EOS 5D Mark IV
EOS 550D / T2i EOS 5Ds / 5Ds R
EOS 600D / T3i EOS 6D
EOS 650D / T4i EOS 7D
EOS 700D / T5i EOS 7D Mark II
EOS 750D / T6i EOS 1D X
EOS 760D / T6s EOS 1D X Mark II
EOS 50D EOS 1D Mark IV
EOS 60D EOS 1D Mark III (1)
EOS 70D EOS 1D Mark II (2)
COMPATIBLE
NIKON
D3100 (3) D300 / D300s (7)
D3200 (4) D610
D3300 D800 / D800e
D3400 D810 / D810a
D5000 (5) D750
D5100 (5) D700 (7)
D5200 D500
D5300 D90 (7)
D5500 D3 / D3s (8)
D7000 (6) D3x (7)
D7100 D4 / D4s (8)
D7200 D5
(1) This camera does not support bulb mode, movie mode. Only supports shooting in single shot
and continuous shoot modes.
(2) This camera does not support bulb mode, movie mode.
(3) This camera does not support live view, movie mode, touch to focus or live view zoom, focus
peeking or bracketing. Only supports shooting in single shot and continuous shoot modes. Can
not set shutter speed.
(4) This camera does not support bulb mode, movie mode, touch to focus or live view zoom. Can
not set shutter speed.
(5) This camera does not support live view or bulb mode.
(6) This camera does not support bulb mode. Only supports shooting in single shot and continu-
ous shoot modes.
(7) This camera does not support bulb mode, movie mode, or focus stacking. Only supports shoot-
ing in single shot and continuous shoot modes.
(8) This camera does not support bulb mode.

3
SSID: CASE_Rxxxxxx
PWD: xxxxxxxx
FEATURES
Power Button
Status Light
Power Indicator Light
Micro-USB Port
Lanyard Connection Point
1/4-20” Female Thread
SSID and Password
ACCESSORIES
USB Charging Cable
Quick-Release Lanyard
Hot Shoe Adapter
SPECIFICATIONS
Size:
2.64″ (67.25mm) x 1.6″ (40.11mm) x 0.55″ (13.99mm)
Weight:
1.76 ounces (50 grams)
CPU:
400Mhz MIPS
RAM:
64M DDR2
WiFi:
802.11 b/g/n
Distance:
150 feet (45m)
Battery Life:
6-8 hours
Battery Type:
1380 mAh lithium battery

4
CHARGING
Case Air can be charged using any standard
USB charger. Charging cables included.
• GREEN
Full (>60%)
• YELLOW
Half (30-60%)
• RED
Low (<30%)
BATTERY LEVEL
• BLUE FLICKER
Starting or Updating
• BLUE STABLE
WiFi Available
WiFi STATUS
POWER BUTTON
SOFTWARE INSTALL
Make sure to install the Case Remote Program
before using the Case Air for the first time.
To install Case Remote on your Windows computer,
download Case Remote from the Tether Tools
website: www.tethertools.com/caseairforwindows
Extract the .zip file
Double click setup

5
In blue pop-up window, click More Info
Click Run Away
Install process will start, click Next
Click Install
Once complete, click Finish

6
Connect to Case Air WiFi
(a) Make sure the Case Remote Program IS NOT run-
ning or open.
(b) Go to Wi-Fi settings in the system tray and connect to
CASE_Rxxxxxx Wi-Fi and enter the PWD code from the
back of the device when prompted for the password.
(c) Start the Case Remote Program.
CONNECTING
Connect the Case Air to your camera using
the supplied USB cable that is compatible with
your camera.
Included Case Air Connector Cables:
USB 2.0 Mini-B 5-Pin
USB 2.0 Mini-B 8-Pin
USB 3.0 Micro-B
Power on your camera. Power on the Case Air
by pressing and holding the power button for
more than 2 seconds.
CASE_Rxxxxxx
SSID: CASE_Rxxxxxx
PWD: xxxxxxxx
POWER BUTTON

7
If the message below is displayed on your Case Remote Pro-
gram, close the program and set up your WiFi connection then
reopen the program to connect your camera to your Case Air.
CASE REMOTE PROGRAM
Camera information

8
FIRMWARE UPDATE
You can determine if a firmware update is needed by clicking on
settings. Click Firmware Update, confirm the battery on Case Air
is charged, then click Confirm.
The firmware update process will take approximately 3 minutes.
DO NOT turn o the Case Air or Case Remote Program during
the update process as this may damage the hardware.
After the firmware update is complete, exit the Case Remote Pro-
gram, ensure the Case Remote Program is connected to WiFi,
and restart the Program

9
CAPTURE INTERFACE
Camera Model
Shooting Mode
Current Shooting Parameters
Shutter Speed
Aperature
ISO
Exposure Compensation
White Balance
FDrive Mode
GMeter Mode
HImage Quality
IShooting Mode
Live View
Auto Focus
Manual Focus (decrease)
Manual Focus (increase)
Gallery
Settings
WiFi Connection
Thumbnails
Movie Mode
Shutter
Advanced Function Buttons
F G
H I

10
PROPERTIES
The Case Remote Program allows you to both review the current
camera settings as well as adjust them. Any setting changes
made on the camera will be updated in the program real-time.
Likewise, any changes made in the program will be displayed
appropriately on the camera.
NOTE: With some cameras you can change the Shooting Mode from the Case Remote Program. If you cannot change the shooting mode from the Case Remote Program, it must be changed on the camera.

11
FOCUS
Case Remote options to change/alter focus:
Click Focus in Live View
Auto Focus
Manual Focus
Zoom
Grid

12
ADVANCED FUNCTIONS
Click the Advanced Functions Button to access your advanced
function menu. These functions include:
Time Lapse
Bulb Time
Focus Stacking
Bracketing
Movie Mode

13
TIME LAPSE
Time Lapse photography takes multiple shots over a determined
period of time.
NOTE: Case Remote Program only provides Time Lapse shooting control; it does not provide post processing functions.
HOW TO USE TIME LAPSE
Select the Start time - the delay after you press the shutter button
Select the Interval time - the time between each shot
Select the Number of shots, up to 1000
Click the Start button to begin taking shots

14
HOW TO USE BULB TIME
Set the duration of your shot
Click the Start button to begin taking shots
BULB TIME
Keep your camera’s shutter open for a long exposure photo.

15
FOCUS STACKING
The Focus Stacking function can be used to take shots of the
same view at dierent focal distances. These images can then
be post processed together so that the entire view is in focus.
+ + =
NOTE: Case Remote Program only provides Focus Stacking shooting control; it does not provide post processing functions.
HOW TO USE FOCUS STACKING
Select the focal length Steps
+1/-1 small step, +2/-2 medium step, +3/-3 large step
Select the Number of shots, up to 9
Click the Start button to begin taking shots

16
BRACKETING
Bracketing takes multiple photos; one using the camera’s set-
tings, and a series intentionally underexposed, and intentionally
overexposed. The images are then combined in post processing
into an image with preferred exposure.
HOW TO USE BRACKETING
Select the desired method to change exposure
Select the starting exposure compensation
Select the desired number of shots
Select the exposure compensation stepping
Click the start button to begin taking shots
NOTE: Case Remote Program only provides Bracketing shooting control; it does not provide post processing functions.

17
HOW TO USE MOVIE
Press Capture to begin taking video.
Press Stop to stop recording.
NOTE: Case Remote Program only provides Movie shooting control; it does not provide post processing functions.
MOVIE
The Movie Mode in the Case Remote Program allows you to
capture video, review the video you’ve recorded, and transfer
the video to your device – wirelessly.

18
GALLERY
The gallery provides an array of thumbnail images of shots that
are stored on your camera’s SD card. In the gallery you can down-
load, delete, or review individual or a selected number of photos.
Photos on the camera’s card
Media filter based on JPEG, RAW and Video files
Download or delete selected photos
Page through SD card photos
Download or delete ALL photos
Change order of photos

19
SETTINGS
Auto Thumbnails:
Automatically shows thumbnail preview after every shot
Exclude RAW Thumbnail:
Exclude the RAW thumbnails from displaying in thumbnails
Image Push:
Automatically open image in computers default program
Auto Download:
Automatically downloads the photo to your computer after
every shot. NOTE: Auto Download must be activated
Auto Focus:
After pressing the shutter button, the camera will auto focus,
then take a photo
Focus Adjust:
Set the adjust step for manual focus
Clear Cache:
Removes thumbnails and Auto Downloads from device
Grid:
Enable grid. Green, red or white
Image Save Path:
Set location of downloaded photos on computer
Firmware Update:
Current firmware version and firmware update button

20
If you have any questions or concern while using the Case Air Wireless Tethering System,
© 2016 Tether Tools Inc.All Rights Reserved. Tether Tools, and the Tether Tools logo are trademarks of Tether Tools Inc., registered in the U.S. and other countries.
CASE Air is designed and manufactured by CheeringTech and distributed by Tether Tools.
Other manuals for Case Air Wireless CAWTS03
2
Other Tether Tools Camera Accessories manuals
Popular Camera Accessories manuals by other brands

Gates
Gates EM7 CINE Setup, use and care guide

Aigis Mechtronics
Aigis Mechtronics HS9369 Series Installation and operating instructions

Photogenic Professional Lighting
Photogenic Professional Lighting PLR1000DR Operator's manual

Magnus
Magnus REX VT-4000-PRO-2 owner's manual

Zen Underwater
Zen Underwater DP-170 instruction manual

Aquatica Digital
Aquatica Digital Nikon AD80 instruction manual