Teton Grill XA Series User manual

Teton Dynamics
P.O. Box 1044
San Leandro, CA 94577
Teton Dynamics
P.O. Box 1044
San Leandro, CA 94577
XA SERIES
XA120K & XA160K
Teton Aeration Kit
ASSEMBLY INSTRUCTIONS

TETON AERATION KIT
XA120K & XA160K
VERSION AUG 2020
www.tetonus.com
800.752.0399
info@tetonus.com
INTRODUCTION
The preceding configuration shows the simple assembly for assembling your new Teton Aeration Kit.
These units with require a flat head screw driver, a knife, and a screw driver to tighten fittings.
CONTENTS OF KIT
WELCOME TO THE WORLD OF TETON,
NATURAL RELIABILTY!
You Made The Right Choice Investing In These Quality
Products. Thank You And Enjoy.
BEFORE USING THESE PRODUCTS, PLEASE READ THESE
INSTRUCTIONS CAREFULLY AND FAMILIARIZE YOURSELF
WITH THE ITEMS. PLEASE KEEP ASSEMBLY MANUAL IN A
SAFE PLACE FOR FUTURE REFERENCE.
XAP120 or XAP160
Air Pump
WAH38.25 Air Tubing x 2
(3/8” x 25ft)
SSC8 Clamps x 6 SHM3858 Fitting
XAS8HD or XAS12HD
Air Stone x 2
XAM2HD Air Valve

STEP 1
• Place stainless steel clamps (provided) onto
one of the end of each hose. Then with the
airstones in hand, slip the tubing onto the
abrbed fittings, applying a little pressure.
Once the tubing is on the fittings, go ahead
and tighten the clamps with scew driver.
STEP 2
• Using a knife, cut a small piece of tubing
about 6 inches long to be used to connect
the valve to the pump. Then locate the
2-way manifold (provided with kit). While
applying pressure, connect both tubing end
onto the two valve fittings.
• Next, slip the remaning stainless clamps
onto short piece of the tubing which you
cut. Press one end of the tubing onto the
valve input and insert the fitting into the
tubing on the other end. Now tighten all of
the clamps with a screw driver.
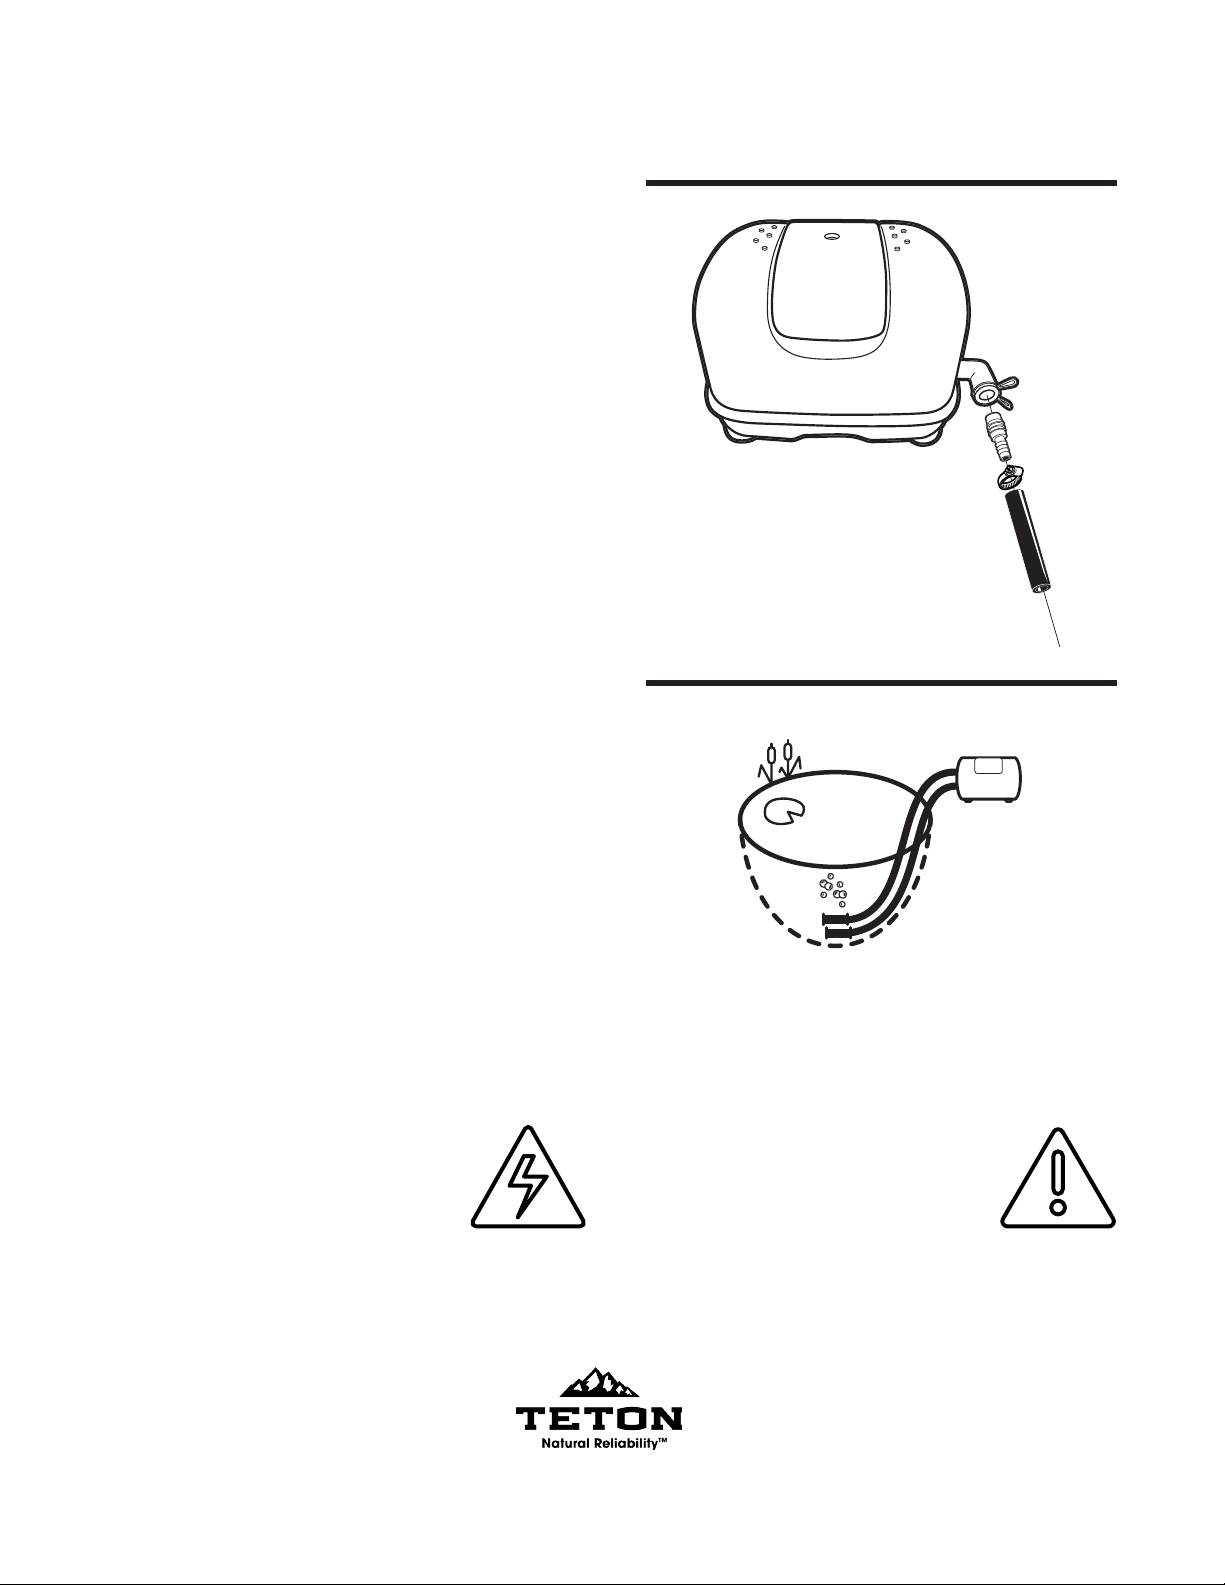
FIGURE A
FIGURE B
SYMBOLS AND MEANING
STEP 3
• Remove pump from box and locate parts bag
(provided in pump box). Connect the ring style
clamps by squeezing them onto both ends of
the white rubber coupling elbow. Then connect
it to the pump on the port marked “OUT.” At-
tach the other end of rubber coupling onto the
barbed fitting.
STEP 4
• Locate air pump in an area free of dust and
avoid areas prone to flooding. Air pumps
located in areas below water level will require
a check valve to prevent potential water flow
back into the pump. Then place the airstones
in the desired area of the pond and plug in the
power cord to a GFCI protected power supply.
DANGER
• DANGER: Keep the pump
out of the reach of children!
• Warns that the failure to
follow the directions given
could cause serious risk to
individuals or objects.
WARNING
• WARNING: This sign warns
the operator that the failure
to follow instructions, may
damage the pump or the
system.
FIGURE D
Please consult your retailer for quality original Teton replacement parts.
Visit www.tetonus.com for your nearest dealer.
800.752.0399
info@tetonus.com
FIGURE C
This manual suits for next models
2
Other Teton Grill Lawn And Garden Equipment manuals


Popular Lawn And Garden Equipment manuals by other brands

Sunforce
Sunforce SOLAR user manual

GARDEN OF EDEN
GARDEN OF EDEN 55627 user manual

Goizper Group
Goizper Group MATABI POLMINOR instruction manual

Rain Bird
Rain Bird 11000 Series Operation & maintenance manual

Cub Cadet
Cub Cadet BB 230 brochure

EXTOL PREMIUM
EXTOL PREMIUM 8891590 Translation of the original user manual


Vertex
Vertex 1/3 HP Maintenance instructions

GHE
GHE AeroFlo 80 manual

Land Pride
Land Pride Post Hole Diggers HD25 Operator's manual

Yazoo/Kees
Yazoo/Kees Z9 Commercial Collection System Z9A Operator's & parts manual

Premier designs
Premier designs WindGarden 26829 Assembly instructions

Snapper
Snapper 1691351 installation instructions