Tevion PC-5400 User manual

USERS MANUAL CD Clock Radio
Model: PC-5400
CD Clock Radio
Thank you for choosing to purchase one of our TEVION products, we appreciate your business and believe that
we have provided you with a product that is both reliable and value for money. We encourage you and your
friends to choose from our range of TEVION products again in future.
PACKAGE CONTENTS
1 CD Clock Radio
1 Instruction manual
Confirm all parts before disposing of gift box.
BEFORE INITIAL USE
Remove all packaging. Carefully wipe the outer case with a soft cloth. Do not immerse the equipment in water or
any other liquid. Check for any damage that may have occurred during transit. Do not use if the equipment is
damaged in any way or if the supply cord is damaged. Contact the service details at the beginning of this manual
for assistance.
Note! Remove the cardboard protection pad located inside the disc
area of the CD and retain for future use.
For any customer query or in the unlikely event of a product failure, please phone or
email the helpline contact details below for assistance.
DO NOT RETURN THE PRODUCT TO THE RETAILER.
Toll Free Help line: 1300 366 144
1

SAFETY WARNING
Carefully read this manual before using this equipment. Make sure that you know how the equipment functions
and how to operate it. Maintain the equipment in accordance with the instructions to ensure that it functions
properly. Keep this manual with the equipment. If the equipment is to be used by a third party, this instruction
manual must be supplied with it. The safety instructions, by themselves, do not eliminate danger completely, and
proper accident prevention measures must always be used.
BATTERY INSTALLATION
The clock radio uses a 9V back up battery (type PP3 - not included) to protect the clock setting and alarm
settings during a power cut. To install, remove rear battery compartment cover and fit to connector inside.
NOTE. The battery backup will not power the display, only the clock memory functions. When normal power is
restored the clock radio will return to normal display and function.
2
LOCATION OF CONTROLS
3

OPERATING GUIDE
Preparation
Place the equipment in the desired position and connect the power supply cord to a standard 230-240v ~AC 50
Hz outlet. Avoid direct sunlight.
Open the CD compartment door and remove the protective travel card. Retain for future use.
Switch on the mains supply.
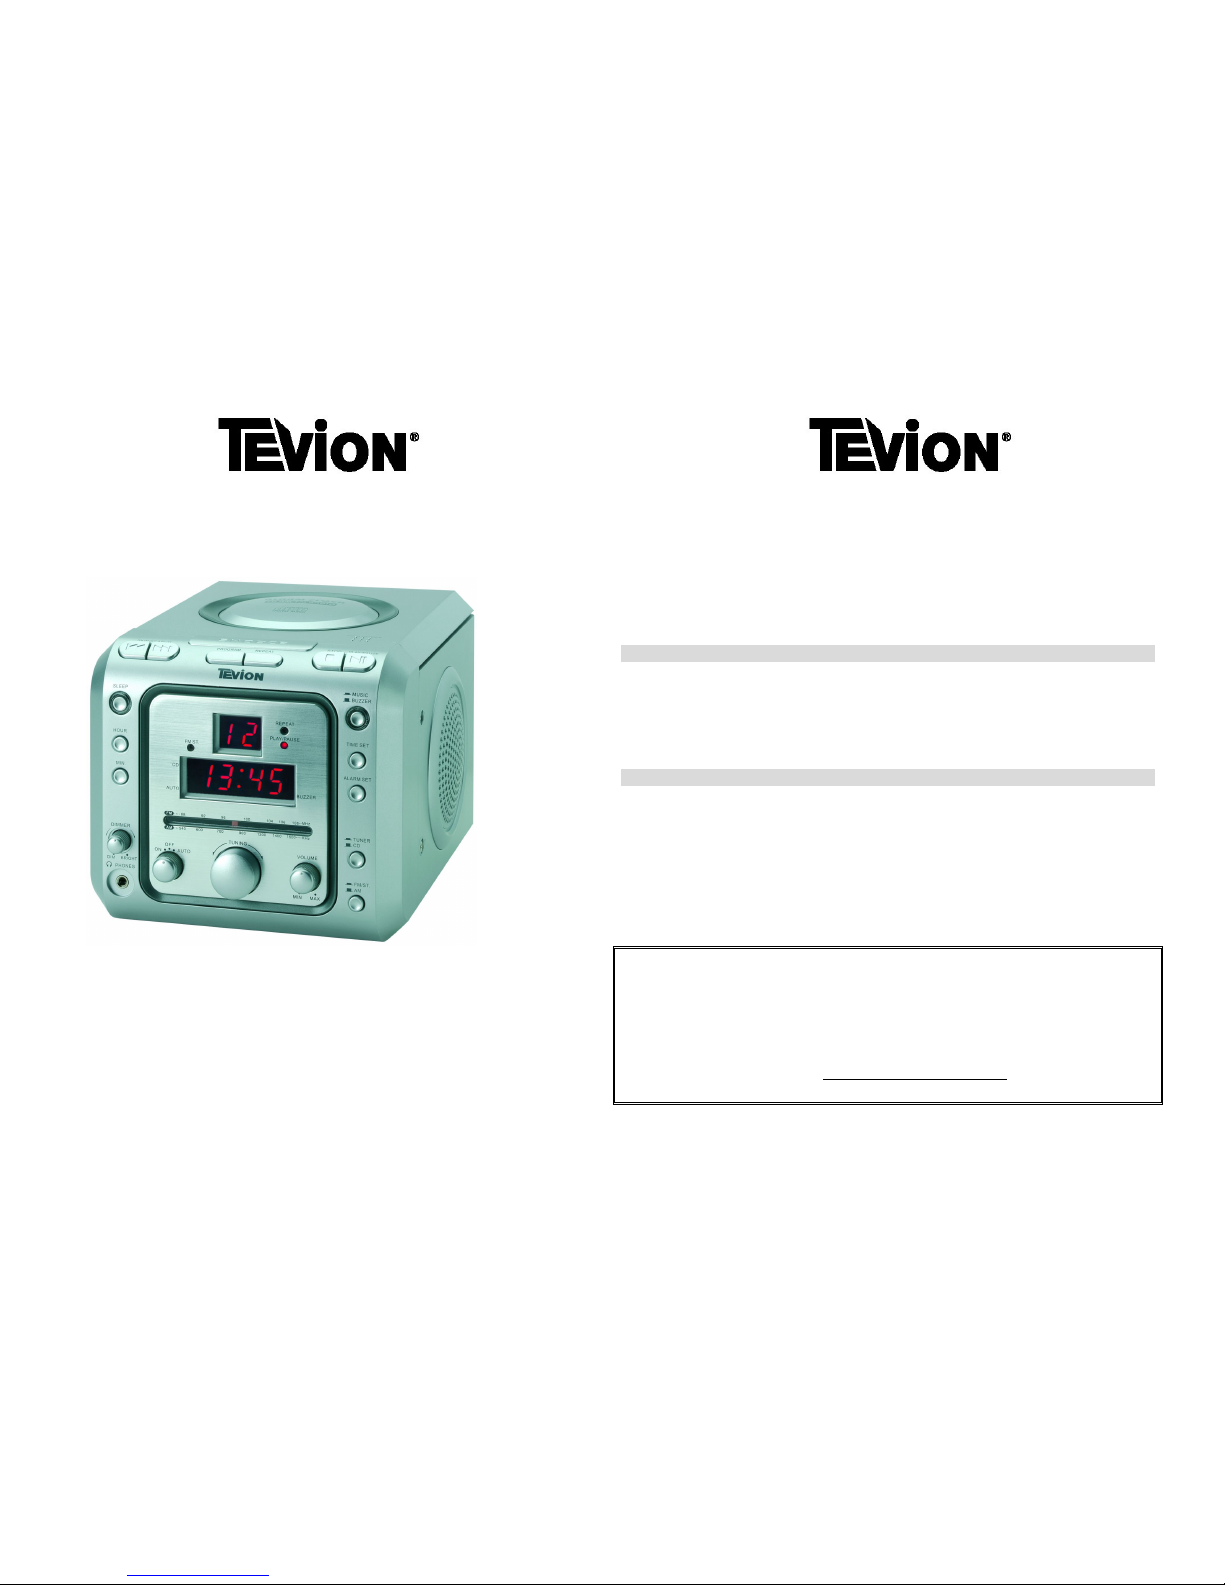
Warning! Ensure VOLUME control is set to minimum. The clock display will flash 0:00
Setting the clock
To set the current time press and hold the TIME SET button whilst pressing the HOUR and then the MIN
buttons. Release the TIME button to confirm and set. Note. The clock is a 24hour clock.
Using the radio
Set the MUSIC-BUZZER button to MUSIC.
Set the TUNER-CD button to TUNER.
Set the ON-OFF-AUTO switch to ON.
Set the FM ST-AM button to the desired frequency band.
Turn the TUNING dial to the desired radio station.
Adjust the VOLUME control to the desired level.
To turn OFF set the ON-OFF-AUTO switch to OFF.
Note. The radio has a built in MW antenna. This antenna is directional so that you may have to rotate the clock
radio slightly to receive the best signal level. The radio has a hard-wired antenna on the rear for FM broadcast.
Unwind and position away from the speakers and mains supply cord.
Using the CD Player
WARNING! This product uses a Class 1 laser. Avoid any direct exposure to the laser beam. Use of controls,
adjustments or procedures not listed in this guide may lead to hazardous exposure.
Set the MUSIC-BUZZER button to MUSIC.
Set the TUNER-CD button to CD.
Set the ON-OFF-AUTO switch to ON.
The display will briefly flash “- -“ then show “00” to display that there is no CD Disc loaded.
Open the CD Door by pressing the PUSH TO OPEN area on the lid.
Place the selected CD into the draw with the label facing upwards.
Close the lid. The CD will automatically start to spin and will display the number of tracks available.
Press PLAY/PAUSE button to commence playback.
CAUTION. Do not place any other object into the CD compartment. Do not force the lid to open further than the
mechanism allows. Keep the lid closed when not in use to prevent dirt and dust from entering the mechanism.
Never insert more than one disc at a time.
4
Advanced CD functions
Pause.
Press PLAY/PAUSE button to temporarily pause playback. The PLAY/PAUSE indicator will flash.
To resume playback, simply press the PLAY/PAUSE button again.
Skip forward or Backward
To select the next track, press the SKIP/SEARCH>> button. If you are on the last track the CD will revert to the
first track.
To go back to the beginning of any track press the SKIP/SEARCH << button once. To go back to the previous
track press this button twice.
Play a particular track
To play a particular track load the disc and press the SKIP/SEARCH buttons until the number of the required
track is displayed. Press the PLAY/PAUSE button.
Programmed track selection
Press the STOP button. Press the PROGRAM button to start. The display will flash “01”.
Press either SKIP/SEARCH button to display the first track number required.
Press the PROGRAM button to store your first selected track. The display will show “02” indicating that it is
ready to store the second track.
Repeat the above steps until a maximum of 20 tracks have been selected. You may select a track more than once.
Press the PLAY button to commence playback.
When the programmed selections have finished the CD will automatically stop. To repeat the selected playback
simply press PLAY button again. The programmed selections will remain in memory until the STOP button is
pressed twice or the CD compartment door opened.
To check a program press PROGRAM twice. The display will show the selected tracks.
Repeat play
You can set the CD to repeat a single track, the whole disc or a programmed selection. To repeat a single track;
Select the desired track number and press REPEAT. The repeat indicator will flash.
Press the PLAY/PAUSE button to commence.
The selected track will play repeatedly until the STOP button is pressed. To cancel this REPEAT function,
simply press the REPEAT button twice.
To repeat play an entire disc press the REPEAT button twice. The repeat indicator will flash and remain ON
indicating CD REPEAT is on.
Press the PLAY/PAUSE button to play the entire disc repeatedly.
To cancel press either the STOP or REPEAT buttons.
To repeat a programmed selection, select your selection as above.
Press the REPEAT button twice. The REPEAT indicator will come on.
Press the PLAY/PAUSE button. The selected tracks will play until the STOP button is pressed.
To cancel press the REPEAT button once.
5

Alarm Setting
Hold the ALARM SET button down and repeatedly press the HOUR and MIN buttons until the desired alarm
time is displayed. Release the ALARM SET button. Note: The clock is a 24HR clock.
Radio Alarm Function
Set the MUSIC-BUZZER button to MUSIC.
Set the ON/OFF/AUTO button to ON.
Set the Tuner/CD button to TUNER.
Select the desired radio station.
Adjust the volume level to the desired volume level.
Set the ON/OFF/AUTO switch to AUTO. The radio will turn OFF and the AUTO indicator will be displayed.
CD Alarm Function
Set the MUSIC-BUZZER button to MUSIC.
Set the ON/OFF/AUTO button to ON.
Set the Tuner/CD button to CD.
Load the desired disc.
Press PLAY/PAUSE button. Adjust the volume level to the desired volume level.
Set the ON/OFF/AUTO switch to AUTO. The CD will turn OFF and the AUTO and CD indicator will be
displayed.
Buzzer Alarm Function
Set the MUSIC/BUZZER button to BUZZER.
Set the ON/OFF/AUTO button to AUTO. The BUZZER indicator will be shown.
Silence Alarm Function
To turn the alarm off press the ON/OFF/AUTO BUTTON to OFF.
Snooze Function
To place the alarm in SNOOZE mode press the SNOOZE button once. The alarm will enter a 9 minute snooze
period.
ADDITIONAL FEATURES
Sleep Function
The sleep function enables you to set either the radio or CD player to play for a set period between 1 minute and
1 hour 59 minutes before automatically switching off.
Set the ON/OFF/AUTO switch to ON
Set the TUNER/CD button to desired setting.
Press the SLEEP button and hold down. The display will show “59” minutes. To decrease the time, whilst still
holding the SLEEP button down, press the MIN button until the desired time is shown. To increase the time,
press the HOUR button. The display will change to “1:59”. To decrease the minutes simply press the MIN button
to set the new minutes time.
Set ON/OFF/AUTO to AUTO.
6
Headphone Use
The equipment will accommodate headphones with an input jack of 3.5mm and an impedance of 8-32 ohms.
To use, lower the volume level and insert the headphone plug into the headphone socket located on the front
control panel. Adjust the volume to suit.
Dimmer
The display time may be dimmed to personal taste. Simply adjust the dimmer control located on the front panel
CARE AND CLEANING
Before cleaning.
When not in use or before cleaning, always disconnect the equipment from the mains supply.
CD Clock Radio
Regularly clean the outside of the main body of the equipment with a soft damp cloth and dry it with a dry towel.
Do not immerse in water. Do not use harsh solvents to clean the plastic components.
Cleaning CDs
Use a soft cloth to remove fingerprints and dust from the disc surface.
Never use chemicals such as record sprays, anti-static sprays, to clean the disc.
Do not expose the CD to direct sunlight, high humidity or high temperatures.
Cleaning the Lens
A dirty lens will cause the disc to skip, fail to read or cause the CD to malfunction.
Unplug from the power supply.
Using a camera lens brush/ blower, blow on the lens area. Wipe with the brush or a soft clean cotton bud and
repeat blow with camera blower.
Storage
When not in use store the equipment and these instructions in a dry place.
7

SAFETY INSTRUCTIONS
Read, Keep and Follow these instructions, heeding all Warnings.
When using electrical products always observe safety regulations where applicable to reduce the risk of fire,
electric shock and personal injury.
WARNING! Always check that the power supply corresponds to the voltage on the rating plate. When using
any electrical apparatus always observe safety regulations and use basic safety precautions to reduce the risk of
fire, electric shock and personal injury, including the following
.
WARNING! Keep out of reach of young children. This apparatus is not suitable for use by young children or
infirm persons without supervision. Young children must be supervised to ensure that they do not play with the
apparatus.
WARNING! Class 1 Laser product. Do not attempt to disassemble this equipment. Laser rays from the optical
pickup may damage the eyes.
WARNING! Do not insert any objects into any openings of an electrical apparatus.
WARNING! Do not touch any moving parts of any electrical apparatus.
WARNING! Do not use this apparatus near water. To avoid the risk of fire or electric shock, do not expose this
apparatus to rain or moisture. The apparatus shall not be exposed to dripping or splashes.
WARNING! No objects filled with liquid, such as vases, shall be placed on any electrical apparatus. Do not
immerse in any liquid whilst in use or in cleaning. Clean only with a damp cloth, dry with a dry towel. Do not
use harsh abrasives as these may damage plastic parts.
WARNING! DO NOT block any ventilation openings. Keep away from curtains, newspapers and restricted
areas. Install in accordance with any specific manufacturer’s instructions. Always allow a sufficient gap around
the apparatus to avoid overheating.
WARNING! DO NOT install near any heat sources such as radiators, gas heaters, stoves or other apparatus
(including amplifiers) that produce heat. Do not leave in direct sunlight.
WARNING! Where the mains plug or an appliance coupler is used as the disconnect device, the disconnect device shall
remain readily operable
WARNING! Do not place any naked flame source, such as lighted candles on any electrical apparatus.
Always unplug from the power source when any electrical apparatus is not in use.
WARNING! Do not abuse or damage a power cord. If any power cord is damaged, it must be replaced by the manufacturer,
its service agent or a similarly qualified person in order to avoid a hazard. A replaceable cord must be replaced with an
authorised replacement from an authorised service agent only.
WARNING! Only use attachments/accessories specified by the manufacturer.
WARNING! Unplug this apparatus during lightening storms or when unused for long periods of time.
WARNING! Attention is drawn to the environmental aspects of disposing of any battery.
WARNING! Refer all servicing to qualified personnel. Servicing is required when the apparatus has been damaged in any
way, such as when the power supply cord or plug is damaged, liquid has been spilled or objects have fallen into the apparatus,
the apparatus has been exposed to rain or moisture, does not operate normally, or has been dropped.
WARNING! Do not attempt to service any double insulated apparatus. Double insulated apparatus requires specialist
servicing and knowledge to retain the safety of the apparatus.
WARNING! WARNING. Do not use any electrical apparatus outdoors. If any electrical apparatus is to be used outdoors, use
a suitable Isolating transformer or Electrical Safety Switch (RCD).
WARNING! For household use only, this apparatus is not intended for commercial use.
WARNING! If this apparatus is to be used by a third party, please supply these instructions with it.
WARNING! No liability will be accepted for any personal injury or damage caused by failure to follow these instructions.
8
SPECIFICATIONS
9
Power Supply: AC 230-240V~50Hz
Radio Frequency: FM: 88-108MHz. MW:540-1600kHz
Speakers: 8 ohm
Headphone: 3.5mm stereo jack plug, 8-32 ohms
LASER SAFETY: This unit employs a laser. Only qualified service personnel should
attempt to service this device due to possible eye injury.
CAUTION: Use of controls, adjustments or performance procedure herein may result in
hazardous radiation exposure.
CAUTION: To reduce the risk of electric shock, do not remove cover (or back). No user-
serviceable parts inside. Refer servicing to qualified personnel.

Warranty Card
This product is guaranteed against faulty materials and workmanship for a period of twelve months from the date
of purchase. This warranty becomes void if the product has been tampered with, damaged by accident, damaged
in any other way by improper use or has been purchased second hand. All production orders have quality
inspections.
For any customer query or in the unlikely event of a product failure, please phone or
email the helpline contact details below for assistance.
DO NOT RETURN THE PRODUCT TO THE RETAILER.
WARRANTY FOR APPLIANCES USED COMMERCIALLY LIMITED TO 90 DAYS
Product: ______________________________________________________
Toll Free Help line: 1300 366 144
Table of contents
Other Tevion Clock Radio manuals