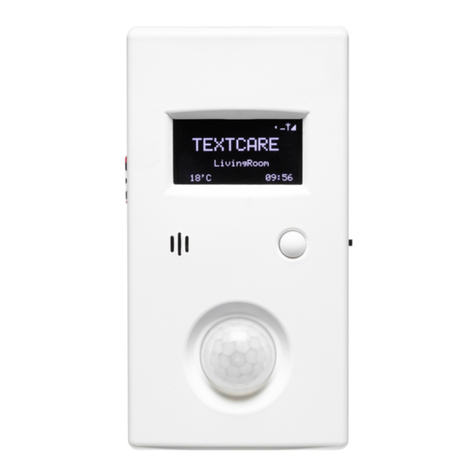
TEXTCARE Main Sensor User manual

USER
MANUAL
2017
TEXTCARE.CO.UK
01245
324
958
UNIT
6,
TABRUMS
INDUSTRIAL
PARK,
TABRUMS
LANE,
BATTLESBRID E,
ESSEX.
SS11
7QX

Please
read
carefully
before
installing
or
using
this
equipment
TextCare
home
monitoring
products
are
an
aid
to
monitoring
and
are
not
intended
to
be
relied
upon
as
an
emergency
alarm
system.
They
do
not
guarantee
detection
of
all
monitoring
activities
and
are
not
a
substitute
for
regular
care
visits.
It
is
the
user
’
s
responsibility
to
confirm
the
information
that
TextCare
is
providing.
TextCare
products
rely
upon
mains
power
being
available
in
the
room
where
the
Main
Sensor
is
installed
and
also
on
the
reliability
of
the
mobile
network
and
data
availability.
TextCare
Limited
accepts
no
responsibility
for
loss
of
information
/
lack
of
data
caused
by
disruptions
to
these
services.
TextCare
Limited
takes
no
responsibility
for
personal,
property
or
revenue
loss
while
using
the
system
and
will
not
accept
any
liability
relating
to
the
installation
or
use
of
this
equipment.
TextCare
Limited
’
s
liability
is
limited
to
the
value
of
the
purchased
system.
This
disclaimer
does
not
affect
your
statutory
rights.
TextCare
Limited
has
no
connections
or
business
interests
with
any
of
the
cellular
providers
and
is
therefore
not
responsible
for
the
quality
of
cellular
service.

MAINTENANCE
The
manufacturers
or
their
agents
will
provide
a
repair
service
for
any
unit
developing
a
fault.
CLEANIN
If
the
unit
requires
cleaning,
use
a
cloth
that
is
only
lightly
dampened
with
water
or
a
mild
detergent.
WARNIN !
TO
AVOID
DAMA E
TO
THE
UNIT,
NEVER
ALLOW
WATER
TO
ET
INSIDE
THE
CASE.
TO
AVOID
DAMA E
TO
THE
CASE,
NEVER
CLEAN
WITH
SOLVENTS.
UARANTEE
The
manufacturers
provide
a
12
-
month
guarantee
period
from
the
date
of
purchase.
The
guarantee
covers
faulty
materials
and
workmanship.
The
guarantee
will
be
void
if
the
equipment
has
been
tampered
with,
modified,
misused
or
subject
to
neglect.
The
guarantee
will
be
void
if
the
system
has
been
exposed
to
mechanical
impact,
chemicals,
high
humidity,
fluids,
corrosive
and
hazardous
environment
or
other
force
majeure
factors.
SAFETY
TextCare
incorporates
a
transceiver
in
radio
bands:
SM
850
/
900
/
1800
/
1900MHz
Do
not
use
this
system
in
environments
where
the
radio
system
may
interfere
with
other
devices,
including,
medical
devices.
Do
not
expose
to
moisture,
high
humidity,
hazardous
environments,
chemical
environment
or
mechanical
impacts.

CONTENTS
Contents
page
Introduction
Installation
of
Main
Sensor
Adding
Sensors
etting
started
Main
Sensor
operation
Room
Sensor
operation
Door
Sensor
operation
Pendant
Sensor
operation
Visitor
Sensor
operation
Setting
-
up
logging
to
the
cloud
Advanced
set
-
up
Set
-
up
alarms
Setting
alarms
by
Text
from
a
phone
Set
-
up
alerts
Maintenance
Page
24
Page
3
Page
4
Page
5
Page
6
Page
9
Page
13
Page
13
Page
14
Page
14
Page
15
Page
16
Page
17
Page
19
Page
19
Page
21

INTRODUCTION
The
TextCare
Main
Sensor
is
all
that
is
required
to
monitor
a
living
area.
It
is
a
complete
room
monitoring
system
that
communicates
to
the
carer
by
text
message
and
/
or
via
the
internet.
The
Unit
will
monitor
and
record
activity,
light,
and
sound
levels,
as
well
as
temperature.
•
Movement
sensing:
monitors
activity
and
records
the
last
time
movement
was
detected.
•
Sound
sensing:
monitors
sound
levels
within
the
room.
•
Light
sensing:
monitors
light
levels
within
the
room.
•
Temperature
sensing:
monitors
temperature
levels
The
Main
Sensor
comes
complete
with
power
adaptor,
instructions
and
mounting
kit
and
is
supplied
with
a
pay
-
as
-
you
-
go
SIM
card,
although
you
can
fit
any
network
SIM
card
you
choose.
You
will
need
to
add
credit
for
texts,
and
data
if
required.
(
Credit
for
calls
is
not
required.
)
You
can
add
up
to
eight
more
sensors
to
your
TextCare
system
to
enable
comprehensive
monitoring
of
your
loved
one.
These
additional
sensors
can
monitor
a
room
(
Room
Sensor
)
,
door
movement
(
Door
Sensor
)
or
can
be
worn
or
carried
in
a
pocket
(
Pendant
Sensor
)
.
Your
TextCare
system
will
monitor
24
/
7,
keeping
track
of
movement,
sound,
light
and
temperature
levels
and
provide
discreete
yet
comprehensive
monitoring
without
explicit
invasion
of
privacy.
Up
to
eight
carers
can
be
registered
to
the
TextCare
system
who
can
all
receive
status
and
alarm
SMS
messages.
The
number
of
carers
who
can
register
online
and
view
the
activity
graphs
is
unlimited
and
is
controlled
by
you.
TextCare
is
a
bespoke
system.
You
can
configure
it
to
suit
your
requirements
based
on
the
needs
of
your
loved
one.
All
settings
and
features
can
be
accessed
by
standard
SMS
text
messages
from
any
mobile
phone
or
online.
PA E
4

INSTALLATION
PLACEMENT
Find
a
suitable
location
close
to
a
mains
power
outlet,
at
a
height
so
the
sensor
has
a
good
line
of
sight
of
the
area
where
movement
will
normally
occur.
Fix
in
position
using
the
pre
-
fitted
stick
-
on
-
Velcro
-
pads:
peel
off
the
protective
layers
and
push
into
position.
NB
Do
not
position
near
other
electrical
devices
such
as
heating
controllers,
phones,
radiators,
etc.
SIM
CARD
Your
unit
is
supplied
all
ready
to
go:
a
giffgaff
SIM
card
is
included
and
installed
;
you
simply
need
to
activate
the
SIM
(
follow
instructions
on
the
giffgaff
card
supplied
)
and
add
credit
)
.
iffgaff
uses
the
O2
network
but
you
can
replace
the
SIM
with
one
from
another
network
if
this
provides
a
better
signal
in
your
area
(
see
SIM
replacement
)
.
PA E
5
MAIN
SENSOR
SIM
Power
Cable
OFF
ON
SWITCH
ON
Plug
the
mains
adaptor
into
a
power
outlet
and
then
plug
one
end
of
the
power
cable
into
the
adaptor
and
the
other
into
the
bottom
socket
on
the
unit.
Switch
on
the
unit
by
sliding
the
ON
/
OFF
switch
located
on
the
right
edge
of
the
unit.
The
unit
will
display
Wait...
then
after
a
few
seconds
the
TextCare
Home
screen
will
appear
(
see
illustration
)
.
The
top
right
of
this
screen
will
display
connection
information.
It
can
take
up
to
20
seconds
for
the
signal
to
be
displayed
and
it
will
need
to
show
at
least
two
bars
for
the
system
to
work
(
see
illustration
showing
four
bars
)
.
After
up
to
20
seconds
the
[
x
]
will
change
to
an
Arial
symbol
if
a
phone
network
is
found.
If
this
does
not
appear
first
check
that
the
SIM
is
correctly
installed.

INSTALLATION
Sensors
supplied
with
your
system
are
ready
to
turn
on
and
connect
to
your
Main
Sensor.
They
are
battery
operated
and
come
with
an
alkaline
battery
installed.
The
Main
Sensor
must
be
turned
on
and
located
near
the
Room
Sensor
before
the
Rom
Sensor
is
turned
on.
NB
Your
TextCare
system
recognises
the
Main
Sensor
as
Room
Sensor
1.
The
default
name
for
this
on
the
display
is
Main.
PA E
6
ADDIN
SENSORS
LED
Window
Pairing
button
on
rear
ROOM
SENSOR
Switch
on:
If
the
Room
Sensor
was
supplied
with
the
Main
Sensor
it
will
already
be
paired,
you
simply
need
to
switch
it
on
by
using
a
pen
nib
to
press
the
recessed
button
(
on
rear
next
to
screw
);
the
white
LED
window
will
flash.
Fix
in
position:
The
Room
Sensor
should
be
placed
at
a
hight
so
it
has
a
good
line
of
sight
of
the
area
where
movement
will
normally
occur.
Fix
in
position
using
the
pre
-
fitted
stick
-
on
-
Velcro
-
pads.
NB
Do
not
position
near
other
electrical
devices
such
as
heating
controllers,
phones,
radiators,
etc.
ADDIN
SUBSEQUENT
ROOM
SENSORS
If
you
have
decided
to
add
further
Room
Sensors:
use
a
pen
nib
to
press
the
recessed
button
(
on
rear
next
to
screw
);
after
a
few
seconds
the
Main
Sensor
will
display
the
Room
Sensor
in
the
Sensors
Menu.
The
Room
Sensor
can
now
be
renamed,
see
'
Advanced
Setup
'
.
The
Main
Sensor
screen
will
now
display
the
sensor
with
the
default
name
ROOM
and
the
default
sensor
number
eg.ROOM2.
So
a
room
sensor
added
in
the
sensor
2
position
will
be
assigned
the
default
name
ROOM2
and
to
3
would
be
ROOM3
etc.
ROOM
SENSOR
RESET
If
a
problem
occurs
then
it
may
be
necessary
to
reset
the
Sensor.
Insert
a
pin
or
a
ball
point
pen
into
the
pairing
button
hole
on
the
rear
of
the
unit,
and
press
and
hold
down.
The
LED
window
will
turn
red.
Keep
holding
down
and
after
approximately
10
seconds
the
LED
will
turn
off.
The
Room
Sensor
is
now
reset,
the
pairing
will
be
cleared
and
the
sensor
switched
off.

INSTALLATION
PA E
7
DOOR
SENSOR
Switch
on:
If
the
Door
Sensor
was
supplied
with
the
Main
Sensor
it
will
already
be
paired,
you
just
need
to
switch
it
on
by
pressing
the
Help
Button.
The
white
LED
will
flash.
Adding
an
additional
Door
Sensor
is
similar
to
the
above
except:
After
a
few
seconds
the
Main
Sensor
will
display
the
Door
Sensor
in
its
sensors
menu.
The
sensor
can
now
be
renamed,
see
advanced
setup.
The
Main
Sensor
will
go
to
the
sensors
display
and
will
show
the
default
name
DOOR
the
sensor
number
will
be
added
to
the
default
name.
So
a
door
sensor
added
in
the
sensor
2
position
will
be
assigned
the
default
name
DOOR2
and
to
3
would
be
DOOR3
etc.
Fix
in
position:
The
Door
Sensor
should
be
fixed
to
the
outer
edge
of
a
door,
ideally
high
up
above
the
handle
so
it
will
not
be
knocked.
Fix
to
the
door
using
the
pre
fitted
‘
stick
-
on
-
Velcro
-
pad
’
.
NB
Do
not
position
near
other
electrical
devices
such
as
heating
controllers,
phones,
radiators,
etc.
DOOR
SENSOR
RESET
If
a
problem
occurs
then
it
may
be
necessary
to
reset
the
sensor.
Press
and
hold
down
the
HELP
button.
The
LED
will
start
flashing.
Keep
holding
down
and
after
approximately
5
seconds
the
LED
will
turn
off.
Keep
holding
the
button
down
until
a
further
flash
is
seen,
then
release.
The
Door
Sensor
is
now
reset,
the
pairing
will
be
cleared
and
the
sensor
switched
off.
You
can
now
add
this
in
the
same
way
you
add
an
additional
sensor,
as
described
above.
Help
Button
LED

INSTALLATION
PA E
8
Help
Button
LED
PENDANT
SENSOR
Switch
on:
If
the
Door
Sensor
was
supplied
with
the
Main
Sensor
it
will
already
be
paired,
you
just
need
to
switch
it
on
by
pressing
the
Help
Button.
The
white
LED
will
flash.
Switch
on:
If
the
Pendant
was
supplied
with
the
Main
Sensor
it
will
already
be
paired,
you
just
need
to
switch
it
on
by
pressing
the
Help
Button.
The
white
LED
will
flash.
Adding
an
additional
Pendant
is
similar
to
the
above
except:
After
a
few
seconds
the
Main
Sensor
will
display
the
Pendant
Sensor
in
its
sensors
menu.
The
pendant
can
now
be
renamed,
see
advanced
setup.
The
Main
Sensor
will
go
to
the
sensors
display
and
will
show
the
default
name
PENDANT,
the
sensor
number
will
be
added
to
the
default
name.
So
a
Door
Sensor
added
in
the
sensor
2
position
will
be
assigned
the
default
name
PENDANT2
and
to
3
would
be
PENDANT3
etc.
If
required
the
pendant
can
be
turned
off
by
holding
the
button
down
for
five
seconds.
The
Pendant
can
be
carried
for
example
in
a
pocket,
or
can
be
attached
to
a
belt
or
necklace.
It
is
designed
to
remain
switched
on
and
the
battery
will
last
approximately
one
year.
A
warning
will
be
given
when
it
is
time
to
change
the
battery.
PENDANT
SENSOR
RESET
If
a
problem
occurs
then
it
may
be
necessary
to
reset
the
sensor.
Press
and
hold
down
the
HELP
button.
The
LED
window
will
start
flashing.
Keep
holding
down,
after
approx.
5
seconds
the
LED
will
turn
off.
Keep
holding
button
down
until
a
further
flash
is
seen,
then
release.
The
Pendant
is
now
reset,
the
pairing
will
be
cleared
and
the
sensor
switched
off.
You
can
now
add
this
as
an
additional
sensor
as
above.

ETTIN
STARTED
PA E
9
STEP
1
-
SIM
CARD
ACTIVATION
Your
Main
Sensor
has
a
SIM
card
installed
which
will
now
need
to
be
activated.
Simply
follow
the
instructions
on
the
giffgaff
card
supplied
in
the
box.
You
will
also
need
to
add
credit
(
logging
only
requires
30Mbytes
/
month
)
.
iffgaff
uses
the
O2
network
but
TextCare
will
work
with
most
other
network
providers.
If
you
would
like
to
use
a
different
SIM
card,
please
refer
to:
SETTIN
UP
NETWORK
PROVIDERS.
STEP
2:
MAIN
SENSOR
INSTALLATION
Find
a
suitable
location
for
the
Main
Sensor
which
is
close
to
a
mains
power
outlet,
away
from
any
other
electrical
devices
or
radiators
and
at
a
height
where
the
Sensor
will
have
a
good
line
of
sight
of
the
area
where
movement
will
normally
occur.
Peel
off
the
protective
layers
from
the
pre
-
fitted
Velcro
sticky
strips
and
fix
into
position
by
pushing
the
sensor
onto
the
surface.
If
a
problem
occurs
then
it
may
be
necessary
to
reset
the
sensor.
Press
and
hold
down
the
HELP
button.
The
LED
window
will
start
flashing.
Keep
holding
down,
after
approx.
5
seconds
the
LED
will
turn
off.
Keep
holding
button
down
until
a
further
flash
is
seen,
then
release.
The
Pendant
is
now
reset,
the
pairing
will
be
cleared
and
the
sensor
switched
off.
You
can
now
add
this
as
an
additional
sensor
as
above.
Switch
on
the
Main
Sensor
by
sliding
the
ON
/
OFF
switch,
located
on
its
right
-
hand
side.
The
unit
will
display
Wait,
then
after
a
few
seconds,
the
TextCare
home
screen
will
appear.
OFF
ON
Power
Cable

ETTIN
STARTED
PA E
10
The
top
right
of
the
screen
will
show
connection
information.
The
SM
symbol
indicates
the
SIM
is
working.
It
may
take
up
to
20
seconds
for
the
signal
to
be
displayed
and
will
need
to
show
at
least
two
bars
for
the
system
to
work.
After
up
to
20
seconds
the
[
x
]
will
change
to
an
aerial
symbol
if
a
phone
network
is
found.
If
this
does
not
appear,
check
that
the
SIM
is
correctly
installed.
STEP
4
-
RE ISTER
THE
PRIMARY
USER
'
S
PHONE
Add
the
SIM
phone
number
to
your
mobile
phone
and
save
as
a
contact
e.g.
TextCare.
You
must
then
register
your
phone
to
the
TextCare
Main
Sensor
by
sending
the
text:
#phone1
to
the
number
that
you
saved
in
your
phone.
After
a
short
time,
you
will
receive
an
acknowledgement
text
back
to
your
phone.
#phone1
Registered
to
TextCare
Phone#1
To
register
more
phones,
send
the
text
#phone
from
each
phone.
You
can
register
eight
phones
in
total.
NB.
this
will
also
set
the
TextCare
Main
Sensor
clock
with
that
of
the
sending
mobile
phone.
STEP
5
-
ETTIN
A
REPORT
To
get
an
activity
report
sent
to
your
mobile
phone,
send
the
text:
?
TextCare
will
then
send
your
phone
a
text
showing
the
current
information
for
each
sensor.
TextCare
is
now
monitoring.
You
can
simply
use
the
system
like
this
or
you
can
use
the
more
sophisticated
features
as
and
when
you
want:
add
more
phones,
schedule
reports,
set
alarm
conditions,
turn
on
or
off
alerts
etc.
See
Advanced
Setup
below
for
full
details.
?
Lounge
21
'
C
Last
movement
08:00
Light
---
5
---
Sound
----
8
---

ETTIN
STARTED
PA E
11
STEP
6
-
SETTIN
-
UP
LO IN
TO
YOUR
ONLINE
PORTAL
Your
TextCare
Main
Sensor
is
pre
-
configured
to
log
information
to
your
online
portal
using
the
giffgaff
SIM
card.
It
is
not
necessary
to
use
this
feature
if
you
would
prefer
not
to.
If
you
have
used
a
different
SIM,
please
refer
to
the
User
Manual
for
configuration
instructions.
To
start
logging,
send
the
text:
LO ON
Once
set
-
up,
the
data
may
take
up
to
one
hour
to
become
available
to
view.
You
can
remain
logging
to
your
online
portal
permanently
as
it
uses
a
relatively
small
amount
of
data,
which
the
minimum
monthly
top
-
up
will
cover.
If
you
would
like
to
pause
or
stop
logging
data,
send
the
text:
LO OFF
LO ON
STEP
7
-
SYSTEM
CONFI URATION
FROM
YOUR
ONLINE
PORTAL
LO OFF

ETTIN
STARTED
PA E
12
SCHEDULE
REPORTS
FROM
YOUR
ONLINE
PORTAL
SET
ALARMS
FROM
YOUR
ONLINE
PORTAL

OPERATION
PA E
13
MAIN
SENSOR
AND
ROOM
SENSORS
The
Main
Sensor
and
Room
Sensors
will
continuously
monitor
temperature,
movement,
light
and
sound
around
a
home.
You
can
schedule
sensor
reports
to
be
sent
to
your
phone
automatically
at
up
to
nine
set
times
per
day,
OR
requested
at
any
time
by
sending
a
text
to
your
TextCare
system.
MOVEMENT
sensing
works
like
a
burglar
alarm
system
using
a
PIR
detector
;
it
records
the
time
of
the
last
movement.
LI HT
sensing
works
by
sensing
the
ambient
light
levels,
it
records
and
logs
lights
levels.
SOUND
sensing
works
by
sensing
the
peak
sound
levels,
it
records
and
logs
sound
levels.
TEMPERATURE
senses
the
current
room
temperature,
in
degrees
Celsius
(
e.g.
21
º
C
)
.
If
you
are
logging
to
your
online
portal,
the
information
can
be
viewed
online
The
information
can
also
be
viewed
at
anytime
by
text
message,
simply
send
a
report
request
text
message
to
your
TextCare
system.
READIN
A
REPORT
FROM
THE
SENSORS
Line
1:
Displays
the
sensor
’
s
given
name
and
the
current
temperature
in
that
area.
Eg
The
Kitchen
is
22
°
C.
Line
2:
Displays
the
time
the
last
movement
was
detected.
Eg
the
last
movement
was
at
8am.
(
NB
If
there
has
been
no
movement
for
24
hours,
the
display
will
show
--
:
--
.
)
Line3:
Displays
the
current
light
level,
0
=
dark
to
9
=
very
light.
Eg
average
light
levels.
Line4:
Displays
the
current
sound
level,
0
=
silent
to
9
=
very
noisy.
Eg
very
little
sound.
?
Kitchen
+
22
'
C
Last
movement
08:00
Light
---
5
---
Sound
-
1
------

OPERATION
PA E
14
DOOR
SENSOR
The
Door
Sensor
communicates
with
the
Main
Sensor
to
update
its
state.
You
will
also
be
able
to
see
the
battery
state.
Any
movement
of
the
door
will
trigger
a
message
to
be
sent
to
the
Main
Sensor.
If
the
‘
Door
Alarm
’
option
is
enabled
a
text
message
will
be
sent
to
your
phone.
The
status
for
the
Door
Sensor
shows
the
last
time
a
movement
occurred
and
the
battery
status.
Eg
the
front
door
was
opened
/
closed
at
8am.
The
Door
information
can
also
be
viewed
online:
Front
door
Last
moved
at
08:00
READIN
A
TEXT
FROM
THE
DOOR
SENSOR
Line
1:
Displays
the
sensor
’
s
name.
Line
2:
Last
moved
is
time
the
last
movement
was
detected.
(
NB
If
there
has
been
no
movement
for
24
hours,
the
display
will
show
--
:
--
.
)
PENDANT
SENSOR
The
Pendant
can
be
clipped
to
a
belt
or
worn
as
a
necklace
or,
more
discreetly,
simply
placed
in
a
pocket.
The
Pendant
provides
information
about
its
status,
whether
it
is
being
moved
and
its
battery
life.
Should
your
loved
one
require
urgent
help
then
they
need
only
press
the
Help
button
(
holding
it
down
for
at
least
one
second
)
and
this
will
trigger
a
Help
message
to
be
sent
to
the
Main
Sensor.
The
Main
Sensor
will
automatically
send
a
Help
Alarm
to
phone
1
or
according
to
how
you
have
set
up
your
TextCare
system.
See
Advanced
Settings
for
information
about
setting
up
the
parameters
for
this
function.
If
the
Help
Alarm
is
enabled
the
help
request
will
be
sent
as
a
text
message
to
the
designated
phone1.
Once
sent,
further
presses
will
send
alarms
every
two
minutes.
If
your
loved
one
falls
or
drops
the
Pendant,
a
Fall
/
drop
message
will
be
sent
to
the
Main
Sensor
immediately.
If
Fall
/
drop
Alarm
is
enabled
the
request
will
automatically
be
sent
as
a
text
message
to
phone
1
.

OPERATION
PA E
15
The
Pendant
Sensor
information
can
also
be
viewed
online:
Front
door
Last
moved
at
08:00
Fall
/
Drop
at
08:00
Help
Press
at
08:00
READIN
A
TEXT
FROM
THE
PENDANT
SENSOR
Line
1:
Displays
the
sensor
’
s
name.
Line
2:
Last
moved
is
the
time
that
the
last
movement
was
detected.
Line3:
Fall
/
Drop
is
the
last
time
a
Fall
/
Drop
was
detected.
Line4:
Help
Pressed:
The
last
time
the
help
button
was
pressed.
(
NB
If
there
has
been
no
help
requested
for
24
hours,
the
display
will
show
--
:
--
.
)
VISITOR
SENSOR
When
carried
by
a
visitor,
the
Visitor
Sensor
is
automatically
detected
by
the
TextCare
Main
Sensor
and
information
will
be
logged
to
your
online
portal.
The
visitor
does
not
need
to
remember
to
do
anything,
such
as
swipe
a
card
reader,
when
entering
or
leaving.
The
Visitor
Sensor
can
be
clipped
to
a
belt
or
worn
as
a
necklace
or,
more
discreetly,
simply
placed
in
a
pocket.
NB
Visitor
information
is
only
available
online,
no
text
reporting
is
available.
The
visitor
information
will
identify
the
visitor
and
show
how
long
they
were
in
the
house.
This
information
can
be
viewed
online
only:

OPERATION
PA E
16
SETTIN
UP
LO IN
TO
YOUR
ONLINE
PORTAL
Your
TextCare
system
is
pre
-
configured
to
log
to
your
online
portal
using
the
giffgaff
SIM
provided.
If
you
have
used
a
different
SIM
/
network
provider
then
TextCare
needs
to
be
configured
to
suit,
please
refer
to
SETTIN
UP
NETWORK
PROVIDERS
BELOW.
SETTIN
UP
NETWORK
PROVIDERS
To
log
to
the
cloud
/
internet,
you
need
to
setup
the
access
code
thru
your
network
provider:
Most
codes
are
pre
stored
in
TextCare,
you
just
need
to
send
the
text
LO x
where
x
=
A
-
K
eg.
For
O2
payandgo
send
text
LO B
see
below,
this
information
may
be
updated
from
time
to
time.
logA
=
giffgaff
logB
=
o2
pay
and
go
logC
=
o2
contract
logD
=
THREE
(
any
SIM
)
logE
=
Orange
logF
=
BT
Mobile
(
any
SIM
)
log
=
EE
(
any
SIM
)
logH
=
T
-
mobile
(
any
SIM
)
logI
=
TalkTalk
(
any
SIM
)
logJ
=
Vodafone
contract
logK
=
Vodafone
pay
and
go
If
your
chosen
provider
is
not
listed
above
you
then
need
to
set
the
network
detail
by
sending
3
text
messages.
This
information
is
available
from
the
network
provider.
LO P
=
PASSWORD
LO A
=
APN
_
URL
_
ADDR
LO U
=
USER
_
ADDR
To
start
logging
send
the
text:
LO ON.
Once
setup
the
data
may
take
up
to
one
hour
to
become
available
to
view.
Once
you
have
started
logging
you
can
leave
it
running
as
it
uses
a
relatively
small
amount
of
data
and
the
minimum
monthly
top
up
will
suffice.
If
you
do
want
to
pause
or
stop
logging,
send
the
text:
LO OFF.
LO ON
LO OFF

ADVANCED
SETUP
PA E
17
RE ISTER
YOUR
PHONES
Add
the
TextCare
SIM
card
phone
number
to
your
contacts
(
eg
as
TextCare
or
DAD
’
s
house
)
.
You
must
then
register
your
phone
(
the
primary
user
)
to
the
TextCare
Main
Sensor
by
sending
the
text
#PHONE1
to
that
number.
After
a
short
time
you
will
receive
an
acknowledge
text
back
to
your
phone.
To
register
additional
phones,
send
the
text
#PHONE
from
each
phone
you
wish
to
add.
TextCare
will
reply
with
a
confirmation
TEXT
to
each
stating
its
number
(
Phone
number
=
2,
Phone
number
=
3,
etc
)
.
To
read
back
the
phone
numbers
in
the
TextCare
Main
Unit,
send
the
text
#PHONE?
from
any
phone,
TextCare
will
send
a
text
to
that
phone
showing
phone
number
settings.
To
delete
a
phone
number
text
PHONE3#
for
phones
1
to
8
Registered
to
TextCare
Phone
Number
#1
LO OFF
Functions
can
be
set
up
either
by
text
message
or
online
under
‘
config
’
.
#PHONE?
PHONE
NUMBERS
1
+
447884123123
2
+
447979321224
PHONE3#
CLOCK
SETUP
The
TextCare
clock
is
set
when
a
phone
is
registered
which
synchronises
the
TextCare
Main
Sensor
clock
with
that
of
the
sending
mobile
phone,
if
the
clock
ever
needs
to
be
reset
simply
resend
the
text.
SETUP
SENSOR
NAMES
TextCare
has
default
names
of
Main
and
ROOM1,
DOOR1,
PENDANT1,
etc
for
the
remote
sensors.
You
can
allocate
your
own
descriptive
names
for
each
sensor
so
that
reports
and
alarms
are
more
easily
understood.
We
recommend
renaming
each
sensor
to
reflect
its
location.
The
names
can
only
consist
of
letters
and
numbers
up
to
a
maximum
of
10
characters.
To
rename
Sensor1
to
Kitchen
for
example,
send
the
text
SENSOR1
=
Kitchen
for
sensors
1
to
9
where
1
in
the
Main
Sensor
(
Main
on
the
TextCare
display
)
.
Will
rename
sensor
1
to
‘
kitchen
’
:
SENSOR1
=
Kitchen

ADVANCED
SETUP
PA E
18
To
read
back
the
names
in
TextCare,
send
the
text:
SENSOR?
TextCare
will
send
a
text
to
your
phone
showing
your
new
sensor
names. SENSORS
1
Kitchen
2
Hall
3
TV
Room
SENSOR?
You
can
name
as
many
sensors
as
you
like
in
one
text
message,
use
a
comma
(
with
no
space
after
)
between
each
name:
SENSOR1
=
Kitchen,2
=
Lounge,3
=
Hall,4
=
TVroom.
TIME1
=
08:00
TIME2
=
16:30,2
SETUP
SCHEDULED
REPORT
TIMES
You
can
assign
up
to
nine
instances
in
any
24
-
hour
period
when
status
reports
will
be
sent.
These
reports
will
be
sent
automatically
by
text
to
the
phone
number
or
numbers
you
designated
when
you
set
up
report
times.
Individual
phone1
Send
the
text:
TIME1
=
08:00
This
will
set
the
time
of
your
first
report,
time1,
to
08:00
and
the
report
will
be
sent
to
the
sending
phone.
This
can
be
repeated
for
time
instances
1
to
9.
Eg
time2
=
09:30
sets
the
second
report
time
to
9:30am.
From
phone1
Send
the
text:
TIME2
=
16:30,2
This
will
set
the
time
of
your
second
report,
time2,
to16:30,
the
report
will
be
sent
to
phone
number
2.
From
phone1
Send
the
text:
TIME3
=
19:30,2
This
will
set
report
time3
to16:30,
the
report
will
be
sent
to
registered
phone
2.
To
read
back
the
report
times
in
TextCare:
Send
the
text:
TIME?
TextCare
will
send
a
text
to
your
phone
showing
the
report
time
settings.
TIME?
TIME3
=
19:30,2

ADVANCED
SETUP
PA E
19
TextCare
will
send
a
text
to
your
phone
showing
the
report
time
settings.
To
delete
a
report
time,
send
the
text
TIME1#
where
the
hash
(
#
)
represents
delete.
In
this
example
you
have
deleted
the
first
report.
You
can
do
the
same
to
delete
other
report
times
(
1
to
9
)
.
ALARM
1
Kitchen
NO
-
MOVE
06:00
to
09:00
TIME1#
SETUP
ALARMS
An
Alarm
is
a
condition
you
set.
The
alarms
you
set
will
trigger
your
TextCare
system
to
send
you
warnings
that
something
is
amiss.
For
example,
you
want
to
know
whether
your
loved
one
is
up
and
about
in
the
morning
so
you
set
an
alarm
to
be
notified
if
no
movement
is
detected
in
the
kitchen
by
09:00.
If
movement
is
detected
you
will
receive
no
alarm
text.
If
no
movement
is
detected
the
following
message
will
be
sent:
SETTIN
ALARMS
BY
TEXT
FROM
A
PHONE
The
Main
Sensor
and
Room
Sensors
monitor
movement,
temperature,
light
and
sound.
The
Door
Sensors
and
Pendants
monitor
movement.
To
set
up
Alarm
conditions,
you
will
first
need
to
tell
TextCare
what
you
consider
unusual
or
uncharacteristic
conditions
using
these
criteria.
You
can
set
up
to
9
alarms
and
for
each
alarm
you
can
identify
the
sensor,
the
activity
that
will
trigger
the
alarm,
the
time
window
of
concern
and
where
to
send
the
Alarm
text
message.
To
set
up
Alarm
conditions
follow
the
sequence
below.
Remember
to
put
a
comma
between
each
parameter:
1
)
The
alarm
number
e.g.
ALARM1
=
ALARMS
1
to
9
can
be
set
2
)
The
sensor
NAME
e.g.
Kitchen
3
)
The
detection
condition:
Move
if
movement
is
detected
between
start
and
stop
times,
an
alarm
text
is
sent
when
movement
is
seen.
NOMove
if
no
movement
is
detected
between
start
and
stop
times,
an
alarm
text
is
sent
at
the
end
time.
Other manuals for Main Sensor
1
Other TEXTCARE Security System manuals
Popular Security System manuals by other brands
Linear
Linear Security DUAL 824 installation instructions
Challenger
Challenger SE801 Installation and operating instructions
Federal Signal Corporation
Federal Signal Corporation Vision SLR Series Installation maintenance and service manual

Time2
Time2 Clan Noah user guide
NAPCO
NAPCO XP-400 Using instruction
Novus
Novus NVR-6316P16-H2 user manual
