TFC TOWER Towerstat REM User manual

-092
Remote Programmable
Thermostat

Introduction
Thisthermostat can replace most common residential thermostatand
is designed to be used with electric, gas or oil heating control system
or cooling system.This thermostat has added an auto-recovery
feature which provides better temperature setting and control. The
remote control can also override the set temperature in a more
convenient way,especially for people with impaired movement.
Outlook
1
Up Button
Comfort/Economy Button
Down Button
LCD
Comfort/Economy Button
Down Button
Anti-Freeze Button
Set Temperature Button
Front Cover
Battery
Compartment
IR Sensor Lens
Up Button
Set Time Button
Reset Button
Set Program Button

LCD
Features
Several useful function and operating modes have been incorporated
to satisfy a variety of customer needs besides all the features
associated with the state of the art programmable thermostat.
-Auto recovery to the comfortable mode set temperature at the
pre-settime.
-LCD shows“need to know”information only, making it more easy to
understand.
-Real-time clock with day of week display.
-Room temperature display.
-Control profile display.
-Simplified temperature adjustment.
-Simplified programming procedure.
Day Indicator
Clock
Control Profile Bar
Economy Icon
Heating/Cooling On Icon
Battery Low Icon
Temperature
Manual Override Icon
Comfort Icon
Anti-freezing Icon
Program Number
2

-6pre-definedcontrolprofiles,3 user-programmablecontrolprofiles.
-Anti-freezeprotection.
-Temporary set-temperature override.
-Remote temperature override setting using an IR remote controller.
-User-selectable temperature span.
-User-selectable Heating/Cooling operation mode.
-Battery level detection/display.
Installation
CAUTION:
1. The thermostat can only be mounted on dry indoor places, and
used under normal polluted environment.
2. A suitable fuse with a rating not exceeding 8A should be in the
power line.
3. Observe national regulations for wiring.
4. It is recommended that installation and servicing be carried out by
a qualified electrician
This thermostat has been designed for simple and quick installation
requiring only a few tools.
Required Material
Hammer
Masking tape
3

Drill and 3/16" drill bit
Screwdriver
Removing the old thermostat/
Installing the programmable thermostat
CAUTION : to avoid electric shock, turn off the power of the Heating/
Cooling system at the main power box. Read the following
instructions carefully before disconnecting the wires.
1. Turn off the old thermostat.
2. Remove the cover from the old thermostat.You may have to pull
extra hard.
3. Unscrew the old thermostat from the wall plate.
4. Now find the screws attaching the wall plate to the wall, and
remove them.You should now be able to pull the wall plate a small
distance from the wall.Do not disconnect any wire yet, simply lo
cate the wires.
WARNING: After removing the wall plate, if you find that it is mounted
on a junction box (e.g. a box similar to one behind a light switch or
electric outlet), a high voltage circuit may be present and there is a
danger of electric shock. Please consult a qualified electrician.
4

Wire Labeling
1. Disconnect and identify each wire.
2.You may wish to tape the wires to the wall to keep them from
slipping through the hole in the wall.If the hole in the wall is larger
than necessary, fill it in order to prevent hot or cold air from
penetrating the thermostat. By doing this, the thermostat will
operate correctly.
Choosing a Location
Note: for a new installation, choose a mounting location about five
feet (1.5 meters) above the floor in an area with good air circulation
and away from:
1. Areas or corners where there is no air circulation.
2. Air ducts.
3. Radiant heat from the sun or appliances.
4. Concealed pipes and chimneys.
Mounting
Mounting the thermostat onto the wall.
1. Completely remove the front housing of the thermostat.
5
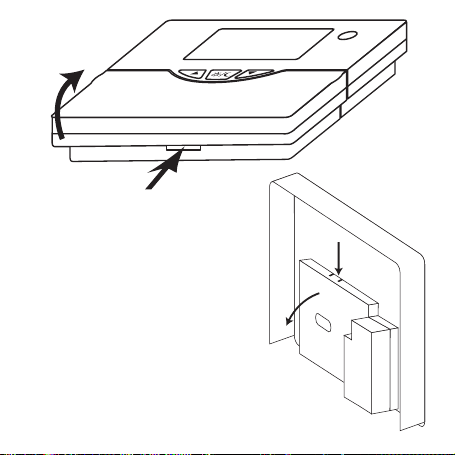
2. Remove the cover over the
connector.
6
Press
Remove front
housing
1Push
Remove
the cover
2

3. Mark the holes position and align the wire coming from the wall in
the hole beside the connectors.
4. Drill twoholesandinsertthe plastic anchors carefully into the holes
until they are flush with the wall.
5. Fasten the thermostat to securely the wall with the two screws.
Connecting the Wires
1. Connect the system wires to the terminals according to the wiring
diagram shown in the section “WIRING DIAGRAM”.
2. Push the wires back into the wall, seal the hole in the wall and
replace the cover over the connectors.
Wiring Diagram
The thermostat can be used with any single stage Heating or Cooling
system.Inside the thermostat, you will find three terminals which are
labeled as COM, NO and NC. It is a typical single pole, double throw
(SPDT) contact.Connect your Heating/Cooling system to the
terminal COM and NO (or NC, depends on the type of Heating/
Cooling system).In most case COM and NO are used.
7
COM
NO
NC
NO
COM
NC

Heating/Cooling Selection
Insidethe front cover,youwillfindtheDIP switch.Thesethree switches
are used to control the span and the Heating/Cooling system. The
DIP switch must be set before installing the batteries. Once the
batteries are installed, you cannot change from heating to
cooling (or from cooling to heating) unless the batteries are
removed or pressing the reset button. Set the DIP switch (position
1) according to your selection of Heating system or Cooling system
as the shown in following diagram.
8
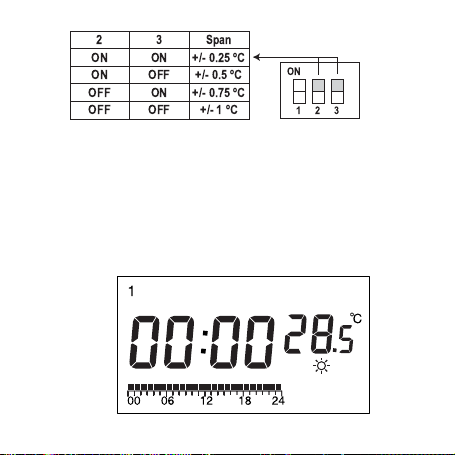
Temperature Span Selection
Span is the temperature difference between the turn-on temperature
and turn-off temperature. For example, if you set the temperature to
20˚C and the span to +/-0.5˚C, the Heating system will operate when
the room temperature drops to 19.5˚C and turn off when the
temperature rises to 20.5˚C. Set the DIP switch (position 2 & 3)
according to your selection of temperature span as shown in the
following diagram.
Battery Installation
Your thermostat uses two (2) “AA” size alkaline batteries.To power-
up the unit, insert two “AA” batteries into the battery compartment.
Be sure to observe correct polarity (+ and -).
When power is applied for the first time, the display should show the
timeandthe dayas well astheroomtemperature(forexample28.5˚C)
as follows:
9
If the display is different, press the RESET button by using a fine
probe such as a straightened paper clip to gently push the RESET
button.Turnonthemain switchof the system.The thermostatisready
for use.
For the remote unit, open the cover of the battery compartment and
install 2 AAA alkaline batteries.Be sure to observe correct polarity (+
and -).
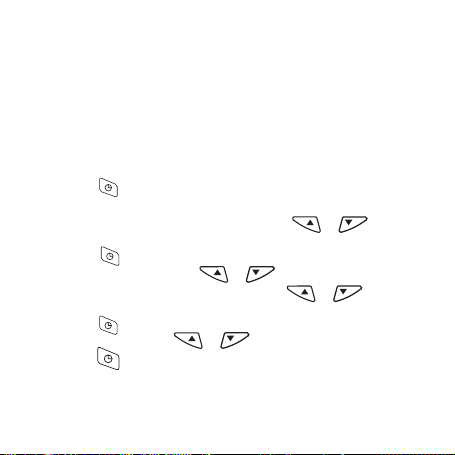
Setting Clock
1. Press the button to clear all digits except the day indicator and
the time display.The Day indicator will flash.
2. While the Day indicator is flashing, press or button to
set the correct day.
3. Press the button again, and the hour digits will flash instead
of the day indicator. Press or button to set the present
time.Note that pressing and holding the or button will
speed up the adjustment rate.
4. Press the button again, and the minute digits will flash instead
the of hour digits.Press or button to set the present time.
5. Press the button again to return to normal operation mode.
6. The unit will return to normal operation mode if no key is pressed
for 10 seconds.
10

Setting ControlTemperature
1. Press the button to display the pre-defined set temperature.
2. Press the button to toggle between the setting of economy
mode and comfortable mode.
3. Press the or button to increase/decrease the set
temperature by 0.5˚C.
4. Press the button again to save the set temperature.
5. Theunitwillreturn to normaloperation mode if no buttonis pressed
for 10 seconds.
6. The default setting of comfortable mode is 21˚C for Heating mode
and 23˚C for Cooling mode. And the economy mode is 18˚C for
Heating mode and 26˚C for Cooling mode.When the user adjusts
the set temperature, the temperature of comfortable mode should
be higher than the temperature of economy mode for Heating. For
Coolingmode,the settemperature of comfortable mode should be
lower than economy mode. Otherwise, the auto-recovery function
will be activated only at economy mode.
11

Setting Program
Select Week-Day
1. Press the button, and the day indicator will show the program
day and will flash.The program number indicator will show the
current program for the selected day.
2. Press the or button to select the day needed to
program.You can select the whole week, working day, weekend,
or individual day to program.
Select Control Profile - Pre-defined
1. Press the button again, and the day indicator will stop flashing
and the program number will start flashing.
2. Press the or button to select the program profile. P1- P6
are predefined programs;their profiles are shown below.
12
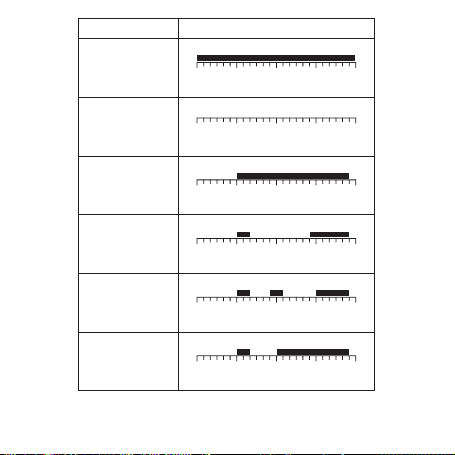
13
Program Number Program profile
Program 1:
Factory preset
"Whole day
Comfort"
Program 2:
Factory preset
"Whole day Econ"
Program 3:
Factory preset
"Holiday"
Program 4:
Factory preset
"Work day(A)"
Program 5:
Factory preset
"Work day(B)"
Program 6:
Factory preset
"Half-day work"
00 06 12 18 24
00 06 12 18 24
00 06 12 18 24
00 06 12 18 24
00 06 12 18 24
00 06 12 18 24

where the black dot ■ means the selected hour is set to comfortable
mode, else economy mode is selected.
3. If any of these programs is selected, press the button again
to return to normal operation mode.
User-defined Control Profile
1. If a user-defined program number is selected (P7-P9), press the
button to stop the program number flashing and display the
control profile bar with the selected hours.
Example:
Hour Digit (Clock) is 0 and the 00
hour bar is flashing. icon is on
if previous setting was comfortable
mode, else icon is on, e.g. Hour
00-23 are comfortable mode.
2. Press the or button to increase or decrease the setting
hour by one.The or icon will be turned on according to
the previous setting.
14
00 06 12 18 24

Example: button is pressed.
Hour Digit (Clock) is 1 and the 01
hour bar is flashing. icon is on
and the operation mode for hour 00
is unchanged, i.e., at comfortable
mode.
3. Pressing the button will toggle the control temperature setting
and advance the sett hour digit by one.
Example: button is pressed.
Hour Digit (Clock) is 2 and the 02
hour bar is flashing. icon is on
and the operation mode for hour 01
is set to economy mode.
4. Pressing the button will terminate the setting procedure and
return to normal operation mode.
Example: button is pressed.
Terminate the setting procedure
and the new control profile is :
00 06 12 18 24
00 06 12 18 24
15
00 06 12 18 24

5. The setting procedure will terminate automatically when no button
is pressed for 10 seconds.
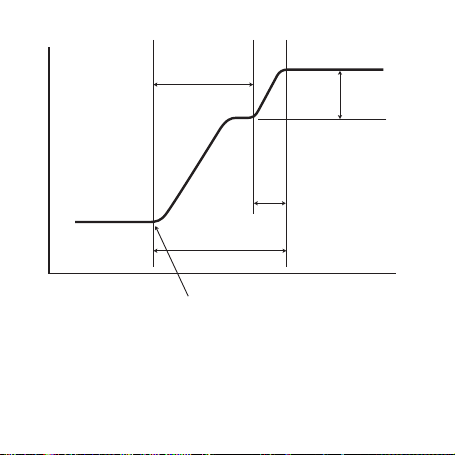
Auto-recovery Mode
The thermostat has an auto-recovery function that brings your room
temperature to the set temperature of comfortable mode exactly at
thepre-set time byturningon theHeating/Coolingsystem earlier.When
itfindsthat the operationmodeneedsto change to comfortablemode
at the coming hour, it will turn on the Heating/Cooling system for a
short period to estimate the Heating/Cooling rate.Then, the thermostat
willcontinuouslymonitor the room temperature and estimate the time
required to heat-up/cool-down the room temperature to the set
temperature of comfortable mode.Once the unit finds that the
remainingtimeisjustenough to bring the room temperature to the set
temperature of comfortable mode, it will turn on the Heating/Cooling
system, with flashing the comfortable mode icon .
Any key press during the auto-recovery mode will terminate the
process immediately and return to the current operation mode.
16
17
Temperature
Set Time Time
Economy mode Auto-recovery mode
Start of auto-recovery mode (turns on the heater)
20
mins.
2˚C
Heater on time,
depends on the
heating rate of
the system

Temporary Override
Override the Operation Mode
At the normal operation mode, pressing the button will toggle the
current set temperature to comfortable mode or economy mode. If
the operation mode is in override, the icon will be turned on with
the current operation mode icon.
Override the SettingTemperature
1. At the normal operation mode, the current set temperature can be
set to override by pressing the or button.When in
override,the newset temperaturewillbedisplayed with the icon,
while both the and icon will be turned off.
2. Pressing any other other button (except the or ) button
will terminate the setting procedure and return to normal mode
with the new setting.
3. The unit will return to normal operation mode automatically when
no button is pressed for 10 seconds.
Override theTemperature Setting by Remote Control
The buttons on the remote control unit have the same override
function as the main unit at normal operation mode.To override the
set temperature of the main unit, press and hold the button of the
18

remote control unit until the LCD display changes.
1. Press & hold the or button again will increase or
decreasing the set temperature by 0.5˚C.
2. Press & hold the button will toggle the current set
temperature to comfortable mode or economy mode.
3. The unit will return to normal operation mode automatically when
no button is pressed for 10 seconds
Anti-freeze Mode/Off Mode
1. Pres the button will activate the anti-freezing mode (for Heating
mode only).The icon and the icon will be turned on while
both the and icon will be turned off.
2. For Cooling mode, pressing the button will set the thermostat
in off mode. In off mode, the unit only display the clock and the
weekday.
3. Pressing button again will terminate the anti-freezing mode/off
mode and return to normal operation mode.
4. The default set temperature for anti-freezing mode is 7˚C.
Battery Replacement
It is recommended the batteries be replace when the display is
showing the icon.To replace the battery,
19
This manual suits for next models
1
Table of contents
Other TFC Thermostat manuals


Popular Thermostat manuals by other brands


Jung
Jung 429 D1 ST operating instructions

Danfoss
Danfoss DEVIreg Room 140F1161 installation guide

Greenlite
Greenlite G2 installation manual

GDC Group
GDC Group 230 VAC User instructions

Grasslin
Grasslin Famoso 600 user manual

Lux Products
Lux Products LuxPro SMART TEMP P521Ua Installation and operating instructions