Thane Fitness Pilates Power Gym User manual

OWNER’S MANUAL
EAT SMART Nutritional Guide with
6 Week Step By Step Training Program
A Quality Thane Fitness Product
Distributed by:
Thane Direct Canada Inc., Toronto, ON
www.thane.ca
Thane Direct UK Ltd., Admail ADM3996, London, W1T 1ZU
www.thanedirect.co.uk
Copyright 2005, Thane International, Inc. All Rights Reserved.
Model# AB-7620

EAT SMART Nutritional Guide with 6 Week Step By Step Training Program
2
IMPORTANT SAFETY NOTICE . . . . . . . . . . . . . . . . . . . . . . . . . . . . . . . . . . . . . . . . . . . . . . . . . . 3
THANK YOU . . . . . . . . . . . . . . . . . . . . . . . . . . . . . . . . . . . . . . . . . . . . . . . . . . . . . . . . . . . . . . . 4
GETTING STARTED . . . . . . . . . . . . . . . . . . . . . . . . . . . . . . . . . . . . . . . . . . . . . . . . . . . . . . . . . . 5
OWNER’S MANUAL. . . . . . . . . . . . . . . . . . . . . . . . . . . . . . . . . . . . . . . . . . . . . . . . . . . . . . . . . . 6
Assembly Instructions . . . . . . . . . . . . . . . . . . . . . . . . . . . . . . . . . . . . . . . . . . . . . . . . . . . . . 7
Exploded Diagram(1) . . . . . . . . . . . . . . . . . . . . . . . . . . . . . . . . . . . . . . . . . . . . . . . . . . . . . 8
Exploded Diagram(2) . . . . . . . . . . . . . . . . . . . . . . . . . . . . . . . . . . . . . . . . . . . . . . . . . . . . . 9
Parts List . . . . . . . . . . . . . . . . . . . . . . . . . . . . . . . . . . . . . . . . . . . . . . . . . . . . . . . . . . . . . . 10
WORKOUT GUIDE. . . . . . . . . . . . . . . . . . . . . . . . . . . . . . . . . . . . . . . . . . . . . . . . . . . . . . . . . . 11
PILATES . . . . . . . . . . . . . . . . . . . . . . . . . . . . . . . . . . . . . . . . . . . . . . . . . . . . . . . . . . . . . . . . . . 11
Plié . . . . . . . . . . . . . . . . . . . . . . . . . . . . . . . . . . . . . . . . . . . . . . . . . . . . . . . . . . . . . . . . . . 11
Arches . . . . . . . . . . . . . . . . . . . . . . . . . . . . . . . . . . . . . . . . . . . . . . . . . . . . . . . . . . . . . . . .11
Arch Pulses . . . . . . . . . . . . . . . . . . . . . . . . . . . . . . . . . . . . . . . . . . . . . . . . . . . . . . . . . . . . 12
Heels . . . . . . . . . . . . . . . . . . . . . . . . . . . . . . . . . . . . . . . . . . . . . . . . . . . . . . . . . . . . . . . . .12
Heel Pulses . . . . . . . . . . . . . . . . . . . . . . . . . . . . . . . . . . . . . . . . . . . . . . . . . . . . . . . . . . . . 12
Second Position Turnout . . . . . . . . . . . . . . . . . . . . . . . . . . . . . . . . . . . . . . . . . . . . . . . . . . 13
The Hundreds . . . . . . . . . . . . . . . . . . . . . . . . . . . . . . . . . . . . . . . . . . . . . . . . . . . . . . . . . . 13
Cat. . . . . . . . . . . . . . . . . . . . . . . . . . . . . . . . . . . . . . . . . . . . . . . . . . . . . . . . . . . . . . . . . . . 13
Arm Circles . . . . . . . . . . . . . . . . . . . . . . . . . . . . . . . . . . . . . . . . . . . . . . . . . . . . . . . . . . . . 14
Heel Lowers . . . . . . . . . . . . . . . . . . . . . . . . . . . . . . . . . . . . . . . . . . . . . . . . . . . . . . . . . . . 14
Bicep Curls . . . . . . . . . . . . . . . . . . . . . . . . . . . . . . . . . . . . . . . . . . . . . . . . . . . . . . . . . . . . 14
Mermaid . . . . . . . . . . . . . . . . . . . . . . . . . . . . . . . . . . . . . . . . . . . . . . . . . . . . . . . . . . . . . . 15
Pelvic Tilt. . . . . . . . . . . . . . . . . . . . . . . . . . . . . . . . . . . . . . . . . . . . . . . . . . . . . . . . . . . . . . 15
Knee Stretch . . . . . . . . . . . . . . . . . . . . . . . . . . . . . . . . . . . . . . . . . . . . . . . . . . . . . . . . . . . 15
Prance . . . . . . . . . . . . . . . . . . . . . . . . . . . . . . . . . . . . . . . . . . . . . . . . . . . . . . . . . . . . . . . . 16
EXERCISES FOR STRENGTH TRAINING . . . . . . . . . . . . . . . . . . . . . . . . . . . . . . . . . . . . . . . . . 16
Seated Row. . . . . . . . . . . . . . . . . . . . . . . . . . . . . . . . . . . . . . . . . . . . . . . . . . . . . . . . . . . . 16
Seated Upright Row . . . . . . . . . . . . . . . . . . . . . . . . . . . . . . . . . . . . . . . . . . . . . . . . . . . . . 17
Bench Press . . . . . . . . . . . . . . . . . . . . . . . . . . . . . . . . . . . . . . . . . . . . . . . . . . . . . . . . . . . . 17
Seated Curls . . . . . . . . . . . . . . . . . . . . . . . . . . . . . . . . . . . . . . . . . . . . . . . . . . . . . . . . . . . 17
Arm Pullover . . . . . . . . . . . . . . . . . . . . . . . . . . . . . . . . . . . . . . . . . . . . . . . . . . . . . . . . . . . 18
Triceps Extension . . . . . . . . . . . . . . . . . . . . . . . . . . . . . . . . . . . . . . . . . . . . . . . . . . . . . . . 18
Lying Triceps Curls. . . . . . . . . . . . . . . . . . . . . . . . . . . . . . . . . . . . . . . . . . . . . . . . . . . . . . . 18
Decline Abdominal Crunch . . . . . . . . . . . . . . . . . . . . . . . . . . . . . . . . . . . . . . . . . . . . . . . . 19
Pulley Ab Crunch. . . . . . . . . . . . . . . . . . . . . . . . . . . . . . . . . . . . . . . . . . . . . . . . . . . . . . . . 19
Lying High Pull . . . . . . . . . . . . . . . . . . . . . . . . . . . . . . . . . . . . . . . . . . . . . . . . . . . . . . . . . 19
Side Deltoid Raises . . . . . . . . . . . . . . . . . . . . . . . . . . . . . . . . . . . . . . . . . . . . . . . . . . . . . . 20
Squat . . . . . . . . . . . . . . . . . . . . . . . . . . . . . . . . . . . . . . . . . . . . . . . . . . . . . . . . . . . . . . . . . 20
One-Legged Squat . . . . . . . . . . . . . . . . . . . . . . . . . . . . . . . . . . . . . . . . . . . . . . . . . . . . . . 20
Twisting Squat. . . . . . . . . . . . . . . . . . . . . . . . . . . . . . . . . . . . . . . . . . . . . . . . . . . . . . . . . . 21
Gluteus Kickbacks . . . . . . . . . . . . . . . . . . . . . . . . . . . . . . . . . . . . . . . . . . . . . . . . . . . . . . . 21
Lunges. . . . . . . . . . . . . . . . . . . . . . . . . . . . . . . . . . . . . . . . . . . . . . . . . . . . . . . . . . . . . . . . 21
6 WEEK TRAINING PROGRAM . . . . . . . . . . . . . . . . . . . . . . . . . . . . . . . . . . . . . . . . . . . . . . . . 22
12 - DAY SUPER SLIM DIET PLAN. . . . . . . . . . . . . . . . . . . . . . . . . . . . . . . . . . . . . . . . . . . . . . 23
Do’s . . . . . . . . . . . . . . . . . . . . . . . . . . . . . . . . . . . . . . . . . . . . . . . . . . . . . . . . . . . . . . . . . . 27
Don’ts . . . . . . . . . . . . . . . . . . . . . . . . . . . . . . . . . . . . . . . . . . . . . . . . . . . . . . . . . . . . . . . .27
Food Preparation . . . . . . . . . . . . . . . . . . . . . . . . . . . . . . . . . . . . . . . . . . . . . . . . . . . . . . . 28
Food Timing . . . . . . . . . . . . . . . . . . . . . . . . . . . . . . . . . . . . . . . . . . . . . . . . . . . . . . . . . . . 28
When to Eat When to Stop. . . . . . . . . . . . . . . . . . . . . . . . . . . . . . . . . . . . . . . . . . . . . . . . 29
Restaurant Eating . . . . . . . . . . . . . . . . . . . . . . . . . . . . . . . . . . . . . . . . . . . . . . . . . . . . . . . 29
Cheating (Indulging) . . . . . . . . . . . . . . . . . . . . . . . . . . . . . . . . . . . . . . . . . . . . . . . . . . . . . 30
TABLE OF CONTENTS

EAT SMART Nutritional Guide with 6 Week Step By Step Training Program
3
EAT SMART Nutritional Guide with 6 Week Step By Step Training Program
4
IMPORTANT SAFETY NOTICE
1. The maximum weight capacity of the Pilates Power Gym™ is 275 pounds (125 kgs).
Persons whose body weight exceeds this limit should not use this machine.
2. Keep children and pets away from the Pilates Power Gym™ at all times.
Do not leave unattended children in the same room with the machine.
3. If the user experiences dizziness, nausea, chest pain, shortness of breath, or
any other abnormal symptoms, stop the workout at once. Consult a physician
immediately.
4. Position the Pilates Power Gym™ on a clear, level surface. Place a mat under
the unit to help keep the machine stable and to protect flooring.
5. Always wear appropriate workout clothing when exercising. Do not wear loose
fitting clothing that could become entangled in any moving parts. Running or
aerobic shoes are also required.
6. Use the Pilates Power Gym™ only for its intended use as described in
this manual. Do not use any other accessories not recommended by
the manufacturer.
7. Do not place any sharp objects around the Pilates Power Gym™.
8. Handicapped or disabled persons should not use the Pilates Power Gym™
without the presence of a qualified health professional or physician.
9. Before exercising always do stretching first.
10. Never use the Pilates Power Gym™ if it is not functioning properly.
11. Do not exercise 45 minutes before eating or one hour after eating.
12. Other people must be at least one meter away from the unit while the
Pilates Power Gym™ is being used.
WARNING: Before beginning this or any exercise program, consult your
physician. This is especially important for individuals over the age of 35 or
persons with pre-existing health problems. Read all instructions and watch
instructional videotapes before using. The manufacturer and the marketing
companies assume no responsibility for personal injury or property damage
sustained by or through the use of this product.
SAVE THESE INSTRUCTIONS
Thank you and congratulations for making the Pilates Power Gym your
choice in all-over body strength and aerobic training.
The Pilates Power gym was developed by Kevin Abelbeck, an exercise
physiologist, body builder and designer of fitness equipment. He has dedicated his
life to promoting a healthy lifestyle through fitness. His Pilates Power Gym is an
amazing all-in-one exercise machine that not only combines 18 weight machines it
also addresses the fitness needs of both men and women. All-in-all, you get over 40
exercises and 20 resistance levels with the Pilates Power Gym.
It gives women that long lean muscle look they want and provides the
necessary weight training to give men that chiseled, bulked-up appearance.
The Pilates method of exercise is designed to stretch, strengthen, and
balance the body while stimulating circulation, increasing lung capacity,
creating heightened body awareness, and toning and firming muscles.
Its main goal of core training is to shape and strengthen the muscular
areas of the abdominals (obliques), upper and lower back (deltoids, rhomboids),
hips (gluteals, hip flexors), outer and inner thighs (abductors and adductors),
hamstrings, triceps, and pectorals.
Before using your Pilates Power Gym it is recommended that you spend
some time conditioning your body with stretching movements to allow you to
become more flexible and to warm up your muscles. Just as important is to spend
time cooling down after you’ve finished your Pilates workout. Warming up and
cooling down prepares you for your workout while it helps to speed post workout
recovery as well.
Well, the time has come for you to begin. Start today and imagine how
great you’ll look in only six weeks!
EAT SMART Nutritional Guide with 6 Week Step By Step Training Program
6
EAT SMART Nutritional Guide with 6 Week Step By Step Training Program
5
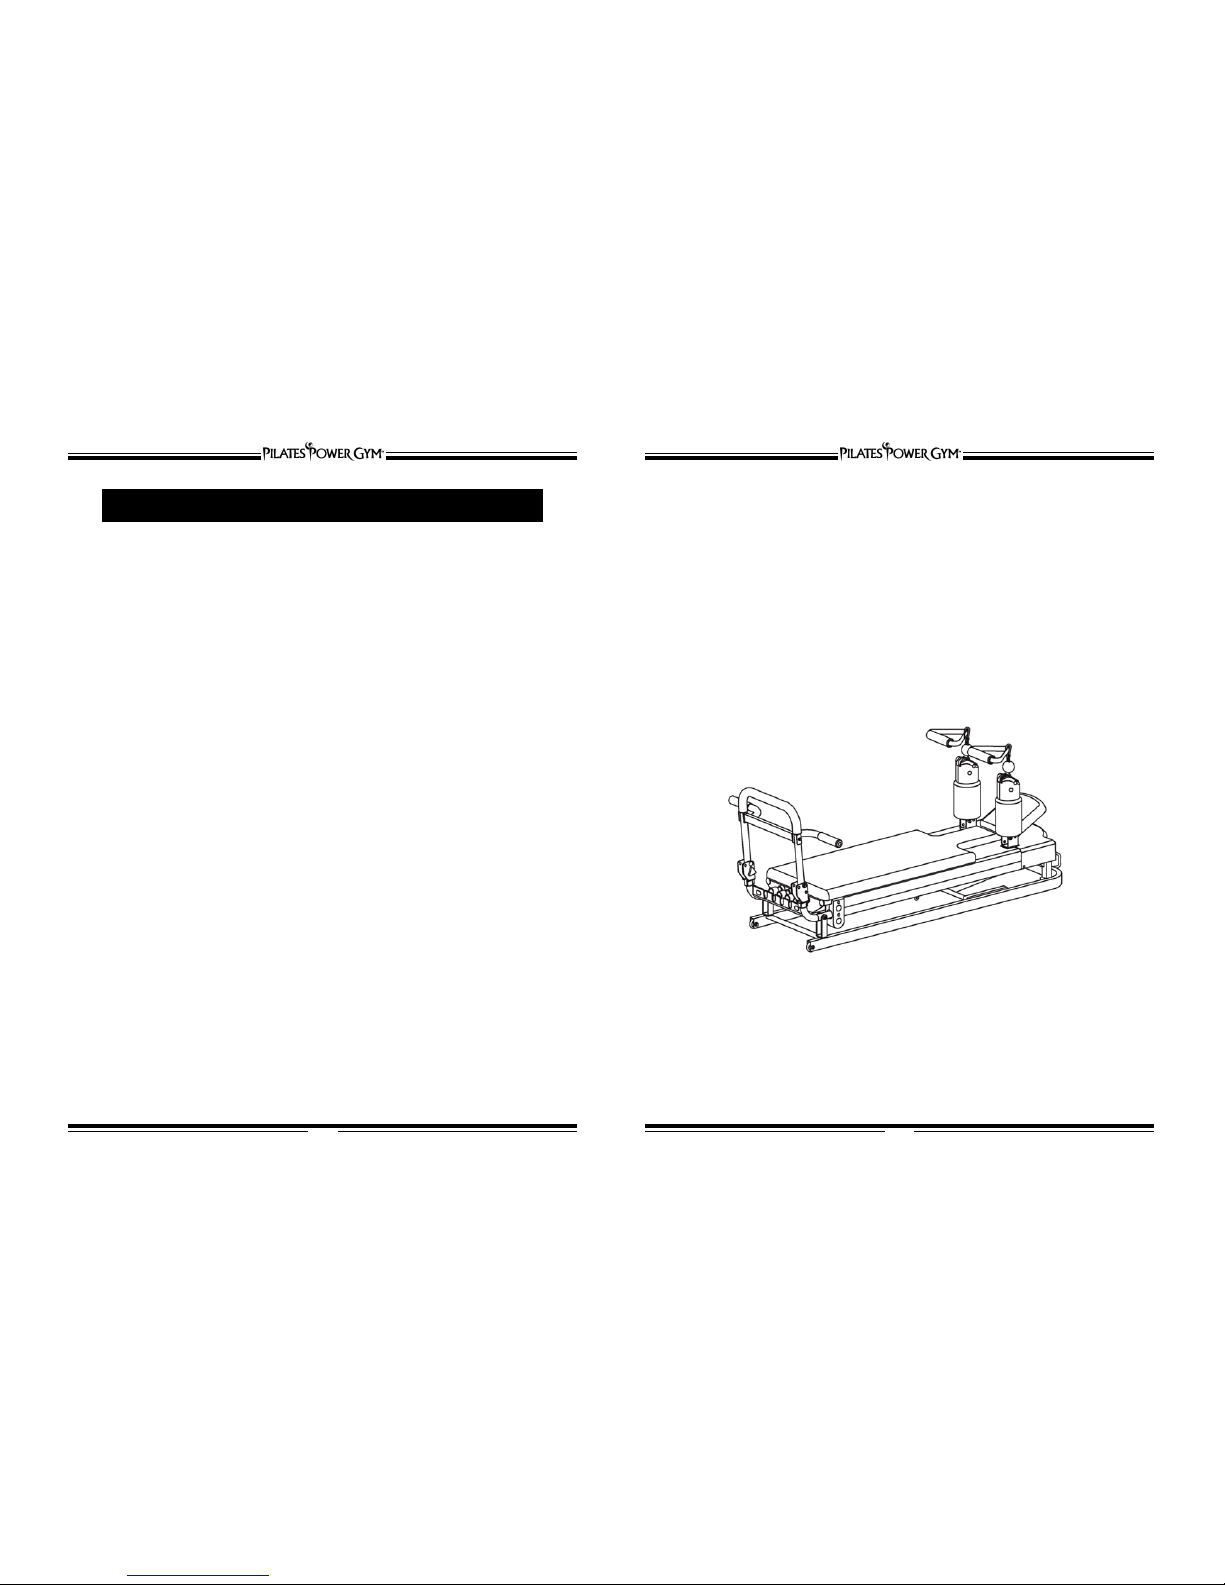
GETTING STARTED
What you need to know about your Pilates Power Gym.
The Pilates Power Gym comes fully assembled. Simply fold up the foot grip bar
and insert the locking pin (refer to photo). You are now ready to begin your
workout routine.
The glide board comes with 5 variable height elevations to intensify your
workout. To raise the glide board, pull out the handle and raise the glide board to
your desired position of elevation.
Resistance can be increased or decreased in two ways. By removing or inserting
one, two, three, or four power cords and/or raising and lowering the glide board
to any of its five positions of incline you can achieve 20 different resistance levels.
The Pilates Power Gym is light and easy to store. Lower the glide board to
its flat position, remove the locking pin from the foot grip bar, and lower the foot
grip bar. The Pilates Power Gym can now be rolled away for storage and can be
conveniently stored under the bed. It is recommended that you store your Pilates
Power Gym in a horizontal position only and NEVER vertically.
Owner’s
Manual
EAT SMART Nutritional Guide with 6 Week Step By Step Training Program
8
EAT SMART Nutritional Guide with 6 Week Step By Step Training Program
7
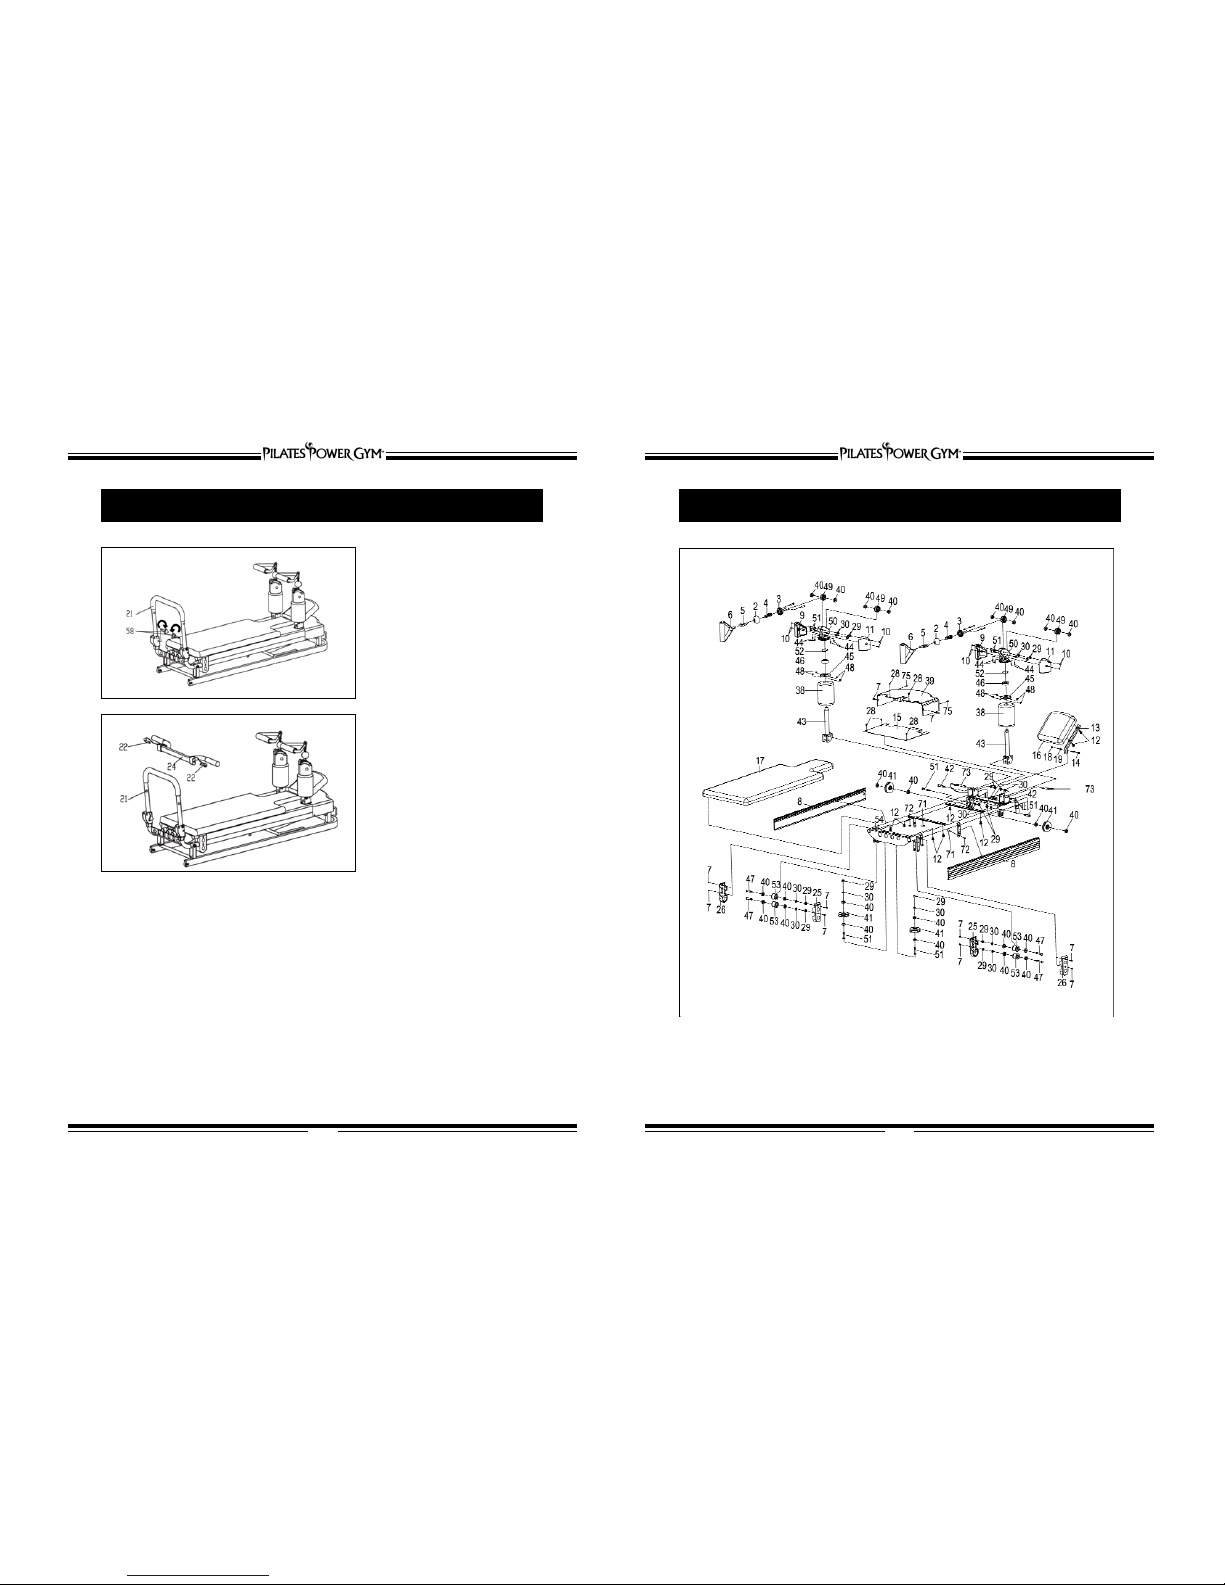
1. Remove the lock knobs (#58),
turn the cross bar (#21) to the
position as shown in the left
drawing, and then lock it by
the lock knobs (#58).
2. Insert the foot rest frame (#24)
into the cross bar (#21) and fix it
by the pins (#22).
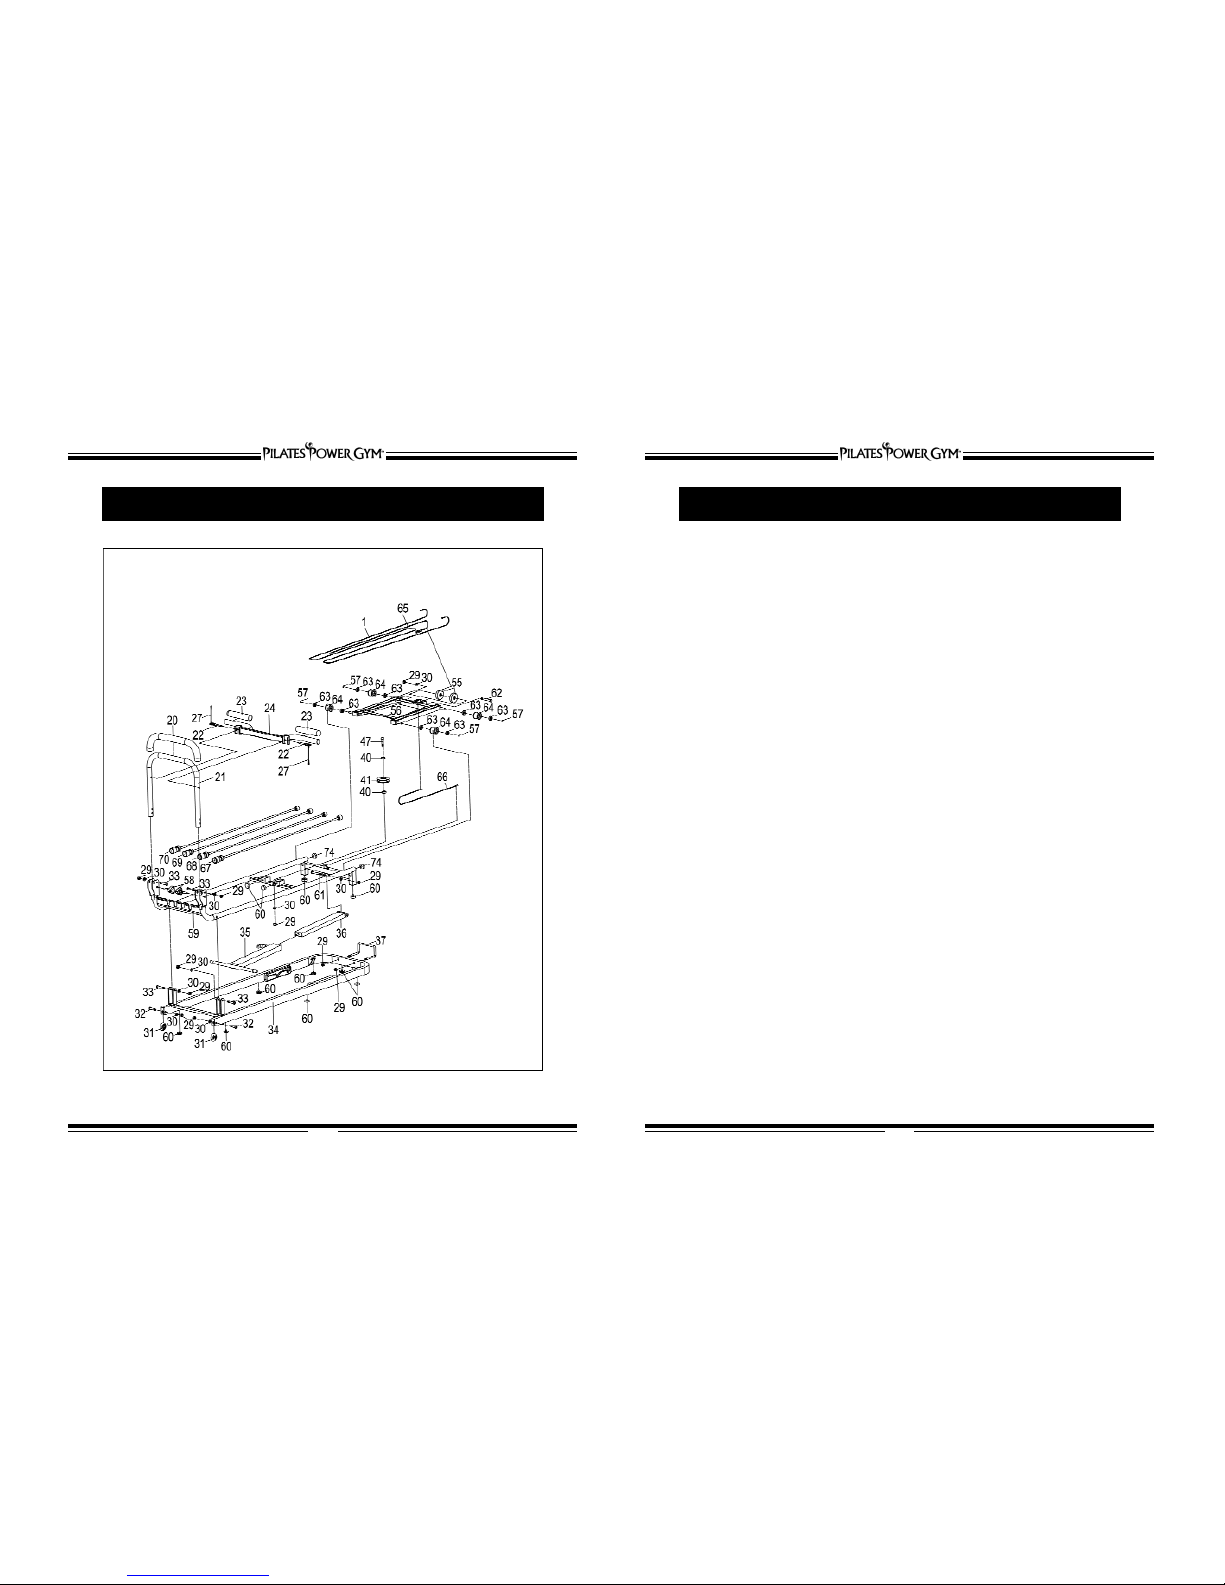
ASSEMBLY INSTRUCTION EXPLODED DIAGRAM (1)
Fig. 1
Fig. 2
EAT SMART Nutritional Guide with 6 Week Step By Step Training Program
10
EAT SMART Nutritional Guide with 6 Week Step By Step Training Program
9
EXPLODED DIAGRAM (2) PARTS LIST
NO. DESCIPTION QTY.( (PCS) SPEC.(MM)
1 Long Cable 1
2 Bottom Cover of Position Ball 2
3 Top Cover of Position Ball 2
4 Pulling Hook 2
5 Hook 4
6 Hand Grip 2
7 Bolt 10 M4*9
8 Side Rail 2
9 Left Protection Cover 2
10 Screw 8 ST4.2X10
11 Right Protection Cover 2
12 Bolt 8 M8*15
13 Fixing Plate of Head Rest 1
14 Bolt 1 M6X35
15 Decoration Board 1
16 Head Rest 1
17 Cushion 1
18 Lock Nut 1 M6
19 Washer 1 º6
20 Foam Tube 1 º33*º25*460
21 Cross Bar 1
22 Pin 2
23 Foam Tube of Handle Bar 2 Ê30*Ê24*150
24 Foot Rest Frame 1
25 Left Protection Cover of Roller 2
26 Right Protection Cover of Roller 2
27 Elastic Cord for Pin 2
28 Screw 6 ST4.2*10
29 Lock Nut 25 M8
30 Washer 23 º8
31 Roller 2 º40*16
32 Bolt 2 M8X30
33 Bolt 4 M8X45
34 Base Frame 1
35 Adjustment Frame 1
36 Adjustment Tube 1
37 “U” Handle 1 º8
38 Foam Pad 2 Ê95*Ê23*135
39 Plastic Protection Cover 1
40 Bearing 26
41 Sliding Wheel 5 Ê64*16
42 Bolt 2 M8X50
43 Foam Tube Frame 2
44 Bolt 8 M5*10
45 Bearing Cover 2
46 Bearing 2
47 Axis l 5 M8*45
48 Lock Nut 8 M5
49 Fixed Sliding Wheel 4 Ê37*17.5
50 “U” Bracket Set 2
51 Axis ll 8 M8X35
52 Elastic Clip 1 2 Ê17
53 Sliding Wheel 4 Ê35*28
54 Top Sliding Frame 1
55 Roller 2 Ê50*12
56 Frame for Sliding Wheel 1
57 Elastic Clip 2 4 Ê8
58 Lock Knob 2
59 Bottom Sliding Frame 1
60 Rubber Stopper 11
61 Bolt 1 M8X85
62 Position Rubber Stopper 1
63 Bearing 8
64 Sliding Frame Roller 4 Ê38*28
65 Middle Cable 1 Ê3.5*895
66 Short Cable 1 Ê3.5*549
67 Elastic Cord 1 1 Ê8
68 Elastic Cord 2 1 Ê8
69 Elastic Cord 3 1 Ê8
70 Elastic Cord 4 1 Ê8
71 Bolt 2 Ê8*28
72 Screw 2 M4*16
73 Pin 2 M4*15
74 Rubber Stopper 2
75 Screw 2 M4*15
EAT SMART Nutritional Guide with 6 Week Step By Step Training Program
12
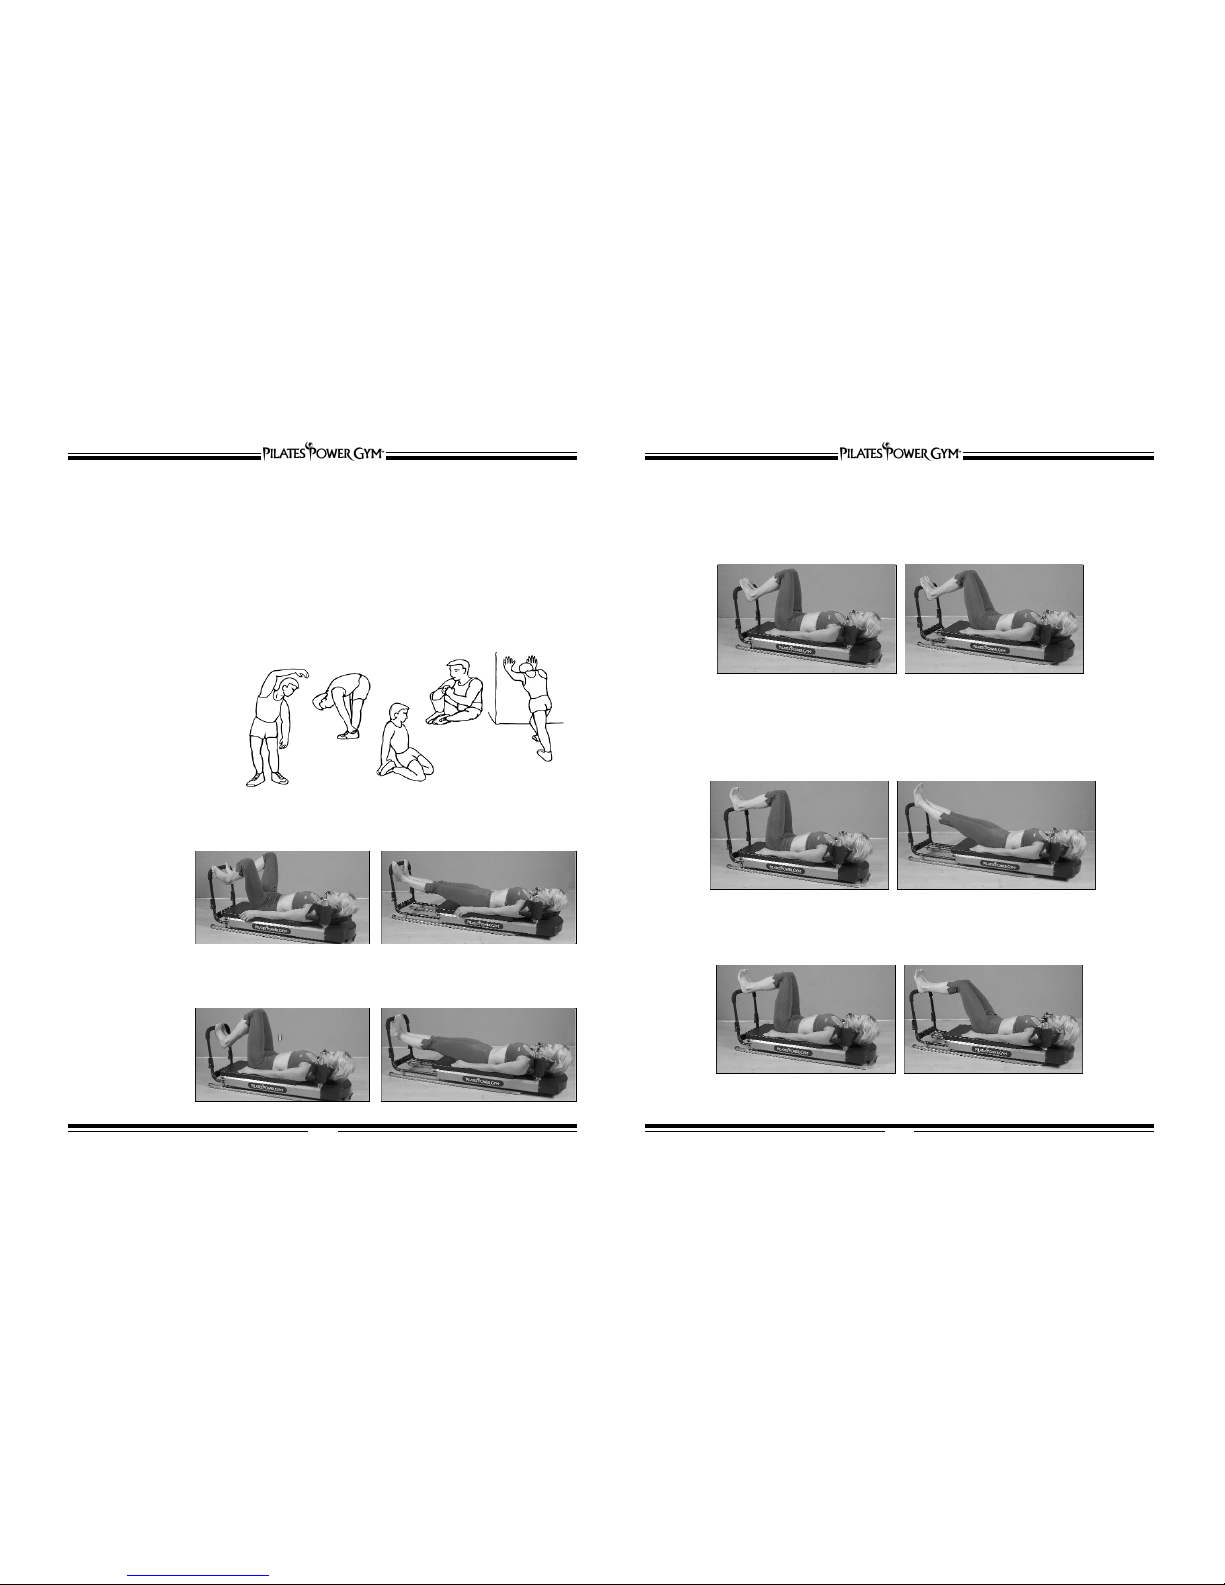
Arch Pulses
Assume the same workout position as for Arches. Instead of fully extending your legs as you did in
Arches, push your legs out partially with short, brisk movements. Keep your knees bent throughout the
exercise. Squeeze your thighs and buttocks as you push out. Relax them as
you return to the starting position. This exercise will work your entire thigh muscle.
Heels
Place the heels of your feet on the foot grip bar and keep your feet flexed with your toes stretching
upward throughout the exercise. Keep your legs together and fully extend and stretch your legs.
Squeeze your inner thighs and buttocks as you push away from the foot
grip bar. Relax them as you return to the starting position. Slowly return to the beginning
position and repeat. Works your calves, quadriceps, and buttocks.
Start Finish
Start Finish
Heel Pulses
Assume the same position as for the Heels workout. Push out in the mid-range with short bursts. Keep
your knees bent throughout the exercise. Works your entire thigh to tone and tighten your muscles.
Start Finish
EAT SMART Nutritional Guide with 6 Week Step By Step Training Program
11
WORKOUT GUIDE
Pilates
The following Pilates workouts are designed to strengthen your abs, lower back, thighs, and buttocks.
When exercising, many people have a tendency to hold their breath. Please be aware of this and remember to
breathe. Inhale deeply through your nose and exhale through your mouth. Expand your diaphragm as you
inhale. Concentrate on your movements. Keep your back, neck, and shoulders relaxed.
As you work out, don’t lock your knees. Locked knees can cause hyperextension and injury.
Keep your spine in a “soft” curve and not arched.
All of the Pilates exercises will require the machine to be in the flat position and you should use all tension
cords during the foot workout. The strength training exercises require that the glide board be used at an incline
level that is comfortable for you and the power cords at a tension level which provide sufficient resistance.
Warm-Up
This stage helps get the blood
flowing around the body and the
muscles working properly. It will
also reduce the risk of cramp and
muscle injury. It is advisable to do
a few stretching exercises as
shown below. Each stretch should
be held for approximately 30
seconds. Do not force or jerk your
muscles into a stretch. If it hurts,
STOP.
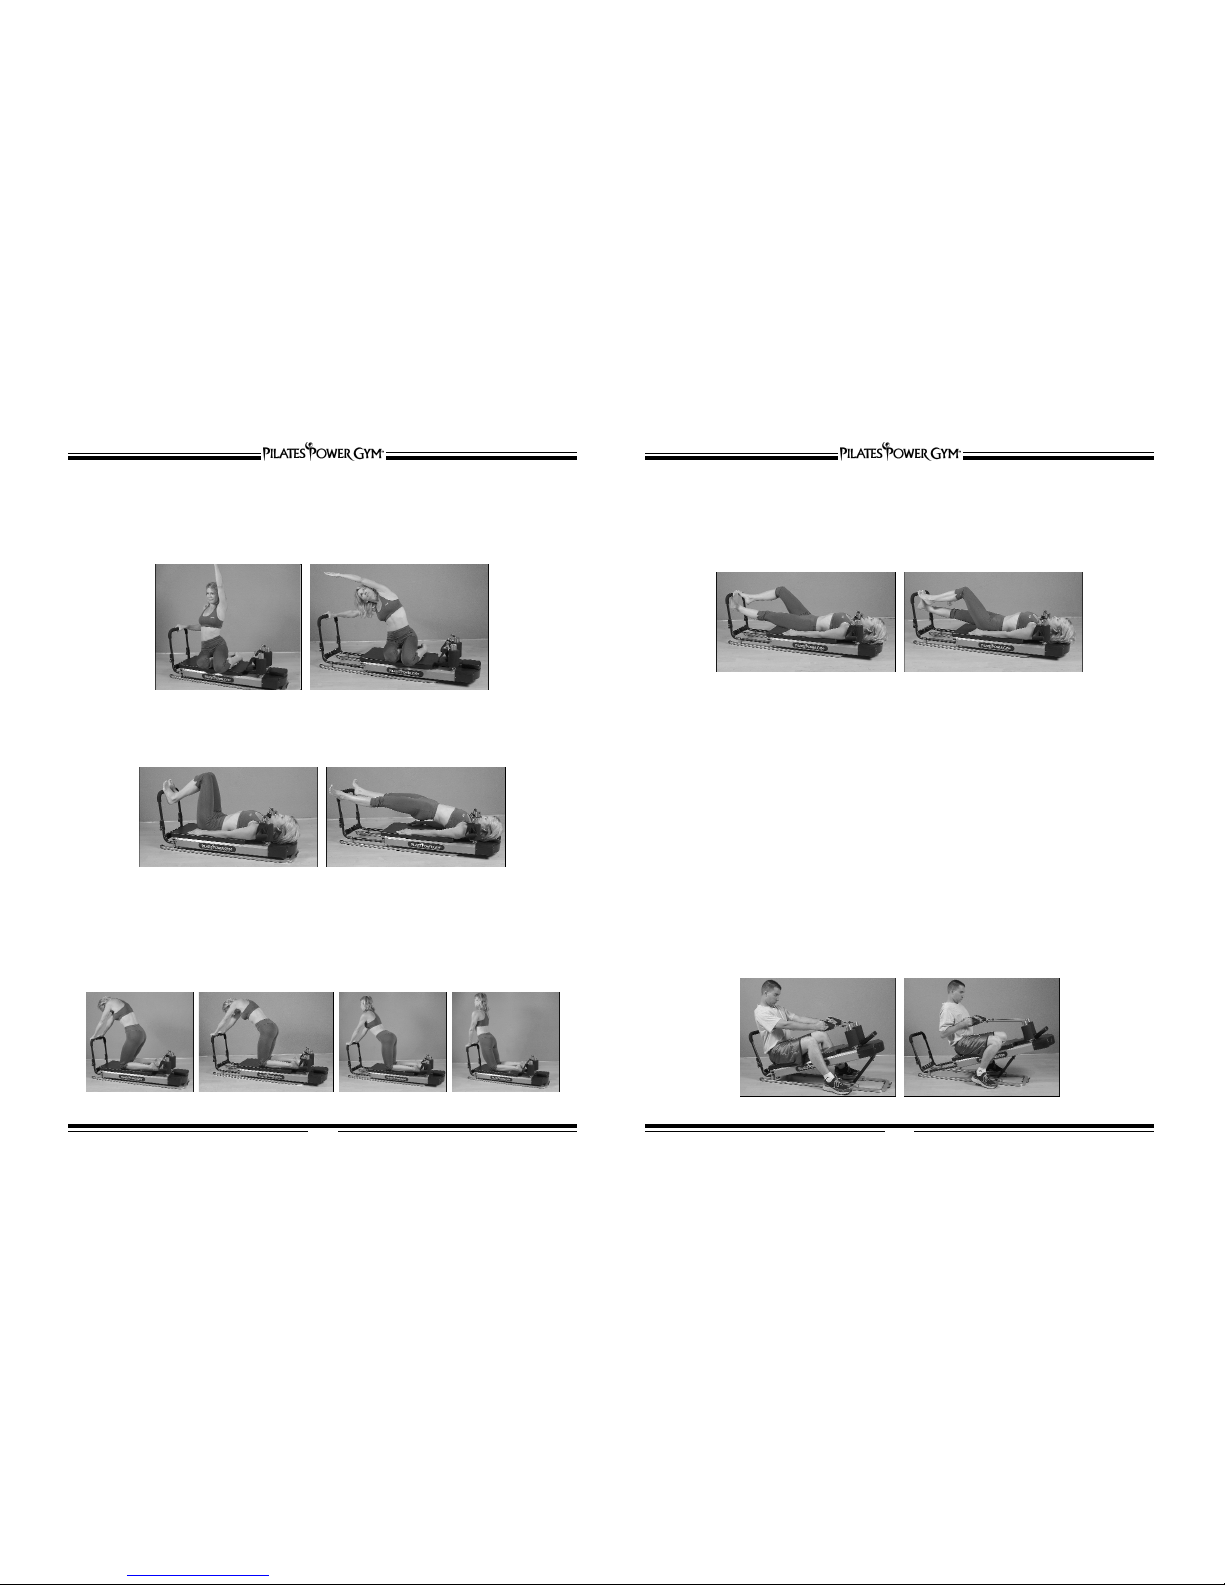
Plié
Place your feet on the foot grip bar, about three inches apart, with your toes curled over the foot grip bar. Make a
V shape with your heels touching. Lift your heels slightly and keep your toes flexed. Push your legs outward while
keeping your heels
together. Slowly
return to the
beginning position.
For calves and
inner thigh.
Arches
Keep your feet together and place the balls of your feet on the foot grip bar. Curl your toes around
the foot grip bar. Keeping the arches of your feet on the bar and your legs together slowly extend your legs.
Squeeze your thighs and buttocks in as you perform the exercise. Slowly return to the beginning position.
Do not lock your
knees after extending
your legs. Focus on
working your entire
thigh.
For calves and
inner thigh.
Start Finish
Start Finish
SIDE BENDS
INNER THIGH
STRETCHES
FORWARD
BENDS
OUTER THIGH STRETCHES
CALF/ACHILLES
STRETCHES

EAT SMART Nutritional Guide with 6 Week Step By Step Training Program
14
Cat
Place your feet on the glide
board at the end furthest from
the foot grip bar. Bend at the
waist and place your hands on
the foot grip bar. Drop your
head between your arms and
keep your neck and shoulders
relaxed. Remember to keep
your knees slightly bent. Push
the glide board out backwards.
Use your lower body and
abdominals to return to the
starting position.
Start
Start Finish
Heel Lowers
Sit on the glide board. Support yourself with your arms extended slightly behind you and grab the
handle holders. Place your feet, approximately four inches apart, on the foot grip bar and curl your
toes around the bar. Bring your heels together so they are touching with your feet in a “V” position.
Maintaining a perfectly straight back, extend your legs, remembering to keep your knees slightly
flexed. Inhale as you push out and exhale as your return to the starting position.
Start Finish
EAT SMART Nutritional Guide with 6 Week Step By Step Training Program
13
Second Position Turnout
Place the heels of your feet on each corner of the foot grip bar. Keep your feet flexed with your toes
stretching upward throughout the exercise. Inhale as you extend your legs, making sure not to lock
your knees. Exhale and slowly return to the beginning position.
Start Finish
Start Finish Bicep Curls
Sit on the glide board with your back near the foot grip bar, and your feet on the headrest. Grab the
handles and lean back using your abdominal muscles for support. Keeping your elbows tight against
your waist, bring your arms up towards your chest while inhaling and back down while exhaling.
The Hundreds
Step 1. Lie flat on the glide board and place your toes on the foot grip bar.
Step 2. Grab the handle holders.
Step 3. Raise your arms vertically. With palms facing forward lower your arms to your sides.
Inhale as you lower your arms while simultaneously raising your head as if doing a crunch and
extending your legs to a 45 degree angle. Extend your feet while they
are in the air.
Step 4. Exhale, raise your arms, lower your head, and return your feet to the foot grip bar.
Suggestion: Inhale 5 counts and exhale 5 counts..
Middle
Finish
Middle
Arm Circles
Lie on the glide board and place the balls of your feet on the foot grip bar. Grab the handles, extend
your arms vertically with the palms of your hands facing the foot grip bar. Make large circles with your
arms moving them down to your sides, out from your body, over your head, and back to the starting
position with the palms of your hads facing the foot grip bar. Keep your back flat. Do five in one
direction then change directions.
Start Finish
EAT SMART Nutritional Guide with 6 Week Step By Step Training Program
16
Start Finish
Prance
Lie flat on the glide board and place your toes on the foot grip bar. Inhale and push out with the
muscles of the right leg. Exhale as your slowly return to the starting position. Now push with the
muscles of the left leg. Exhale and return to the starting position. Alternate legs and emulate the
running stride as much as possible.
Watch the “Pilates Body” video for many more Pilates moves.
Start Finish
EAT SMART Nutritional Guide with 6 Week Step By Step Training Program
15
Mermaid
Sit sideways on the glide board and place and your right hand on the foot grip bar. Raise your left arm
straight up keeping it close to your head. With your back straight, bend sideways at the waist toward
the foot grip bar, push the glide board out fully with your lower body, stretching from your side.
To stretch your right side, change your position on the glide board so that your left hand is on the
foot grip bar.
Start Finish
Pelvic Tilt
Position yourself flat on the glide board with your heels at each corner of the foot grip bar. Raise your
buttocks 3 to 4 inches off the glide board. Extend your legs while keeping your buttocks raised.
Do not lock your knees.
Start Finish
Exercises for Strength Training
Strength Training
This machine was designed to allow you to add resistance to your workout to increase your lean
muscle mass thereby toning and tightening your entire body. The glide board may be positioned
at your desired resistance level throughout the strength-training program. One, two, three, or four
power cords may be added giving you 20 levels of resistance.
For more resistance increase the ingle of the guide board. The steeper the angle of the guide board,
the greater the resistance will be. The power cords also offer additional resistance. You may use One,
Two, Three, Four or any combination. There are 16 possible combinations for the power cords. There
are 5 incline positions and flat. The power cord combinations may be used on each of the 6 levels for
a total of 95 resistance settings (96 combinations minus zero power cords with no incline (96-1=95)).
Seated Row
Sit, facing the headrest and straddle the glide board with your legs. Grab the handle holders and turn
your palms so they are facing each other. Keeping you back and body stationary pull your arms in back
towards your waist. Keep your arms shoulder width apart and tight against your body. Exhale as you
pull your arms back. Slowly bring your arms back to the beginning position as you inhale.
Muscle groups involved are the upper back, trapezius, and biceps.
Start Finish
Middle A Middle B
Knee Stretch
Step 1. Kneel midway on the glide board and place both hands on the foot grip bar. Place your feet
on the handle holders as support.
Step 2. Arch your back slightly upward. Drop your head forward, and sit back slightly.
Step 3. Inhale and push out using your lower body to move the glide board.
Step 4. Exhale and pull forward. As you pull forward, straighten your back, pull your pelvic bone
forward, raise your head, and stretch your body upwards.

EAT SMART Nutritional Guide with 6 Week Step By Step Training Program
18
Bench Press
Lie on the glide board. Place the balls of your feet, approximately 10 inches apart, on the foot bar.
Grab the handle holders with your palms facing forward. Inhale slowly and extend the handles upward,
keeping your palms facing forward. Inhale and slowly and extend your arms upward, being careful not
to lock your elbows. Exhale as you pull your arms back. Slowly bring your arms back to the beginning
position as you inhale.
Works the chest, shoulders, triceps, and abdominals.
Start Finish
Arm Pullover
Lie flat on the glide board and place your feet approximately 6 inches apart on the foot grip bar.
Grab the handle holders and with your palms facing upward fully extend your arms over your head.
Inhale and pull your arms, in an arc-like motion to your side until they touch your thighs. Your palms
will now be facing downwards. Lift your head and shoulders, using your abdominals, as you pull your
arms over your head. Exhale as you pull your arms back. Slowly bring your arms back to the beginning
position as you inhale.
Great for
strengthening
your shoulders,
upper back,
triceps, upper
abs, chest,
and lats.
EAT SMART Nutritional Guide with 6 Week Step By Step Training Program
17
Seated Upright Row
Elevate the glide board to your comfort level. Sit on the glide board, facing the headrest, and bend
your knees. Reach out and grab the handle holders. With your palms facing down, pull your hands
back towards your chest in a rowing motion. Inhale as you pull back. Exhale as you pull your arms back.
Slowly bring your arms back to the beginning position as you inhale.
Works the calves, legs, hips, abdominals, lower and upper back, and shoulders.
Start Finish Start Finish
Seated Curls
Sit on the glide board, facing the handle holders, with your legs straddling the glide board. Grab the
handle holders with your palms up. Arms should be extended out in front of you. Keeping your elbows
tight against your sides, inhale and bring your palms towards your shoulders. Keep your back straight
at all times. Exhale as you pull your arms back. Slowly bring your arms back to the beginning position
as you inhale.
Start Finish
Tricep Extension
Lie flat on the glide board and place your feet approximately 3 inches apart on the foot grip bar. Grab
the handle holders with your palms up, and extend them upward. Keep your upper arms in a stationary
position, inhale, and extend the handles toward your knees. Your palms will now be facing downward
and your arms will be fully extended. Exhale as you pull your arms back. Slowly bring your arms back to
the beginning position as you inhale.
Great workout for your triceps and forearms.
Start Finish
Lying Tricep Curls
Lie flat on the glide board and place your feet approximately 3 inches apart on the foot grip bar.
Grab the handle holders, fully extend your arms, and bring them to your sides. Keep your upper arms
stationary against your sides, inhale, and bend your elbows, bringing your arms down towards your
shoulders. Exhale as you pull your arms back. Slowly bring your arms back to the beginning position as
you inhale.
Start Finish
Focus on
working
your biceps,
forearms,
and shoulders.

Squat
Lie on the glide board and place your feet on the foot grip bar, shoulder width apart. Bend your
knees at a 90 degree angle. Inhale as you slowly push against the footboard until your legs are fully
extended. Exhale as you slowly return to your starting position.
This is a great workout for the quadriceps, buttocks, and calves.
Start Finish
One-Legged Squat
Lie on the glide board and place one foot on the foot grip bar and the other foot flat on the glide
board. Inhale and push with the leg against the foot grip bar. Exhale as you slowly return to the starting
position. Switch legs for an equally good workout.
Start Finish
EAT SMART Nutritional Guide with 6 Week Step By Step Training Program
20
Side Deltoid Raises
Lie flat on the glide board and place your feet on the foot grip bar, approximately 3 inches apart. Grab
the handle holders and bring them to your side. Your palms should be turned inward toward your
body. As you inhale, extend your arms straight out, away from your sides, in an arc-like motion until
they are parallel with your shoulders. Be sure to keep them straight with your elbows slightly bent.
Exhale and slowly return your arms to the starting position.
Great exercise to add definition to your shoulders.
Start Finish
Decline Abdominal Crunch
Raise the glide board to a comfortable level. Place your feet on the foot grip bar, approximately
3 inches apart. Cross your arms across your chest. Inhale, contract your abdominal muscles, and
as you push with your feet raise your head and shoulders. Exhale and slowly return to the starting
position lowering your head and shoulders. Your upper and lower abdominals will really benefit
from this exercise.
Start Finish
Pulley Ab Crunch
Lie flat on the glide board and place your feet approximately 3 inches apart on the foot grip bar.
Grab the handle holders and keeping your upper arms tight against your sides bring your lower arms
to your shoulders with your palms facing down. Inhale and extend your arms downward against your
sides, lifting your head and shoulders and contracting your abdominal muscles. Exhale and slowly
return to the starting position. Be sure to let your arms and abdominal muscles do all the work.
This is a great exercise to work your upper and lower abs.
EAT SMART Nutritional Guide with 6 Week Step By Step Training Program
19
Start Finish
Lying High Pull
Lie flat on the glide board with your head at the foot grip bar end of the glide board and your feet at
the head rest end. Bend your knees. Grab the handle holders and with your arms extended bring them
to your sides, palms facing down. Inhale and pull the handles straight back toward your chest keeping
them parallel with your body. Exhale and slowly return to the starting position.
Great exercise for working your upper body especially the shoulders, trapezius,
and biceps.
Start Finish

EAT SMART Nutritional Guide with 6 Week Step By Step Training Program
22
6 WEEK TRAINING PROGRAM
GET FIT FAST AND HEALTHFULLY.
Before you begin we recommend taking a photo of yourself in a bikini or your bra and
panties. Put this photo somewhere that you can see it every morning to remind yourself why
you have made the decision to get in shape!
Eat Right
Follow the twelve day "Super Slim Nutritional Diet Plan" for six weeks. You can substitute
one “lunch” for another “lunch” or one “dinner” for another “dinner”. Allow yourself to cheat
just a little (up to 400 additional calories) once a week. This will help
avoid overindulging or binging on a favorite food.
Water
Helps flush fat. You MUST DRINK at least 64 ounces of pure water (not coffee, tea
or cola) every day.
Exercise
Alternate the TrimFlex™ “Body Sculpting” workout and the “Pilates Body” workout every
other day for best results. Do this at least five times per week for the first four weeks.
During the last two weeks of your program, pick two days to do both workouts and then
do the "Body Sculpting" workout alone for the other three days.
Mental Attitude
Stay positive; stay focused on your goal. After six weeks take a photo of yourself in the same
bikini or bra and panties that you wore at the beginning of your training. You will be amazed.
If you are comfortable sharing your photos and your success story, please contact us at
www.thanefitness.com
EAT SMART Nutritional Guide with 6 Week Step By Step Training Program
21
Twisting Squat
Lie on the glide board and place both feet on the foot grip bar approximately 3 inches apart. Exhale
and slowly push back. Slightly drop your knees to one side as you extend them outward. This will
create a slight twist to your legs. Keep your buttocks flat on the glide board and keep your upper
body straight. Exhale and slowly return to the starting position. Alternate twisting to each side.
Great for toning and firming your thighs, calves, hips, buttocks, and quadriceps.
Start Finish
Gluteus Kickbacks
Facing the headrest, kneel midway on the glide board. Hold onto the side of the rail for support and
place one foot on the foot grip bar. Inhale and slowly push against the foot grip bar until your leg is
fully extended, do not lock your knee. Use your gluteus muscle as you push. Exhale and slowly return
to the starting position. Alternate legs.
This is a great exercise for tightening and toning the buttocks.
Start Finish
Lunges
Place one foot firmly on the floor near the foot grip bar and the other foot in the center of the glide
rail. Keeping both feet flat, inhale, and slowly push the glide board forward. Bend the knee, on the
glide board, to 90 degrees. Take care not to lock your knee. Switch legs.
Great for toning and strengthening your legs while focusing on the quadriceps, hips,
buttocks, and hamstrings.
Start Finish

EAT SMART Nutritional Guide with 6 Week Step By Step Training Program
24
DAY 4
(1650 calories / 46 gr. fat)
BREAKFAST
✓jgrapefruit
✓1 cup low fat cottage cheese
SNACK
✓1 handful almonds
LUNCH
✓1 grilled chicken breast
✓jcup brown basmati rice
✓1 large romaine salad with
shredded red cabbage, carrots,
and tomatoes
• 2 tbs. low-fat dressing
✓jcup steamed veggies,
your choice
SNACK
✓1 jcup strawberries
DINNER
✓1 j cups spaghetti or
other pasta:
• 3 oz. 90% lean ground
beef, cooked and drained
•jcup spaghetti sauce
✓2 tbs. parmesan cheese
✓sautéed mushrooms, onions,
and lcup zucchini
✓jcup spinach, steamed or 1
small Caesar salad
DAY 5
(1525 calories / 35 gr. fat)
BREAKFAST
✓1 apple
✓1 cup oatmeal with 1 tbs. honey
SNACK
✓1 peach
✓jcup blueberries
LUNCH
✓Pita Sandwich:
• 1 pita pocket
• 3 oz. turkey
• lettuce, tomato slices
• 1 tbs. reduced-calorie
mayonnaise
✓lcup raw cauliflower
✓jcup V-8 or tomato juice
SNACK
✓1 cup low fat yogurt
DINNER
✓6 oz. baked seafood
✓2 cups broccoli, carrots, or
other veggies
• Stir-fried with 1 tbs. olive
oil until just tender
✓Mixed green salad with
• 1 tbs. low-fat Italian dressing
DAY 6
(1350 calories / 37 gr. fat)
BREAKFAST
✓1 cup low fat cottage cheese
mixed with jbanana and
jcup blueberries
SNACK
✓1 handful of almonds
LUNCH
✓Turkey Salad:
• 4 oz. deli turkey cut
into strips
• 2 cups mixed green
salad with
•l cup raw broccoli
and cauliflower
• 1 tomato, sliced
•kcup chopped onion
• 2-3 tbs. low fat dressing
SNACK
✓2 cups watermelon
DINNER
✓2 slices of a medium
cheese pizza
✓1 jcups cucumber, onion and
tomato slices with
• 1 tbs. low-fat
Italian dressing
✓jcup V-8 or tomato juice
EAT SMART Nutritional Guide with 6 Week Step By Step Training Program
23
12-DAY SUPER SLIM DIET PLAN
• Upon rising in the morning drink 16 oz. of water with squeezed lemon.
• 2 hours after breakfast and lunch drink 24 oz. of water.
• 2 hours after dinner drink 8 oz. of water or herbal tea.
(Limit fluids to 6-8 oz. with meals)
DAY 1
(1650 calories / 45 gr. fat)
BREAKFAST
✓jcup calcium-fortified
orange juice
✓2 slices whole-wheat toast or 1
bagel with 2 tbs. jam
SNACK
✓2 apples
LUNCH
✓Tuna Sandwich:
• 2 slices 7-grain bread with
•jcup water-packed tuna
(rinsed well)
• 1 tbs. reduced-calorie
mayonnaise and
chopped celery, lettuce and
tomato slices
✓jred pepper cut in strips
SNACK
✓1 orange and lcup
pineapple chunks
DINNER
✓4 oz. skinless chicken
breast, grilled
✓1 small baked potato with
1 tbs. butter
✓jcup carrots, steamed
✓jcup green beans or
broccoli, steamed
✓1 cup green salad with 1 tomato
✓2 tbs. low-fat dressing
✓add shredded red cabbage,
carrots, and chopped cucumber
DAY 2
(1600 calories / 38 gr. fat)
BREAKFAST
✓1 whole banana
✓1 cup oatmeal with 1 tbs. honey
SNACK
✓1 cup nonfat yogurt
LUNCH
✓1 cup vegetable soup
✓1 whole-wheat bagel with
2 oz. cheese
✓1 raw carrot, cut into sticks
✓kred pepper cut into strips
✓1 cup nonfat yogurt
SNACK
✓1 apple
✓1 pear
DINNER
✓4 oz. broiled fish with lemon
✓lcup broccoli or Brussels
sprouts, steamed
✓2 cups Romaine salad with 1
tomato, sliced, 2 tbs. dressing
DAY 3
(1650 calories / 50.3 gr. fat)
BREAKFAST
✓jbanana
✓1 cup bran flakes
✓1 cup low fat milk or
milk alternative
SNACK
✓1 apple
✓1 pear
LUNCH
✓Sandwich:
• 2 slices 7-grain bread
• 3 oz. turkey or
chicken breast
• 2 tbs. reduced-calorie
mayonnaise
• lettuce, tomato slices
✓1 med. cucumber sliced
✓1 carrot cut into strips
SNACK
✓1 cup nonfat yogurt
DINNER
✓4 oz. lean beef tenderloin
✓jcup brown basmati rice,
cooked in water or broth
✓lcup zucchini, steamed
✓lcup yellow
squash, steamed
✓1 spinach salad with
• 1 small tomato
• 2 tbs. low-fat dressing
If weight loss is your goal, in addition to becoming fit with the Pilates Power Gym™, you will find
the following guidelines indispensible in helping you shed unwanted pounds. As a general rule
you should always pay attention to your diet by making healthy food choices. This means
decreasing your fat intake, increasing the amount of high fiber foods you eat, and keeping an eye on
the number of calories consummed in a day. And, you need to make this a regular part of your life.
Sounds like a big order doesn’t it? Well, it’s really not… not if you become aware of your eating
habits and make a few changes in the way you think about dieting.

EAT SMART Nutritional Guide with 6 Week Step By Step Training Program
26
DAY 10
(1650 calories / 48 gr. fat)
BREAKFAST
✓1 apple, sliced
✓1 whole-wheat English muffin
with 2 tbs. honey
SNACK
✓1 handful almonds
LUNCH
✓1 cup vegetable soup
✓1 whole-wheat bagel with
2 oz. cheese
✓1 raw carrot cut into sticks
SNACK
✓2 cups melon of choice
DINNER
✓4 oz. lean beef tenderloin
✓lcup zucchini, steamed
✓lcup yellow squash, steamed
✓1 lg. spinach salad with
• 1 small tomato, shredded
cabbage, carrots, beets, and
cucumber and 2 tbs. low-fat
dressing
DAY 12
(1490 calories / 45 gr. fat)
BREAKFAST
✓jcup calcium fortified
orange juice
✓1 or 2 scrambled eggs
✓1 slice 7-grain bread toast
SNACK
✓1 fresh peach
✓1 pear
LUNCH
✓Turkey Salad:
• 2 cups mixed green
salad with
•lcup raw broccoli
and cauliflower
• 1 tomato, sliced
• 4 oz. turkey, sliced
• 2 oz. ham, sliced
•kcup onion, chopped
• 2-3 tbs. low-fat dressing
SNACK
✓1 cup low-fat yogurt
DINNER
✓4 oz. skinless chicken
breast, grilled
✓jcup carrots, steamed
✓jcup green beans or
broccoli, steamed
✓1 small baked sweet potato
✓1 sliced tomato,
✓1 tbs. low-fat dressing
DAY 11
(1590 calories / 48 gr. fat)
BREAKFAST
✓jgrapefruit
✓1 whole-wheat bagel
SNACK
✓1 apple
✓2 oz. almonds
LUNCH
✓1 small baked potato
topped with
•jcup low-fat
cottage cheese
✓1 large romaine salad with
• 1 tomato, sliced
• 2 tbs. low-fat dressing
✓1 cup steamed veggies,
your choice
SNACK
✓1 apple
✓1 pear
DINNER
✓4 oz. broiled fish with lemon
✓lcup broccoli or brussel
sprouts, steamed
✓1 jcups green salad with
shredded red cabbage, carrots,
cucumber, 1 small sliced tomato
✓2 tbs. low-fat dressing
EAT SMART Nutritional Guide with 6 Week Step By Step Training Program
25
DAY 8
(1525 calories / 40 gr. fat)
BREAKFAST
✓jcup calcium-fortified
orange juice
✓2 slices 7-grain bread toasted
with 1 tbs. butter each
SNACK
✓1 apple
✓jcup low-fat cottage cheese
LUNCH
✓Sandwich:
• 2 slices 7-grain bread
• 2 oz. turkey or
chicken breast
• 1 tbs. reduced-calorie
mayonnaise
• lettuce, tomato slices
✓lcup coleslaw
SNACK
✓1 jcups grapes
DINNER
✓6 oz. baked seafood
✓2 cups broccoli, carrots, or
other veggies
• Stir-fried with 1 tbs.
olive oil
✓Mixed green salad with 1 tbs.
low-fat Italian dressing
DAY 7
(1480 calories / 44 gr. fat)
BREAKFAST
✓jcup V-8 or tomato juice
✓1 or 2 scrambled eggs
✓1 slice toasted 7-grain bread
SNACK
✓1 cup fresh strawberries
✓1 peach
LUNCH
✓4 oz. roasted, skinless
chicken breast
✓lcup coleslaw
• combine shredded carrot,
jcup red cabbage,
•jcup green cabbage,
1 tbs. reduced-calorie
mayonnaise
• 1 tbs. plain yogurt, ktbs.
dill, and jtbs. salt
SNACK
✓1 cup yogurt
✓lcup fresh pineapple chunks
DINNER
✓Taco Salad:
• 3 oz. ground turkey breast
or ground beef, cooked
•kcup pinto or
kidney beans
• 1 oz. grated cheese
• 3 tbs. picante sauce
• 1 tomato, sliced,
• 1 cup lettuce
• 1 cup raw (or quickly
steamed) veggies (green
pepper, carrots,
red onions, mushrooms)
DAY 9
(1750calories / 42 gr. fat)
BREAKFAST
✓1 banana
✓1 cup oatmeal with 1 tbs. honey
✓jcup low fat milk or milk
alternative
SNACK
✓1 jcups fresh strawberries
LUNCH
✓Tuna Sandwich:
• 2 slices 7-grain bread with
•jcup water-packed tuna
• 1 tbs. reduced-calorie
mayonnaise and chopped
celery, onion, lettuce and
tomato slices
✓lcup broccoli
✓1 carrot cut into strips
SNACK
✓1 cup low-fat yogurt
DINNER
✓1 jcups spaghetti or other
pasta:
• 3 oz. 90% lean ground beef,
cooked and drained
•jcup spaghetti sauce
• 2 tbs. Parmesan cheese
• sautéed mushrooms, onion,
and lcup zucchini
✓jcup spinach, steamed
✓1 small green salad with
low-fat dressing

EAT SMART Nutritional Guide with 6 Week Step By Step Training Program
28
body. The digestion of any food requires an expenditure of energy by the body. Once the food is digested, it
releases its own stored energy in the form of calories, which are then either used (“burned”) or stored,
mostly as fat. Sometimes, the number of calories in a food is lower than the number of calories it takes to
chew and digest it. The act of eating, for example, celery or cucumber, can be a weight losing proposition all
by itself — without exercise or anything! Now isn’t that interesting...?
• Alfalfa sprouts
• Beet greens
• Broccoli - (a close call)
•Cabbage
• Cauliflower - (a close call)
•Celery
• Chard, Swiss
•Chives
•Cucumber
• Eggplant - (a close call)
•Endive
•Garlic
•Lettuce
•Mushrooms
• Peppers - (a close call)
•Radishes
• Seaweeds of all kinds
•Spinach
• Tomato - (a close call)
• Turnip greens
• Water chestnuts
• Watercress
Vegetables whose digestion can use more calories than they contain include:
Food Preparation
This subject could fill a book all by itself. The essential point to remember is, once again, toavoid added
fats and oils! Do not fry with oil. Use non-stick pans and fry with water. A little experimentation and you’ll
see how easy this is. Also remember that any menu that contains oil, butter or margarine can easily be made
as well or nearly as well without those ingredients. You must experiment to apply this concept to every one
of your favorite recipes, but the reward for doing so is very high. It will mean better and better health as well
as greater and greater success.
Food Timing
The best way to arrange your food day is to spread out your daily intake into several meals, as opposed
to eating, say, one large meal per day. Studies have shown that when two comparable groups of people eat
the same number of calories but on different schedules, the group that eats one large meal per day gains
weight and feels worse, while the group that spreads its calories out during the day feels better and gains
no weight.
Other studies indicate that when food is eaten late in the day, closer to bedtime, weight is gained as com-
pared to no weight gain when the same food is eaten earlier in the day.
Therefore, LARGEST MEAL=Lunch, SMALLEST MEAL=Dinner, MODERATE MEAL=Breakfast.
This is the optimal way to arrange your days. The typical large dinner with which most people are
familiar is problematic because the natural daily rhythms of the body are such that evening is when it is
preparing for rest, not a large meal. More importantly, food eaten late in the day is much more likely to be
converted to stored body fat. So eat a very light meal for dinner — salad, perhaps soup and a small side dish.
Not much more. Remember: food eaten this late will almost certainly be converted to body fat; and body fat,
once accumulated, comes off much slower, and with much greater difficulty, than it goes on - a fact with
which many people are already familiar.
Breakfast can go either way. If you’re hungry in the morning, by all means, eat away. If not, eat lightly.
Follow your body’s signals.
EAT SMART Nutritional Guide with 6 Week Step By Step Training Program
27
SUPER SLIM DIET PLAN
Don’ts
It is very important to avoid added fats, not just because they’ll make you fat, but because
they’ll also make you sick, linked as they are to such disorders as breast and colon cancers, heart disease,
and other serious illnesses.
Eliminating added fats and oils means avoiding:
•Margarine,
•Mayonnaise,
•Butter,
•Oily salad dressings,
•Chips of all kinds (unless they’re baked),
•Fried foods,
•French fries,
•Cream cheese,
•Ice cream,
•Lard
Note that if you don’t like salads without dressing — try lemon juice and seasoning salt.
It’s delicious! Or... try any of the oil-free salad dressings now widely available.
All the above-listed items are horrible for you. But the hydrogenated products such as margarine, may-
onnaise, and all heated fats and oils are the worst, as they are high in trans fats, substances that form when
fat or oil is heated or heavily processed. Trans fats are directly implicated in the onset and/or exacerbation
of obesity, cardiovascular disease and cancer. Avoid these “foods” at all costs.
T
ry to avoid processed foods high in sugar and white flour. Check your labels and do not eat anything
that has too much of these items in the ingredient list, as they too contribute to obesity and ill health.
DOs
1) ALWAYS BALANCE YOUR FOOD INTAKE -- so that your intake of carbohydrates (all flour
products such as bread, pasta, etc., and all sweet foods) approximately matches your intake of
protein (e.g., meat, fish, fowl, egg, milk products, soy products). You may do this by simply
eyeballing the foods you are eating. Example: if you have a dish full of pasta in front of you
(high carbs) then you need to balance it with what you approximate to be an equal amount
(by volume or better, by weight) of high protein food. The best high protein foods are those fat-free
turkey or chicken breast deli slices found in the deli section of your supermarket. They are
inexpensive, and they are pure protein, with NO fat, NO carbs. Note that egg whites are also pure
protein, and may be eaten in just about any (reasonable) quantity.
2) DRINK PLENTY OF WATER! Try to drink eight 8 ounce glasses of water each day, or more.
It is usually best to use bottled spring or distilled water, since the water in most areas
today is heavily treated with chlorine and other unhealthful chemicals.
3) The BEST possible foods to eat are green vegetables: eat all you want of them (within reason,
of course). And remember not to ruin things for yourself by adding oily salad dressings!
There are several vegetables that actually use up more energy getting digested than they bring to your

EAT SMART Nutritional Guide with 6 Week Step By Step Training Program
30
• Avoid creamy foods. Many dishes that are normally prepared with cream are just as tasty without it.
Ask the kitchen to prepare it the way you want it.
• Order a salad first, the larger the better, and ask that it be brought out immediately. Avoid the
oily/creamy dressings, and eat the salad as soon as it comes out. This will help “take the edge off” your
hunger, help you resist the temptation to eat those unhealthful white flour rolls and butter, and get
you started in the right direction.
• Resist the temptation to order dessert. If you must do so, get one that is as close to “real
recognizable food” as you can get. A cup of fruit, or a fruit tart may do. In any event, avoid the creamy
cakes and pies.
• In general, do not be afraid to ask for what you want. If they say “no”, say “good-bye”. There are
plenty of restaurants that will be only too happy to accommodate you, so don’t put up with anything
less than what you know is right for your body.
Cheating (Indulging)
OK, we all know you’re going to do it. Nobody’s perfect.
That’s why we use that well-worn euphemism... “indulging”, instead of “cheating”.
The secrets of success are:
•Don’t “indulge” too often, and
•If you do cheat, choose ways that are not so bad for you; i.e., minimize the damage.
There is no quota for “cheating”. We urge you to strive for perfection. If you find yourself succumbing
once in a while, consider it cheating, not your “quota of bad stuff for the week”. You should always strive to
reject your old, bad ways — to renew your dedication to yourself and to the new body and health you are
determined to achieve.
But if you are going to cheat, at least don’t eat all of whatever you’re cheating with. Leave some to throw
out. That way you’ll get in the habit, and someday you may find yourself throwing it out before you eat it!
EAT SMART Nutritional Guide with 6 Week Step By Step Training Program
29
Lunch is the perfect time to eat your largest meal of the day, if you have one. There’s plenty of time left
to burn it off, and the satiety will probably last well into dinnertime, thereby helping to keep dinner small.
When to Eat, When to Stop
Naturally thin people typically follow both of these two simple patterns:
1) Eat only when hungry; and
2) Stop eating when no longer hungry.
This is how primitive man ate, a good indication that it is the way nature intended. Most of us have been
conditioned to eat when it’s time to eat: lunchtime, dinnertime, breakfast. But the truth is that it is far more
natural to eat when you’re hungry. That means truly hungry, not just craving food. As much as possible, try
to follow this simple but powerful principle of eating.
The second timing principle - to stop eating when you’re no longer hungry - is also very powerful,
but may contradict some childhood training. Remember “Eat! Children are starving in India/ Somalia,
wherever...”?
That may be true, but it is certainly no reason to stuff yourself. Childhood lessons are not always good
ones. The most natural time to stop eating is when you’re full, which is, surprisingly, not what most of us
do. This principle means that you should stop even if 95% of the food is still left on your plate or if only 5%
is left. It doesn’t matter. The amount of food on the plate is of no importance; it is completely arbitrary and
irrelevant to your body’s needs. What is important is only how you feel. If you’re satisfied... if the hunger is
gone... STOP.
If you can master these two basic eating concepts, you will, to a large extent, master your nutritional and
weight situation forever.
Restaurant Eating
This is a particularly troublesome area. Restaurants, for some unknown reason, love oil. Even simple sal-
ads are drowned in truly ridiculous amounts of oil. This abuse of oil is the single biggest problem with eat-
ing in restaurants.
Food freshness is also an area of concern. Fish, poultry and meat, in descending order, are most likely
to be problematic. Be careful. Ask plenty of questions, particularly about freshness. If there is any reason to
believe your food is not fresh, order something else, or leave.
When ordering in a restaurant follow these simple rules:
• Always ask how much oil is in the dish(es) you wish to order.
• Insist that the dish(es) you want be made with no oil, or at worst, a very small amount.
• Refuse any offer of sprinkled cheese to go over your food.
• Order salads with vinegar dressing only, or lemon wedges that you can squeeze onto the salad. If you
must order dressing from the house, get one that separates, like vinaigrette, so that you can pour
off the oil that floats on top, using only the tasty part below the oil. Or bring your own, healthful
salad dressing.
•Never order anything that is deep fried! Remember to ask about this, because there are many more
foods that are deep fried than is obvious from most menus. For example, Italian restaurants often deep
fry their “eggplant parmigiana”. You must ask, and avoid all foods that are so prepared.
Other manuals for Pilates Power Gym
1
Table of contents
Other Thane Fitness Home Gym manuals

Thane Fitness
Thane Fitness BODYROW User manual

Thane Fitness
Thane Fitness AB-DOer User manual

Thane Fitness
Thane Fitness Total FLEX User manual

Thane Fitness
Thane Fitness Rockin' ABS User manual

Thane Fitness
Thane Fitness WAVERTONE 180 AB2360 Operating and maintenance manual

Thane Fitness
Thane Fitness Power Gym User manual


