The Fireplace Fogata Guide

FOGATA FIREPIT
INSTALLATION AND ASSEMBLY INSTRUCTIONS
12/2013
WARNING
THIS FIRE MUST NEVER BE USED INDOORS OR FOR ENCLOSED HEATING IN AN INDOOR SITUATION
The Fireplace Ltd reserves the right to alter or amend the specifications due to improvements or otherwise of
this fireplace without further notice.
HANDLING & WEIGHTS
All of the Fogata components are made from a special heat resistant concrete.
• It is highly recommended that each unit is treated with care to avoid any chipping or damage during movement
between one location and another. DO NOT drop or mishandle these as they are not repairable if damaged
beyond effective use. Replacement components can be ordered should any damage occur.
• It is recommended if the Fogata is to be stored for any length of time, that each Fire Bowl segment is stacked
on top of each other in a reverse manner with the curved sections facing down.
• DO NOT stack any higher than 3 segments on top of each other. Use of Bubble Wrap or corrugated cardboard
between each segment will help them protect from scratching or chipping.
• The Fogata Fire Bowl segments do not require any jointing compound and rely on the mass of the units and
their shape to “lock” into place once correctly positioned.
• Each of the 6 legs weighs 14kg each making a total weight of 84kg.
• Each of the 6 Fire Bowl segments weighs 15.5kg each making a total weight of 93kg.
• The Stainless Steel Ring weighs approx. 2kg.
• Total all up combined weight is 180kg.
F1

• Stainless Steel Locating Ring
• Concrete Legs (x6)
• Fire Bowl segments (x 6)
• Temporary dowel supports (not shown)
• Instruction SheetsUsers MUST observe any
open fire restrictions that may apply at any time.
Fogata Components
Locating your Fogata is a matter of personal choice, but some general cautions should be observed when doing so.
• The Fogata is able to be safely installed onto a timber deck. However, for timber deck locations, it is recommended
that the Fogata should be positioned centrally onto a sheet of 6mm thick non combustible board approx. 1200mm
square.
• There should be a “safe” perimeter of approximately 2 metres radius away from any surrounding combustibles.
• The Fogata MUST be positioned so that there is no overhead hindrance such as a roof, plants, trees or portico etc.
above it.
• The Fogata, by its very construction, is able to be located in various locations as it is “portable” in nature and does
not require any permanent fixings to position it.
Users MUST observe any open fire restrictions that may apply at any time.
seLeCtIng a LoCatIon & pLaCement
F2
The Fogata has a unique “locking ring” made from stainless steel to tie the 6 legs into position before the Heat bowl
segments are positioned in place.
It is important to mark off 6 equidistant marks onto the SS ring which signifies the location of each and every joint,
which will be located centrally on each leg. (Fig 3)
• The SS ring is able to be marked off with the 6 equidistant marks quite simply, using a tape measure and an
indelible pen.
• Measure the diameter of the ring (approx. 650mm) and halve this (approx. 325mm).
• Place a mark on the SS ring with the pen on a 325mm (or thereabouts) arc.
• Place the tape end on this point and scribe off two marks either side of the first.
• Repeat the process using the new scribed marks and when completed, there should be 6 equally spaced marks
around the perimeter of the ring when finished. Make any slight adjustments that may be required to achieve this if
necessary, ensuring any difference is divided between all 6 measured marks.
You are now ready to set up the legs of the Fogata in preparation of adding the fire bowl segments.
maRKIng Up tHe ss RIng FoR posItIonIng
Concrete Legs (x6)
Stainless Steel Ring
Heat Bowl Segments (x6)
Fig. 2
Please note:
The components shown
are of a Fogata that has
been trial burnt with a
test fire.

• Locate the SS ring in the middle of the Fogata’s final location such that the marked points on the SS ring align to
where the legs are to be positioned.
• Position the 6 legs to be located centrally against each of the 6 marked points on the SS ring.
posItIonIng tHe ss RIng (Refer to Fig.3) F3
Fig. 3
• Set each leg up so that the SS ring sits in the locating groove on the legs.
• In the back of each leg is located a small hole in which to insert a dowel (or similar) as a temporary support to
prevent the legs from toppling over. These are removed once the Fogata is assembled. These dowels or sticks need
to be approx. 170mm long.
• It is best to set each leg up with the one directly opposing it so as to maintain balance during this process.
• Once the 6 legs are in place and the SS locking ring is positioned so that each mark coincides with the middle of
each leg, you are now ready to add the Fire bowl segments.
settIng Up Legs WItH BaCK sUppoRts (Refer to Fig 4)
Fig. 4

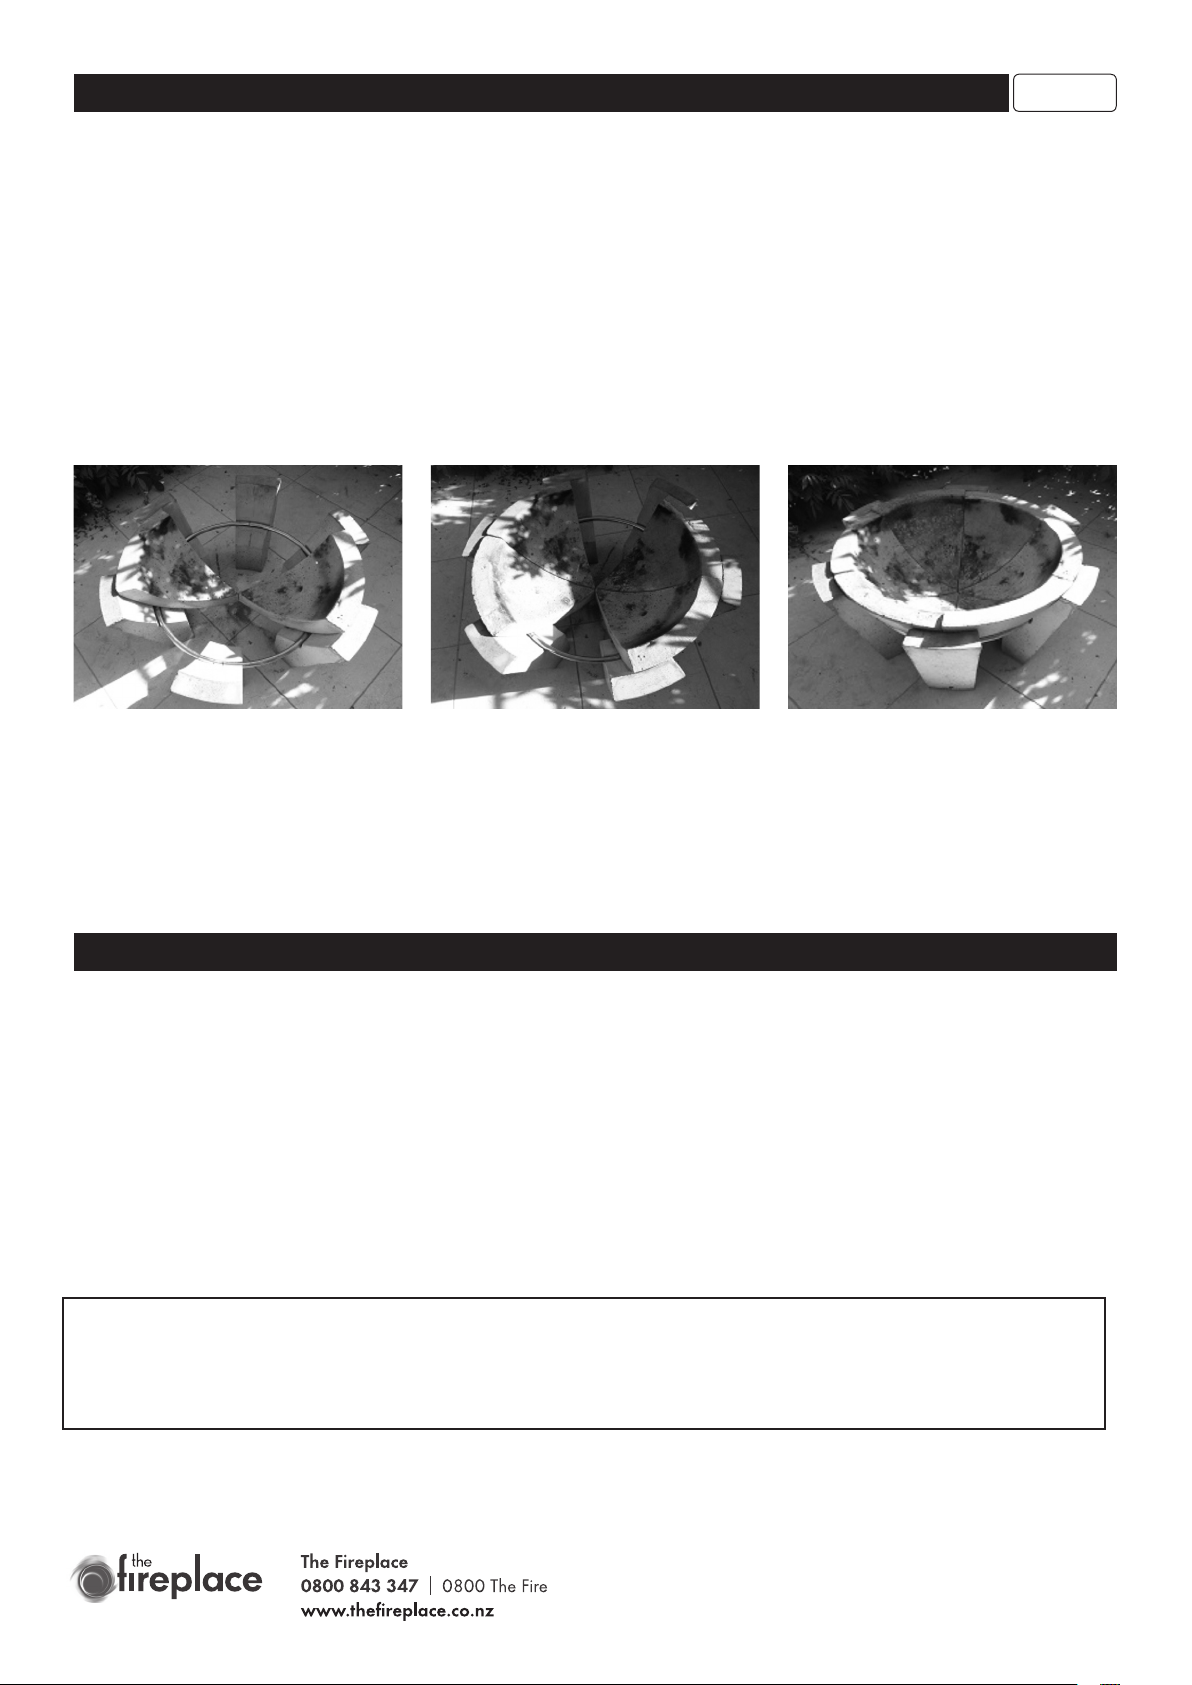
pLaCement oF tHe FIRe BoWL segments F4
The geometric design of the Fogata is designed to lock
all components into position by way of its overall mass
(weight) and friction between the Fire Bowl segments.
Once a fire is lit, additional minute ash and burnt carbon
particles will also help to create additional friction
between each segment joint as it consolidates.
As these concrete components are hand made, each
segment is trial fitted at the factory and numbered 1 – 6
in chronological order. They should be fitted in this same
numbered sequence.
If required, a small block of wood or similar approx.
90mm high, can be placed in the centre of the Fire bowl
at base level. This can be used as a temporary support
for the heat bowl segment tips (refer to Fig 5) while these
are being added to the structure and removed once all
segments are in place.
Lay opposing sides as shown in the following pic’s.
LIgHtIng anD WooD LoaDs
The Fogata is designed for burning wood only and we recommend the following;
Build the initial wood loading to be only slightly higher that the top lip of the Fogata and stack the wood in a tepee
fashion into the middle. Ideally, lengths of wood 200 – 250mm long should be used and split into sections approx.
50 – 70mm in section.
You can use Beehive log lighters in preference to wood and kindling, as these provide a good start to any fire.
Once the fire is lit, let it burn down to establish an ash/coal base before adding more firewood to suit.
Avoid lighting the fire in windy conditions or in unprotected surrounds from wind influence.
The fire performs extremely well on low wood loads and use of a mix of softwoods (pine) and hardwoods (manuka or
gum) will provide an excellent coal base. Retain these coals/ash once the fire has been extinguished, for later base
building.
The Fogata will retain its heat for many hours following die down of the fire. DO NOT leave the fire in
an unattended condition while still burning. Extinguish it entirely with water or sand before retiring.
DO NOT use the Fogata during local fire bans. Always check with your local council if in doubt.
Fig 5 is with 2 Fire bowl segments
Fig 6 is with 4 heat bowl segments fitted
Fig 7 is the Fogata fully assembled and temporary supports removed.
Fig. 5 Fig. 6 Fig. 7
Table of contents
Other The Fireplace Outdoor Fireplace manuals
Popular Outdoor Fireplace manuals by other brands

Outdoor Plus
Outdoor Plus OPT-R8424PCR manual

Hiland
Hiland Premium Series owner's manual

Members Mark
Members Mark FP2342607-MM Assembly instructions & user manual

RST
RST Milo Fire Table Assembly instructions

Courtyard Creations
Courtyard Creations TRS42GN Assembly instructions

Signature Design by Ashley
Signature Design by Ashley P040-772 user guide

StoneBilt Concepts
StoneBilt Concepts Telluride installation instructions

Monessen Hearth
Monessen Hearth ODWR400 Brochure & specs

Agio
Agio 294448 manual

Endless Summer
Endless Summer Kingston owner's manual

Outdoor GreatRoom Company
Outdoor GreatRoom Company CV-30 installation guide

Regency
Regency Horizon HZO60-NG Owners & installation manual