The Handy THHPWVAC Installation and operation manual

193889001 07/01/2016
OPERATOR’S MANUAL & PARTSLIST
MODEL –THHPWVAC
2 IN 1 PRESSURE WASHER WITH WET & DRY VACUUM
SAVE THESE INSTRUCTIONS
SPARES & SUPPORT: 01793 333212
Please read & understand this manual, paying particular attention to the safety instructions,
before use.
The manufacturer reserves the right to change the product specification and livery
according to continued product improvements.


CONTENTS - PRESSURE WASHER
SPECIFICATION
SAFETY INSTRUCTIONS
MACHINE CONTENTS
ASSEMBLY
OPERATION
MAINTENANCE & STORAGE
PARTS DIAGRAM & LIST
TROUBLESHOOTING
SPECIFICATION –PRESSURE WASHER
Model
THHPWVAC
Product Number
193889001
Weight (N.W & G.W) (Kgs)
13.5 & 15.5
PRESSURE WASHER
Voltage
230v / 50hz
Pressure (Bar)
90 –Max 150
Watt
1700
Protection
IPX5
Max Temp Water Inlet
40℃
Max Pressure Water Inlet
0.6MPa
Water Flow (Litre Per Hour)
400
Electrical Cable Length (Metre)
5
High Pressure Hose Length (Metre)
5
The manufacturer reserves the right to change the product specification and livery
according to continued product improvements.

SAFETY INSTRUCTIONS –PRESSURE WASHER
Read and understand the owner’s manual and labels affixed to the product. Learn its
application and limitations as well as the specific potential hazards. Retain these
instructions for future reference. The operator is responsible for following the warnings &
instructions in this manual and on the product.
WARNING LABELS/SYMBOLS
Read & understand operator’s manual
before using the machine. Failure to
follow instructions could result in
death or serious injury.
Do not smoke which using this machine
Double insulated or class 2 electrical
appliances are products that have been
designed in a way so as not to require a
safety connection to electrical earth
(These products must NOT have a
safety connection to Earth).
Do not use near a flame, or sparks
To reduce the risk of electric shock,
always unplug tool after use. Always
unplug tool before changing parts or
servicing. Failure to do so could result
in serious injury or death
Acoustic power level LWA accordance
with directive 2000/14/EC + 2005/88/EC
(Please see machine for actual reading)
This is the safety alert symbol. It is used to alert you to potential personal injury hazards.
Obey all safety messages that follow this symbol to avoid possible injury.
DANGER
Indicates an imminently hazardous situation which, if not avoided, will result in serious
injury.
WARNING
Indicates a potentially hazardous situation which, if not avoided, could result in serious
injury
CAUTION
Indicates a potentially hazardous situation which, if not avoided, may result in minor or
moderate injury.
CAUTION
Used without the safety alert symbol indicates a potentially hazardous situation which, if not
avoided, may result in property damage.

THIS PRODUCT IS INTENDED FOR HOUSEHOLD USE ONLY.
IF USED COMMERICALLY THE WARRANTY IS VOID.
IMPORTANT SAFETY INSTRUCTIONS
WHEN USING AN APPLIANCE, BASIC PRECAUTIONS SHOULD ALWAYS BE FOLLOWED,
INCLUDING THE FOLLOWING:
WARNING
READ AND UNDERSTAND ALL INSTRUCTIONS. FAILURE TO FOLLOW ALL INSTRUCTIONS
LISTED BELOW MAY RESULT IN ELECTRIC SHOCK, FIRE, AND/OR SERIOUS PERSONAL
INJURY.
WARNING
HIGH PRESSURE JETS CAN BE DANGEROUS IF SUBJECT TO MISUSE. THE JET MUST NOT BE
DIRECTED AT PERSONS, ANIMALS, ELECTRICAL DEVICES, OR THE MACHINE ITSELF.
STAY ALERT - Do not operate the machine while under the influence of drugs, alcohol, or
any medication that could affect your ability to use it properly. Do not use this machine
when you are tired or distracted from the job at hand. Be aware of what you are doing at all
times. Use common sense.
AVOID DANGEROUS CONDITIONS - Make sure there is adequate surrounding workspace.
Cluttered areas invite injuries.
Keep your work area clean with sufficient light. Keep the area around the machine clear of
obstructions, grease, oil, rubbish and other debris which could cause persons to fall onto
moving parts.
Do not use it in areas where fumes from paint, solvents or flammable liquids pose a
potential hazard.
Do not operate the appliance on a slope that is too steep for safe operation. When on
slopes, slow down and make sure you have good footing.
INSPECT YOUR MACHINE - Check all bolts, nuts, and screws for tightness before each use,
especially those securing guards and drive mechanisms. Vibration during use may cause
these to loosen.
Form a habit of checking to see that all other tools/equipment are removed from the
machines area before turning it on.
Replace damaged, missing or failed parts before using it. Warning labels carry important
information. Replace any missing or damaged warning labels.
DRESS PROPERLY - Do not wear loose clothing, gloves, neckties, or jewellery. They can get
caught & draw you into moving parts. Rubber gloves and non-skid footwear are
recommended, working outdoors. Also wear protective hair covering to contain long hair.
WEAR APPROPRIATE FOOTWEAR - Do not operate the equipment while barefoot or when
wearing sandals or similar lightweight footwear. Wear protective footwear that will protect
your feet and improve your footing on slippery surfaces.
DO NOT ABUSE THE CABLE - Never carry the machine by the electrical cable or yank it to
disconnect the plug from the mains supply.
Keep the cable from heat, oil and sharp edges.

AVOID ELECTRICAL SHOCK - The use of a Residual Current Device (“RCD”), on 230V electrics
is recommended.
Check the electric circuit is adequately protected and that it corresponds with the power,
voltage and frequency of the machines motor. Do not plug or unplug the motor while
standing in or around damp or wet ground. Do not use the machine in wet or damp areas or
expose it to rain. Prevent body contact with grounded surfaces: pipes, radiators, ranges, and
refrigerator enclosures.
Make sure your fingers do not touch the plug’s metal prongs when plugging or unplugging
the machine.
EXTENSION CABLES - Use only extension cords that are intended for outdoor use. These
extension cords are identified by a marking “Acceptable for use with outdoor appliances;
store indoors while not in use.” Use only extension cords having an electrical rating not less
than the rating of the product. Do not use damaged extension cords. Examine extension
cord before using and replace if damaged. Do not abuse extension cord and do not yank on
any cord to disconnect. Keep cord away from heat and sharp edges. Always disconnect the
extension cord from the receptacle before disconnecting the product from the extension
cord. Always plug the extension cord into a GFCI protected outlet.
To avoid the possibility of the tool plug getting wet when using an extension cord, arrange a
“drip loop” in the cord connecting the pressure washer to the extension cord. The “drip
loop” is that part of the cord below the level of the connector which prevents water
travelling along the cord and coming in contact with the connection. If the plug does get
wet, DO NOT unplug the cord. Disconnect the fuse or circuit breaker that supplies power to
the tool, then unplug and examine for presence of water in the connection.
WARNING
To reduce the risk of electrocution, keep all connections dry and off the ground. Do not
touch plug with wet hands.
KEEP BYSTANDERS AND CHILDREN AWAY - Keep unauthorised persons a minimum distance
of 10 metres away from the machine. Do not allow children to handle, climb on the
machine.
NEVER DIRECT A WATER STREAM TOWARD PEOPLE OR PETS, OR ANY ELECTRICAL DEVICE.
CHECK DAMAGED PARTS. - Before further use of the product, a guard or other part that is
damaged should be carefully checked to determine that it will operate properly and perform
its intended function. Check for alignment of moving parts, binding of moving parts,
breakage of parts, mounting, and any other conditions that may affect its operation. A guard
or other part that is damaged must be properly repaired or replaced by an authorized
service centre to avoid risk of personal injury.
DO NOT OVERREACH - Keep proper footing and balance at all times when using the
machine. Never stand on the machine. Serious injury could occur if the moving parts are
unintentionally contacted. Do not store anything above or near the machine where anyone
might stand on the machine to reach them.
AVOID INJURY FROM UNEXPECTED ACCIDENT - Keep hands out of the way of all moving
parts. Do not place any part of your body or any tool during operation.
DO NOT FORCE TOOL - This product is only designed for pressure washing and vacuuming
only
NEVER LEAVE MACHINE RUNNING UNATTENDED - Turn Power Off. Do not leave the
machine unattended until it has come to a complete stop.
DO NOT USE PRODUCT IF SWITCH DOES NOT TURN IT OFF. - Have defective switches
replaced by an authorised service dealer.
MAINTAIN YOUR MACHINE WITH CARE - Clean the machine immediately after use. Keep
the machine clean to ensure it operates to its full and safest performance. When
maintaining this machine, only the manufacturer’s original replacement parts should be
used. The use of non-original manufacturer parts may invalidate your warranty.
PROTECT THE ENVIRONMENT - Take left over materials to an authorised collection point
or follow the stipulations in the country where the machine is used. Do not discharge into
drains, soil or water.
STORE IDLE EQUIPMENT - When not in use, the machine should be stored in a dry location.
Keep the machine away from children and others not qualified to use it.
ONLY USE APPROVED REPLACEMENT PARTS - Only use approved replacement parts.
Unauthorised replacement parts can cause damage to the machine and invalidate your
warranty.
RESIDUAL RISK - Even with the intended use of the appliance there is always a residual risk,
which cannot be prevented. Common sense is the responsibility of the user and not the
manufacturer.
ELECTRICAL CONNECTION
Do not connect either core to the earth pin
The insulation on the grounded three metre electrical cord will only remain effective if the
original insulating parts are used for repairs and the spaces between the original insulation
are maintained.
The use of a Residual Current Device (“RCD”), on 230V electrics is recommended. If using an
extension cable, plug it directly into the RCD.
DOUBLE INSULATION
Double insulation is a concept in safety in electric power tools, which eliminates the need
for the usual three-wire grounded power cord. All exposed metal parts are isolated from the
internal metal motor components with protecting insulation. Double insulated products do
not need to be grounded.
WARNING
The double insulated system is intended to protect the user from shock resulting from a
break in the product’s internal insulation. Observe all normal safety precautions to avoid
electrical shock.

MACHINE CONTENTS –PRESSURE WASHER
Remove the product & contents from the carton. Be sure the carton is empty before
discarding.
If you require any assistance with regards to the contents of the Tiller, please contact us:
Tel: 01793 333212 - Mon –Fri 8.30am –5.30pm (excl. Bank Holidays)
Email: [email protected]
PRESSURE WASHER
Presssure Washer
High Pressure Hose (5m)
Trigger Gun
Multi Lance
Power Lance
Extension Lance
Wash Brush
Patio & Deck Cleaner
WARNING
If any parts are damaged or missing, do not operate this product until the parts are
replaced. Use of this product with damaged or missing parts could result in serious
personal injury.
WARNING
Do not attempt to modify this product or create accessories not recommended for use
with this product. Any such alteration or modification is misuse and could result in a
hazardous condition leading to possible serious personal injury.
WARNING
Do not connect to power supply until assembly is complete. Failure to comply could result
in accidental starting and possible serious personal injury.
ASSEMBLY –PRESSURE WASHER
WARNING
NEVER change nozzles without engaging the lock-out on the trigger handle and never
point the wand at your face or at others. The quick-connect feature contains small springs
that could eject the nozzle with some force. Failure to heed this may cause personal
injury.
TO INSTALL A LANCE
•Push the end of the Lance into the Trigger Gun and rotate clockwise to secure.
•Pull on the Lance to be certain it is properly secured.
TO REMOVE A LANCE
•Turn off the pressure washer and shut off the water supply. Pull the Trigger to release
water pressure from the machine.
•Push in the Lance towards the Trigger Gun & rotate counter clockwise to remove.

CONNECTING HIGH PRESSURE HOSE TO TRIGGER HANDLE
•Push the Hose Lock downwards
•Insert the High Pressure Hose
•Push the Hose Lock upwards
•Pull on the hose to be certain it is correctly secure.
CONNECTING HIGH PRESSURE HOSE TO MAIN UNIT
Push the end of the high pressure hose into the Pressure Washer Outlet and turn clockwise
to secure.
CONNECTING THE GARDEN HOSE TO MAIN UNIT
CAUTION
Always observe all local regulations when connecting hoses to the water main. The water
supply must come from a water main. NEVER use hot water or water from pools, lakes,
etc.
WARNING
The temperature of the incoming water must not exceed 40℃
Before connecting the garden hose:
•Run water through the garden hose for 30 seconds to clean any debris from the hose.
•Inspect the screen in the water inlet.
•If the screen is damaged, do not use the machine until the screen has been replaced.
•If the screen is dirty, clean it before connecting the garden hose to the machine.
•With the garden tap turned completely off, attach the garden hose to the machine,
using a standard Garden Hose Connector (Not supplied).
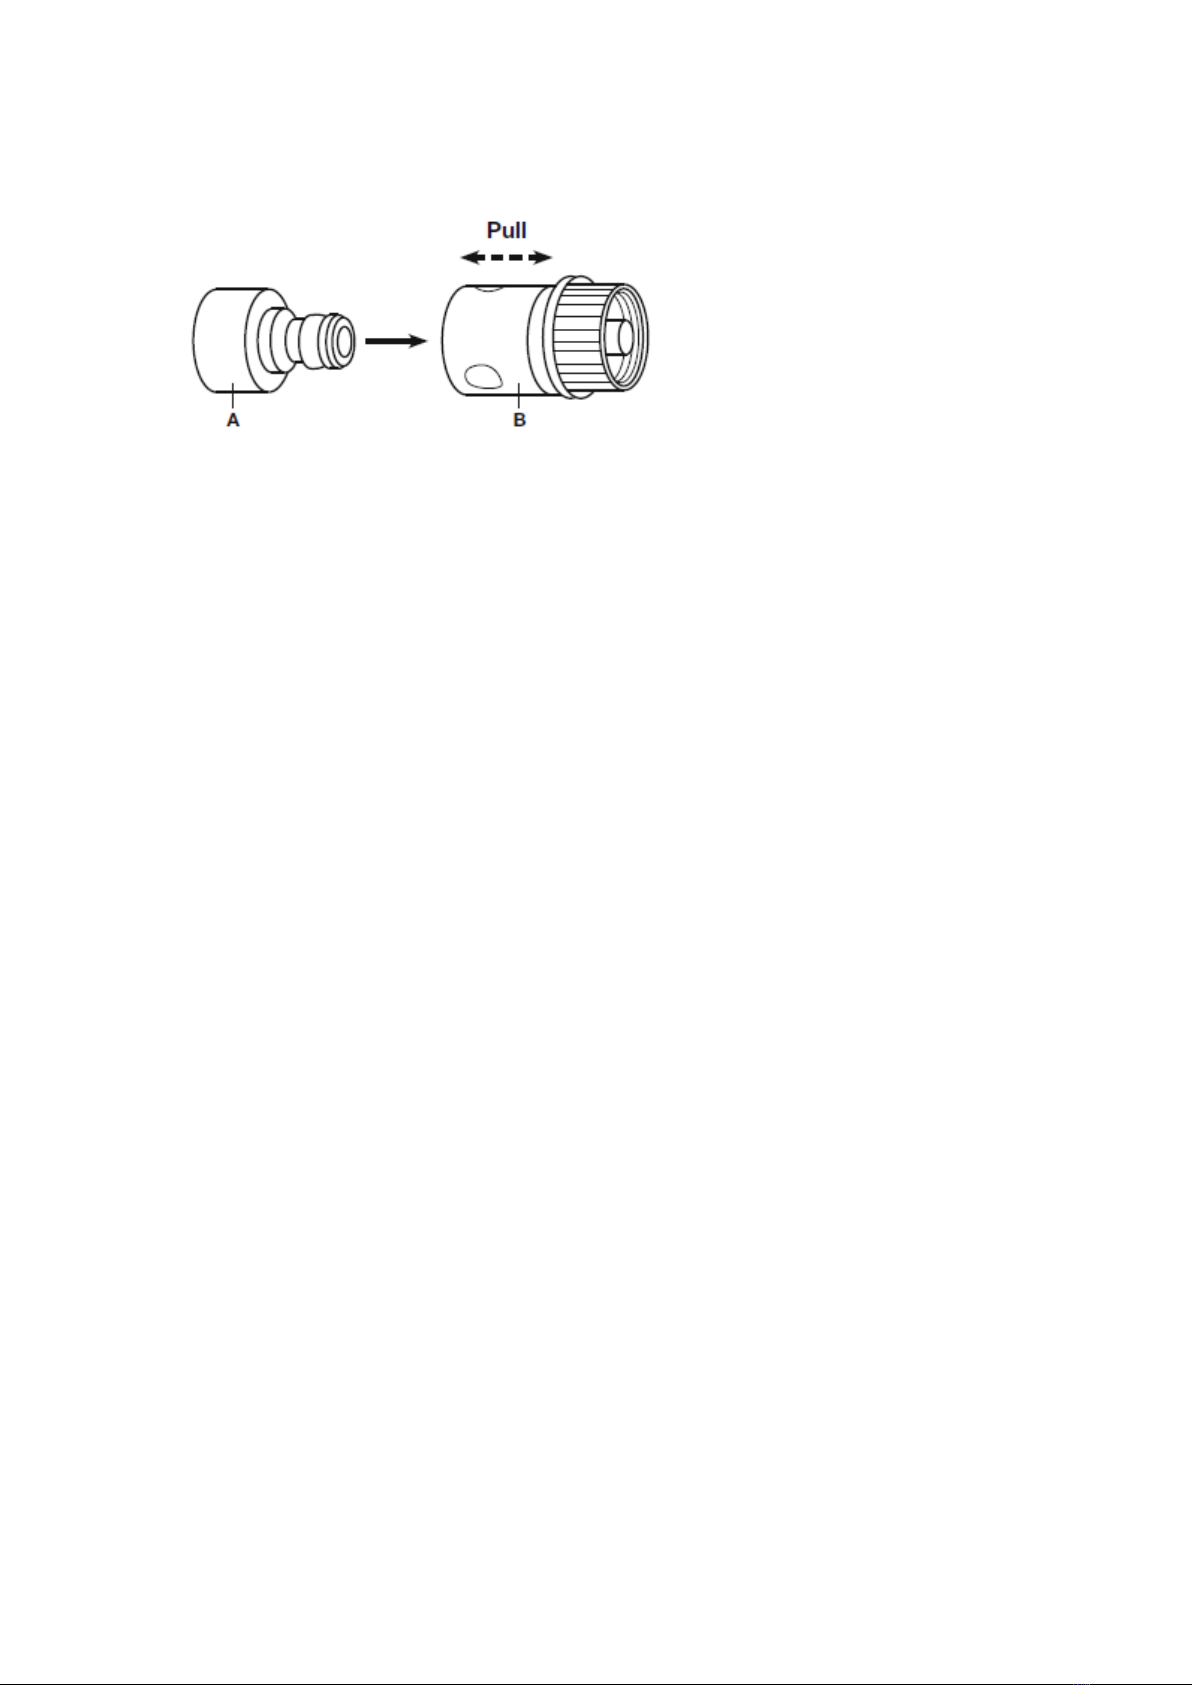
HOW TO ATTACH A QUICK CONNECTOR?
This Pressure Washer includes an easy to use Quick Connector. The quick connect system
consists of a male end nozzle (A) and a female end coupler (B), and will come assembled and
attached to the Pressure Washer.
With the hose faucet turned off, disconnect the female coupler from the nozzle by pulling
back on the collar in the direction away from the pressure washer. Secure the female
coupler to the hose end by tightening the threads of the two pieces.
Attach the garden hose with assembled female hose coupler to the unit by pulling the collar
back & moving the female coupler over top the male end nozzle.
When use of the pressure washer is complete, unthread the garden hose from the female
coupler and leave the entire quick connect system attached onto the unit for easy-to-access
on-board storage.

OPERATION –PRESSURE WASHER
APPLICATIONS
You may use this product for the purposes listed below:
Cleaning boats, bicycles, motorcycles, motor cars, outdoor furniture, grills, guttering, patios,
steps, decking.
ON/OFF SWITCH
This switch turns the pressure washer on and off.
TRIGGER HANDLE
The trigger handle has a gripping surface that provides added control of the spray wand and
helps reduce fatigue.
TRIGGER WITH LOCK-OUT
Pulling the trigger releases a stream of water for high pressure cleaning. The lock-out
provides protection against unauthorized use.
USING THE TRIGGER AND LOCK-OUT
For greater control and safety, keep both hands on the trigger handle at all times.
•Pull back and hold the trigger to operate the pressure washer.
•Release the trigger to stop the flow of water through the nozzle.
TO ENGAGE THE LOCK-OUT:
Push the lock-out button to the left on the trigger until it snaps into place.
TO DISENGAGE THE LOCK-OUT:
Push the button to the right on the trigger.
For the most effective cleaning, the nozzle end of the spray wand should be between 8 in.
and 24 in. from the surface to be cleaned. If the spray is too close it can damage the
cleaning surface.
OPERATING THE PRESSURE WASHER
Use only detergents designed for pressure washers. Many detergents may require mixing
prior to use. Prepare cleaning solution as instructed on the solution bottle.
WARNING
Hold the trigger handle securely with both hands. Expect the trigger handle to move when
the trigger is pulled due to reaction forces. Failure to do so could cause loss of control and
injury to yourself and others.

THE POWER LANCE
For particularly dirty items or areas. Ideal for stubborn stains on driveways, patio’s or moss
covered surfaces. Not suitable for wood or cars. Cannot be used to feed detergents.
THE WASH BRUSH
Suitable for use with detergents. Soft bristles provide protection of car paintwork and glass.
Detergent can be fed through the machine and wash brush to provide a thorough clean.
THE MULTI LANCE
Carrying out the most common cleaning tasks. The work pressure can be regulated "High" &
"Low". “High” pressure can be used on your garden patio, decking or plastic garden
furniture to remove algae. Whilst a lower pressure can be used on your car. The “Low”
pressure setting, will feed detergent onto the areas for cleaning.
TO CLEAN USING DETERGENT:
•The machine is fitted with a clear detergent hose, located at the rear of the machine.
•Use a bottle with detergent and put detergent tube in bottle.
•Install the Multi-Lance and adjust to ‘Low’setting.
•Start the pressure washer and spray the detergent on a dry surface using long, even,
overlapping strokes. To prevent streaking, do not allow detergent to dry on the surface.
TO RINSE:
•Remove the detergent tube from the detergent bottle and store the tube, in the
machine body.
•Using the Multi-Lance, adjust the spray to the high pressure setting.
NOTE: The pressure washer does not dispense detergent when on the high-pressure
setting.
•During rinsing, the distance between the nozzle and the object surface to be cleaned
should not be more than 30cm, as the cleaning force decreases with the increase of the
distance.
•Spray away from the rinsing surface for approximately 10 seconds to allow any
remaining detergent to be flushed from the line.
•Start at the top of the area to be rinsed and work down, overlapping the strokes.
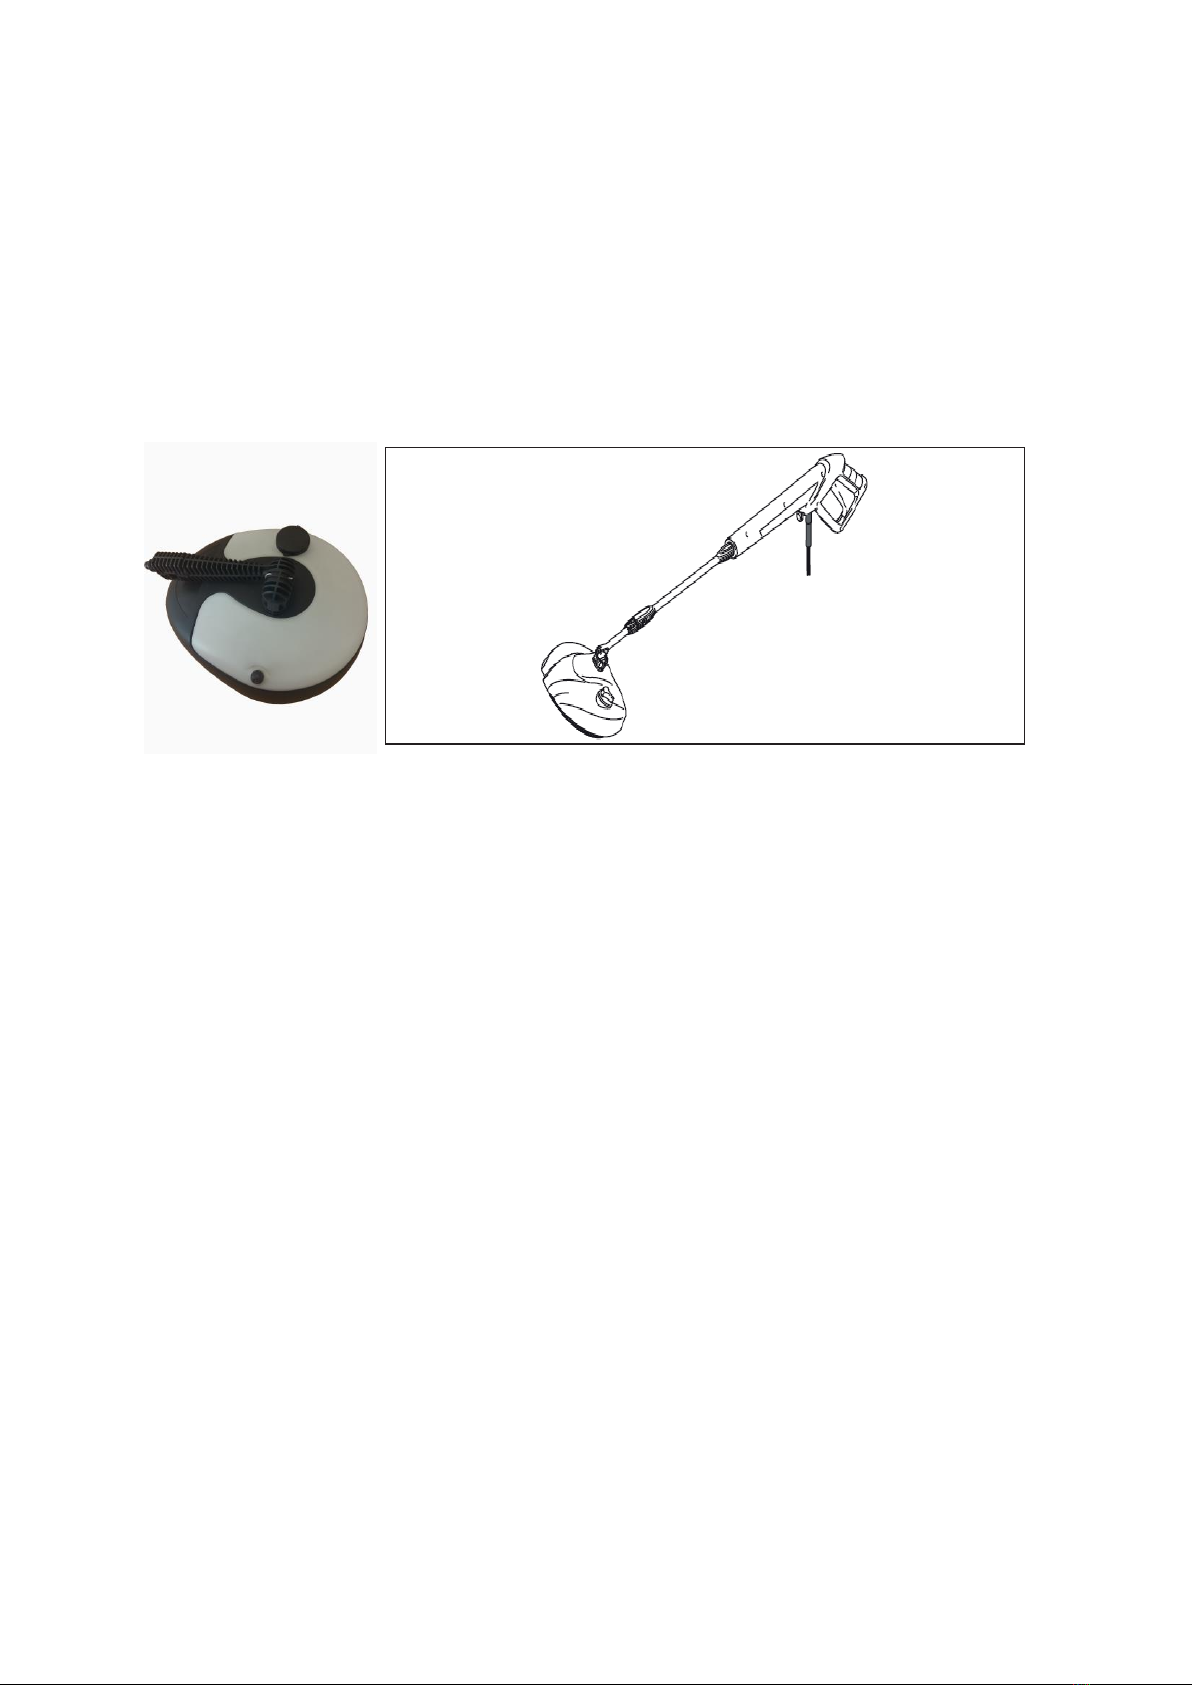
THE PATIO & DECK CLEANER
The Patio & Deck cleaner is ideal for cleaning floor & wall surfaces of different materials. It is
compatible with wood, plastic, concrete, natural stone and tiles. The extension lance,
provides you with extended reach.
Detergent can be entered into the large cap positioned on the top of the cleaner. To release
detergent, adjust the valve positioned on top of cleaner. Close once detergent is no longer
required.
Tips: We recommend the surface is swept prior to cleaning, to avoid damaging the high
pressure nozzles. The cleaner is not recommended for scrubbing at surfaces. Guide the
cleaner over the pre-prepared surface, without effort.
STARTING AND STOPPING THE PRESSURE WASHER
CAUTION:
Do not run the pump without the water supply connected and turned on.
•Connect the garden hose.
•Turn the garden hose on then squeeze the Trigger to relieve air pressure. Once a steady
stream of water appears, release the Trigger.
•After ensuring the ON/OFF Switch is in the OFF (O) position, connect the pressure
washer to the power supply.
•Turn ON (I) on the switch to start the motor.
•To stop the motor, release the trigger and turn the switch to OFF (O).
NOTE: The pressure washer may be on and the system may have pressure even when the
pump and/or motor cannot be heard running. Always use caution around the pressure
washer.
MOVING THE PRESSURE WASHER
•To move the pressure washer:
•Turn the pressure washer off.
•Point the Trigger Gun in a safe direction and pull the Trigger to until all the water
pressure has been released.
•Stand to the rear of the machine
•Tilt the machine toward you until it balances on the wheels, then roll the machine to the
desired position, using the adjustable transport handle.

MAINTENANCE & STORAGE –PRESSURE WASHER
When servicing, use only approved replacement parts. Use of non-genuine parts may create
a hazard or cause product damage, which will invalidate your product warranty.
WARNING
Always wear eye protection with side shields. Failure to do so could result in objects being
thrown into your eyes, resulting in possible serious injury.
WARNING
Before inspecting, cleaning or servicing the machine, shut off the motor, wait for all
moving parts to stop, disconnect the unit from the power supply, and pull the trigger to
release water pressure. Failure to follow these instructions can result in serious personal
injury or property damage.
GENERAL MAINTENANCE
Avoid using solvents when cleaning plastic parts. Most plastics are susceptible to damage
from various types of commercial solvents and may be damaged by their use. Use a clean
cloth to remove dirt, dust, oil, grease, etc.
WARNING
Do not at any time let brake fluids, gasoline, petroleum-based products, penetrating oils,
etc., come in contact with the machine. Chemicals can damage, weaken or destroy plastic
which may result in serious personal injury. We recommend the machine is repaired or
replaced by an authorised service dealer.
PUMP LUBRICANT
The pressure washer pump has been filled with sufficient lubricant at the factory and is
maintenance free. You do not need to check or add lubricant to the pump before initial use.
LANCE MAINTENANCE
Excessive pump pressure (a pulsing sensation felt while squeezing the trigger) may be the
result of a clogged or dirty nozzle.
•Turn off the pressure washer and shut off the water supply. Pull the Trigger to release
water pressure.
•Unplug the pressure washer.
•Remove the Lance from the Trigger Gun.
NOTE: Never point the Trigger Gun & Lance at your face.
•Clean the Lance nozzle, carefully using a suitable sized needle.
•Using a garden hose, flush debris out of nozzle by back flushing (running the water
through the nozzle backwards or from the outside to the inside).
•Reconnect the spray wand to the trigger handle.
•Turn on the water supply.

STORING THE PRESSURE WASHER
Store in a dry, covered area where the weather can’t damage it.
Clean the strainer in the water connection. It can be easily removed with flat-nosed pliers.
WINTER PROTECTION
Frost will destroy an appliance that has not been completely emptied of water. The correct
method is to separate the inlet hose from the water supply system. Turn on the cleaner to
run for about 30 seconds for water extraction. Remove the high-pressure plastic hose to
exhaust the remaining water in it. The appliance had better be stored in a warm room.
CAUTION
The use of a pump protector is recommended to prevent cold weather damage during
storage over the winter months.

PARTS DIAGRAM –PRESSURE WASHER
Note: Some parts are listed & shown for illustration purposes only, & may not be available
individually as replacement parts.
13
14
2120
17
11
19
38
37
2
1
1216
18
28
25
46
36
31
32
27
26
24
30
22
23
45
43
29
33
34
39
40
41
42
44
47
48
58
5756
35
49
50
51
54
5355
52
15
60
3
10
8
4
5
6
7
9
61

PARTS LIST –PRESSURE WASHER
Item No. Part No. Handy Description Qty Item No. Part No. Handy Description Qty
1TH2A210085R Motor Assembly 1 32 THX3592930001R Inside Rod 2
2THA545009A001R Pump Assembly 1 33 THQ918428H13R Inside Rod Cover 2
3THQ0969300H02 Bracket 1 34 THJ334000001R Steel Rod 2
4THD1A01897003R Auto-stop Wire 1 35 THQ9182010H02 Rod Plug 2
5THD3048000002R Micro Switch 1 36 TH222-36 Stopper 2
6THQ1555180B36R Switch Cover 1 37A TH222-37A Wheel Assembly 2
7THQ1558011B55R Switch Bracket 1 37 THQ286150PH02 Wheel 2
8THA5082430001R Quick Connector 1 38 THQ286152PZ98 Wheel Trim 2
9THQ9189020H33R Inlet Connector 1 39 THQ918438PZ98 Main Housing 1
10 THQ9182910B55R Motor Fan Cover 1 40 THQ918439PZ98 Front Cover 1
11 THQ918H410B55R Switch Box Cover 1 41 THJ0010000865R Housing Cover 1
12 THX5422880002R Switch Box Guard 1 42 THJ0010000665R Screw ST4x16FT 12
13 THQ278523AH01 On/Off Switch knob 1 43 THQ918A40PZ98 Rod Left Plug 1
14 THQ278F171B36R Switch knob shaft 1 44 THQ918A41PZ98 Rod Right plug 1
15 THX0000010011R O-ring 1 45 THJ9180290001R Rod Limit Spring 2
16 THD3036000006R Main Switch 1 46 THJ0010000665R Screw ST4x16FT 2
17 THD1AK9689001R Power Cord with BS Plug 1 47 THQ0955580B13R Power Cord Bracket 1
18 THD5000100001R Pressing Cap 1 48 THJ0010000665R Screw ST4x16FT 2
19 THJ0010000156R Screw ST4x16FT 4 49 THG9180390001 Air-out Waterproof Sponge 1
20 THQ542B080H02 Fixing Plate 1 50 THG9180380001 Inlet Air Waterproof Sponge 1
21 THJ0010000156R Screw ST4x16FT 4 51 THG9180360001 Water Outlet Waterproof Sponge 1
22 THQ918K20AH01 Transport Handle Cover 1 52 THZ12000000012 Suction Pipe 1
23 THQ918007AZ98 Transport Handle Button 1 53 THX0951610002R Grommet 1
24 THQ918683AH01 Transport Handle 1 54 THJ2640370005R Suction Pipe Spring 1
25 THQ918358AH01 Front Cover Accessory Bracket 1 55 THQ358B310B02 Filter 1
26 THQ918363AH01 Back Cover Accessory Bracket 1 56 TH222-56 Trigger Gun 1
27 THQ918581AH01 Power Cord Cable Hook 2 57 TH222-57 Multi Lance 1
28 THQ918901PH02 Trigger Gun Holder 1 58 TH222-58 High Pressure Hose 1
29 THJ0010000037R Screw STx12FT 4 59 TH222-59 Power Lance (Not Imaged) 1
30 THJ0010000784R Screw ST4x12 13 60 TH222-60 Patio & Deck Cleaner (Not Imaged) 1
31A TH222-31A Inside & Outside Rod Assembly 1 61 TH222-61 Extension Lance (Not Imaged) 1
31 THJ2470000107R Outside Rod 2 62 TH222-62 Wash Brush (Not Imaged) 1

TROUBLESHOOTING –PRESSURE WASHER
PROBLEM
POSSIBLE CAUSE
SOLUTION
Pressure washer does not
start when trigger is
depressed
1. Power cord not connected to
power source
2. Switch is off
3. RCD has tripped
4. Property trip switch has
triggered
1. Connect the power cord to a
suitable electrical supply
2. Turn switch on.
3. Press reset button on the RCD
plug.
4. Reset trip switch within
property fuse box. Make sure
pressure washer is connected
to an individual branch circuit
only. If using an extension cord,
make sure it is sufficient
enough to carry the current of
the pressure washer.
Pump doesn’t produce
pressure
1. Inadequate water supply
2. Multi-Lance leaks
3. Nozzle is clogged
4. Pump is faulty
5. Air in line
6. Water inlet filter is clogged
or dirty
1. Provide adequate water flow.
2. Check connections and / or
replace trigger gun or lance.
3. Clean nozzle.
4. Contact authorised service
dealer.
5. Squeeze trigger to remove air
from line.
6. Remove the water inlet
screen, rinse with warm water,
then replace in unit.
Machine doesn’t reach
high pressure
1. Diameter of garden hose is
too small
2. Water supply is restricted
3. Not enough inlet water
1. Replace with 3/4 in. garden
hose.
2. Check garden hose for kinks,
leaks, and blockages.
3. Open water source to full
force.
No detergent
1. Water supply is
inadequate or clogged
2. Wrong nozzle is attached
1. Check garden hose for kinks,
leaks and blockages.
2. Attach Multi-Lance and set to
low pressure.

SPECIFICATION –WET & DRY VAC
Model
THHPWVAC
Product Number
193889001
Weight (N.W & G.W) (Kgs)
13.5 & 15.5
WET & DRY VACUUM
Voltage
230v / 50hz
Watt
700
Max Vacuum Degree
16KPa
Noise
90 dB(A)
Collection Capacity (Litre)
10
Electrical Cable Length (Metre)
3
Suction Hose Length (Metre)
1.2
The manufacturer reserves the right to change the product specification and livery
according to continued product improvements.
CONTENTS - WET & DRY VAC
SPECIFICATION
SAFETY INSTRUCTIONS
MACHINE CONTENTS
ASSEMBLY
OPERATION
MAINTENANCE & STORAGE
TROUBLESHOOTING
PARTS DIAGRAM & LIST
WARRANTY
EC DECLARATION OF CONFORMITY
SAFETY INSTRUCTIONS –WET & DRY VAC
Read and understand the owner’s manual and labels affixed to the product. Learn its
application and limitations as well as the specific potential hazards. Retain these
instructions for future reference. The operator is responsible for following the warnings &
instructions in this manual and on the product.
WARNING LABELS/SYMBOLS
Read & understand operator’s manual
before using the machine. Failure to
follow instructions could result in
death or serious injury.
Do not smoke which using this machine
Double insulated or class 2 electrical
appliances are products that have been
designed in a way so as not to require a
safety connection to electrical earth
(These products must NOT have a
safety connection to Earth).
Do not use near a flame, or sparks
To reduce the risk of electric shock,
always unplug tool after use. Always
unplug tool before changing parts or
servicing. Failure to do so could result
in serious injury or death
Acoustic power level LWA accordance
with directive 2000/14/EC + 2005/88/EC
(Please see machine for actual reading)
This is the safety alert symbol. It is used to alert you to potential personal injury hazards.
Obey all safety messages that follow this symbol to avoid possible injury.
DANGER
Indicates an imminently hazardous situation which, if not avoided, will result in serious
injury.
WARNING
Indicates a potentially hazardous situation which, if not avoided, could result in serious
injury
CAUTION
Indicates a potentially hazardous situation which, if not avoided, may result in minor or
moderate injury.
CAUTION
Used without the safety alert symbol indicates a potentially hazardous situation which, if not
avoided, may result in property damage.
Table of contents


