The Pool Factory Saltwater Aurora User manual

INSTALLATION MANUAL
OVAL POOL
SALTWATER AURORA
12.19
V35079-AUR

ABOVE GROUND POOL SAFETY
warning
FAILURE TO HEED THESE WARNINGS CAN RESULT IN PERMANENTINJURY,
PARALYSIS FROM A BROKEN NECK, ELECTROCUTION OR DROWNING.
THIS POOL IS NOT DESIGNED FOR DIVING OR JUMPING!
DANGEROUS INJURY CAN RESULT. SHALLOW WATER!
Your pool contains a large quantity of water, and is deep enough to present inherent dangers to life and health unless the
following safety rules are strictly observed. First-time users run the highest risk of injury. Make sure everyone understands and
encourage all users especially children to learn how to swim. Learn Basic Life Support (Cardiopulmonary Resuscitation-CPR)
and refresh this knowledge regularly. Instruct all pool users, including children, what to do in case of an emergency. Keep a
working phone and a list of emergency phone numbers near the pool. This can make a life-saving dierence in the event of an
emergency. To ensure your pool is used safely you MUST observe the following safety precautions:
1. NO JUMPING OR DIVING
The top rail of your pool is not a walkway and must not be used for jumping or diving. Do not
permit jumping or diving into the pool from a deck or the top rail of the pool. Diving or jumping
into the pool can result in serious injury.
2. NEVER USE THE POOL ALONE
Never permit the pool to be used unless it is attended by at least one person other than the
bather. Someone should always be available to lend assistance in an emergency. Designate a
competent adult to supervise the pool each time it is being used. Vigilant supervision of weak
swimmers and non-swimmers by a competent adult is required at all times, remembering that
children under ve are at the highest risk of drowning.
3. NEVER LEAVE CHILDREN UNATTENDED
Never leave a child alone and unsupervised in or near the pool—not even for a second. There
is no substitute for constant adult supervision.
4. NO ROUGH PLAY
Do not permit “roughhousing” in and around your pool. Surfaces can become slippery and
hazardous when wet.
5. LIGHT THE POOL AT NIGHT
If the pool is used after dusk, adequate lighting must be provided. Illumination in the pool area
must be sufcient to clearly judge pool depth and all features in and around the pool. For light-
ing recommendations, consult your local licensed electrical contractor
6. RESTRICT ACCESS TO THE POOL
Do not leave chairs or other furniture beside the pool that could be used by a child to climb
up into the pool. Ladders must be removed whenever the pool is unattended. A fence with a
lockable gate around the pool or yard is strongly recommended and may be required by law
in some jurisdictions. Secure doors and windows, where applicable to prevent unauthorized
access to the swimming pool. Remove all toys from the swimming pool and surrounding area
when not in use to avoid attracting children to the pool. Barriers, pool covers, pool alarms
or similar safety devices are helpful aids, but they are not substitutes for continuous adult
supervision.
7. NO ALCOHOL OR DRUGS
Never drink alcoholic beverages, use any intoxicants or medication which could hinder your
judgment and reexes.
8. KEEP YOUR POOL CLEAN AND SANITARY
Your lter system will remove suspended particles from the water and the surface skimmer
will remove insects, leaves and other debris from the water surface. Use the correct pool
chemicals as directed to destroy harmful bacteria and prevent formation of algae. Remember,
unsanitary water is a serious health hazard.
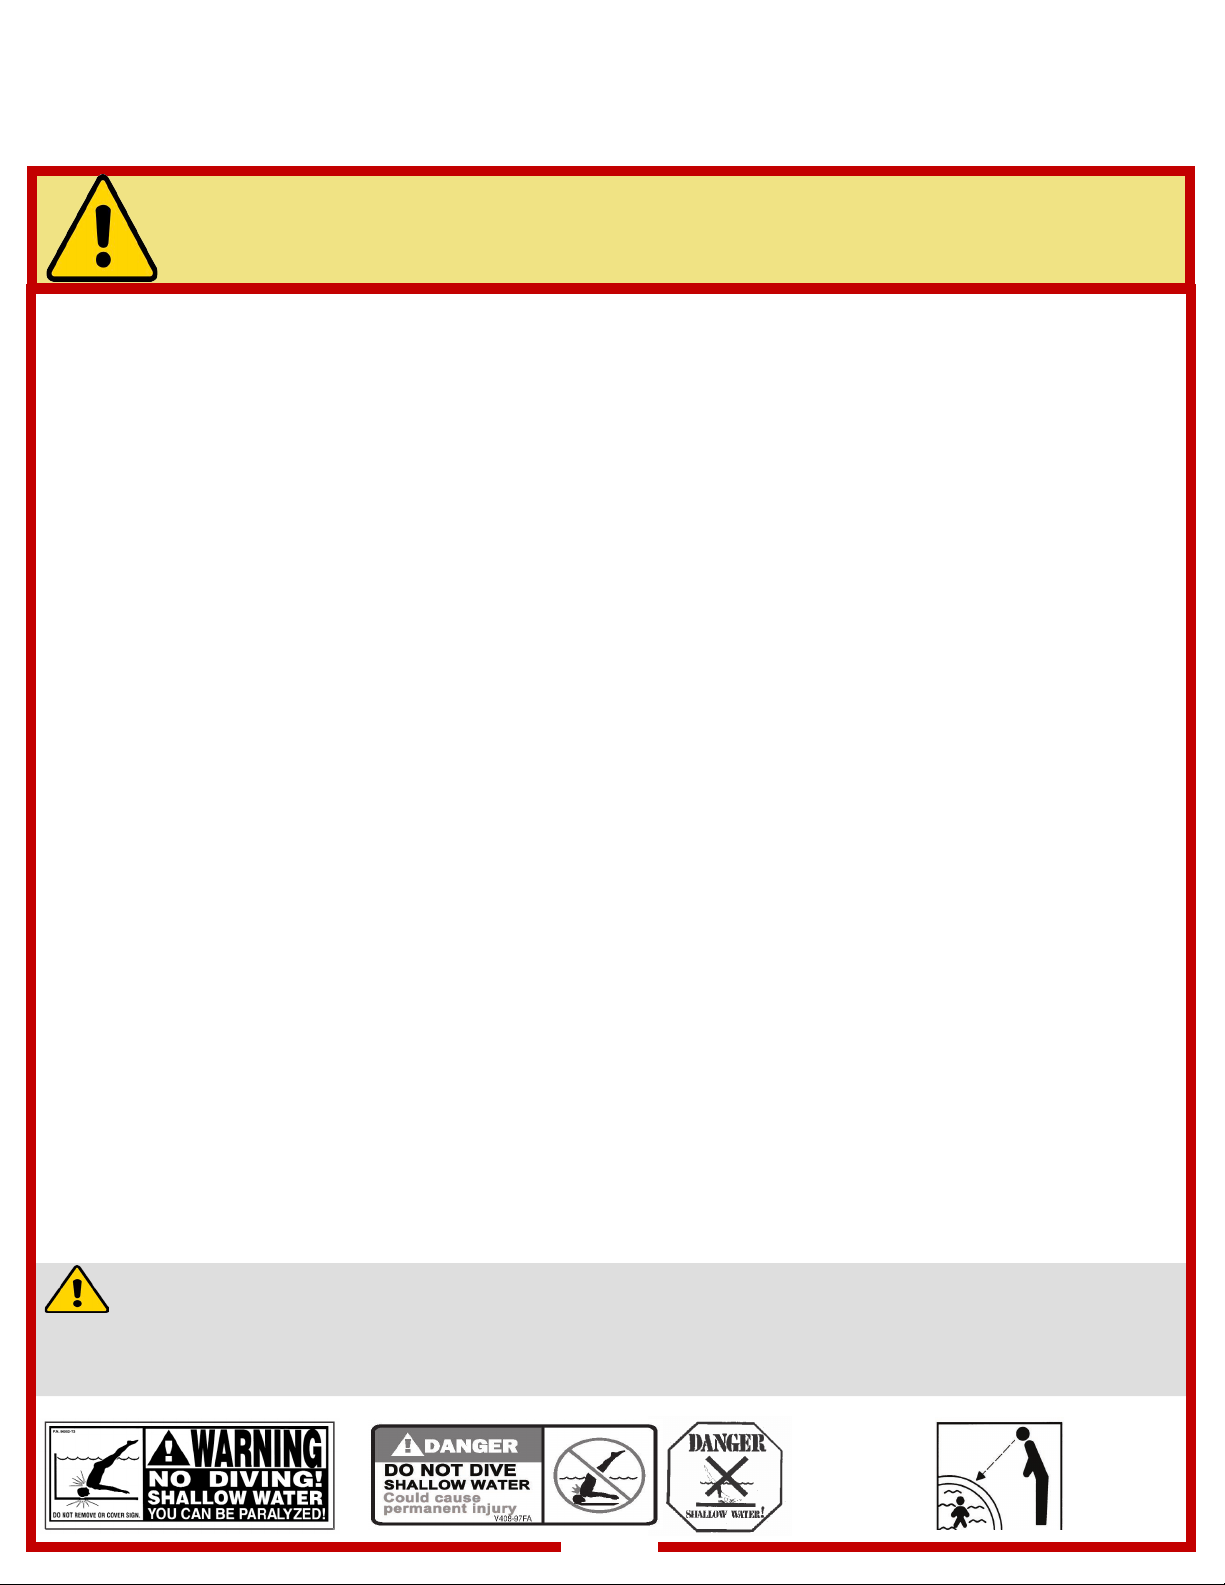
The safety stickers must be installed as per following instructions. Failure to properly install warning labels will void warranty. Failure
to mount these safety labels may subject you to substantial liability in case of injury. These warnings are not to be removed under
any circumstances! If they become discolored or fall o please request replacements which will be sent at no charge.
FOLLOW ALL SAFETY INSTRUCTIONS
Read and follow all safety instructions packaged with pool, ladder,
deck or any other accessory. Additional pool safety publications can be
obtained by contacting: The Association of Pool & Spa Professionals
(www.apsp.org)
important notice read before installation!
9. KEEP OFF TOP LEDGES
Do not walk on top ledges. They can be slippery and they are not a walkway.
10. POOL COVER SAFETY
The cover must have a tamperproof locking retainer cable that positions the cover around the
pool wall and keeps it securely in place. Never allow anyone, especially small children on the
cover. Asphyxiation or drowning could result. Be sure to remove pool cover completely from
the water surface before entering the pool. When purchasing any pool cover, please consult a
swimming pool professional.
11. ELECTRICAL HAZARD
Never touch or attempt to service electrical equipment, including the lter when your body and/
or the ground is wet. Electrocution or permanent injury due to high voltage (120V AC) could
result. The pool should be bonded in accordance with Section 680-26 of the National Electical
Code. For further assistance contact your dealer or a local licensed electrician. Do not use pool
during electrical or rain storms.
12. SAFETY EQUIPMENT
Keep a safety rope 1/4" by 50" with a otation buoy with an outside diamter of 15". Have
accessible in a prominent area by your pool. Keep a pole not less that 16 feet (4,88m) long
with a blunt or hook end available at poolside in case of emergencies. Weak swimmers and
non-swimmers should wear personal protection equipment when using the pool.
13. POOL CHEMICALS
Store pool chemicals out of the reach of children. Do not place chlorine, chlorine tablets or
sticks directly into skimmer, or winterize your pool with liquid chlorine. Damage to the skimmer,
pool liner and lter will result. Failure to obey this instruction will void all component warranties.
Always follow chemical manufacturer’s instructions when storing, handling and dispensing pool
chemicals.
14. CHECK FOR DAMAGE
Periodically check your pool and ladder components for damage and wear. Be sure all screws
are in place. Replace all damaged or worn components and tighten all screws before you use
the pool, deck or ladders. At rst sign, remove rust and touch up immediately.
15. POOL PARTS
Never modify the pool or accessories, or remove or drill holes in the pool, deck or ladder com-
ponents unless instructed. Your pool wall is made of thin metal, there is an inherent cut hazard
with metal so use gloves during installation. Always use Original Equipment Manufactured parts
for your replacement parts.
remember
to watch
children
place sign
on wall
next to pool
entry
R.01/18
PLEASE READ BEFORE INSTALLATION
place sign on liner above water line, opposite entry to pool
Carefully read, understand and follow all information in this user manual before installing and using the swimming pool.
These warnings, instructions and safety guidelines address some common risks of water recreation, but they cannot
cover all risks and dangers in all cases. Always use caution, common sense and good judgment when enjoying any
water activity. RETAIN THIS INFORMATION FOR FUTURE USE.
Page 3


No Diving or Jumping. Observe all Safety Rules
Using ne mason sand (free of rocks and debris), lay a 3 inch thick bed of sand across the entire inside of the pool
(wall-to-wall) to form your base. Build a sand cove against the pool wall by creating a 4" angle of sand or use foam
pool cove (on to of the 3 inch sand base) giving you a total cove height of 7 inches where the base meets the pool
wall. It is very important to make sure that the vinyl pool liner is supported by the proper sand base height. There
should be NO AIR SPACE between the vinyl pool liner and the base that it’s resting on.
IMPORTANT
INFORMATION
It is EXTREMELY IMPORTANT to follow these instructions when you’re
installing a base underneath your pool liner. If this is done incorrectly your
pool wall will break or become permanently damaged. Failure to follow these
instructions will result in pool wall damage that voids the warranty.
Metal Pool Wall
4" Sand Cove
3" Sand Base
3" Sand Base
7" Total
IMPORTANT: If using foam cove, install it on top of the 3 inch sand base.
Page 5

IMPORTANT
INFORMATION
ABOUT YOUR LINER
We do not make or supply liners for our pools.
Please contact your liner’s manufacturer with questions or if
instructions are not included with the liner.
Liner must be installed per the liner manufacturer’s
instructions.
Incorrect liner installation may void the warranty.
Page 6
No Diving or Jumping. Observe all Safety Rules Section 1
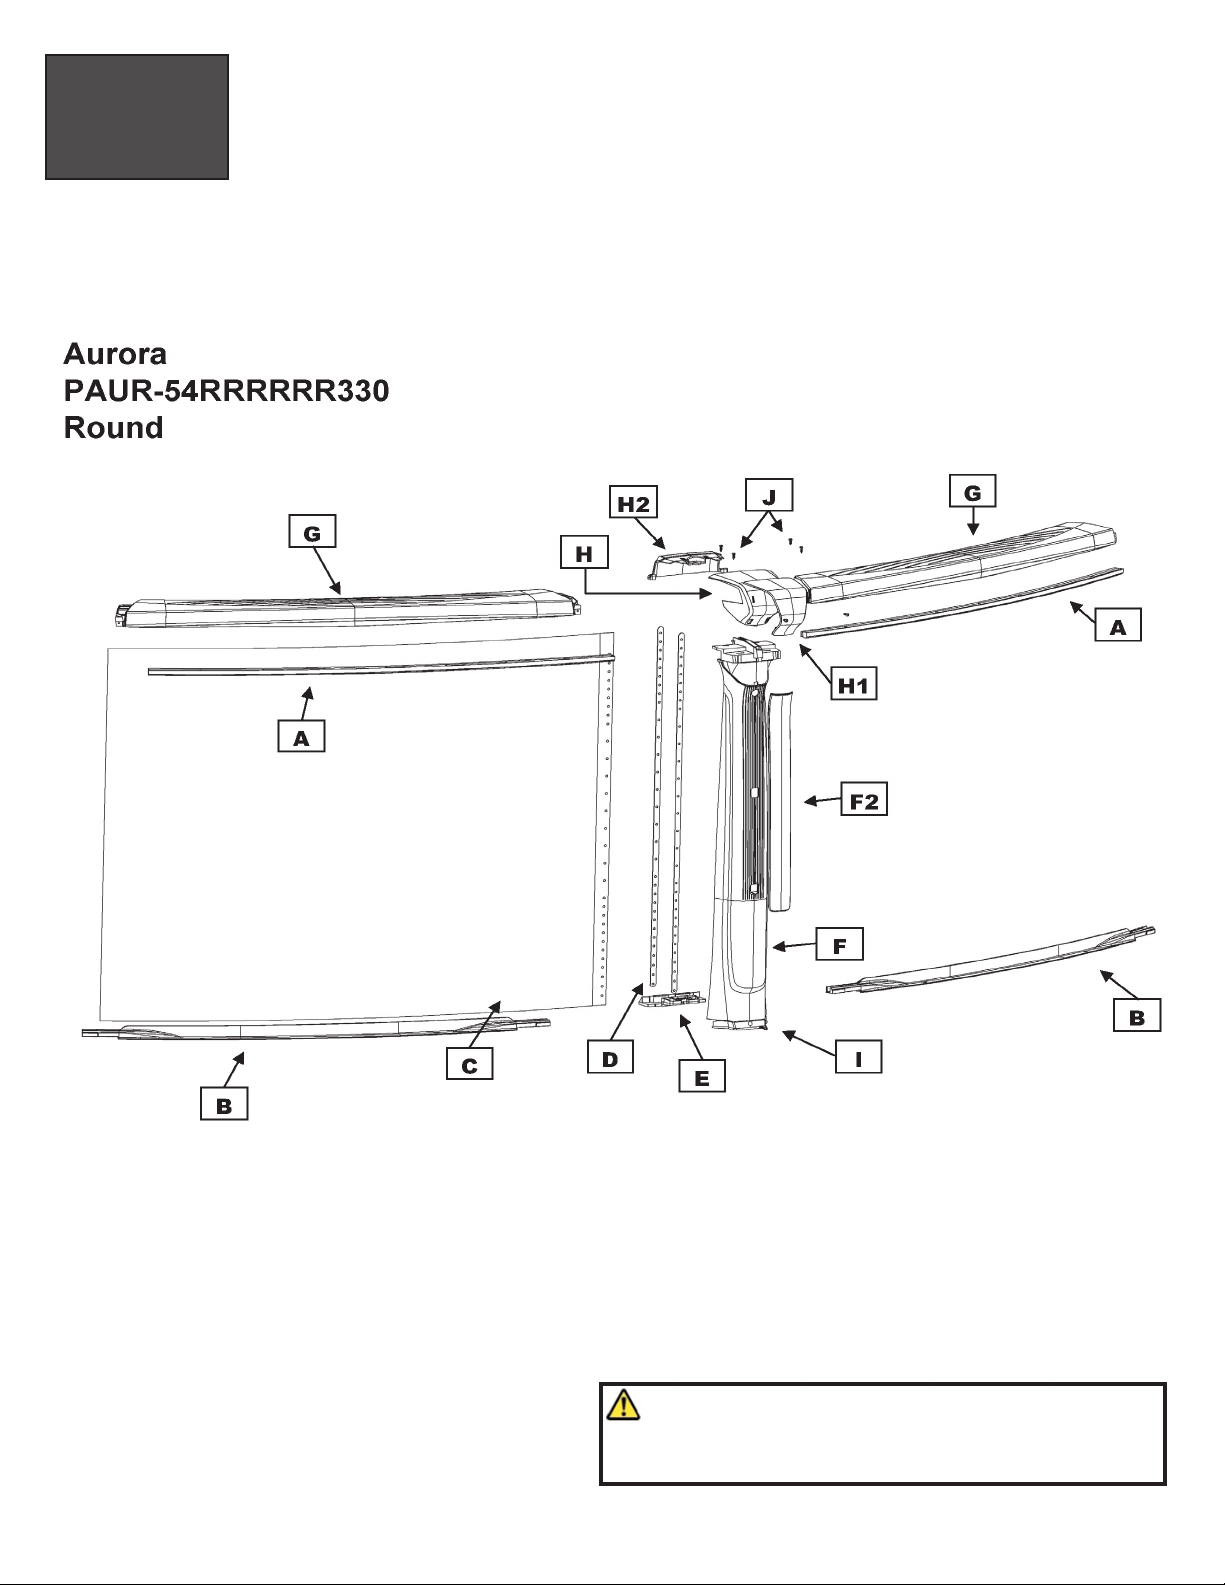
Parts listing
GENERAL INSTRUCTIONS - OVAL POOLS
GROUND PREPARATION
Secon
1
PARTS LISTING
IMPORTANT NOTE:
Make sure you have all the parts necessary before you
start installation.
Page 7

No Diving or Jumping. Observe all Safety Rules
Section 1
Parts listing
GENERAL INSTRUCTIONS - OVAL POOLS
GROUND PREPARATION
Secon
1
PARTS LISTING
Page 8

No Diving or Jumping. Observe all Safety Rules Section 1
Parts listing
GENERAL INSTRUCTIONS - OVAL POOLS
GROUND PREPARATION
Secon
1
PARTS LISTING
Page 9

No Diving or Jumping. Observe all Safety Rules
Section 1
Parts listing
GENERAL INSTRUCTIONS - OVAL POOLS
GROUND PREPARATION
Secon
1
PARTS LISTING
Page 10
Section 1
GENERAL INSTRUCTIONS - OVAL POOLS
GROUND PREPARATION
Section
1
No Diving or Jumping. Observe all Safety Rules
1
2
3
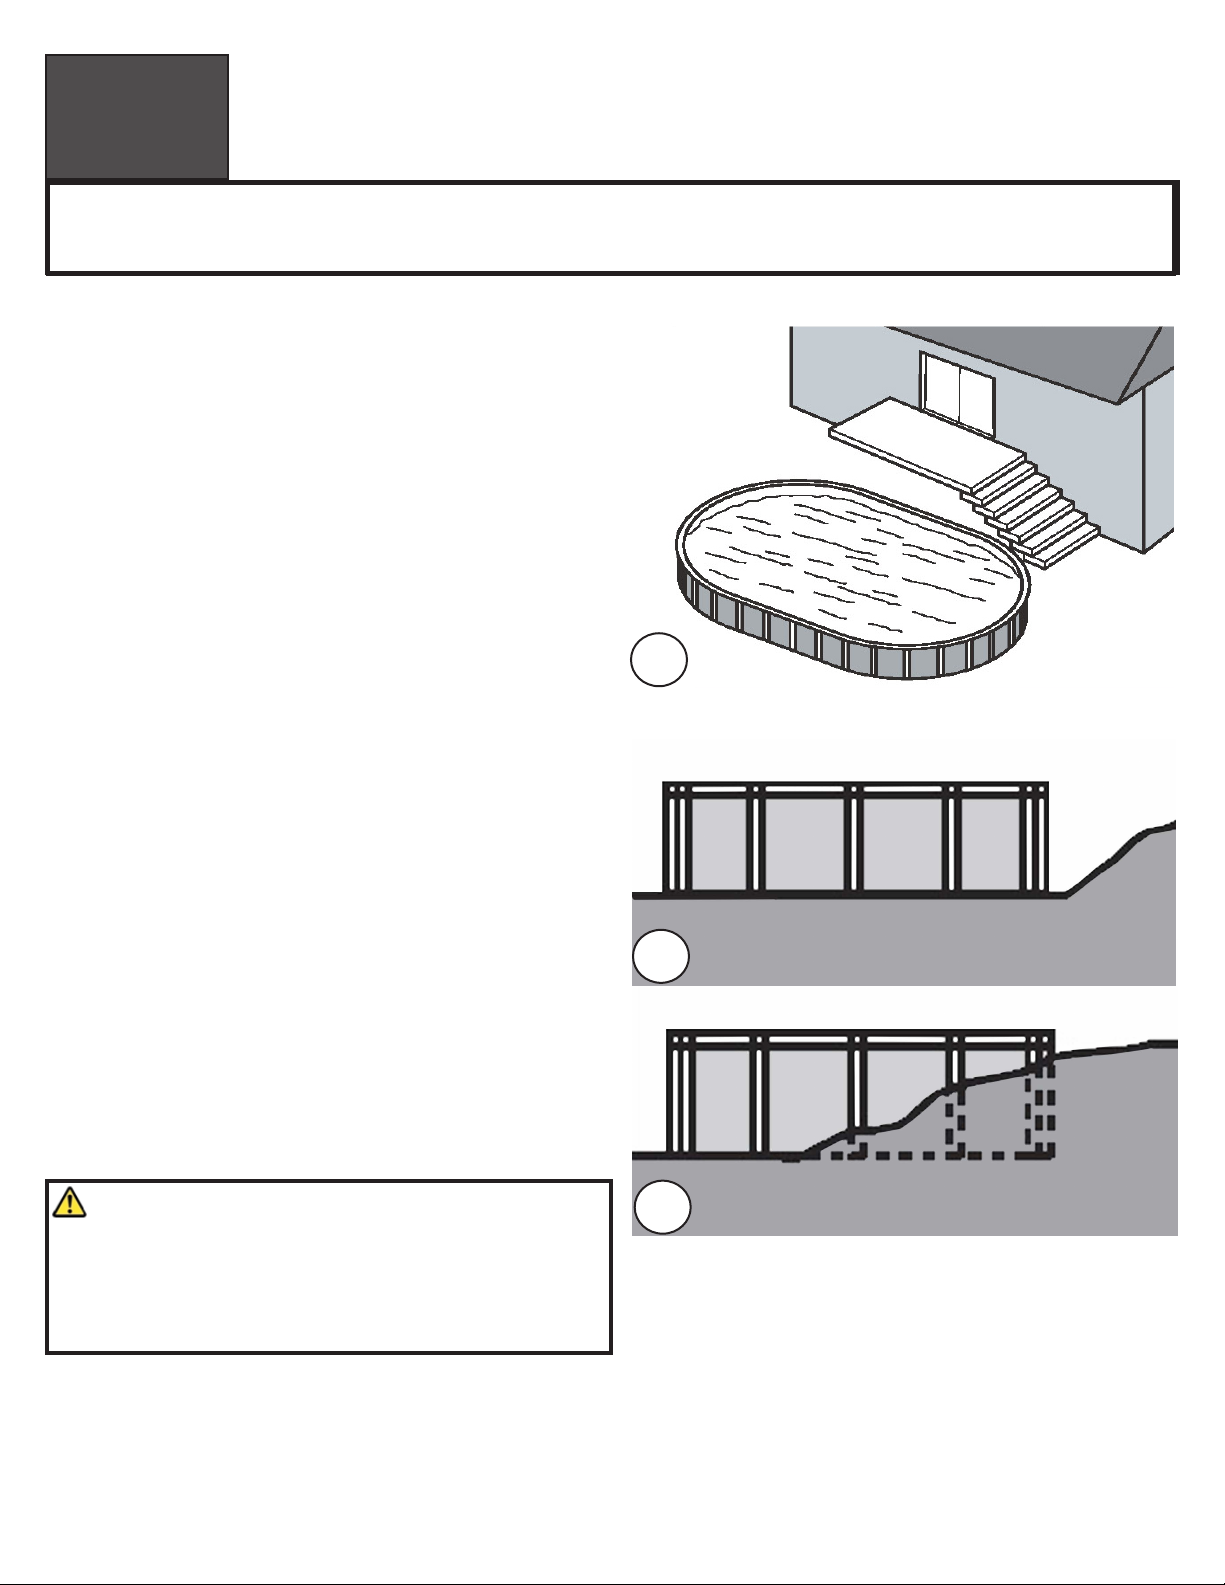
A. DETERMINE THE LOCATION OF YOUR POOL
1. The Terrain
Pay special attention to choosing the right location for your
pool:
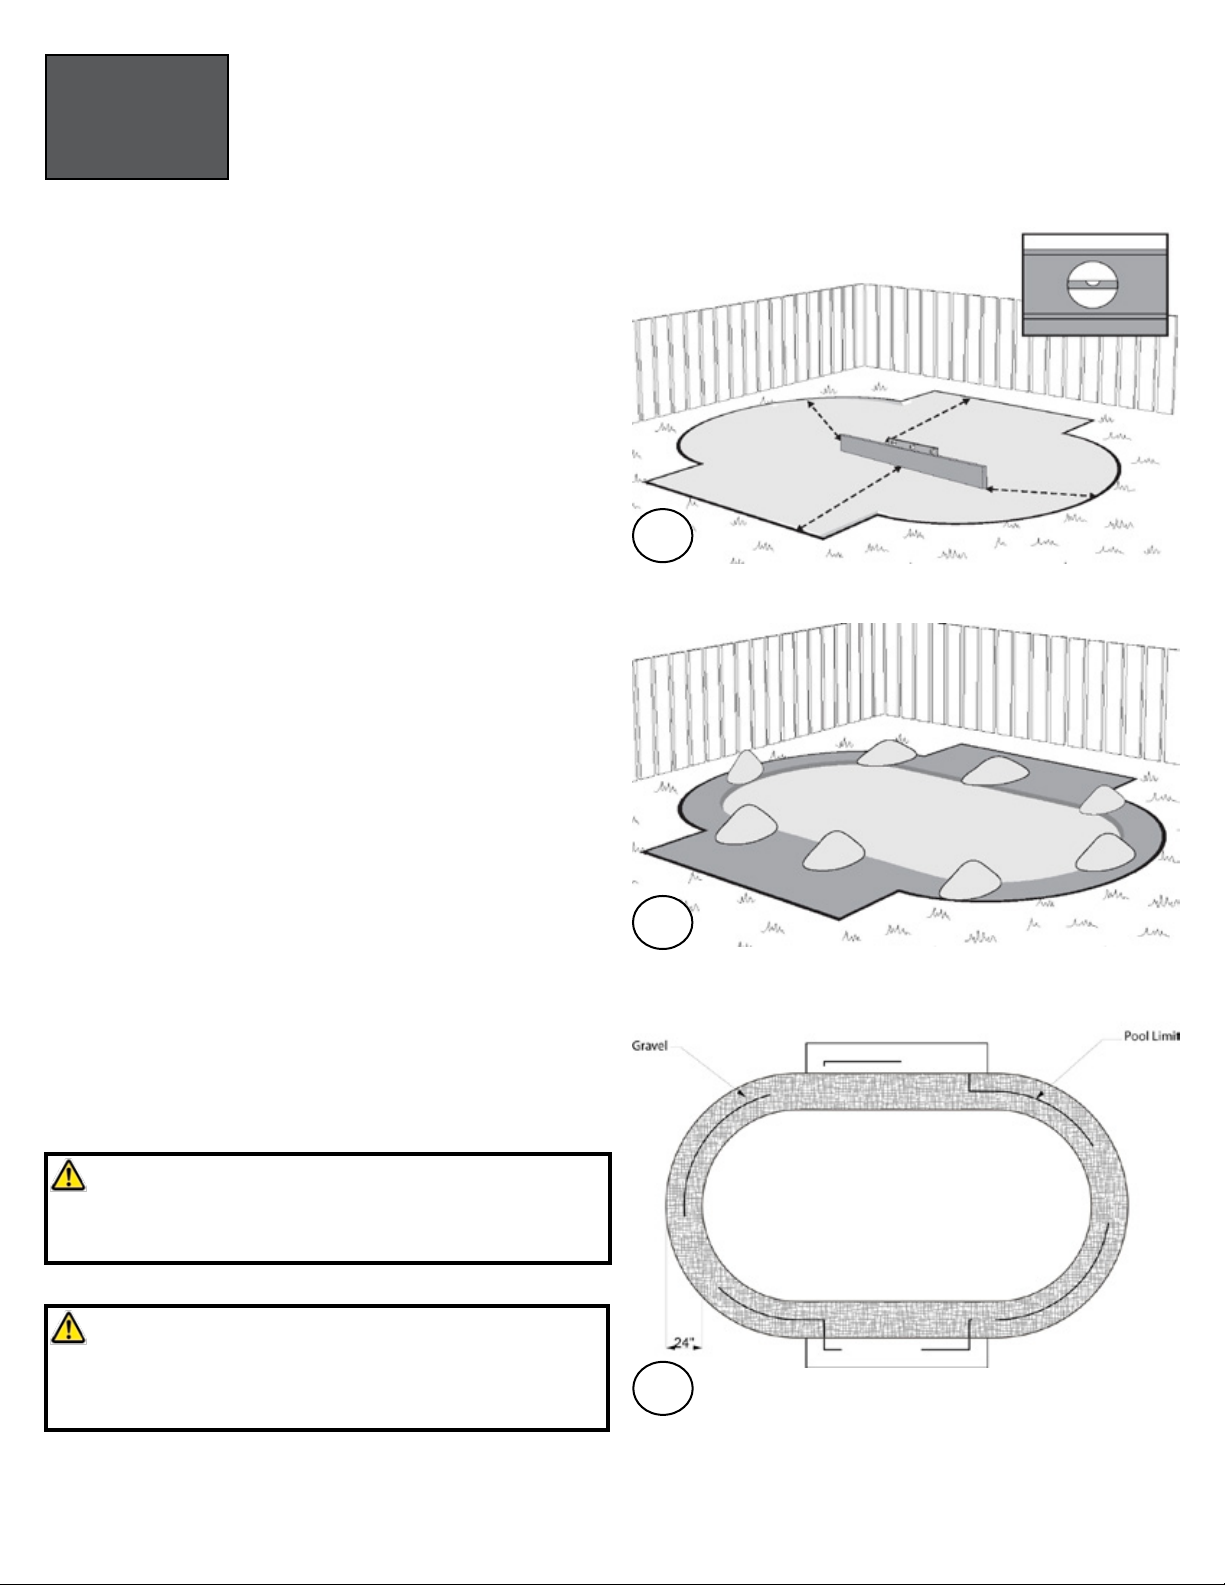
• Choose a large area, as at and level as possible and well
drained. (Image 1)
• Choose a spot on dry, rm earth (stabilizer or other)—do
not install the pool on asphalt, tar or oil based surfaces,
gravel, peat moss, wood or chemically treated soil.
• Check with your pool dealer to see if Nut Grass grows in
your area. This type of grass may grow up through your pool
liner. Your dealer will be able to advise how best to treat the
site.
• Sloped areas will need to be made level by digging away
high spots, not by lling low spots—be prepared to hire
earth-moving equipment if necessary.
• Ensure the earth is well compacted and a wall is placed to
prevent the earth from seeping out.
(Image 2)
• If you need to install partly in the ground, you must contact
your dealer to see if this is an option for you and that you
meet law requirements in your jurisdiction. (Image 3)
Important Note:
Ground preparation is one of the most important steps in
the installation process. A proper foundation will ensure
the rest of the pool assembly goes smoothly and that no
problems will occur when the pool is lled with water.
READ ALL INSTRUCTIONS CAREFULLY
The approximate time it takes for installation, excluding earthworks and lling is about 1 day.
You will need at least 3 people to help with installation.
Page 11

Section 1
GENERAL INSTRUCTIONS - OVAL POOLS
GROUND PREPARATION
Section
1
No Diving or Jumping. Observe all Safety Rules
A. CONT. DETERMINE THE LOCATION OF YOUR POOL
2. Things to Avoid
Do not locate your pool near or on any of the following
(Images 4 to 6):
• Overhanging tree branches.
• Overhead wires and clotheslines.
• Buried pipes and wires. Contact your gas, electric and tele-
phone utilities to nd buried pipes and wires before you dig.
• Areas with poor drainage.
• Grass, stones and roots. Grass will rot underneath the pool
liner, and stones and roots will damage the pool liner.
• Areas recently treated with oil-based weed killers, chemi-
cals or fertilizers.
3. Plan Ahead
• Will you be adding an adjacent deck later?
Be sure to leave room.
• Will you be using pool accessories or other appliances that
need electricity or gas? Locate your pool near these services
or plan to have them installed later by a licensed contractor.
Important Note:
When locating the centre of the pool, be sure to take
into consideration any structures (deck, patio, house) or
relevant items (change rooms, gazebo, etc.) that the pool
may need to line up with and ensure that the pool is in the
most visual pleasing location for your property.
4
6
5
Buried pipes
Overhead wires
Poor drainage
Overhanging
tree branches
Page 12

Section 1
GENERAL INSTRUCTIONS - OVAL POOLS
GROUND PREPARATION
Section
1
No Diving or Jumping. Observe all Safety Rules
A. CONT. DETERMINE THE LOCATION OF YOUR POOL
Compactor Hammer Water hose Level File
Vacuum cleaner Pliers Rake Lawn roller Metal snips
Screwdriver Wheelbarrow Shovel Spraypaint Mallet
Measuring tape Duct tape Trowel Wrench Gloves
4. Tools Needed
• Optical Level
Can be useful for precise
measurements
List of required materials
• Straight wood plank
• Material that provides a permanent base (ex. Crushed stone)
• Fine sand (void of debris)
• Cement blocks (5cm x 20cm x 40cm / 2”x 8”x16”) (Recommended)
• 2x Plywood (60cm x 120cm /2ft x 4ft)
• Wood board (30cm x 20cm / 1ft x 1ft)
• Vinyl covered hooks (to hold wall steady)
• String and stakes & wooden pegs
• Prefabricated cove sections (optional)
• Liner oor pad
• Rope
• Polyethlyne Plastic Sheeting
Page 13

Section 1
GENERAL INSTRUCTIONS - OVAL POOLS
GROUND PREPARATION
Section
1
No Diving or Jumping. Observe all Safety Rules
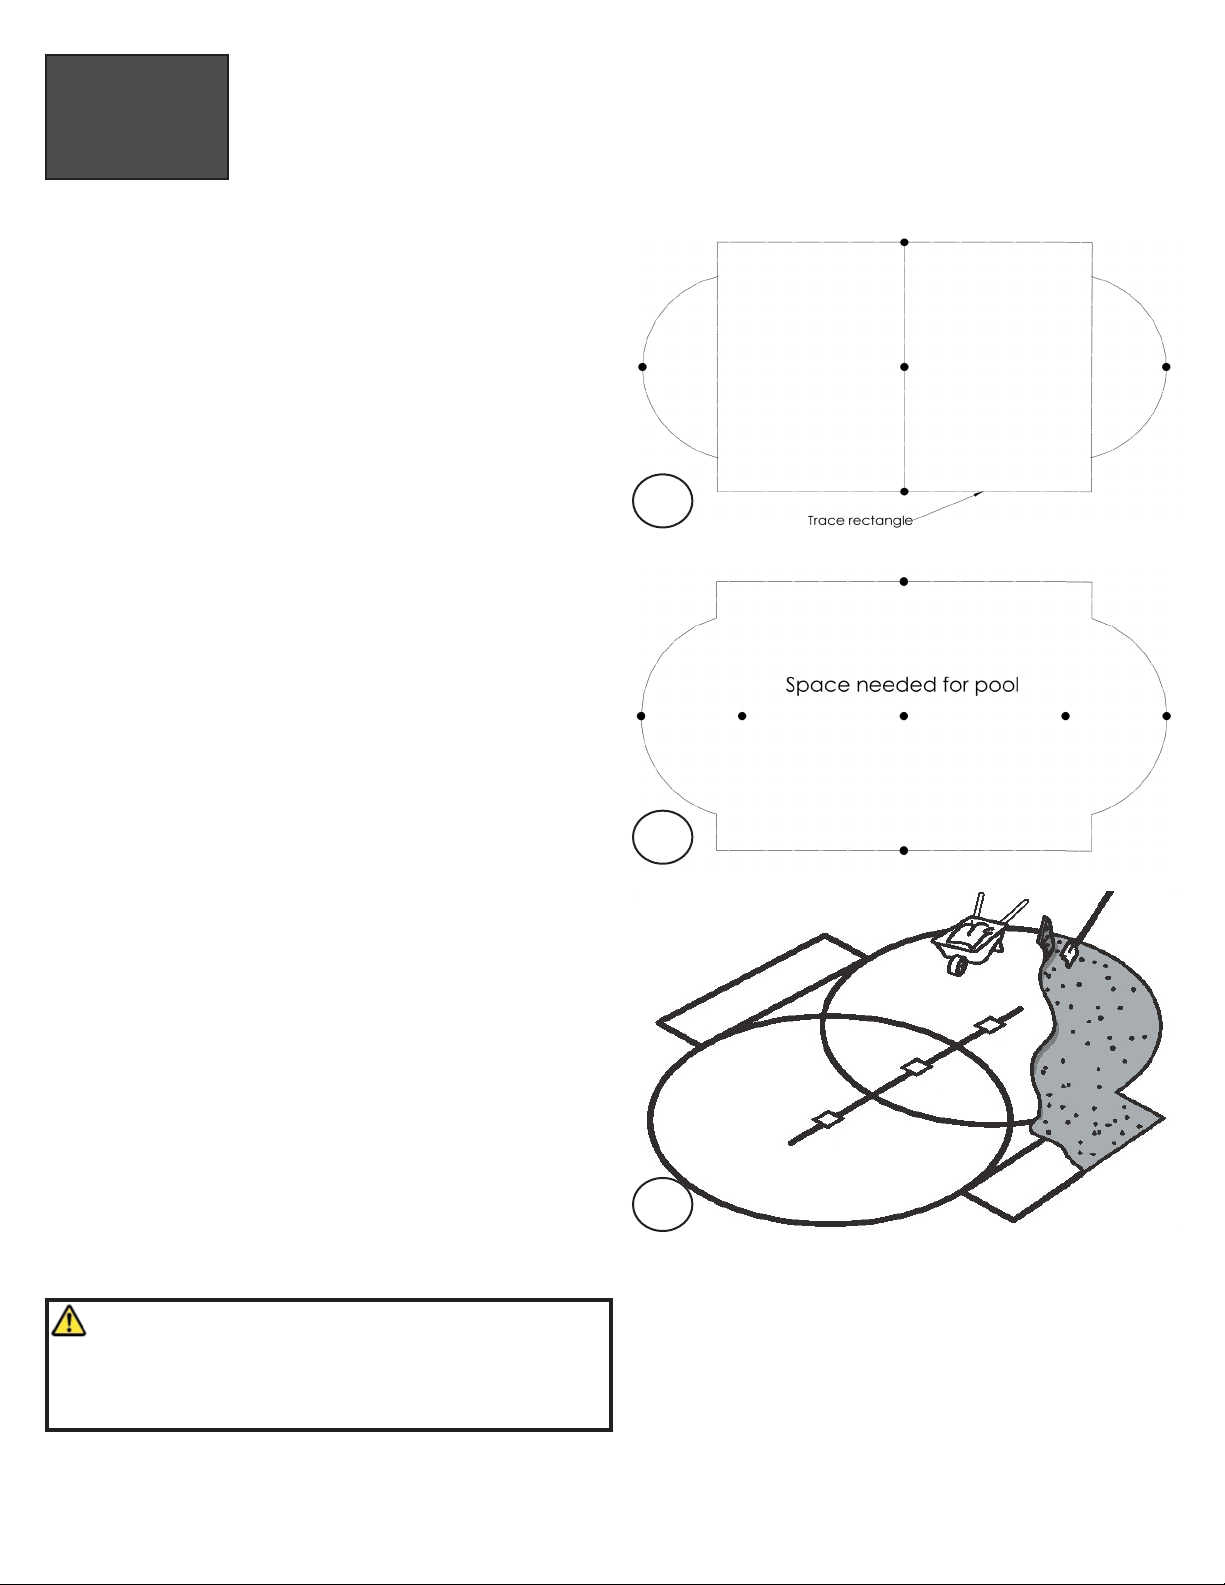
B. PREPARE THE FOUNDATION OF YOUR POOL
1. Mark out the area
a. The next following steps will show you how to mark out
the area you need for the oval pool. This marked area
will be larger than the pool size itself, but this space is
needed. Find a site where the ground is stable, level
and well drained. Once you have selected your site,
determine where the middle of your pool will be.
b. Drive a peg into the ground at the centre point.
(Image 1)
c. Now you must make the round ends that will be the oval
part. In order to do so, you will have to determine the
center of the radius on each side and drive a peg into the
ground. (Image 2)
d. Using a length of string tied between the peg and a can
of spray paint mark the circles on the ground. (Image 3)
e. Once the center has been established, and the
measurement of the pool itself has been determinded,
you must now determine the outer limits of the perimeter
of your pool. Add 12” (30cm) outside this measurement
to determine pool perimeter. (Image 4)
See Diagrams:
Please see in the next page for an EXAMPLE on how to
correctly mark your pool area.
Please verify your pool’s FOOTPRINT for correct
measurements on the last pages of this Section 1.
1
2
3
4
Page 14
Section 1
GENERAL INSTRUCTIONS - OVAL POOLS
GROUND PREPARATION
Section
1
No Diving or Jumping. Observe all Safety Rules
5
6
7
B. CONT. PREPARE THE FOUNDATION OF YOUR POOL
f. Mark areas along both straight sides of your oval. Use
pegs and string as a guide for the can of spray paint to
mark straight lines. (Image 5)
g. You now have the space marked out that is needed for
your oval pool. (Image 6)
2. Remove the sod
a. Remove the sod from the area you have just outlined.
(Image 7)
b. Remove all debris (rocks, roots, etc) using a rake. Then
compact the ground to achieve a rm base.
You can use a sod removal machine.
Important Note:
Your pool must be perfectly level. Take the time you
need to be sure your foundation is perfecty level.
Page 15

Section 1
GENERAL INSTRUCTIONS - OVAL POOLS
GROUND PREPARATION
No Diving or Jumping. Observe all Safety Rules
Section
1
B. CONT. PREPARE THE FOUNDATION OF YOUR POOL
. 18'-1 1/2"
R9'-3"
3'-6"
12 places
Perimeter 1047" (hole to hole)-Track length measured in track slot
All dimensions are in inches
18'-6 1/2"
17'-9"
15'-10"
12'-10"
9'-0 1/2"
20'-11 1/2" .
4'-8"
4'-4 1/2"
. 14'-6"
18'-6"
33'-0"
. 20'-11 1/2"
Pool Limit
Outer Limit
12" (30cm)
19"
(47,5cm)
Example on how to mark out pool area for an 18 x 33
Please be sure to use your pool’s footprint for your
pool size on the last pages of this Section1.
EXAMPLE
. 18'-1 1/2"
R9'-3"
3'-6"
12 places
Perimeter 1047" (hole to hole)-Track length measured in track slot
All dimensions are in inches
18'-6 1/2"
17'-9"
15'-10"
12'-10"
9'-0 1/2"
20'-11 1/2" .
4'-8"
4'-4 1/2"
. 14'-6"
18'-6"
33'-0"
. 20'-11 1/2"
Pool Limit
Outer Limit
12" (30cm)
19"
(47,5cm)
Page 16
No Diving or Jumping. Observe all Safety Rules
Section 1
GENERAL INSTRUCTIONS - OVAL POOLS
GROUND PREPARATION
Section
1
B. CONT. PREPARE THE FOUNDATION OF YOUR POOL
3. Make the area at and level
a. Remove all the high spots with a shovel, hoe or rake. To
make sure your pool is stable, compact the ground well
before adding the sand. Be prepared to hire earth moving
equipment if you need to level a large area. Remember,
your pool must be level across the diameter of the pool.
(Image 8)
b. Small dips and hollows may be lled in, but the soil must
be hard-packed with a tamping tool or a soil compactor
machine.
c. Take material such as rock dust or ne mortar that
can conform a solid, permanent base and deposit this
material around the rim of the basin. (Image 9)
d. The material used should be spread around the perimeter
of the pool to a width of 24” (60cm) and a thickness of 2”
(5cm). (Image 10)
e. Recheck the outer perimeter of the oval shape, where the
pool wall will be placed. Compact the ground and make
sure there are no high or low spots. The bottom edge of
the pool wall must rest at on the ground and have no
gaps under it.
8
9
Helpful Hint:
Use the optical level to ensure that the ground is
perfectly at and level.
Important Note:
Your pool must be perfectly level. Take the time you
need to be sure your foundation is perfectly level. 10
610mm
Page 17
Section 1
GENERAL INSTRUCTIONS - OVAL POOLS
GROUND PREPARATION
No Diving or Jumping. Observe all Safety Rules
Section
1
C. PRE-ASSEMBLY OF THE STRAIGHT SECTION
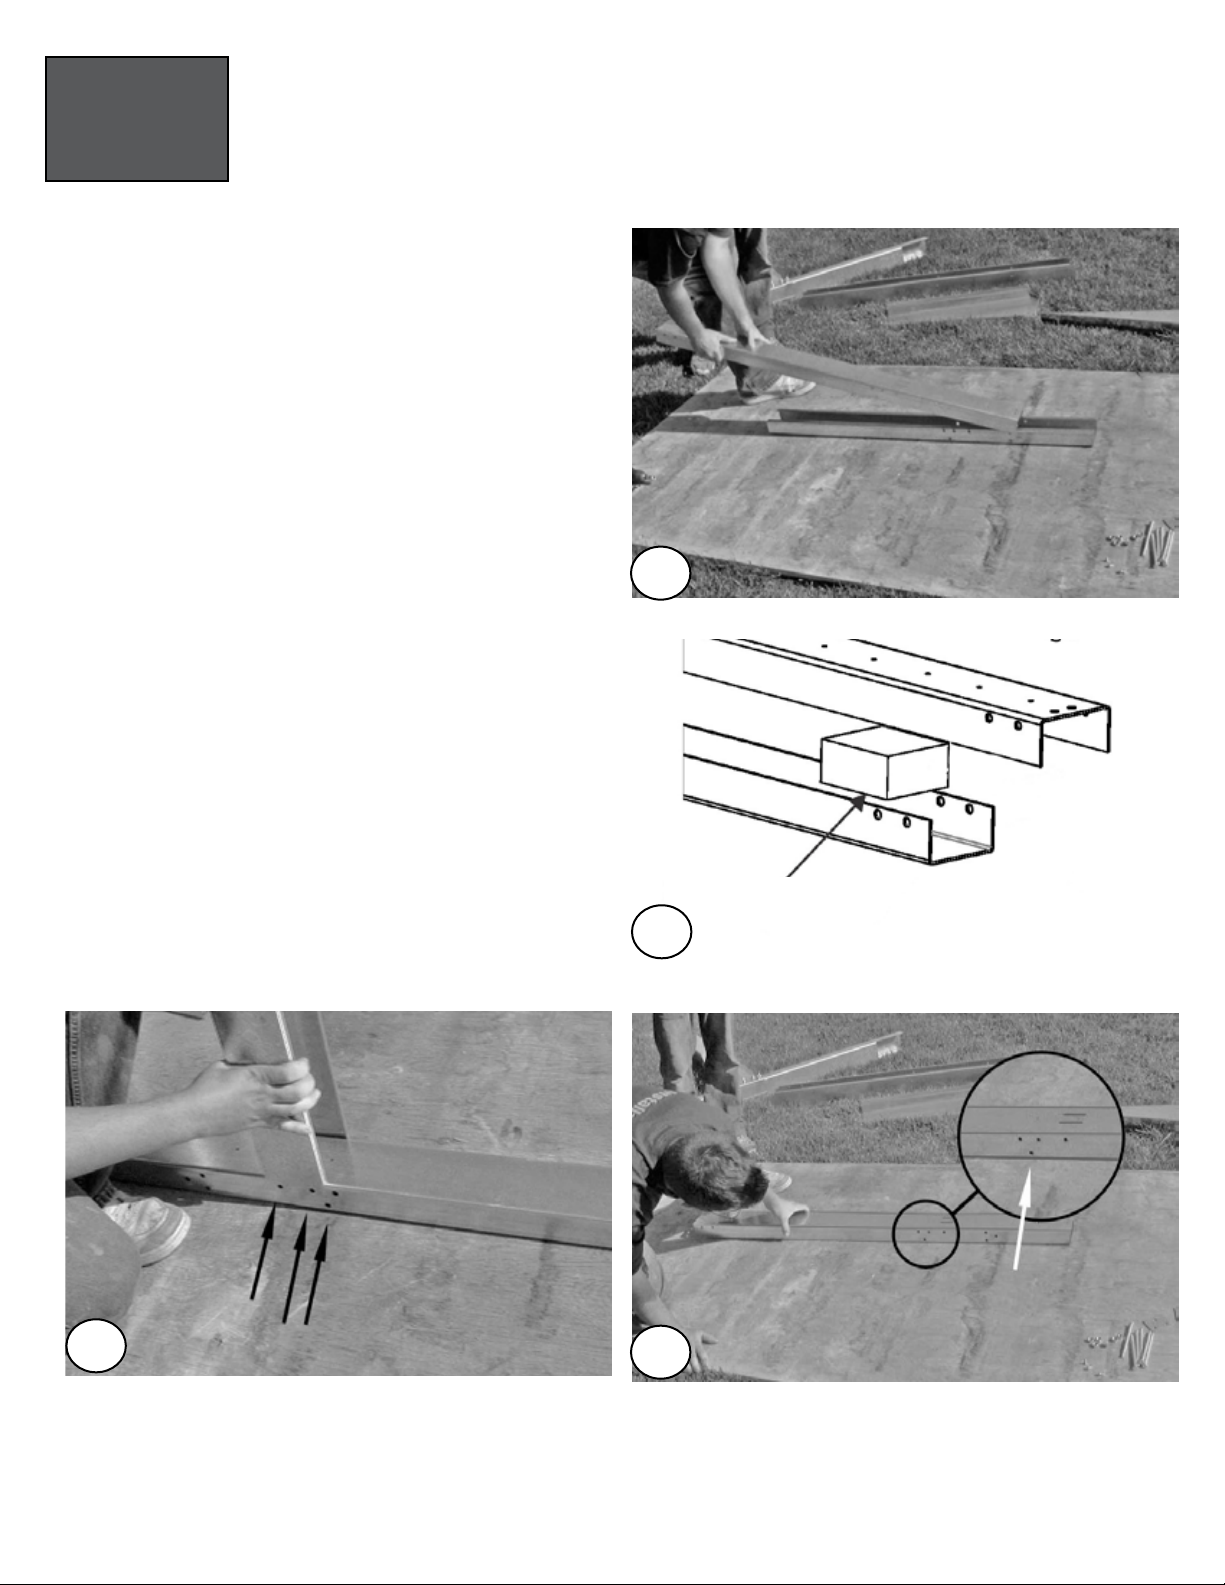
1. Assembling the strap end channel
a. Overlay the strap end channel over the under channel
(under channel is belly-up). (Image 11)
b. Before bolting the strap sections to the strap end
channels, Insert the foam block in the front part of the
strap end channel, insert it at least 1 1/2” past the edge
of the channel. (Image 12)
c. Align the holes of the strap end channel with those of the
underbox channel, but do not secure them with the bolts
at this time. (Image 13)
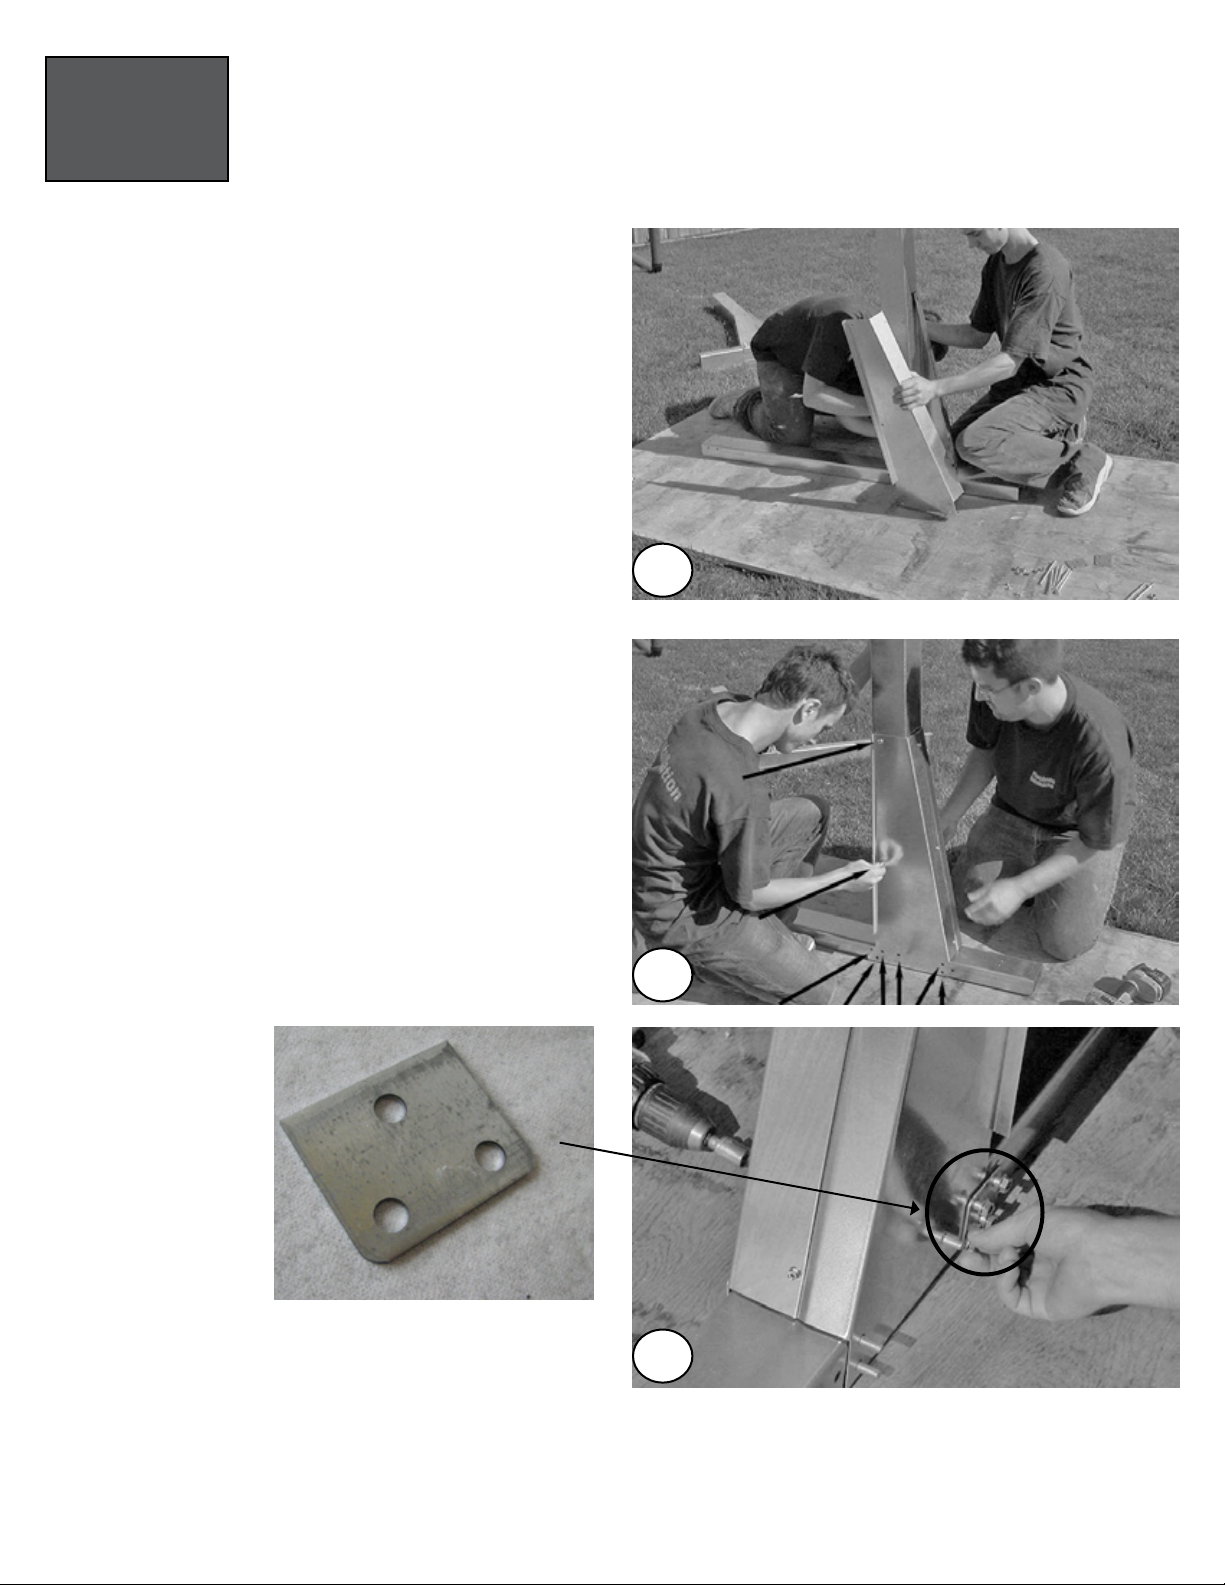
d. Slide the steel upright over the strap end channel making
sure that the holes line up. The steel upright opening
must face the longest part of the strap end channel.
(Image 14)
HELPFUL HINT: The top channel extends past the
under channel towards the inside of the pool.
Foam Block
11
13
14
12
Page 18

No Diving or Jumping. Observe all Safety Rules
Section 1
GENERAL INSTRUCTIONS - OVAL POOLS
GROUND PREPARATION
Section
1
C. PRE-ASSEMBLY OF THE STRAIGHT SECTION-Yardmore Hardware
(99-0027)
5/16”
Nut
(99-0068)
#10–1/2”
Screw
(99-0026)
1/2”-5/16
Screw
(V12x34)
#12–3/4”
Screw
(99-0026)
1/2”–5/16”
Screw
(99-0027)
5/16”
Nut
(99-0027)
5/16”
Nut
(99-0073)
5/16–5”
Bolt
(99-0070)
#10–1”
Screw
(V12x34)
#12–3/4”
Screw
(99-0068)
#10–1/2”
Screw (99-0073)
5/16–5”
Bolt
(99-0027)
5/16”
Nut
(99-0070)
#10–1”
Screw
(99-0027)
5/16”
Nut
(99-0027)
5/16”
Nut
(99-0073)
5/16–5”
Bolt
(99-0068)
#10–1/2”
Screw
(16663)
3 Hole Washer
(2PCB520) 5 1/2” x 1/4-20 Bolt
Page 19
Section 1
GENERAL INSTRUCTIONS - OVAL POOLS
GROUND PREPARATION
No Diving or Jumping. Observe all Safety Rules
Section
1
e. Insert the left and right gussets. the pieces are marked
“L” and “R”. Ensure that the holes are aligned.
(Image 15)
f. All holes should be lined up at this point. Use the
5/16” x 5” bolts (99-0073) and 5/16” nuts (99-0027) to
connect the channels and to connect the gussets to the
steel uprights. Remember to include the three-hole
washers (16663) on the front side of the gussets.
(Images 16 & 17) DO NOT TIGHTEN THE BOLTS.
C. CONT. PRE-ASSEMBLY OF THE STRAIGHT SECTION
THREE-HOLE WASHER
15
16
17
Page 20
Table of contents
Other The Pool Factory Swimming Pool manuals


