Cuando usted coloca el botón en posición “Light (ON)” (#1 en la ilustracion), el aparato produce un efecto
de luz disco. Las 4 lindas luces giran y son proyectadas en el techo
Las imágenes son:
Usted puede apagar las 4 luces disco (#10 en la ilustracion), resbalando el botón FUNCIÓN en posición
“Light (OFF)”.
SELECCIÓN DE RITMO
TOMA DE ENTRADA AUDIO
CONECTADOR MIC
STOP
POWER
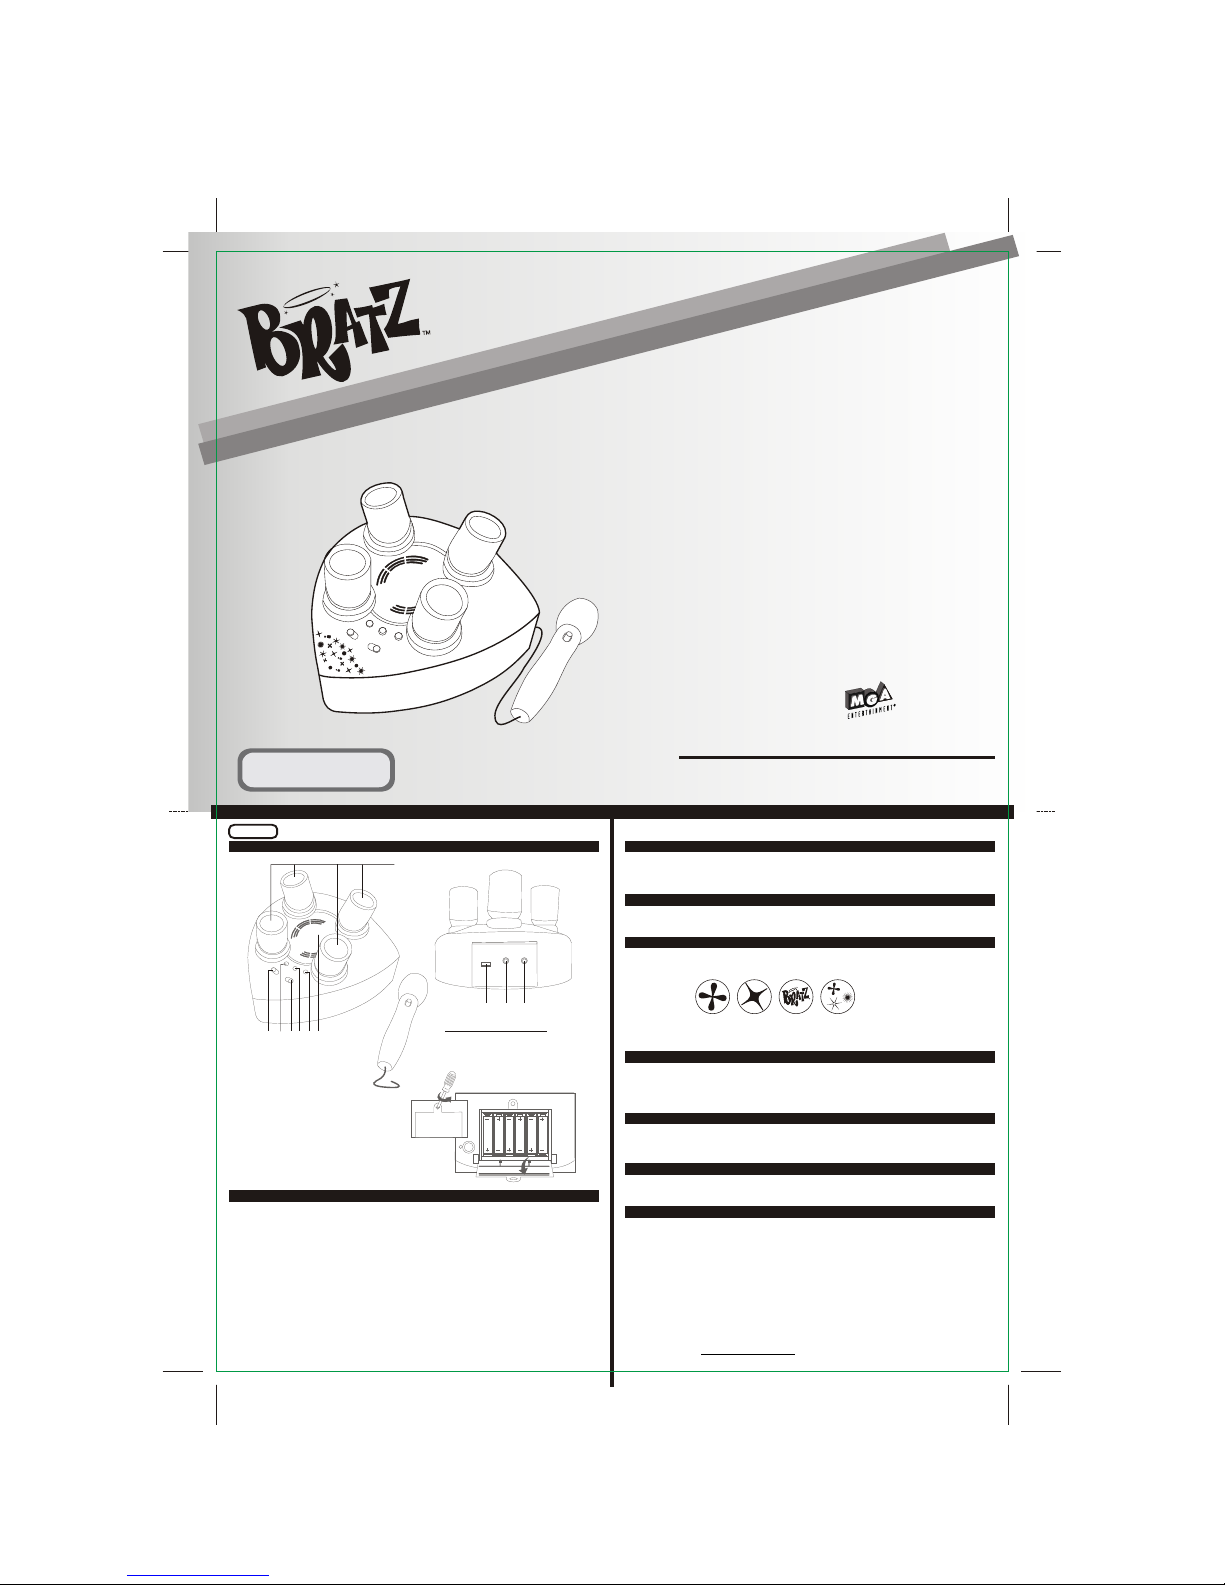
1. FUNCIÓN SELECTOR
2. 1
3. CONTROL MASTER VOLUME
4. 2
5. STOP
6.
7. /
8. TOMA DE ENTRADAAUDIO
9. CONECTADOR MIC
10. LUCES DE DISCOTECA
RITMO
RITMO
DEMOSTRACIÓN REPRODUCCIÓN
ALTAV OZ
789
123456
10
LUCES DE DISCOTECA
Antes de utilizar el aparato, verifique que él esté en modo “PLAY”.
.
El modo de la "VERSIÓN
PARCIAL DE PROGRAMA" está para el propósito de la demostración solamente
IMPORTANT!
Usted puede encender el aparato con el botón de FUNCIÓN (#1 en la ilustracion), cambiando la posición
“OFF” en “Light (ON)” o “Light (OFF).
Usted puede escoger 12 ritmos disco apretando los botones “RITMO 1” (#2 en la ilustracion) o “RITMO 2”
(#4 en la ilustracion). Cada botón presenta 6 ritmos. Usted puede controlar el nivel de volumen con
“MASTER VOLUME” en posición “HIGH”, “MID” o “LOW”. Usted también puede parar los ritmos
apretando el botón “STOP”.
Usted puede tocar sus músicas predilectas conectando su AUX / MP3 en la entrada AUX IN (#8 en la
ilustracion). Usted también puede controlar el nivel de volumen con “MASTER VOLUME” en posición
“HIGH”, “MID” o “LOW”
Para utilizar el micrófono (#9 en la ilustracion), verifique que él está conectado y ponga el botón en “ON”.
Apretando la tecla Stop , el ritmo para.(#5 en la ilustracion)
Recuerdo: Apague el aparto cuando usted no utiliza con colocando el botón en posición “OFF” (#1
en la ilustracion).
ESPAÑOL
LISTA DE LAS FUNCIONES
INSTALACIÓN DE LAS BATERÍAS
1. Desatornille la tapa de las baterías.
2. Abra la tapa.
3. Inserta 6 baterías “AA”
4. Cierre la tapa y atornille.
PRECAUCIONES CON LA BATERÍA
Las precauciones abajo deben ser obedecidas, cuando usen baterías, en este dispositivo:
Use solamente baterías del tamaño y tipo especificados.
Esté seguro, de estar obedeciendo a las polaridades correctas de la batería al instalarlas, como
indicado, en su compartimiento.Invertir las baterías puede damnificar el aparato.
No mezcle pilas distintas (por ejemplo Alcalinas con Carbono-Zinc) ni pilas viejas con nuevas.
Sí el dispositivo no debe ser usado por un largo período de tiempo, remueva las baterías par a
evitar daños o heridas debido un vaciamiento de la batería.
No intente recargar las baterías que no sean recargables. Ellos (ellas) pueden tener un súper-
calentamiento y romperse (Siga las instrucciones del fabricante de la batería).
Las pilas recargables deber ser retiradas del equipo antes de la recarga.
Las pilas recargables deben ser recargadas por un adulto.
Pilas descargadas deben ser retiradas del equipo.
Los terminales de alimentación de energía no deben ser colocados en corto circuito.
1.
2.
3.
4.
5.
6.
7.
8.
9.
IMPRESO EN CHINA
VISITE NUESTRO SITIO INTERNET www.singingmachine.com
SELECCIÓN DE 21 RYTHME
D’ENTREE AUX
ENTRÉES MICRO
ARRET
ALIMENTATION
1. SÉLECTEUR DE FONCTION
2. RYTHME 1
3. CONTRÔLE DE VOLUME PRINCIPAL
4. RYTHME 2
5. ARRET
6. HAUT-PARLEUR
7. DEMONSTRATION/LECTURE
8. D’ENTREE AUX
9. ENTRÉES MICRO
10. LUMIERE DISCO
PRÉCAUTIONS POUR LES PILES
7 8 9
1 2 345 6
10
LUMIERE DISCO
Verifiez que le mode « PLAY » est allume avant utilisation. Le mode « DEMO » sert seulement a
la demonstration.
IMPORTANT!
On peut allumer l’appareil en faisant glisser le bouton de FONCTION (#1 sur l'illustration) de la position
« OFF » à « Light (ON) » ou « Light (OFF) ».
On peut choisir parmi 12 rythmes disco différents en appuyant sur « RYTHME 1 » (#2 sur l'illustration) ou
« RYTHME 2 » (#4 sur l'illustration). Chaque bouton offre 6 rythmes. Vous pouvez contrôler le niveau de
volume en réglant le « MASTER VOLUME » sur « HAUT », « MOYEN » ou « BAS ». On peut aussi arrêter
les rythmes en appuyant sur le bouton « STOP ».
Vous pouvez faire jouer vos musiques préférées en branchant un appareilAUX / MP3 à l’entrée AUX IN
(# 8 sur l'illustration). Vous pouvez aussi contrôler le niveau de volume en réglant le « MASTER VOLUME
» sur « HAUT », « MOYEN » ou « BAS ».
Pour utiliser le microphone (#9 sur l'illustration), vérifiez qu’il est branché, faites glisser le bouton du
microphone sur « ON ».
Si l’on appuie sur la touche Stop , le rythme s’arrête.(#10 sur l'illustration)
Rappel: Eteignez l’appareil quand vous ne vous en servez pas en faisant glisser le bouton en
position OFF (#1 sur l'illustration).
Si vous faites glisser le bouton en position « Light (ON) » l’appareil produit un effet de
lumière disco. Les 4 belles lumières tournent et se projettent sur le plafond.
(#1 sur l'illustration),
Les images sont:
On peut éteindre les 4 lumières disco (#10 sur l'illustration) en faisant glisser le bouton FONCTION sur.
FRANÇAIS
LISTE DES FONCTIONS
INSTALLATION DES PILES
1. Dévissez le couvercle des piles.
2. Ouvrez le couvercle.
3. Insérez 6 piles « AA ».
4. Refermez le couvercle et revissez.
Les précautions ci-dessousdoivent être suiviesquand vous utilisez des piles dans cet appareil:
1. Utilisez seulement lataille et letype de pilesspécifiées.
2. Ayez soin derespecter la polaritéquand vous placezles piles commeindiqué dans le
compartiment des piles.Les piles inverséespeuvent causer desdégâts à l'appareil.
3. Ne pas mélangerdifférents typesde piles (parexemple Alcalineet Carbone-Zinc) oude
vieillespiles avec desneuves.
4. Si vous n'utilisezpas l'appareil pendantune longue période,retirez les pilespour éviter
les dégâts oublessures qui pourraientêtre causés parla fuite despiles.
5. Ne pas essayerde recharger lespiles qui nesont pas rechargeables.Ils peuvent
surchauffer et casser(Suivez les instructionsdu fabricant despiles).
6. Retirez les pilesrechargeables de l'appareilavant de lesrecharger.
7. Les piles rechargeablesdoivent être rechargéessous la surveillanced'un adulte.
8. Retirez les pilesusées de l'appareil.
9. Ne pas court-circuiterles bornes d'alimentation.
IMPRIMÉ EN CHINE
VISITE NOTRE SITE INTERNET www.singingmachine.com