TheatreCom Portable LED Stage Lighting User manual
Issued: 31/07/2012 by GJW Page 1 of 13
Portable LED Stage Lighting
User Manual
Contents
1 General Description 3
2 Safety 3
3 Unpacking 4
4 Connections 4
4 1 Lighting Control 4
4 1 1 Lighting Outputs 4
4 1 2 Mains inlet 5
4 1 3 Fusing 5
4 2 LED Floodlight 5
4 2 1 Lighting Input 5
4 2 2 Lighting Output 5
5 Lighting Control 6
5 1 VIBRANT (colour mode) 6
5 2 PASTEL (colour mode) 7
5 3 RAINBOW DIAL 7
5 4 LATIN (music mode) 7
5 5 MOONLIGHT (music mode) 7
5 6 POP (music mode) 8
5 7 INTENSITY (sound mode) 8
5 8 FADER 8

Issued: 31/07/2012 by GJW Page 2 of 13
6 TheatreCom LED Cables 8
7 Installation 9
7 1 Mounting Arrangements 9
7 2 Positioning the lights 9
8 Troubleshooting 10
9 Product Range 11
10 Technical Specifications 12
11 Guarantee 13
Issued: 31/07/2012 by GJW Page 3 of 13
1 General Description
TheatreCom portable LED stage lighting kits offers professional quality stage lighting in a safe and easy
to use format The product is designed for temporary or permanent installations
A TheatreCom installation consists of a mains-powered lighting control and up to 5 LED flood lights,
connected by TheatreCom LED cables
All TheatreCom products are provided with a comprehensive one year warranty In addition, Top Hex
offers a lifetime repair guarantee In the event of a failure of the product for any reason, Top Hex
commits to repair the product at a nominal cost In the unlikely event that the product cannot be
repaired, a refurbished product of similar specification will be offered at a special price
2 Safety
To reduce the risk of electrical shock, do not remove the cover on this product There are no user
serviceable parts inside Removing the cover invalidates the warranty
TheatreCom portable LED stage lighting is designed for indoor use as described in this manual Using
this product for any other purpose other than that for which it was designed may cause harm and will
invalidate the warranty
If you are unsure about the safe operation of this product, contact Top Hex for advice Contact details
are provided at the end of this manual
TheatreCom LED floodlights operate at a safe Voltage of 48V and the output from the lighting control is
protected However, it is important to inspect any cables or connectors for damage before use and to
replace any faulty parts
The LED floodlights are cooled with a fan and therefore do not pose a risk of burning In the event of
the fan failing or the lights over-heating, an over-temperature cut-out will turn the lights off
Issued: 31/07/2012 by GJW Page 4 of 13
As with all stage lighting, TheatreCom lights are bright and it is not advisable to stare directly at the
LEDs When powering up the lighting control, it is sensible to ensure the fader is at the minimum level
to ensure the lights do not illuminate unexpectedly
3 Unpac ing
Top Hex takes great care to ensure your TheatreCom portable LED stage lighting kit reaches you in
perfect condition After unpacking, please check for any damage to the unit, retaining any packing
materials should the unit need to be returned
On receipt, please ensure that the package is complete A list of parts supplied with each package or kit
is detailed in the Product Range section of this manual
4 Connections
4.1 Lighting Control
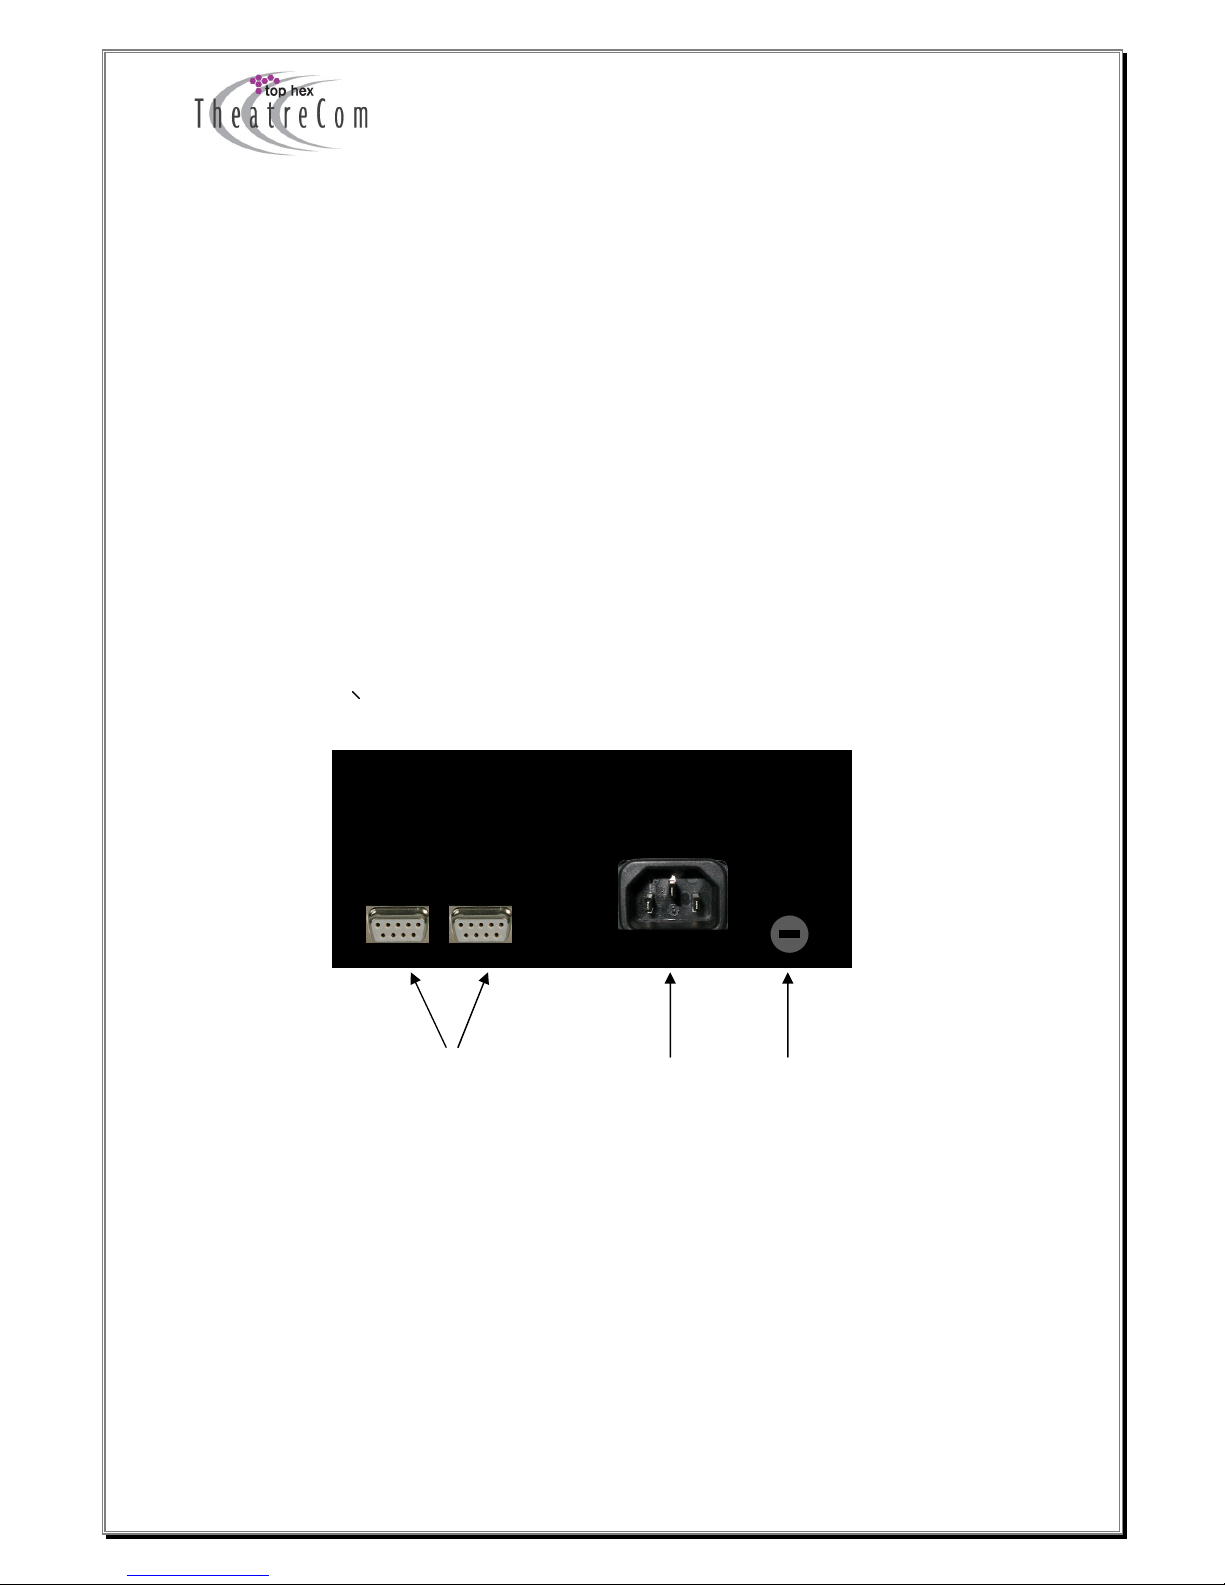
4 1 1 Lighting Outputs
Two LED lights can be connected directly to the Lighting Control Further lights can be connected to
these lights via the lighting outputs on the LED Floodlight A maximum of 5 LED Floodlight can be
powered from a single Lighting Control The lighting outputs are identical
1
2
3
Lighting outputs
Mains inlet
Fuse

Issued: 31/07/2012 by GJW Page 5 of 13
4 1 2 Mains inlet
The IEC mains inlet allows connection of the supplied mains lead fitted with a 3A fuse
4 1 3 Fusing
The unit is also protected by a 3 15AT (slow blow) 20mm fuse which is user-replaceable
4.2 LED Floodlight
4 2 1 Lighting Input
The LED cable from the Lighting Control or the preceding LED Floodlight is connected to the lighting
input
4 2 2 Lighting Output
The lighting output is used to connect to the next LED Floodlight in the chain (if required) A maximum
of 5 LED Floodlights can be connected to one Lighting Control
1
2
Lighting input
Lighting output
Issued: 31/07/2012 by GJW Page 6 of 13
5 Lighting Control
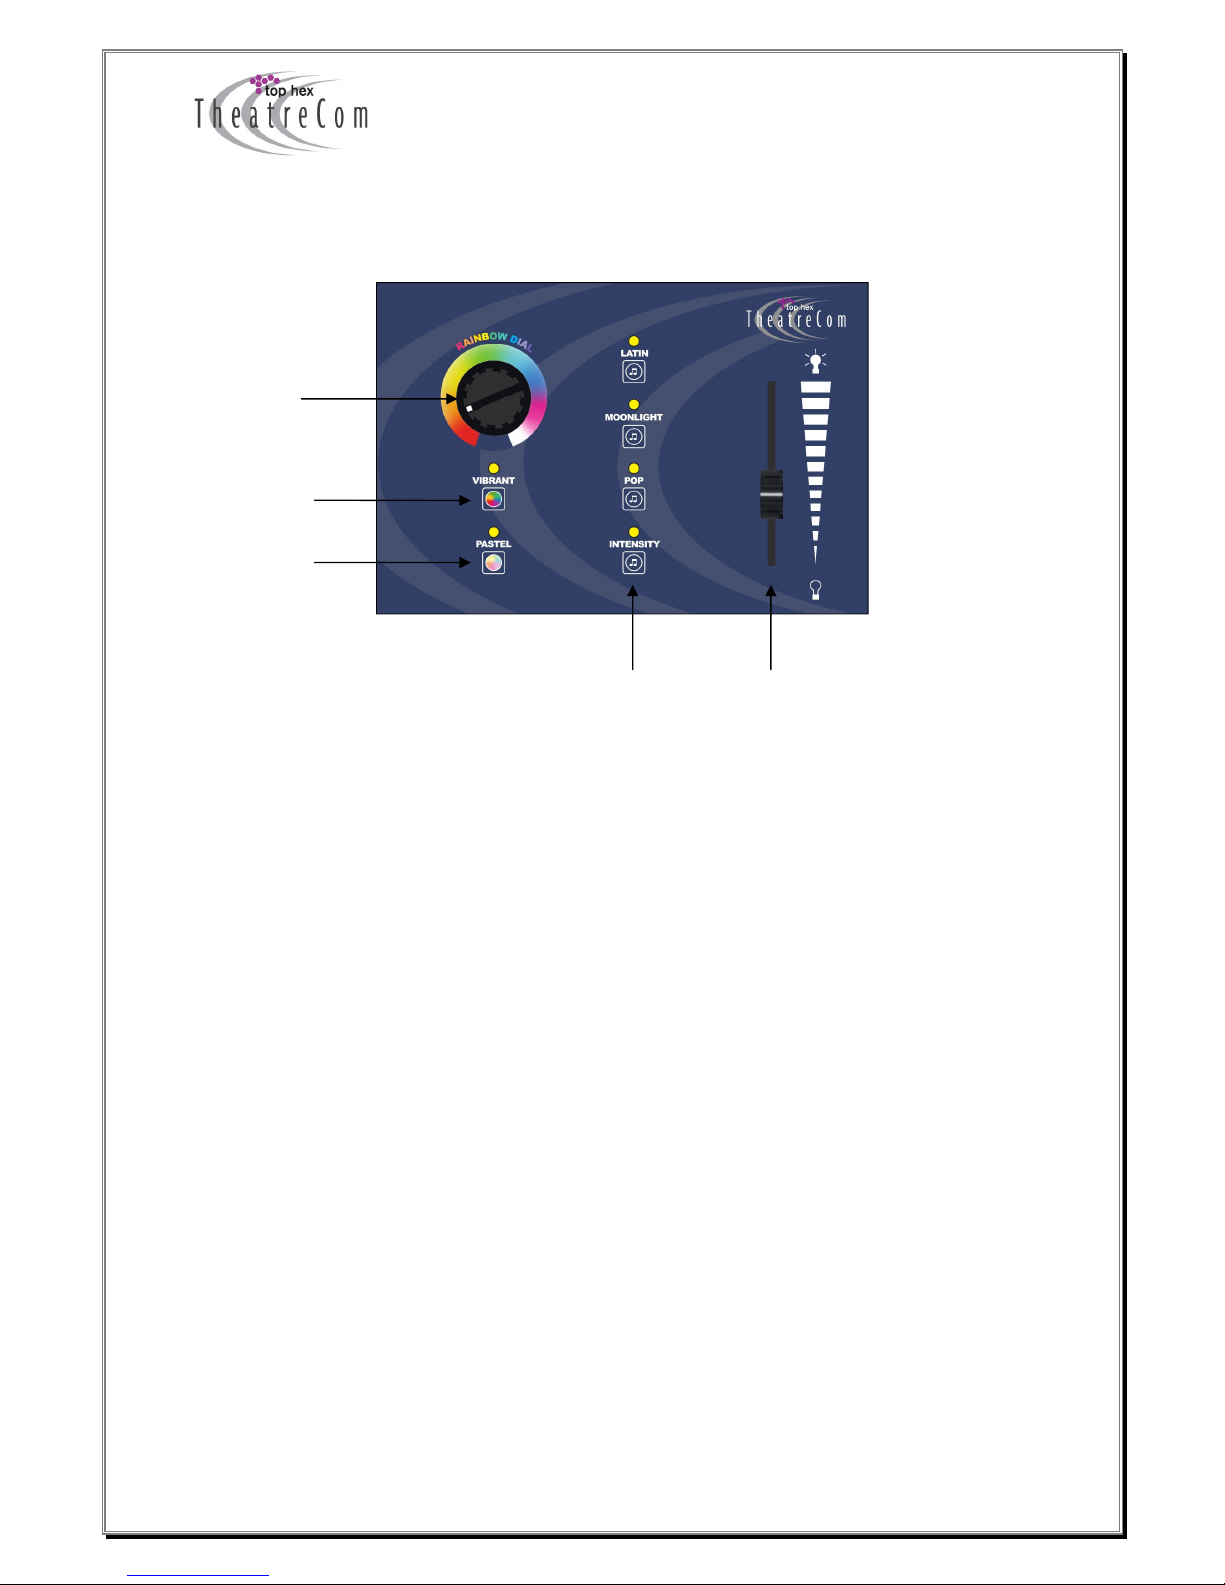
5.1 VIBRANT (colour mode)
Press VIBRANT to select the vibrant colour mode and the indicator will illuminate above the vibrant
button Use the RAINBOW DIAL to set the colour and the FADER to set the brightness In this mode,
primary colours are displayed giving vibrant reds, blues and greens
Vibrant (colour mode)
Pastel (colour mode)
Rainbow Dial
Latin (music mode)
Moonlight (music mode)
Pop (music mode)
Intensity (sound mode)
Fader
3
1
2
4
-
7
8
Issued: 31/07/2012 by GJW Page 7 of 13
5.2 PASTEL (colour mode)
Press PASTEL to select the pastel colour mode and the indicator will illuminate above the pastel
button Use the RAINBOW DIAL to set the colour and the FADER to set the brightness In this mode,
pastel colours are displayed which allow for more subtle lighting
5.3 RAINBOW DIAL
The RAINBOW DIAL affects all lights connected the Lighting Control In order to allow you to select
the maximum range of colours, the RAINBOW DIAL has some additional colours not found in the
rainbow The colours displayed are as follows:
Red, Orange, Yellow, Green, Blue, Purple, Pink, White
As you turn the dial, the lights fade gradually between colours allowing you to select an infinite range of
colours Turning the dial fully clockwise will set the lights to a warm white which will allow you to
illuminate your performance area without colour
5.4 LATIN (music mode)
When the POP button is pressed, the indicator above the button will illuminate to indicate that the latin,
music mode has been selected A microphone is built into the Lighting Control which picks up music
allowing the lights to respond to the beat The lights will change colour between the colour set on the
RAINBOW DIAL and 3 contrasting colours (selected automatically) In latin mode, the colour changes a
maximum of once per second which works well with a latin tempo The brightness of the lights can be
adjusted using the FADER
5.5 MOONLIGHT (music mode)
Pressing MOONLIGHT will select the moonlight, music mode and the indicator above the button will
illuminate As with the LATIN mode, the lights respond to the music but in MOONLIGHT mode, this
happens more gradually The lights will change between the colour set on the RAINBOW DIAL and 4
matching colours (selected automatically) In this mode, the colour changes a maximum of once every
two seconds which works well with a waltz or slower music number The brightness of the lights can be
adjusted using the FADER

Issued: 31/07/2012 by GJW Page 8 of 13
5.6 POP (music mode)
When the LATIN button is pressed, the indicator above the button will illuminate indicating the pop,
music mode is active The lights change colour rapidly in time to the beat of the music In this mode, the
colours are random and not affected by the rainbow dial The colours change a maximum of twice per
second and as with the LATIN and MOONLIGHT modes, the brightness of the lights can be adjusted by
using the FADER
5.7 INTENSITY (sound mode)
When the INTENSITY mode is selected, the indicator above the button will illuminate In this mode, the
brightness of the lights is affected by the sound received by the internal microphone – the noisier the
sound, the brighter the lights The colour of the lights can be set using the RAINBOW DIAL This mode
is commonly used for a lightning effect as the lights will respond to a thunder sound effect It also works
well responding to speech
5.8 FADER
The fader is used to adjust the brightness of the lights
6 TheatreCom LED Cables
The cables for your TheatreCom backstage communication system have a 9 pin D socket at one end
and a 9 pin D plug at the other end Cables can be purchased from Top Hex in standard or custom
lengths

Issued: 31/07/2012 by GJW Page 9 of 13
7 Installation
Before installing your TheatreCom portable LED stage lighting, it is worth setting up one or two LED
floodlights with a Lighting control to become familiar with the connections and controls
7.1 Mounting Arrangements
The bracket fitted to your LED Floodlights can be used to mount the light in several ways
The light can be fitted to a TheatreCom TL-B base and placed on the floor
The light can be hung from a standard 50mm lighting bar You are advised to fit a safety chain
in order to ensure the light is secure
The bracket has screw holes which allow the light to be screwed directly into a wall, ceiling or
beam Once again, it may be appropriate to consider a safety chain or other restraint
7.2 Positioning the lights
As a guide, one LED floodlight will illuminate approximately 1m of stage However, more lights will
improve your lighting coverage
The LED floodlights have a beam angle of approximately 30 degrees from centre Allowing the beams
to cross will minimise shadows and improve the overall lighting effect If you are using floor-mounted
lights to light a stage, consider adjusting the angle of the outer lights as shown below
STAGE

Issued: 31/07/2012 by GJW Page 10 of 13
8 Troubleshooting
1. One of the colours (red, green or blue) is not being illuminated on the lights.
(i) The most likely reason is that one of the cables is not screwed in properly Check the LED
lighting cables are pushed in and the screws are finger-tight
2. The light wor s for a period of time then goes off.
(i) The lights are protected with an over-temperature circuit which will turn off the light to
prevent over-heating Check the fan in the back of the light is rotating freely and that it is
not obstructed In the event of a problem, contact Top Hex to return the unit for repair
3. None of the lights are wor ing.
(i) Check there is at least one indicator illuminated on the Lighting Control, this confirms the
unit is powered up If not, check the power is on, then check the fuses in the mains plug
and in the back of the Lighting control
(ii) Try connecting the lighting control into just one LED floodlight via a short cable Add the
lights one by one to identify a faulty light or cable
4. The lighting control or LED floodlight has failed.
(i) Contact Top Hex to arrange for the unit to be returned for repair Top Hex offer a lifetime
repair guarantee service on all TheatreCom products Please use the original packaging

Issued: 31/07/2012 by GJW Page 11 of 13
9 Product Range
Part:
Description:
Contents:
TL
-
2
Basic TheatreCom LED stage
lighting kit
•
TL
-
C lighting control with mains lead
• 2 x TL-L LED stage floodlights
• 1 x TL-C10 10m TheatreCom LED cable
• 1 x TL-C5 5m TheatreCom LED cable
TL
-
4
Enhanced TheatreCom LED stage
lighting kit
•
TL
-
C Lighting control with mains lead
• 4 x TL-L LED stage floodlights
• 1 x TL-C20 20m TheatreCom LED cable
• 1 x TL-C10 10m TheatreCom LED cable
• 2 x TL-C5 5m TheatreCom LED cable
TL
-
5
Enhanced+ TheatreCom LED stage
lighting kit
•
TL
-
C Lighting control with mains lead
• 5 x TL-L LED stage floodlights
• 1 x TL-C20 20m TheatreCom LED cable
• 2 x TL-C10 10m TheatreCom LED cable
• 2 x TL-C5 5m TheatreCom LED cable
TL
-
B
Base
Floor mounting b
ase for LED floodlight
TL
-
L
LED floodlight
TheatreCom LED stage floodlight
TL
-
C
Lighting control
TheatreCom lighting control
TL
-
C5
Cable
5m TheatreCom LED cable
TL
-
C10
Cable
10m TheatreCom LED cable
TL
-
C25
Cable
20m TheatreCom LED cable

Issued: 31/07/2012 by GJW Page 12 of 13
10 Technical Specifications
TL
-
C Lighting Control
:
Supply Voltage:
230Vac
Supply Current:
2A
The mains plug must be fitted with a 3A fuse to protect the system
Integral Fuse
3 15AT (slow blow) 20mm fuse
Dimensions:
200mm(w) x 12
0mm(h) x
200
mm(d)
Weight:
2 90kg
TL
-
L LED Floodlight
:
Power:
50W
Operating voltage:
48V
Maximum floodlights per TL
-
C Lighting
Control
5
Maximum cable length between units:
2
0m
Maximum system cable length:
50m
Dimensions:
220
mm(w) x
33
0mm(h) x
55
mm(d)
Weight:
1 90kg
TL
-
B Floor Mounting Base:
Dimensions:
180mm(w) x 25mm(h) x 180mm(d)
Weight:
1 05kg
LED Cable:
Specification:
5 core 16/0 2mm unscreened cable
Connector:
9 way D
-
type socket / plug

Issued: 31/07/2012 by GJW Page 13 of 13
11 Guarantee
This TheatreCom product is warranted by Top Hex Ltd to the original end-user purchaser against
defects in workmanship and materials in its manufacture for a period of one year from the date of
shipment to the end-user
Faults arising from misuse, unauthorised modifications or accidents are not covered by this warranty If
the TheatreCom product is faulty, it should be sent in its original packaging to Top Hex Ltd at the
address below, with shipping prepaid Please include details of the fault found and a copy of the
supplier’s invoice
To reduce the risk of electrical shock, do not remove the cover on this TheatreCom product There are
no user serviceable parts inside Removing the cover invalidates the warranty
A life-time repair service is offered on this product; please contact Top Hex for details
TheatreCom
Top Hex Ltd
5 Ramsay Court
Hinchingbrooke Business Park
Huntingdon
PE29 6FY
www theatrecom co uk
Table of contents


