manuals.online logo
Brands
  1. Home
  2. •
  3. Brands
  4. •
  5. Thermaltake
  6. •
  7. Indoor Furnishing
  8. •
  9. Thermaltake U Series User manual

Thermaltake U Series User manual

This manual suits for next models

2

Popular Indoor Furnishing manuals by other brands

Homelegance California 1662PEK-1CK Assembly instruction

Homelegance

Homelegance California 1662PEK-1CK Assembly instruction

Osmond Ergonomics FLO instructions

Osmond Ergonomics

Osmond Ergonomics FLO instructions

OVE ELOISE 42 installation manual

OVE

OVE ELOISE 42 installation manual

overstock MF286255 Assembly instructions

overstock

overstock MF286255 Assembly instructions

Sonoma 160-801 Assembly instructions

Sonoma

Sonoma 160-801 Assembly instructions

BOLERO Wicker Side Chair CF158 Care Instructions

BOLERO

BOLERO Wicker Side Chair CF158 Care Instructions

Coaster 4799N Assembly instructions

Coaster

Coaster 4799N Assembly instructions

Stor-It-All WS39MP Assembly/installation instructions

Stor-It-All

Stor-It-All WS39MP Assembly/installation instructions

Lexicon 194840161868 Assembly instruction

Lexicon

Lexicon 194840161868 Assembly instruction

Next AMELIA NEW 462947 Assembly instructions

Next

Next AMELIA NEW 462947 Assembly instructions

impekk Manual II Assembly And Instructions

impekk

impekk Manual II Assembly And Instructions

Elements Ember Nightstand CEB700NSE Assembly instructions

Elements

Elements Ember Nightstand CEB700NSE Assembly instructions

JWA CARY 68429 Assembly instruction

JWA

JWA CARY 68429 Assembly instruction

VIPACK AMORI AMKB9014 Assembly instructions

VIPACK

VIPACK AMORI AMKB9014 Assembly instructions

Rowico SANNA Assembly instructions

Rowico

Rowico SANNA Assembly instructions

Southern Enterprises CK556000TX Assembly instructions

Southern Enterprises

Southern Enterprises CK556000TX Assembly instructions

hygena 314/5041 Assembly instructions

hygena

hygena 314/5041 Assembly instructions

VINNOVA Kinsley 536060S manual

VINNOVA

VINNOVA Kinsley 536060S manual

manuals.online logo
manuals.online logoBrands
  • About & Mission
  • Contact us
  • Privacy Policy
  • Terms and Conditions

Copyright 2025 Manuals.Online. All Rights Reserved.

Place Screws in X-Pattern
5
VER1.0
5
INSTALLATION GUIDE
Seat Back X 1 Seat Base X 1 Mechanism X 1 Five-star base X 1 Caster wheels X 5 Gas lift piston,
Piston cover X 1
Lumbar Lumbar Headrest
cushion X 1 cushionX 1 cushion X 1
U Comfort series U Fit series
Side Cover X 2
M8 screw X 8 (Pre-mounted)
Plastic Plug X 2 M8 Hex Allen key X 1 M5 screw X 2
Attention
STEP by STEP
Please make sure the angle of the adjuster on the seat base is set at 90 degrees (As shown in )
1.Install the caster wheels, gas lift piston and
piston covers onto the 5-star base.Please
note: when installing the caster wheels, hold
the wheels at a 90-degree with a firm grip
of the hand; and do not use tools to knock
it into place or the ground as to prevent
damage.Detailed installation methods can
be found on the official website:
(www.thermaltake.com)
2.Take out the M8 screws and install the seat
back onto the seat base.
3.Use M8 allen key to screw the seat back onto
the seat base.
4.Align the rubber cover of the backrest with
the hole and lock with a M5 hexagonal screw.
5.Mount the mechanism underneath the seat
base using 4x M8 screws. Please note: The
screws for the mechanism have been tightened
underneath the seat base and needs to be
removed and reattached via the provided allen
key upon mechanism placement.
6.Attach the 5-star base with gas lift piston onto
the notch of the mechanism that has now been
attached to the seat base.
NOTE : Place the screws by hand before
tightening them in an X-Pattern with the
allen key.
ACCESSORIES
VER1.0
User Guide
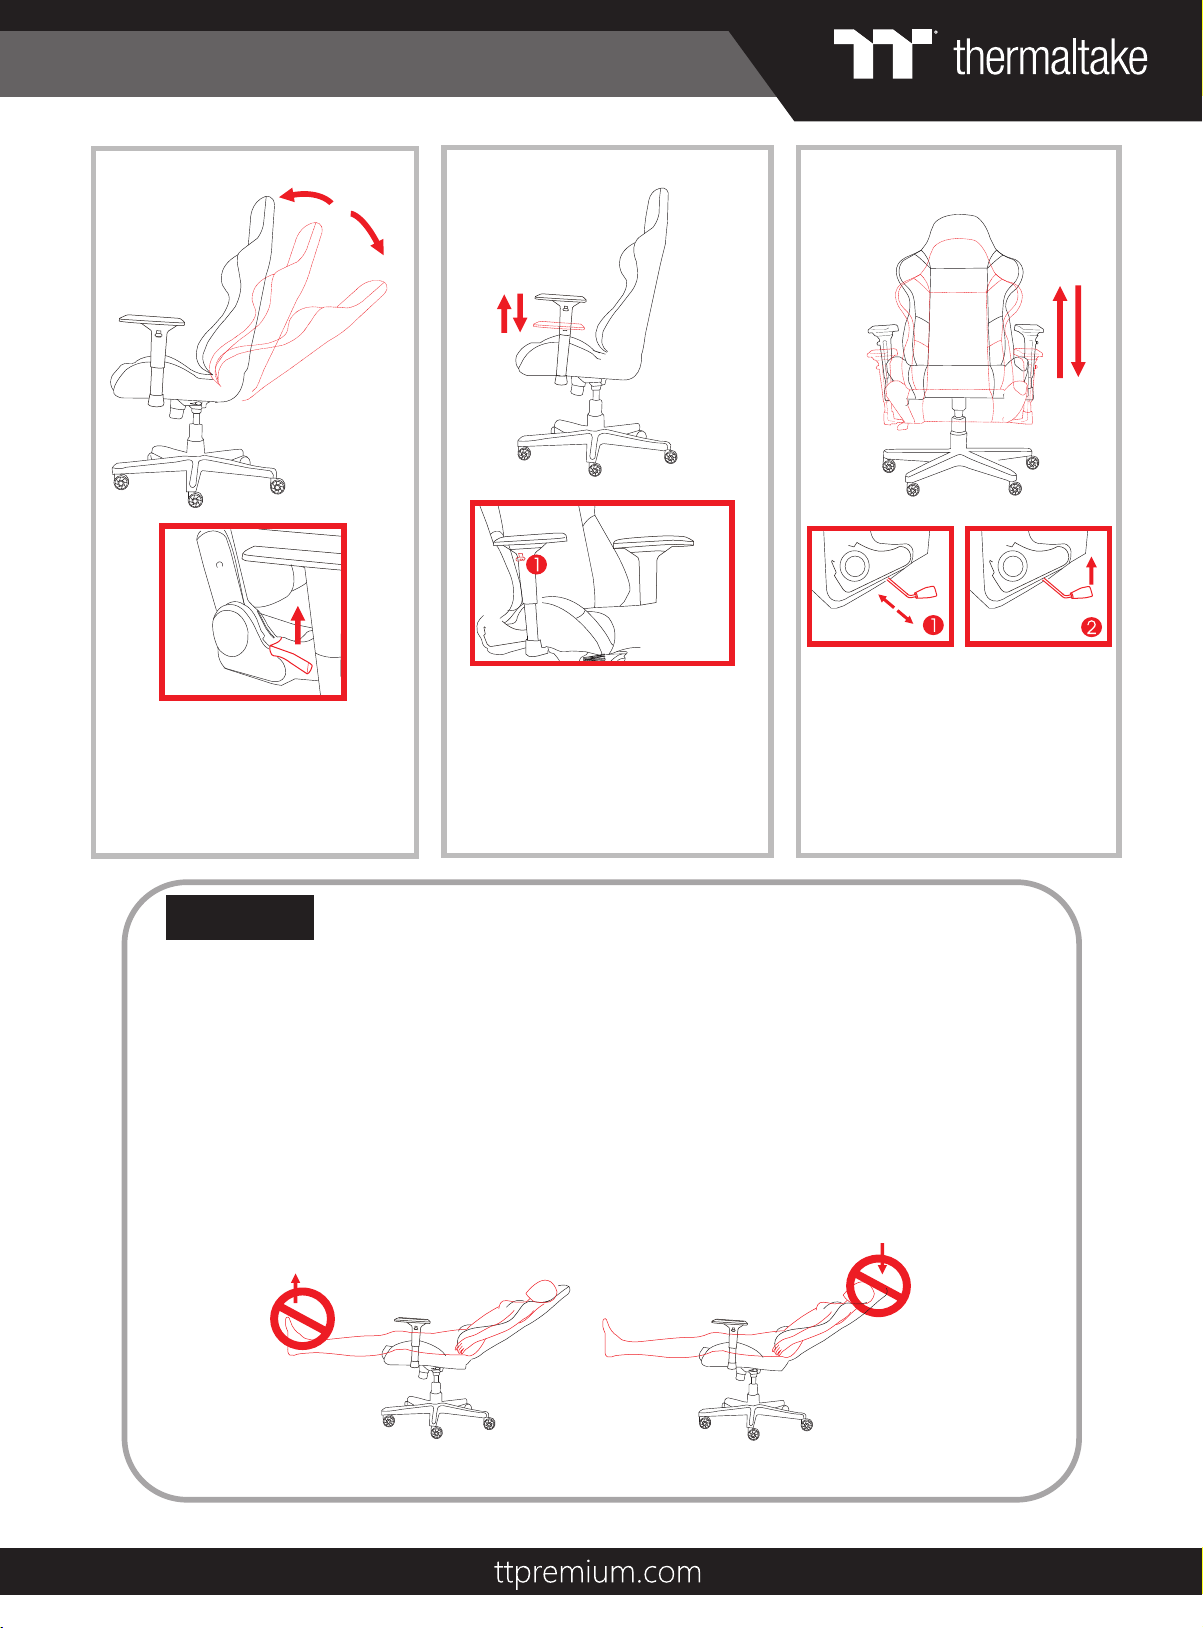
1. SEAT BACKREST ADJUSTMENT 2. ADJUSTMENT OF ARMRESTS 3. SEAT HEIGHT ADJUSTMENT
Pull the handle upwards or downwards to
the desired height and release the handle
to lock the height according to the picture.
Push the armrest panel and move back
and forth.
Backward Adjustment of Seat: Pull handle
upwards and adjust to the desired angle by
leaning gently against the seat back, release
handle once desired angle is reached.
Retracting Seat Back: Pull handle upwards,
gently lean back against seat back for
automatic angle release.
Pull up the handle underneath the right
side of seat base to adjust the seat height
and then lock it by releasing the handle.
1.Max load : TT Gaming U Fit - 140KG/308.64ib
TT Gaming U Comfort - 140KG/308.64ib
2.Do not use the chair for other purposes other than originally intended by the manufacturer.
3.Do not use the chair as a ladder.
4.We recommend placing the chair on a soft covering when used on hard floors as to avoid potential damage.
5.Chair is designed for surface use.
6.Product is for single person use.
7.We recommend not to move the chair with objects on it.
8.Do not place the chair near flammables for the risk of fire hazard.
9.To prevent damage, keep away from direct sunlight.
10.Keep away from fire or water hazards.
11.Use a soft dry cloth for general cleaning and maintenance of the chair. Do not apply corrosive chemicals on the chair.
12.Do not dismantle parts outside of original installation procedures.
13. If the dirt can not be removed even with a light wipe, soak a soft cloth in a 2% solution of neutral detergent in hot water
and wipe it with a dry cloth.
14.Please read the user guide carefully.
15.Two adults are recommended for assembly.
For your safety, do not lift up your feet For your safety, do not push your head back
whilst lying on the chair. on the headrest area whilst lying on the chair.
Attention