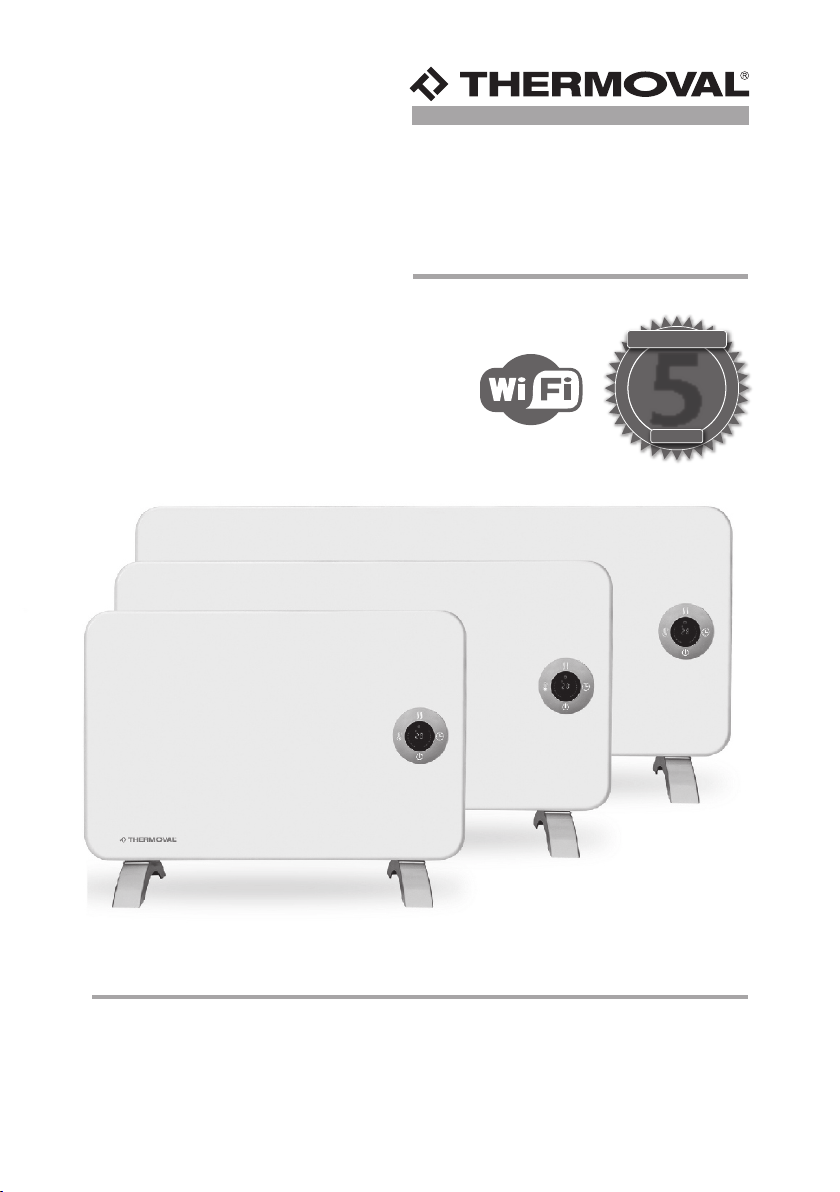
Thermoval T19 1000 WiFi User manual
ELECTRICAL
T19 1000 WiFi
HEATER
T19 1500 WiFi
T19 2000 WiFi
Manual
H
E
A
T
I
N
G
E
L
E
M
E
N
T
H
E
A
T
I
N
G
E
L
E
M
E
N
T
5
YEARS
WARRANTY

ATTENTION!
2
The device is exclusively used in residential areas where the air temperature
does not drop below 5°C.
The device can not be operated at temperatures exceeding the permissible
range of minimum and maximum >5-35<°C
It is forbidden to cover the air inlet and outlet grilles in the radiator.
Doing so may result in overheating, destruction of the radiator
or in the risk of fire.
Only an authorized service center is allowed to repair the device.
In the event of a malfunction or prolonged interruption in the use of the device,
the heater should be disconnected from the mains, pull out the plug.
The external surface of the device may heat up to a significant temperature.
It is not allowed to place the device on carpets and linings with long bristles.
The device should be used away from water sources, eg: bathtub, shower, sink.
Do not use the heater in rooms with flammable materials.
It is prohibited to bring the power cord close to a hot device.
Do not install the heater directly under the power socket.
The socket should be next to or below the device.
Do not leave small children unattended in the room where the radiator is located.
SAFETY RULES
1
ATTENTION !
THE APPLIANCE SHOULD NOT BE INCORPORATED
FOR HOUSEHOLD WASTE!
In accordance with applicable law, unusable devices powered
by electricity should be collected separately, in specially designated places, for processing
and re-use, based on applicable environmental standards.
The product meets the requirements
in the European Union and EFTA directives.
The product complies with the requirements
of the European Union directives.
heating power
power supply
weight
dimensions h/w/d
500 - 1000 W power split
~230V 50Hz
4,1 kg.
380 / 600 / 65 mm
Model T19 1000W WiFi
750 - 1500 W power split
~230V 50Hz
4,8 kg.
380 / 760 / 65 mm
Model T19 1500W WiFi
1000 - 2000 W power split
~230V 50Hz
5,4 kg.
380 / 920 / 65 mm
Model T19 2000W WiFi
2TECHNICAL DATA
3
3
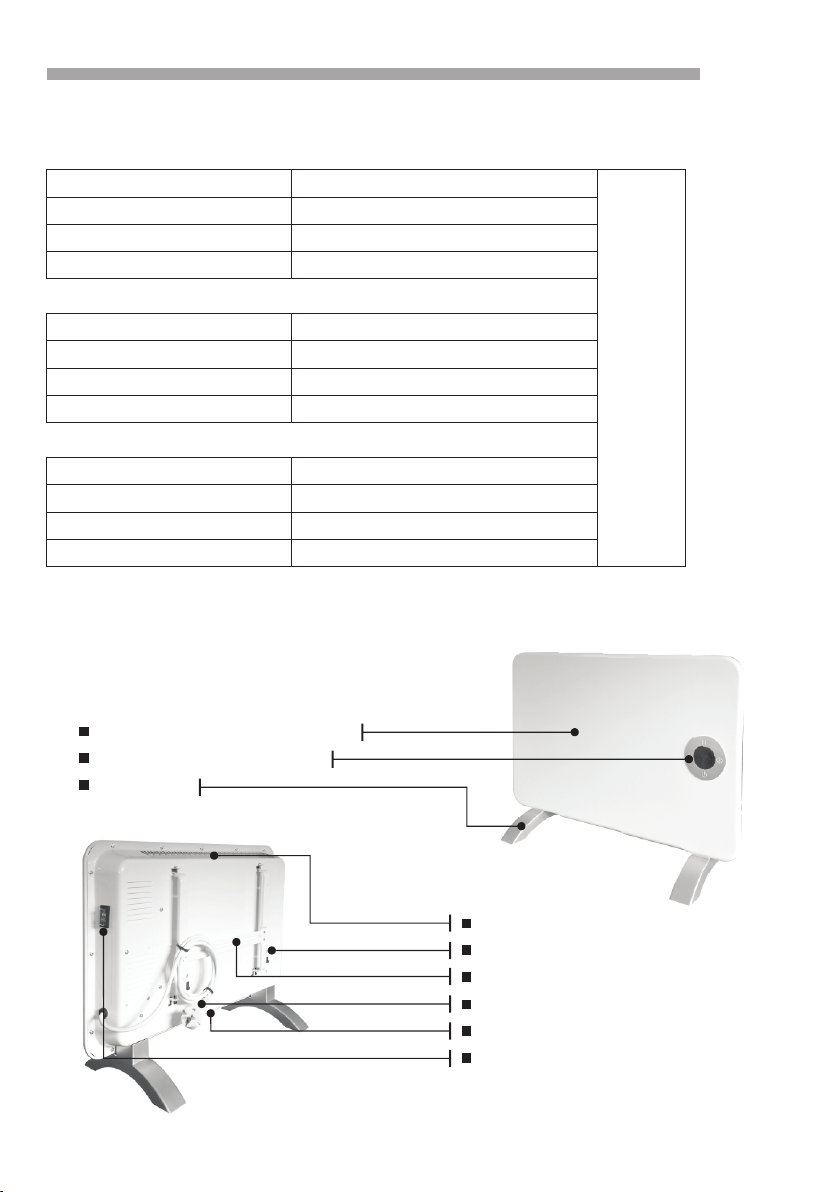
DESCRIPTION OF THE HEATER CONSTRUCTION
Front housing of the radiator
Control panel with display
Static feet
Upper air outlet
Radiator rear case
Wall-mounted hanger, screwed in
Power cord with plug
Low air inlet grille
Main switch
IP24
heating power
power supply
weight
dimensions h/w/d
heating power
power supply
weight
dimensions h/w/d
ELECTRIC
HEATER
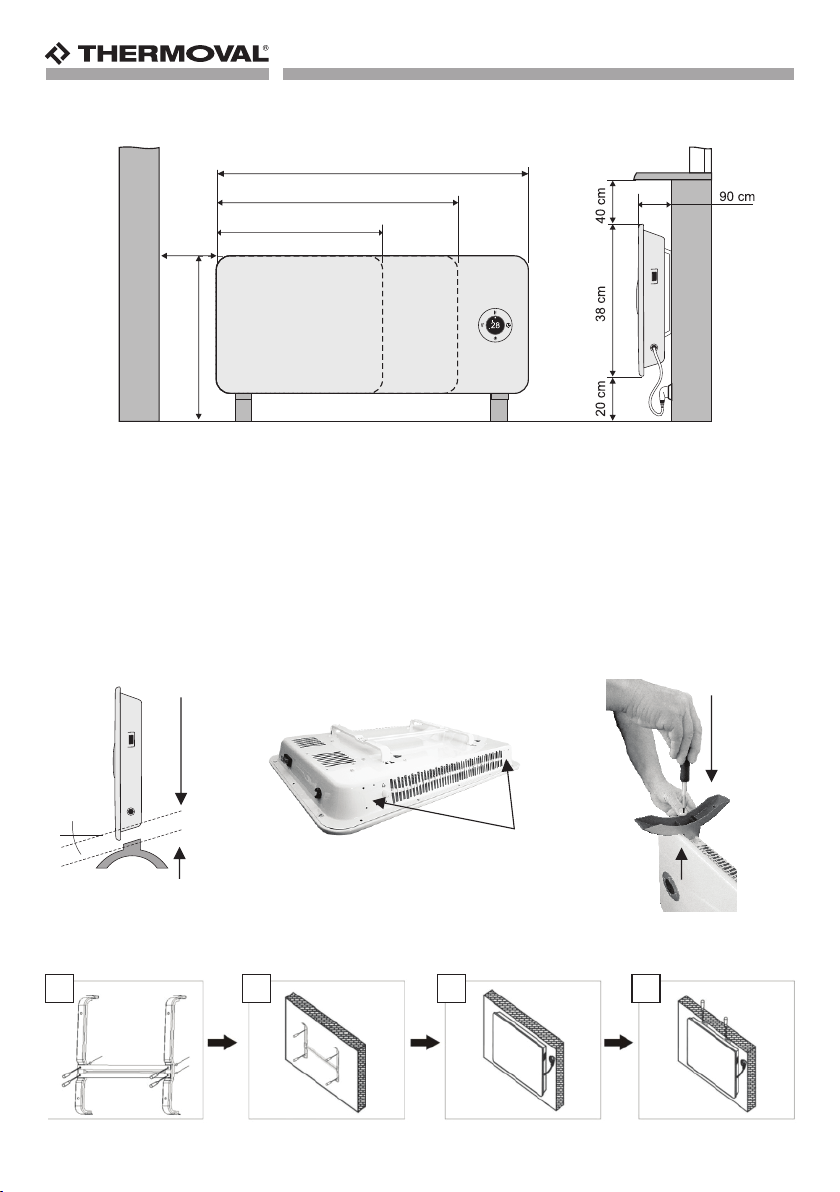
4STATIC LEGS INSTALLATION
WALL INSTALLATION
The radiator is equipped with a pair of legs to set the heater on the floor. In order
to install them, use the 4 screws (self-tapping screws) to screw the feet to the bottom
of the housing. For this purpose, there are special mounting holes on the bottom
housing. Before fitting, adjust the shape of the feet to the radiator housing.
Using a Phillips screwdriver, tighten the feet to the housing, using two screws per side.
ATTENTION!
Under no circumstances should you place the device without the mounting legs
being screwed onto the device
5
43 cm
92 cm
30 cm
SAFE DISTANCES FROM ELEMENTS
76 cm
60 cm
1000 W 1500 W 2000 W
wall or furniture
wall
windowsill
1 2 3 4
(Fig.1)
Make the right place for assembly.
Keep the required minimum distances from walls, furniture, window sill, etc. (Fig.2)
Mounting holes
4

On/ OFF button
ELECTRIC
HEATER
5
1 - Use the assembly template to mark the space for the mounting pins.
2 - Drill the holes and install the wall plugs (figure 2 - img. 1)
(4 mounting pins with screws are included with the heater)
3 - Screw the wall hanger (figure 2 - img. 2)
4 - Install the heater on the hanger (figure 2 - img. 3)
5 - Finish the installation by screwing the two pipes blocking the heater
on hanger (figure 2 - img. 4)
Remember! The power socket must be located on the side of the radiator
or under the radiator, never above the radiator.
4DESCRIPTION OF THE CONTROL PANEL
Heating mode button 50% -100% / WiFi connection
Ready for work led indicator
Work mode controls
T19 1000W
- 50% - 500W, - 100% - 1000W
Button - temperature setting
Temperature display
Work / WiFi connection activation light
T19 1500W
- 50% - 750W, - 100% - 1500W
T19 2000W
- 50% - 1000W, - 100% - 2000W
h
Description of the operation of the control panel
With this button you turn ON or OFF the heater. Button activates the heater,
after switching the power supply ON with the main switch, which is located on
the side of the radiator housing.
Heater indicates switch ON with activation sound.
LED indicators lamps in TIMER mode
Lights informing about TIMER activation
TIMER button
On / off button

6
Heating mode button / WiFi connection
With this button, by pressing once, you can change the heating mode.
The appropriate icons will appear on the display:
- 50 % , - 100 %.
By pressing and holding the button for about 5 seconds, you activate the WiFi
connection in the heater. The moment of activation of the WiFi module is
signaled by a longer sound signal. The heater automatically connects to
wireless network and the LED will flash on the display
"Work activation / WiFi connection"
Controlling the wireless radiator, it is possible through a special program,
the operation of which is described in a separate manual.
Temperature setting button
Using this button you can set the temperature that the heater should maintain.
Press once - you enter the option to change the temperature, and the display
shows the flashing value of the currently set air temperature
Subsequent press
TIMER button
With this button you can program the radiator's operating time in the range
from 1 to 24 hours, with an accuracy of 1 hour. After the set time has elapsed,
the radiator will automatically turn off.
Press once - you enter the option of setting the working time. The display will
show the value (00) with the icon {h} and the blue LED will indicate
"Working in TIMER mode".
Subsequent presses - select the number of hours after which the device should turn
off. After selecting the appropriate settings, the indicator will
flash. After about 5 seconds, the thermostat will be activated
and the measured ambient temperature will appear again on
the display and the TIMER lamp will remain visible, informing
about the operation in the program of the preset mode.
You can check or change settings at any time by pressing
button
Setting the value (00) turns off the TIMER
- change the temperature settings every 1 °C, in the range
of 15 to 35°C in the loop. After selecting the appropriate
temperature, the indicator will flash. After about 5 seconds,
the thermostat will start and the measured ambient
temperature will be displayed again. The temperature readout
is made using a sensor placed on the bottom of the housing in
a plastic cover, near the air inlet grille. The thermostat measures
the cold air drawn by the device from the bottom. It is a local
measurement, short-term and it may be necessary to adjust the
temperature on the programmer in order to obtain the right
temperature in the room. The display shows the ambient air
temperature on the display. You can check or change settings
at any time by pressing the button

7
Sound signaling
All changes made to the device are confirmed by a sound signal.
Overheating protection
The radiators have been equipped with a thermal fuse protecting the device
against overheating. Overheating can occur for a variety of reasons.
The most common reasons for overheating are: disruption of free air
circulation or operation of the device with full power at high ambient
temperature. In such a situation, the thermal fuse cuts off the power supply
to the heater. If the heater is turned off in an emergency, disconnect the
heater from the power source and leave the appliance to cool down.
The fuse will restart the power supply after it has completely cooled down.
Cleaning and maintenance
The radiator should be protected from dirt and dusting. Maintenance
should be limited to cleaning the housing with a soft cloth and without using
aggressive cleaning liquids. All work related to cleaning the interior of the
heater may only be carried out by an authorized Thermoval service center.
Any unauthorized interference, opening, attempts to clean or repair the
interior of the device automatically result in the loss of warranty rights.
FAULTS AND REPAIRS
In the case when the device stops heating or there are errors in the operation
of the control panel, please check the correctness of connection for the power
supply and correct settings in the programmer.
If, after checking, an error in connection or settings is not detected and the
radiator is still defective, contact the certified service.
ATTENTION ! All attempts to repair, interfere with the construction of the
device, carried out by third parties, outside the authorized
service center, result in automatic loss of warranty rights.
WARRANTY
Thermoval Polska guarantees a reliable work in the dimension of:
- 2 years for the housing and electrical controls
- 5 years for a heating element (heater)
ELECTRIC
HEATER

Manufacturer and distributor:
QR code
29,502 x 29,502 mm
This manual suits for next models
2
Table of contents
Popular Electric Heater manuals by other brands

Soleus Air
Soleus Air HC1-15-12 operating instructions

Gude
Gude GH 15 EV Translation of original operating instructions

Harvia
Harvia K10G-U1W Owner's/operator's manual

Trotec
Trotec TEH 70 Original instructions

Trotec
Trotec TDS 20 R operating manual

Airchaud Diffusion
Airchaud Diffusion Haverland HL WI3S/C Instruction and installation manual


