Thermrad AluSoft Electric Installation and operation manual
Instruction
and installation
booklet
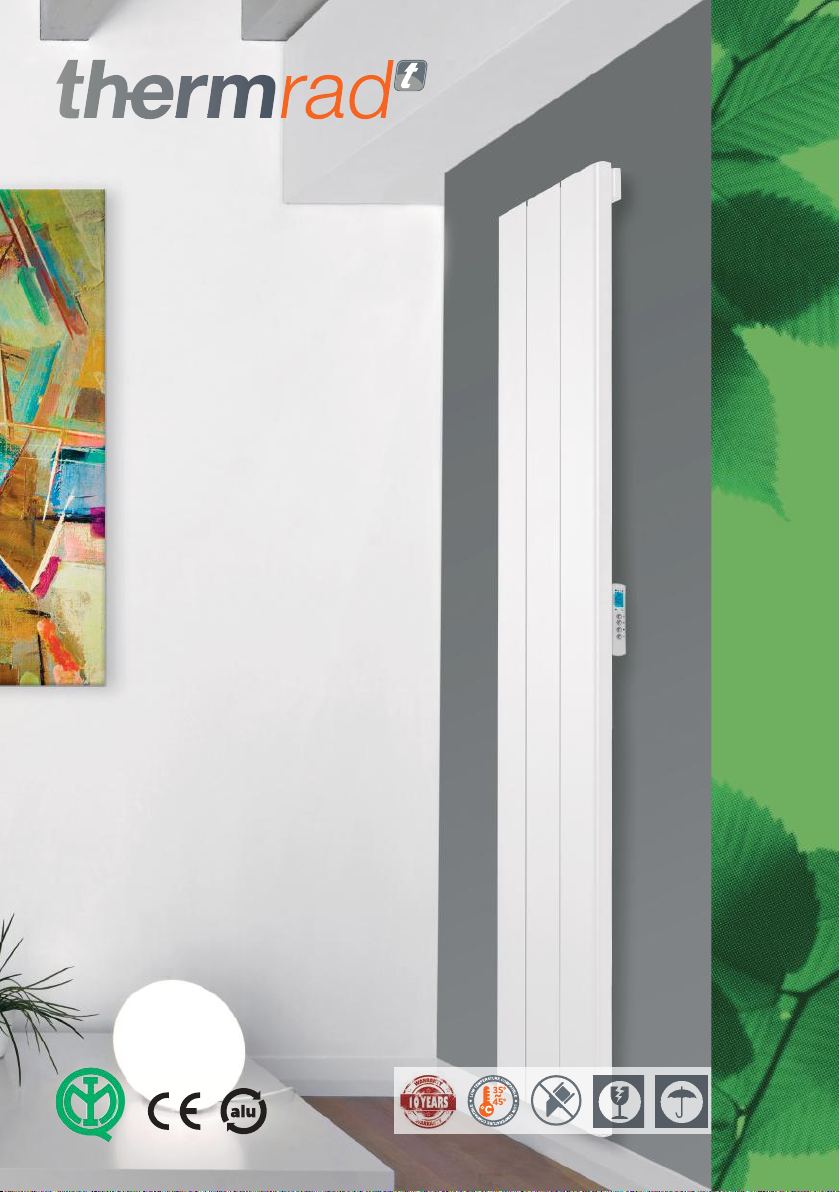
The image refers to the 1500W model.
AluSoft Electric
100% Electric
Electric design radiator alu
We disclaim all responsibility for any inaccuracies contained in this instruction
manual.
Customers are invited to check the material received before assembly or installation.
1Manufacturer's data page 2
2Warnings and precautions page 3
3Assembly warnings page 4
4Useful installation requirements page 5
5Material present in the packaging page 5
6Preparations for wall support page 5
7Technical details page 6
8Manual thermostat: how to use page 8
9Special functions page 12
10 Supply of the product page 13
11 Certifications page 13
12 Warranty and assistance page 14
13 Towel rail installation and measures page 15
INDEX
CAUTION!!!
MANUFACTURER’S DATA
Dear Customer,
Thank you for choosing us. Before installing and / or using the product, please
read this manual carefully regarding installation, use and correct maintenance.
This radiator is commercialized by:
SOLAR NEDERLAND B.V.
Toermalijnstraat 7
1812 RL Alkmaar
Nederland
www.thermrad.eu
IMPORTANT:
We decline all responsibility in case of accidents caused by incorrect use of
the radiator which is not in line with the following instructions.
This radiator is strictly tested according to the regulations in force before
leaving the factory.
We reserve the right to make any technical or constructive changes deemed
necessary, without notice.
The construction features of this radiator is patented.
AluSoft Electric
100% Electric
Electric design radiator alu
1 2
Instruction and installation booklet
•The radiator operates at 230V. Make sure the system voltage matches.
•The radiator belongs to class II and to the IPX4 electrical protection; do not apply any
electrical connection ignoring these safety rules.
•Make sure you have the necessary power indicated on the sign plate because the radiator
works.
•This radiator is only intended for drying fabrics washed with water.
•The radiator should not be placed immediately under a fixed socket.
•If the power cable is damaged, it must be replaced by the manufacturer or its after-sales
service, or by a qualified person, in order to prevent all risks.
•In the event of a fault, contact your dealer. Do not alter the product in any way. Any
disassembly or any opening compromise the safety of the product. We do not accept
any responsibility for accidents resulting from any type of manipulation carried out on
the electric device.
•Do not intervene on the appliance during operation.
•The protection system of this radiator is designed to prevent direct access to the electric
heating elements and must be kept in its position during use.
•The radiator may not be used by children under the age of 8 and by persons with reduced
physical, sensory or mental abilities, or by lack of experience or necessary knowledge,
provided they are supervised or after receiving the instructions for using the appliance.
and after understanding the dangers inherent to it.
•Children must not play with the appliance. Cleaning and maintenance intended for the
product must not be carried out by children without supervision.
•Children under 3 must be kept away from the appliance if they are not continuously
monitored
•Children aged between 3 and 8 years should only switch the appliance on / o under
conditions that it has been placed in the normal operating position provided that it
is supervised and has received instructions regarding safe use of the appliance and
potential hazards related to the use of the appliance.
•Children between the ages of 3 and 8 must not connect, adjust or clean the appliance or
perform maintenance on the appliance.
•The electric radiator must be installed away from any contact with water and the control
and electrical control devices must not be placed within reach of persons in bathtubs,
showers or situations in contact with water. .
•Before cleaning, make sure that the electric radiator is at room temperature and that the
circuit is disconnected.
•Clean with damp cloths without using aggressive or abrasive detergents that could
compromise the painting of the appliance.
•In models equipped with towel bar, do not load or hang excessive weights, the structure
capacity is calculated to support a maximum of 2 kg.
•On models equipped with a towel bar, the minimum height from the ground of these
elements must not be less than 60 cm.
WARNINGS AND PRECAUTIONS
Read all the following warnings and precautions carefully.
Some parts of the product can reach a very high temperature and can cause
burns. Particular attention must be paid in presence of children and persons
with reduced physical, sensory or mental abilities.
CAUTION!!!
WARNINGS AND PRECAUTIONS
Carefully read all instructions and measures
for proper radiator assembly.
•Sectioning the cables is mandatory.
•All contacts must be separated by at least 3 mm.
•It is mandatory that the power supply system to which the regulator is connected
has an extra-sensitive dierential protection.
3 4
CAUTION!!!
•Make electrical connections only after fixing the radiator to the wall.
•The fittings must be made only by qualified and experienced personnel and must
be made in compliance with the regulations in force using certified materials.
•Do not attempt to disassemble the radiator body or electrical boxes.
If you have problems, contact your installer. The supplied cable is made specifically
fortheapplication.Donot attempttoreplacethiscablewithanyotherinappropriate
cable.
•In the power supply unit, in accordance with the installation rules, a device must
be provided that ensures the omnipolar disconnection of the electrical network,
with a contact opening distance, which allows the complete disconnection of the
category conditions overvoltage III.
•In case the radiator charge is higher than the data plate of the control or control
system (contact of thermostat or control switch), interpose a properly sized power
release or counter.
•The power supply circuit of the appliance must be protected by a high sensitivity
dierential protection device.
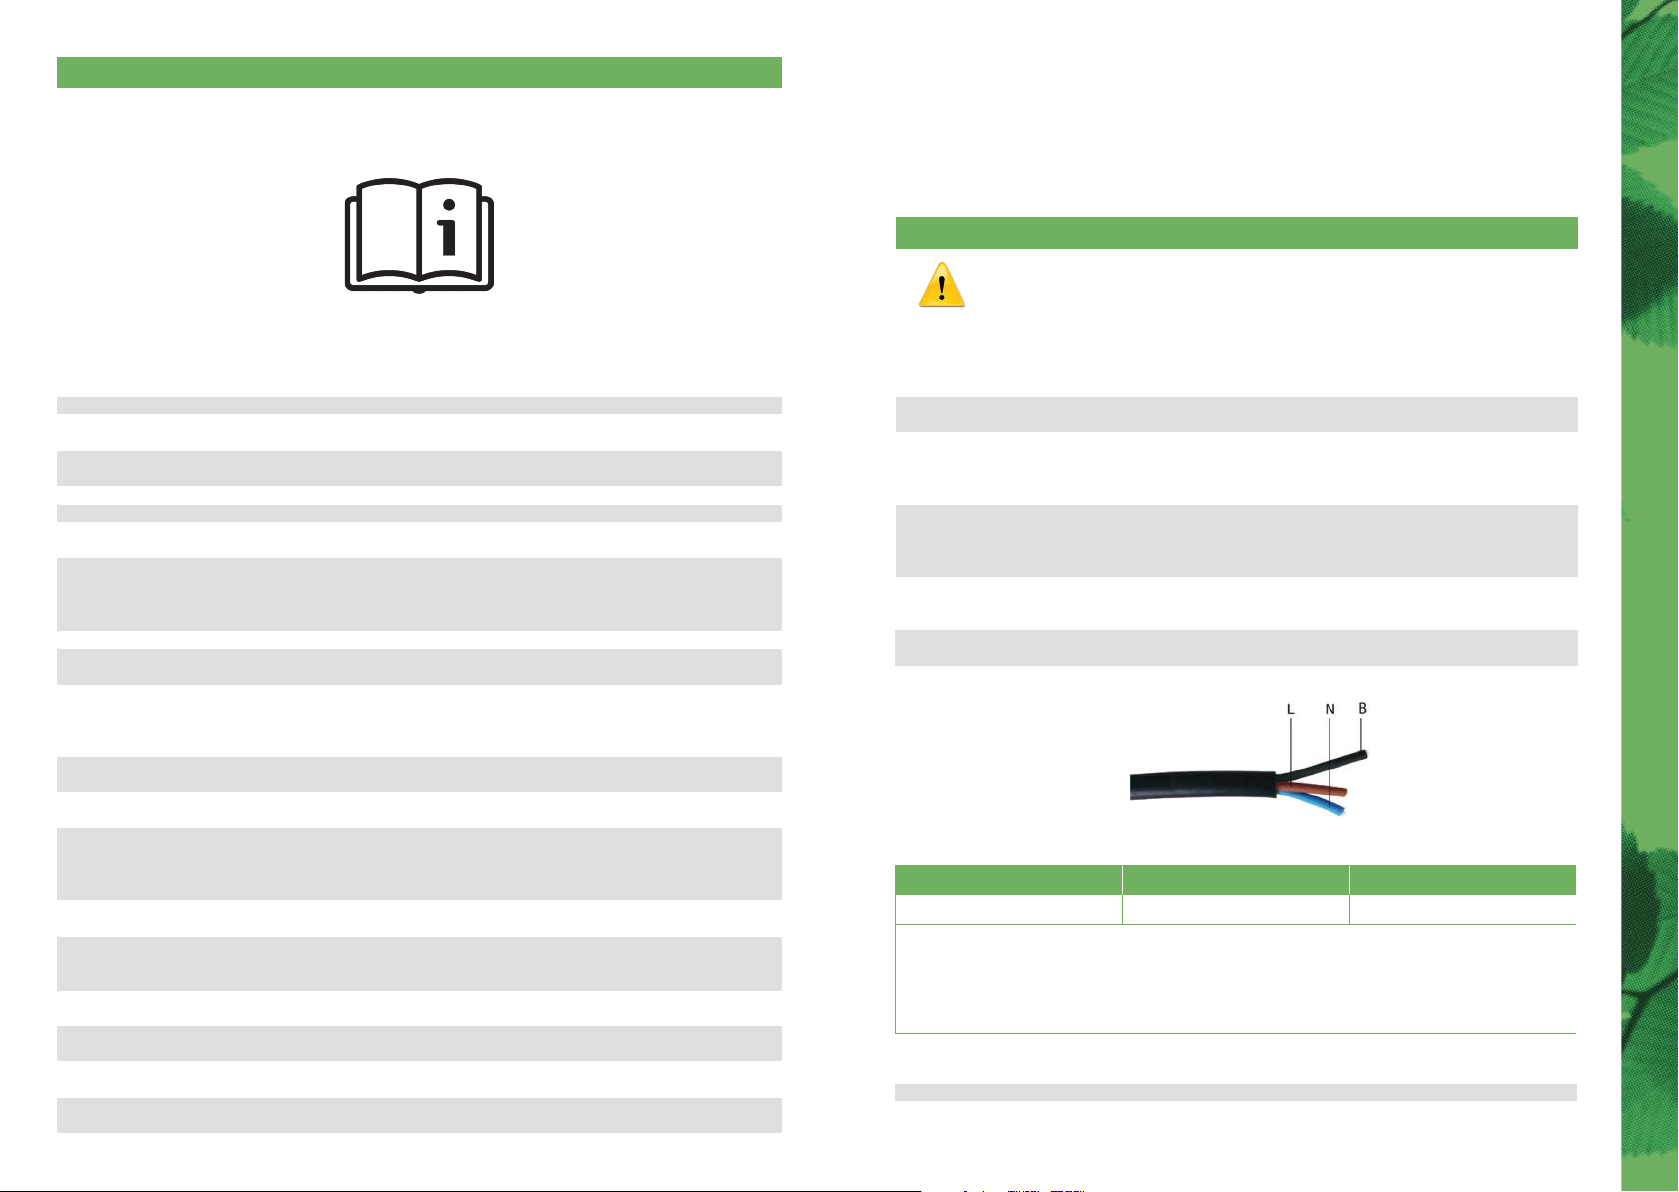
•For appliances without plug, observe the following colors:
L N B
line (brown) neutral (blue or gray) fil pilot (black)
WARNING!
The “FIL PILOT” is intended for radiators connected to the energy
management unit. If the black “FIL PILOT” cable is not used, the safety
rules require it to be insulated and not connected to the cable from the
ground.

•In the bathroom, it can be installed in zone 3 (see figure 1) provided that the control
device can not be used by people while using the shower or bathtub.
•The electric cable must be connected to an outlet or connection block, which must be at
least 25 cm away from the ground (without intermediate plugs for devices sold without
plugs.
Figure 1: Classification of the bathroom area
•Star screwdriver (in case of use of supplied sockets)
•Drill;
•Wall drill D. 8 mm (If you use the plugs supplied).
INSTRUMENTS NECESSARY FOR MOUNTING
•4 brackets for wall mounting
•8 fische plugs for concrete, whole bricks, hollow bricks, compact stone.
MATERIALS CONTAINED IN THE PACKAGING
Secure the radiator using the included fastening kit, the lower straight support
must be folded down and the hook must be pulled down using the adjusting screw
to lock the radiator.
SUPPORT PREPARATION
DATA SHEET
Length of the side exit cable: 1.20 mt
Fix the wall support in the opposite
direction to that of the other 3 to prevent
the wall radiator from tipping over.
5 6
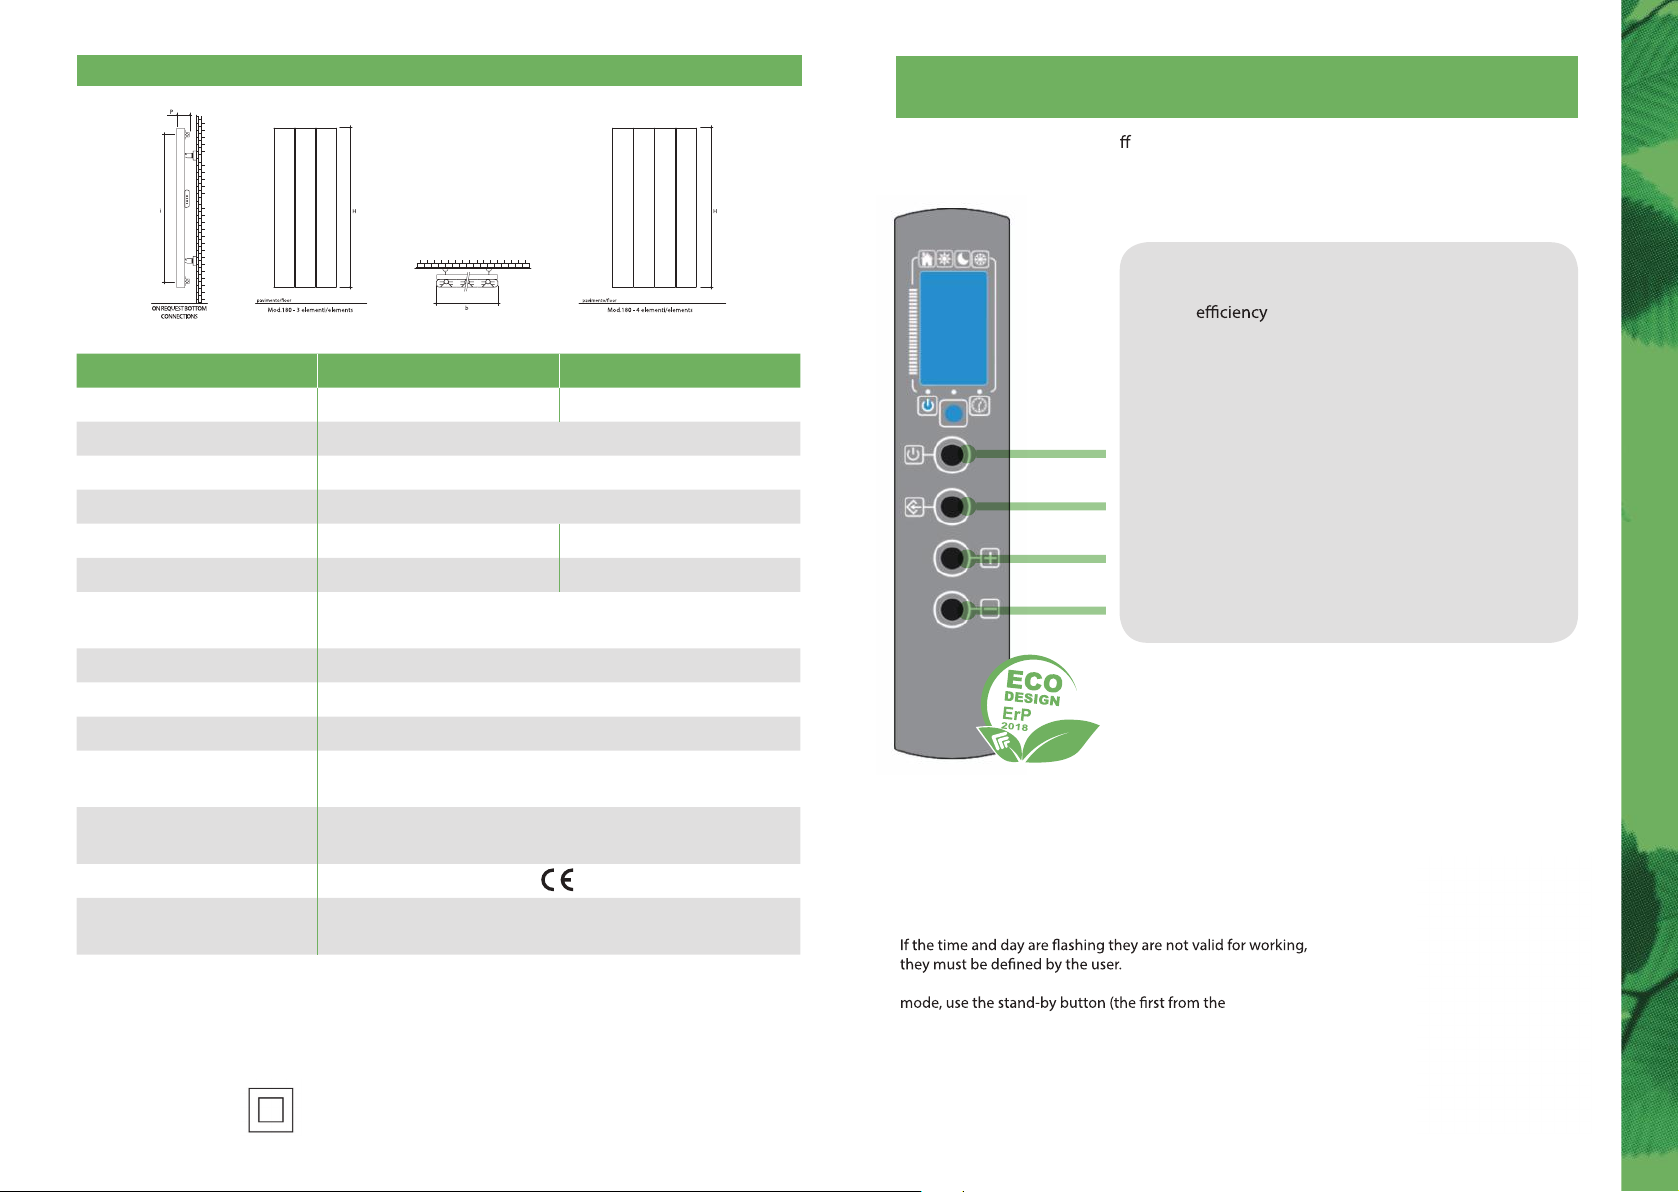
METHOD OF USE
OF THE CHRONOTHERMOSTAT
1. STAND-BY
7 8
According to the COMMISSION REGULATION
(EU) 2015/1188 of April, 28th 2015, the seasonal
energy of fixed electric local space
heaters with a rated thermal input of more than
250 W is not less than 38%.
In particular, the calculation formula:
ηs= ηs,on -10% + F (1) + F (2) + F (3) - F (4) - F (5)
with
F (2) = 7.0%: with electronic control of the room
temperature and weekly timer
F (3) = 1.0%: room temperature control with
detection of open windows
It results in:
ηs= 40% - 10% + 7% + 1% = 38%
1. Stand-by
2. Mode
3. +
4. –
In STAND-BY mode, the radiator does not work.
The screen shows the real time in the clock section of the screen.
To switch from STAND-BY mode to another operating
top) and keep it pressed for 2 seconds.
When you exit the stand-by mode, the last mode of
operation will be re-established and will appear on the
screen.
MODEL AluSoft 1800/3 AluSoft 1800/4
Rated power 1500 W 2000 W
Power supply 230V + / -10% 50Hz
Class of insulation CLASS II
Degree of protection IPX4
Dimension L x H x D 475x1800x90
Fixing hole LfxHf 152,5x1467 272,5x1467
Length / type
of electric cable total lenght 2mt / 3x1 mmq
Operating service temperature 0 - 35°C
Storage temperature 0 - 50°C
Humidity 0 - 85 % without condensation
Type of regulation Microprocessor thermostat with weekly program,
with open windows detection
Temperature regulation
range 7 - 35°C
Certification
Content of the
packaging
4 brackets for wall mounting - 8 fisher for concrete,
whole bricks, hollow bricks, compact stone
IPX4: device protected from splashes of water.
Class II: double insulation
Features of the appliance
DATA SHEET
* For towel rails installation and measures please read the final attached page
The internal thermostat has di erent operating modes, which can be selected
cyclically by pressing the MODE button.
355x1800x90

2. PROGRAM MODE
To change the comfort and night temperature, select the comfort or night
button (MODE, second from above), then use the + and - buttons to change
the temperature parameters.
3. “FIL PILOTE” MODE
NOTE:
To change the comfort and night temperature, select the comfort or night mode
using the MODE button, then use the + and - buttons to change the temperature
parameters.
4. COMFORT MODE
5. NIGHT MODE
9 10
arrow in the top left corner. A second arrow indicates the program mode
selected.
Fil Pilote command:
1) Comfort: set point = temperature of comfort mode.
2) Nighttime reduction: set point = comfort -3.5 ° C
3) ECO1: set point = comfort -1 ° C
4) ECO2: set point = comfort -2 ° C
5) Antifreeze: Delivery point = 7 ° C
6) OFF: no temperature regulation, stand-by mode
«INSIDE» has a programmable thermostat 24 / 24h and 7/7 days,
the function is selected when the arrow relative to the clock
symbol is SHOWN (the clock is at the bottom of the screen).
In the clock section is shown the time of day while the daily program is
shown on the left of the screen.
The SET temperature is visible on the screen.
To program the thermostat, please refer to the corresponding paragraph.
In this operating mode, the thermostat regulates the temperature using
the comfort or the night reduction temperature, as programmed.
An arrow at the top of the screen indicates the actual mode
(comfort or night).
The comfort program is set when the arrow on the left
indicates the sun symbol and the comfort temperature appears
on the screen.
In this operating mode the thermostat regulates the selected
temperature.
To program the comfort temperature, use the + and - buttons.
The selected temperature is used both for the weekly program
temperature point
The night program is set when the arrow indicates the moon
symbol on the screen and the temperature for the night appears.
In this operating mode the thermostat regulates the selected
temperature.
To program the night temperature, use the + and - buttons.
The selected temperature is used both for the weekly program
as the night temperature and for Fil Pilot mode as a night
temperature point.
In antifreeze mode, the arrow indicates the ice symbol,
and the antifreeze temperature, set at 7 ° C, appears on the
screen.
This mode of operation prevents the room from freezing,
when the temperature is below 7°C.
6. ANTIFREEZE
7. WEEKLY PROGRAMMING 24 H/24 AND 7/7 DAYS
Press the MODE button to save the weekly program at least 5 seconds until END appears.
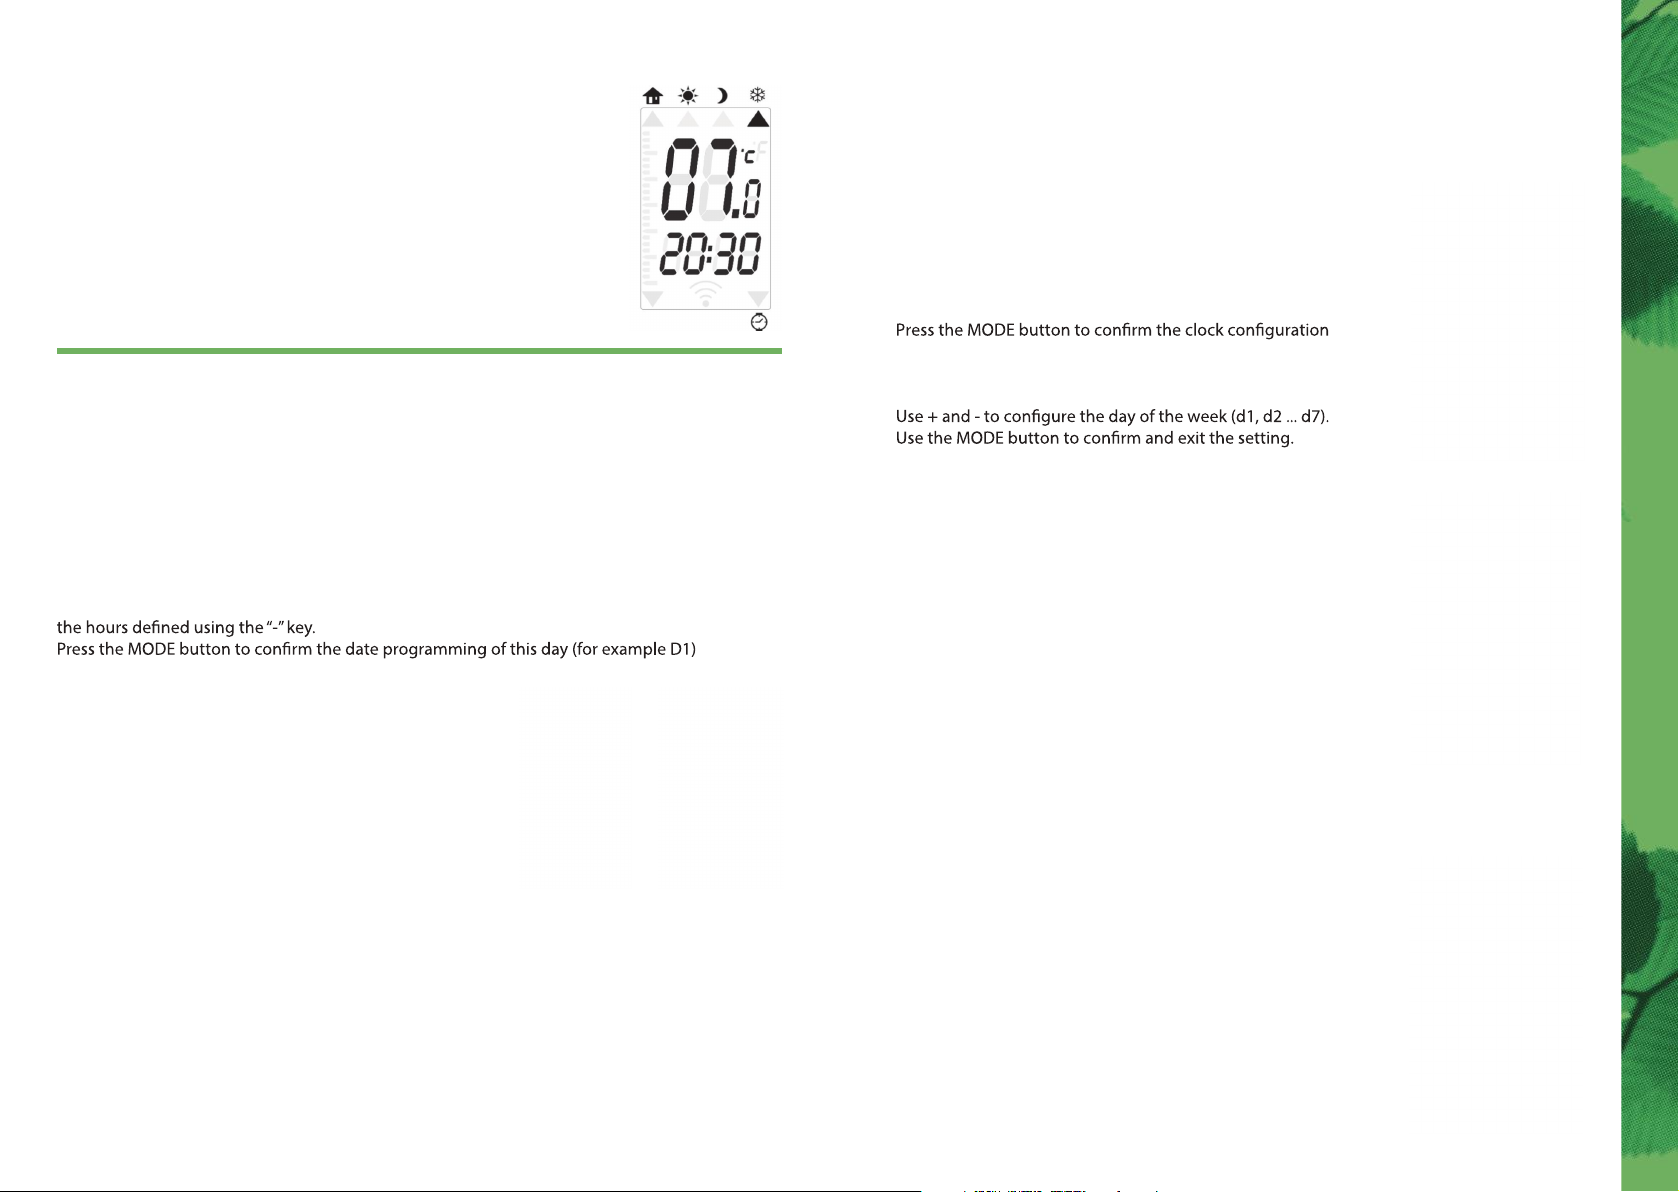
a. SET HOURS AND DAY
The thermostat clock can only be changed from STAND-BY mode.
When in Stand-by mode please press the MODE button until
the clock is activated.
If you press the MODE button for a few seconds, the screen shown
below (SET) appears on the screen.
Adjust the clock by using the + and - buttons, press and hold
the button to change quickly.
and switch to adjust the day of the week by keeping the MODE
button pressed.
b. OPEN WINDOW DETECTION
8. SPECIAL FUNCTIONS
11 12
To program the thermostat, select the program mode by using the MODE button
(second button from the top), until “PRO” appears on the screen.
Press the MODE button again for about 5 seconds, the letters FP (Programming
Function) will appear on the screen, and then the letters “PR” will allow you to access
the programming mode.
The message d1 (day 1) will appear on the screen and use the + and - buttons to change the time.
With the + button, the function will be activated at the desired time while it will stop during
and select the other days d2, d3 .... D7.
EXAMPLE:
Once you have entered d2, press the MODE key until
the word PRO appears for a few seconds and repeat
the above operation for D3.
The day of the week and the hours to be programmed are displayed on the screen.
The lower screen indicates the time interval to program: use + to use the comfort
temperature and - to use the night temperature. For each selection the time interval will
increase automatically.
To return to the day selection, press the MODE button.
The function can detect the status of open windows, the function
is activated when the temperature drops QUICKLY (e.g. when a
window is open in the room).
When the status of the open window has been detected,
“OPn”(OPEN) appears on the screen and the radiator switches to
anti-freeze mode at 7 ° C.
The status ends automatically if the window is closed or by
pressing the thermostat MODE button.

DISPOSAL
The presence of a mobile container crossed out on the
product indicates that within the European Union all electric
and electronic products are subject to special collection at
the end of their life cycle. Do not dispose of these products
in unsorted municipal waste.
At the end of the life of the product, the appliance can’t be
disposed of in municipal solid waste but be delivered to a
special collection center in your region.
Theseparatecollectionofelectricalandelectronicequipment
is an integral part of a policy of preservation, protection and
improvement of the quality of the environment; it is aimed
at avoiding potential harmful eects on human health due to
the presence of dangerous substances classified as such by
European directives.
CERTIFICATION
This product is manufactured in accordance with the European directive:
Directive 2014/35/UE
In accordance with the harmonized standards:
- EN 60335-1:2012 + A11:2014 + A13:2017: Safety of household electrical
appliances and similar, general regulations.
- EN 60335-2-30:2009 + A11:2012: Safety of household electrical
appliances and the like, Part 2: special requirements for electric
radiators.
- EN 60335-2-43:2003 + A1:2006 + A2:2008: Safety of household
electrical appliances and the like, Part 2: Particular requirements for
drying machines and towel warmers.
- EN 62233:2008
- EN 55014-1: 2000 + A1: 2001 + A2: 2002
- EN 61000-3-2: 2000
- EN 61000-3-3: 1995 +A1: 2001
- EN 55014-2: 1997 + A1: 2001
- EN 61000-4-2: 1995 +A1: 1999 +A2: 2001
- EN 61000-4-4: 1995 +A1: 2001 +A2: 2002
- EN 61000-4-5: 1995 +A1: 2001
- EN 61000-4-6: 1996 +A1: 2001
- EN 61000-4-11: 1994 +A1: 2001
WARRANTY AND ASSISTANCE
The aluminum alloy body is guaranteed against manufacturing defects
for 10 years from the date of purchase.
The electrical and electronic components are guaranteed for 2 years from the
date of purchase of the radiator.
The warranty is valid if the product remains intact, without any alteration or
modification.
The warranty is valid from the date of sale.
It is therefore necessary to keep the invoice or receipt to prove the date of
purchase.
Technical assistance
For technical assistance, contact your installer.
CAUTION!!!
For the validity of the warranty, the installation must comply with the standards
and laws in force and must be performed ina professional manner.
The manufacturer reserves the right to make changes to its products which it
deems necessary or useful without compromising the essential characteristics.
13 14
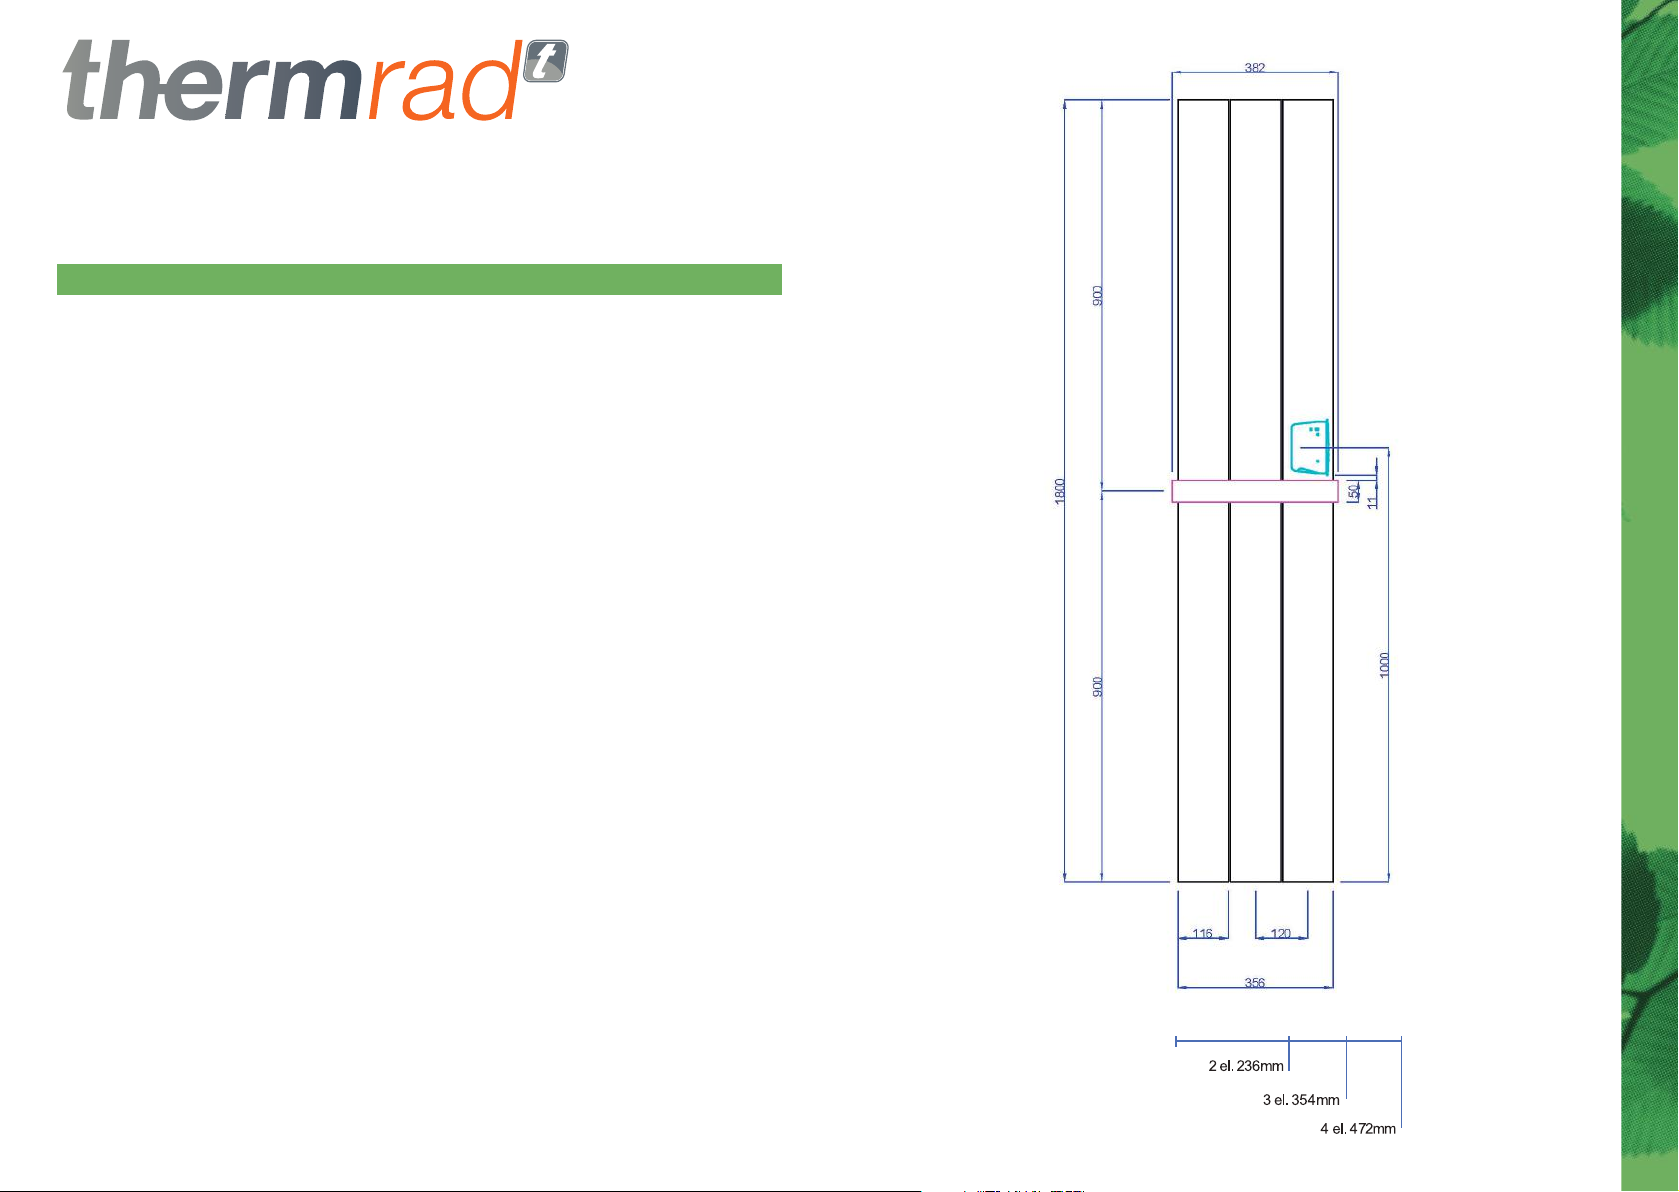
TOWEL RAIL INSTALLATION AND MEASURES
AluSoft Electric
For Thermrad AluSoft asingle towel rail can be added.
The bar canbemounted at 900mm from thebottom of the radiator.
For assembly, FIX the bar to the radiator USING a suitable screwdriver, inserting
the screws in the appropriate holes already repared on the radiator and the bar.
Towel rails measures:
For AluSoft 2 elements: 252*50 mm
For AluSoft 3 elements: 383* 50 mm
For AluSoft 4 elements: 504,5* 50 mm
15 16
NOTES

Table of contents
Other Thermrad Heater manuals

Popular Heater manuals by other brands

Etherma
Etherma TC Series Installation and operating instructions

Laretti
Laretti LR-HT3004K manual

Helo
Helo HIMALAYA Elite Quick instructions

Austria Email
Austria Email REU Series Operator's Manual and Installation Instructions

Webasto
Webasto HL30 Workshop manual

Johnson
Johnson Arcobaleno Instructions for use


jablotron
jablotron Futura user manual

Vasco
Vasco EVE10 Instructions for installation and use

Pinnacle Climate Technologies
Pinnacle Climate Technologies REMINGTON REM-80T-KFA-B User's manual & operating instructions

Westfalia
Westfalia 86 81 39 instruction manual

BENSON
BENSON RH06 user manual

Santon
Santon DFB 25 instructions