Thinkkitchen PARMA User manual

PARMA
NOODLE MAKER
MACHINE À NOUILLES
200 WATTS
INSTRUCTION MANUAL / MODE D'EMPLOI

2

THANK YOU!
Thank you for purchasing this appliance. We trust that you will have a
pleasant experience with your new product.
To guarantee safety and best efciency, please read this manual
carefully and keep a copy for future reference.
EN
3

• A variety of mold combinations can make narrow noodles, large noodles,
etc.
• Add liquid eggs, vegetables (soft vegetable leaves can be put in directly,
hard vegetables must be juiced), and more to make healthy and delicious
noodles with different avours.
• Simple recipes and simple operation.
• Food-grade materials, hygienic, healthy, environmentally friendly and
practical.
• No hand kneading necessary - put the right amount of our in the machine
and the machine will automatically mix the our and water.
• Excess dough can be cleaned up easily by hand - simple and convenient.
• Multiple safety protection devices, long service life.
EN
FEATURES
4

• This product is suitable for personal or family use, not suitable for long-term
work for commercial purposes.
• The minimum amount of noodles per batch is about 160g.
• Please add our and water in strict accordance with the amount of
ingredients recommended in the reference table for the ratio of our to
water. Otherwise, the noodles will be too dry or too wet, and the accessories
may be damaged in severe cases.
• When using the manual mode, make sure that the our and water are
evenly mixed before squeezing, so as not to block the hole of the cutter head
with dry our and cause damage to the accessories.
• The product is equipped with an intelligent control program, which will
automatically stop after a noodle-making cycle. If you need to continue
using it, please stop for 20-30 minutes and wait for the motor to cool down
before continuing use. This practice will help extend the product life.
• Before disassembling, installing, or adjusting any part of the product, be sure
to disconnect the power supply.
• If the product needs to be repaired, please contact the company's customer
service department, or go directly to the repair point designated by the
company for repairs. To avoid any danger, do not disassemble it yourself.
• Please check the mixing barrel, screw rod, large nut, and kneading cavity
before use.
• When the product is on, it will intelligently identify the softness and hardness
of the dough, and will reverse during the process.
• If the machine is blocked, please check if the dough is too dry or if foreign
matter has entered the mixing tank. If there is no foreign matter, add the
appropriate amount of water. After stirring for two minutes, select
"manually out" to continue working. If the machine is still blocked, it is
recommended to disconnect the power supply and clean the our in the
knife mold before continuing use.
• After the product is connected to the power supply or during
operation, if there is a ashing alarm, please disconnect the power supply
and check whether there is clogging of our or other things. After cleaning it,
reconnect the power supply to continue using. If the display ashes Alarm,
please go to the designated maintenance point of our company for repair.
• When the product is working, it is strictly prohibited to add any non-liquid
foreign matter (such as chicken) in the mixing tank. Eggs need to be well
mixed with water.
EN
PRECAUTIONS
5

EN
PRECAUTIONS
• When the product is working, it is strictly prohibited to open the top cover or
unscrew the die nut to take out the die, let alone use it.
• To avoid thermal deformation and damage, don't sterilize any part of this
product in a microwave oven.
• Do not put the body of the machine in water or other liquids, nor wash it
under water or other liquids.
• Do not use steel wool, abrasive cleaners, or corrosive liquids (such as
gasoline or acetone) to clean the product.
• The product should be stored in a place out of reach for children. Do not let
people (including children) who lack relevant experience and knowledge
use or play with this product.
• Avoid exposure to the sun to avoid discoloration of the appliance.
• It is strictly prohibited to disassemble or modify this product by yourself.
• Do not put this product in the dishwasher for cleaning.
• Do not heat the parts of this product.
• This product is a Class I electrical appliance. The grounding wire of the
socket must be well grounded.
• When making egg noodles, please weigh the eggs and water. It is strictly
forbidden to add egg liquid directly.
• If the power cord is damaged, it must be replaced with a special soft cord
or special components purchased from the manufacturer or maintenance
department.
6

EN
PARTS & FUNCTIONS
Note: The extrusion pipe’s plastic washer can be removed for cleaning.
Don’t forget to insert the washer after cleaning, otherwise the product cannot
operate properly.
Washer
Fix location Ready for use
1. Housing
2. Mixing bowl
3. Mixer
4. Extruding pipe
5. Mixing axle
6. Discs
7. Discs nut
8. Top cover lid
9. Extruding head
10. Water measuring cup
11. Flour cup
12. Cleaning tool
1
4
7
10
2
5
8
11
3
6
9
12
7

EN
USER GUIDE
Before the rst use of the product, please thoroughly clean the parts in contact with
the ingredients.
• Operation instructions
• Button description
This machine has "Knead","On/Off", total of 2 buttons "On/Off" button: enter the work,
make pasta automatically or shutdown state; "Knead" button: Re-extrude pasta.
• Status description
1. Initializationstate: Plug in the power supply, indicate the water level and humidity
for 15 seconds, and the machine enters the standby state. In the standby state,
press "Stop/Automatic presentation: Manual presentation". The indicator light is
on.
2. Power-on state: When the top cover is closed in the standby state, when the
function is selected, the indicator light is always on, and the noodle machine
automatically enters the corresponding working state. At this time, pressing
other function selection keys is invalid.
3. Pause: In the standby state, it is detected that the top cover is opened, and when
the function key is pressed, the noodle machine does not enter the working state,
and the motor does not rotate. In the working state, if the top cover is detected
to be opened, the motor will immediately stop rotating - it will go back to the
working state if the top cover is put back on within 1 minute, and will return to the
off state if the cover isn't shut after 1 minute.
• Process description
1. Come out manually: In the standby mode, press the "Manually" button to select
this process. The function indicator light is always on, and the process goes
as such: 4 minutes and 25 seconds, pause for 5 seconds, and reversing for 30
seconds (takes 5 minutes total)
2. Come forward automatically: In the shutdown state, press the "Automatic
appearance" key function. The function indicator light is always on. Process:
reverse mixing for 3 minutes, pause for 5 seconds, and about 12 minutes to rotate
forward.
Knead On/Off
8

EN
USER GUIDE
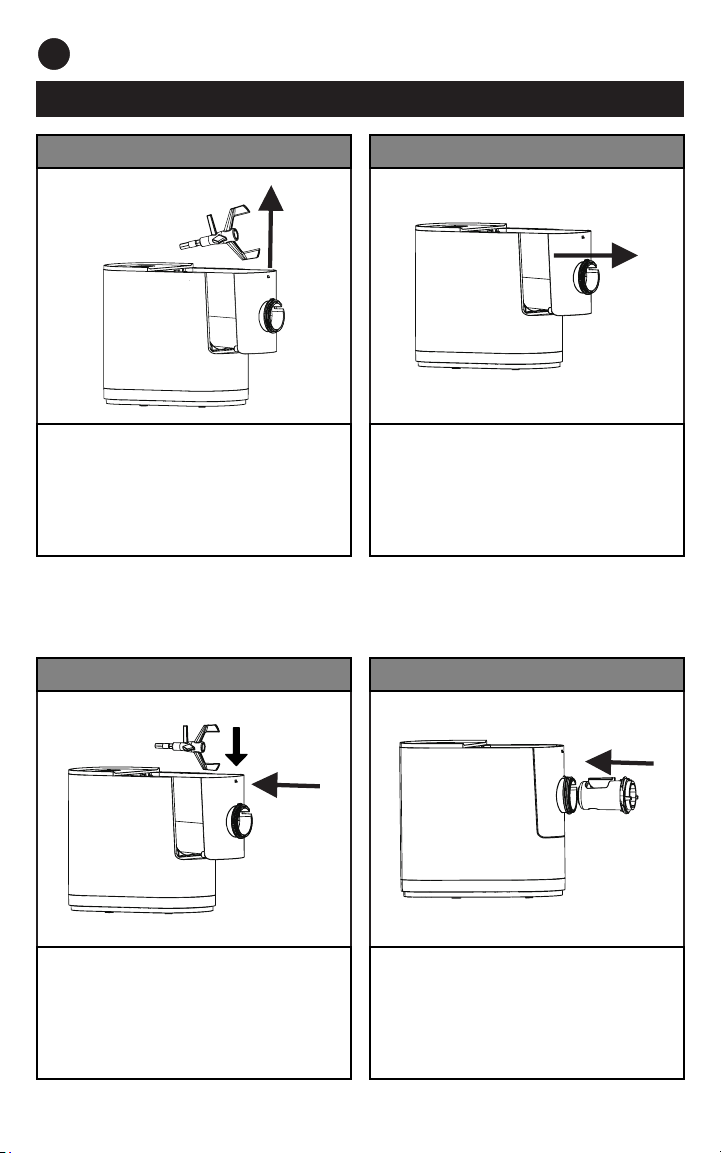
• Product disassembly instructions
Disassembly steps (before disassembly, be sure to turn off the switch and
disconnect the power).
01
Rotate counterclockwise, unscrew
nut and kneading cavity, cutting
die.
02
Remove the die and screw.
03
Remove the kneading tube.
04
Hold the top lid open with thumb,
raise the end face of the top lid at
the same time with index nger,
remove the top lid.
9
EN
USER GUIDE
05
Remove the mixer.
06
Remove the mixing bowl.
• Product installation steps
Before installation, be sure to turn off the switch and disconnect the power.
01
Install the mixer into the mixing bowl.
The outer hexagon hole of the mixer
is tted into the inner hexagon hole
of the motor shaft.If it gets stuck
in the assembly, rotate the mixer
slightly to install it smoothly.
02
Attach the extruding pipe to the
mixing bowl.
10
Table of contents
Languages:
Other Thinkkitchen Kitchen Appliance manuals


Popular Kitchen Appliance manuals by other brands

Tayama
Tayama TYG-35AF instruction manual

AEG
AEG 43172V-MN user manual

REBER
REBER Professional 40 Use and maintenance

North American
North American BB12482G / TR-F-04-B-NCT-1 Assembly and operating instructions

Presto
Presto fountain popper instruction manual

Westmark
Westmark 1035 2260 operating instructions


