THOR T35106SKW User manual

6 kg Washing Machine
T35106SKW
1

Features……………………………………………………………………………………
.…………….. 3
Safety Instructions........................................................................................ 4
Electrical Requirements
…………………………………………………………….…….………. 5
Installation.................................................................................................... 6
Connecting to Water Supply …………………..................................................... 7
Before First Use
…………………………………………………………..…………………………… 9
Control Panel
……………………………………………………………………………….………… 10
Detergent and Softener
…………………………………………………………………….…... 12
Using your Washing Machine
………………………………………………………………... 13
Cleaning and Care……………….......................................................................
14
2

Moving your Washing Machine / Top Tips ……………………...........................
15
Problem solving .......................................................................................... 16
Technical data ............................................................................................. 17
Health and Safety ....................................................................................... 18
Warranty Information................................................................................. 19
Customer Care
……………………………………………………………….………..……………. 21
3

The use of any electrical appliance requires the following common sense
safety rules. There is danger of injury or death to the person and damage to
the appliance.
4

Note: If the following instructions are not adhered to the warranty
will not be applicable
●This appliance is not intended for use by persons (including children)
with reduced physical, sensory or mental capabilities unless there is a
person responsible for their safety present
●This appliance is only intended to wash items which are specified by
the manufacturer to be machine washable on the label
●In the event of a power outage, the programme will resume when
power is restored
●Have an electrician connect the appliance to a grounded outlet
protected by a fuse
●Ensure that the water supply and draining hoses are securely
fastened to avoid any water leakage
●Never open the loading door or remove the filter while there is still
water in the drum
●Never force the loading door open, it will automatically release at the
end of its cycle
●To protect against the risk of electric shock Never immerse the
appliance body in water or any other liquid and ensure the electrical
connections are kept dry. Never hose the appliance down
●Use washing machine detergents and softeners only
●Ensure that appliance is unplugged during installation, maintenance,
cleaning and repairs
●This appliance is intended to be used in household and residential
type environments, it is not suitable for commercial use
●Keep children away from the appliance while in use and store
detergent and softener out of reach
●Check that the voltage on the rating plate of your appliance
corresponds with your house electricity supply which must be A.C.
(Alternating Current)
5

●If the socket outlets in your home are not suitable for the plug
supplied with this appliance, the plug should be removed and the
appropriate one fitted
●Should the fuse in the 13 amp plug require changing, a 5 amp BS1362
must be fitted
●Do not connect your Washing Machine to the mains electricity supply
using an extension lead.
Warning:
The plug removed from the mains lead, if severed, must be destroyed
as a plug with a bared flexible cord is hazardous if engaged into a
live socket outlet
Warning:
This appliance must be earthed
●Use an authorised agent to install this appliance ensuring water and
electricity source are in place prior to installation
●Remove all the packing including the foam base
6

●Dispose all the packaging safely and keep out of the reach of children
●It is normal that water drops may appear on the plastic and the door
glass as a result of the manufacturers testing process
●Before installing your washing machine, check for any external visible
damage. Do not install or use your washing machine if it is damaged
●Ensure that the water inlet, hoses or power cable are not damaged
while pushing the product into its place after installation or cleaning
●This appliance must be installed on a flat surface
●Never place your washing machine on carpet
●Don’t install washing machine in an area that may be damp
●Don’t install washing machine in direct sunlight
●Ensure that the surrounding temperature of the appliance will not
drop below 0 °C
●Tilt the appliance gently backwards to remove packaging
●Remove the four transit bolts and the rubber washers from the back
of the machine by turning anti-clockwise with a suitable spanner. Pull
out the remaining plastic section of each transit bolt and insert the
blanking caps
●The distance between the machine and the wall should be 10cm
●To level the machine, use a spanner to turn the locknuts in a clockwise
direction. Then turn the locknuts together and adjust feet to unscrew.
Use a spirit level to check that the machine is level. Hold the
Adjustable feet securely with a pipe wrench. Turn the locknut again
Using the spanner until it sits firmly up against the housing
Levelling Continued -
7
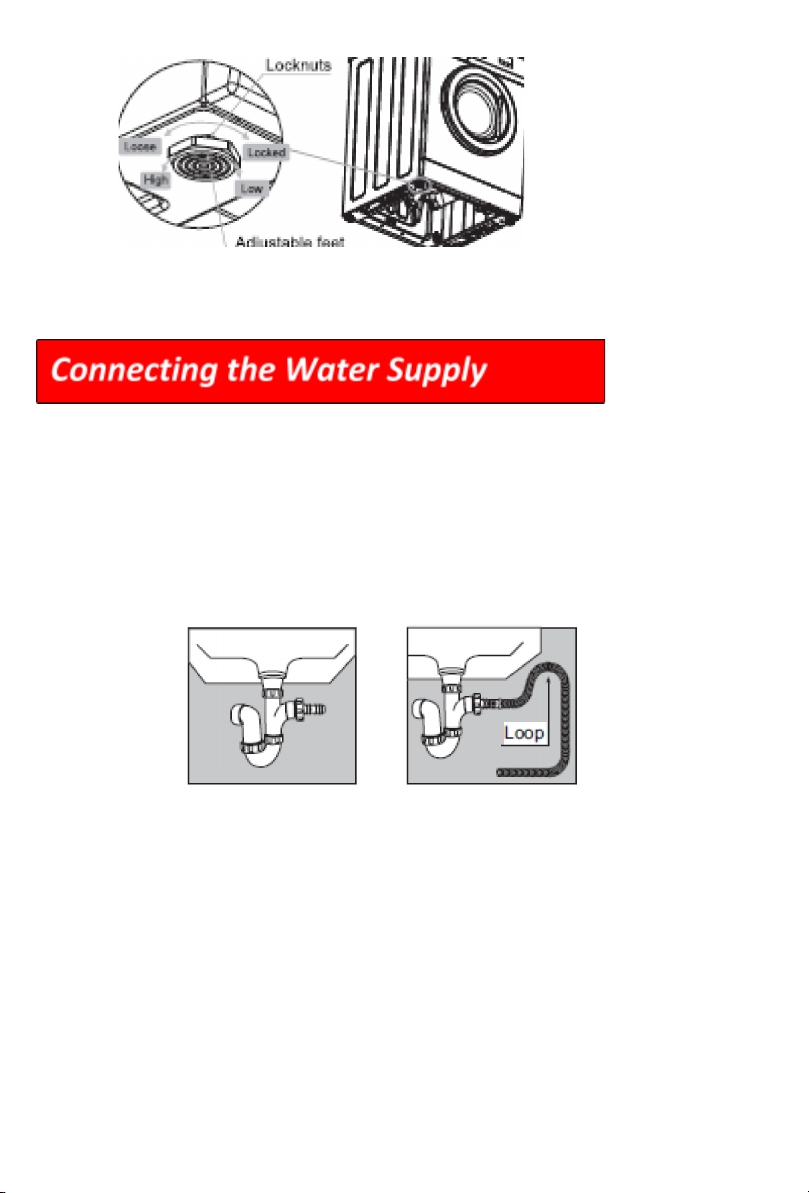
Drain Hose Connection Directly to a Sink
●If the outlet spigot has not been used before, remove any blanking
plug that may be in place
●Push the drain hose onto the spigot and secure with a clip if required,
Ensure that a loop is formed in the drain hose to prevent waste from
the sink entering the washing machine. If required, the drain hose can
be extended to a length of 4 m
Connecting Directly to a Standpipe
●Firstly form a hook in the end of the drain hose using the “U” piece”
Supplied
●Place the drain hose into your standpipe, which should have an
internal diameter of approximately 38mm ensuring there is an air
break between the drain hose and the standpipe
●When discharging into a standpipe ensure that the top of the
standpipe is no more than 90cm and no less than 60cm above floor
level
8

Water Inlet Connection
●Connect the inlet hose supplied with the machine to a tap with a 3/4”
thread. Installation should comply with local water authority and
building regulations’ requirements.
●Connect a water supply to the inlet valve at the back of the machine.
Follow the indication of the picture that follows to complete the
connection
Warning:
Your house will be flooded if the hose comes out of its housing during
water discharge. There is a risk of scalding due to high washing
temperatures. Ensure that you fix the end of the discharge hose tightly
so that it cannot come out.
9
Do NOT connect your appliance to the electricity supply until all packing and
transit protectors have been removed.
Before laundering clothes, perform a cotton cycle using detergent in main
wash section of drawer.
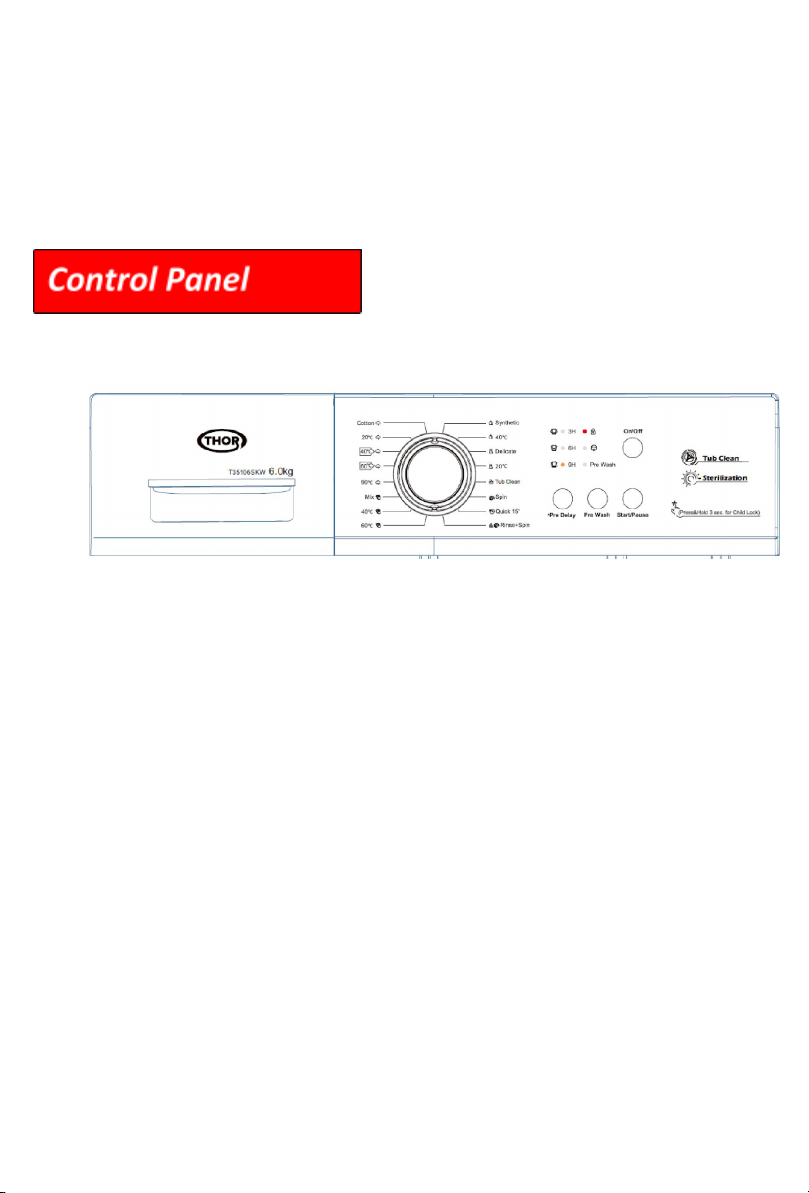
1. On /Off Button
Press this button to turn power on / off. When Wash Programme
Finished press Power button to cut power off.
2. Start / Pause Button
Press this button to Start operating, Press it to also pause during
operation press again to continue.
3. Pre Wash Button
Press this button if clothes are extra dirty, you can choose this
programme before washing.
4. Delay button
Press this button to set the delay time of a wash cycle from 3 hours to
18 hours
5. Programme Knob
Turn this knob clockwise or anticlockwise to select the required wash
program. Once the “Start/Pause” button is pressed and the machine is
10

running, the program cannot be changed. At the end of a wash cycle,
the knob must be turned to the position “0 ”.
Standard 60 °C and 40 °C are suitable to clean normally soiled cotton
laundry and they are the most efficient programs in terms of
combined energy and water consumptions for washing.
6. Child Lock Button
Press this Button to prevent against Children operating, When Child
lock is in operation all other buttons are unavailable except on /off.
Press Pre Delay button for more than 3 seconds to unlock the child
lock function.
7. Status Indicator
Wash this Icon indicates the start and end of the wash
Rinse This Icon indicates the start and end of Rinse
Spin This Icone Indicates the start and end of Spin
Door Lock This Icon indicate the when Door Lock on and Off
Child Lock This Icon Is used to control Child Lock on and Off
Programmes:
11

12

The detergent drawer is made up of 3 compartments:
1. Pre-Wash
2. Main Wash
3. Softener
Different detergents should be used for coloured, white and woollen laundry.
See detergent/softener packaging for instruction on quantities required.
Tablets may not be suitable for short cycles.
●Add detergent and softener before washing
●Don’t open detergent drawer whilst machine is in operation
●If using a programme that does not require pre-wash, do not put any
detergent in pre-wash compartment
●Take care to add the correct amount of detergent to your washing
machine
13

●Open the door, and put the clothes into the drum one by one
●Choose a programme by turning the knob
●Press “ Start/Pause” button to start the washing machine
●Upon completion of the cycle turn the programme selection dial to
the off position. Your washing machine door lock will automatically be
released approximately 2 minutes after the programme has finished
●It is possible to stop the cycle by pressing the power button and the
lock will release after 2 minutes
●Pull the door handle forwards and open the door
●Remove laundry from the drum
●Leave the door open for a short time to allow the interior of the
machine to dry
●Close the door
●The machine is fitted with a balance control device to ensure that it is
stable during the spin cycle. This will rotate the drum in reverse to
redistribute the load. If after 15 minutes this has not been rectified
the machine will not spin and laundry must be redistributed manually
and spin cycle reselected
Cleaning your Detergent Drawer
This should be cleaned every 4-5 weeks as the use of detergent may cause
residual build up in the detergent drawer over time. Remove the drawer at
regular intervals to clean the accumulated residue. Clean with a soft brush and
replace.
Cleaning the Door and Drum
Run a Sterilisation programme every 3 months. Wipe the drum clean after
each wash ensuring that there is nothing left in the drum. Use a mild,
14

non-abrasive cleaning agent, or soap and water, to clean the external casing.
Wipe dry with a soft cloth.
Cleaning Water Inlet Filters
Water inlet filters prevent dirt from entering your machine. These filters
should be cleaned when your machine is unable to receive sufficient water.
To clean the water inlet filters:
●Unscrew the water inlet hose from the washing machine by turning
the hose anticlockwise and gently pulling
● To remove the water inlet filter from the water inlet valve use pliers
to pull on the plastic bar in the filter
●Clean the filter thoroughly with a soft brush, wash with soapy water
and rinse thoroughly
●Re-insert the filter by gently pushing it back into place
A second water inlet filter is located in the tap end of the water inlet hose
which also needs to be cleaned.
Draining Water and Clearing the Pump Filter
If the machine fails to drain water the pump filter is clogged:
●Before opening the filter cover, place a container under the filter
cover to collect any water left in the machine
●Pull the top of the cover until the pump filter is fully exposed. Allow
the water to drain
●Remove any foreign objects from the filter with a soft brush
●Rotate pump by hand
●Clean the pump with a soft brush
●Re-fit the filter by inserting it and turning clockwise
●Close the filter cover
●Unplug the appliance before transporting it
15

●Remove water drain and water supply connections
●Drain the remaining water in the appliance
●Install transportation safety bolts
●Do not turn machine upside down or on its side
●2 or more people are required to carry this machine
●Laundry items with metal elements such as, underwired bras, buckles
or buttons will damage the appliance. Remove the metal pieces or
wash the clothes by putting them in a laundry bag or pillow case
●Empty pockets
●Put small items in a laundry bag or pillow case
●Do not wash colours and whites together as dark coloured cottons
release a lot of dye
●Treat tough stains prior to washing
● Wash delicate laundry turned inside out
●Sort the laundry by colour and by care label
●Close any zips, fasten hooks and eyes etc. before washing
●Dark textiles often contain excess dye and should be washed
separately several times before being included in a mixed load
●Always wash whites and coloureds separately
●Badly soiled areas, stains etc. should be pre-treated with liquid
detergent, stain removers etc.
Energy Saving Tips
●Do not over-load the appliance
●Follow the instructions on the detergent packaging
●Wash lightly soiled laundry at a low temperature
16

●Do not use prewash or high temperatures for laundry that is not
heavily soiled
Fault Machine does not operate
Cause Machine is switched off at mains, programme dial is in off position or
Door is open
Fault Machine not receiving water
Cause Water tap is off, hose is bent or filters are blocked
Fault Machine is not draining
Cause Drain hose is bent or pump filter is obstructed
Fault Machine is vibrating
Cause Feet are not adjusted or transit bolts are in place
Fault Clothes are not washed properly
Cause Incorrect programme was selected, insufficient detergent was used or
the machine was overloaded.
17

Location
18

●This appliance is intended to be used in household and residential
type environments. It is not suitable for use in shops, offices and
other working environments
●Do not use outdoors or in a bathroom
●Do not place appliance on a highly polished wooden surface as
damage may occur to the surface
●Do not place the appliance on or near a hot surface
●This appliance should not be used in an unheated, cold room i.e.
Garage, conservatory, annex, shed, out-house etc.
Mains Cable
●Do not let the lead run across an open space
●Do not let the cable run across a cooker or hot area which may
damage the cable
●The mains cable should reach from the socket to the base unit without
straining the connections
●The power cord cannot be replaced
Personal Safety
●Do not touch discharging hose or water as they may reach high
temperatures and risk burning
●To protect against the risk of electric shock ensure the electrical
connections are kept dry
●This appliance is not intended for use by persons (including children)
with reduced physical, sensory or mental capabilities
Children
●Children should be supervised to ensure that they do not play with
this appliance
●Teach children to be aware of dangers in the kitchen
19

●Do not allow children to play with the appliance or tamper with the
controls
●Children under the age of 8 should not use this appliance
Other Safety Considerations
●Do not operate any appliance with a damaged cord or plug or after
the appliance malfunctions or has been damaged in any manner
●Do not use the appliance for anything other than its intended purpose
●Unplug from the outlet when not in use or unattended and before
assembling, disassembling and cleaning
●Make sure the appliance is switched off before connecting to or
disconnecting from the mains supply
●If the appliance is dropped or damaged in any manner, return the
appliance to the nearest authorized dealer or after-sales service
centre for examination, repair, electrical or mechanical adjustment
Registering Your 2 Year Guarantee
20
Other THOR Washer manuals


