threeposts YD-5022 Instruction sheet

For assistance with assembly or questions contact:
Wayfair Customer Service, 877-WAYFAIR (877-929-3247) | www.wayfair.com
PAGE 2
YD-5022 Kitchen Pantry
Before beginning assembly, separate all parts and carefullystudy the parts diagrams
below. Review all parts and hardware before disposing of any packaging. You may
receive extra hardware with your unit. Call Customer Service for missing hardware.
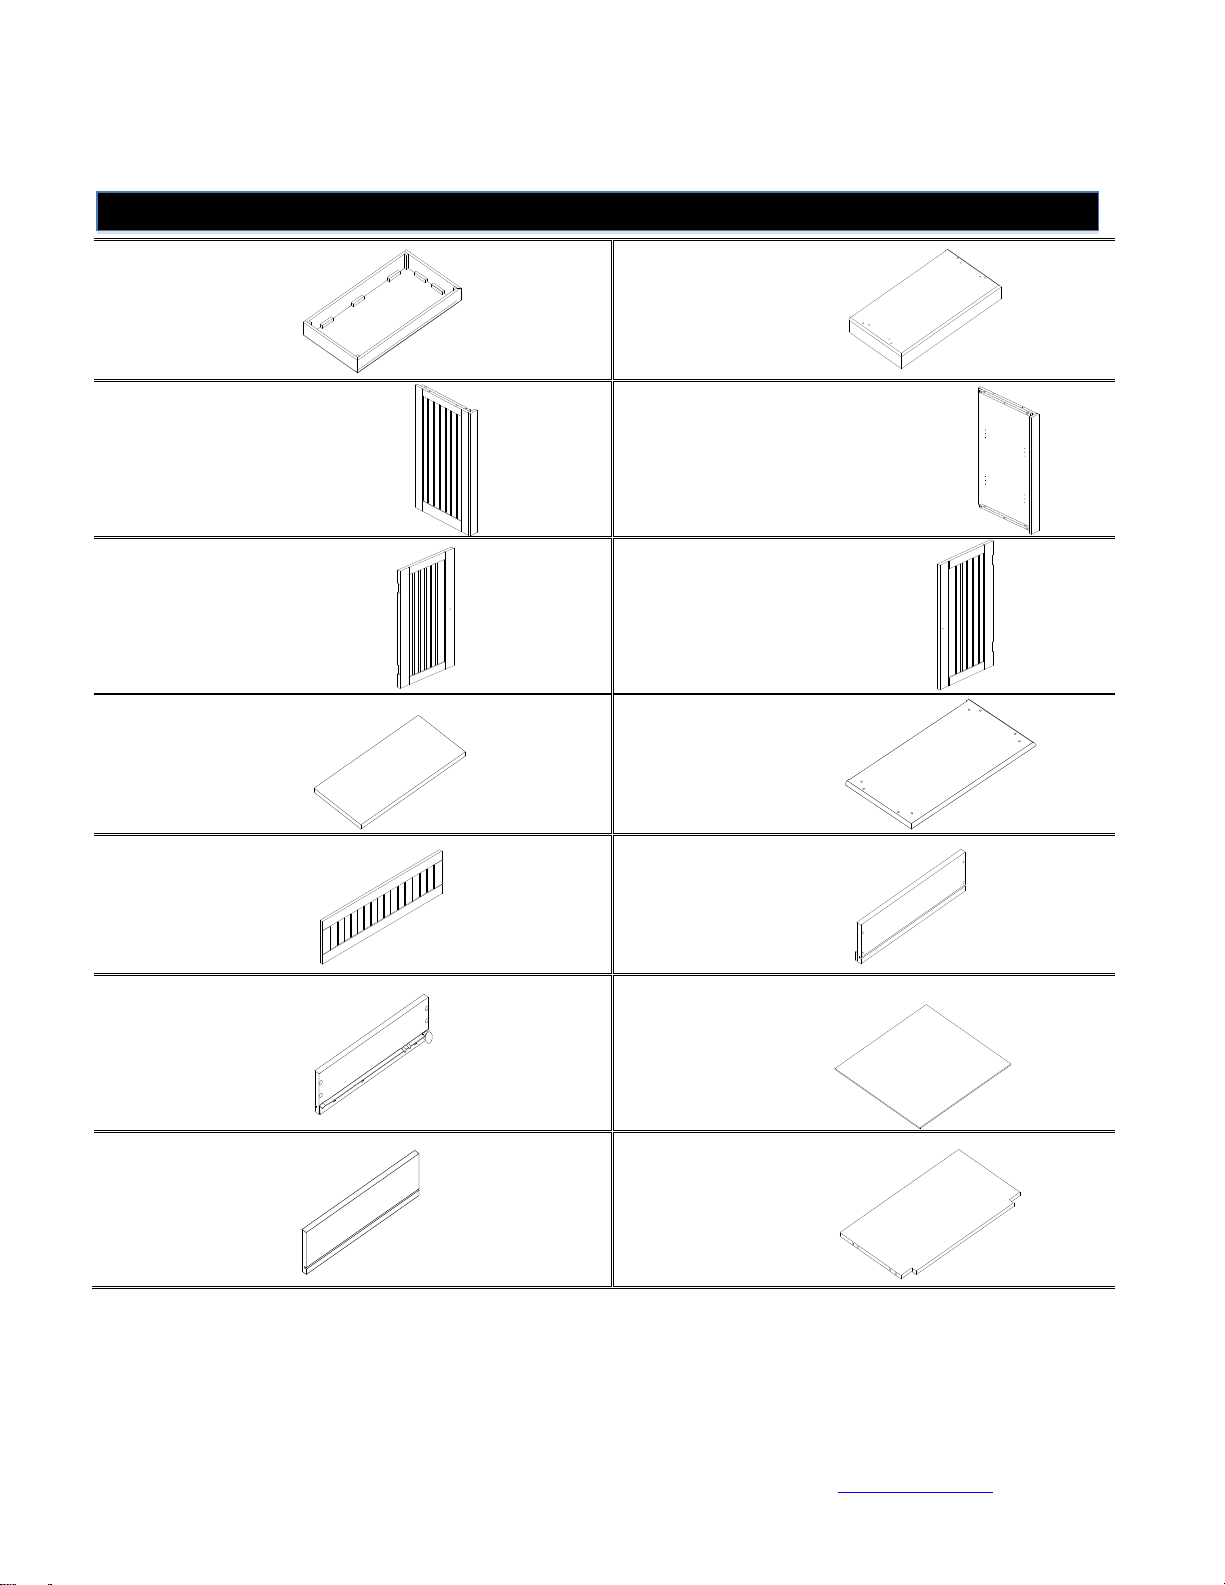
1: Top (1)
2: Base (1)
3:UpperLeft Side Frame(1)
4: Upper Right Side Frame(1)
5: Upper Left Side Door (1)
6:Upper Right Side Door(1)
7: Adjustable Shelf Panel(3)
8: Middle Panel (1)
9: Drawer Front Panel (1)
10: Drawer Left Panel (1)
11: Drawer Right Panel (1)
12: Drawer Bottom Panel(1)
13: Drawer Back Panel (1)
14: Middle Fixed Panel (1)
Parts List

For assistance with assembly or questions contact:
Wayfair Customer Service, 877-WAYFAIR (877-929-3247) | www.wayfair.com
PAGE 3
15: Lower Left Side Frame (1)
16: Lower Right Side Frame (1)
17: Lower Left Side Door (1)
18:Lower Right Side Door (1)
19:Upper Back Panel (1)
20:Lower Back Panel (1)
A:Dowel 3cm (20)
B: Cam Bolt (20)
C:Cam Lock (20)
D:Plastic Cover (20)
E: Magnet (4)
F: Screw1.5cm(8)
G:Screw1.2cm(54)
H: Hinge (8)
I: Screw 1.2cm(56)
J: Knob (6)


For assistance with assembly or questions contact:
Wayfair Customer Service, 877-WAYFAIR (877-929-3247) | www.wayfair.com
PAGE 5
YD-5022 Kitchen Pantry
Figure 1
Attach the Magnet (E) onTop
Step 1
Attach Magnets (E) to Middle
Fixed Panel (14) and Top Panel
(1) using Screws (F).
Tighten Screws (F) by rotating
clockwise with Phillips screwdriver
(not included).
Figure 2
Step2
Insert Cam Locks (C) into
predrilled holes on Middle Fixed
Panel (14).
Screw Cam Bolts (B) into
predrilled holes on Lower Left
&Right Side Frames (15&16).
Attach Middle Fixed Panel (14) to
Lower Left &Right Side Frames
(15&16) by inserting Dowels (A)
and Cam Bolts (B) into
corresponding holes
until components meet.
Tighten by rotating Cam Locks (C)
clockwise with Phillips screwdriver
(not included).
Cover Cam Lock (C) holes with
Plastic Covers (D).
Assembly Instructions
14
F
EE
FF
15
16
14
B
A
A
BCD
CD
CD
B
B

For assistance with assembly or questions contact:
Wayfair Customer Service, 877-WAYFAIR (877-929-3247) | www.wayfair.com
PAGE 6
Figure 3
Step3
Insert Cam Locks (C) into
predrilled holes on Lower Left
&Right Side Frames (15&16).
Screw Cam Bolts (B) into
predrilled holes on Base (2).
Attach Base (2) to unit from Figure
2 by inserting Dowels (A) and Cam
Bolts (B) into corresponding holes
until components meet.
Tighten by rotating Cam Locks (C)
clockwise with Phillips screwdriver
(not included).
Cover Cam Lock (C) holes with
Plastic Covers (D).
Figure4
Step4
Insert Cam Locks (C) into
predrilled holes on Lower Left
&Right Side Frames (15&16).
Screw Cam Bolts (B) into
predrilled holes on Middle Panel
(8).
Attach Middle Panel (8) to unit
from Figure3 by inserting Dowels
(A) and Cam Bolts (B) into
corresponding holes
until components meet.
Tighten by rotating Cam Lock (C)
clockwise with Phillips screwdriver
(not included).
Cover Cam Lock (C) holes with
Plastic Covers (D).
D
C
C
C
D
D
A
A
AA
B
B
B
8
15
16
B
B
B
B
A
A
A
2
16
15
14
CD
CD
C
D

For assistance with assembly or questions contact:
Wayfair Customer Service, 877-WAYFAIR (877-929-3247) | www.wayfair.com
PAGE 7
Figure 5
Step5
Insert Cam Locks (C) into
predrilled holes on Upper Left &
Right Side Frames (3&4).
Screw Cam Bolts (B) into predrilled
holes on Middle Panel (8).
Attach Upper Left & Right Side
Frames (3&4) to Middle Panel (8)
by inserting Dowels (A) and Cam
Bolts (B) into corresponding holes
until components meet.
Tighten by rotating Cam Locks (C)
clockwise with Phillips screwdriver
(not included).
Cover Cam Lock (C) holes with
Plastic Covers (D).
Figure 6
Step6
Insert Cam Locks (C) into
predrilled holes on Upper Left &
Right Side Frames (3&4).
Screw Cam Bolts (B) into predrilled
holes on Top (1).
Attach Top (1) to Upper Left &
Right Side Frames (3&4) by
inserting Dowels (A) and Cam
Bolts (B) into corresponding holes
until components meet.
Tighten by rotating Cam Locks (C)
clockwise with Phillips screwdriver
(not included).
Cover Cam Lock (C) holes with
Plastic Covers (D).
3
4
8
B
A
A
A
AB
B
B
CD
CDC
1
3
4
AA
A
AB
B
B
CD
C
C
CD
D
For assistance with assembly or questions contact:
Wayfair Customer Service, 877-WAYFAIR (877-929-3247) | www.wayfair.com
PAGE 8
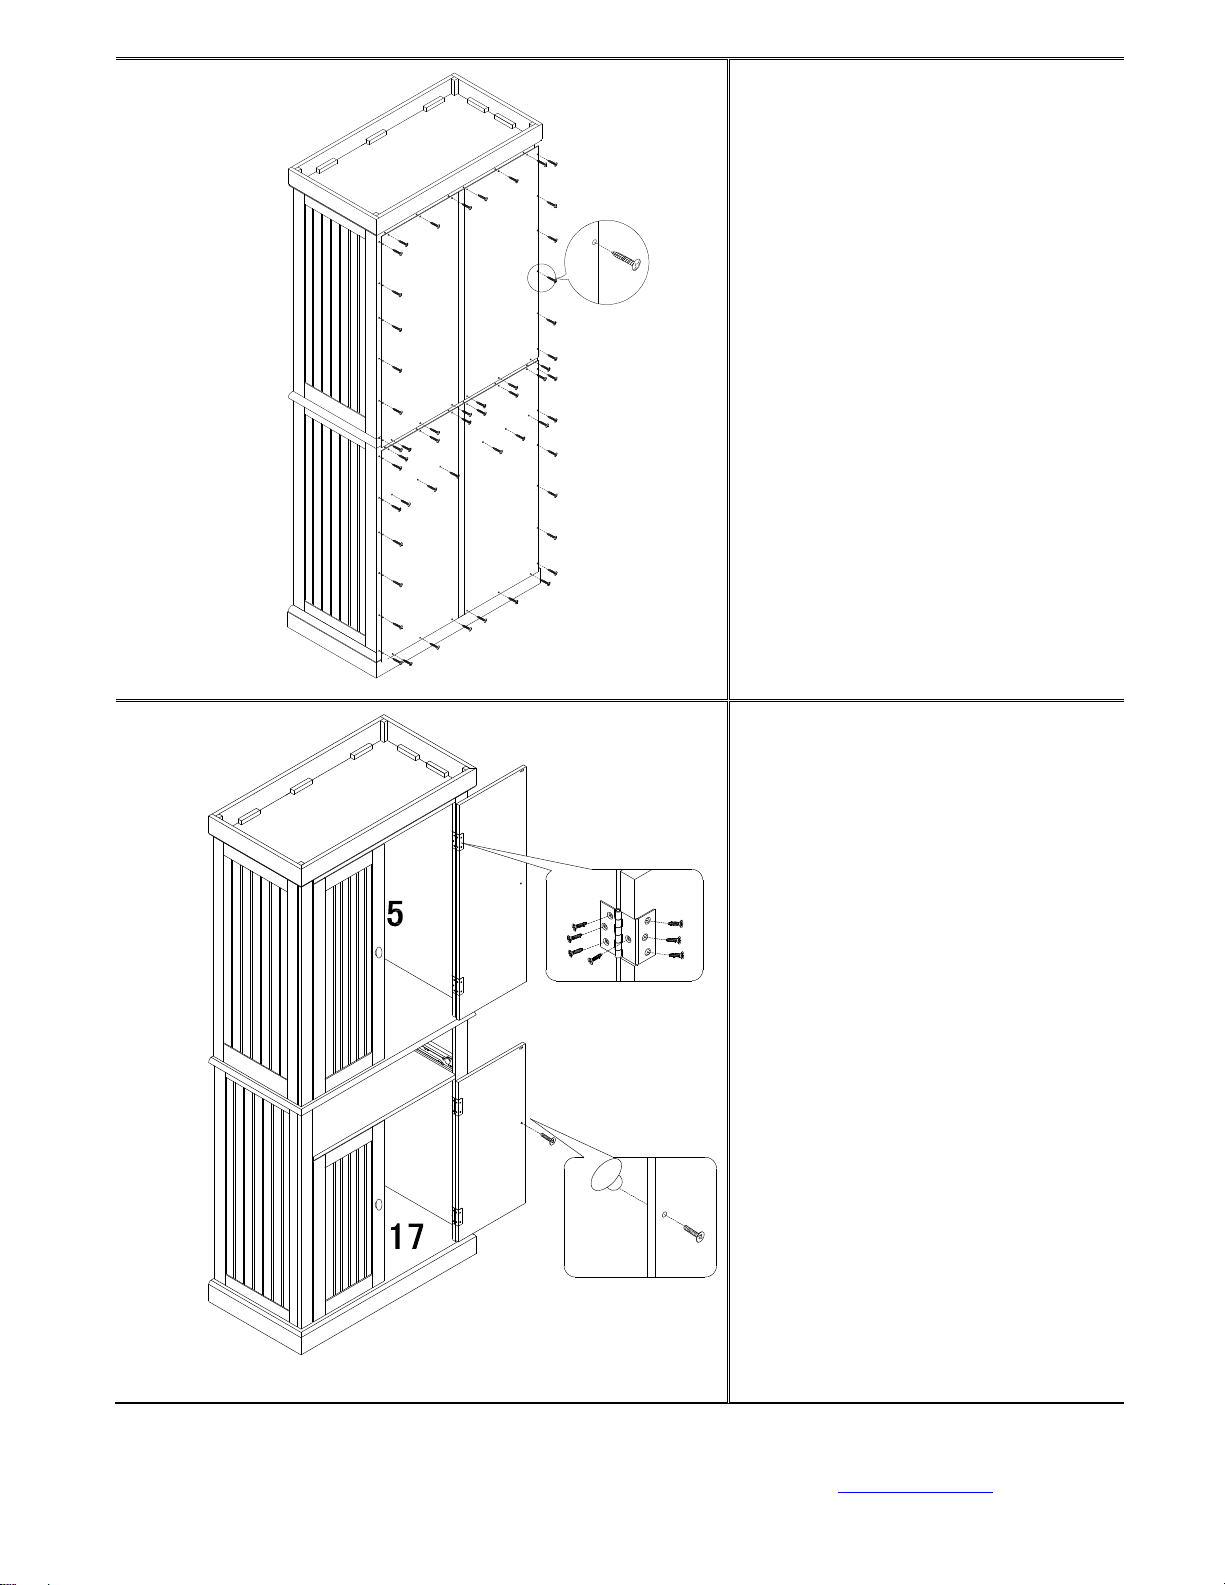
Figure 7
Step7
Attach Upper Back Panels (19&20)
to the back of the unit from Figure
6 using Screws (G) as shown in
Figure 7.
Tighten Screws (G) using Phillips
screwdriver (not included).
Figure 8
Step8
First use Screws (I) to connect
Hinges (H) to Doors (5, 6,17&18)
as shown in Figure 8.
Tighten Screws (I) using Phillips
screwdriver (not included).
Then connect Doors (5,
6,17&18) to unit from Figure 7
using Screws (I).
Tighten Screws (I) using Phillips
screwdriver (not included).
Use Bolts (K) to connect Knobs (J)
to Doors (5, 6,17&18).
Tighten Bolts (K) using Phillips
screwdriver (not included).
19
20
G
6
18
K
J
K18
6
H
II
For assistance with assembly or questions contact:
Wayfair Customer Service, 877-WAYFAIR (877-929-3247) | www.wayfair.com
PAGE 9
Figure 9
Step9
Insert Shelf Brackets (M) into
corresponding predrilled holes on
all Side Frames (3, 4,15&16). Then
put the three adjustable Shelf
Panels (7) on Shelf Brackets (M)
as shown in Figure 9.
Figure 10
Step10
First slide Drawer Bottom Panel
(12) into grooves of Drawer Front
Panel (9) and Drawer Back Panel
(13).
Then attach the Drawer Left Panel
(10) and Drawer Right Panel (11)
to Drawer Front Panel (9) and
Drawer Back Panel (13) using
Screws (L).
Tighten Screws (L) using Philips
screwdriver (not included).
Connect Knobs (J) to Drawer Front
Panel (9) using Bolts (K).
Tighten Bolts (K) using Philips
screwdriver (not included).
7
7
7
17
18
5
6
4
3
15
4
M
12
10
11
L
L
J
J
L
L
K
K
9
For assistance with assembly or questions contact:
Wayfair Customer Service, 877-WAYFAIR (877-929-3247) | www.wayfair.com
PAGE 10
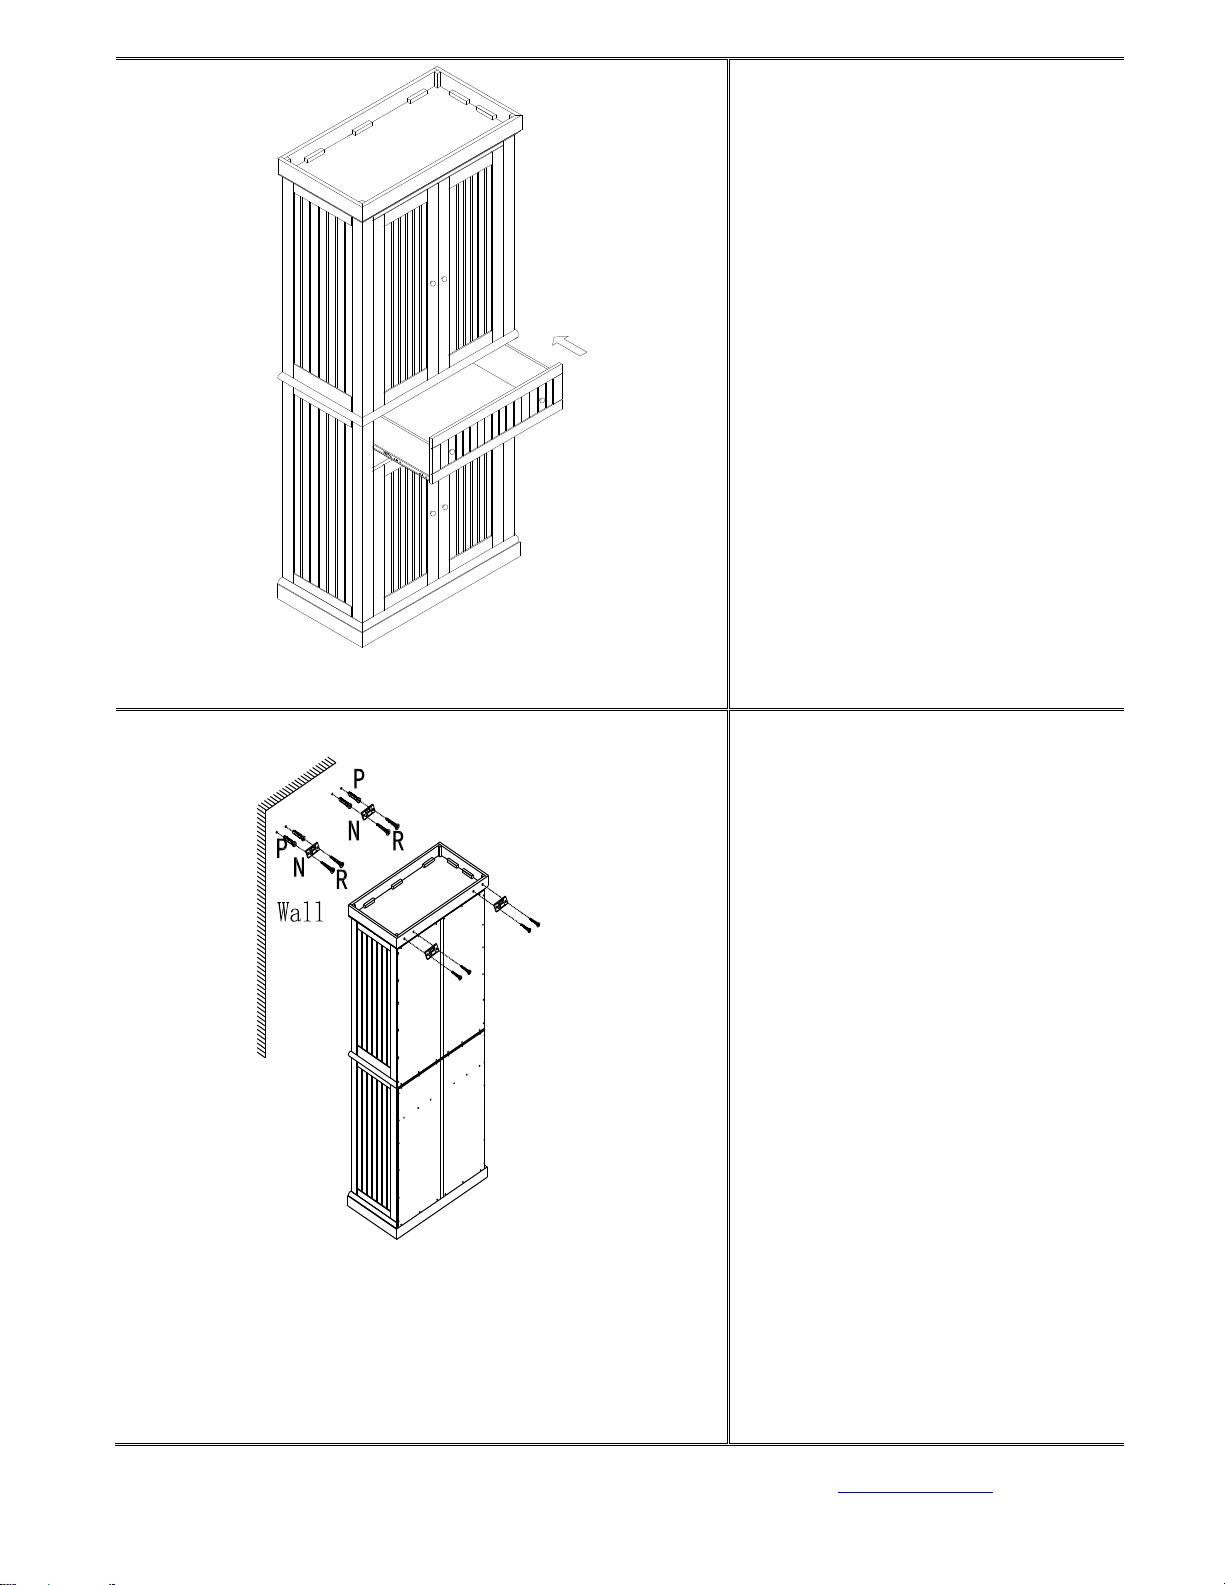
Figure11
Step 11
Insert drawer into assembled unit
as shown in Figure 11.
Figure 12
Step 12
Attach two Brackets (N) to Top (1)
using Screws (Q).
Tighten Screws (Q) using Philips
screwdriver (not included).
Mark two desired locations on the
wall. Drill two holes, 3/16" in
diameter, per desired location
(total 4 holes) to align with
Brackets (N)
Insert wall Anchors(P) into the two
holes on wall as shown in Figure
12. Use a hammer to insert
Anchors(P) until they are flush with
the wall.
Attach remaining Brackets (N) to
Anchors (O) in the wall using
Screws (R).
Tighten Screws (R) using Philips
screwdriver (not included).
P
N
N
Q
Q

For assistance with assembly or questions contact:
Wayfair Customer Service, 877-WAYFAIR (877-929-3247) | www.wayfair.com
PAGE 11
Figure 13
Step 13
Move assembled unit close to wall
Brackets (N) and tie all Brackets
(N) together using Plastic Strap
(O) as shown in Figure 13.
WARNING: Anti-tipping hardware
must be usedfor this product to
avoid tipping and injury.
Figure 14
Step 14
Now your Kitchen Pantry is
ready to use!
N
NNN
WALL
Other threeposts Indoor Furnishing manuals

threeposts
threeposts ZH1825 Instruction sheet

threeposts
threeposts DD-QHB4250-1CR Instruction sheet

threeposts
threeposts TRT-BRC-1 Instruction sheet

threeposts
threeposts TY-18 Instruction sheet

threeposts
threeposts TRT-LS-1OAK User manual

threeposts
threeposts YD-5542 Instruction sheet

threeposts
threeposts TRT-BS-1 User manual
Popular Indoor Furnishing manuals by other brands

Regency
Regency LWMS3015 Assembly instructions

Furniture of America
Furniture of America CM7751C Assembly instructions

Safavieh Furniture
Safavieh Furniture Estella CNS5731 manual

PLACES OF STYLE
PLACES OF STYLE Ovalfuss Assembly instruction

Trasman
Trasman 1138 Bo1 Assembly manual

Costway
Costway JV10856 manual


