Thuraya SatSleeve User manual

Thuraya SatSleeve
User Guide | ENGLISH
Thank you for choosing the Thuraya SatSleeve!
The SatSleeve allows you to use your iPhone in satellite mode.
You can now enjoy calls, messages, and Internet browsing even
if your iPhone does not have a terrestrial network connection. The
following User Manual contains important and useful information
on how to use the Thuraya SatSleeve. Please read it carefully
before operating your unit.

User Guide | ENGLISH
2
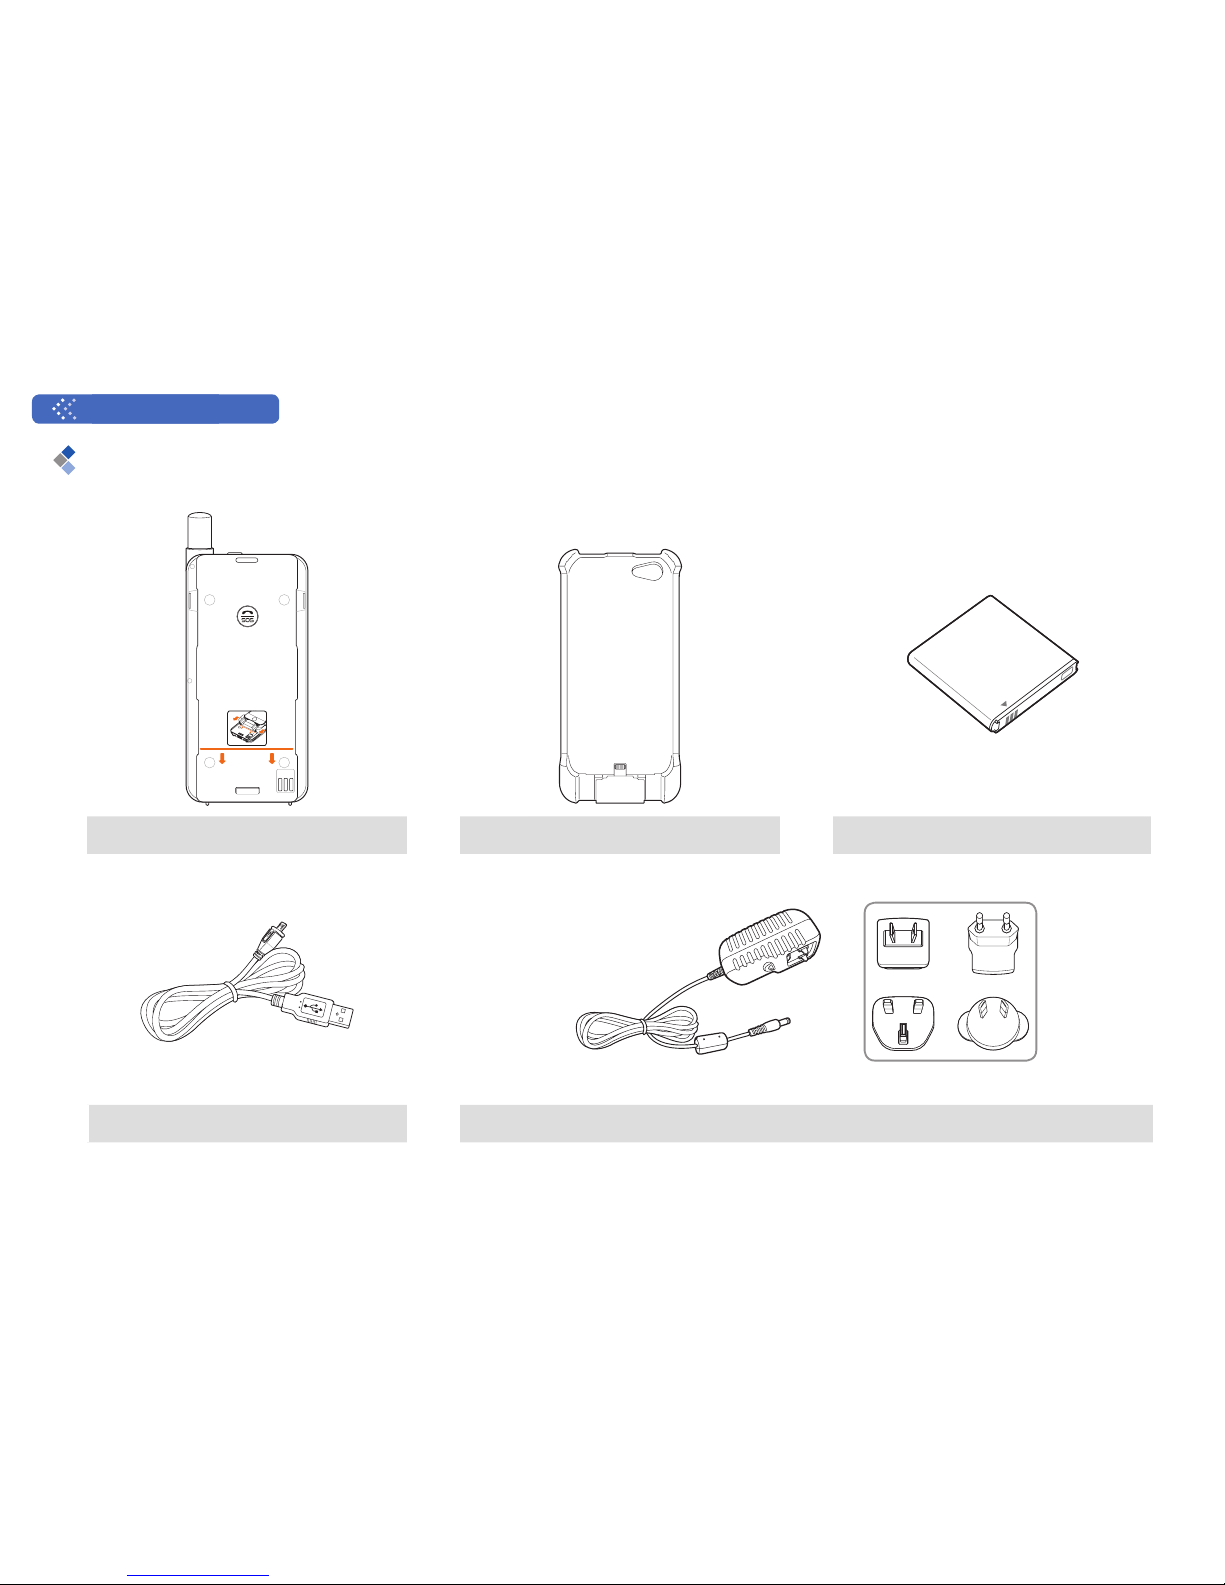
Unpacking your SatSleeve
Main Satellite unit iPhone adaptor Battery
USB data cable Universal travel charger

3
EnBiDeEsFrItPt
3ɭɫɫɤɢɣ
Part Description
No. Part Descriptions
1 Power On/Off button
2 Status indicator LED
3 Backup battery switch
4 Earpiece
5 iPhone docking connector
6 Loud speaker
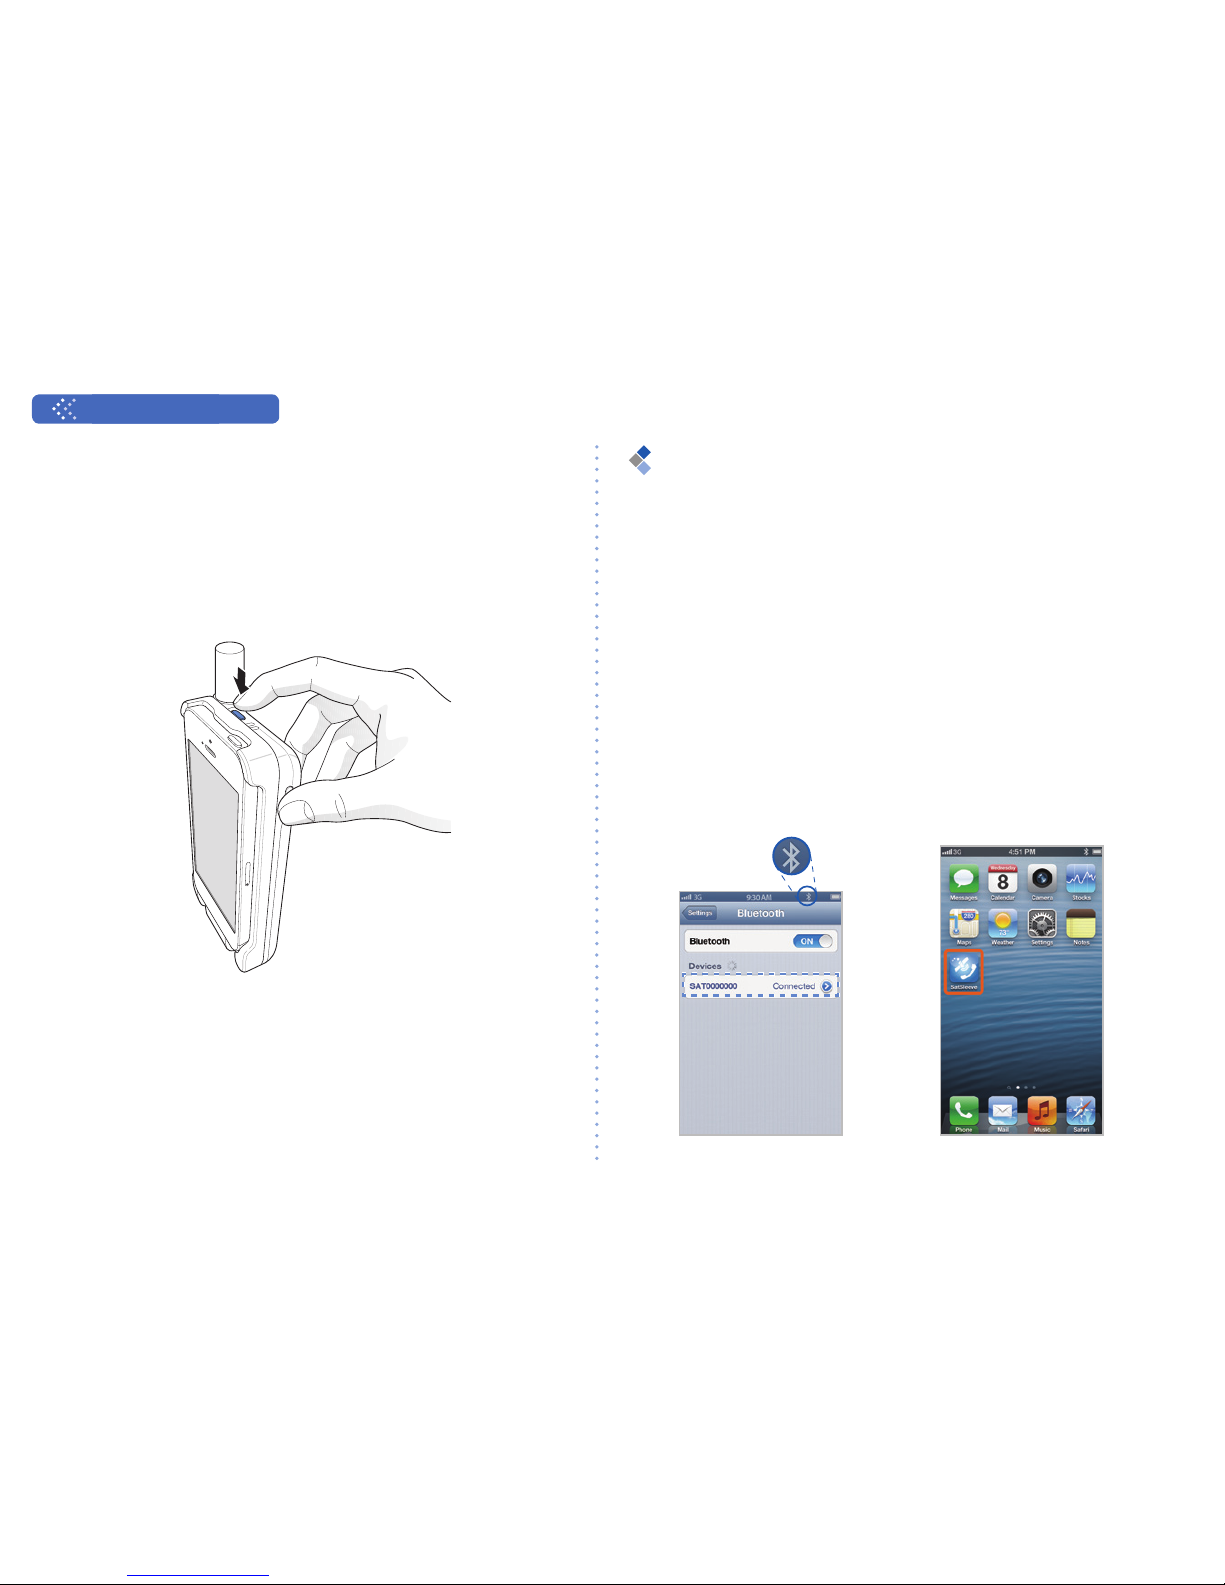
7 Bluetooth paring button
8 Charger jack
9 Antenna
10 Microphone for hands-free calling
11 SIM card holder
12 Micro USB jack
13 Adaptor lock
14 Earset jack
15 Microphone

User Guide | ENGLISH
4
Preparation
The Thuraya SatSleeve uses satellite communications
which requires direct line of sight to a Thuraya satellite.
To achieve the best connection, please take care of
the followings:
Use the SatSleeve in a place with no
obstructions such as high buildings, tall trees,
and mountains which may obstruct the line of
sight with the satellite.
In order to connect to the satellite network, the
SatSleeve needs to receive the GPS location
GDWD¿UVW7KLVPD\WDNHVHYHUDOPLQXWHVLIWKH
product is used in a new location.
Always fully extend the antenna when using the
SatSleeve for optimum connectivity.
Getting Started
Installing the SatSleeve Application
In order to use the Thuraya SatSleeve with your
iPhone, you need to download the Thuraya SatSleeve
App for free from Apple’s App Store. Please search for
the SatSleeve in the Apple App Store on your iPhone
and install the application afterwards.

5
EnBiDeEsFrItPt
3ɭɫɫɤɢɣ
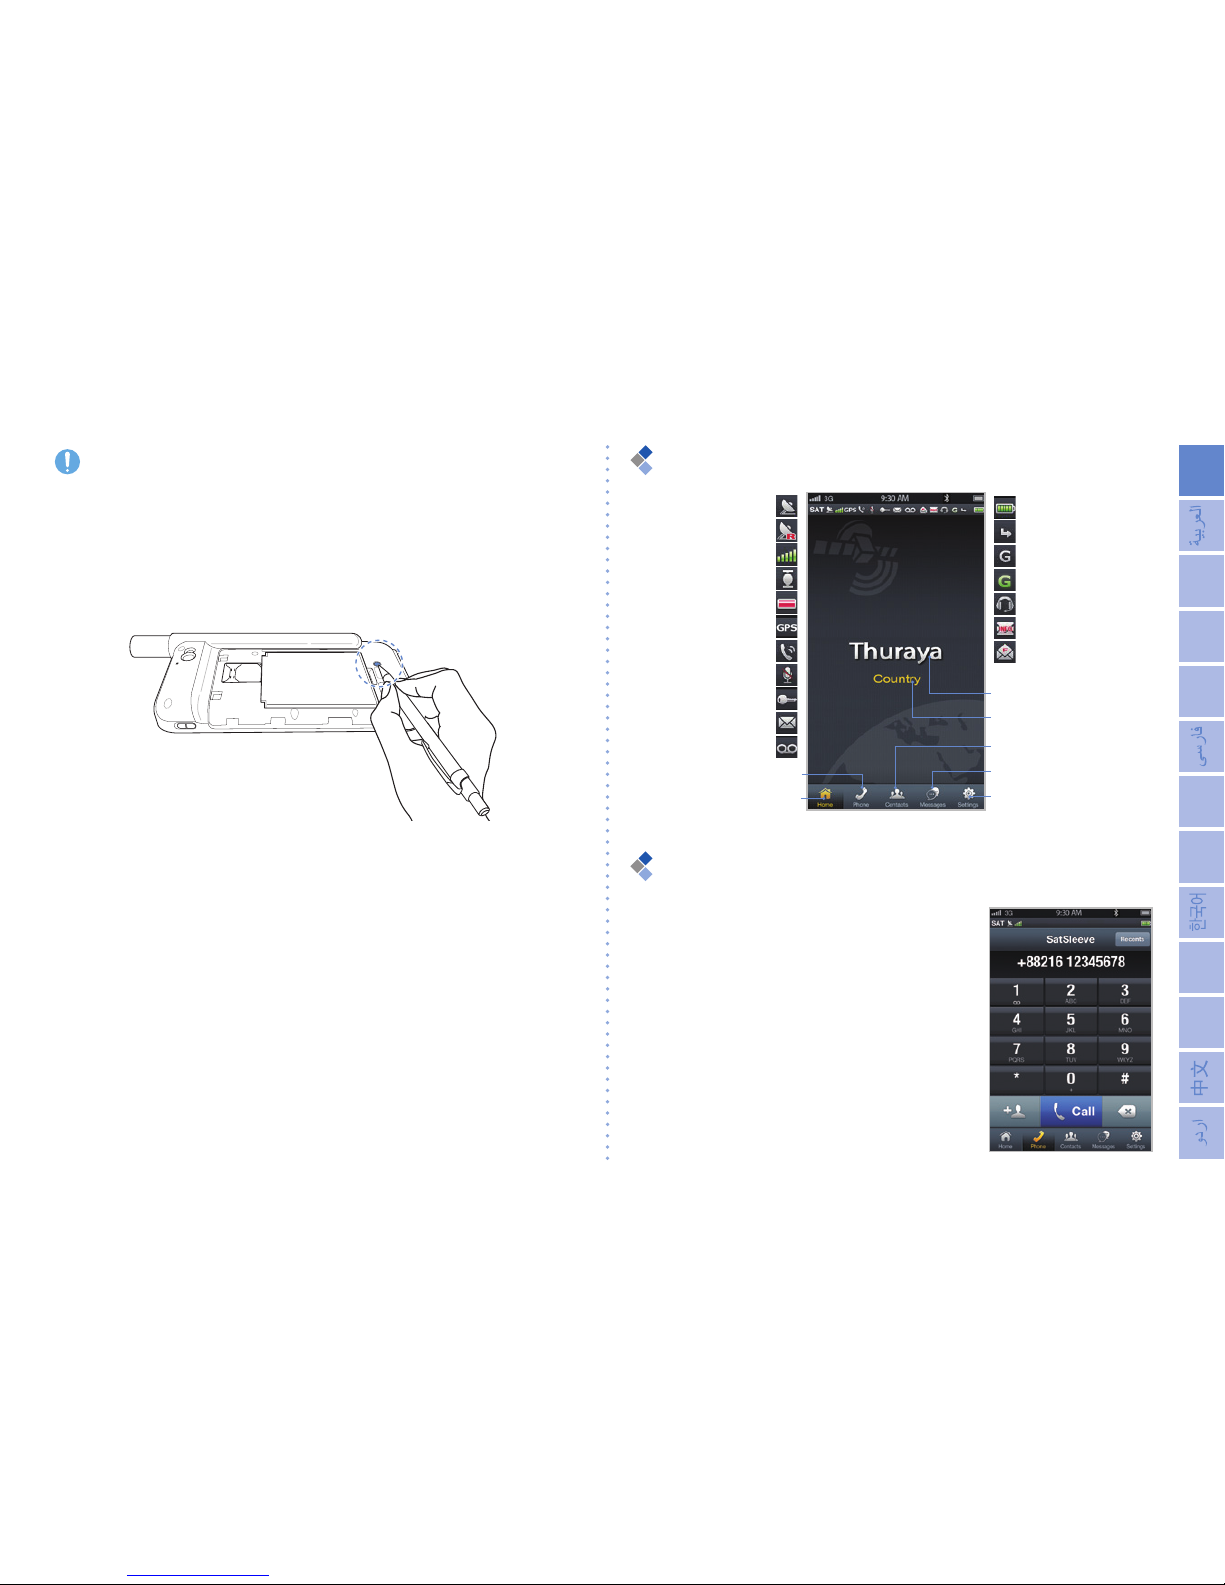
Inserting the SIM Card
A SIM card is required to use satellite services
when connecting to the satellite network. Ensure to
insert the SIM card before attaching the battery and
turning on the Thuraya SatSleeve.
Inserting the Battery
Remove the battery cover from the Thuraya
SatSleeve by pushing it downward (1) and sliding
it down (2).
,QVHUWWKHEDWWHU\IURPWKHWRSHQG¿UVW2QFHWKH
battery is in place, reinstall the battery cover.
CAUTION
RISK OF EXPLOSION IF BATTERY IS REPLACED BY
AN INCORRECT TYPE. DISPOSE OF USED BATTERIES
ACCORDING TO THE INSTRUCTIONS.

User Guide | ENGLISH
6
Inserting your iPhone to the SatSleeve
1Attach your iPhone to the docking adaptor pin and
press the top side of the iPhone into the adaptor.
2Place the docking adaptor onto the orange
line of the SatSleeve main unit. Slide down the
docking adaptor.

7
EnBiDeEsFrItPt
3ɭɫɫɤɢɣ
Removing your iPhone from the SatSleeve
In order to remove your iPhone from the Thuraya
6DW6OHHYH\RX¿UVWQHHGWRGHWDFKWKHGRFNLQJ
adaptor from the main unit. Once the docking
adaptor is removed, you can then remove the
iPhone from the docking adaptor.
1Press down the lock button until you hear a click.
2Slide up the docking adaptor to detach it from
the main unit.
3Press the edges of the docking adaptor.
4Gently pull out the iPhone.

User Guide | ENGLISH
8
Turning On the Thuraya SatSleeve
Press and hold the power button down for about 2
seconds to power on the Thuraya SatSleeve. The
blue LEDs will blink and you will hear a beeping
sound. The Thuraya SatSleeve is now ready to pair
with your iPhone.
To turn off the SatSleeve, press and hold the power
button down for about 2 seconds until all of the
UHG/('VDUHÀDVKLQJDQG\RXZLOOKHDUDEHHSLQJ
sound.
How to use the SatSleeve
To enable satellite mode on your iPhone, you
will need to pair your iPhone with the Thuraya
SatSleeve via Bluetooth. Follow the below steps to
pair the devices:
1On your iPhone, go to Settings > Bluetooth >
On to activate Bluetooth on your iPhone.
2Select e.g. SAT0000000 from the devices list.
3Check the Bluetooth icon displayed on the
top of your iPhone screen when the pairing is
complete.
4Open the SatSleeve application.

9
EnBiDeEsFrItPt
3ɭɫɫɤɢɣ
NOTE
In case the two devices do not pair automatically,
press the Bluetooth pairing button on the back of
the SatSleeve with a pointed object such as a pen
or the end of a paper clip until the Satsleeve shows
up in the Devices list on the iPhone.
Overview of Home Screen
Contacts Tab
Messages Tab
Settings Tab
Network Name
Location Information
Battery Status
Call Divert
GmPRS initiated
GmPRS active
Earset
Info Message
SMS Full
SAT
Roaming
Signal Strength
HPA (Call Alert)
HPA Strength
GPS searching
In Use
Mute On
Ciphering Off
SMS
Voice Mail
Phone Tab
Home Tab
Making a Call in Satellite Mode
On the Phone tab you can
enter a phone number directly,
or select a phone number from
your iPhone Contacts.

User Guide | ENGLISH
10
SOS Call without iPhone
The SatSleeve allows you to make and receive a
call even if you don’t have the iPhone with you. The
SOS Call button is located between the main unit
and the docking adaptor.
Setting an SOS Number
1Select Settings at the
bottom of the screen.
2Tap Call > SOS number.
3Enter a phone number
you would like to set as
emergency number on the
SatSleeve.
4Tap Done.
NOTE
The SOS Button works even if there is no emergency
number stored but the SIM card must be installed in
the SatSleeve. As a default setting, the call will be
routed to an emergency service if available in your
country.

11
EnBiDeEsFrItPt
3ɭɫɫɤɢɣ
Sending a Message
1Select the tab Messages.
2Enter a recipient’s phone number or select the
phone number from your Contacts.
3Enter the message.
4Tap Send.
Managing Contacts
When using the Thuraya SatSleeve application,
you have access to all your contacts on your
iPhone. If you create a new contact in the Thuraya
SatSleeve application the contact will be saved on
your iPhone.
Creating a Contact
1Tap Contacts at the bottom of the screen.
2Tap +.
3Enter the related information and tap Done.

User Guide | ENGLISH
12
How to Use Satellite Data on your
iPhone
You can use Internet and email over Satellite on
your iPhone by switching on Satellite Data on
your SatSleeve. This will establish a satellite data
connection (GmPRS) as well as a Wi-Fi access
point.
1Tap Settings.
2Tap Satellite Data.
3Tap On to activate satellite data.
(Optional: you can change SSID, password, and
security type)
4Leave the SatSleeve application, go to iPhone
Settings and turn on Wi-Fi, then select your
SatSleeve from the network list to connect your
iPhone to the SatSleeve (the default password is
12345678).
5You can now use your iPhone’s Internet
browser, Mails and Apps in satellite mode.
NOTE
The SatSleeve can only be connected to one device
at a time for a stable Wi-Fi connection.

13
EnBiDeEsFrItPt
3ɭɫɫɤɢɣ
Settings
General
Adjust the settings for Calls, Messages, Bluetooth,
and Sounds of your SatSleeve.
Network
Select network options and network priorities.
Security
You can activate and change PIN codes, Barring
code and set a Closed User Group. You can check
the device information including IMEI Number,
$SSOLFDWLRQYHUVLRQ5,/YHUVLRQDQG¿UPZDUH
version. Factory reset will restore the default
settings.
Charging the Battery
Charging the SatSleeve
Connect the plug of the
charger on the bottom left
VLGH¿UPO\
Charging the iPhone Battery
with the Thuraya SatSleeve
The Thuraya SatSleeve battery
can charge your iPhone battery
when the iPhone is docked to the
Thuraya SatSleeve.
To activate or deactivate battery
charging of the iPhone, use
the iPhone charging button on
the right side of the Thuraya
SatSleeve.

User Guide | ENGLISH
14
Optional: Connecting a PC or
laptop to the SatSleeve
The SatSleeve also allows you to use Internet
and email over satellite on your laptop or PC by
connecting to it with the USB data cable.
Installing the USB driver
1Download the SatSleeve USB driver from the
Thuraya website (www.thuraya.com/support).
2Install the driver on your PC or laptop.
3Turn on the SatSleeve and connect it to the PC
or laptop with the USB cable.
Installing the SatSleeve modem on PC/laptop
1Select Start >Settings > Control Panel >
System > Hardware > Device Manager.
2Check the USB serial port of the SatSleeve (e.g.
COM40).
3Select Start > Settings > Control Panel >
Phone and Modem.
4Select the Modems tab and press Add.
5Check the box of “Don’t’ detect my modem; I
will select it from a list.” and press Next.
6Select and press Standard 56000 bps Modem
and press Next.
7Select the USB serial port that you previously
checked in step 2 and press Next.
8When the modem installation is completed,
press Next.
Creating a dial-up connection
1Select Start > Settings > Control Panel >
Network and Sharing Center.
2Select and press Set up a new connection or
network.
3Select and press Set up dial-up connection
and then Next.
4Enter *99# on the Dial-up phone number
¿HOG<RXGRQRWQHHGWRHQWHUXVHUQDPHDQG
password.
5Input connection name and press Connect.
6Use the Internet with the newly created dial-up
connection.

15
EnBiDeEsFrItPt
3ɭɫɫɤɢɣ
Troubleshooting
Problem Solution
Bluetooth pairing
doesn’t work.
Did you try pressing the pairing button
for 5 seconds?
Please refer to the page 9.
Unable to make/
receive calls.
Did you fully extended the antenna?
'LG\RXFKHFNLI\RXKDYHVXI¿FLHQW
network coverage? Please refer to
page 4.
Unable to hear
ringtones.
Did you run the SatSleeve application?
In case the application is not active,
there will be a vibration alert for
incoming calls or messages.
The battery
doesn’t charge.
Did you check if the backup battery
switch is off?
If it is on, the iPhone battery will be
charged instead of SatSleeve.
SatSleeve doesn’t
charge the iPhone
even if the backup
battery switch
is on.
To charge the iPhone using the
SatSleeve, the SatSleeve battery needs
WREHVXI¿FLHQWO\FKDUJHGDQGFRQQHFWHG
to a main socket.
Problem Solution
iPhone shows
Emergency Only.
Did you check if the SIM card contacts
are dirty or damaged?
Your SIM card must be active. If you
are abroad, roaming service must be
enabled when using a non-Thuraya SIM
card in the SatSleeve.
No Network
Please ensure you are in a place with
no obstructions such as high buildings,
tall trees, and mountains.
Calls in satellite
mode are dropped
when there is an
incoming GSM or
3G call.
The Satsleeve is designed to prioritize
GSM or 3G calls. Therefore, when a
GSM or 3G call is received while a
satellite call is ongoing, the satellite call
will be dropped.
Cannot join the
SatSleeve Wi-Fi
network.
Check if the Wi-Fi password in the
SatSleeve and in the iPhone match.

User Guide | ENGLISH
16
&HUWL¿FDWLRQLQIRUPDWLRQ6$5
THIS DEVICE MEETS INTERNATIONAL GUIDELINES
FOR EXPOSURE TO RADIO WAVES
Your wireless SatSleeve phone is a radio transmitter and
receiver. It is designed and manufactured not to exceed the
limits for exposure to radio frequency (RF) recommended
by international guidelines (ICNIRP). These limits are part of
comprehensive guidelines and establish permitted levels of
RF energy for the general population. The guidelines include
a substantial safety margin designed to assure the safety
of all persons, regardless of age and health. The exposure
guidelines for mobile devices employ a unit of measurement
NQRZQ DV WKH 6SHFL¿F $EVRUSWLRQ 5DWH RU 6$5 7KH 6$5
limit stated in the ICNIRP guidelines is 2.0 watts/kilogram
(W/kg) averaged over ten grams of tissue. Tests for SAR are
conducted using standard operating positions with the device
WUDQVPLWWLQJ DW LWV KLJKHVW FHUWL¿HG SRZHU OHYHO LQ DOO WHVWHG
frequency bands. The actual SAR level of an operating device
can be below the maximum value because the device is
designed to use only the power required to reach the network.
That amount changes depending on a number of factors such
as how close you are to a network base station. The highest
SAR value under the ICNIRP guidelines for use of the device
at the ear is 0.402 W/kg which was below the limit of 2.0 mW/g
into a 10g averaging mass. Use of device accessories and
enhancements may result in different SAR values. SAR
values may vary depending on national reporting and testing
requirements and the network band.
CAUTION
This equipment generates or uses radio frequency energy.
&KDQJHVRUPRGL¿FDWLRQVWRWKLVHTXLSPHQWPD\FDXVH
KDUPIXOLQWHUIHUHQFHXQOHVVWKHPRGL¿FDWLRQVDUHH[SUHVVO\
approved in the instruction manual.The user could lose
the authority to operate this equipment if an unauthorized
FKDQJHRUPRGL¿FDWLRQLVPDGH.
RoHS
This product is in compliance with EU RoHS Directives and
manufactured using lead-free solder paste and parts.

17
EnBiDeEsFrItPt
3ɭɫɫɤɢɣ
Limitation of Liability
THIS LIMITED WARRANTY IS IN LIEU OF ALL OTHER
WARRANTIES, WHETHER EXPRESSED, IMPLIED OR
STATUTORY, INCLUDING, WITHOUT LIMITATION, THE
IMPLIED WARRANTIES OF MERCHANTABILITY AND
FITNESS FOR A PARTICULAR PURPOSE. THURAYA
SHALL NOT BE LIABLE FOR DAMAGES IN EXCESS
OF THE PURCHASE PRICE OF THE PRODUCT,
LESS REASONABLE AMOUNT FOR USE AND WEAR,
OR FOR ANY INCIDENTAL, SPECIAL, PUNITIVE
OR CONSEQUENTIAL DAMAGES OF ANY NATURE
WHATSOEVER, OR FOR ANY DELAYS, LOSS OF
USE, TIME, PROFITS, REVENUE OR SAVINGS, ANY
COMMERCIAL LOSS, INCONVENIENCE, MILEAGE,
DAMAGE TO BUYER’S OR TO OTHER PERSON’S VEHICLE
OR ANY OTHER PROPERTY, ARISING FROM THE USE OR
INABILITY TO USE THE PRODUCT, OR OTHERWISE FOR
ANY FAILURE TO PERFORM.
All liability and obligations of Thuraya under this Limited
Warranty shall terminate upon the expiration of the applicable
Warranty Period provided herein. This Limited Warranty
sets forth the entire responsibility of Thuraya with respect to
the Product. There are no other liabilities of Thuraya arising
from the sale of the Product whether based on warranty,
contract, negligence or other theories of liability. In no event
shall Thuraya liability exceed the cost of correcting defects
DVSURYLGHGKHUHLQ7KLV/LPLWHG:DUUDQW\JLYHVVSHFL¿FOHJDO
rights to Buyer, and Buyer also may have other rights which
may vary from jurisdiction to jurisdiction.
$VLD3DFL¿F6DWHOOLWHFRPPXQLFDWLRQV,QF$36,
hereby declares that SatSleeve is in compliance
with the essential requirements and other relevant
provisions of Directive 1999/5/EC and EU RoHS
Directives.The crossed-out wheeled bin means that
within the European Union the product must be
taken to separate collection at the product end-of-life. Do not
dispose of these products as unsorted municipal waste.
THURAYA trademark is the sole and exclusive property of
Thuraya Telecommunications Company.
Copyright © 2013 Thuraya Telecommunications Company. All
rights reserved.
This manual is published by Thuraya Telecommunications
Company without any warranty. Thuraya Telecommunications
Company reserves the right to make changes and
improvements to any of the products described in this manual
without prior notice.
Printed in Korea.
0983

Other manuals for SatSleeve
4
Table of contents
Other Thuraya Cell Phone Accessories manuals