Tibek HGM409 User manual

Food Processor
INSTRUCTION MANUAL
MODEL: HGM409
READ THIS MANUAL THOROUGHLY
BEFORE USING AND SAVE IT FOR FUTURE REFERENCE
Shenzhen Luoteman Trade Limited Co.,LTD
Longgang District Longcheng Street Longxiang Avenue
No. 5105 Yuanjing Garden No. 209 ShenZhen GuangDong 518000
Facebook Pag e: https://www.facebook.com/TIBEK.CC/
5011642
Made In China
HOUSEHOLD USE ONLY

1 2
Read this user manual carefully before you use the
appliance and save it for future reference.
Danger
- Never immerse the motor unit in water or any other
liquid, nor rinse it under the tap.
Warning
- Check if the voltage indicated on the appliance corre-
sponds to the local mains voltage before you connect the
appliance.
- Never connect this appliance to a timer switch in order to
avoid a hazardous situation.
- Do not use the appliance if the mains cord, the plug or
other parts are damaged.
- If the mains cord is damaged, you must have it replaced
by the supplier, a service center authorized by the Suppli-
er or similar qualified persons in order to avoid a hazard.
- This appliance is not intended for use by persons
(including children) with reduced physical, sensory or
mental capabilities, or lack of experience and knowledge,
unless they have been given supervision or instruction
concerning use of the appliance by a person responsible
for their safety.
- Children should be supervised to ensure that they do not
play with the appliance.
- Never let the appliance run unattended.
- Never use your fingers or an object (e.g. a spatula) to
push ingredients down the feeding tube while the appli-
ance is running. Only use the pusher for this purpose.
- Be very careful when you handle the discs or food
processor blade unit. Be especially careful when you
remove them from the food processor bowl , when you
empty the bowl and when you clean it .Its cutting edges
are very sharp.
Caution
- Never switch off the appliance by turning the food
processor bowl. Always switch off the appliance by turning
the speed control knob to OFF.
- Switch off the appliance before you detach any accesso
ry.
- Unplug the appliance immediately after use.
- Always unplug the appliance before you reach into the
processor bowl with your fingers or an object (e.g. a
spatula).
- Wait until moving parts stop running before you remove
the lid of the bowls.
- Never use any accessories or parts from other manufac-
turers or that Supplier does not specifically recommend. If
you use such accessories or parts, your guarantee
becomes invalid.
- Do not exceed the maximum content indicated on the
food processor bowl.
- Consult the tables in this user manual for the correct
quantities and processing times.
- Thoroughly clean the parts that come into contact with
food before you use the appliance for the first time.
- Let hot ingredients cool down before you process them
(max. temperature 80°C/175°F).
3 4
Built-in safety lock
This feature ensures that you can only switch on the
appliance if you have assembled the processor bowl
with blade unit,on the motor unit. If the food processor
bowl, is assembled correctly, i.e. when it has been turned
in the direction of the ‘locked’ symbol as far as possible
(‘click’), the built-in safety lock will be unlocked.
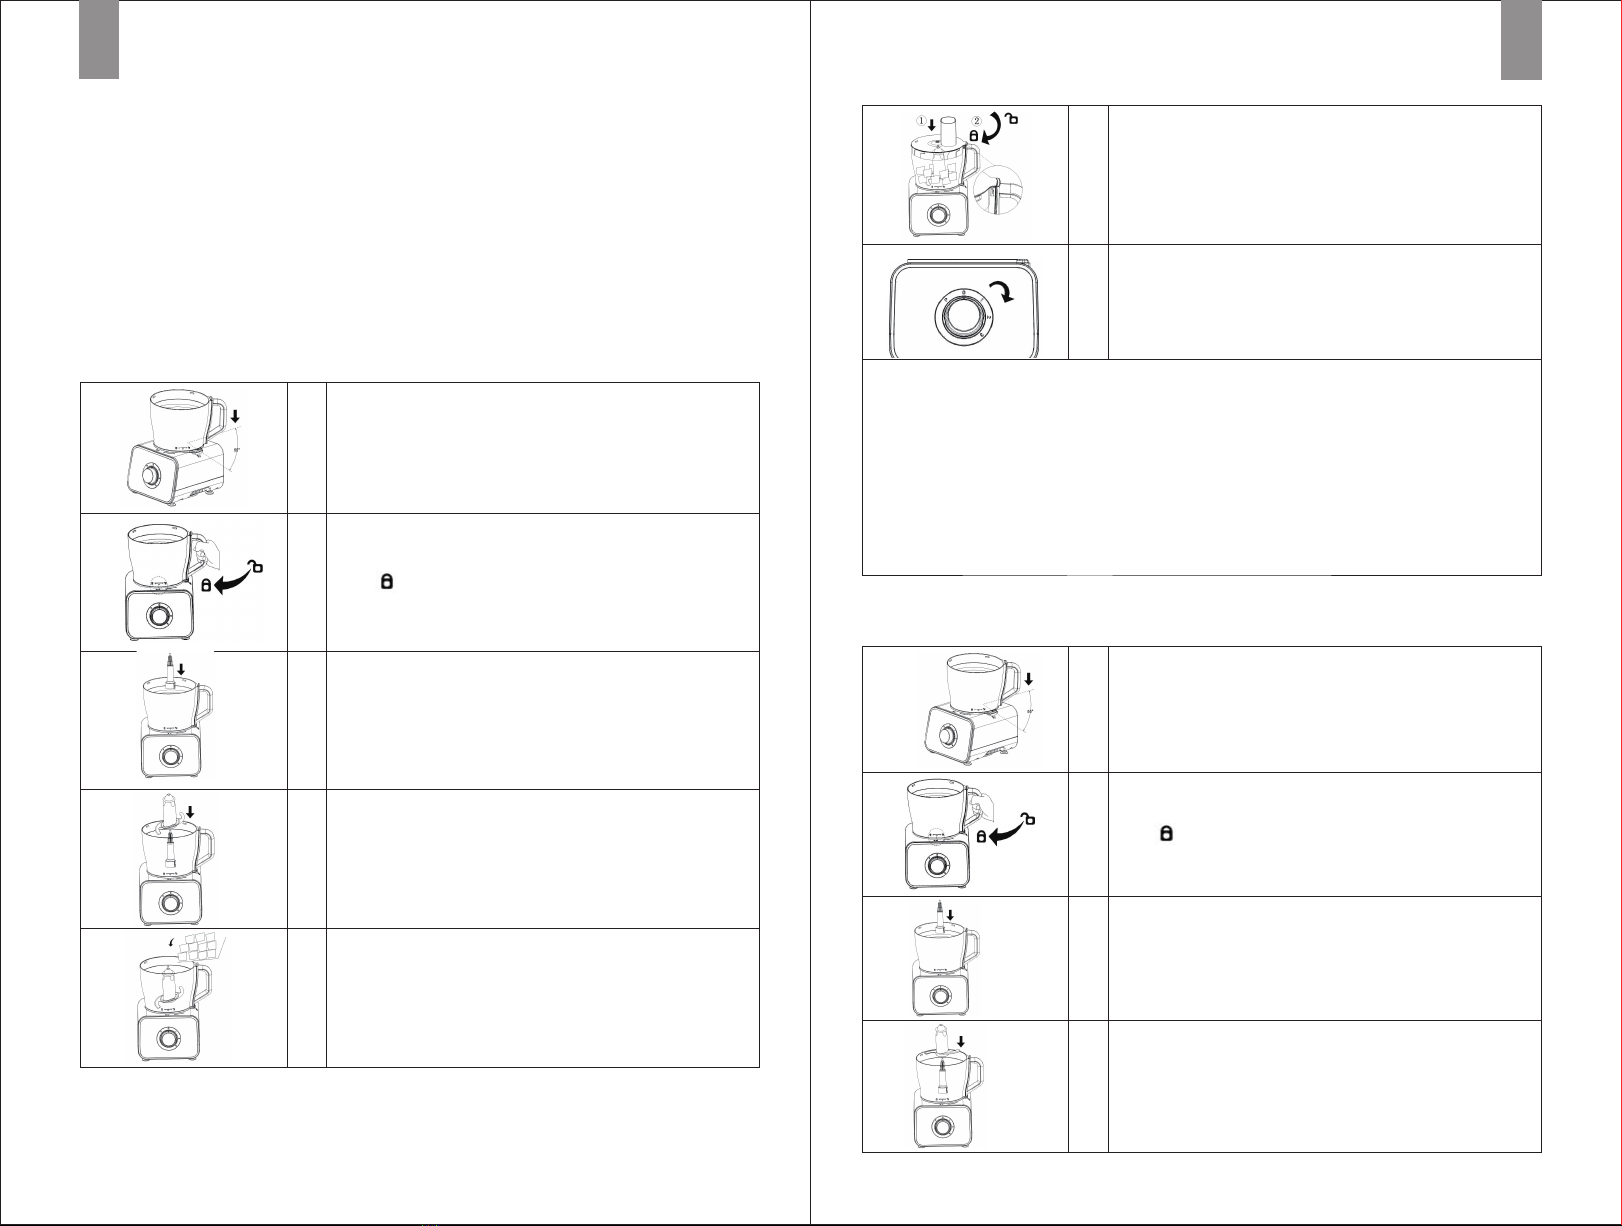
Chopping Meat
Kneading Dough
Place the Bowl on the Main Body, the angle between the handle
and the main body safety switch is about 55 degrees (before
placing, make sure that the Main Body is on a flat desktop and
it is not shaking).
1
2
3
4
5
Hold the handle of the Bowl and turn it clockwise into the Main
Body. When the "▼" on the Bowl is opposite to the Main
Body“ ” or a "click" is heard, it indicates that the Bowl has
been rotated in the right position.The product does not work if
the Bowl is not in the right position.
Put the Drive Shaft into the Bowl.
Put the Chopping Blade on the Drive Shaft.
Put the meat into the Bowl. Food that needs to be processed
should not exceed 500g.
① Cover the Blow with the Bowl Lid.
② Rotate the Bowl Lid lockwise into the Bowl. When the "click"
is heard, it means that the Bowl Lid has been rotated in the
right position, The product does not work if the Bowl Lid is
not in the right position.
Insert the power cord into the power supply, and rotate the switch
to 1 or 2 shift and start working. Each working time should be
less than 30 seconds.
7
6
1)Make sure that the Chopping Blade is placed first when putting the ingredients in the Bowl, so as
to avoid the difficulty to assemble Chopping Blade.
2)The Bowl Lid should be in the right postion to avoid not working.
3)Do not process hard food materials, such as coffee beans, ice cubes, etc. to avoid cracking Bowl
and deformation blunt of Chopping Blade;
4)Ingredient should not exceed the maximum calibration line of the Bowl, otherwise the crushing
effect and life of the product will be affected.
5)When there is ingredient sticking to the Chopping Blade and Bowl, please be sure to turn off the
power, then take out the food.
Caution:
Place the Bowl on the Main Body, the angle between the handle
and the main body safety switch is about 55 degrees (before
placing, make sure that the Main Body is on a flat desktop and
it is not shaking).
1
2
3
4
Put the Drive Shaft into the Bowl.
Put the Dough Hook on the Drive Shaft.
Hold the handle of the Bowl and turn it clockwise into the Main
Body. When the "▼" on the Bowl is opposite to the Main
Body“ ” or a "click" is heard, it indicates that the Bowl has been
rotated in the right position.The product does not work if the Bowl
is not in the right position.
5 6
-
-
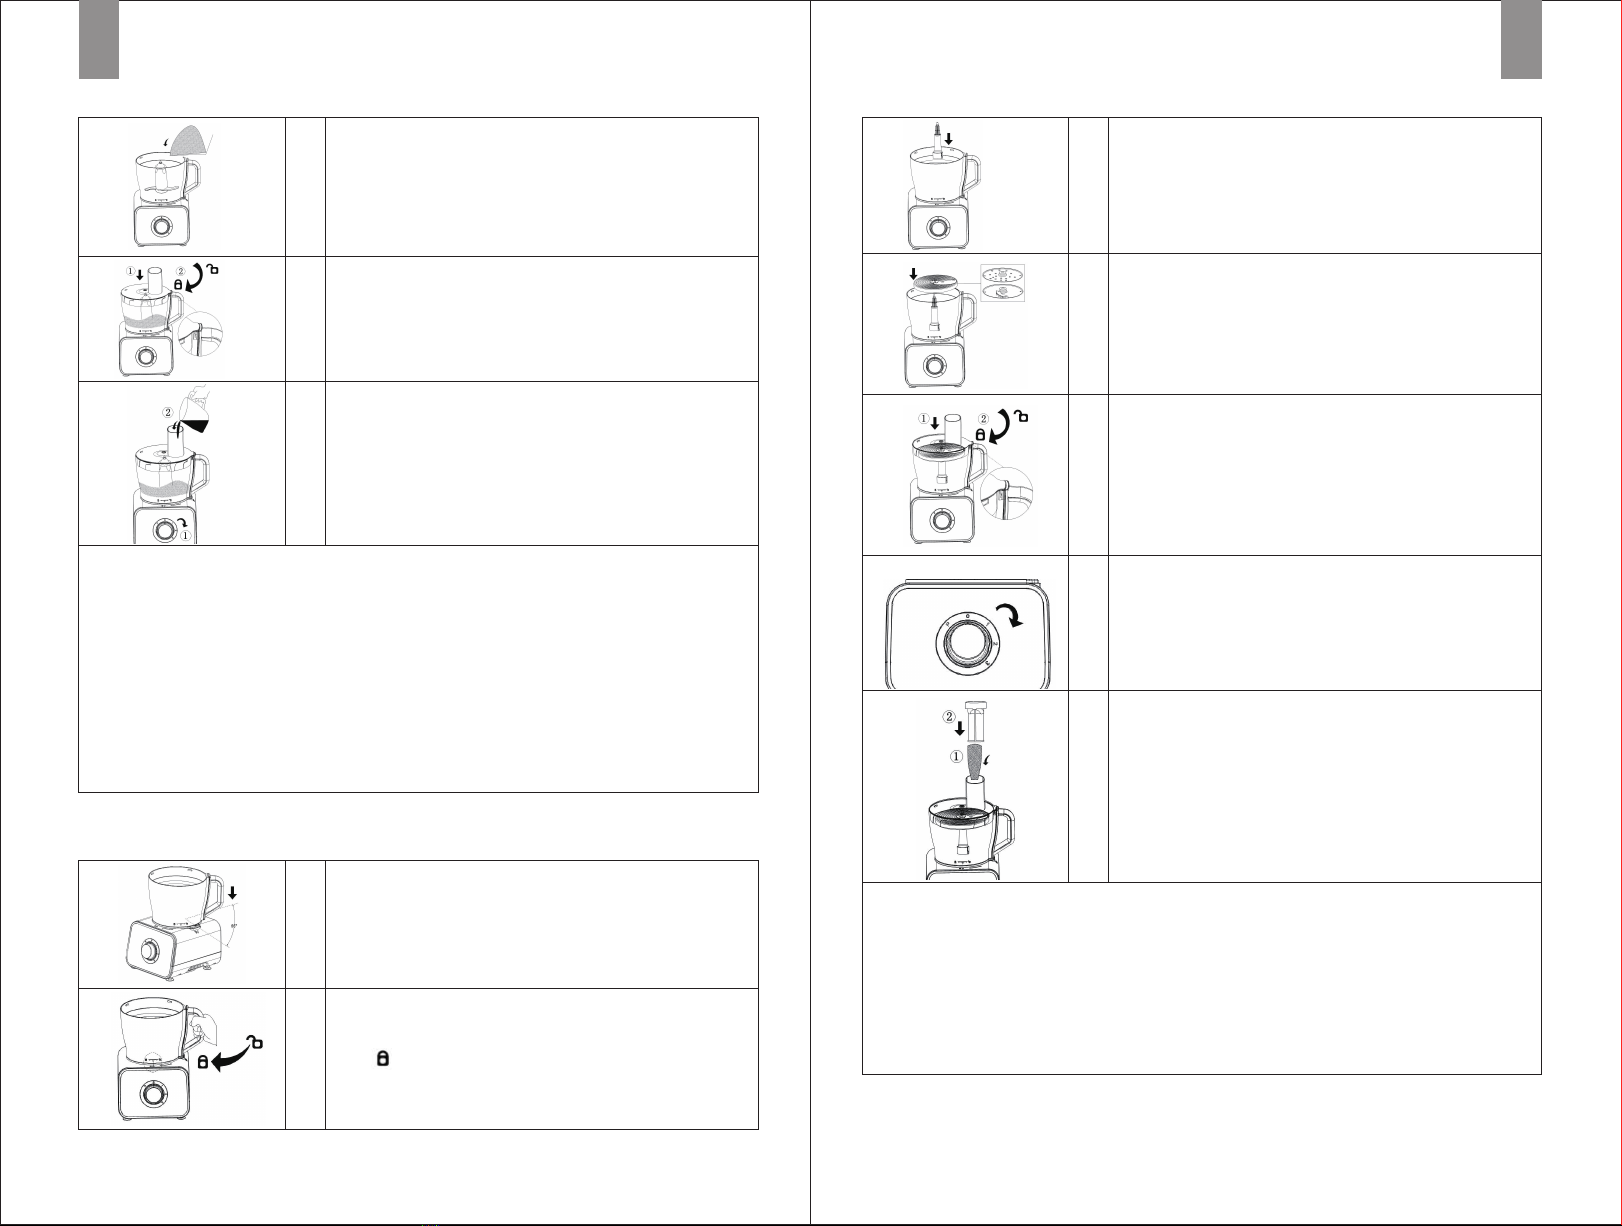
Slicing & Shredding
Put the flour into the Bowl. The flour should not exceed 500g.5
6
7
①Cover the Blow with the Bowl Lid.
②Rotate the Bowl Lid clockwise into the Bowl. When the "click"
is heard, it means that the Bowl Lid has been rotated in the
right position, The product does not work if the Bowl Lid is
not in the right position.
① Insert the power cord into the power supply, and rotate the
switch to 1 shift and start working. Each working time should
be less than 3 minutes.
②Pour slowly water into the Bowl through chute on the Bowl
Lid when the product start working. Don't pour the water too
fast.
1)Make sure that the Dough Hook is placed first when pouring the flour inot the Bowl, so as to
avoid the difficulty to assemble the Dough Hook.
2)Do not process hard food materials, such as coffee beans, ice cubes, etc. to avoid cracking Bowl
and deformation blunt of Dough Hook.
3)Ingredient should not exceed the maximum calibration line of the Bowl, otherwise the crushing
effect and life of the product will be affected.
4)When there is ingredient sticking to the Dough Hook and Bowl, please be sure to turn off the
power, then take out the food.
5)Please put in the appropriate proportion of flour first, then start the machine to ensure that the
Dough Hook works first, then evenly and slowly pour into the appropriate proportion of water, do
not pour water too fast, so that water can not form paste with the flour.
Caution:
Place the Bowl on the Main Body, the angle between the handle
and the main body safety switch is about 55 degrees (before
placing, make sure that the Main Body is on a flat desktop and
it is not shaking).
2
1
Hold the handle of the Bowl and turn it clockwise into the Main
Body. When the "▼" on the Bowl is opposite to the Main
Body“ ” or a "click" is heard, it indicates that the Bowl has been
rotated in the right position.The product does not work if the
Bowl is not in the right position.
1)Before processing, please make sure that the size of food materials can be fully put into the chute.
2)When you put the food into the chute, don't push hard by the Double Pusher to avoid affecting
the processing effect and stuck.
3)Do not put hand or other objects (such as knives, forks, spoons, chopsticks, etc.) into the chute,
only use the Double Pusher.
4)Ingredient should not exceed the maximum calibration line of the Bowl, otherwise the crushing
effect and life of the product will be affected.
5)When the food stuck on the Disc, please turn off the power first, and then take out the food.
Caution:
Put the Drive Shaft into the Bowl.
Place the Adjustable Slicing Disc on the Drive Shaft. (Three
types of Disc can be selected according to the processing
requirements)
①Cover the Blow with the Bowl Lid.
② Rotate the Bowl Lid clockwise into the Bowl. When the "click"
is heard, it means that the Bowl Lid has been rotated in the
right position, The product does not work if the Bowl Lid is
not in the right position.
Insert the power cord into the power supply, and rotate the
switch to 1 or 2 shift and start working. Each working time should
be less than 30 seconds.
① Put slowly food material to the Bowl through the chute on the
Bowl Lid.
② Gently use the Double Pusher to push the ingredients through
the chute.
7
6
5
4
2

Safety
• Don’t touch the sharp blades. Keep the blade unit away
from children.
Important
• Switch off as soon as you’ve got the right consistency.
• Don’t process spices – they may damage the plastic.
• Use for dry ingredients only.
7 8
-
-
EN | Cleaning
- Always unplug the appliance before you remove acces
sories or clean the motor unit.
- You can quickly and easily pre-clean the food processor
bowl with the pulse button. Simply add some water and
washing-up liquid to the dirty bowl and secure the lid. Then
use the pulse button until the bowl is clean. When you pre-
clean the food proces sor bowl in this way, make sure the
food processor blade is assembled in the bowl.
Choosing a speed for all functions
Tool/
Attachment
Picture Function Speed Maximum
capacities
KB time Rest
time
Empty
working
KB time
Chopping
blade
Chopping meat
Cutting vegetables
Min. –
Max.
500g 30sec 1min. 30sec
Dough took
(plastic
knife)
Dough making
Dough kneading
Min. 500g flour
280ml
water
30sec 1min. 30sec
Discs -
slicing/
shredding/
chipping/
Slicing/ shredding/
chipping food and
vegetables such as
as Carrots, Cheese,
Cucumber, etc
Mid. –
Max.
1200ml 1min. 2min. 30sec
EN | Environment
Do not throw away the appliance with the normal
household waste at the end of its life, but hand it in
at an official collection point for recycling. By doing
this, you help to preserve the environment.
EN | Troubleshooting
Question
The appliance does not go on. Make sure that all assembly indications (on the lid of the bowl, on
the bowl, on the motor unit) are aligned.
Answer
The appliance suddenly stops
running.
The lid of the bowl may have become undone during a heavy
processing job. Close the lid properly. The appliance immediately
starts working again. The processing job is too heavy. Set the
control knob to OFF to switch off the appliance and remove the
mains plug from the wall socket. Then let the appliance cool down
to room temperature. lug in the appliance and switch it on again.
Process smaller batches.
Can I clean all removable parts
in the dishwasher?
Yes, except the motor unit and the protection cap for the blade
unit.
What does ‘pulse’ mean? When you press the Pulse button, the appliance will run at its
highest speed a s long you keep pressing the button. Using the
Pulse button is recommended if you want to have more control
over the processing job, for instance when you are chopping.
Why does the motor produce an
unpleasant smell during
processing?
It is very common for a new appliance to give off an unpleasant
smell or emit some smoke the first few times it is used .This
phenomenon will stop after you have used the appliance a
number of times. The appliance may also give off an unpleasant
smell or emit some smoke if it has been used too long. In that
case you have to switch the appliance off and let it cool down
for 60 minutes.
What should I do when the blade
unit or motor gets blocked during
processing?
Switch the appliance off and use a spatula to dislodge the
ingredients that block the blade unit. We also recommend
processing a smaller quantity.
Table of contents
Other Tibek Food Processor manuals


Popular Food Processor manuals by other brands

Nesco
Nesco FP-300 instruction manual

Bellini
Bellini SUPERCOOK manual

Kompernass
Kompernass KM 250 B1 operating instructions

Cuisinart
Cuisinart Core Custom FP-110 Series INSTRUCTION AND RECIPE BOOKLET

Scarlett
Scarlett SC-HB42F64 instruction manual

VOX electronics
VOX electronics MC-355 operating instructions


