Tibret VI 406 User manual

1
MEAT GRINDER
Model # VI 406
220 ~240V, 50/60Hz, 400W

2
Read this manual carefully and keep for future reference
1.This appliance is not intended for use by person(including children)with reduced
physical, sensory or mental capabilities, or lack of experience and knowledge, unless they have been given
supervision or instruction.
2.Children should be supervised to ensure that they do not play with the appliance.
If the supply cord of is damaged, it must be replaced by the manufacturer or its
service agent or a similarly qualified
3.This appliance can be used by children from 8 years and above and persons with
reduced physical, sensory or mental capabilities or lack of experience and knowledge
if they have been given supervision or instruction concerning use of the appliance in a
safe way and understand the hazards involved. Children shall not play with the appliance.
4.Cleaning and user maintenance shall not be made by children unless they are
older than 8 and supervised.
5.Do not use if it has a bad cord or plug or after a malfunction. It should always be repaired or
examined by qualified personnel.
6.To avoid electrocution, do not immerse cord or appliance in water or other liquids. Also do
not expose to rain or damp conditions; Water entering the appliance will increase the risk of
electrocution.
7.Do not leave the appliance in operation unattended, especially if there are children nearby.
Keep the appliance and its cable out of the reach of children under 8 years of age.
8.Do not leave cord hanging or on hot surfaces.
9.Unplug the appliance when you are not going to use it.
10.The use of non-recommended accessories could cause damage to it.
11.Not suitable for external use.
12.Do not place it on heat sources, such as ovens, gas ranges ..., etc.
Do not use near flammable materials such as curtains, fabric coverings, etc., to prevent
fire.
13.It's not a toy. Children should not play with this product.
Cleaning and maintenance of the appliance should not be carried out by children, unless
they are 8 years of age or older and are supervised.
14.To unplug, pull the plug, not the cable. Do not use the cord to transport the appliance.
Before plugging in the appliance, always check that the voltage of the machine matches
that of the mains electricity where you are plugging in.
15.Only suitable for domestic use, not for commercial or professional use.
16.When carrying the unit be sure to hold the motor housing with both hands. Do not carry the unit by holding
only the hopper plate or head.
17.Do not fix the cutting blade and cutting plate when using kibbe attachment.
18.Never feed food by hand. Always use food pusher.
19.Do not grind hard food such as bones, nuts, etc.
20.Do not grind ginger and other materials with hard fiber.
21.Continuous running of meat grinder should be not more than 10 minutes.
22.Check that voltage indicated on the rating label corresponds the mains voltage in your home.
23.Wash all parts (except body) in warm soapy water.
24.Before plugging in, ensure the“ON/O/ R”switch is turned to“ON”position.

3
Parts List
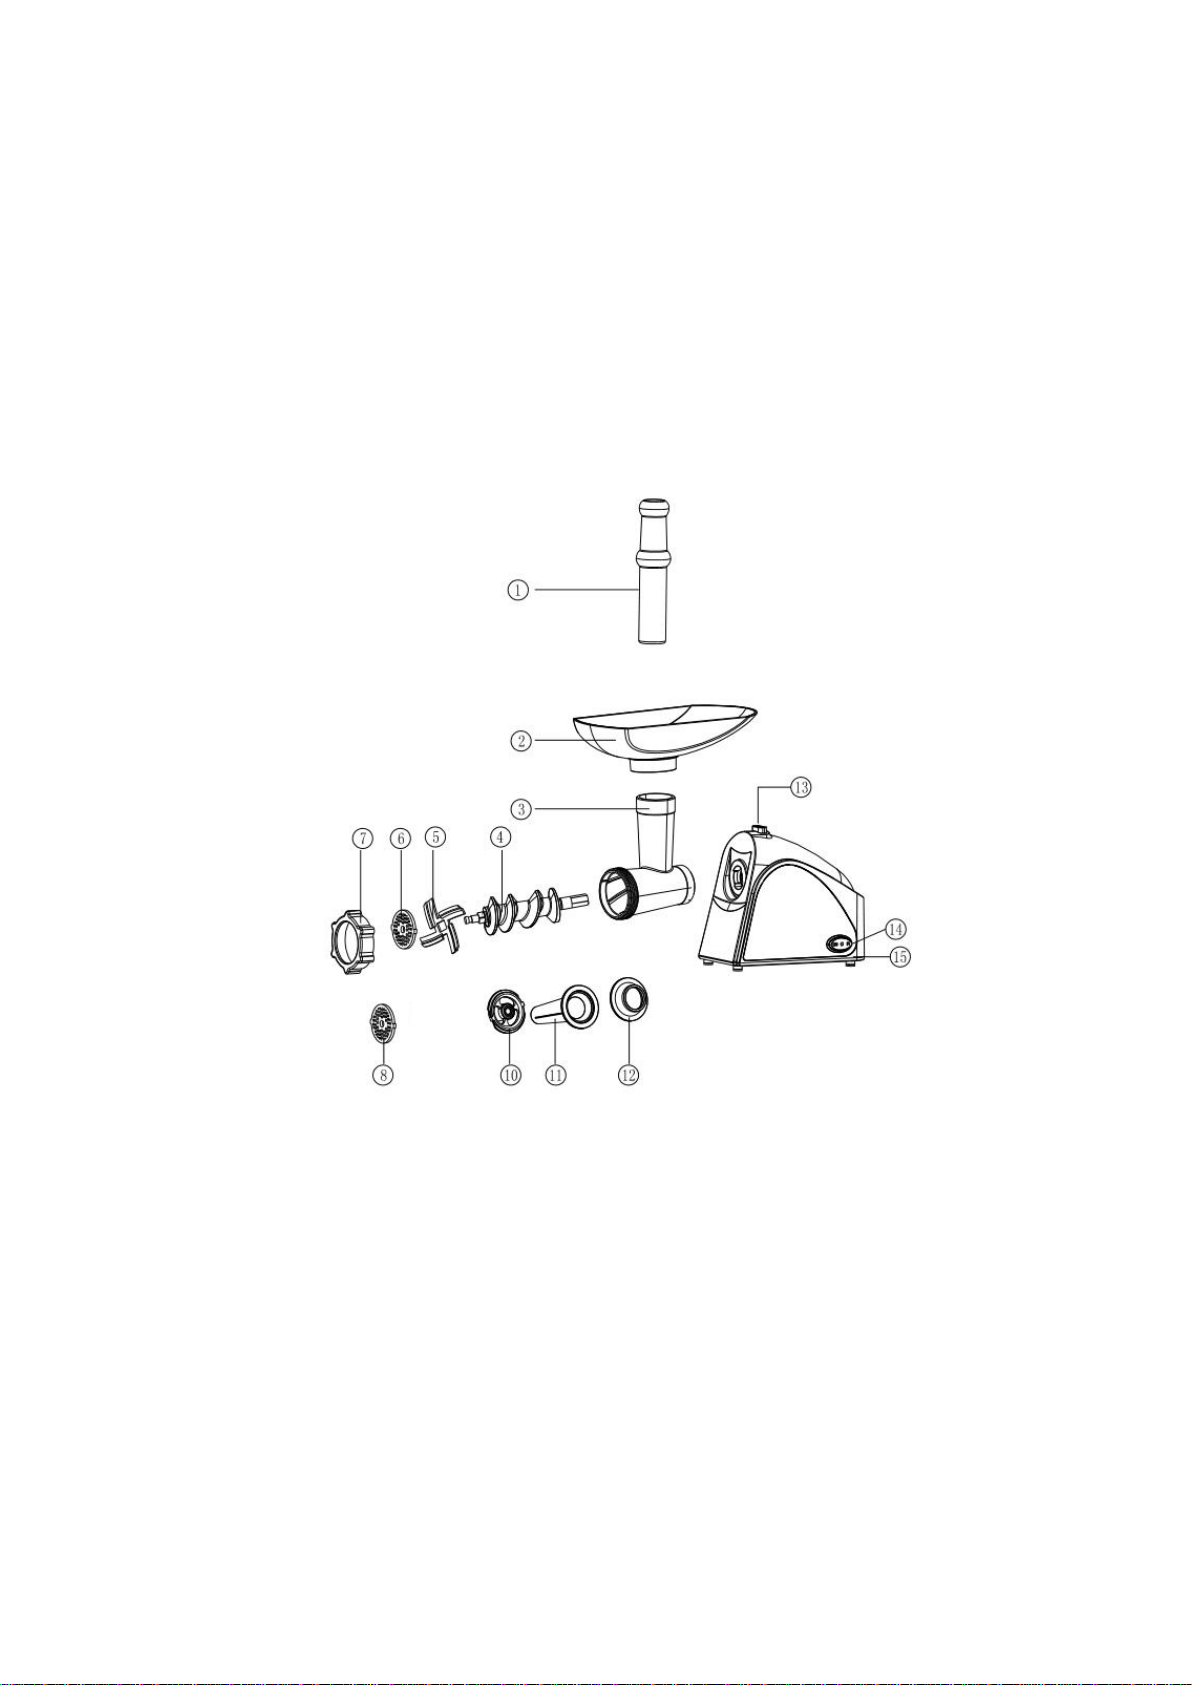
1. Food pusher 2. Hopper plate
3. Head 4. Feed screw
5. Cutting blade 6. Cutting plate (medium)
7. Fixing ring 8. Cutting plate (coarse)
10. Sausage attachment 11. Kibbe attachment
12. Kibbe attachment 13. Locking knob
14. ON/O/R switch 15. Housing
Instruction for Use
ASSEMBLING
◆Holding the head and insert it in the inlet with one hand, revolves toward left(fig.2).

4
◆Place the feed screw into the head, long end first, by turning the feed screw slightly until it is set into the
motor housing(fig.3).
◆Place the cutting blade onto the feed screw shaft with the blade facing the front as illustrated (fig.4). If it
is not fitted properly, meat will not be ground.
◆Place the desired cutting plate next to the cutting blade, fitting protrusions in the slots (fig.5).
◆Support or press the centre of the cutting plate with one finger then screw the fixing ring until tight with
another hand (fig.6). Do not over tighten.
◆Place the hopper plate on the head and fix into position.
◆Locate the unit on a firm place.
The air passage at the bottom and the side of the motor housing should be kept free and not blocked.
MINCING MEAT
◆Cut all foods into pieces (Sinewless, boneless and fatless meat is recommended, approximate size :20 mm
x 20 mm x 60 mm) so that they fit easily into the hopper opening.
◆Plug in and turn the “ON/O/ R” switch to“ON”position.
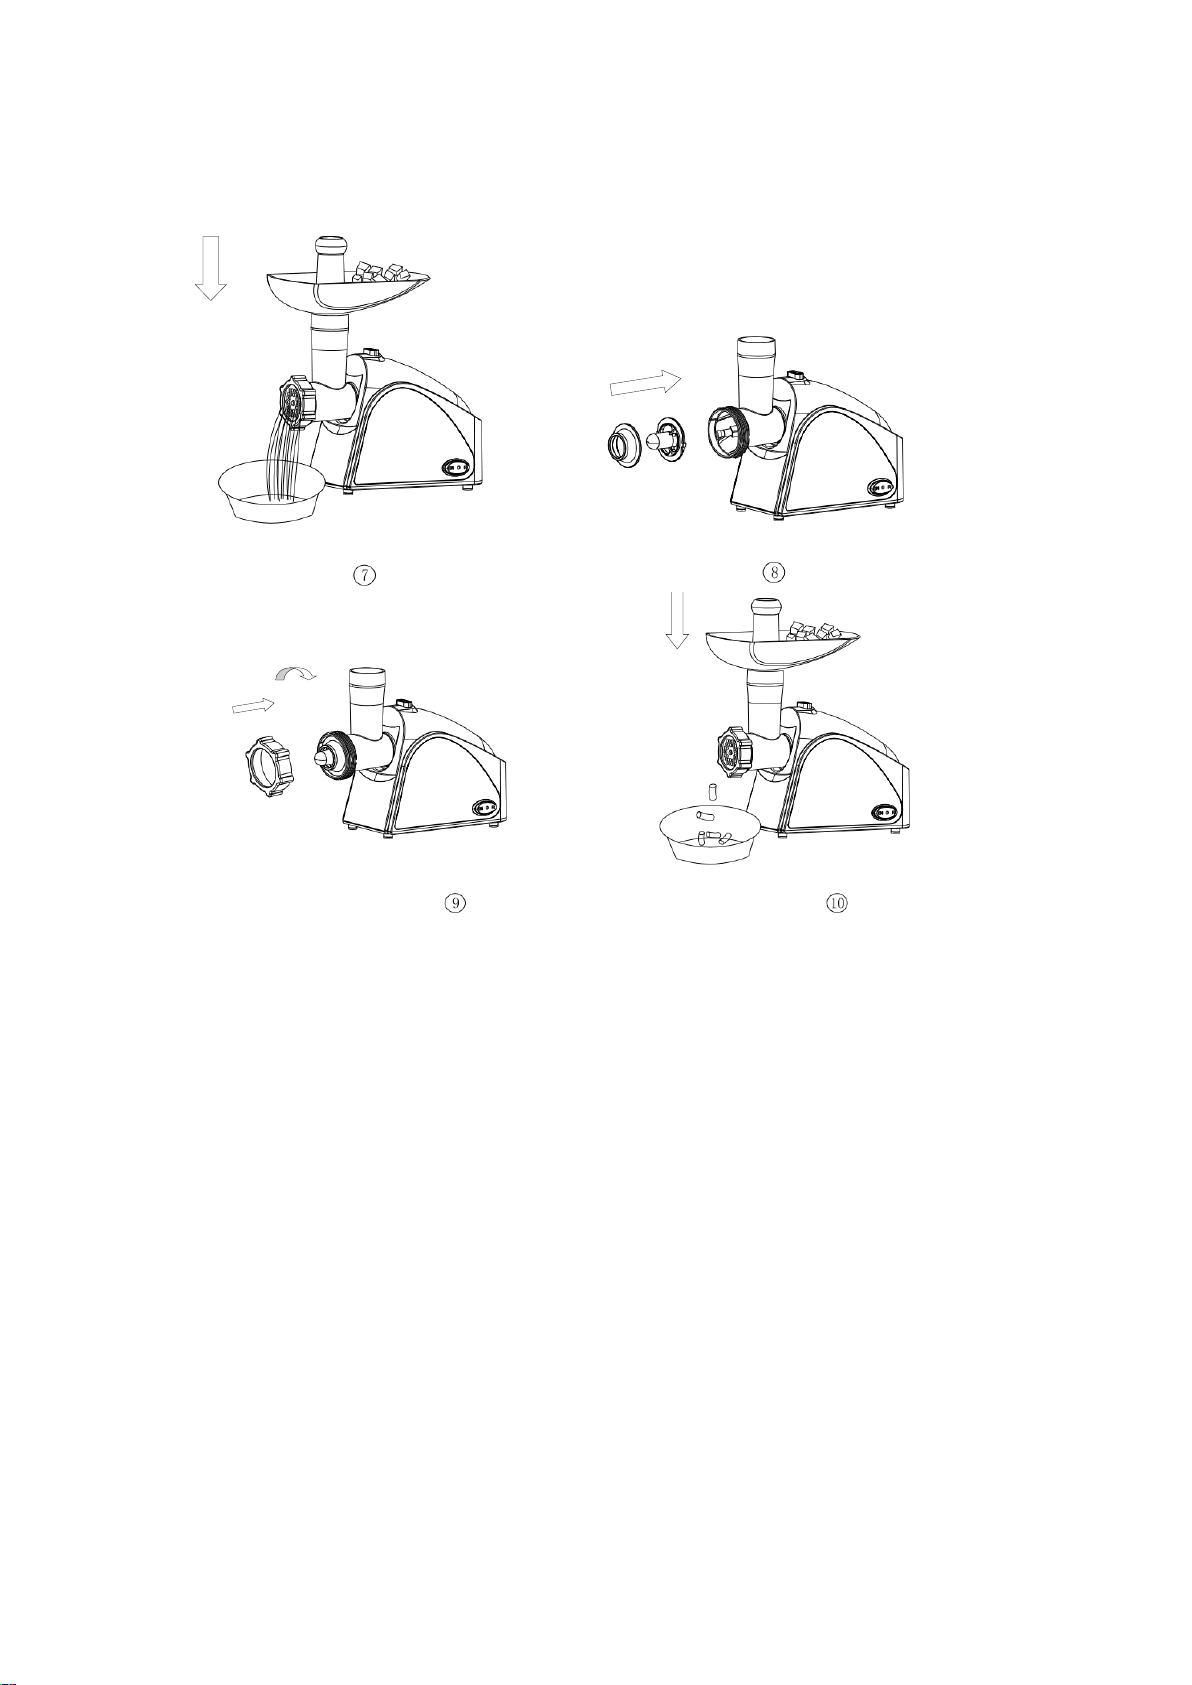
◆Feed foods into the hopper plate. Use only the food pusher (fig.7).
◆After use switch the unit off and unplug it from the power supply.

5
REVERSE FUNCTION
In case of jamming switch the appliance off by turning the “ON/O/ R”switch to“R”.
wait at least one minute until grinder has come to a complete stop.Then,
turn the “ON/O/ R” switch to“R”position.
◆Feed screw will be rotating in the opposite direction, and the head will get empty.
If it doesn't work, switch the unit off and clean it.
Making Kebab
RECIPE STUFFING
Mutton 100g
Olive oil 1 1/tablespoons
Onion (cut finely) 1 1/tablespoons
Spices to your taste
Salt to your taste
Flour 1 1/tablespoons
◆Mince mutton once or twice.
◆Fry onion until brown and add minced mutton, all spice, salt and flour.
OUTLET COVER
Lean meat 450g
Flour 150-200g
Spices to your taste
Nutmeg (cut finely) 1
Powdered red pepper to your taste
Pepper to your taste
◆Mince meat three times and mix all ingredients together in a bowl. More meat and less flour for outlet
cover creates better consistency and taste.
◆Grind the mixture three times.
◆Disassemble by reversing the steps from 5-3 to remove the cutting plate and cutting blade.
◆Place kibbe attachments A and B onto the feed screw shaft together, fitting protrusions in the slots (fig.8).
6
◆Screw fixing ring into place until tight. Do not over tighten (fig.9).
◆Make the cylindrical outlet cover
(fig.10).(
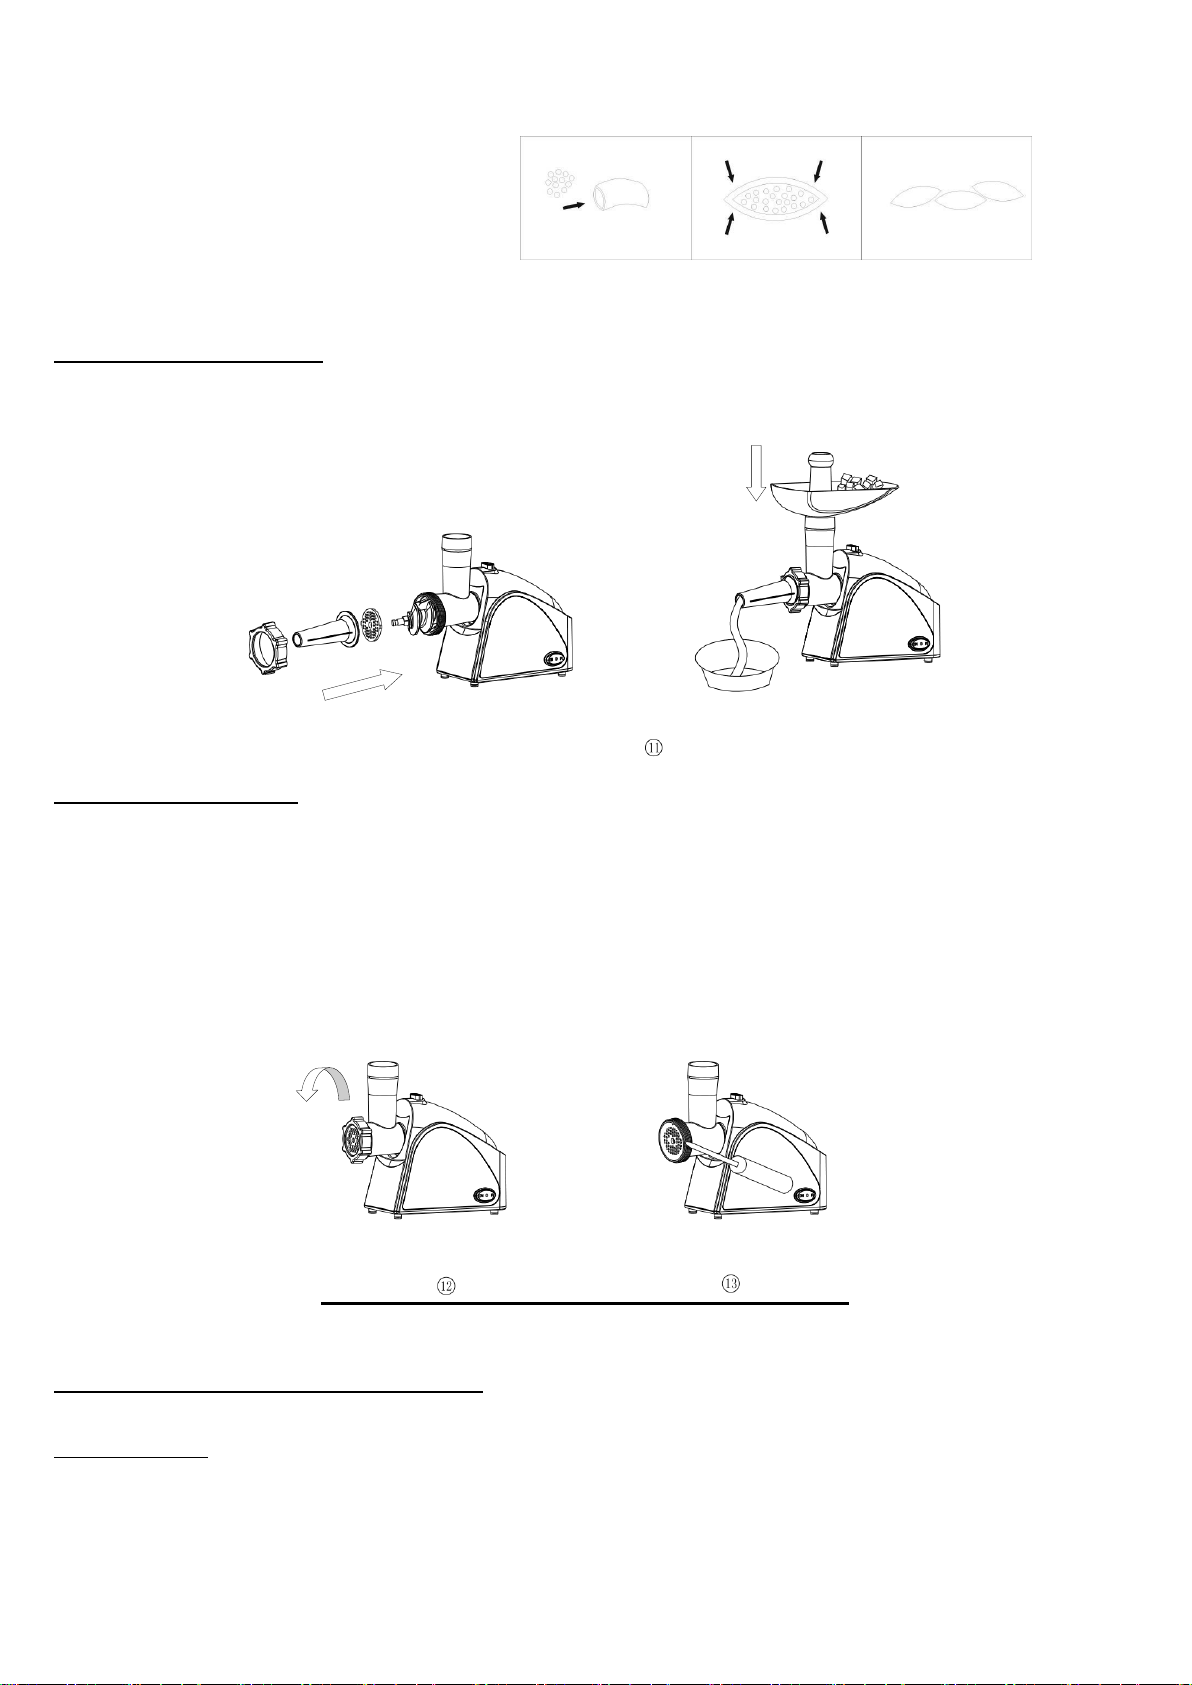
Form kebab as illustrated below and deep
fryer.
Making Sausage
◆Before starting please assemble sausage attachment as per following (fig.11)
DISASSEMBLING
◆Make sure that the motor has stopped completely.
◆Disconnect the plug from the power outlet.
◆Disassemble by reversing the steps from 6-1 pictures.
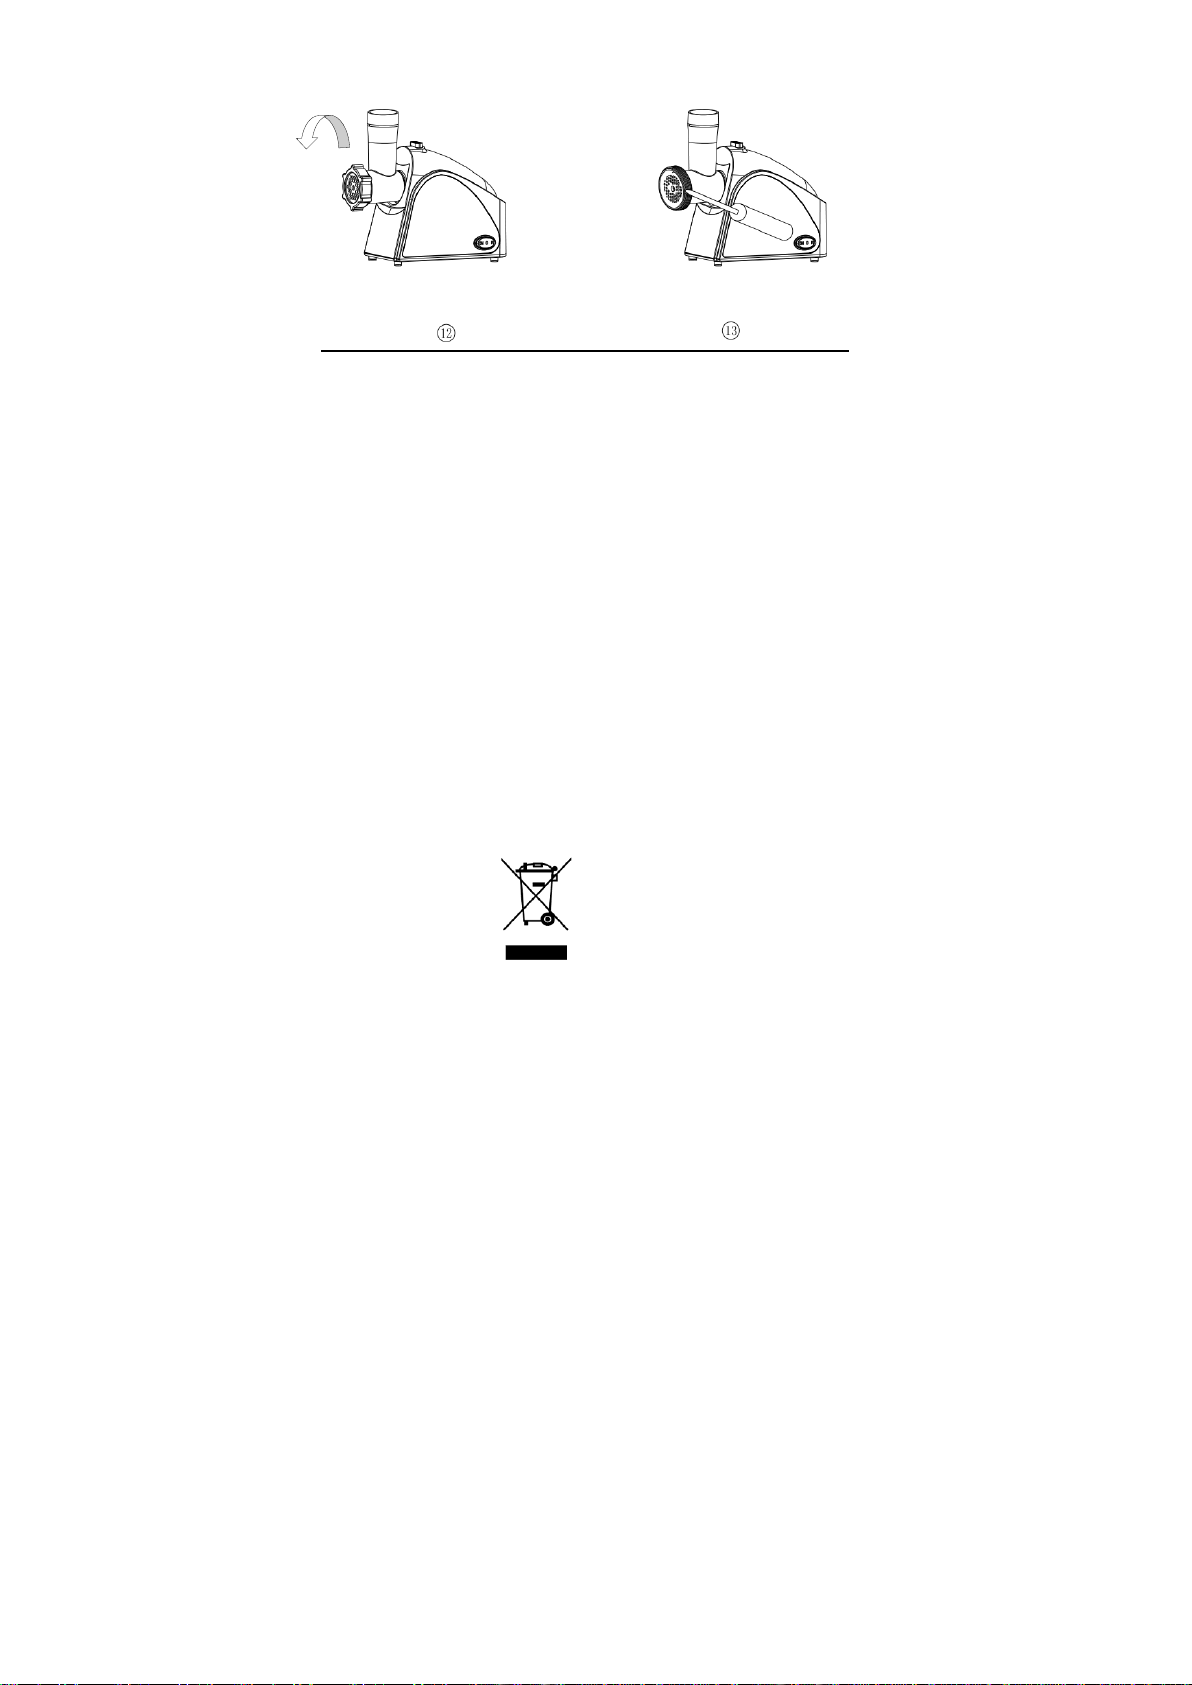
◆If the fixing ring is not easily removed by hands, please use tools(fig.12).
To remove the cutting plate easily, place a screwdriver between the cutting plate and the head as
illustrated and lift it up (fig.13).
Cleaning & Maintenance
CLEANING
◆Remove meat, etc. Wash each part in warm soapy water.
◆A bleaching solution containing chlorine will discolor aluminum surfaces.
◆Do not immerse the motor housing in water, but only wipe it with a damp cloth.

7
◆Thinners and petrol will crack or change the color of the unit.
Wipe all the cutting parts by vegetable oil -wet cloth.
Environmental Protection
Waste electrical production should not be disposed of with household waste.
Please recycle where facilities exist. Check with your Local Authority or retailer for
recycling advice.

1
Picadora de Carne
Mdl # VI 406
220 ~240V, 50/60Hz, 400W

2
MANUAL DE INSTRUCCIONES
Instrucciones generales de seguridad
Antes de poner en marcha este dispositivo, lea atentamente el manual de instrucciones.
1.Lea siempre las instrucciones de uso y consérvelas.
2.Este aparato no debe ser usado por personas (incluidos niños) con capacidades mentales,
sensoriales o físicas reducidas ni por personas,
Que no tengan conocimiento suficiente para el manejo de la misma a menos de que
haya una persona responsable que lo supervise , por razones de seguridad.
Los niños deben ser vigilados en todo momento para asegurarse de que no jueguen con el aparato.
Si el cable estuviera dañado, debe ser sustituido o reparado por el fabricante, servicio
técnico profesional o personal cualificado.
3.Este aparato puede ser utilizado por niños a partir de 8 años y por personas con capacidades
físicas, sensoriales o mentales reducidas o por personas con falta de experiencia
y conocimientos si están bajo supervisión o si se les ha explicado cómo utilizarlo y los
riesgos que puedan incurrir. Los niños no deben jugar con este aparato. La limpieza y el
mantenimiento no deben ser realizados por niños si no están bajo supervision
4.Si desea desenchufar el aparato, no tire del cable, sino del cuerpo aislante de la clavija.
5.No lo use si tiene algún cable o enchufe en mal estado o después de un mal funcionamiento.
Siempre debe ser reparado o examinado por personal cualificado.
5.Para evitar electrocuciones, no sumerja el cable ni el aparato en agua u otros líquidos.
Tampoco exponer a la lluvia o condiciones de humedad; el agua que entre en el aparato
aumentaráel riesgo de electrocución.
6.No deje el aparato en funcionamiento desatendido, especialmente si hay niños cerca.
Mantener el aparato y su cable fuera del alcance de los niños menores de 8 años.
7.No deje el cable colgando o sobre superficies calientes.
8.Desenchufe el aparato cuando no vaya a utilizarlo.
9.El uso de accesorios no recomendados podría causar daños en el mismo.
10.No apto para uso externo.
11.No lo coloque sobre fuentes de calor, como hornos, cocinas de gas..., etc.
12.No utilizar cerca de materiales inflamables como cortinas, revestimiento de telas, etc.,
para prevenir un incendio.
13. No es un juguete. Los niños no deben jugar con este producto.
14. La limpieza y mantenimiento del aparato no debe realizarse por niños, a menos que
sean de 8 años o mayores y que sean supervisados.
15.Para desenchufar tire del enchufe no del cable. No usar el cable para transportar el
aparato.
16.Antes de enchufar el aparato, verifique siempre que el voltaje de la máquina coincide
con el de la red eléctrica donde va a enchufar.
17.Sólo apto para uso doméstico, no para uso comercial ni profesional.
18. Cuando transporte la unidad, asegúrese de sujetar la carcasa del motor con ambas manos. No transporte
la unidad sujetándola únicamente por la placa o el cabezal de la tolva.
19. No fije la hoja de corte ni la placa de corte cuando utilice el accesorio kibbe.
20. Nunca alimente la comida a mano. Utilice siempre el empujador de alimentos.
21. No triture alimentos duros como huesos, nueces, etc.
3
22. No muelas jengibre y otros materiales con fibra dura.
23. El funcionamiento continuo de la picadora de carne no debe durar más de 10 minutos.
24.Compruebe que el voltaje indicado en la etiqueta de características corresponde al voltaje de red de su
hogar.
25. Lave todas las piezas (excepto el cuerpo) con agua tibia y jabón.
26. Antes de enchufar, asegúrese de que el interruptor "ON/O/ R" estéen la posición "ON".
Lista de partes
1. Empujador de alimentos 2. Placa de la tolva
3. Cabeza 4. Tornillo de avance
5. Cuchilla de corte 6. Placa de corte (mediana)
7. Anillo de fijación 8. Placa de corte (gruesa)
10. Accesorio para salchichas 11. Accesorio para kibbe
12. Accesorio Kibbe 13. Perilla de bloqueo
14. Interruptor ON/O/R 15. Carcasa

4
MONTAJE DE LA UNIDAD
◆Sosteniendo la cabeza e insértela en la entrada con una mano, gira hacia la izquierda (fig.2).
◆.Coloque el tornillo de alimentación en la cabeza, el extremo largo primero, girando el tornillo de
alimentación ligeramente hasta que encaje en la carcasa del motor (fig.3).
◆Coloque la hoja de corte en el eje del tornillo de alimentación con la hoja hacia el frente como se
ilustra (fig.4). Si no se coloca correctamente, la carne no se triturará.
Coloque la placa de corte deseada junto a la hoja de corte, encajando salientes en las ranuras (fig.5).
Sostenga o presione el centro de la placa de corte con un dedo y luego atornille el anillo de fijación con la
otra mano hasta que quede apretado (fig.6). No apriete demasiado.
Coloque la placa de la tolva en el cabezal y fíjela en su posición.
Ubique la unidad en un lugar firme.
El paso de aire en la parte inferior y lateral de la carcasa del motor debe mantenerse libre y no bloqueado.
◆CARNE PICADA
◆Corte todos los alimentos en trozos (se recomienda carne sin tendones, sin huesos y sin grasa, tamaño
5
aproximado: 20 mm x 20 mm x 60 mm) para que encajen fácilmente en la abertura de la tolva.
◆Enchufe y gire el interruptor “ON/O/ R” a la posición “ON”.
◆Introduzca los alimentos en la placa de la tolva. Utilice únicamente el empujador de alimentos (fig.7).
◆después de su uso, apague la unidad y desenchúfela de la fuente de alimentación.
FUNCIÓN INVERSA
* En caso de atasco, apague el aparato girando el interruptor "ON/O/ R" a "R".
espere al menos un minuto hasta que el molinillo se detenga por completo. Luego,
gire el interruptor “ON/O/ R” a la posición “R”.
*El tornillo de alimentación giraráen la dirección opuesta y la cabeza se vaciará.
*Si no funciona, apague la unidad y límpiela.
Hacer kebab
RECETA RELLENO
Cordero 100g
Aceite de oliva 1 1/cucharadas
Cebolla (cortada finamente) 1 1/cucharadas
Especias a tu gusto
sal a tu gusto
Harina 1 1/cucharadas
Picar el cordero una o dos veces.
Freír la cebolla hasta que se dore y agregar el cordero picado, todas las especias, la sal y la harina.
CUBIERTA DE SALIDA

6
Carne magra 450g
Harina 150-200g
Especias a tu gusto
Nuez moscada (cortada finamente) 1
Pimiento rojo en polvo a tu gusto
Pimienta a tu gusto
Picar la carne tres veces y mezclar todos los ingredientes en un bol. Más carne y menos harina para cubrir
la salida crea una mejor consistencia y sabor.
Moler la mezcla tres veces.
Desmonte invirtiendo los pasos del 5 al 3 para retirar la placa de corte y la hoja de corte.
Coloque los accesorios del kibbe A y B en el eje del tornillo de alimentación juntos, ajustando las
protuberancias en las ranuras (fig. 8).
Atornille el anillo de fijación en su lugar hasta que quede apretado. No apriete demasiado (fig. 9).
◆Hacer la tapa de salida cilíndrica
(fig.10).(
◆.Forme kebab como se ilustra a
continuación y fríalo.
Hacer salchichas
◆Antes de comenzar, monte el accesorio para salchichas según se indica a continuación (fig.11)
◆DESMONTAJE
◆Asegúrese de que el motor se haya detenido por completo.
◆Desconecte el enchufe de la toma de corriente.
◆Desmonte invirtiendo los pasos de las imágenes 6-1.
◆Si el anillo de fijación no se quita fácilmente con las manos, utilice herramientas(fig.12).
Para retirar fácilmente la placa de corte, coloque un destornillador entre la placa de corte y el cabezal
como se ilustra y levántelo (fig.13).
7
LIMPIEZAY MANTENIMIENTO
Retire la carne, etc. Lave cada parte con agua tibia y jabón.
Una solución blanqueadora que contenga cloro decolorarálas superficies de aluminio.
No sumerja la carcasa del motor en agua, límpiela únicamente con un paño húmedo.
Los diluyentes y la gasolina agrietarán o cambiarán el color de la unidad.
Limpie todas las piezas de corte con un paño húmedo con aceite vegetal.
Símbolo de recogida selectiva en países europeos
Este símbolo indica que este producto debe eliminarse por separado.
Las cláusulas siguientes se aplican únicamente a los usuarios de países

WARRANTY CARD
- The warranty comes into force on the date indicated on the product invoice or purchase
receipt
- Repair will be carried out completely free of charge, for both materials and labour during
the first two years.
- Damage is not covered by this Guarantee if it is caused by using the equipment not
described in the instruction manual and in general for use other than domestic use, knocks
from being dropped, external agent(lime scale, chemical products, water damages etc.)
and any operations other than by the official service.
- Any aesthetic damage caused by use, normal wear and the periodic maintenance opera-
tions described in the instruction manual which may be carried out by the user is also
excluded.
-Supplies(filters,bags,brushes,batteries,bulbs,rubber bands,joints ,screw head ,etc) are not
covered by this warranty.
Please complete in block capitals and return with the product .
- Should an Official Technical Support Service carry out unsatisfactory work, the holder
may make a claim to be warranty, contacting them directly at the address give at the end
of this document.
NAME_________________________________________________________________________
ADDRESS_____________________________________________________________________
POST CODE , CITY _____________________________________________________________
TELEPHONE
(DAY TIME) __________________________________________________________________
DATE, SIGNATURE_____________________________________________________________
DESCRIPTION OF
THE ARTICLE __________________________________________________________________
DESCRIPTION OF
DEFECT ___________________________________________________________________

GARNTIA GERAL(2 ANOS) - GARANTIA TOTAL
"Exclusóes da garantia geral (2 anos)"
POR FAVOR COMPLETA EN MAYÚSCULAS Y VUELTA CON EL PRODUCTO
- Esta garantia cobre, durante dois, a partir data de compra, qualquer defelto de funcionamento,
sem custo algum para o titular do mesmo.
- para que a gaantia TIBRET tenha validade, esta deverá estar devidamente preenchida,sem
rasuras, nem emendas e carimbada pelo estabelecimento vendedor,com indicaçáo clara da
data de venda.
- Adicionalmente, o titular da garantia desfrutará em cada momento de todos as direitos que a
legislaçáo vigente lhe conceda.
- A garantia náo cobre as roturas ou avarias produzidas por caidas, instalaçáo incorrecta, manip-
ulaçáo total ou parcial por pessoal alhelo aos Serviços Técnicos da TIBRET, assim como por
causas de força maíor alheías á TIBRET.(fenómenos geológicos, distúrbios, uso náo doméstíco
etc.)
- Lgualmente, a presente garantia náo tem efelto sobre os componentes e acessórlos que sáo
objecto de desgaste como consequéncia do uso, assim como os perecívels, tais como compos-
tos plástícos, borracha, vídro, cabos, lámpadas, papel, fíltros, esmaltes, pinturas ou revestímen-
tos deteríorados por uso indevido ou reacçáo a agentes como calor,água ou produtos quimicos
externos.
- Também flcam isentas da garantia as operaçóes de ajuste e limpeza explicadas nos livros de
instruçóes.
Os textos, fotos, cores, fíguras e dados, correspondem ao nivel actual técnico do momento em
que foram impressos, Reservamo-nos o direito de efectuar modificaçóes, motivados pelo desen-
volvimento permanente da técnica nos nossos produtos.
NOMBRE ______________________________________________________________________
DIRECCIÓN ___________________________________________________________________
CÓDIGO POSTAL_______________________________________________________________
TELEFONO ____________________________________________________________________
FECHA, FIRMA ________________________________________________________________
DESCRIPCIÓN DEL ARTÍCULO __________________________________________________
DESCRIPCIÓN DE LOS DAÑOS __________________________________________________
Table of contents
Languages:


