Tiger 3D Printers Tiger3D XHD User manual
Tiger3D Series
XHD / HD / XL
3DPrinters
Operators Manual
Version 1.0.2
™
11/14/2017

Contents
1. Product Information .................................................................................................. 1-4
1.1 Regulatory Statements................................................................................................................. 1
1.2 Safety Precautions ....................................................................................................................... 2
1.3 General Information ..................................................................................................................... 3
1.4 Package Contents ........................................................................................................................ 3
1.5 Product Overview ......................................................................................................................... 4
2. Setting up your 3D Printer - Hardware ...................................................................... 5-7
2.1 Unpacking..................................................................................................................................... 5
2.2 Connecting to the Power Adapter and Cable ............................................................................... 5
2.3 Power Button Control ................................................................................................................... 6
2.4 Installing the Picker ...................................................................................................................... 7
2.5 Filling the Resin Tank ................................................................................................................... 7
3. Using PrinterTool - Software...................................................................................... 8-23
3.1 Installing Tiger3D PrinterTool Software ........................................................................................ 8
3.2 Quick Access Tool Bar.................................................................................................................. 8
File Management ................................................................................................................... 8
Overview ................................................................................................................................ 8
3.3 Platform Mode .............................................................................................................................. 9
3.4 Layout Mode ................................................................................................................................ 10-12
Object List ............................................................................................................................. 10-11
Information ............................................................................................................................ 12-13
3.5 Supporter Mode ........................................................................................................................... 13-17
Supporter List ........................................................................................................................ 13-14
Supporter Settings ................................................................................................................ 14-15
Heavy, Medium, & Light Support ................................................................................. 14
Support Parameters .................................................................................................... 14
Supporter Sections ...................................................................................................... 15
Supporter Settings - Joint Shapes ............................................................................... 15
PrinterTool Special Features ........................................................................................ 16
Grid / Angle / Sliced / Base ................................................................................ 16
Supporter Setting in Modify Mode ............................................................................... 17
Explore Endless Creativity with Tiger 3D

Contents
3. Using PrinterTool - Software (continued) .................................................................. 8-23
3.6 Print Mode ................................................................................................................................... 17-18
3.7 Advanced Settings ....................................................................................................................... 19
UserDenedSupporter ......................................................................................................... 19
Naming Files ......................................................................................................................... 19
Troubleshooting .................................................................................................................... 19
How to Resolve "Fatal Error" when Installing.......................................................... 19
3.8 PrinterTool Features .................................................................................................................... 20-21
Surface Smoothing ................................................................................................................ 20
Print Setting ........................................................................................................................... 20
How to use Tiger Controller ................................................................................................... 21
Print and Inspect ................................................................................................................... 21
3.9 Engineering Mode ....................................................................................................................... 22-23
Advanced Settings ................................................................................................................ 22-23
Print, Record, and Update ..................................................................................................... 23
More Information ................................................................................................................... 23
How to use the Manual IP function ......................................................................... 23
Troubleshooting IP .................................................................................................. 23
4. After Printing Is Complete ......................................................................................... 24-27
4.1 Casting Preparation and Burn-Out Process ................................................................................ 24-26
4.2 Cleaning Picker and Tank ............................................................................................................ 27
5. Appendix ................................................................................................................... 28-31
Appendix 1.Specications ................................................................................................................ 28
Appendix 2. Resin Curing Time ......................................................................................................... 29
Appendix 3. Printing Parameter ......................................................................................................... 30
Appendix 4. Tiger Settings for Burgundy & Smart-Res Resin ........................................................... 31
Explore Endless Creativity with Tiger 3D

1. Product Information
1.1 Regulatory Statements
FCC NOTICE
This equipment has been tested and found to comply with the limits for a class “A” digital device, pursuant to Part 15 of the
FCC Rules.
These limits are designed to provide reasonable protection against harmful interference. This equipment generates, uses, and
can radiate radio frequency energy. If not installed properly and used in accordance with the instruction manual, may cause
harmful interference with radio communications. Operation of this equipment in a residential area is likely to cause harmful
interference, in which case the user will be required to correct the interference at their own expense.
COMPLIANCE
This equipment conforms with International Electric Committee (IEC) 60950-1 and meets the requirements of the applicable
EC directives.
1
Explore Endless Creativity with Tiger 3D

1.2 Safety Precautions
Please read through the following Safety Precautions before you begin using your printer.
(1) Use only the power adapter and accessories provided by the manufacturer for this printer.
(2) Before plugging the power adapter into an electrical outlet, verify the local power rating conforms
withthespeciedvoltageandfrequency.
(3) This printer needs a grounded, 1-phase electrical power source.
(4) Make sure power and communication cables are well managed to prevent injury.
(5) Only use resins supplied by the Tiger3D manufacturer. Use of other unauthorized resins may
cause printing failure.
(6) Do not expose the resin tank to a direct light source; the resin will solidify under UV light.
(7) Chemical substances like resin may cause skin irritation. Please read the guidelines in the Material Safety
Data Sheet (MSDS) supplied by the manufacturer. It is recommended that the user wear protective gloves
when handling resin.
(8) Before lifting and moving the printer, be sure to dispose of the remaining resin in the reaction tank.
Cleanthetankinadvancetopreventresinoverow.
(9) Keep printer doors closed during printing or curing to prevent UV leakage.
(10) UV light may cause injury to the eyes. Do not stare directly into the printer when it is in operation.
Wearing UV protective glasses is reccomended during printer operation.
(11) Place the printer on a level surface and keep it in an upright position at all times.
(12) Do not store the printer in extremely hot or cold temperatures.
(13) Do not attempt to disassemble or repair the printer yourself. Doing so may cause device malfunction or injury.
2
Explore Endless Creativity with Tiger 3D

1.3 General Information
Product Names Tiger XHD / HD / XL
Model Number (XHD) 78-5050 (HD) 78-5080 (XL) 78-5000
Build Area (mm) (XHD) 57 x 32 x 120 (HD) 80 x 45 x 120 (XL) 125 x 70 x 123
Resolution (XHD) 30.mm (HD)41.5mm (XL)65mm
Wavelength (XHD / HD / XL) 405nm LED
Layer Thickness 5 ~ 200mm
Printer Size 17 x 17 x 23 1/2” 83 - lbs
Printer 24V DC, 3.75A
File Input .SLC, .ZIP(PNG), .CWS, .WRK
File Input Limitation TigerControllerleinputlimitationfromPC:130
TigerControllerleinputlimitationfromUSB:1GB
Interface Ethernet Connection, USB (Direct Printing)
PowerInput WithAdapter:100~240VAC,2A,50/60Hz
Operating System Windows 7, Windows 8, Windows 10
Network Browser Google Chrome
Packaged Size and Weight 32 x 32 x 37 1/2” (including packing materials) 127.60 lbs
Operating Temperature 10°C to 30°C
Ideal Temperature 50 to 86°F (10°-28°C)
Humidity (RH) 40% to 60%
The printer should be kept in a dry environment
Store the materials at ambient temperatures, from 15°C to 28°C
Storage of Printing Material Do not expose material to UV light; the resin may solidify.
●Pleasefollowtheoperatingmanualasdirected.Failuretodosomayresultinliabledamagesandpossibleinjury.
●Repairshouldonlybecarriedoutbytheauthorizedmanufacturer.
1.4 Package Contents
Please verify that you have received the correct printer and accessories. Contact our sales team if the
printer or accessories are missing or damaged.
3
Explore Endless Creativity with Tiger 3D

4
Inside
Resin Tank
Picker
Handle
Projector
Front View
Product Label
Fan
Storage Area
Front Panel
Network Port
Power Jack
USB Port
Printer Door
Power Button
1.5 Product Overview
Explore Endless Creativity with Tiger 3D

5
2. Setting up your 3D Printer - Hardware
2.1 Unpacking
WARNING: Do not attempt to unpack or move the Tiger3D printer without
assistance. Always use proper lifting techniques to avoid injury.
(1) Remove the top cardboard
(2) Remove the EPE inside the inner box
(3) Remove the side cardboard
(4) Remove the inner box
2.2 Connecting to the Power Adapter and Cable
(1) Connect the power cord and adapter to the printer before you plug it into an electrical outlet
(2) Connect the printer to your computer or laptop
-Basic:ConnectprintertolaptopwithRJ-45cable(Graph1.)[Initiatingtime;1minute]
-LAN:Connectbothprinterandlaptoptolocalareanetwork[Initiatingtime;afewseconds]
-IPsharer:ConnectbothprinterandlaptoptoIPsharer[Initiatingtime;afewseconds]
Explore Endless Creativity with Tiger 3D
6
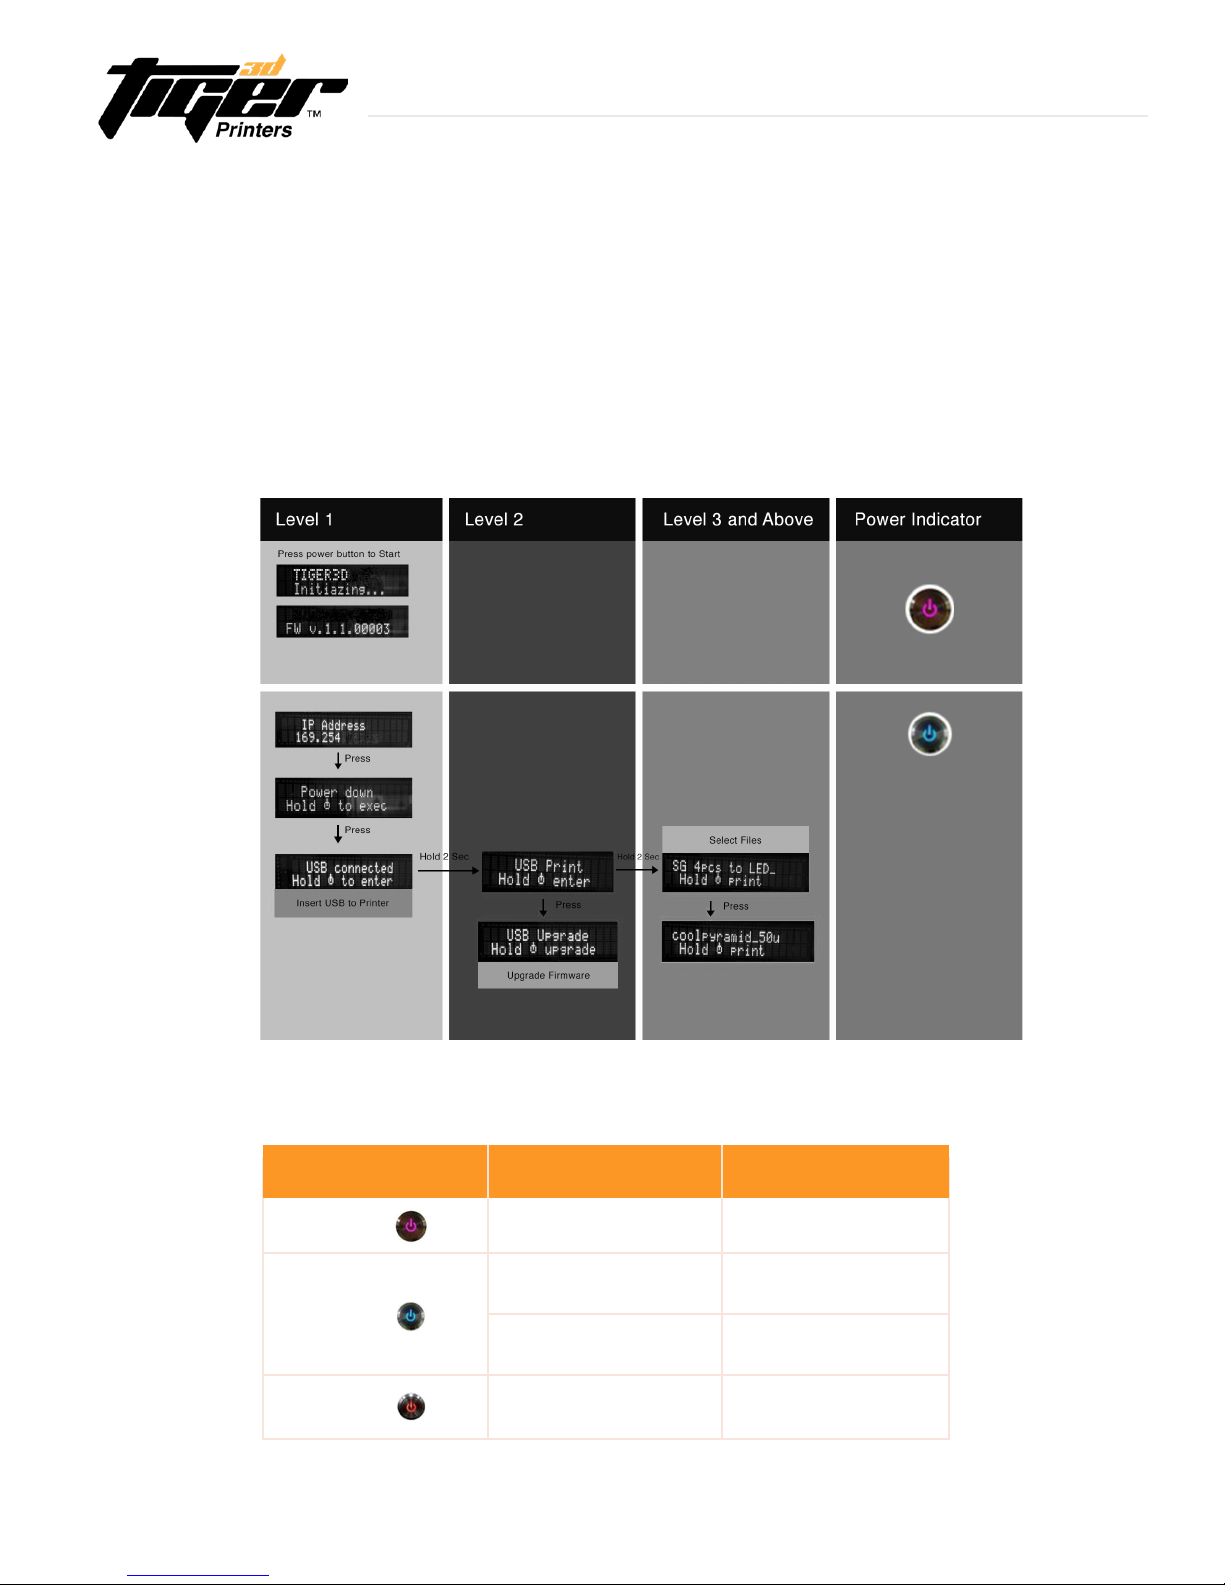
Power Indicator:
Color Behavior Printer Status
Purple Blinking System warming up
Blue
Solid Standby mode
Blinking Printing in progress
Red Solid Error
2.3 Power Button Control
To turn your printer on, press the Power button located at the top left corner of the printer. The system will begin
warm up and the indicator light will turn purple. After a few seconds the indicator light will turn blue and the
printerwillbereadyforuse.ThePowerbuttonisalsousedtoselectaleonaUSBdrivetoprint.Downloadthe
latestrmwarefromourwebsite,orexecutermwareupgradebyUSB.
- Press power button:changemodeinthesamelevel
- Press and Hold power button: hold down the power button for up to 2 seconds
to enter the next level
Explore Endless Creativity with Tiger 3D

7
NOTE: Before you begin printing, please remove
EPE under resin tank.
If you remove the material tank, be sure to not contaminate
the underside surface of the teon.
(2) Fill resin up to the bottom step.
Do not exceed top line.
(1) To remove resin tank, unlock the
tank from the four corners.
(1) Pour resin into the resin tank.
(2) Pick up the tank and store in a clean black container.
(1) Pick up and hold both ends of picker and
carefully install it onto the machine.
(2) Pull down the top handle to lock the Picker
into place. To remove the Picker, lift the top
handle and pull it out.
2.5 Filling the Resin Tank
2.4 Installing the Picker
Explore Endless Creativity with Tiger 3D

8
3.1 Installing PrinterTool Software
(1) Download PrinterTool.exe from www.tiger3dprinters.com/support
System Requirements:
-WindowsOS:Windows7,Windows8,Windows10orotherupdatedversions
-Browser:GoogleChrome
(2)Unzipthedownloadedle
(3) Click PrinterTool.exe to create shortcut of PrinterTool.exe
(4) Open PrinterTool.exe
3. Using PrinterTool - Software
3.2 Quick access Tool Bar
File Management
(1) View the quick access tool bar on the top of the screen.
(2)Toenable“Createnewle”,“open.2dple”andthen“Save.3dple”.Your.3dllewillnowbe
inaneditableformatforPrinterTool.Youcansaveyourworkingstatusasa.3dlle
anytime,andopenthe.3d1letocontinueediting.
(3) Enable “undo” , and “redo action” to go back or forward to past actions.
(4) Enable “perspective view” or “orthogonal view” . to change perspectives.
(5) The primary method of setting your view of the build area is to drag the mouse inside the viewport.
withthefollowingkeycombinations:
Right Mouse Button - Rotates your view of the build table
Middle Mouse Scroll - Zooms in and out making the view of the build area larger or smaller
Middle Mouse Button - Move the build plate
Overview
Thereare4modesinthePrinterTool.Selectionofmodesappearontherightsideofthescreen.You
can switch between the 4 modes at anytime by clicking on the Platform, Layout, Supporter, or Print tabs.
Explore Endless Creativity with Tiger 3D

The platorm mode allows you to select the printer
congurationusingthefollowingdrop-box.
Select printer type -> Then the printers boundary
will show in the preview panel.
3.3 Platform Mode - Software
9
Explore Endless Creativity with Tiger 3D

10
3.4 Layout Mode - Software
ImporttheSTLlestobeorientedinthe
build area.
- Once the object is imported, that
object will appear in the center of the
build area in the viewport and will be
selected. The object is then ready to be
oriented and supported.
This allows you to arrange objects in the build area.
-Selectmorethanoneobjectinthelist:
Shift + Left mouse button.
-YoucanimportasmanySTLlesas
youwant.ThoseSTLleswillbelistedin
the box on your right and models will be
displayed in the build area.
- A new window status bar will appear
to show the importing program.
Object List
Explore Endless Creativity with Tiger 3D

11
Object List
3.4 Layout Mode - Software
Duplicate the selected object.
Delete the selected object.
ExportawholelayoutasanSTLle.
This tool is handy if you want to save the layout once it is ready to be printed. It is not required to export
thelayouttoanSTLle.YoucanskipthisstepandgodirectlytotheSupporter Mode.
Explore Endless Creativity with Tiger 3D
12
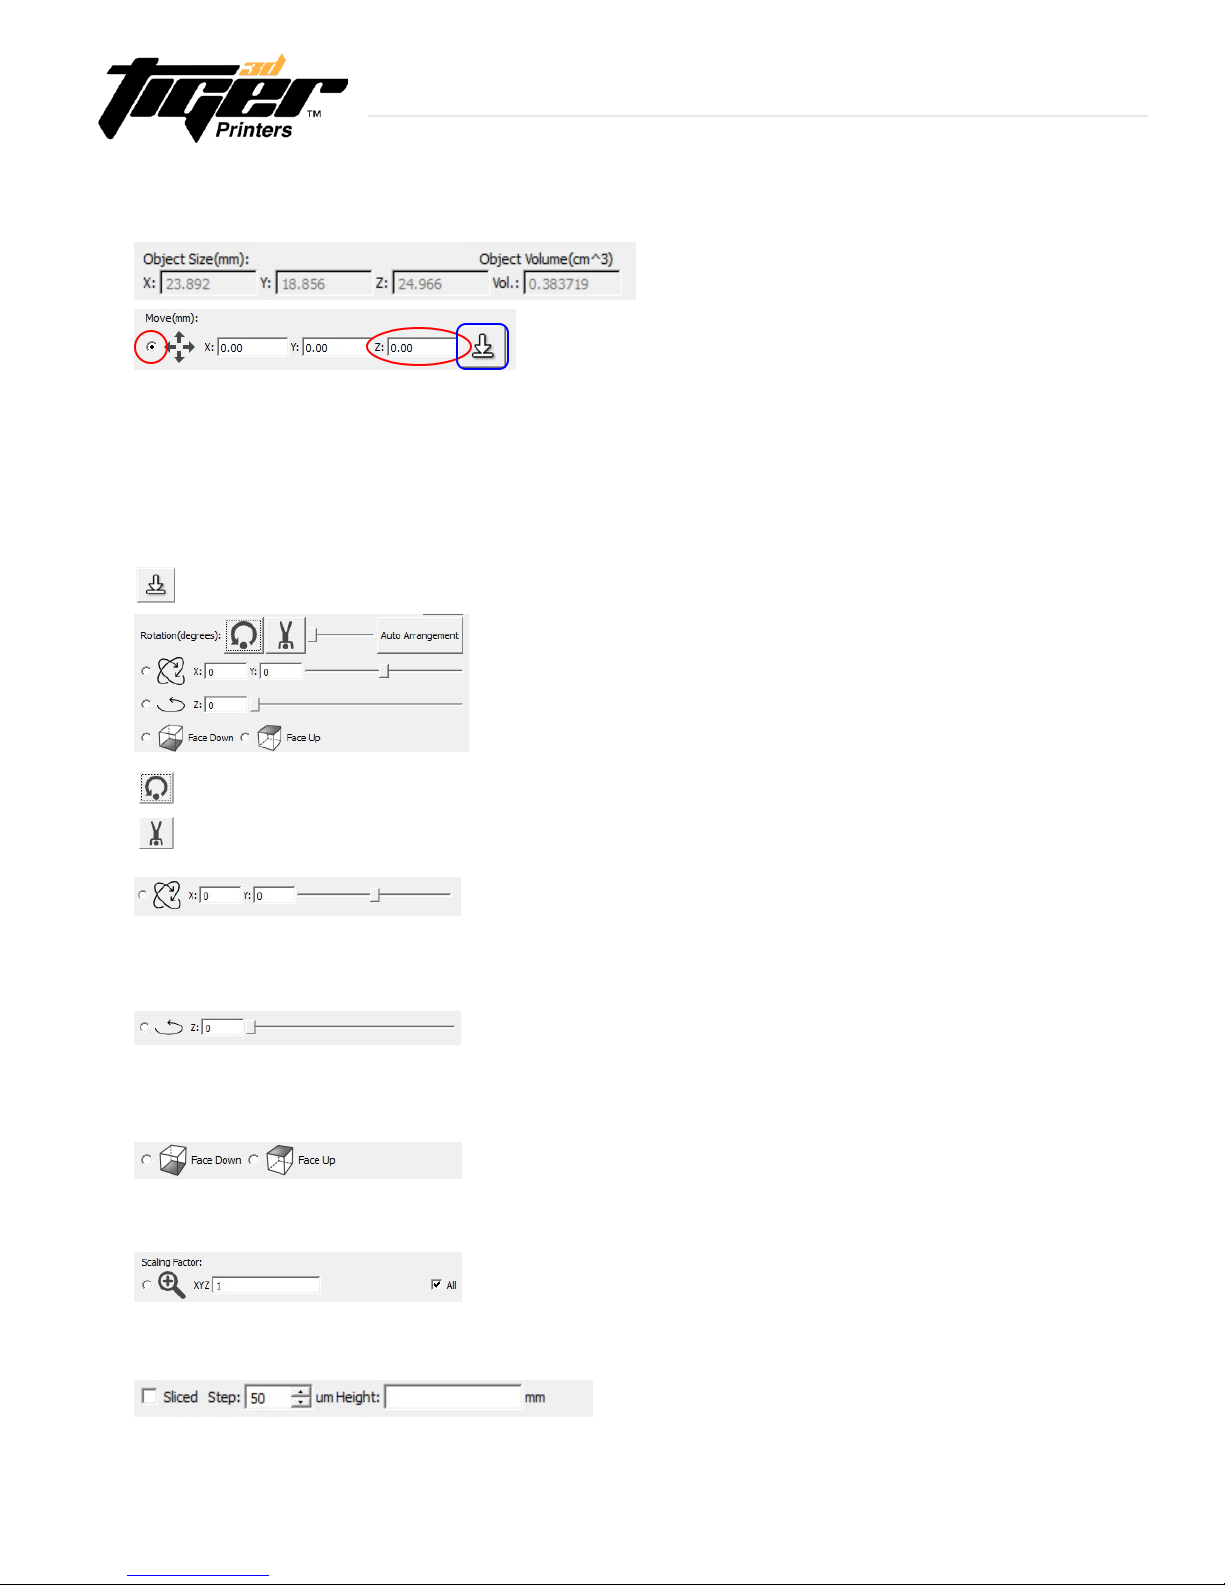
Information
Move the object.
Rotate the object.
X, Y rotation.
Z rotation.
Rotation of objects surface.
Scaling Factor.
-Reset(X,Y,Z)rotationsbackto(0,0,0).
- Upside down ( =X rotate 180 degrees ).
-SelectthisitemtoenableXrotationandYrotation.
-AddintheXandYrotationsoftheobject,indegrees,andpress“Enter”.
- Moving the slider will rotate the object from 0 to 360 degrees.
- Select this item to enable Z rotation.
- Add in the Z rotations of the object, in degrees, and press “Enter”.
- Moving the slider will rotate the object from 0 to 360 degrees.
- Select this option and click on any point of the object’s surface.
- Once this option is selected, the object will face down / face up.
- Select this option to scale a selected object.
- Add your desired number and press enter to scale the object.
- Select this option to view the object in slices/layers.
Hint: Press F1 on your keyboard to increase height or F2 to decrease height.
- Select this item to enable clicking and dragging of the object around the build table.
- To move a object, left click the object in the viewport and drag until it is in the desired position.
Then release the mouse click.
- When moving the object across the build area, it is best to use this tool in the top view.
- When raising or lowering the object, it is best to use this tool in a front tool.
- Hold the shift key while dragging up and down to lift the object in the Z direction or enter
thevalueincoordinate(X,Y,Z).
-Puttheobjecttotheground(=Z:0.00)
3.4 Layout Mode - Software
Explore Endless Creativity with Tiger 3D

Hint: Before you go into Supporter mode, enter into
Layout mode in preparation for the adding of the support
structure. In Layout mode elevate the model from 1 to
4mm, allocating space for the supports to be added on.
This picture shows the side view of the two identical
parts. The piece on the left shows the allocated space
for supports.
3.4 Layout Mode - Software (continued)
Information
Explore Endless Creativity with Tiger 3D
13
Supporter List
Add Support
- Enable adding of supports with the mouse.
- To add a support, left click on the object where the support should connect to.
- Parameters of added supports can be altered in the “Setting” tab.
Add Multi-Support
- Enable multi-support or branches from this selected support column.
Delete
- Enable deletion of supports with the mouse.
- To delete a support, left click on that support with the mouse.
Support Mode is only available when the desired object
is selected. It allows the user to edit supports on one
object at a time.
Hint: Use bottom view to easily edit or add supports.
Zoom in to see details and layering guide.
3.5 Supporter Mode - Software

3.5 Supporter Mode - Software
14
Modify
-Enablemodicationofsupports.
-SupportscanbemodiedwiththemouseorviatheSettingstab.
- Clicking and dragging the top or the middle of a support, will move the top of the support across the objects surface.
- While holding control + while dragging the joint of the support, the length of the joint will be altered.
- While holding control + while dragging the middle of the support, the loverall width of the support will be altered.
- Clicking and dragging the bottom of the support, this will move only the bottom of the support.
- While holding control + while dragging the bottom of the support, the overall thicknness of the support will be altered.
Supporter Settings
- The Supporter Setting was created to specify the size and shapes of the supports.
- If the user is using the “Add Support”, the interface will show the parameters that the support added will have.
- If the user is using the “Modify” and a support is selected, the interface is used to edit the parameters of the
selected support.
Supporter List (Continued)
Explore Endless Creativity with Tiger 3D
Heavy Support
- When selected, this brings a heavier
construction to support columns.
-Use"HEAVY"tosupporttheboneofthe
model and larger sections of the piece
(see example in yellow box).
Medium Support
- When selected, this brings a medium
construction to the support columns.
- Use "MEDIUM" to support the taller sections
of the piece (see example in orange box).
Light Support
- When selected, the support will be light
and delicate.
- Use "LIGHT" as the default structure
(see example in red box).
Adding Support Setting Parameters
- PrinterTool has 3 preset support modes. The user can edit and set custom supports
using this tool. PrinterTool will save the users settings for future reference.
Deleting Support Setting Parameters
- Deletes the users parameters previously saved.
Save Current Supporter Setting Parameters
- PrinterTool will save users settings for future reference.
15
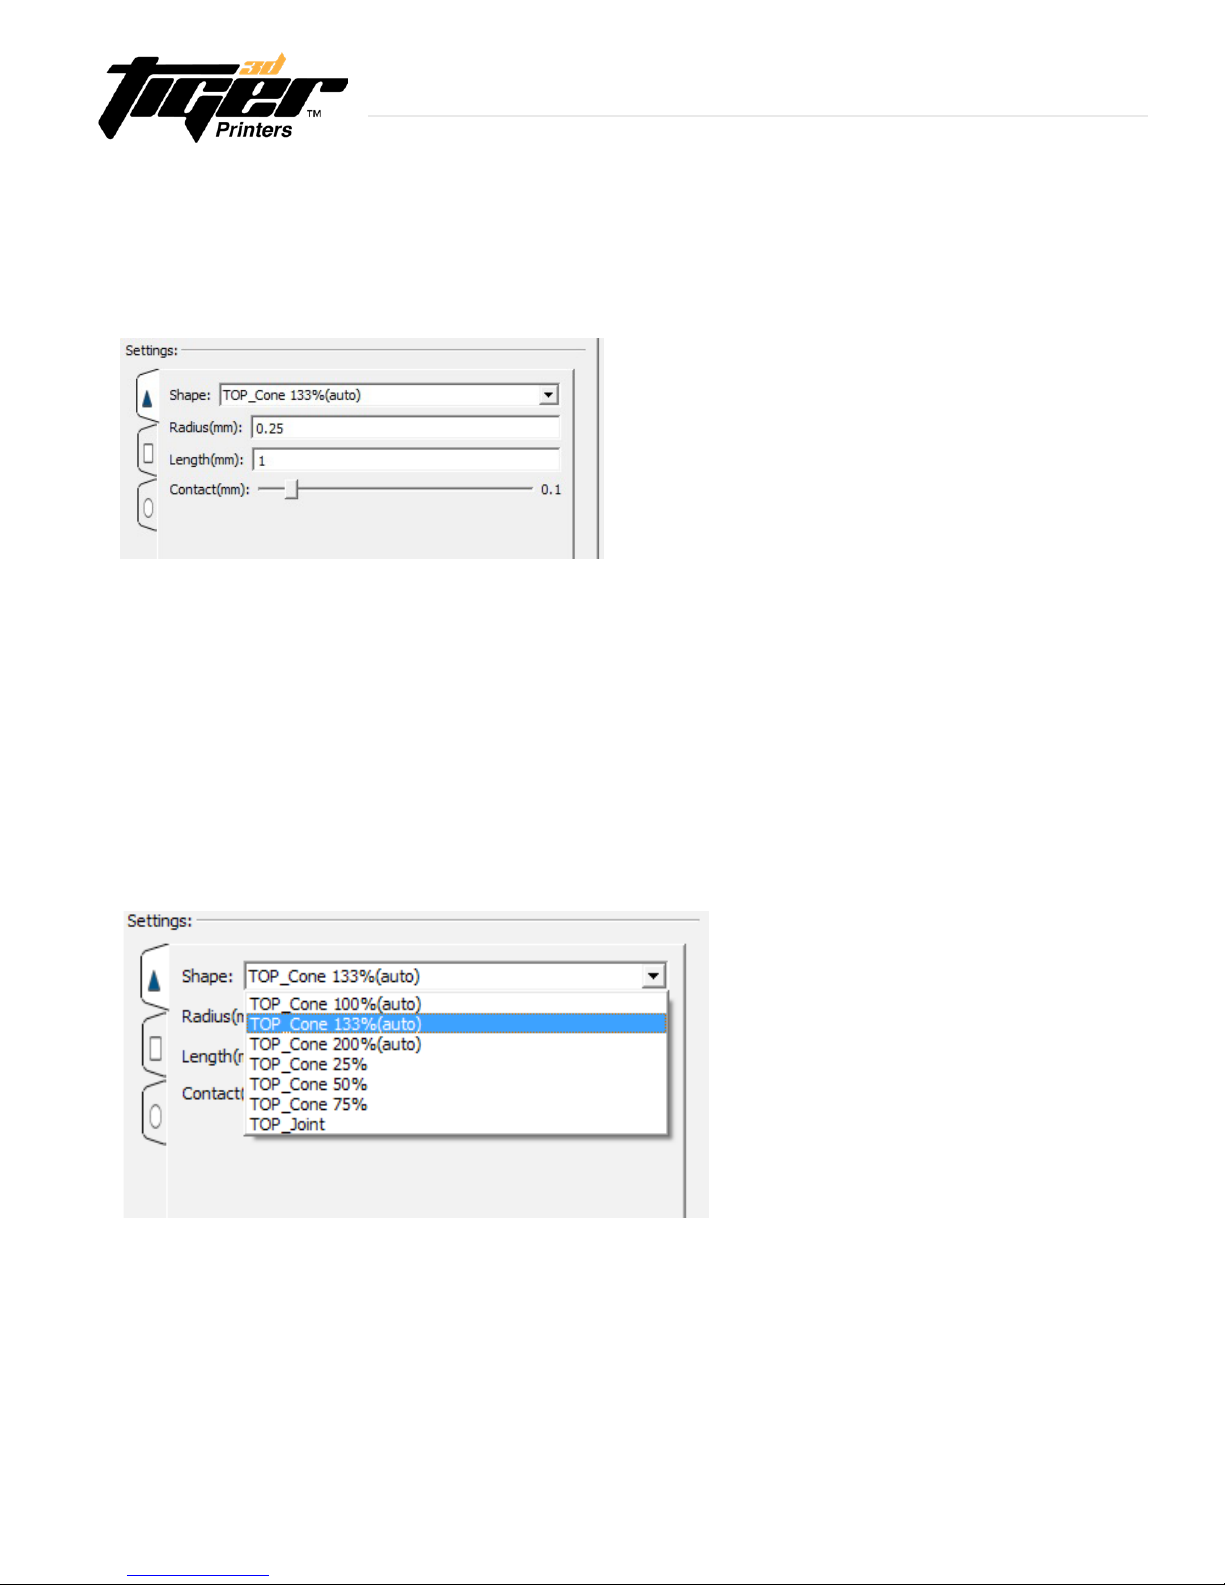
Supporter Sections
-Shape:Theshapeofthejoint.
-Radius:Theradiusofthejoint.
-Length:Thelengthofthejoint.
-Contact:Howfarthejointshouldextendpastitspositionandintotheobject.
Top Shapes are:
-TopCone:100%
-TopCone:133%
-TopCone:200%
-TopCone:25%
-TopCone:50%
-TopCone:75%
- Top Joint
Thesupporterismadeupwith3sections:Joint, Middle, and Bottom. These sections are accessible in the interface
byclickingonthecorrespondingsidewaystabintheinterface:
3.5 Supporter Mode - Software
Supporter Settings - Joint Shapes
PrinterTool incorporated 7 different shapes of the joint section. For a slight joint or stronger support, you can select
the shape of the top contact between the support and the model.
Explore Endless Creativity with Tiger 3D

3.5 Supporter Mode - Software
16
Explore Endless Creativity with Tiger 3D
PrinterTool Special Features
Grid : When enabled, shown is a grid over the plate.
Angle : Enables a visual indicator of the most common undercuts and overhangs.
PrinterTool will show in red the areas where supports might be needed.
- Hint : Use this tool to familiarize with the support structure concept. Try from 6 to 20 degrees.
- Disclaimer : Due to the variety of geometries and possibilites, always visually check for other areas
where supports must be carried.
Sliced: Enables the Slice Tool from the Platform Mode.
- Mirror Supporter: Creates mirror supports as two dimensional axis reference.
- Hint : Use this handy tool to quickly and accurately create supports in symmetric models.
Base: Creates a base at the bottom of the model. Use can select shape, thickness and size of the base.
- Hint : It is recommended to create a FULL BASE in one of the models of the build plate. This will generate a complete
base to all the models on the build plate. It is a good practice to extend the life expectancy of the foil of the tank and
cohesionthroughtherstprintedlayers.
- Hint : it is recommended to change the thickness of the base to 0.3mm.
3.5 Supporter Mode - Software
17
Supporter Setting in Modify Mode
- Support will become vertical to object.
- Undo the vertical supporter.
Explore Endless Creativity with Tiger 3D
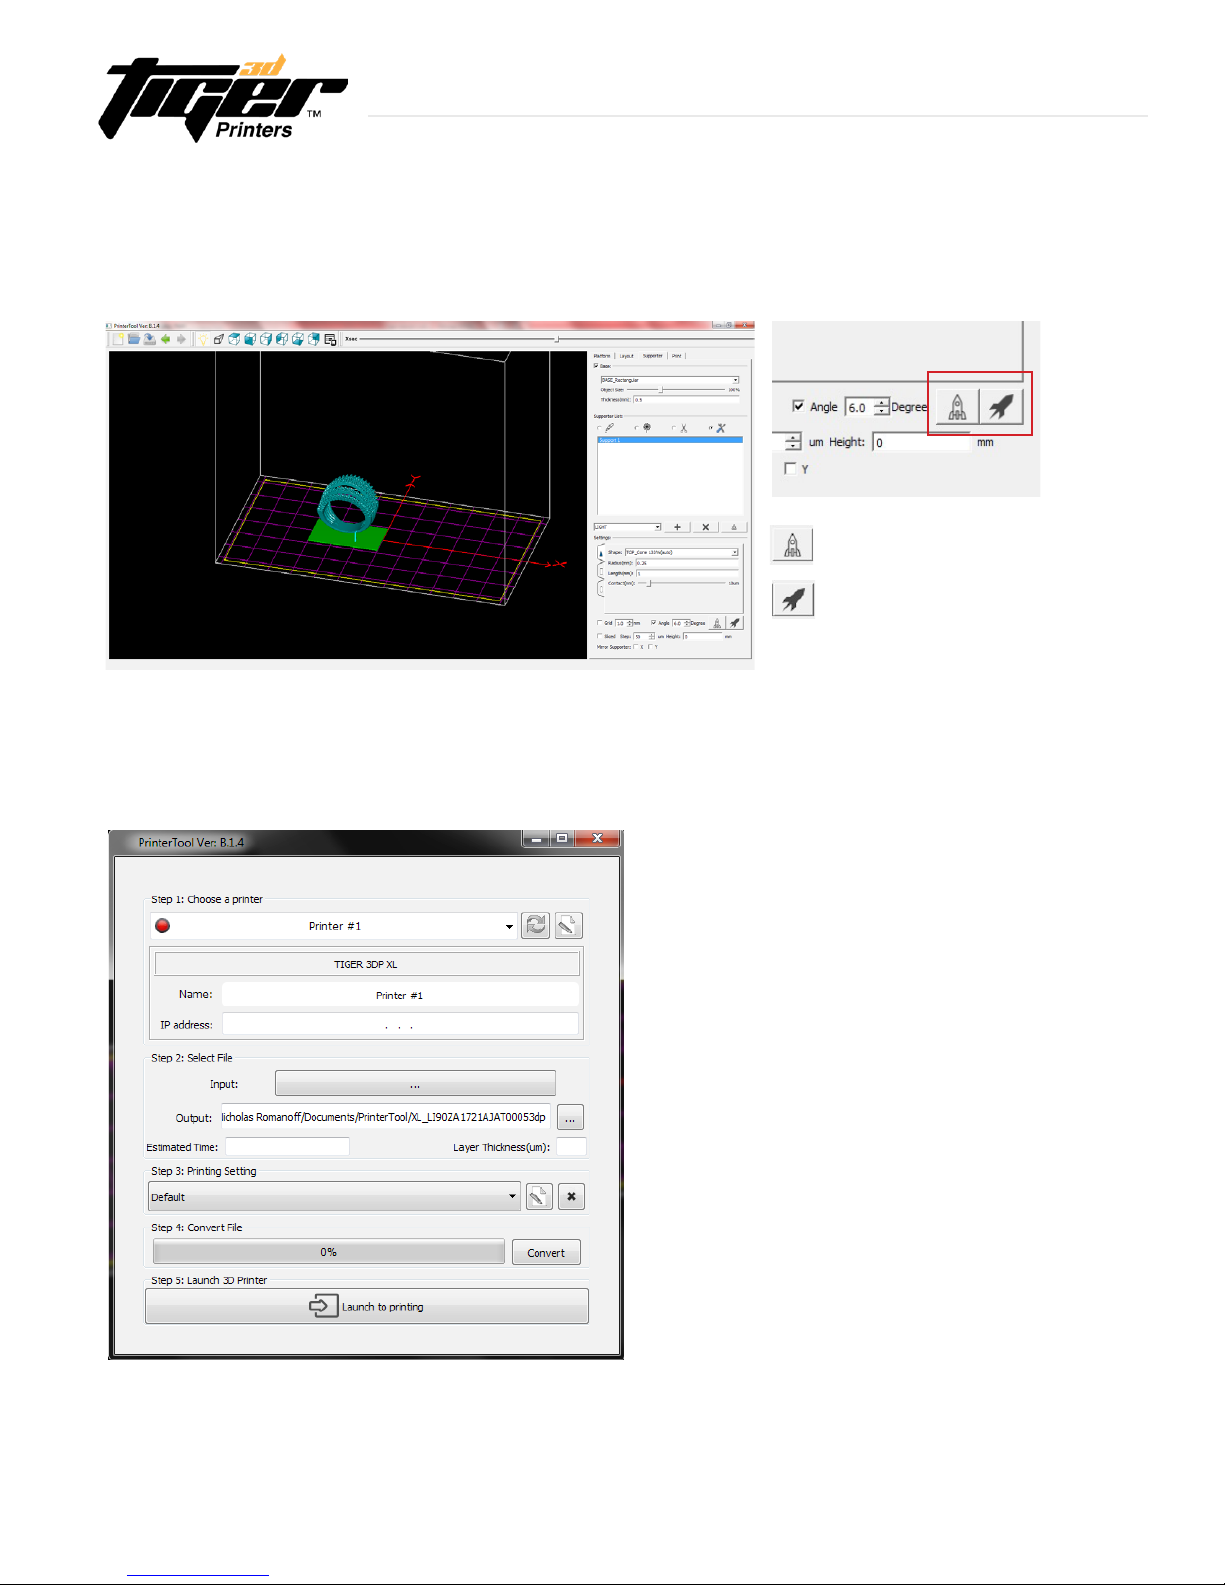
3.6. Print Mode - Software
Once your model(s) have been oriented and
supported properly, click on the Print tab.
Hint:Makesuretheprintermatchesyour
selection on Step 1. If the printer is online,
the IP address will be shown.
This manual suits for next models
2
Table of contents
Other Tiger 3D Printers 3D Printer manuals


