Tiger Dental TopJet clix Distalizer 250 User manual

TopJet clix Distalizer
250, 360, 250+8, 360+8
Gebrauchsanleitung
Instructions for use
Tiger Dental
Innovations in orthodontics
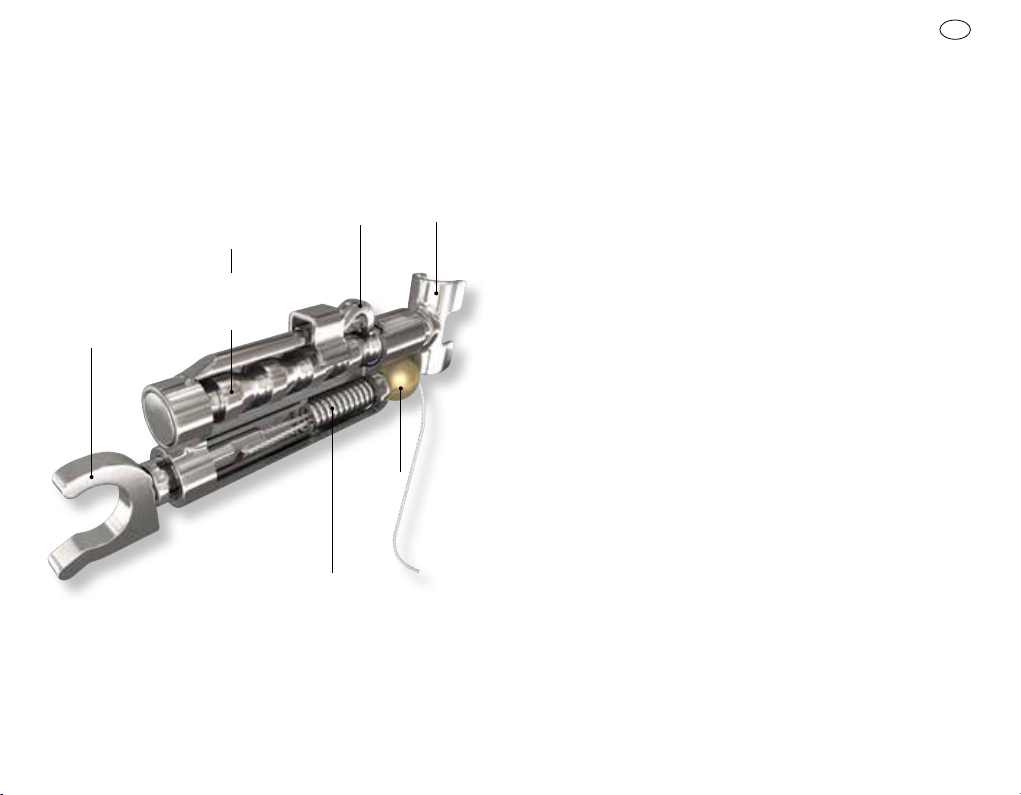
T-Connector
T-connector
Distanzstift mit Raststufen
Piston with ratchet steps
C-Clip
C-clip
NiTi-Druckfeder
NiTi open-coil spring
Sicherheitsfaden mit
Fixierkugel
Security thread
with crimped bead
Rastzahn
Ratchet
Power module
Krafteinheit
Adjustment module
Einstelleinheit
Die Bestandteile des TopJet clix Distalizer
Components of the TopJet clix Distalizer
Deutsch
D

Sehr geehrte Kieferorthopädin, sehr geehrter Kieferorthopäde
Wir freuen uns, dass Sie sich für dieses innovative Produkt aus dem Hau-
se Tiger Dental entschieden haben.
Um eine sichere und optimale Anwendung dieses Produktes zu gewähr-
leisten, muss diese Gebrauchsanweisung sorgfältig gelesen und beach-
tet werden.
Die Gebrauchsanweisung deckt alle notwendigen Sicherheitshinwei-
se ab, kann aber nicht alle Gegebenheiten einer möglichen Anwen-
dung beschreiben. Deshalb finden Sie im Internet unter tigerdental.com
im (Menüpunkt „Know-how“) zusätzliche Anwendungshinweise. Zudem
steht Ihnen unser Kundenservice für Fragen gerne zur Verfügung.
Die fortlaufende Weiterentwicklung unserer Produkte zeichnet uns als in-
novatives Unternehmen aus. Daher empfehlen wir Ihnen auch nach mehr-
facher Nutzung das aufmerksame Durchlesen der beiliegenden bzw. im
Internet unter www.tigerdental.com (Menüpunkt „Downloads“) hinter-
legten Gebrauchsanweisung.
1. Hersteller
Tiger Dental e.U., Belruptstraße 59, 6900 Bregenz, Austria
2. Produktbeschreibung
Mit dem TopJet clix Distalizer ist eine zuverlässige, körperliche Molarendi-
stalisation in kurzer Behandlungszeit möglich. Mittels eines Distanzteles-
kops kann die Länge individuell eingestellt werden. Der Behandler profi-
tiert vom optimierten Handling, die Patienten vom maximalem Komfort.
Der TopJet clix bietet ein ansprechendes und funktionelles Design und er-
möglicht die mitarbeitsfreie ein- oder beidseitige Distalisation der ge-
wünschten Zähne bis zu 0,8 mm pro Monat.
Aufgrund seiner kompakten Form ist der Einbau des TopJet clix beste-
chend einfach und lässt sich auch in kleinen und schmalen Oberkiefern
bewerkstelligen. Der TopJet wurde bereits bei Patienten ab einem Alter
von 8 Jahren erfolgreich angewendet. Nach nur wenigen Minuten ist der
Distalizer eingebaut, für den Patienten sind die Unsichtbarkeit des Gerä-
tes und auch der hohe Tragekomfort wesentliches Argument für dieses
Behandlungsgerät.
Während des gesamten Einbaus ist der TopJet Distalizer durch einen Fa-
den gesichert. Dieser Faden ist mit der Packung des TopJet außerhalb des
Mundes verbunden, so dass dies einen großen Sicherheitsaspekt dar-
stellt. Erst nach Durchtrennung dieses Sicherheitsfadens wird der Top-
Jet clix aktiviert.
Die scharnierartige Verbindung zum Palatinalbogen, der sogenannte
T-Connector, verhindert die Kippung der Molaren. Durch Anwendung ei-
nes Transpalatinalbogens (TPA) kann die Molarenrotation nachhaltig ver-
hindert und eine reibungsfreie Kraftabgabe des TopJets garantiert wer-
den. Mit 250 cN (schwarze Codierung) bzw. 360 cN (rote Codierung)
stehen dem Behandler zwei Kraftgrößen zur Verfügung (siehe Kapitel
„Auswahl des TopJet clix“).
Für besonders lange Distanzen ist der TopJet clix auch als Sonderausfüh-
rung in einer Überlänge von plus 8 mm erhältlich. Bei voller Federspan-
nung beträgt die kleinste Einbaudistanz zwischen Miniankerschraube und
TPA 14 mm, die größte 28 mm. Die maximale Distalisation beträgt 14 mm,
der TopJet kann in Schritten von 1,8 mm nachaktiviert werden.
Auswahl des TopJet clix
Schwarze Codierung: TopJet clix 250 (250 cN) wird hauptsächlich bei Kin-
dern zur alleinigen Distalisation der „Sechser“ verwendet.
Rote Codierung: TopJet clix 360 (360 cN) für Molaren- und Prämolarendis-
talisierung. Kann durch Deaktivierung auch weniger Druckkraft abgeben.
3. Anwendungsbereiche
Indikationen:
1. Engstand im Bereich der OK-Front bei ausreichend langen Kiefern (evtl.
zuvor Entfernung der oberen Weisheitszähne erwägen!)
2. Protrudierte OK-Frontzähne
3. Platzmangel im OK-Seitenzahnbereich (z. B. durch hypo plastische seit-
liche Schneidezähne, fehlende oder zu schmale Milchzähne oder reti-
nierte Prämolaren).
4. Molare Kl. II Verzahnung bei aufgewanderten OK-Mola ren (auch bei
skelettaler Kl. III und gleichzeitiger dentaler Kl. II). Der TopJet clix kann
problemlos einseitig oder beidseitig eingesetzt werden.
D

Kontraindikationen:
1. Parodontal vorgeschädigte Molaren, wenn die Druckkraft zu hoch sein
könnte
2. Kurzer Oberkiefer (distal gerichtete 2. Molaren)
4. Ein- und Ausbau des TopJet clix Distalizers
Systemvoraussetzungen
- Bänder 16/26 mit gefensterten Goshgarianschlössern
- TopJet clix Palatinalbogen (lt. Biegeschablone oder vorge fertigt)
- Dual Top Miniankerschraube Typ JS, Ø 2,0 mm ≥ 10/12/14 mm,
Ø 2,5 mm ≥ 12/14/16 mm in Region M4
- Untersetztes Winkelstück mit Hexagonal-Schraubendreher-Schaft
(113-MJ-204)
- Hakensonde als Teil des zahnärztlichen Grundbestecks zum
Aktivieren und Deaktivieren des TopJet clix
- Ligaturencutter zum Durchtrennen des Sicherungs fadens
- TopJet-Zange: Zum Schließen des T-Connectors
- Fasspinzette: Halten des TopJet clix während des Einbaus
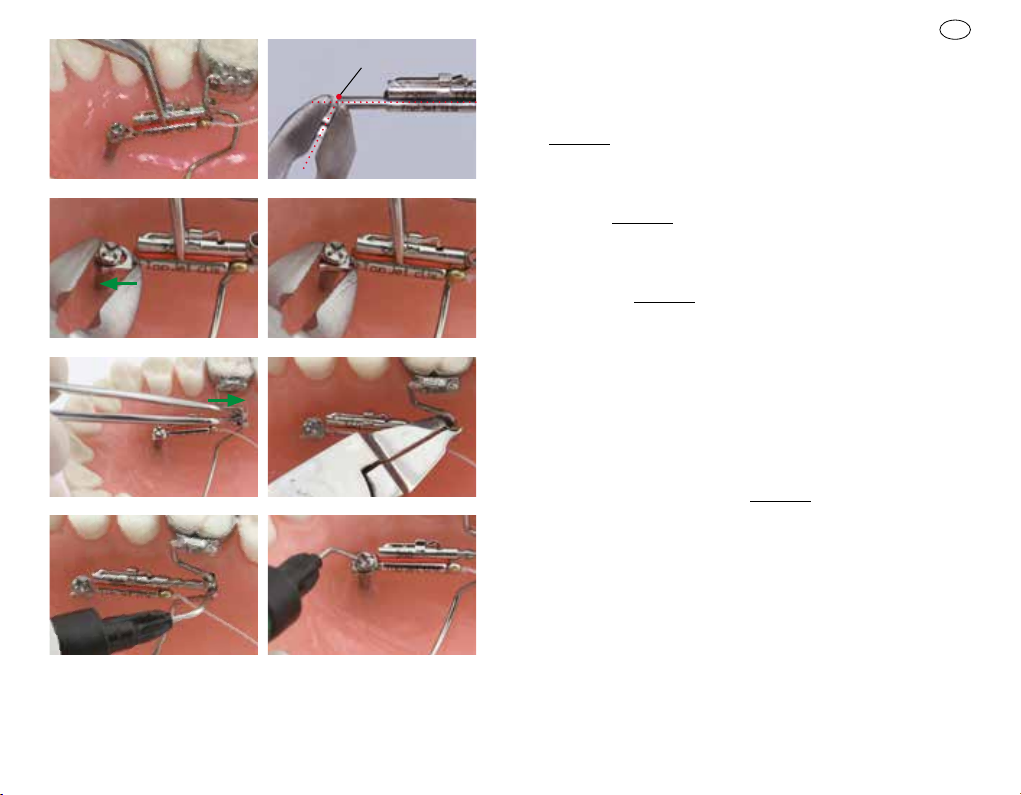
Einsetzen im Mund:
Der TopJet muss vor dem Einbau auf seine korrekte Ausrichtung paral-
lel zur Okklusionsebene überprüft werden. Je nach Achsenneigung der
Schraube muss die Richtung des C-Clips angepasst werden. Dazu muss der
C-Clip mit der Weingart-Zange flach gefasst werden und am Biegepunkt
je nach Bedarf auf- oder abgebogen werden, so dass der T-Connector
spannungsfrei an die D-Strecke des Transpalatinalbogens (TPA) zu liegen
kommt. (Abb.2 – 3 und 7– 9). Diese Biegung gewährleistet den spannungs-
freien Einbau des TopJets.
Clip-on: Aufschieben des C-Clips auf die Miniankerschraube
Den Topjet mit der Fasspinzette halten und den C-Clip am Schraubenkopf
richtig positionieren. Clip-on: C-Clip mit leichtem Zangendruck (Weingart-
zange) auf den Kopf der Miniankerschraube schieben. Achtung: Das lange
Ende des C-Clips schaut dabei nach median (Abb.4– 5). Hinweis: Die Form
des C-Clips darf dabei nicht geändert werden. Das lange Ende des C-Clips
niemals nach innen biegen und den Durchmesser nicht verändern. Sonst
kann der C-Clip nicht mehr vom Schraubenkopf der Miniankerschraube ab-
geschoben werden.
D
1 Die C-Clip-Mechanik sorgt für einfaches Auf- und Abschieben (Clip-on/Clip-off) sowie
sicheren Halt des des TopJet Distalizers am Hals der Jetschraube. Die Geometrie des C-Clips
darf deshalb nicht verändert werden!
Langes Ende
Clip-off-Punkt Clip-on-Punkt
Biegepunkt
Durchmesser (Ø) darf
nicht geändert werden!
2 Insertionswinkel der Schraube
4 Clip-on des C-Clips (vorher) am Clip-on-
Punkt
> Clip-off des C-Clips siehe Abb. 22
3 Anbiegen des C-Clips an Insertionswinkel
5 Clip-on des C-Clips (abgeschlossen)
„click“
Der C-Clip im Detail
20°
20°

6 Einpassen 7 Anbiegen des C-Clips
9 Clip-on: C-Clip fixiert8 Clip-on: Aufschieben des Clips (vorher)
10 T-Connector ausziehen und positionieren
D
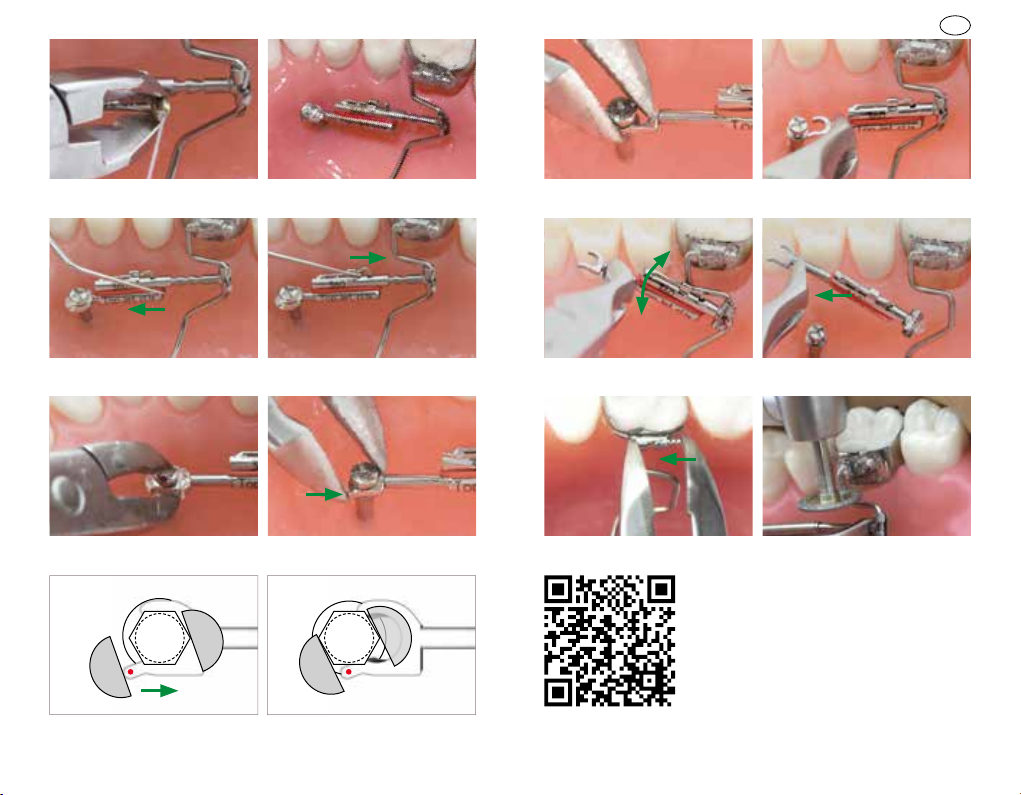
Verbinden des T-Connectors
Nun wird mittels einer Fasspinzette der T-Connector herausgezogen und
am TPA positioniert. Mit der T-Connector-Zange (modifizierte Tweed-Zan-
ge) werden die Laschen des T-Connectors geschlossen, sodass dieser mit
leichtem Spiel am TPA zum Sitzen kommt (Abb. 10 – 11).
Nach dem Einrasten der mesialen und distalen Verbindungen erfolgt die
Fixation bzw. Abdeckung zur Komfortsteigerung mittels Auftragen von
lichthärtendem Resin. So entsteht in sekundenschnelle eine dreh- und
winkelstabile Verbindung zwischen Schraube und TopJet clix (Abb. 12 –
13).
Aktivierung des TopJet clix Distalizers:
Nun wird der Sicherungsfaden zwischen Kugel und Federteleskop durcht-
rennt und damit gleichzeitig der TopJet clix aktiviert. Der Patient verspürt
jetzt einen leichten Druck am Molaren (Abb. 14 –15).
Einfache Reaktivierung und Deaktivierung
Aktivierung wie auch Deaktivierung sind beim TopJet clix mit einer den-
talen Häkchensonde in Sekunden möglich. Im Laufe der Molarendistalisa-
tion wird diese Federspannung wieder hergestellt, indem der Behandler
am distalen Ende des Teleskoprohres mit der Häkchensonde einhakt und
das Doppelrohr nach mesial zieht. Dabei rastet die Federarretierung hör-
bar ein. Zuviel Aktivierung? Zur Deaktivierung genügt das Einsetzen die-
ser Sonde in die Öse der Federarretierung. Durch Öffnen der Federarre-
tierung gleiten die beiden Zylinder nach distal, gleichzeitig geht die Kraft
zurück. Eine Feineinstellung ist in Schritten von 1,8 mm auf diese Weise
kinderleicht möglich (Abb. 16 –17).
11 Schließen des T-Connectors
12 Verkleiden T-Connector 13 Verkleiden Schraubenkopf
Biegepunkt

22 Clip-off: C-Clip gelöst
16 Aktivierung/Reaktivierung 24 Laschen schwenken zum Öffnen
14 Aktivierung: Sicherungs faden entfernen 23 Lösen des T-Connectors
17 Deaktivierung 25 Entnehmen
45°
26 Klassische Entnahme: distalen Überstand
des TPA herausdrücken
27 Notentnahme: TPA durchtrennen mit
Minidiamantscheibe
18 Kunststoffentfernung 19 Clip-off: Abschieben des C-Clips
D
20 Clip-off des C-Clips (vorher) am Clip-
off-Punkt
21 Clip-off des C-Clips (abgeschlossen)
15 Fertig eingesetzt & aktiviert
Zur TopJet Distalizer Animation:
www.topjet-distalizer.com

5. Entnahme des TopJet clix Distalizers & TPA
Deaktivierung des TopJet Distalizers
Zuerst muss der TopJet clix Distalizer nach distal deaktiviert werden.
Clip-off: Entfernen des C-Clips von der Miniankerschraube
Nun die Gel-Verkleidung am Schraubenkopf mit einem Cutter entfernen.
Clip-off: Eine Branche der Weingartzange hält das lange Ende des C-Clips
am Clip-off-Punkt, die andere Branche hält sich am Kopf der Minianker-
schraube. Nun schiebt man mit etwas Druck den C-Clip gegen die Minian-
kerschraube ab (Abb. 18 –22). Dabei werden auch Triad® Gel Klebereste
aufgebrochen. Achtung: Den C-Clip nicht direkt vom Schraubenkopf durch
Ziehen am Federstift entfernen. Gefahr der Schraubenlockerung!
Lösen des T-Connectors und Entfernen des TopJet clix
Nachdem der TopJet clix am Schraubenkopf gelöst wurde, kann der Di-
stanzstift mit einer Weingart-Zange gefasst werden. Durch eine 45°
Schwenkbewegung öffnen sich die Laschen des T-Connectors und dieser
bricht aus der Klebeverbindung aus. Nun kann der TopJet clix problemlos
entnommen werden (Abb. 23 –25).
Klassische Entnahme des TPA
Um den fest eingeklebten TPA aus dem Goshgarianschloss zu lösen, drückt
man zur Entnahme den distal leicht überstehenden Anteil des TPA mit ei-
ner Weingart-Zange, gegen das Schloss, aus diesem heraus (Abb. 26).
Notfallentnahme: Durchtrennen des TPA
Für den Fall, dass eine klassische Entfernung des TPA nicht möglich wäre
(Druckstelle in diesem Bereich mit Schleimhautulcus), wird empfohlen,
die kleine Diamantscheibe in ein blaues Winkelstück einzuspannen und
den TPA wassergekühlt vorsichtig zu durchtrennen. Hier bei sollte der TPA
immer mit Moskito klemme, Nadel halter oder Zahnseide gesichert sein
(Abb. 27).
6. Hinweise für Produkte zum einmaligen Gebrauch
Dieses Produkt ist in seiner Verpackung gebrauchsfertig, aber nicht ste-
ril und darf nur einmal verwendet (eingebaut) werden. Die Wiederauf-
bereitung dieses einmal benutzten Produktes (Recycling) sowie dessen
erneute Anwendung am Patienten ist nicht zulässig.
7. Sicherheitshinweise
Die vorliegende Gebrauchs- und Einbauanleitung beinhaltet Tipps und
Empfehlungen, entbindet die Ärztin/den Arzt jedoch nicht von der per-
sönlichen Verantwortung!
Die Verwendung dieses Produktes ist laut RL 93/42/EWG ausschließ-
lich kieferorthopädisch und zahnärztlich geschulten Ärztinnen/Ärzten
erlaubt. Die Anwenderin/der Anwender wird ausdrücklich darauf hin-
gewiesen, dass sie/er bei der Verwendung die Vorschriften des Medi-
zinproduktegesetzes sowie evtl. andere Vorschriften oder Gesetze ein-
zuhalten hat. Für die Einhaltung ist Anwenderin/der Anwender selbst
verantwortlich.
Dieses Produkt enhält Nickel.
8. Qualitätshinweise
Tiger Dental versichert dem Anwender eine einwandfreie Qualität der
Produkte. Der Inhalt dieser Gebrauchsanweisung beruht auf eigener Er-
fahrung. Der Anwender ist für die Verarbeitung der Produkte selbst ver-
antwortlich. In Ermangelung einer Einflussnahme von Tiger Dental auf die
Verarbeitung durch den Anwender besteht keine Haftung für fehlerhaf-
te Ergebnisse.
Obwohl dies ein ausgereiftes Produkt ist, können Verbesserungen und
Änderungen erfolgen, die möglicherweise nicht in der vorliegenden Ge-
brauchsanweisung dokumentiert sind. Ebenso übernehmen wir keine
Haftung für Druckfehler.
9. Inhalt
REF 10664 TopJet clix 250
REF 10665 TopJet clix 250+8
REF 10666 TopJet clix 360
REF 10667 TopJet clix 360+8
D
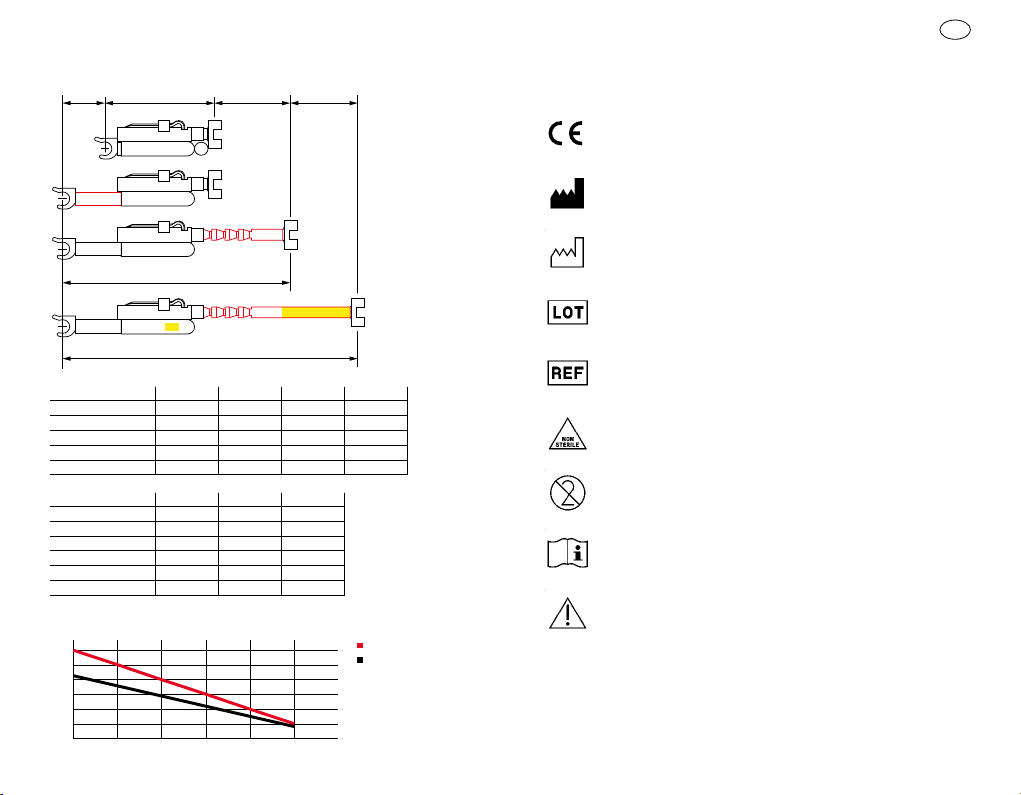
10. Technische Daten 11. Erklärung der verwendeten Symbole
gemäß ÖNORM EN ISO 15223-1
Benannte Stelle
Hersteller
Herstellungsdatum
Chargencode
Artikelnummer
Unsteril
Nicht wiederverwenden
Gebrauchsanweisung beachten
Achtung
Raststufe mm TJ 250 TJ 360
0 0 250 cN 360 cN
1 1,8 210 cN 300 cN
2 3,6 170 cN 240 cN
3 5,4 130 cN 180 cN
4 7,2 90 cN 120 cN
5 9,0 50 cN 60 cN
TopJet 250 = 40 g/Raste, TopJet 360 = 60 g/Raste
Type 250 360 250+8 360+8
max. Kraftgröße 250 cN 360 cN 250 cN 360 cN
min. Einbaulänge 14 mm 14 mm 22 mm 22 mm
max. Distalisation 14 mm 14 mm 14 mm 14 mm
Raststufen 5 5 5 5
Länge je Raststufe 1,8 mm 1,8 mm 1,8 mm 1,8 mm
5
TopJet clix
TopJet clix +8
14 mm
28 mm
36 mm
9. +8
D
cN
360
300
240
180
120
60
0
0 1,8 3,6 5,4 7,2 9,0 mm
TopJet Distalizer 360
TopJet Distalizer 250
0483

English
EN
Notizen /Notes

Dear doctor, we are honored that you have chosen this innovative new
product from Tiger Dental.
To ensure the safe and effective use of this product, you must carefully
read and adhere to this user manual.
The user manual covers all necessary safety instructions but cannot de-
scribe all possible circumstances. For this reason, you may find further
user notices online at tigerdental.com under the “Know-how” link. Our
customer service is available for any additional questions.
The continual development of our products indicates our company’s com-
mitment to innovation. Accordingly, after several clinical uses, we recom-
mend you carefully review the accompanying user manual (this can be
found online under the “Downloads” link at tigerdental.com).
1. Manufacturer
Tiger Dental e.U., Belruptstrasse 59, 6900 Bregenz, Austria
2. Product Description
TopJet clix allows for reliable and incremental molar distalization through
the use of a programmable telescoping arm. The operator benefits from
the appliance’s optimized handling characteristics and patients benefit
from its maximal comfort. The TopJet clix appliance offers appealing es-
thetics and enables compliance free one or two-sided distalization of the
desired teeth of up to 0.8 mm per month. Due to its compact design, the
installation of TopJet clix is amazingly simple and can be done in small
and narrow palates. The TopJet has already been successfully used in pa-
tients 8 years and older. The appliance can be installed in just a few min-
utes. Add this feature to near invisibility and high patient comfort, and it
is easy to see why this is such a great device. During the entire installa-
tion process, a thread secures the TopJet Distalizer to its packaging out-
side the mouth. This safety feature minimizes the risk of aspiration. The
appliance can only be activated after the tread is cut. The appliance’s
hinge-like connection to the palatal arch, called the T-connector, prevents
distal tipping of the molars. Use of a transpalatal arch (TPA) ensures a lack
molar rotation and the TopJet’s friction-free power output. Operators can
choose from either a 250 cN (black coding) or 360 cN (red coding) ver-
sion (see section “Selecting the TopJet clix”).
The TopJet clix can be special ordered for lengths in excess of 8 mm. At
the maximum spring activation, the smallest distance between the micro
implant and the TPA is 14 mm while the largest distance is 28 mm. This
allows for a maximum distalization of 14 mm. The TopJet can be reacti-
vated in 1.8 mm increments.
Selection of TopJet clix
Black Coding: TopJet clix 250 (250 cN) Is mainly used in children to distal-
ize the upper first molars only.
Red Coding: TopJet clix 360 (360 cN) For molars and premolar distaliza-
tion. Can be deactivated to exert less force.
3. Field of Application
Indications
1. Crowding in the maxillary anterior with sufficient space in the posteri-
or for distalization (consider removal of third molars!)
2. Protruded maxillary anterior teeth
3. Lack of space in the maxillary buccal segments (i.e. peg laterals, miss-
ing/narrow primary teeth or impacted premolars ).
4. Class II malocclusion with mesially migrated maxillary molars (also in
skeletal class III/dental class II combination cases). The TopJet clix can
be used without problems on one side or both sides.
Contraindications
1. Periodontally compromised molars when using high force values
2. Short maxilla (distally directed second molars)
EN

4. Installation of TopJet clix
System Prerequisites
- 16/26 bands with windowed Goshgarian lingual sheaths
- TopJet transpalatal arch (prefabricated or using bending template)
- Dual Top micro implant (JetScrew) measuring: 2.0 mm x 10/12/14
mm, 2.5 mm x 12/14/16 mm and placed in the M4 position
- Off-angle handpiece with a hex driver attachment (113-MJ-204)
- A hooked explorer for activating and deactivating the TopJet
- Ligature cutter to cut the security thread
- TopJet-Pliers: to close the T- connector
- Tweezers: holding the TopJet clix during installation
Insertion in the mouth:
The TopJet must be checked for proper orientation, which is parallel to
the occlusal plane prior to the placement. Depending on the obliquity of
the axes of the screw, the orientation of the C-clip must be adjusted. To
achieve this, the C-clip must be held flat with the Weingart-pliers and bent
back or bent off at the bending point as needed, so that the T-Connec-
tor lies at the D-section of the transpalatal arch (TPA) tension-free. (Fig.
2 – 3 and 7– 9). This bending ensures tension-free placement of the TopJet.
Clip-on: Pushing the C-clip onto the mini-anchor screw
Hold the Topjet with a fixation forceps and position the C-Clip on the screw
head properly. Clip-on: Push the C-clip onto the head of the mini-anchor
screw with gentle pressure using forceps (Weingart-pliers). Caution: The
long end of the C-clip is orientated to median (Fig. 4 – 5). NB: The form of
the C-clip mustn’t be changed. Never bend the long end of the C-clip in-
wards and never change the diameter. Otherwise, the C-clip cannot be re-
moved from the head of the mini-anchor screw.
EN
1 The c-clip ensures easy clip-on / clip-off and secure hold of the TopJet Distalizer at the
neck of the jet screw. The geometry of the C-clip must therefore not be altered!
long end
Diameter (Ø) must
not be changed!
2 Insertion angle of the screw
4 Clip-on the C-clip (before) at the Clip-on
point
3 Bend the c-clip at the insertion angle
5 Clip-on (completet)
„click“
The c-clip in detail
20°
20°
clip-off point clip-on point
bending point
> Clip-off the C-Clips see Fig. 22
6 Insertion
10 Extend and position the T-connector
Connecting the T-connector
Now the T-connector is pulled out with a fixation forceps and positioned
onto the TPA. The T-connector-pliers (modified tweed pliers) closes the
brackets of the T-Connector so that it lies on the TPA with some space
(Fig. 10 –11).
With the mesial and distal connections engaged, the fixation or covering
is made to increase comfort by applying light-curing resin. In this way,
a rotational and angularly stable connection between the screw and the
TopJet clix (Fig. 12 –13) is created within seconds.
Activation of TopJet clix
Now activate TopJet clix by cutting the security thread between the ball
and the spring telescope. The patient will now feel a slight pressure now
on the molars (Fig. 14 –15).
Easy Reactivation and Deactivation
Activation as well as deactivation are possible in seconds with TopJet clix
using a hooked explorer or probe. During molar distalization, spring ten-
sion can be increased by hooking a probe behind the distal end of the tel-
escope tube and pulling mesially. The spring will lock into place audibly.
Too much activation? To deactivate the telescope simply disengage the
spring lock with the same hooked explorer. When disengaging the spring
lock, both tubes will slide distally, simultaneously decreasing the force on
the molars. Fine adjustment in this fashion is extremely easy and can be
selected at increments of 1.8 mm (Fig. 16 –17).
EN
7 Bending the C-Clip
bending point
9 Clip-on: C-clip fixed (completed)8 Clip-on: Slide the clip (before)
11 Close the T-connector
12 Coat the T-connector 13 Coat the screw head
22 C-clip is now detached
16 Activation/reactivation 24 Swivel the TopJet upwards to
loosen/detach the T-connector
18 Remove Plastic-coat
14 Activation: Remove security thread 23 Detaching the T-connector
17 Deactivation 25 Remove the TopJet
19 Slide the c-clip off the screw
45°
26 Traditional Removal: Press out the TPA
from the distal side
27 In Case of Emergency: Cutting through
the TPA
EN
21 Clip-off (completet)
20 Clip-off the C-clip (before) at the Clip-off
point
TopJet Distalizer full animation video:
www.topjet-distalizer.com
15 Insertion completed & activated
5. Removal of the TopJet clix distalizer & TPA
Deactivation of the TopJet distalizer
First, the TopJet clix distalizer must be distally deactivated.
Clip-off: Removing the C-clip from the mini-anchor screw
Now remove the gel cover on the screw head with a cutter.
Clip-off: One part of the Weingart-pliers holds the long end of the C-clip
at the clip-off point, the other one holds to the head of the mini-anchor
screw. Now, push the C-clip against the mini-anchor screw with a little
pressure (Fig. 18 – 22). It will also break the Triad® gel adhesive residues.
Caution: Do not remove the C-clip directly from the screw head by pulling
the spring pin. Risk of loosening the screw!
Loosen the T-connector and remove the TopJet clix
After loosening the TopJet clix on the screw head, the spacer pin can be
grasped with a Weingart-pliers. With a 45° swivel movement, the bra-
ckets of the T-connector open and it breaks out of the adhesive bond. The
TopJet clix can be easily removed now (Fig. 23 –25).
Removing a TPA in a classic way
In order to loosen the glued TPA from the Goshgarian lock, the slight-
ly distally proturing part of the TPA is pressed out with a Weingart-pliers
against the lock. (Fig. 26).
In Case of Emergency: Cutting Through the TPA
In the event that a traditional removal of the TPA is not possible (i.e. pres-
sure from the TPA has ulcerated the palate), it is recommended to use the
small diamond disc in an off-angle handpiece with water cooling to care-
fully sever the TPA. During this process ensure that the TPA is secured
with mosquito pliers, needle- nosed pliers or with floss (Fig. 27).
6. Notices for Single-use Products
This product is nearly ready to use out of the box, but is not sterile and
should not be used more than once. The reprocessing of this once used
product (recycling) and its reapplication to the patient is strictly prohib-
ited.
7. Safety Instructions
This operating and installation manual contains tips and recommenda-
tions, but does not release you from personal responsibility! The use of
this product is allowed only by orthodontists and dentists according to
MDD 93/42/EEC. The user must comply with the provisions of the Medical
Devices Directive and any other applicable laws and regulations.
This product contains nickel.
8. References of Quality
Tiger Dental assures the user a flawless quality of its products. The con-
tent of this manual is based on experience. The user is responsible for the
processing of the products themselves. Tiger Dental is not liable for erro-
neous results or processing by the user that occure in the absence of influ-
ence of Tiger Dental. Although this product is a mature product, improve-
ments and changes can be made, which may not be documented in the
present manual. Similarly, we are not liable for printing errors.
9. Contents
REF 10664 TopJet clix 250
REF 10665 TopJet clix 250+8
REF 10666 TopJet clix 360
REF 10667 TopJet clix 360+8
EN

10. Technichal specifications 11. Description of the used symobols of ÖNORM EN ISO 15223-1
Notified body
Manufacturer
Date of manufacture
Lot / Batch number
Reference / Article number
Non sterile
Do not reuse
Consult instructions for use
Caution
Ratchet step mm TJ 250 TJ 360
0 0 250 cN 360 cN
1 1,8 210 cN 300 cN
2 3,6 170 cN 240 cN
3 5,4 130 cN 180 cN
4 7,2 90 cN 120 cN
5 9,0 50 cN 60 cN
Type 250 360 250+8 360+8
Max. strenght 250 cN 360 cN 250 cN 360 cN
Min. insertion lenght 14 mm 14 mm 22 mm 22 mm
Max. distal movement 14 mm 14 mm 14 mm 14 mm
Ratchet steps 5 5 5 5
Length per ratchet step 1.8 mm 1.8 mm 1.8 mm 1.8 mm
5
TopJet clix
TopJet clix +8
14 mm
28 mm
36 mm
9. +8
TopJet 250 = 40 grams per ratchet step, TopJet 360 = 60 grams per ratchet step
EN
cN
360
300
240
180
120
60
0
0 1,8 3,6 5,4 7,2 9,0 mm
TopJet Distalizer 360
TopJet Distalizer 250
0483

Notizen /Notes

Stand der Information:
Date of information:
V0.0/11/2017/11026
Änderungen vorbehalten
Subject to modifications
© Tiger Dental e.U., Austria
Tiger Dental e.U., Belruptstr. 59,
6900 Bregenz, Austria, EU
www.tigerdental.com
Informationen zu Produkten und Serviceleistungen finden Sie unter:
For more information on our products and services, please visit:
www.tigerdental.com
www.topjet-distalizer.com
0483
This manual suits for next models
3
Table of contents
Languages:


