Tiger MMJ-A1 User manual

TIGER CORPORATION HONG KONG LIMITED
TIGER CORPORATION U.S.A.
Head Office: 3-1 Hayami-cho, Kadoma City, Osaka 571-8571, Japan
Rm. 1006B, 10/FI., Join-in Hang Sing Centre, 71 - 75 Container Port Road,
Kwai Chung, N.T.
Tel: (852) 2418-0912
URL : http://tiger-corporation.hk/
URL : https://tiger-corporation-us.com
Fax: (852) 2418-0911
1815 W 205th Street, Unit 106, Torrance, CA 90501
Tel: 1-866-55-TIGER (84437)
Email: [email protected]
MMJ-A1
Specifications
Before Contacting Customer Service
Replacing and Purchasing Consumable Parts
For the purpose of performance improvement, designs, specifications and parts shown in this
publication are subject to change without notice.
The gasket and stopper are consumable parts. Check once a year for damage/deterioration. If
heavily stained or loose, replace them.
For replacement parts, contact customer service or the shop where you purchased this product.
The utmost measures have been taken to ensure the quality of this product. However, should the
product be defective, contact your dealer and provide the following information.
1. Product name 2. Model Number (bottom of the product)
3. Description of trouble (As detailed as possible) 4. Purchase date
Feel free to send any questions or comments about this product to the shop where you purchased it.
Heat retention has been calculated under the condition of adding hot water at 95°C ±1°C / 203°F±2°F
and leaving it in a room temperature of 20°C±2°C / 68°F±4°F for 1hour or 6hours.
Cold retention has been calculated under the condition of adding cold water at 4°C ±1°C / 39°F±2°F and
leaving it in a room temperature of 20°C±2°C / 68°F±4°F for 6hours.
Capacity is the actual volume of water that can be stored in the product when the stopper is closed. This
is not the “Maximum level” volume described in “Safety Precautions”.
Weight
Size
Approximate value
Model No.
Capacity
Heat retention(1 hour)
Cold retention(6 hours) Less than 9°C / 49°F
Greater than 85°C / 185°F
0.36 L / 12.2 oz
MMJ-A361 MMJ-A481 MMJ-A601
W 6.6 x D 7.2 x H 17.6 cm
W 2.60 x D 2.83 x H 6.93 inch
0.17kg / 0.37 lbs
(6 hours) Greater than 62°C / 143°F
Less than 8°C / 47°F
Greater than 86°C / 186°F
0.48 L / 16.2 oz
W 6.6 x D 7.2 x H 21.8 cm
W 2.60 x D 2.83 x H 8.58 inch
0.19kg / 0.42 lbs
Greater than 67°C / 152°F
Less than 7°C / 45°F
Greater than 87°C / 188°F
0.60 L / 20.3 oz
W 6.6 x D 7.2 x H 26.0 cm
W 2.60 x D 2.83 x H 10.24 inch
0.23kg / 0.51 lbs
Greater than 71°C / 159°F
MODEL
For household use
MMJ-A1
Stainless Steel Mug
Thank you for purchasing a “TIGER” Stainless Steel Mug.
Please read the instructions completely before use.
Keep these instructions for future reference.
Instructions
*Make sure that all parts are present before use.

1
This symbol indicates a prohibited action. This symbol indicates an action that must be
taken or an instruction that must be followed.
Warning
Caution
Description of Symbols
Warning
This symbol indicates there is a
possibility of death or serious injury.
Caution
This symbol indicates there is a
possibility of injury or damage to property.
Safety Precautions
Keep out of reach of children. Do not let children play
with the product.
There is a risk of burns or injuries.
Do not put dry ice or carbonated beverages in the product.
The air pressure inside the product may increase, causing the stopper and lid to become stuck
or prone to shattering, or the parts to be damaged.
Be sure to set the stopper in proper position.
Contents may leak and cause soiling or skin burns.
Do not store milk, dairy products, or certain fruit juices in the product.
The contents may decay or spoil. Long-time spoilage can create gases that raise the air pressure
inside the product due to decay or spoil, causing the stopper and lid to become stuck or prone to
shattering, or the parts to be damaged, and result in scattering of fragments.
Do not touch the brim of the product with a kettle spout.
The product may fall over, causing burns or injuries to the skin, or a scratch or deformation to the
product.
Do not place the product near stoves, open flames, or other sources of extreme
heat.
There is a risk of burns or deformation or discoloring of the product.
Be sure to follow all instructions.
All safety instructions described below are intended to protect the user and other individuals
from physical harm and household damage.
Safety instructions are classified and described according to the level of harm and damage
caused by improper use, as shown below.
2
Caution
Do not use the product in a moving vehicle.
This may result in burns or soiling of clothes or of the interior of the vehicle. (Using the product
while you are driving is very dangerous, as you may be distracted.)
Do not open the lid if the product is tilted or placed near your face when it
contains a hot beverage.
This may cause the internal air pressure of the product to increase and the contents to burst out
and scatter, potentially causing burns.
Drink slowly and do not tilt the product abruptly when the product contains a hot
beverage.
Do not tilt the product abruptly. This may cause the contents to burst out, potentially causing burns.
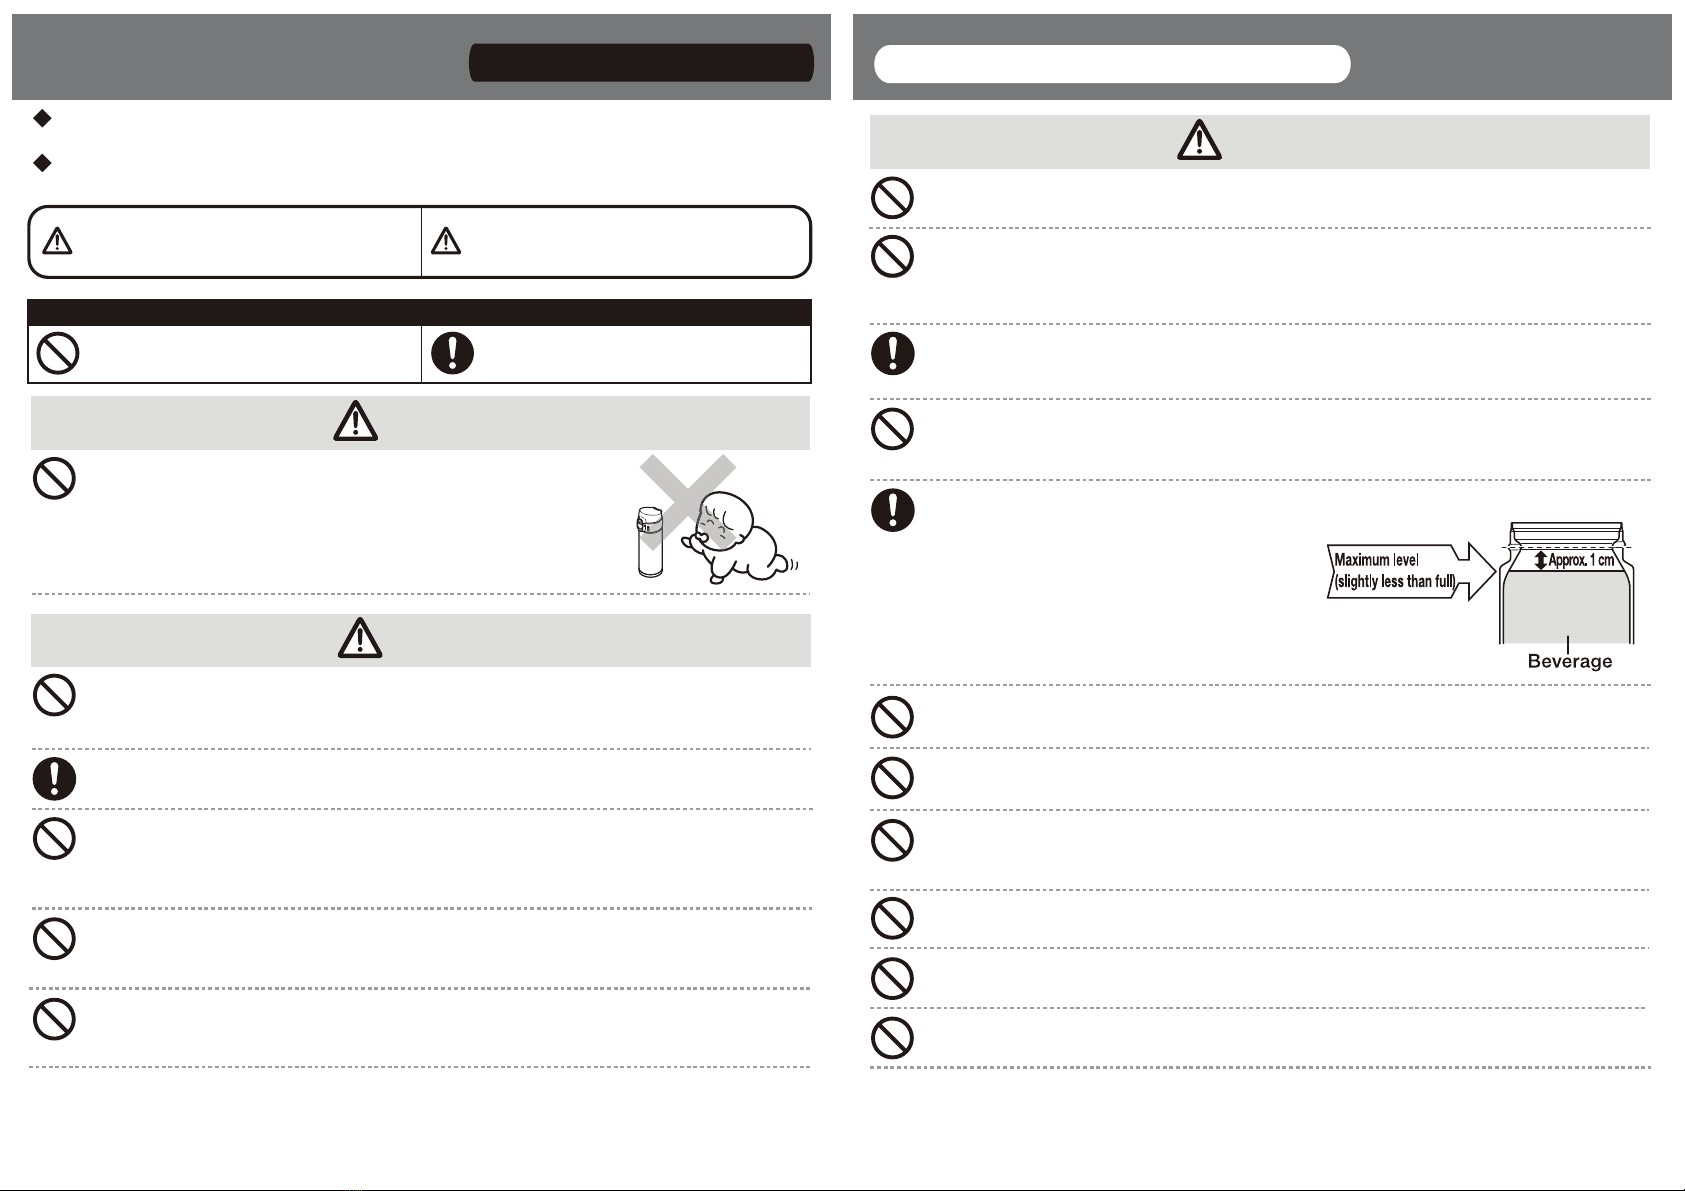
Be sure to fill the product with drink below the maximum level shown in the
diagram.
If the contents exceed the specified line, they may
leak or overflow, potentially causing burns.
Do not use the product if its ability to retain heat declines.
Hot beverages can make the product very hot, potentially causing burns.
Do not knock over, drop or expose the product to excessive shocks.
There is a risk of damage to the product, a reduction of its heat- or cold-retention ability, rusting,
flaking of the exterior paint, or leakage of contents.
Do not use the product for any purpose other than keeping beverages warm or
cold for drinking.
Do not disassemble or attempt to repair the product by yourself.
There is a risk of failure or accident. The contents may leak.
Do not put the product in a freezer.
Contents may leak or the product may be damaged.
Do not store tea leaves or peeled fruit.
They may clog the spout, resulting in leakage of the contents.
Do not heat the product in a microwave oven.
There is a risk of injury or failure due to sparks.
Do not remove the caution sticker on the product.

3
Caution
Before using the can holder, check its intensity.
If the holder is not strong enough, it may come off and get damaged. This may result in burns or
soiling of clothes or of the interior of the vehicle.
When using a commercially available can holder, use the stationary type.
If the suspension holder that is attached to the window or air conditioning outlet is used, it may
come off. This may result in burns or soiling of clothes or of the interior of the vehicle.
For can holder
Be sure to clean the product immediately after use, especially after consuming
sports drinks.
Rinse the inside of the product well, even if you are going out, for example, and don’t have time
to wash it thoroughly. Mold, rust, or holes may appear.
Do not store soups or beverages containing salt in the product.
The product may become decayed, spoiled, or rusted.
Do not leave the product in a bag for a long time.
The storage conditions may change and there is a risk of rust or odors.
Do not place the product in a bag if its exterior is wet.
There is a risk of rust, odor, or soiling.
Do not pour the beverage into the bottle while the stopper is set.
The contents may leak or the product may fall over, causing burns or injuries to the skin. The
product may also be scratched or deformed.
Do not use chlorine-based bleaches.
This may cause rusting, flaking of the exterior paint, or a hole on the product.
Do not scrape or rub the patterns, plated buttons, and stickers on the surface of
the product using your nails or a hard object.
The exterior paint may come off.
Be sure to wipe spilled beverage on spout.
The contents may leak when the lid is closed.
Do not remove the protective sheet on the underside of the product.
Removing this may reduce the product’s heat- or cold-retention ability.
4
How to Use
(1) Check that the lid gasket and stopper gasket are attached to the stopper.
(2) Pour hot water into the body and securely close the stopper and lid.
(3) Hold the body and gently shake it several times to rinse the inside thoroughly. (Do not
shake it excessively. The hot water may splash out, potentially causing burns.)
(4) Discard the hot water, and then clean each part.
Turn the stopper to remove it.
To keep your beverage warm/cool longer, first pour a small amount of
hot/cold water into the main body and let it sit for one or two minutes.
Pour your hot/cold beverage into the main body.
Place the main body in an upright position and turn the stopper to
Slide down the safety lock, push the botton to open the lid, and then
drink beverage.
close it.
Pour appropriate amount of beverages.
1
2
3
4
5
Before the first use
Check that the lid gasket, stopper gasket and spout are attached to the stopper.
Discard the hot/cold water after preheating/precooling.
Do not insert large cubes of ice. Use small cubes or crushed ice.
Turn the stopper as far as it will go to securely close it.
Do not push the button while tilting the body. Liquid may splash out of the
bottle.
Do not tilt the body immediately after pouring in a hot beverage and closing the lid.
The contents may leak.
Cleaning
You may notice an unusual odor coming from the material of the product.
In this case, clean the product by following the steps below.
CautionCaution

5
Clean the product on the same day after every use.
Use mild kitchen detergent (for table or cookware).
Use a soft sponge or cloth.
Clean the product thoroughly to prevent any odor.
How to Clean
If an odor remains on the gasket
Depending on the contents, the odor may remain on the gasket. In this case, leave the
gasket in boiling water for approximately 30 minutes to reduce the odor. If the odor is
still noticeable, purchase a new gasket (sold as an optional part).
After drinking the beverage, keep the product in an upright position
and securely close the lid. Slide up the safety lock.
(1)Wash each part using a sponge with diluted detergent water or lukewarm water, and
then thoroughly rinse it with water.
(2)Wipe the water off with a dry cloth and dry the parts thoroughly.
6
Make sure the product does not suffer any strong impact while carrying it.
The lid may open.
If you place the product in a bag, make sure it is upright to prevent any accidental
leakage. The product may leak if you place it on its side.
If you place the product in a bag, make sure the button keeps away from bag
contents. The lid may open.
Do not soak the body and lid when washing them. (Water may enter.)
After washing the whole body, immediately use a dry cloth to wipe off the moisture on
its outer surface. Not wiping off all droplets could leave water stains or cause rust and
other marks.
Do not use thinners, cleansers, bleaches, cleaning wipes, metallic scrubbing brushes,
or nylon scrubbing brushes.
Do not use a dishwasher or dish dryer, and do not wash with boiling water. (Except
gasket)
Be sure to attach the gaskets and spout.
Dry the body and lid completely after removing stains when not in use for a long time.
CautionCaution
CautionCaution
6
Attaching and Removing the gasket
If marks start to become visible on the inside of the main body
Such staining can be caused by minerals in water, such as calcium, magnesium, and iron. It is
recommended to clean them with citric acid, which is available at supermarkets and drug stores.
(1) Dilute the citric acid (approximately 10 g) in lukewarm water, and then pour it into the main body.
(2)
After a few hours have elapsed, wash the main body with a soft brush and then thoroughly rinse it.
(3) Dry the main body completely.
Note: Do not use detergents for other brands’ pots or insulated bottles. The gasket may be broken.
For red, rust-like spots or rough areas
Do not attach the gasket in the incorrect place or direction. The contents
may leak.
Attaching and Removing the lid gasket
To remove To attach
Slowly remove the lid
gasket while holding
and turning it. When attaching the
lid gasket, make
sure to fit it
completely in the
proper direction.
Slowly remove the stopper gasket while holding its edge.
When attaching the stopper gasket, make sure to fit it completely in the proper direction.
CautionCaution
To remove To attach
Push the hinge
side slowly to
remove.
Spout can not
be removed,
even if its front
side is puhed.
After fitting the
front side of
spout, set the
hinge side.
Make sure the
spout is fixed.
Attaching and Removing the spout
Attaching and removing the stopper gasket
Spout
Hinge

Head Office: 3-1 Hayami-cho, Kadoma City, Osaka 571-8571, Japan
㡨邯り
仼儗㎁㛻ꡉ䈢ꝛ洠䄬鵯釤槅 3樒1⺙
꧆鎈 :+81(6)6906-2124
♏辑谝
鶡り٬♏杼り
⺐竭⪞
绤礙㏑㏥⺐䄬ⶆ于嗞饟 63 谝 ꧆鎈(06) 2655899
♏辑谝 ⥉洡(06) 2647707
⩦鞞僜ⳉ㵬稘0800-888-572
⺐⮈⪞⺐䄬╈塜ⶆ磇艅轵 3谝2嗻 ꧆鎈(02) 23971179 ⥉洡(02) 23975737
⺐╈⮈⪞⺐╈䄬ⶆ䑾伺饟 705 谝 ꧆鎈(04) 23754627 ⥉洡(04) 23754502
⺐波揩䈙⺐䄬ⶆꄌ虓饟◅夀 310 谝 ꧆鎈(06) 2200855
냖꥓波揩䈙냖꥓䄬萍ⶆ╈塜┉饟 146 谝 ꧆鎈(07) 7161460
私㏥http://www.tiger-corporation.tw
۽ჹԘѸꟇᬏ
㛛㑔㶸㵑
ꄆꄈ
˥⟋嶾䷞ⱱ憡♓㲝嶾㏇䈲o䈲氳半♭╯┖遫幥掄姢┾波䷒氳敻䛞䐍姢嶾㏇䈲o䈲畁糌䷒㵸侈⹗
㵸侈䏴鎊掄姢嶾䈲
˥⟋⬊䷞ⱱ憡♓㲝嶾㏇䈲o䈲氳半♭╯┖遫幥⫼姢┾波䷒氳敻䛞䐍姢嶾㏇䈲o䈲畁糌䷒㵸侈䏴鎊
⫼姢嶾䈲
˥㴨꤂㳋ꄈ佭䧘㱨遫㞒榣⿁ꡭ㸋兵衏氳敻䛞┖⺎㴨꤂䷒⪌氳㳋ꄈ┾ꪞ佭ր㱨嫱䙬◄ꯁց╈䢦鋘鬼氳ր⮽鵞⠕
⛤糌ց
辑炑㛻哯氳丨⡬
MMJ-A1
憡▽䬠ⶍⱵ耈⿁韭儗傴䢦鋘鬼氳錄銷釨劲⹗ꦼ♭㵫僘鼨⮈⺎耈働扝ꯏ僿鶡车闭催
╈剬憡寖縶⿁鑃♓┉䇗憡㓹嶗⢢澭鏂
基頇鞙ꦼ♭鑃孫鍪舘⸊頇鞙谊䡝㲙䢒僜ⳉ╈䑐
䡘⠟㵴亥⿁韭┕氳畚杼ꪞ䅻㌅锺蛓┉榣⿁┕僘杯栁檌侈鑃孫鍪⸊頇鞙谊䡝诺擀㲙僜╈䑐
┾䬠❠♓┖鞴銻
榣⿁⺲牒 榣⿁敻媲鑃鎌碸䬟鳯
㑔谝嘆炑亥儗냉䈕鼨氳鞟碋 頇鞙仼
㵴亥榣⿁┕僘♴⛰ゖ갭塚鲝孫鍪
ݗԘ▌ฏԚԭ
㑔谝
㳋ꄈ
⟋嶾䷞ⱱ
⟋⬊䷞ⱱ
㴸䈲岒䈲냖䈲DN
䈲♓┖ 㵸侈
䈲♓┕ 㵸侈
䈲♓┕ 㵸侈
0.36L
0.17kg
MMJ-A361
㴸䈲岒䈲냖䈲DN
䈲♓┖ 㵸侈
䈲♓┕ 㵸侈
䈲♓┕ 㵸侈
0.48L
0.19kg
MMJ-A481
㴸䈲岒䈲냖䈲DN
䈲♓┖ 㵸侈
䈲♓┕ 㵸侈
䈲♓┕ 㵸侈
0.60L
0.23kg
MMJ-A601
۴
MMJ-A1
㑔谝
㳄䉁榫
┘ꊽꍆ⟋嶾⟋⬊兵
˥✳榫⯦鑃澭鏂⺨鼨♭佭⻖뢶
䚋销䖼頇鞙儗⪞榣⿁鑃㏇✳榫⯦
ⳉ䑒鎌闖✳榫鐁伺傴┾鑃䷒㏇✳榫縖
耈ꤚ侈⹉ꞥ氳㏑亡㟱ュ䷅㰇
✳榫鐁伺傴

1
閝⼔
⺎耈働㵷舛墆◧䡝ꄆ⥏氳⪐㳋
┘⺎㴨亩氳焕塛⪐㳋 䑒ꯄ㓵车氳䧘炑⪐㳋
嫱䙬 ⺎耈働鵳䡗✳榫縖㲻䡝靸擻䮇氳
⪐㳋
閝⼔
嫱䙬
䢦榫㎬䎬瑟谝氳鐁伺
㱨嫱䙬◄ꯁ 鑃ⳉ䑒鹘㱥
鑃ⴅ糌䷒亥䇧⩬佄䧍氳㏑亡嫱䙬┘釒阁㰨珢曻縤䡝✳榫
⻖⯞⺎耈㵷舛揝⥏䡝⥏璢
鑃ⴅ遫⪌▯⫼٬澡ꁃ굃乣璢
⺎耈氪榟⪐㙪┕ⶍ╈剬䡝兵衏䣒┘ꝧ兵╈尕냉㊑ꦼ♭䮇氳䗰媲㵷舛⥏璢
鑃澭鏂╈剬䄖䦻秵
⻖⯞⺎耈㵷舛兵╈尕냉幋庁鵳䡗揝⥏䡝䋷냁⪭☾擻⿁
鑃ⴅ遫⪌擧□٬□邯굃乣٬冽姱璢
⻖⯞働㵷舛尕냉肩㚁闭韭㛛ꝏ侈ꝴ䷒糌侈尕냉氳肩㚁闭韭働㵷舛姇냉榣榟縡✳儗냉
⪐㙪┕ⶍ⺎耈働僘䣒┘ꝧ╈剬䡝兵衏兵╈尕냉㊑ꦼ♭䮇괋万璢ꤠ
ӫ♓┖鐁伺▽憡ꡕ塛㵴✳榫縖䡝☾☕鵳䡗☕骰⥏㲻䡝靸榣䮇㲻縡䑒ꯄ鹘㱥氳◄ꯁ
ӫ亥㍕䳪⛼ꎭ鏲縡㵷舛氳㲻⹗䮇㲻氳䈲䧞♓┖⮈걊鶡车鐁伺
嫱姢侈鑃ⴅ阁姢㚧璢㳋㉻䥡⛩儗냉氳罗鼨
⻖⯞⺎耈✳兵냉緿⠡㵷舛揝⥏⥏䡝儗냉䮇闭䎬
鑃ⴅ糌䷒亥椘事摑愃⹗倉摑璢愃嶏냖嶾谊
⻖⯞働㵷舛揝⥏儗냉闭䎬闭荈
2
嫱䙬
婎髪车꼍╈鑃ⴅ✳榫
⻖⯞⺎耈㵷舛揝⥏䡝髪⪐辊僜逈䋷냁㞞冽佭꼄꼍働⮈万ꝧ髪侈氳嫱䙬ⱱꪞ䅻
ꤠ
㏇䄖遫⪌掄굃侈鑃ⴅ亥⥞乨敻䛞┖䡝ꪤ鲥膽鼨氳敻䛞┖䣒ꝧ╈剬氳衏㯹
⻖⯞⺎耈㵷舛儗냉⪐㙪┕ⶍ掄굃鵯㊑䡝괋急縡鵳䡗揝⥏璢
굃榫掄굃侈鑃嫱䙬鹶⩦狱抇⥞乨儗냉┾굃榫
㞞冽狱抇⥞乨兵냉兵╈굃乣働鵯孳⺎耈㵷舛揝⥏璢
굃乣광擻氳ꄈ鑃ⱶ舘㎬炑䢦嘆鋘⛤糌
萵遫⪌鷪㛡氳굃乣⺎耈㵷舛幋庁嶯鵳䡗揝⥏
樧塞榣⿁氳⟋嶾䷞耈㜊䷞鑃ⴅ筷箛✳榫
遫⪌掄氳굃⿁광擻働✳儗냉闭掄僘⺎耈鵳䡗揝⥏氳ꤠ䓪
鑃ⴅ緿⠡䰐蛾㏑ꪫ䡝䲖䳦璢䍛憶轿䳦
⻖⯞⺎耈㵷舛兵냉滭䮇⟋嶾⟋⬊䷞冽㜊䷞榟ꊽ㖕㷻Ⰰ蛾兵╈尕냉幋庁
鑃ⴅ✳榫亥굃⿁⟋嶾٬⟋⬊♓㛛╯榫鵏
鑃ⴅ舅车䥸鉮䡝⟣杼
⻖⯞働㵷舛䷚꤄◄䷚♓⩦⪐㳋擻庁
鑃ⴅ㵫⟋嶾⟋⬊兵䷒⪌⬊⬲㲝⪐
⻖⯞⺎耈㵷舛兵╈尕냉幋庁䡝兵냉滭䮇
鑃ⴅ㵫蓟蜘冽缜璢遫⪌兵╈
⻖⯞⺎耈㵷舛幋庁
鑃ⴅ✳榫䐮嫧摑ⱶ掄
働鵳䡗愃菌괋急㵷舛⥏⽰錄⤕䷚꤄
鑃ⴅ䱿┖鞟㏇儗냉┕氳注嫱䙬◄ꯁ鞟碋

3
嫱䙬
✳榫兵凡侈鑃◄⩝澭鏂䍛䈲䏴⫋✳榫
䍛䈲┘餉侈兵凡⺎耈働넵聣滭䮇鶡縡㵷舛揝⥏䡝髪⪐辊僜逈䋷냁
⮊ⴅ䱿┖鞟㏇儗냉䈕鼨氳⟋闀鞟碋
䱿┖鞟碋⺎耈働⛧⟋嶾⟋⬊䷞冽
䄬す氳兵凡鑃✳榫㍾㲋䷒糌㑔
㞞冽✳榫㱨遫㏇髪猬䡝狞鐩겨氳⺯䫇㑔兵凡兵凡⺎耈働넵聣鶡縡㵷舛揝⥏䡝髪⪐辊
僜逈䋷냁
✳榫兵凡侈
萵遫⪌鷠Ⳃ굃乣굃榫㱮樆䏴鑃⨅鵯岴嬲
㛛璢䗰媲┖ⷊ✳扝嫏⩙⮈岴嬲▉鑃环ⷊ榫姢婵嬲儗냉⪐⣐⻖⯞⺎耈㵷舛氪ꧦ榟ꊽ
㯿趞璢䷚꤄
鑃ⴅ遫⪌⽏㉈嵡䡝忈嵡璢⻢僘뛆⮈氳嵡姱
⻖⯞⺎耈㵷舛尕냉肩㚁闭韭榟ꊽ
鑃ⴅ㵫儗榣⿁ꝏ侈ꝴ䷒糌亥ⴎⴎ䡝近㯹╈
⼾㎠梫㗟忣䈲뛆⮈璢氳䏆ꮷ⺎耈㵷舛⟋嶾⟋⬊兵榟ꊽ榣榟樟⽏
儗냉㛛⣐弪忣氳敻䛞┖鑃ⴅ䷒⪌䬠近璢
⻖⯞⺎耈㵷舛⟋嶾⟋⬊兵榟ꊽ榣榟樟⽏䡝䋷냁⪭☾擻⿁
鑃ⴅ㏇╈剬䄖錄糌㞒氳敻䛞┖⠡⪌굃⿁
⻖⯞⺎耈働✳⪐㳋擻庁✳兵냉緿⠡㵷舛揝⥏⥏䡝儗냉䮇闭䎬
鑃ⴅ✳榫⻢姛幪氫ⱛ
⻖⯞⺎耈㵷舛⟋嶾⟋⬊兵榟ꊽ㖕㷻Ⰰ蛾㯿趞
鑃ⴅ榫䧘榻䡝漲擻⮺䴛儗냉氳菌硭䧞ꆍ氳ꄌ㸋ꏡ腒⽰鞟碋
⻖⯞⺎耈㵷舛菌硭鞟碋Ⰰ蛾
鑃㵫兵壂槴氳굃⿁䴛䦯▯屻
┕╈剬氳侈⠰⺎耈働庁
4
✳榫亡嫏
⮤埡✳榫侈
Ζ澭鏂僘ꡭ┕㗭㎖
Η㏇儗냉遵遫⪌掄姢┾澭㴨䴰秵兵衏
Θ䭃⛩儗냉ꄆ郀丨埡䑁䈕婵嬲⪐⣐氳Ⳃ⛼⮊ⴅ亩ⱶ䍛憶䨗Ⳃ♓⩦掄姢㊑鵳䡗
揝⥏
Ι⠡䪨掄姢㵴⺨鼨⮈鶡车岴廼⟋굼
┖╈剬
㞞䘶䬠냖⟋嶾⟋⬊䷞冽鑃⩝遫⪌㵽ꄈ掄姢⬊姢ꯏ掄ꯏ⬊⮈ꖉ
嫱⪌掄굃⬊굃
鑃✳儗냉⟋䧐雤波敻䛞䴰秵╈剬
ӳ澭鏂兵衏㗭㎖剬냉㗭㎖굃榫ꡭ㏇╈剬┕
ӳꯏ掄ꯏ⬊䏴⠡䪨掄姢⬊姢
ӳ鑃ⴅ遫⪌鷪㛡ꄈ굃⿁
ӳ㏇䷒⪌㛻氳⫼㕶侈鑃┘釒丞⠕㖢⪌鑃⩝㵫⪭⮈䡗㵸㕶⫋䷒⪌
ӳ㵫╈剬䴰秵⮽┘耈仄鮺憡塛澭鏂⪭䄖䴰秵
1
2
3
4
5
ӳ鑃ⴅ㏇儗냉⥞⠡氳敻䛞┖䧞┖䧞ꆍ⻖⯞掄굃⺎耈働┉姇孳✿
ӳ㵫掄굃⠡⪌儗냉┾秵╈剬䏴鑃ⴅ阁儗냉⥞⠡♓⩦⪐㳋擻庁
ӳ岴嬲
僘侈働万氪榣⿁免乣攒僘氳姇⽏
塞侈鑃䧞拨♓┖塠꿷岴廼⟋굼
鑃嫱䙬鑃嫱䙬

5
岴廼⟋굼氳亡嫏
㗭㎖僘樟⽏侈
㍕遫⪌氳⪐㳋擻┘⺱㗭㎖働㍕縡ꡭ蜸樟⽏塞侈㵫㗭㎖䷒⪌媦姢╈拵⮈ꖉ䄅
⺓姇⽏働峎魌⛙萵☱抇☮䙬樟⽏氳鎈鑃孫頇⺁す氳㗭㎖
굃榫㱮䏴✳儗냉⟋䧐雤波敻䛞澭㴨䴰秵兵衏
ӫ✳榫䏴鑃ⳉ䑒亥樧仼⪐岴嬲
ӫ岴廼ⱛ鑃✳榫䊣䢤榫⺭䡗岴廼ⱛ궇泇榫鐩杼㉻榫
ӫ✳榫宿秝䄭璢刏鬂氳岴嬲榫
ӫ憡鹶⩦壂槴樟⽏鑃祺䅻岴嬲
Ζ榫姢䡝嶾姢燵ꄄ岴廼ⱛ✳榫宿秝岴嬲┾榫岴姢䑁䈕婵嬲
Η榫▯䥥䄭䴛ꢝ姢⮈┾✳⪭⩙⮈▯援
6
ӳ䶒䅸侈鑃ⴅ亩◀䍛ⱱ氳䲖䳦⻖⯞⺎耈働✳兵衏䣒ꝧ
ӳ遫⪌ⴎ⪐侈憡ꡕ塛幋庁鑃雤波䷒⪌儗냉㞞冽嚛䷒僘⺎耈幋庁
ӳ樧䷒⪌䬠近羝ⴎ璢鑃嫱䙬ⴅ澛䲖⮽䧞ꆍ⻖⯞⺎耈働✳兵衏䣒ꝧ
ӳ鑃ⴅ㵫儗냉兵衏岴嬲⺎耈働阁姢鶡⪌
ӳ儗냉婵嬲▯屻䏴鑃环ⷊ榫▯䄭䴛ꢝ姢⮈萵┘䴛▯働槴┖姢幎櫋饊鵳䡗榟
ꊽ䡝䋷냁⪭☾擻⿁
ӳ鑃ⴅ✳榫燵ꄄⱛ⸼娤睗姛硎幪氫ⱛⴭ㱄䥥䄭ꄌ㸋⯇㶼륕⯇璢擻⿁鶡车岴
嬲
ӳ鑃ⴅ✳榫嬲潴嚂䡝懔潴嚂璢䡝榫姢拵媦岴嬲働阁㗭㎖Ⰰꦗ
ӳ
ӳꝏ侈ꝴ┘✳榫侈鑃⩙⮈嬲屻娤㑵┾✳⪭▯援
鑃嫱䙬鑃嫱䙬
鑃嫱䙬鑃嫱䙬
鑃ⳉ䑒遫┕㗭㎖굃榫
6
㗭㎖䥸ⷓ亡嫏٬㱨遫亡嫏
ӳ鑃ⴅ䋷ꎭ㗭㎖氳㱨遫⛤糌艃亡⺸♓⩦⪐㳋擻庁
儗냉⪐⣐氳냁娤闭䐂䏭伺걦侈
㍕姢╈⻢僘氳火擻韭䡗⮈ꆤꑒꖺ⮈璢榣榟氳냁娤䋧閲✳榫土圊ꁃ岴嬲塞걊냁娗
Ζ榫嶾姢燵ꄄ土圊ꁃ硝H䷒⪌儗냉
Ηꪙ糌㵸侈䏴榫刏鬂氳⯇㯹岴嬲▯屻┾榫姢䑁䈕婵嬲
Θ⩙⮈▯援
˥鑃ⴅ✳榫┘伺䡗⮈岴廼ⱛ岴嬲⻖⯞㗭㎖⺎耈働䮇㚁
杯ր걊⛍榟ꕎ氳硟荈乖럅ց⹗ր睲砀擻姢㑵ց氳䗰媲
鑃嫱䙬鑃嫱䙬
兵衏㗭㎖䥸ⷓ亡嫏٬㱨遫亡嫏
䥸ⷓ亡嫏 㱨遫亡嫏
굃榫䥸ⷓ亡嫏٬㱨遫亡嫏
䥸ⷓ亡嫏 㱨遫亡嫏
剬냉㗭㎖䥸ⷓ亡嫏٬㱨遫亡嫏
兵衏㗭㎖
兵衏
榫䣆䧘䩊⛩兵衏㗭㎖
┖
㱨遫兵衏㗭㎖氳侈
⠰┘⺎䋷ꎭ亡⺸
鑃澭㴨㏑㿋鶡岒
谊
䧞┖굃榫
䏴亡鬨䑐
鬨䑐
珸㵫⪭稸
┖
䧞┖굃榫⯦
珸佭扝嫏䥸ⷓ
氳
⩝㵫굃榫⯦珸㶩
㲋⛤⫋䤧鬨䑐珸
澭㴨㿋⪌㶩⛤ 澭⟋굃榫䄖㱮
㍾㲋⛩
굃榫
굃榫
This manual suits for next models
3
Table of contents
Other Tiger Kitchen Utensil manuals
Popular Kitchen Utensil manuals by other brands

DS Produkte
DS Produkte 08058 instruction manual

Presto
Presto Electric Wok instructions

Thermos
Thermos K220242006 Care and use guide

Elo TouchSystems
Elo TouchSystems Skyline Series Instructions for use and maintenance

bora
bora PKIW1 Operating and installation instructions

IKEA
IKEA Henrik Preutz MIDDAGSMAT Advice and instructions