manuals.online logo
Brands
  1. Home
  2. •
  3. Brands
  4. •
  5. TiiTENT
  6. •
  7. Tent
  8. •
  9. TiiTENT PRO 4Sunrise User manual

TiiTENT PRO 4Sunrise User manual

Other TiiTENT Tent manuals

TiiTENT SPACE PRO User manual

TiiTENT

TiiTENT SPACE PRO User manual

TiiTENT Hill200 User manual

TiiTENT

TiiTENT Hill200 User manual

TiiTENT TB300 User manual

TiiTENT

TiiTENT TB300 User manual

Popular Tent manuals by other brands

Nordcap Easy Up 400 Build-up instructions

Nordcap

Nordcap Easy Up 400 Build-up instructions

Zempire Neo Series instructions

Zempire

Zempire Neo Series instructions

CampTrails Grand Manan Assembly instructions

CampTrails

CampTrails Grand Manan Assembly instructions

Maanta ULISSE 90 Instructions and warnings

Maanta

Maanta ULISSE 90 Instructions and warnings

OZTENT JV SIGNATURE EDITION owner's manual

OZTENT

OZTENT JV SIGNATURE EDITION owner's manual

GigaTent Summer Chalet Mini Tent owner's manual

GigaTent

GigaTent Summer Chalet Mini Tent owner's manual

Outsunny 84C-230 manual

Outsunny

Outsunny 84C-230 manual

Crivit Outdoor 96716 instruction manual

Crivit Outdoor

Crivit Outdoor 96716 instruction manual

Reimo Marina instructions

Reimo

Reimo Marina instructions

Outsunny 84C-063 Assembly instruction

Outsunny

Outsunny 84C-063 Assembly instruction

EuroTrail ATLANTIS PRO manual

EuroTrail

EuroTrail ATLANTIS PRO manual

Coleman 2000033134 Assembly & instruction manual

Coleman

Coleman 2000033134 Assembly & instruction manual

Ozark Trail W784.1 Assembly instructions and owner's manual

Ozark Trail

Ozark Trail W784.1 Assembly instructions and owner's manual

SlingFin CrossBow 2 instructions

SlingFin

SlingFin CrossBow 2 instructions

Coleman 9600-141 instructions

Coleman

Coleman 9600-141 instructions

Palram Arizona 5000 Wave - WINGS manual

Palram

Palram Arizona 5000 Wave - WINGS manual

COVERPRO 56184 Owner's manual & safety instructions

COVERPRO

COVERPRO 56184 Owner's manual & safety instructions

Vango Zenith 100 instructions

Vango

Vango Zenith 100 instructions

manuals.online logo
manuals.online logoBrands
  • About & Mission
  • Contact us
  • Privacy Policy
  • Terms and Conditions

Copyright 2025 Manuals.Online. All Rights Reserved.

Outer tent X 1
Inner tent X 1
Pole bag X 1
Peg set X 1
Flysheet X 1
Outside pole (16mm X2)
Inside pole (19mm X2)
Vestibule pole(X2)
Back door pole(X2)
Pole repair kit (16mm X1)
Pole repair kit (19mm X1)
Polebagcontents
Topreventbreakage,makesurethatthepole
jointsarefirmlyconnectedbeforeproceeding.
4Sunrise PRO divided into two bags
1. Content
380
145
145
105
105
140
640
210
210
145 105 140 105 145
175
2. Dimension
w
u
v
3. Set up the outer tent
Please set up the flysheet first
Topreventbreakage,make
surethatthepolejointsare
firm ly co nne cted before
proceeding.
Note
Before setting up, fix the flysheet on the outer tent.
There are three Velcro felts on the outside of the front and rear door sleeves,
which can be fixed correspondingly to the flysheet. Please fix in order.
21
3 4
Be sure to loosen the webbing strap first,
and then push the buckle into the pole.
Insert the outside pole (16mm)
into the sleeve (black)
Insert the inside pole (19mm with
red sticker) into the sleeve (red)
At the mark (8 places):
Insert the pin of the ring & pin
connector into one end of the
pole. Bend the pole slightly into an
arc shape and insert the other ring
& pin connector into the other
end of the pole.
At the mark (16 places):
Fasten the buckle to the pole.
5
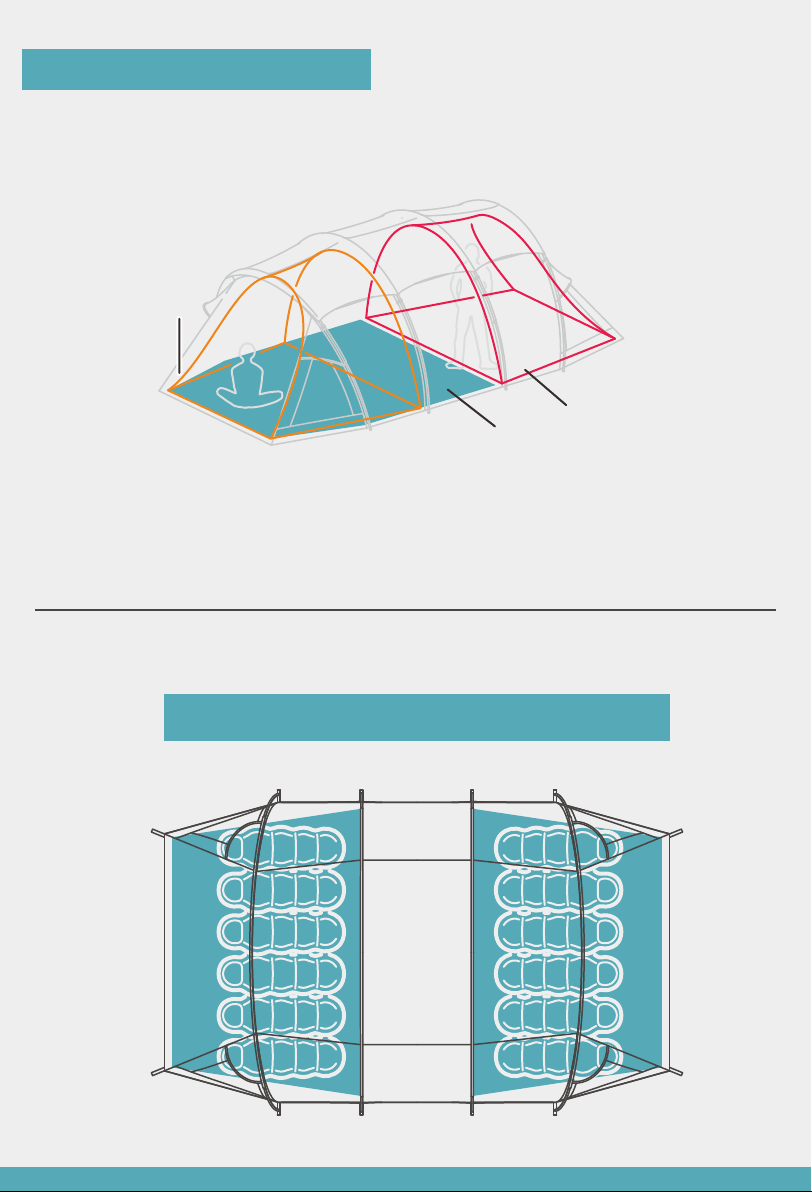
After the frame is fixed, the tent will be as shown as the figure below. Adjust the
position of the tent and stake the webbing strap at into the ground.
Stake the pegs into the ground at a
45-degree angle. Be careful when
hamming in case you get hurt.
back door
Note
Before propping up the tent, make sure all the
buckles are securely fastened to the poles and
the webbing strap is pulled taut.
It can avoid damage to the poles caused by the
instantaneous strong wind.
6
After the back door is secured, pull the front door away from the back door to
form the tent shape. Pull tight the tent and stake the straps at the front door
into the ground.
back
door
7
6
8
8
8
8
8
7
7
7
7
Flatten the tent and stake down
at , , ,and in order
6
6
back
door
78
Fasten and tighten the windproof guy line (16 places)
Congratulations, your tent is set up!
Note
When packing away, please buckle up the positioning cords
before pulling out the pegs. The poles can be dangerous if
they bounce to the sides.
1. Wrap the webbing strap
around the pole
2. Pull the front end of the
webbing strap through the
loop
3. Tie the guy line to the
front end of the strap
8
The windproof guy line is tied in a loop to enhance the wind resistance
of the tent.
u
v
w
Use vestibule poles to prop the front door open
4. Tent Expansion
Use back door poles to prop
the back door open
After using the vestibule poles to prop the middle
side door, the left and right sides are connected with
guy lines and then staked down.
5. Pack away the tent
Lay the outer tent flat on
the floor and pull up the
four corners as shown in
the figure.
Fold it in half Fold it in half again
Put it in the tent bag
Outer tent:
inner tent:
Lay the inner tent flat on
the floor and fold towards
the center as shown in the
figure.
Divide it into three equal
parts and fold the sides
towards the center.
Fold it in half
Finish!
6. Space inside the tent
u
vw
The inside of the tent consists of three parts as shown in the figure.
uThe vestibule tent (sold separately):
increase sleeping area in the vestibule area
Vestibulev
Inner tentw
The inside of the vestibule tent:
Can easily accommodate 12 adults