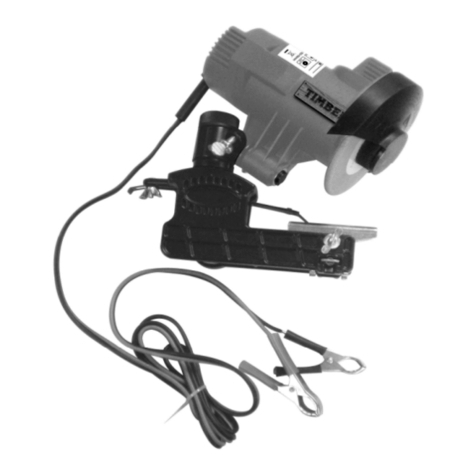
Timber Tuff Tools CS-96V User manual

9.6V CORDLESS CHAINSAW SHARPENER
___
MODEL #CS-96V
IMPORTANT: READ THESE INSTRUCTIONS CAREFULLY TO ENSURE SAFE OPERATION
OF THIS PRODUCT.

2
GENERAL INFORMATION
Read all instructions before operating this product. Save these instructions for
future reference. This manual contains the intention for which the product has been
designed and necessary information to ensure correct and safe use. It is recommended
to read ALL instructions before any operation, any kind of adjustment, or any
assembly/maintenance to this product. Following all general safety instructions
contained in this manual will provide product and operator safety, and a longer usage
life for this product.
CONTENTS
Contents ………………………………………………………………………2
Specification ………………………………………………………………………2
General Safety Instructions ………………………………………………………………………3
Additional Safety Instructions ………………………………………………………………………5
Parts Listing & Information ………………………………………………………………………6
Assembly ………………………………………………………………………7
Operation and Use(CHAIN SHARPENING) ………………………………………………………………………7-10
Maintenance ………………………………………………………………………11
Disposal ………………………………………………………………………11
Explanation of Symbols/Pictograms ………………………………………………………………………12
SPECIFICATION
Stock No: CS-96V
Battery:
Type: Ni-Cad
Rated Voltage: 9.6V
Rating: 750mAh
Transformer:
Type: Fail-Safe Safety Isolating
Rated Supply Voltage: 110V
Rated Supply Frequency: 60Hz
Rated Output Voltage: 9.6V
Rated Output: 6.0VA
Rated Output Current: 500mA
Revolutions Per Minute (no load): 8,000-20,000min-1
Sound Pressure Level: 88.5dB(A)
Sound Power Level: 99.5dB(A)
Vibration Level: <2.5m/s²
Weight (machine only): 0.75 lbs

3
GENERAL SAFETY INSTRUCIONS
WARNING:
Read all instructions. Failure to follow instructions listed below may result in electric
shock, fire and/or serious injury. The term ”Power Tool” in all of the warnings listed below
refers to hand operated power tool(corded) or battery operated(cordless) power tool.
SAVE THESE INSTRUCTIONS
1.Work Area
a. Keep work area clean and well lit. Cluttered and dark areas invite accidents.
b. Do not operate power tools in explosive atmospheres, such as in the presence of flammable
liquids, gases or dust. Power tools create sparks which may ignite the dust or fumes.
c. Keep children and bystanders away from work area while operating a power tool.
Distractions can cause you to lose control.
2.Electrical Safety
a. Power tool (corded) plugs must match the outlet. Never modify the plug in any way. Do
not use any adapter plugs with grounded power tools. Unmodified plugs and matching
outlets will reduce risk of electric shock.
b. Avoid body contact with grounded surfaces such as pipes, radiators, ranges and
refrigerators. There is an increased risk of electric shock if your body is earthed
or grounded.
c. Do not expose power tools to rain or wet conditions. Water entering a power tool will
increase the risk of electric shock.
d. Do not abuse the cord. Never use the cord for carrying, pulling or unplugging the power
tool. Keep cords away from heat, oil, sharp edges or moving parts. Damaged or entangled
cords increase the risk of electric shock.
e. When operating a power tool outdoors, use an extension cord suitable for outdoor use.
Use of a cord suitable for outdoor use reduces the risk of electric shock.
3.Personal Safety
a. Stay alert, watch what you are doing and use common sense when operating a power tool.
Do not use a power tool while you are tired or under the influence of drugs, alcohol
or medication. Any in-attention while operating power tools may result in serious
personal injury.
b. Use safety equipment. ALWAYS wear ANSI approved eye protection. Safety equipment such
as gloves, dust mask, non-skid safety shoes, hard hat, and hearing protection used for
appropriate conditions will reduce risk of personal injuries.
c. Avoid accidental starting. Ensure the switch is in the off position before plugging
in. Carrying power tools with your finger on the switch or plugging in power tools
that have the switch on invites accidents.
d. Remove any adjusting key or wrench before turning the power tool on. A wrench or a
key left attached to a rotating part of the power tool may result in personal injury.
e. Keep proper footing and balance at all times. This enables better control of the power
tool in unexpected situations.

4
f. Dress properly. Do not wear loose clothing or jewellery. Keep your hair, clothing
and gloves away from moving parts. Loose clothes, jewelry or long hair can be caught
in moving parts.
g. If devices are provided for the connection of dust extraction and collection facilities,
ensure these are connected and properly used. Use of these devices can reduce dust
related hazards.
4.Power Tool Use and Care
a. Do not force any power tool. Use the correct power tool for your application. The correct
power tool will do the job better and safer for which it was designed.
b. Do not use the power tool if the switch does not turn it on and off. Any power tool
that cannot be controlled with the switch is dangerous and must be repaired.
c. Disconnect the plug from the power source before making any adjustments, changing
accessories, or storing power tools. Such preventive safety measures reduce the risk
of starting the power tool accidentally.
d. ALWAYS Store idle power tools out of the reach of children and do not allow persons
unfamiliar with the power tool or these instructions to operate the power tool. Power
tools are dangerous in the hands of untrained users.
e. Maintain power tools. Check for misalignment or binding of moving parts, breakage of
parts and any other condition that may affect the power tools operation. If damaged,
have the power tool repaired before use. Many accidents are caused by poorly maintained
power tools.
f. Keep cutting tools sharp and clean. Properly maintained cutting tools with sharp
cutting edges are less likely to bind and are easier to control.
g. Use the power tool, accessories and tool bits etc., in accordance with these instructions
and in the manner intended for the particular type of power tool, taking into account
the working conditions and the work to be performed. Use of the power tool for operations
different from intended may result in serious or hazardous situations.
5.Battery Tool Use and Care
a. Ensure the switch is in the OFF position before inserting battery pack. Insert the battery
pack into power tools that have the switch on invites accidents.
b. Recharge only with the charger specified by the manufacturer. A charger for one type
of battery pack can create risk of fire when used with a different battery pack.
c. Use power tools only with specifically designated battery packs. Use of any other battery
packs may create a risk of injury and fire.
d. When battery pack is not in use, keep it away from other metal objects like paper clips,
coins, keys, nails, screws, or other small metal objects that can make a connection
from one terminal to another. Shorting the battery terminals together may cause burns
or a fire.
e. Under abusive conditions, liquid may be ejected from the battery; avoid contact. If
contact accidently occurs, flush with water. If liquid contacts eyes, seek medical
help immediately. Liquid ejected from the battery may cause irritation or burns.
6.Service
Have your power tool serviced by a qualified repair person using only identical replacement

5
parts. This will ensure the safety of the power tool is maintained.
ADDITIONAL SAFETY INSTRUCTIONS
Specific to Battery Chargers
- Before charging, read any additional instructions for charger.
- Designed for indoor use ONLY. Do not expose charger to rain or wet conditions.
- NEVER charge non-rechargeable batteries. This can cause dangerous situations.
- The battery charger is only for re-chargeable Ni-Cad batteries having 8 cells + (9.6V). Any
other application is considered misuse.

6
PARTS INFORMATION FOR 9.6V SHARPENER
Contact Customer Service: phone 952-945-9058 or fax 952-945-0066 for:
(1) If any missing or broken parts when unpacking, please have original receipt
and purchase date
(2) To purchase additional grinding wheels or spare parts.
Spare parts No Description QTY
Product no Position
CS-96V 1 Sharpening stones pack
(5/32”,3/16”,7/32”)
1
CS-96V 2 Battery pack(2pcs) 1
CS-96V 3 AC/DC Adapter 1
CS-96V 4 Chain Saw Sharpening
Attachment
1
CS-96V 5 Charger Base 1
CS-96V 6 On/Off switch/Variable speed dial 1
CS-96V 7 Hook 1
CS-96V 8 Spindle Lock 1
CS-96V 9 Collar 1
CS-96V 10 Collet Nut 1

7
ASSEMBLY
NOTE: Always remove battery pack before making any adjustments, servicing, or maintenance to
this product.
ACCESSORY INSTALLATION/ REPLACEMENT (FIG.1):
This product is designed for use with 3.2mm shank accessories.
WARNING: Selection of the correct accessory, suitable for the intended application is vital.
Seek guidance if uncertain of selection.
Press the spindle lock button Aand unscrew the collet nut B.
Slide the grinding stone inward as far as possible before
tightening the collet nut. Press spindle lock button Aand
tighten the collet nut to secure. If the grinding stone
appears loose, remove and try again to ensure the bit is
secured correctly.
NOTE: Do not over tighten the collet nut.
IMPORTATNT!: Never press lock button A while the spindle is rotating.
OPERATION AND USE:
WARNING: ALWAYS Wear ANSI approved eye protection
when operating this product.
BATTERY CHARGING (FIG.2&3)
To charge the battery, first remove from the sharpener.
To release battery pack, squeeze the grips located on both
sides of battery casing and gently pull battery pack from the
tool housing (Fig.2). Plug the AC/DC Adapter cord into the
charger base, then into standard 110V outlet. Slide battery
into the charger base as shown in Fig.3 NOTE Be sure the arrows C
marked on the charger base and battery housing line up.
Do not force, be sure battery is inserted correctly. The
green LED light Don charger base will illuminate to show the
battery is charging. The battery fully charges in 3-5 hours.
Do not charge the battery for more than 6 hours. After 3-5
hours, remove battery pack. Insert battery pack back into the
sharpener by firmly pushing until battery pack locks into place.
NOTE: The battery is discharged after manufacturing; after five
to ten charges battery pack will reach its full capacity.
It is helpful to use battery until completely uncharged, before re-charging again.

8
VARIABLE SPEED DIAL (FIG.4)
NOTE: Be sure the switch is in the “off” position before
connecting the battery pack.
STARTING TOOL: Rotate dial Eround to one of the five speed
settings
STOPPING TOOL: Rotate dial Eto the “O” position (off) to stop
Variable speed dial allows you to alter speed of rotation.
Position 2-SLOW
Position 4-SLOW/MEDIUM
Position 6-MEDIUM
Position 8-MEDIUM/FAST
Position 10-FAST
OPERATION-SHARPENING CHAINS
WARNING: ALWAYS Wear ANSI approved eye protection
when operating this product.
ADJUST SHARPENING ATTACHMENT (SEE FIG.5,6,7)
Due to many different sizes and types of chain, adjustment to the sharpener attachment may
be needed. Follow these below steps to determine adjustments:
1. Determine the size and pitch of saw chain to sharpen.
Refer to your Chainsaw Owner’s manual, or contact the chain manufacturer to find your
chain size and pitch.
2. Next, refer to below chart for grinding stone sizes.
3. After determining correct grinding stone, refer to below figure #5, then adjust
sharpening attachment accordingly. Separate metal guide and plastic guide using a
phillips screwdriver by removing 2 screws in top of sharpener attachment. Then use
appropriate number of spacers.
If grinding stone size:
7/32” grinding stone, use TWO spacers between metal guide and plastic guide
5/32” grinding stone, use ONE spacer between metal guide and plastic guide
3/16” grinding stone, use ZERO spacers between metal guide and plastic guide
After using correct number of spacers, re-assemble sharpener attachment.
Be sure to save unused spacers for future.
4. Next, insert correct grinding stone into sharpener tool, leaving approx. 1/4" of shank
between the grinding stone and chuck cap. SEE figure #6 below.
5. Now remove housing cap, and replace with adjusted sharpener attachment.
SEE Figure #7.
CHAIN SIZE GRINDING STONE SIZE
1/4” Pitch 5/32” (diameter) stone
3/8” Pitch 7/32” (diameter) stone
3/8” Pitch Low Profile (LP) 5/32” (diameter) stone
5/16” Pitch 3/16” (diameter) stone

9
SHARPENING SAW CHAIN (SEE FIG.8,9,10)
1. Set your saw on a flat, solid surface so it will not slip while you are sharpening
the chain. The chain tension should be adjusted as specified in the Chain Saw Owner’s
Manual. If it is too loose, the teeth will move, resulting in a poor sharpening.
BEST RESULTS are accomplished by sharpening on flat area of the saw bar-somewhere near
the middle of the bar.
2. Position saw so you are looking at the side of the chain bar with the motor to your
right. Cutter teeth on the far side of the chain are sharpened, from inside to outside,
or away from you, as shown in figure 8. The metal guide (B) should be laid flat on
the tooth with the 30 degree index line (L) parallel with the chain. Align by eye
with the chain.
Two or three light strokes are usually enough, unless the cutters have been damaged.
Sharpen all cutters equal. Start with the cutter with the most visual damage (i.e.
nicks or gouges) and sharpen all cutters back equally. Do not remove excessive metal
material while sharpening, as this can shorten the life of the chain.
NOTE: Sharpen cutter teeth (J) only, not the depth gauge/raker (K).
3. When all of the teeth on the top of the bar have been sharpened, advance the chain
using a glove or a rag to protect your hand, by pulling the chain toward the end
of the bar. Repeat until all the teeth on the far side of the chain have been
sharpened.
4. Next, turn the saw around so that you are looking at the side of the chain bar with
Ref. Number Description
1 Screws
2 Metal Guide
3 Spacers
4 Plastic Guide
5 Led worklight
FIG 5
FIG
6
FIG
7

10
the motor to your left. Sharpen the cutter teeth on the far side of the chain, from
inside to outside, or away from you, as shown in figure.
The guide should be laid flat on the tooth with the 30 degree index line parallel
with the chain.
Repeat the process above to sharpen all of the cutter teeth on the far side of the
chain.
CHECK DEPTH GUAGE – (also called RAKER)
5. After sharpening one chain several times, you may find that it does not cut as fast.
Each cutter on the chain has a depth gauge or raker (see figure 9 letter (K) below)
just ahead of the cutting edge (J) that determines how big of bite the chain will
take. To check for proper depth of the cut, lay a metal straight edge across the
tops of the cutting edges, as shown in figure 10, and check the dimension between
straight edge and depth guide/raker. CHECK your chain mfg. info or chainsaw owner
manual for exact depth gauge relating to your size chain. As a guide, this dimension
should be approximately equal to the height or thickness of end/tip on the metal
gauge of the chain saw sharpening attachment. If the difference is very thin, or
the depth gauge/raker is taller than cutter teeth, file or grind the depth gauge/raker)
until the clearance is approximately equal to the height/thickness of the metal end
of sharpening attachment or per mfg. specification. Be careful to maintain depth
gauge shape. Do not remove more material than necessary or you will overload your
saw.
NOTE: Be careful to keep this depth gauge setting uniform on all cutter teeth or you
will not be able to make a straight cut.
FIG 8 FIG 9
FIG 10

11
MAINTENANCE & PARTS REPLACEMENT
Regular inspection and cleaning reduces the necessity for maintenance operations and will keep
your tools in good working condition.
Motors must be ventilated during operation, avoid blocking any air inlets. After use remove
the battery pack and clear any ventilation slots if applicable.
Contact Customer Service: Phone 952-945-9058 or Fax 952-945-0066 for:
-If any missing or broken parts when unpacking, please have original receipt and purchase
date
-To purchase additional grinding wheels or spare parts.
DISPOSAL OF TOOL
At the end of the tool working life, or when it can no longer be repaired, dispose of according
to any local regulations.
Contact local authority for details of collections in your area.
In all circumstances:
Do not dispose of power tools with domestic waste.
Do not incinerate.
Do not abandon in the environment.
HEALTH AND SAFETY FOR BATTERIES
General: Do not burn/dispose in fire or mutilate; cells may burst and release toxic materials.
Do not short circuit cells, this may cause burns.
Batteries must be removed from the appliance before disposal.
DISPOSAL
Do not mutilate batteries, corrosive electrolyte will be released.
Do not incinerate-danger of explosion and release of toxic fumes.
Do not dispose of batteries or cells in a charged condition.
Expired nickel-cadmium batteries must be recycled / disposed of in accordance with the
appropriate regulation or legislation.

12
EXPLANATION OF SYMBOLS/PICTURES
Do not dispose of with unsorted municipal waste.
Class II construction (Double insulated).
For indoor use only. Do not expose to rain.
Non-Self-Resetting protective device.
Short-circult-proof safety isolating transformer
Battery must be recycled or disposed of properly. Contains heavy
metal-separate collection.
© BAC Industries/Timber Tuff Tools
PO BOX 5236
Hopkins, MN 55343
952-945-9058
BAC Industries or Timber Tuff Tools will not be held liable for any damages, losses or injury due
to misapplication or misuse of this product or any other reason. Always wear approved safety
glasses, protective clothing and proper hand and foot protection at all times. Keep all people,
pets and/or animals clear from any work area.
Table of contents
Other Timber Tuff Tools Power Tools manuals
Popular Power Tools manuals by other brands

Prince Castle
Prince Castle 164-a operating instructions
Precision matthews
Precision matthews PM-833TV manual

Rothenberger Industrial
Rothenberger Industrial HS-060A-2 Instructions for use
Bosch
Bosch GSH 16-28 Professional Original instruction

Makita
Makita 6905B instruction manual

Parkside
Parkside PSTD 800 A1 translation of original operation manual
