Time Electronics 5075 User manual

User Manual
5075
Digital Multimeter
Version 1.1
June 2021
Time Electronics Ltd
Unit 5, TON Business Park, 2-8 Morley Road,
Tonbridge, Kent, TN9 1RA, United Kingdom.
T: +44 (0) 1732 355993 | F: +44 (0) 1732 350198
mail@timeelectronics.co.uk | www.timeelectronics.com

© 2021 Time Electronics Ltd.
All rights reserved.
Nothing from this manual may be multiplied, or made public in any form or manner, either
electronically or hard copy, without prior written consent from Time Electronics Ltd.
This also applies to any schematics, drawings and diagrams contained herein.
This manual provides operating and safety instructions for the Time Electronics product.
To ensure correct operation and safety, please follow the instructions in this manual.
Time Electronics reserves the right to change the contents, specifications and other
information contained in this manual without notice.

Time Electronics User Manual
5075 Digital Multimeter v1.1
5075 Digital Multimeter Page 3 of 70
Contents
1Safety Guidelines...........................................................................................................................5
2Introduction....................................................................................................................................6
3Installation......................................................................................................................................7
3.1 Rear Panel............................................................................................................................................. 7
3.2 Grounding Requirements ......................................................................................................................7
3.3 Power Requirements ............................................................................................................................. 8
3.4 Setting the Line Voltage ........................................................................................................................8
3.5 GPIB (IEEE 488) Connection ................................................................................................................8
3.6 Bench Use .............................................................................................................................................8
3.7 19” Rack Mounting ................................................................................................................................9
4Basic Operation Procedure ........................................................................................................10
4.1 Switching On .......................................................................................................................................10
4.2 The Display..........................................................................................................................................11
4.3 Warning Messages..............................................................................................................................12
4.4 Keys..................................................................................................................................................... 12
4.5 DC Voltage Measurements.................................................................................................................. 15
4.6 DC Current Measurements.................................................................................................................. 18
4.7 Resistance Measurements ..................................................................................................................21
4.8 Capacitance Measurements................................................................................................................ 25
4.9 Using the Diode Tester........................................................................................................................26
4.10 True RMS AC Voltage Measurements ................................................................................................27
4.11 True RMS AC Current Measurements................................................................................................. 29
4.12 Measuring AC + DC Voltage or Current ..............................................................................................30
4.13 Frequency Measurement Using AC Function......................................................................................31
5Advanced Operation Procedure .................................................................................................32
5.1 Menu Options ......................................................................................................................................32
6Measurement Techniques...........................................................................................................38
6.1 Common Mode Noise and Using the Guard Terminal......................................................................... 38
6.2 Using the Guard on Resistance...........................................................................................................39
6.3 Input Impedance and Lead Capacitance .............................................................................................40
6.4 Thermal EMF’s ....................................................................................................................................40
6.5 Making High Value Resistance Measurements ................................................................................... 42
6.6 DC Current Measurement Errors.........................................................................................................43
6.7 AC Measurements............................................................................................................................... 43
6.8 True RMS ............................................................................................................................................ 44
6.9 Bandwidth............................................................................................................................................ 44
6.10 Crest Factor.........................................................................................................................................44
6.11 Zero AC Input Error .............................................................................................................................45

Time Electronics User Manual
5075 Digital Multimeter v1.1
5075 Digital Multimeter Page 4 of 70
7IEEE (GPIB) Operation ................................................................................................................46
7.1 Data Transfer and Device Addressing.................................................................................................46
7.2 IEEE Cables ........................................................................................................................................46
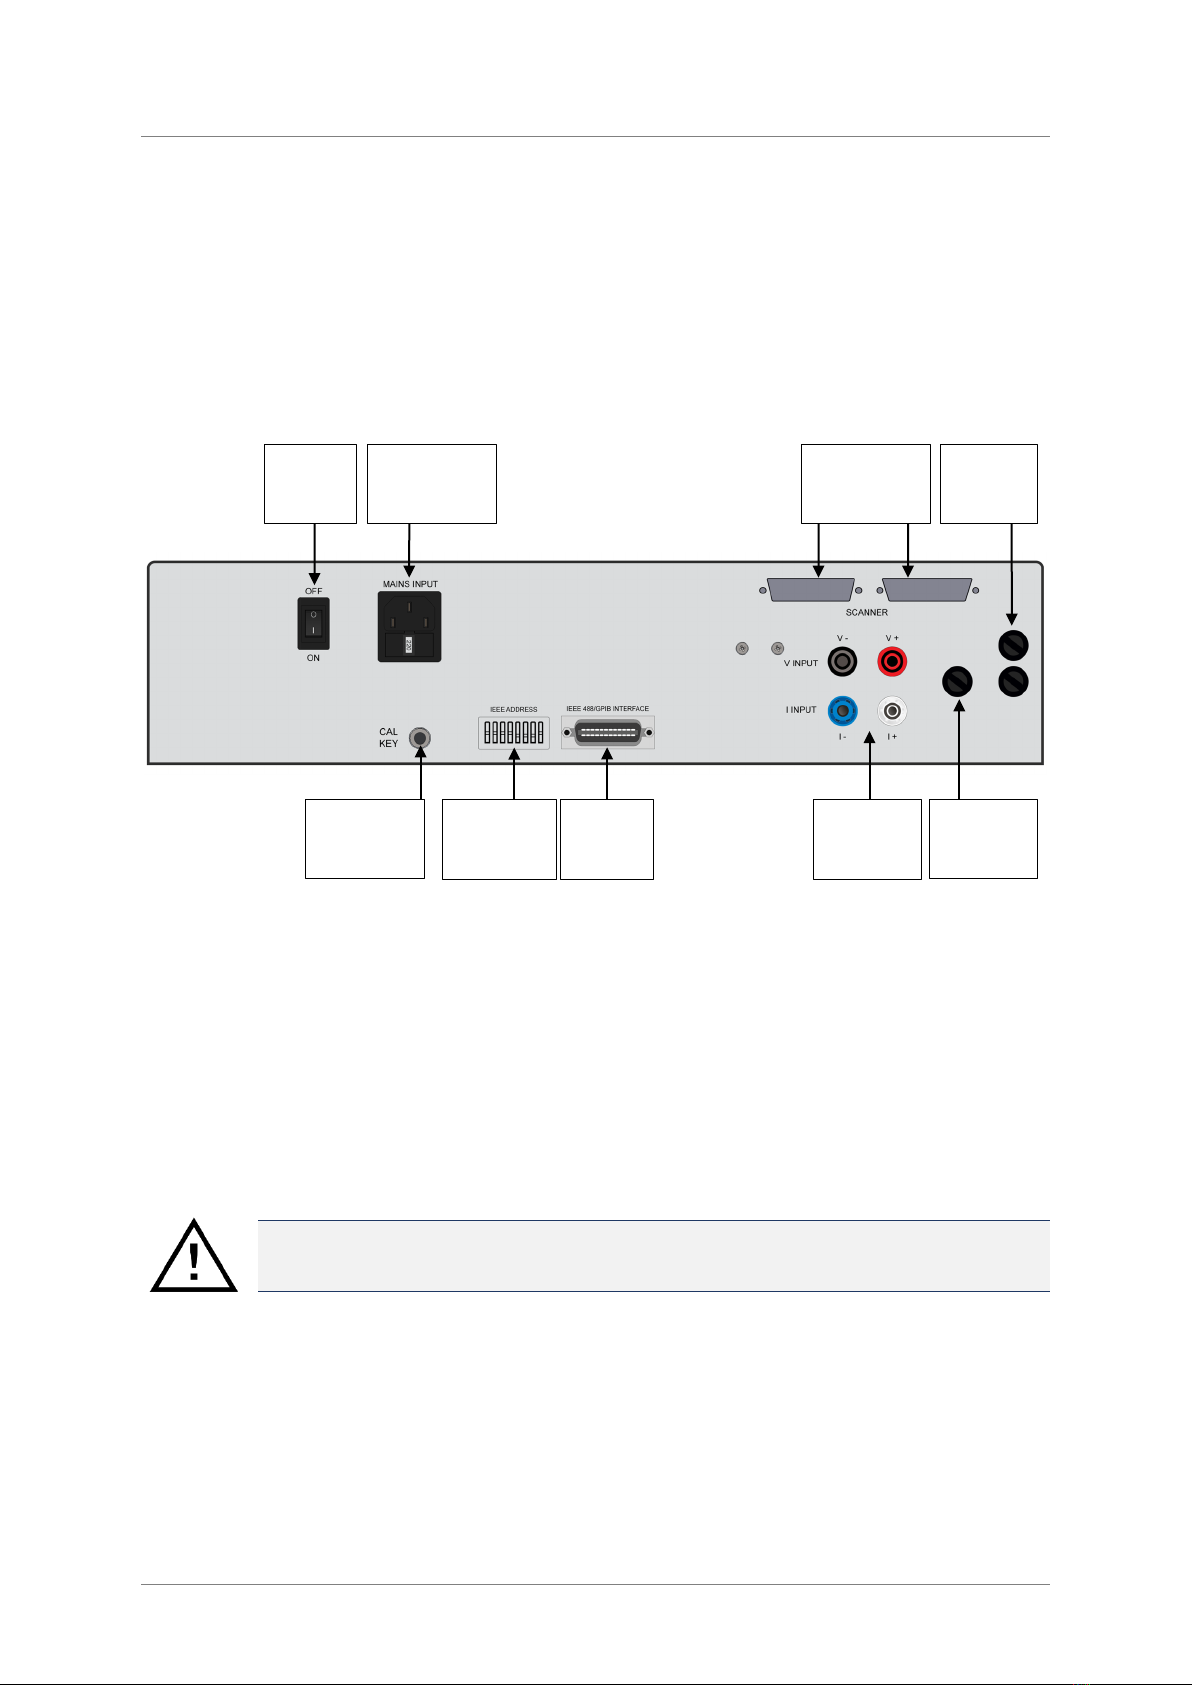
7.3 IEC Bus Connections ..........................................................................................................................46
7.4 IEEE Connector................................................................................................................................... 47
7.5 IEEE Address Selection ...................................................................................................................... 48
7.6 Local/Remote Operation......................................................................................................................48
7.7 Interface Clear Command - IFC........................................................................................................... 48
7.8 IEEE Command Format ......................................................................................................................49
7.9 Terminating Character......................................................................................................................... 49
7.10 IEEE Command Execution ..................................................................................................................49
7.11 IEEE Command List ............................................................................................................................ 50
7.12 Transmitted Value Format ................................................................................................................... 51
7.13 Programming Example ........................................................................................................................ 52
8Re-Calibration ..............................................................................................................................53
8.1 Calibration Source ............................................................................................................................... 53
8.2 Warm Up Time ....................................................................................................................................53
8.3 Front Panel Re-calibration...................................................................................................................54
9Specifications .............................................................................................................................. 55
9.1 Technical/General Specifications ........................................................................................................55
9.2 Operating Information/Features........................................................................................................... 55
10 Scanner Option 9726 ...................................................................................................................58
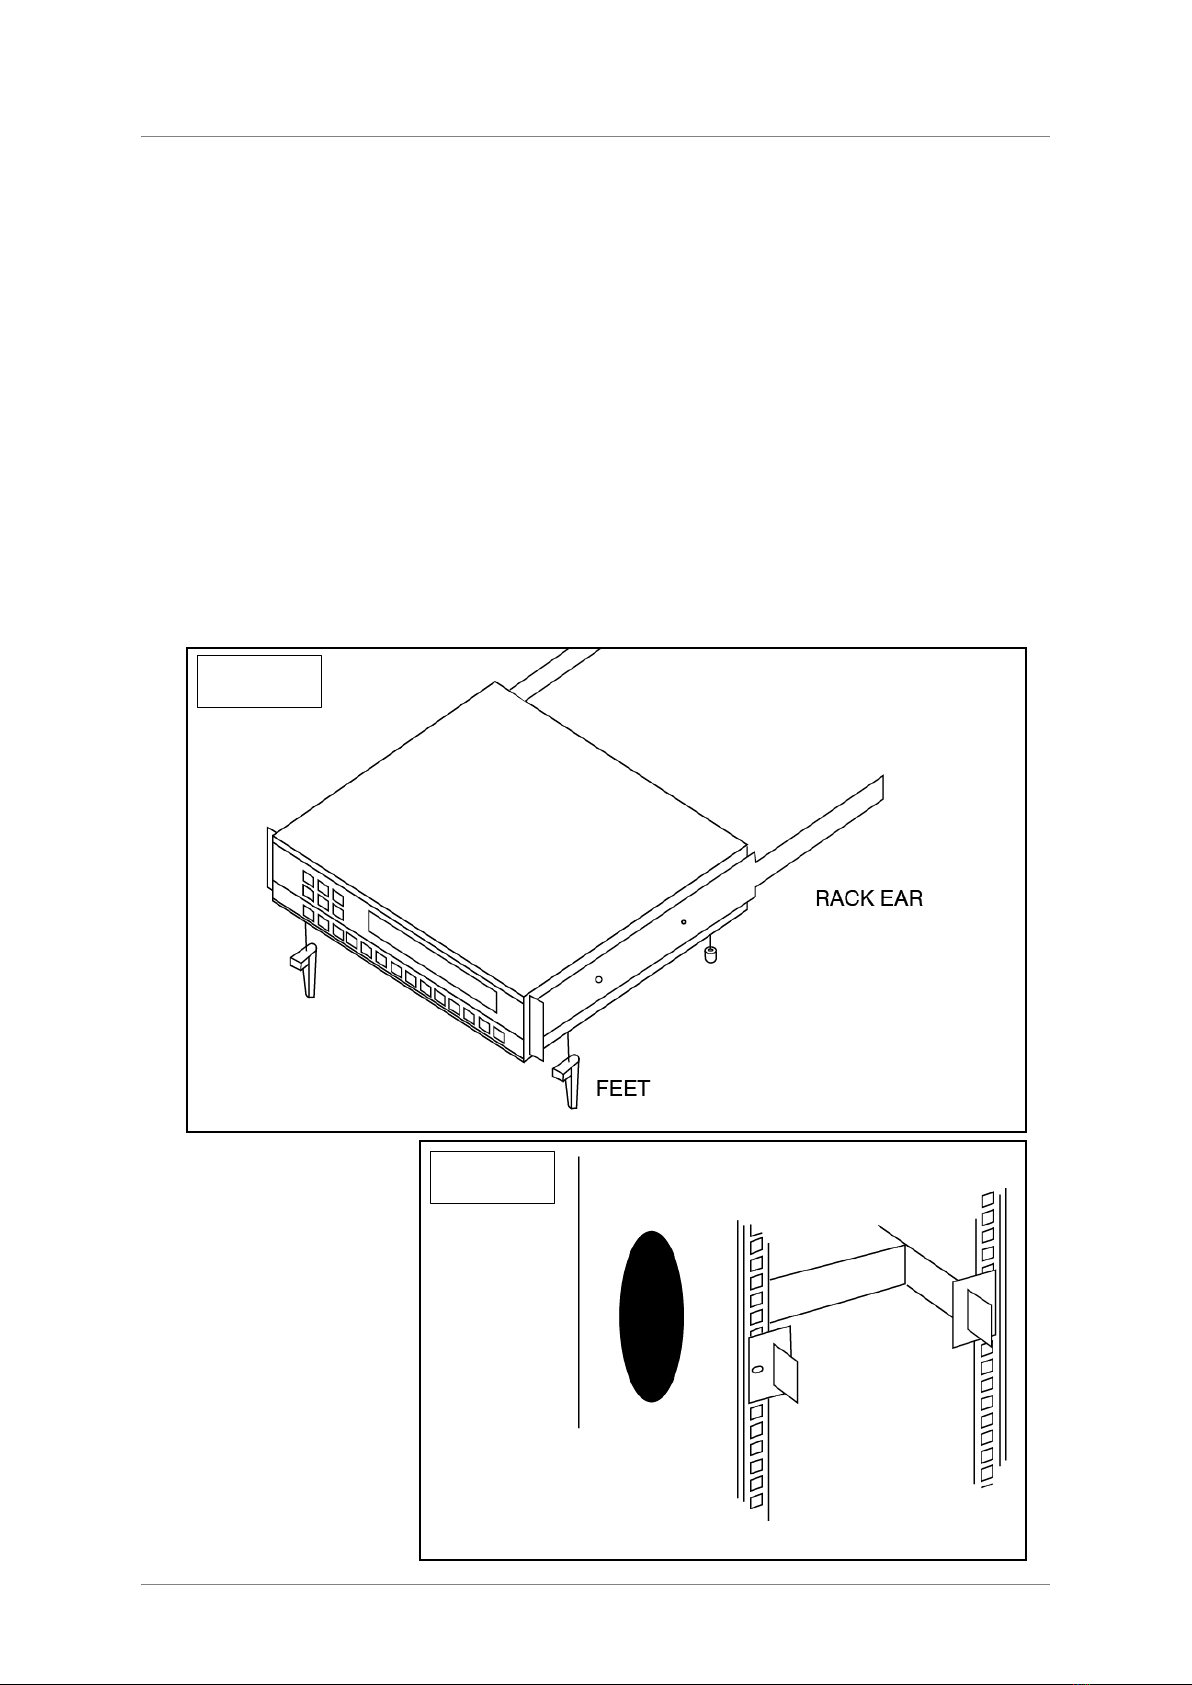
10.1 Fitting the Scanner (Option 9726)........................................................................................................58
10.2 Connections......................................................................................................................................... 58
10.3 Operating the Scanner ........................................................................................................................ 59
10.4 Scanner Specifications ........................................................................................................................ 59
11 5075 Internal Componentry Information....................................................................................60
11.1 Digital Board ........................................................................................................................................60
11.2 Analogue Board................................................................................................................................... 61
11.3 True RMS AC Voltage Measurements ................................................................................................62
11.4 True RMS Current Measurement ........................................................................................................62
12 Fault Diagnosis............................................................................................................................63
12.1 Fault Check List...................................................................................................................................63
12.2 Fuse Replacement ..............................................................................................................................64
12.3 Replacement of Analog or Digital Boards............................................................................................66
12.4 Replacing the Clock Backup Battery ................................................................................................... 67
13 Spare Parts List ...........................................................................................................................68
14 Warranty and Servicing............................................................................................................... 69

Time Electronics User Manual
5075 Digital Multimeter v1.1
5075 Digital Multimeter Page 5 of 70
1Safety Guidelines
This manual contains information and warnings, which the operator should follow to ensure
their own safety and continued operation of the instrument.
The 5075 has been designed and tested in accordance with the recommendations of IEC
348 Class 1.
Protection is assured by a direct connection via the power cable from ground to exposed
metal parts and internal ground screens. The line connection must only be inserted in a
mains power outlet provided with a protective earth conductor and continuity of the ground
conductor must be assured between the socket and the instrument.
Always ensure that when measuring high voltages the V+ and V– input terminals are
connected correctly. (V+ connected to the most positive potential with respect to earth and
V– to the nearest potential to earth).
If any sign of malfunction or if the instrument shows visible signs of damage, the instrument
should be repaired only by a skilled engineer who is aware of the potential hazards
associated with mains operated equipment.
Maximum Voltages Between Terminals
Do not exceed these specified voltages between terminals otherwise serious damage will result.
Between V+ and V– terminals < 1100V DC
Between High Voltage and V– terminals < 10kV DC
Between V– and Guard < 200V DC
Between Guard and Earth < 500V DC
Before switching the equipment under test off, disconnect the inputs, especially when
connected to equipment capable of delivering a high voltage. (High back EMF’s can damage
the 5075).
Interruption of the protective mains earth conductor, either internal or external to the
instrument is potentially hazardous.
The terminals marked with this symbol carry the potential of the source under test.
These terminals and any other connections to the source could carry lethal high voltages
and at no time should they be touched during a high voltage test. Switch off the source
before attempting to rectify any problems associated with the test.

Time Electronics User Manual
5075 Digital Multimeter v1.1
5075 Digital Multimeter Page 6 of 70
2Introduction
A benchtop digital multimeter that combines high performance and accuracy with simple
operation. With speed and precision, the 5075 measures from nanovolts to 10 kV, from
picoamps to 30 Amps, from nano-ohms up to 1 GΩ, and from picofarads to 300 μF. It is ideal
for users requiring a cost-effective DMM with multiple functions and exceptional resolution
and accuracy up to 7½ digits.
This makes the 5075 is a versatile solution to essential laboratory calibration and verification,
covering a wide range of applications with excellent measurement capabilities, whilst
maintaining reliability and performance.
The Auto Dynamic Filter (ADF) mode allows the 5075 to automatically select the most
suitable filter. For a fast-changing signal or for when the signal is first connected the reading
is displayed almost immediately, but if the input remains constant, the filter time is increased
to provide a more stable accurate reading. If the input were disconnected the filter would
immediately return to the fastest.
Operation is simple, all major functions from range selection to null require just one key press.
The large 24 digit display shows clearly the range and reading and can even show the time to
the next sample if required. Other functions can be easily selected from a scrolled menu.
Functions for diode/zener tests, max/min, peak hold and continuity checks are available and
also various audible warnings can be selected. A bar graph function allows the user to
program high and low pass/fail limits and switch to the bar display mode. This will give an
audible and visual indication to the user of the components specification.
A low thermal 10-channel scanner option, allows multiple inputs to be displayed or compared
without the additional cost and inconvenience of a separate switching arrangement.
The 5075 can be controlled via Time Electronics EasyCal software to automate the
calibration process. This provides increased speed of calibration and consistency of results.

Time Electronics User Manual
5075 Digital Multimeter v1.1
5075 Digital Multimeter Page 7 of 70
3Installation
This chapter contains information about the power requirements, fuses and installation of the
instrument into a 19” rack mount frame.
3.1 Rear Panel
3.2 Grounding Requirements
The multimeter is supplied with a three conductor A.C. power lead. This lead must be
connected to a three-conductor power supply that has its ground conductor connected to an
electrical earth (safety ground). The power socket and cable both comply with IEC safety
standards.
For continued protection against electrical shock, always ensure that the instrument is
properly earthed.
Calibration
Key Socket
IEEE address
selection
IEEE
connector
Rear input
terminals
Capacitance
fuse
Power
Switch
Mains input and
voltage selector
Scanner Inputs
(option 9726)
Current
fuses

Time Electronics User Manual
5075 Digital Multimeter v1.1
5075 Digital Multimeter Page 8 of 70
3.3 Power Requirements
You can operate the multimeter from a single-phase source rated at 110 V AC, 220 V AC, or
240 V AC 50/60 Hz.
Line voltage may vary by up to 10 % but must not exceed 250 V AC.
The power lead must be wired in accordance with the diagram below.
Be sure that the voltage setting on the instrument is correct before connecting to a power
source and that the correct fuse has been installed.
3.4 Setting the Line Voltage
To alter the line voltage setting, firstly remove the power lead from the instrument.
Remove the fuse holder/voltage setting cartridge from the power connector then locate and
remove the fuse holder.
Rotate until the correct voltage setting is displayed in the window.
Install the correct fuse and replace the cartridge (800 mA for 220/240 V AC or 1.6 A for
110 V AC).
3.5 GPIB (IEEE 488) Connection
This instrument implements the requirements of the IEEE - 488/1978 standard.
The connection is made by a standard 24 pin IEEE connector mounted on the rear panel.
The IEEE address is selected by a DIP switch again on the rear of the instrument as shown
below. Refer to Chapter 7 for IEEE operations.
3.6 Bench Use
The instrument may be used free standing by using the tilt feet on the base.
The front panel terminals are permanently connected inside the instrument to the rear panel
terminals. Before making any connection to the front panel terminals, ensure that any rear
panel terminations have been removed (or vice versa).

Time Electronics User Manual
5075 Digital Multimeter v1.1
5075 Digital Multimeter Page 9 of 70
3.7 19” Rack Mounting
Refer to Figure 3.1, removing the feet and Figure 3.2, rear fixing detail.
To mount the instrument in a 19” rack you must first have the 19” rack mount kit (part # 9728).
First remove the two tilt feet and two standard feet from the base of the instrument and then
remove the carrying handle.
Fix the two mounting ‘ears’ on each side of the instrument using the two fixing holes and the
2BA screws.
Locate the rear support fixings as in Figure 3.2 on the rack and fix using the screws provided.
Mount the instrument in the rack, locating the two ‘ears’ in the rear support fixings.
Fix the front of the unit to the frame using the screws provided.
As before, decide which terminals are going to be used. Only one set of connections should
be made to the front or rear terminals.
Figure 3.1
Figure 3.2

Time Electronics User Manual
5075 Digital Multimeter v1.1
5075 Digital Multimeter Page 10 of 70
4Basic Operation Procedure
This chapter provides an introduction into the operation of the instrument. The more
advanced features and functions may be found in the next section.
Before operating the DMM ensure that the mains voltage setting is correct and that the
correct fuse has been installed.
Also check for any options that may have been installed such as the AC / frequency option
or the Scanner option.
4.1 Switching On
The mains power switch is mounted on the rear of the instrument.
When the instrument is powered up, it will run through a limited self-test routine, display the
version number of the internal software, the IEEE address, the instruments serial number,
the calibration date, next calibration due date, calibration temperature and calibration period.
This may be by-passed by pressing the Key at turn on.
The multimeter will default to DC volts and auto-range. The display then shows the
measured voltage and the mode of operation. The LED’s above the keys will also show
which mode of operation has been selected.
The initial state at power on is:
•Function DCV
•Range Auto
•Resolution6 1/2 digits
•Filter 500ms
•Auto Dynamic Filter On
•Dual Display Off
The 5075 will perform an internal calibration of the full scale, zero and linearity of its A/D
converter every 5 minutes or when the internal temperature changes by more than one
degree Celsius. This will take less than 1 second.
During this time the display will show:
+ 0 . 00000 mV IntCal

Time Electronics User Manual
5075 Digital Multimeter v1.1
5075 Digital Multimeter Page 11 of 70
If this message is displayed, the 5075 will require recalibration.
Refer to Re-Calibration Section 8. This may or may not disappear after a few seconds,
depending on the options set in the menu.
30 minutes after power on the unit should be near its specification and after 2 hours it will be
within specification. Therefore, to use the instrument to its full specification allow it to warm
up for at least 2 hrs.
4.2 The Display
The 5075 has a multipurpose display. Not only will it display the measured value, but it will
also display its range and function.
The display may also be used in a ‘dual display’ mode to simultaneously display the
frequency of an ac voltage or current input.
In addition to this, the display shows the time until the next reading or to show which scanner
channel has been selected.
The default display is explained here:
CALIBRATION OUT OF DATE
+ 0 . 00000 mV 3mV
Measured Input
Measured Mode
(eg DC or AC)
Present Range

Time Electronics User Manual
5075 Digital Multimeter v1.1
5075 Digital Multimeter Page 12 of 70
4.3 Warning Messages
During operation, the 5075 may display messages indicating attention is required.
For example, the internal temperature may be outside its specifications and will display an
error message displaying this.
Also, if the unit is out of its calibration period, a message will be displayed. The message
may be set to display whenever an Internal Calibration is performed or it may be set to
display and hold, thereby no more calibrations may be performed if calibration is to remain
traceable.
Another message ‘noisy’ may appear at the end of the display indicating that the input has a
very large amount of noise on it.
4.4 Keys
All the main functions such as range change or mode selection can be performed by one
key-press. The LED above the key indicates the measurement function. The range and
function may also be seen on the display. To select a function, simply press the key.
These keys also serve as a numeric keypad for menu operations and are numbered
accordingly.
The keys and their functions are detailed as follows in this section.
4.4.1 N Digits Key
When pressing this key, the reading resolution is changed between 4, 5, 6 and 7
digits, (the number of digits displayed).
On some low value ranges the resolution has been limited.
For example, the 3 mV range has a 6-digit maximum resolution. Any more digits than this
could be considered as meaningless.

Time Electronics User Manual
5075 Digital Multimeter v1.1
5075 Digital Multimeter Page 13 of 70
4.4.2 NULL Key
The null facility is available on all DC ranges, Ohms and Capacitance. Null is not
available on AC or frequency.
When this key is pressed, the DMM will accept the measured present value as the zero
value for the range selected. If auto-range is on, the unit will null each range.
This is useful for cancelling an offset voltage or for zeroing the value of the test leads on
resistance.
To null an offset, either short the end of the test leads or connect to the source and press the
null key.
During a null the instrument will display:
If the 5075 is in auto-range ‘Nulling Ranges’ will be displayed and all ranges will be nulled.
An upper or lower case N will appear in the display to indicate a null value. An upper case N
will show that there is a large offset (over 1% of full scale) and the lower case n will indicate
a small offset.
All further readings will have the measured null value subtracted.
You may null any value up to the range maximum.
This null value is applied to all readings on the same range. If a new zero input value is
applied, you should re-null the DMM as any readings displayed will have the incorrect null
subtracted.
At power up the DMM assumes that the null is off.
The null value is lost if the measurement function is changed.
NULLING RANGE

Time Electronics User Manual
5075 Digital Multimeter v1.1
5075 Digital Multimeter Page 14 of 70
4.4.3 FILTER Key
Pressing the filter key will alter the integration time of the reading. Filter times are
150 ms, 250 ms, 500 ms, 1 s, 2 s, 4 s, 8 s, 16 s, 32 s and off.
A unique feature of the 5075 is the Auto - Dynamic Filter which may be enabled in the menu
options.
The Auto - Dynamic Filter will automatically choose the most suitable filter time depending
upon the stability of the input.
If the input is stable over the first filter period, the next filter time is chosen. The filter time
will steadily increase to the maximum filter time set by the filter key.
If this stable input was to suddenly change to a varying input, or if the input was
disconnected, the filter time would immediately decrease to a faster integration period.
4.4.4 AUTO Key
The auto-range (AUTO) key will select the optimum range for the measurement.
This will introduce short delay for the operator. The indicator above the keypad will
show when the DMM is in the auto-range mode.
To turn the auto-range function off, press the AUTO key once more.
The instrument will then remain on the last range select by auto-range.
You can manually select a range when the instrument is in measurement mode
(displaying a reading or showing Over range). Pressing the Up Arrow key will
select a higher range and turn the auto-range off. The selected range is shown
on the display. Pressing the Down Arrow key will select a lower range.
Pressing this key will also turn the auto-range off. The selected range is shown
on the display.
4.4.5 USER FUNC and MENU Keys
Pressing the USER FUNC key will display the last option selected in the menu. Pressing the
MENU key will display the menu options.
See section 4 for user functions, menu operations and features.
Pressing the LOCAL key whilst the unit is in remote control will return control back to the
front panel. Any other front panel key will not function under IEEE remote control.

Time Electronics User Manual
5075 Digital Multimeter v1.1
5075 Digital Multimeter Page 15 of 70
4.5 DC Voltage Measurements
Select the DC voltage range and either set auto-range on or manually set the appropriate
range. Select the required resolution and filter time and if required select the Auto Dynamic
filter.
Measurements are made over the selected filter period and are averaged to produce the
reading.
Most measurements may be made with the simple lead connections shown below.
The disadvantage of this connection V+/V- method is that a loop is formed, and stray
magnetic ac fields induce small voltages in the loop.
The use of twisted pair cable reduces the loop area and will tend to cancel out the induced
voltages. In most cases the guard terminal may be connected to the V- terminal.
Thermal EMF’s may also affect the readings. The terminals of the 5075 are made from
Linear Crystal Oxygen Free Copper to minimise this effect. Nickel plated brass 4mm banana
plugs should be avoided since they produce significant thermal EMF’s adding errors to the
reading.
Always use low thermal emf leads and connectors when measuring uV signals.
V– V+
For guarded
measurements
only

Time Electronics User Manual
5075 Digital Multimeter v1.1
5075 Digital Multimeter Page 16 of 70
If noisy readings are encountered or when the source to be measured presents an
unbalanced impedance to the measuring terminals, screened twisted pair cable should be
used with the shield taken to the guard terminal and the guard input taken to the source of
the common mode voltage.
The table below shows the full scale, resolution and input impedance for each range.
RANGE
MAXIMUM RESOLUTION
INPUT IMPEDANCE
3mV
10mV
30mV
100mV
300mV
1V
3V
10V
30V
100V
300V
1kV
3kV
10kV
6
6
7
7
7
7
7
7
7
7
7
7
7
7
>1GΩ
>1GΩ
>1GΩ
>1GΩ
>1GΩ
>1GΩ
>1GΩ
>1GΩ
10MΩ
10MΩ
10MΩ
10MΩ
100MΩ
100MΩ

Time Electronics User Manual
5075 Digital Multimeter v1.1
5075 Digital Multimeter Page 17 of 70
4.5.1 Making a High Voltage DC Measurement
To make a high voltage DC measurement up to 1 kV on the 1 kV range, the V-, and V+ 4mm
sockets can be used. To record measurements on DC voltages from 1 kV up to 10 kV on the
3 kV and 10 kV ranges the kV BNC socket must be used. It is not possible to auto-range the
3 kV, and 10 kV ranges, see page 12 for manual selection of ranges.
We recommend that connection to the KV socket is made using the supplied high voltage
lead 8684. Connectors (6204) are available to make your own cables using UR43 or similar
high voltage rated cable.
No high voltage should be applied until full connection to the 5075 has been made.
It is most important to connect the 4 mm V- terminal to ground before connecting the BNC
plug. When using the supplied lead 8684, the short black fly lead is first connected as shown
in the picture, followed by connection of the BNC plug. If a non-standard lead is to be used,
then the V- socket must be linked to the green 4mm earth socket before any connection to
the BNC socket is made.
Extreme caution must be exercised when measuring very high voltages.
Do not work alone and do not depend upon the insulation of the cables for protection.
High voltages can discharge from point to point or from point to air.
Ensure that the test leads are clean, moisture and grease free.
Even if equipment has been switched off, capacitors may still retain a high voltage charge.
Using standard 8684
BNC lead
kV+ V–
Using non-standard BNC
lead V- Earth connection

Time Electronics User Manual
5075 Digital Multimeter v1.1
5075 Digital Multimeter Page 18 of 70
4.6 DC Current Measurements
Select the DC current range and set to auto-range or manually select the correct range.
Select the required resolution and filter time or set the Auto - Dynamic Filter on.
Connection details:
The same precautions may be applied for current measurement as for voltage
measurement. Since the 5075 is capable of measuring very low currents, the use of
screened twisted pair cable will help reduce any induced signals if necessary.
At this level care should be taken, especially if the current source is mains powered. Careful
earthing and guarding will reduce noise.
Connecting the guard to the source of the common mode voltage will provide a separate
current path for it to flow in.
Selecting the analogue filter may also reduce noise since it will filter out the noise before it
reaches the A/D converter.
The current ranges (up to 1 Amp) are protected by two 1 Amp fast blow fuses, mounted on
the rear of the instrument (one for positive and one for negative).
I– I+
For guarded
measurements
only

Time Electronics User Manual
5075 Digital Multimeter v1.1
5075 Digital Multimeter Page 19 of 70
The table below shows the full scale, resolution and shunt resistance for each range.
RANGE MAXIMUM RESOLUTION SHUNT RESISTANCE
3 uA
10 uA
30 uA
100 uA
300 uA
1 mA
3 mA
10 mA
30 mA
100 mA
300 mA
1 A
3 A
10 A
30 A
6
6
6
6
7
7
7
7
7
7
7
7
6
6
6
10 kΩ
10 kΩ
1 kΩ
1 kΩ
100 Ω
100 Ω
10 Ω
10 Ω
1 Ω
1 Ω
100 mΩ
100 mΩ
10 mΩ
10 mΩ
10 mΩ

Time Electronics User Manual
5075 Digital Multimeter v1.1
5075 Digital Multimeter Page 20 of 70
4.6.1 Making a High Current Measurement
Currents from 3 Amps up to 30 Amps may be measured using the separate high current
terminals.
If a high current has been applied for any length of time it may produce thermal EMF’s within
the instrument from the current shunt. Therefore, allow the DMM to reach thermal
equilibrium before making any precision measurements.
This input is un-fused.
Connection details:
I– I+
Unknown high current
Other manuals for 5075
2
Table of contents
Other Time Electronics Multimeter manuals
Popular Multimeter manuals by other brands

Maxwell Digital Multimeters
Maxwell Digital Multimeters 25303 user manual

Datron
Datron 4708 User handbook

Shijiazhuang Suin Instruments Co., Ltd
Shijiazhuang Suin Instruments Co., Ltd SA5041 user guide

Draper
Draper DMM11B Instructions for

Suin
Suin SA5052 user guide

Elma Instruments
Elma Instruments Elma 319 user manual